
Once the Quiz application is installed on your development device, return to the device’s Home screen, and you’ll see that its icon is a plain white tile. Let’s give Quiz a better icon.
An application icon is a simple image that represents the application on the iOS desktop. Different devices require different sizes icons, and these requirements are shown in Table 1.1.
Table 1.1. Application icon sizes by device
| Device | Application icon size |
|---|---|
| iPhone/iPod touch without Retina display | 57x57 pixels |
| iPhone/iPod touch with Retina display | 114x114 pixels |
| iPad | 72x72 pixels |
If you supply a single application icon image at 57x57 pixels, that image will be scaled up on devices where a larger icon is needed. This is never good. A scaled-up icon will be pixellated and scream, “We’re amateurs!” to your customers. Therefore, any application you deploy to the App Store should have an icon for every device class on which it can run.
We have prepared two icon image files (sizes 57x57 and 114x114) for the Quiz application. You can download these icons (along with resources for other chapters) from http://www.bignerdranch.com/solutions/iOSProgramming.zip. Unzip iOSProgramming.zip and find the Icon.png and the [email protected] files in the Resources directory of the unzipped folder. (If you open these images, you’ll see that they aren’t glossy and don’t have rounded corners like other application icons. These effects are applied for you by the OS.)
Now you’re going to add these icons to your application bundle as resources. In general, there are two kinds of files in an application: code and resources. Code is used to create the application itself (like QuizAppDelegate.h and QuizAppDelegate.m). Resources are things like images and sounds that are used by the application at runtime. XIB files, which are read in at runtime, are also resources.
In the project navigator, select the Quiz project, which is at the top of the list and slightly shaded. Then, in the editor area, select Quiz from under the Targets heading. Finally, select Summary from the top of the editor area (Figure 1.23).
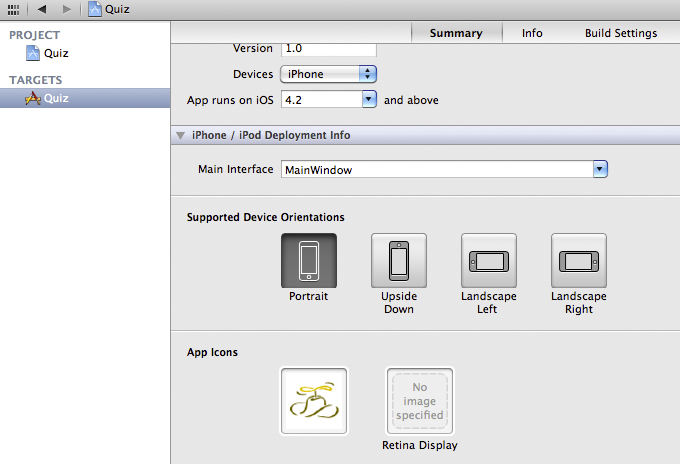
This panel is where you can set a number of options for the application, including its icon. Drag the Icon.png file from Finder onto the tile in the App Icons section. A drop-down sheet will appear. You’ll see this sheet any time you add a file to a project (Figure 1.24).
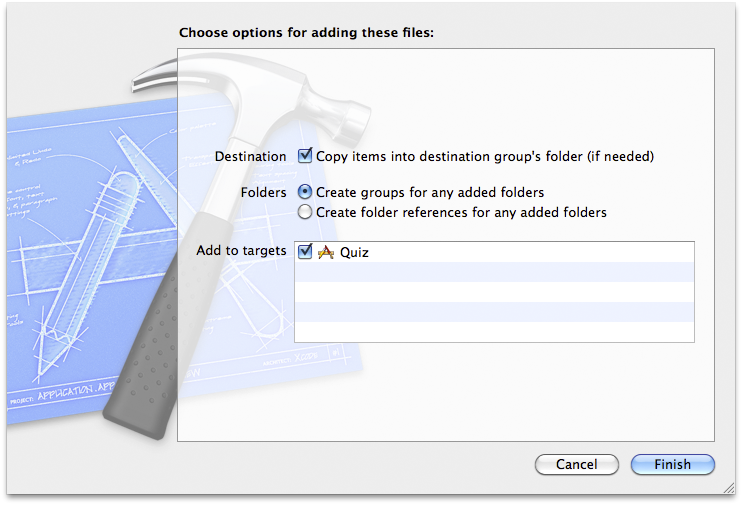
The first check box asks if you want to copy this file into your project’s directory on the filesystem. Make sure this box is checked to keep all the files for this project in a single directory. You can ignore the Folders section because you are only adding a single file. Also make sure the Quiz target is checked. This specifies to the project to include this file in the application bundle on building. Click Finish.
Next, drag the [email protected] file from Finder onto the tile labeled Retina Display. (Note that there isn’t a tile here for the iPad because Quiz is an iPhone application.)
Build and run the application again. After you exit the application, you should see the Quiz application with the BNR logo.
When you dragged the image files onto the icon tiles, two things happened. First, the image files were added to your project. (You can verify this by returning to the project navigator, where you’ll find Icon.png and [email protected] in the list of files.) Second, two entries were made in the Quiz-Info.plist file. When you add an icon, the Icon files value is updated with the names of the files you added. You can verify this by selecting Quiz-Info.plist and viewing it in the editor area. You can also select the Info item next to Summary to see the same information.