
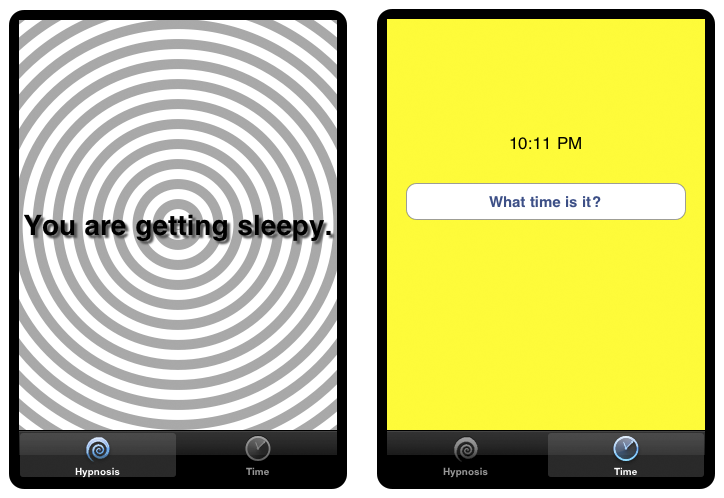
In this chapter, you are going to write an application with two view controllers. One will display the HypnosisView you created in the last chapter, and the other will let the user get the current time by tapping a button (Figure 7.4). We will swap in the views using a UITabBarController.
In Xcode, create a new Window-based Application iPhone project named HypnoTime. (Yes, there is a Tab Bar Application project template, but using that template makes things seem more complicated and magical than they are. Do not use it for this application.)
You will re-use HypnosisView in this application. Use Finder to locate HypnosisView.h and HypnosisView.m and drag them into the project navigator of this project. When the sheet appears, check the box labeled Copy items into destination group’s folder and click . Also, add the icons Hypno.png and Time.png (available at http://www.bignerdranch.com/solutions/iOSProgramming.zip) to the project navigator in the same way.
In HypnoTimeAppDelegate.m, create the tab bar controller and set it as the rootViewController of the window:
- (BOOL)application:(UIApplication *)application
didFinishLaunchingWithOptions:(NSDictionary *)launchOptions
{
// Create the tabBarController
UITabBarController *tabBarController = [[UITabBarController alloc] init];
// Set tabBarController as rootViewController of window
[[self window] setRootViewController:tabBarController];
// The window retains tabBarController, we can release our reference
[tabBarController release];
// Show the window
[[self window] makeKeyAndVisible];
return YES;
}
Build and run the application. The big white space is where your views will get swapped in. Also notice the black tab bar at the bottom of the window. This is the UITabBar, a subview of the UITabBarController’s view. Right now, there aren’t any tab bar items in it, but we’ll fix that in the next section.
In previous applications, you manipulated the view hierarchy directly. For example, in Chapter 5, you added subviews to the window dragging them onto the window in a XIB file. In Chapter 6, you added subviews to the window using the method addSubview:.
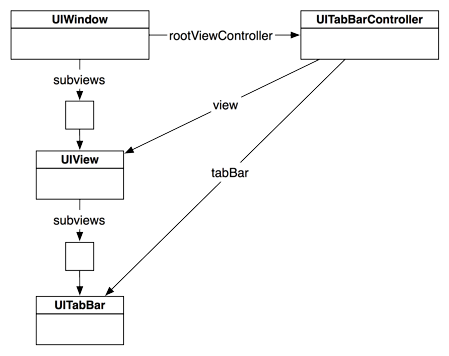
When using view controllers, you don’t have to manipulate the view hierarchy directly. UIWindow implements a method named setRootViewController:. Passing an instance of UIViewController as the argument to this method automatically adds the view of that view controller as a subview of the window and resizes it to fit. The window also retains its root view controller.
To create the first view controller for HypnoTime, select New File... from the New menu item in the File menu. While there is a UIViewController subclass template option, you won’t use it here. Choose Objective-C class and select NSObject as the superclass on the next pane. Name this class CurrentTimeViewController.
Open CurrentTimeViewController.h and change the superclass to UIViewController.
@interface CurrentTimeViewController : UIViewController
Now create another class in the same way, but name it HypnosisViewController. In HypnosisViewController.h, change the superclass to UIViewController.
@interface HypnosisViewController : UIViewController
Now you need to create instances of the view controllers and add them to the tab bar controller. At the top of HypnoTimeAppDelegate.m, import the header files for these classes.
#import "HypnoTimeAppDelegate.h" #import "HypnosisViewController.h" #import "CurrentTimeViewController.h"
Then, also in HypnoTimeAppDelegate.m, modify the application:didFinishLaunchingWithOptions: method to create instances of these view controllers and add them to the tab bar controller.
- (BOOL)application:(UIApplication *)application
didFinishLaunchingWithOptions:(NSDictionary *)launchOptions
{
// Create the tabBarController
UITabBarController *tabBarController = [[UITabBarController alloc] init];
// Create two view controllers
UIViewController *vc1 = [[HypnosisViewController alloc] init];
UIViewController *vc2 = [[CurrentTimeViewController alloc] init];
// Make an array containing the two view controllers
NSArray *viewControllers = [NSArray arrayWithObjects:vc1, vc2, nil];
// The viewControllers array retains vc1 and vc2, we can release
// our ownership of them in this method
[vc1 release];
[vc2 release];
// Attach them to the tab bar controller
[tabBarController setViewControllers:viewControllers];
// Put the tabBarController's view on the window
[[self window] setRootViewController:tabBarController];
[tabBarController release];
// Show the window
[[self window] makeKeyAndVisible];
return YES;
}
Build and run the application. The tab bar now has two tabs that you can select, but there isn’t anything interesting about the tabs. Every view controller has a tab bar item that controls the text or icon that appears in the tab bar as shown in Figure 7.6.

Let’s start by putting a title on the tab bar items. Open HypnosisViewController.m. Create a new init method, override the designated initializer for the superclass (UIViewController), and edit the viewDidLoad method to match the code below:
- (id)init
{
// Call the superclass's designated initializer
self = [super initWithNibName:nil
bundle:nil];
if (self) {
// Get the tab bar item
UITabBarItem *tbi = [self tabBarItem];
// Give it a label
[tbi setTitle:@"Hypnosis"];
}
return self;
}
- (id)initWithNibName:(NSString *)nibName bundle:(NSBundle *)bundle
{
// Disregard parameters - nib name is an implementation detail
return [self init];
}
// This method gets called automatically when the view is created
- (void)viewDidLoad
{
[super viewDidLoad];
NSLog(@"Loaded the view for HypnosisViewController");
// Set the background color of the view so we can see it
[[self view] setBackgroundColor:[UIColor orangeColor]];
}
Open CurrentTimeViewController.m and do all the same things, but use a different background color for the view:
- (id)init
{
// Call the superclass's designated initializer
self = [super initWithNibName:nil
bundle:nil];
if (self) {
// Get the tab bar item
UITabBarItem *tbi = [self tabBarItem];
// Give it a label
[tbi setTitle:@"Time"];
}
return self;
}
- (id)initWithNibName:(NSString *)nibName bundle:(NSBundle *)bundle
{
// Disregard parameters - implementation detail
return [self init];
}
- (void)viewDidLoad
{
[super viewDidLoad];
NSLog(@"Loaded the view for CurrentTimeViewController");
// Set the background color of the view so we can see it
[[self view] setBackgroundColor:[UIColor greenColor]];
}
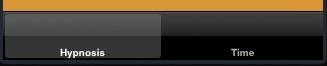
Build and run the application. Two labeled tab bar items will appear on the tab bar (Figure 7.7). Tap one and then the other, and you will see that the views for the view controllers are getting swapped in.
(If you are wondering why we made a new designated initializer for the UIViewController subclasses, hang on until Chapter 10 – we’ll explain it then.)
Now let’s add icons. Open HypnosisViewController.m and edit the init method:
- (id)init
{
self = [super initWithNibName:nil
bundle:nil];
if (self) {
UITabBarItem *tbi = [self tabBarItem];
[tbi setTitle:@"Hypnosis"];
// Create a UIImage from a file
UIImage *i = [UIImage imageNamed:@"Hypno.png"];
// Put that image on the tab bar item
[tbi setImage:i];
}
return self;
}
Next, open CurrentTimeViewController.m and edit its init method:
- (id)init
{
self = [super initWithNibName:nil
bundle:nil];
if (self) {
UITabBarItem *tbi = [self tabBarItem];
[tbi setTitle:@"Time"];
UIImage *i = [UIImage imageNamed:@"Time.png"];
[tbi setImage:i];
}
return self;
}
Now when you build and run the application, you will also see icons in the tab bar (Figure 7.8).
Now that you have a perfectly nice tab bar with two view controllers (and the two corresponding tab bar items), it’s time to give your view controllers views. (Technically, they already have views, but they are default, blank views.) There are two ways to do this:
- create the view programmatically
- create a XIB file
How do you know when to do one versus the other? Here’s a good rule-of-thumb: if the view has no subviews, create it programmatically; if it has subviews, create a XIB file.
When the view needs to be created, the view controller is sent the message loadView. In HypnosisViewController, you are going to override this method so that it creates an instance of HypnosisView programmatically. When an instance of a UIViewController is instantiated, its view is not created right away. A UIViewController’s view is created when it is placed in a view hierarchy (also known as “the first time it appears on screen” Add the following import statement and method to HypnosisViewController.m:
#import "HypnosisViewController.h"
#import "HypnosisView.h"
@implementation HypnosisViewController
- (void)loadView
{
HypnosisView *hv = [[HypnosisView alloc] initWithFrame:CGRectZero];
[hv setBackgroundColor:[UIColor whiteColor]];
[self setView:hv];
[hv release];
}
We no longer want the background of the view to be orange, so delete the following line from the viewDidLoad method in HypnosisViewController.m:
[[self view] setBackgroundColor:[UIColor orangeColor]];
Also delete the similar line of code from the viewDidLoad method in CurrentTimeViewController.m.
[[self view] setBackgroundColor:[UIColor greenColor]];
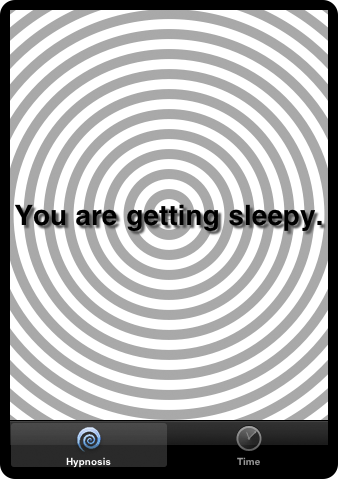
Build and run the application. You should see a HypnosisView like the one in Figure 7.9.
The CurrentTimeViewController’s view will have subviews (a UIButton and a UILabel). Therefore, you will use a XIB file to load its view. Create a new XIB file by selecting New File... from the New item in the File menu. From the iOS section, choose User Interface. Then, select the Empty XIB template. On the next pane, select iPhone from the pop-up menu.

Name this file CurrentTimeViewController.xib and save it. Then, select it in the project navigator to show it in Xcode.
This is an empty XIB file, there are only two “objects” in it: File's Owner and First Responder. The goal of this XIB file is to create the view for the CurrentTimeViewController.
Open the utilities area and drag a UIView onto the canvas. Notice that this view was added to the gutter on the left edge of the XIB editor pane.
We would like this view to be the view of the CurrentTimeViewController. In other words, the instance variable view of CurrentTimeViewController should point at the view. Therefore, we must have an outlet connection from an instance of CurrentTimeViewController to the view. In previous exercises, this was simple: there was a AppDelegate object, and we’d set up connections between the view objects in the XIB file and that AppDelegate. However, there is not a CurrentTimeViewController object in this XIB file that you can make connections to and from.
Your first intuition may be to add a CurrentTimeViewController to the XIB file. But, if there was a CurrentTimeViewController object in the XIB file, whenever that XIB file was loaded it would create an instance of CurrentTimeViewController. This application already has an instance of CurrentTimeViewController, the one you created in application:didFinishLaunchingWithOptions:. If you were to add an instance of this class to the XIB file, you would have two CurrentTimeViewController instances.
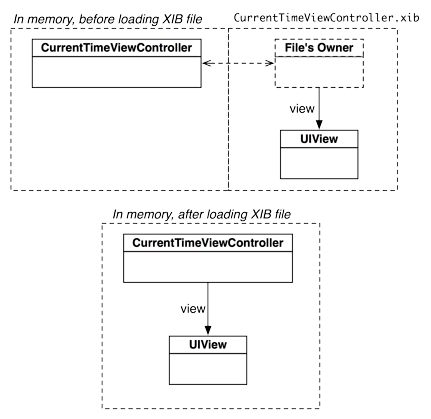
Instead, we need some way to connect objects loaded from the XIB file to objects that exist in memory before the XIB file is loaded. This way, the already existing CurrentTimeViewController could set its view instance variable to point at the view loaded from this XIB file. This is where the File's Owner comes in. The File's Owner is a placeholder object. When a XIB file is loaded, placeholder objects are not instantiated. You can think of a placeholder object as a hole in which existing objects can be placed so that connections can be made between them and the objects in the XIB file.
Take a peek at the available connections for the File's Owner by Control-clicking on it. There aren’t any. That is because the type of the File's Owner defaults to NSObject, which has no IBOutlets. Because a CurrentTimeViewController will be the placeholder object, we must change the type of the File's Owner in this XIB file to be that class.
Select the File's Owner placeholder object on the outline view and click the ![]() icon to show the identity inspector. Change the Class field to CurrentTimeViewController and hit return.
icon to show the identity inspector. Change the Class field to CurrentTimeViewController and hit return.
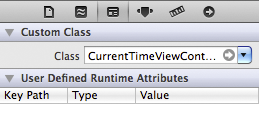
Now, Control-click on the File's Owner to see the available outlets. There is now a view outlet available because UIViewController’s view is an IBOutlet and CurrentTimeViewController is a subclass of UIViewController. Connect this outlet to the view in this XIB file.
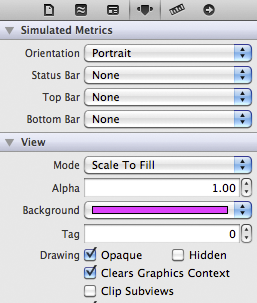
Select the view and open the attributes inspector. Change its background color to something obnoxious, like bright purple.
Build and run the application. While running, select the Time tab. Notice that you are looking at the exact same view you created in CurrentTimeViewController.xib.
So, how does this work? When you create an instance of a UIViewController subclass, you pass it the name of a XIB file through its designated initializer, initWithNibName:bundle:. When the view controller is asked for its view, it checks to see if a XIB file with that name exists in your application bundle. (If you specify nil as the name, it will search for a XIB file whose name matches the name of the view controller subclass.) It then loads that XIB file. You can be more explicit about the XIB file loaded in CurrentTimeViewController.m.
- (id)init
{
self = [super initWithNibName:@"CurrentTimeViewController"
bundle:nil];
if (self) {
UITabBarItem *tbi = [self tabBarItem];
[tbi setTitle:@"Time"];
UIImage *i = [UIImage imageNamed:@"Time.png"];
[tbi setImage:i];
}
return self;
}
The loadView method is responsible for this XIB loading behavior. The default implementation of this method does the checking for and loading of a XIB file. Therefore, when a view controller is loading its view from a XIB file, you do not override loadView. If instead you want to create a view for a view controller programmatically, you must override loadView so it does not load a XIB file.
The instance of CurrentTimeViewController that is loading the XIB file places itself in the File's Owner hole of that XIB file. Any connections to or from the File's Owner are made on that instance of CurrentTimeViewController. This concept allows placeholder objects to get pointers to objects loaded from a XIB file. If you did not set pointers from objects in memory to objects loaded from a XIB file, the loaded objects would be alive but nothing would have a pointer to it. This would be a leak.
Take a look at MainWindow.xib and check out the File's Owner in the identity inspector: its class is UIApplication. When your application first launches, an instance of UIApplication is created and it loads MainWindow.xib. The UIApplication is the File's Owner. The File's Owner of this file has a outlet connection for its delegate that has been connected to HypnoTimeAppDelegate. Therefore, after the XIB file loads, the delegate of the UIApplication is set to point at the HypnoTimeAppDelegate object – the reason why HypnoTimeAppDelegate gets sent the message application:didFinishLaunchingWithOptions:.
Understanding the File's Owner is an integral part of demystifying the magic of a XIB file. In Chapter 15, we will talk about how objects are archived into the XIB file.
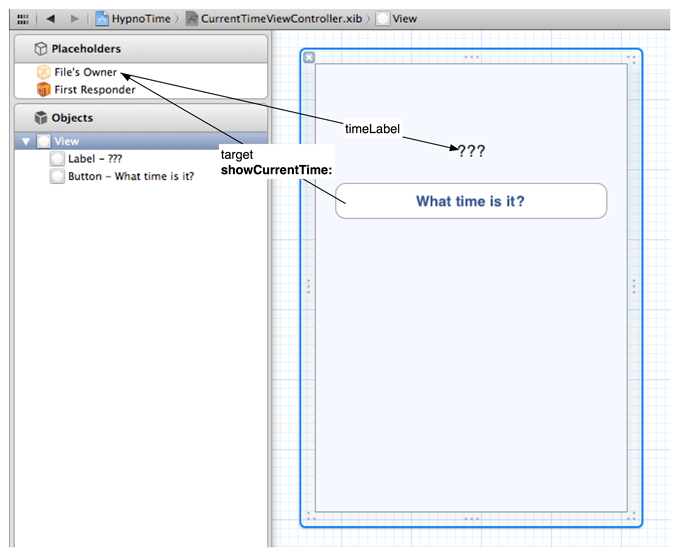
Now that your XIB file is set up to work properly, you can continue creating the interface for CurrentTimeViewController. In CurrentTimeViewController.h, add an outlet and an action.
#import <UIKit/UIKit.h>
@interface CurrentTimeViewController : UIViewController
{
IBOutlet UILabel *timeLabel;
}
- (IBAction)showCurrentTime:(id)sender;
@end
Save this file.
In CurrentTimeViewController.xib, drag a UILabel and UIButton object onto the view that is already there. Configure these objects and make connections, as shown in Figure 7.14.
Implement the action method in CurrentTimeViewController.m:
- (IBAction)showCurrentTime:(id)sender
{
NSDate *now = [NSDate date];
// Static here means "only once." The *variable* formatter
// is created when the program is first loaded into memory.
// The first time this method runs, formatter will
// be nil and the if-block will execute, creating
// an NSDateFormatter object that formatter will point to.
// Subsequent entry into this method will reuse the same
// NSDateFormatter object.
static NSDateFormatter *formatter = nil;
if (!formatter) {
formatter = [[NSDateFormatter alloc] init];
[formatter setTimeStyle:NSDateFormatterShortStyle];
}
[timeLabel setText:[formatter stringFromDate:now]];
}
Build and run the application. You will be able to switch back and forth between the two views. Clicking the button on the time view will display the current time.