
The process of providing a UITableView with rows in Cocoa Touch is different from the typical procedural programming task. In a procedural design, you tell the table view what it should display. In Cocoa Touch, the table view asks another object – its dataSource – what it should display. In our case, the ItemsViewController is the data source, so it needs a way to store possession data.
In Chapter 2, you used an NSMutableArray to store Possession instances. You will do the same thing in this exercise, but with a little twist. The NSMutableArray that holds the Possession instances will be abstracted into a PossessionStore (Figure 10.5).

If an object wants to see all of the possessions, it will ask the PossessionStore for the array that contains them. In future chapters, you’ll make the store responsible for performing operations on the array, like reordering, adding, and removing Possessions. It will also be responsible for saving and loading the Possessions from disk.
From the menu, select and then . Create a new NSObject subclass and name it PossessionStore.
PossessionStore will be a singleton, just like UIAccelerometer. This means there will only be one instance of this type in the application; if you try and create another instance, the class will quietly return the existing instance instead.
To get the PossessionStore, you will send the class the message defaultStore. Declare this class method in PossessionStore.h.
#import <Foundation/Foundation.h>
@interface PossessionStore : NSObject
{
}
// Notice that this is a class method, and is prefixed with a + instead of a -
+ (PossessionStore *)defaultStore;
@end
When this message is sent to the PossessionStore class, the class will check to see if the instance of PossessionStore has already been created. If the store exists, the class will return the instance. If not, it will create the instance and return it. To do this, you’ll use a global static variable. At the top of PossessionStore.m, create a global static variable to hold the instance of PossessionStore where the class can access it.
#import "PossessionStore.h" #import "Possession.h" static PossessionStore *defaultStore = nil; @implementation PossessionStore
Also in PossessionStore.m, implement +defaultStore, +allocWithZone: and -init so that only one instance of the class can be created.
+ (PossessionStore *)defaultStore
{
if (!defaultStore) {
// Create the singleton
defaultStore = [[super allocWithZone:NULL] init];
}
return defaultStore;
}
// Prevent creation of additional instances
+ (id)allocWithZone:(NSZone *)zone
{
return [self defaultStore];
}
- (id)init
{
// If we already have an instance of PossessionStore...
if (defaultStore) {
// Return the old one
return defaultStore;
}
self = [super init];
return self;
}
This code is a bit tricky; let’s walk through it. Whenever the message defaultStore is sent to the class PossessionStore, it checks if the defaultStore variable is nil. The first time this message is sent, defaultStore will be nil, and an instance of PossessionStore will be created by calling allocWithZone: and init.
You have overridden allocWithZone: to return the existing defaultStore to protect the PossessionStore’s singleton status. That’s why defaultStore must call [super allocWithZone:nil] instead of [self allocWithZone:nil].
Now, override the retain count methods so that no one can release the defaultStore
- (id)retain
{
// Do nothing
return self;
}
- (void)release
{
// Do nothing
}
- (NSUInteger)retainCount
{
return NSUIntegerMax;
}
Now you have a singleton.
In PossessionStore.h, give PossessionStore an instance variable to hold an array of Possession instances and declare two more methods:
#import <Foundation/Foundation.h>
@class Possession;
@interface PossessionStore : NSObject
{
NSMutableArray *allPossessions;
}
+ (PossessionStore *)defaultStore;
- (NSArray *)allPossessions;
- (Possession *)createPossession;
@end
In PossessionStore.m, create an instance of NSMutableArray and assign it to the instance variable in the init method.
- (id)init
{
if (defaultStore) {
return defaultStore;
}
self = [super init];
if (self) {
allPossessions = [[NSMutableArray alloc] init];
}
return self;
}
Now implement the two methods in PossessionStore.m.
- (NSArray *)allPossessions
{
return allPossessions;
}
- (Possession *)createPossession
{
Possession *p = [Possession randomPossession];
[allPossessions addObject:p];
return p;
}
In ItemsViewController.m, import PossessionStore.h and Possession.h and update the designated initializer to add 10 random possessions to the PossessionStore.
#import "ItemsViewController.h"
#import "PossessionStore.h"
#import "Possession.h"
@implementation ItemsViewController
- (id)init
{
// Call the superclass's designated initializer
self = [super initWithStyle:UITableViewStyleGrouped];
if (self) {
for (int i = 0; i < 10; i++) {
[[PossessionStore defaultStore] createPossession];
}
}
return self;
}
- (id)initWithStyle:(UITableViewStyle)style
{
return [self init];
}
Now that there are some possessions in the store, you need to teach ItemsViewController how to turn those possessions into rows that its UITableView can display. When a UITableView wants to know what to display, it uses a set of messages declared in the UITableViewDataSource protocol.
From the menu, choose to open the iOS SDK documentation. Find the UITableViewDataSource protocol documentation (Figure 10.6).
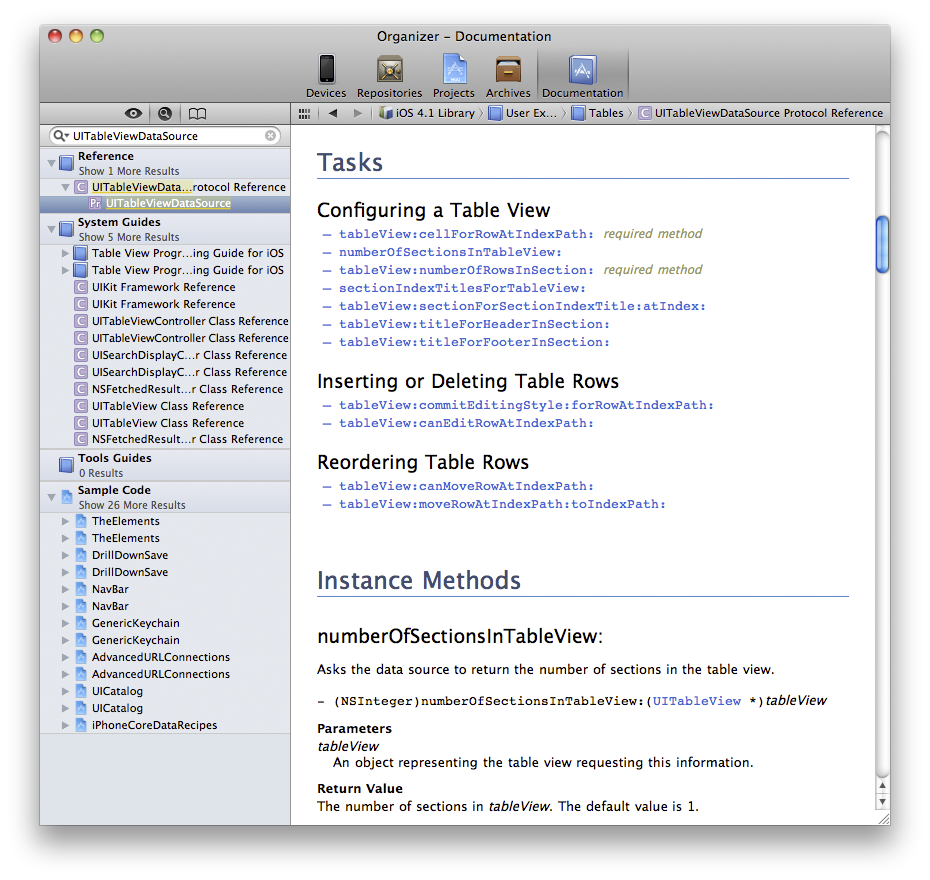
There are many methods here, but notice the two marked required method. For ItemsViewController to conform to UITableViewDataSource, it must implement tableView:numberOfRowsInSection: and tableView:cellForRowAtIndexPath:. These methods tell the table view how many rows it should display and what content to display in each row.
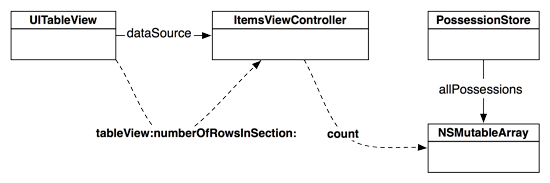
Whenever a UITableView needs to display itself, it sends a series of messages (the required methods plus any optional ones that have been implemented) to its dataSource. The required method tableView:numberOfRowsInSection: returns an integer value for the number of rows that the UITableView should display. In the table view for Homepwner, there should be a row for each entry in the store (Figure 10.7).
Implement tableView:numberOfRowsInSection: in ItemsViewController.m.
- (NSInteger)tableView:(UITableView *)tableView
numberOfRowsInSection:(NSInteger)section
{
return [[[PossessionStore defaultStore] allPossessions] count];
}
Wondering about the section that this method refers to? Table views can be broken up into sections, and each section has its own set of rows. For example, in the address book, all names beginning with “D” are grouped together in a section. By default, a table view has one section, and for this exercise, we will work with only one. Once you understand how a table view works, it’s not hard to use multiple sections. In fact, it’s one of the challenges at the end of this chapter.
The second required method in the UITableViewDataSource protocol is tableView:cellForRowAtIndexPath:. To implement this method, we’ll need to learn about another class – UITableViewCell.