
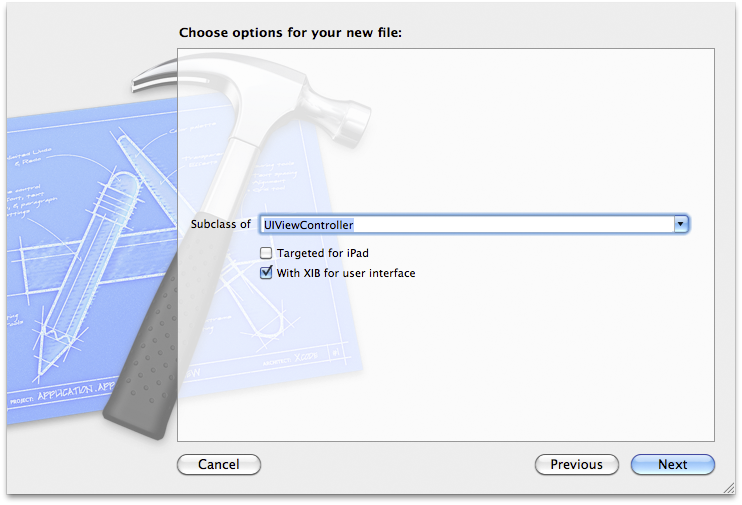
To see the real power of UINavigationController, you need another UIViewController to put on the navigation controller’s stack. Create a new UIViewController subclass ( → → ). Choose the UIViewController subclass template. When prompted, check the box With XIB for user interface (Figure 12.10). Save this class as ItemDetailViewController.
In ItemDetailViewController.m, delete all of the code between the @implementation and @end directives.
In Homepwner, we want the user to be able to tap a possession to get another screen with editable text fields for each property of that Possession. This view will be controlled by an instance of ItemDetailViewController.
The detail view needs four subviews – one for each instance variable of a Possession instance. And because you need to be able to access these subviews during runtime, ItemDetailViewController needs outlets for these subviews. Therefore, you must add four new outlets to ItemDetailViewController, drag the subviews onto the view in the XIB file, and then make the connections.
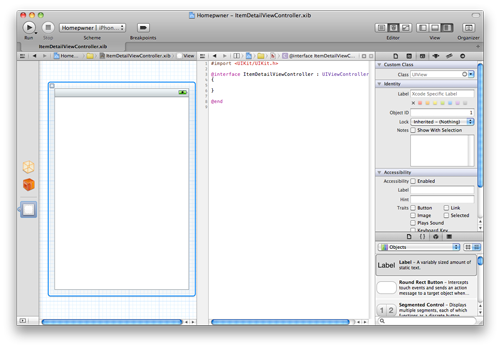
In previous exercises, these were three distinct steps: you added the outlets, then you configured the interface, and then you made connections. We can combine these steps using a shortcut in Xcode. First, open ItemDetailViewController.xib by clicking on it in the project navigator.
Now, Option-click on ItemDetailViewController.h in the project navigator. This shortcut opens the file in the assistant editor, right next to ItemDetailViewController.xib. (You can toggle the assistant editor by clicking the middle button from the Editor control at the top of the workspace; the shortcut to display the assistant editor is Command-Option-Return; to return to the standard editor, use Command-Return.)
You will also need the object library available so that you can drag the subviews onto the view. Show the utilities area by clicking the right button in the View control at the top of the workspace (or Command-Option-0).
Your window is now sufficiently cluttered. Let’s make some temporary space. Hide the navigator area by clicking the left button in the View control at the top of the workspace (the shortcut for this is Command-0). Then, change the outline view in the XIB file to the dock view by clicking the toggle button in the lower left corner of the outline view. Your workspace should now look like Figure 12.11.
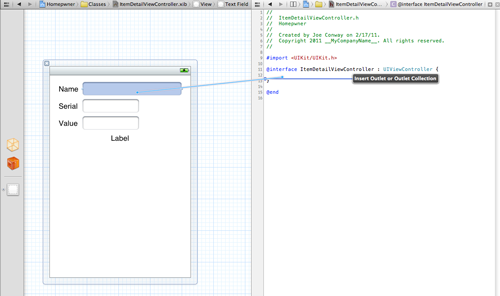
Now, drag four UILabels and three UITextFields onto the view in the canvas area and configure them to look like Figure 12.12. For each of the UITextFields, uncheck the Clear when editing begins box in the attribute inspector.

The three UITextFields and bottom UILabel will be outlets in ItemDetailViewController. Here comes the exciting part. Control-drag from the UITextField underneath the Name label to the instance variable area in ItemDetailViewController.h, as shown in Figure 12.13.
Let go while still inside the instance variable area, and a pop-up window will appear. Enter nameField into this field and click Connect.
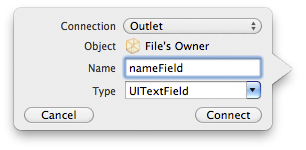
This will create an IBOutlet instance variable of type UITextField named nameField in ItemDetailViewController. It will also connect this UITextField to the nameField outlet of the File's Owner in the XIB file. You can verify this by Control-clicking on the File's Owner to see the connections – notice that hovering your mouse above the nameField connection in the panel that appears will reveal the UITextField that you connected. Two birds, one stone. Create the other three outlets in the same way and name them as shown in Figure 12.15.

For each of the UITextFields in the XIB file, connect their delegate property to the File's Owner. (Remember, Control-drag from the UITextField to the File's Owner and select delegate from the list.)
Next, let’s consider the ItemDetailViewController’s view. Right now, it has a plain white background. Let’s give it the same background as the UITableView. Recall that a view controller’s view is not created until the view controller loads it the first time, so when should you make this change to the view? After a UIViewController loads its view, it is immediately sent the message viewDidLoad. This message is sent whether that view is loaded from a XIB file or programmatically. If you need to do any extra initialization to a UIViewController that requires its view to already exist, you must override viewDidLoad. Override viewDidLoad in ItemDetailViewController.m.
- (void)viewDidLoad
{
[super viewDidLoad];
[[self view] setBackgroundColor:[UIColor groupTableViewBackgroundColor]];
}
When ItemDetailViewController’s view gets unloaded, its subviews will still be retained by ItemDetailViewController. They need to be released and set to nil in viewDidUnload. (When you add outlets to a class by Control-dragging into a source file, code is automatically added to viewDidUnload that will release the instance variables that you created; however, they may not be set to nil.) Override this method in ItemDetailViewController.m.
- (void)viewDidUnload
{
[super viewDidUnload];
[nameField release];
nameField = nil;
[serialNumberField release];
serialNumberField = nil;
[valueField release];
valueField = nil;
[dateLabel release];
dateLabel = nil;
}
And, finally, you need a dealloc method because this view controller will be instantiated and destroyed multiple times while the application is running:
- (void)dealloc
{
[nameField release];
[serialNumberField release];
[valueField release];
[dateLabel release];
[super dealloc];
}
Now that this project has a good number of source files, you will be switching between them fairly regularly. One way to speed up switching between commonly accessed files is to use Xcode tabs. If you double-click on a file in the project navigator, the file will open in a new tab. You can also open up a blank tab with the shortcut Command-T. The keyboard shortcuts for cycling through tabs are Command-Shift-} and Command-Shift-{. (You can see the other shortcuts for project organization by selecting the General tab from Xcode’s preferences.)