
In this chapter, you’re going to add photos to the Homepwner application. You will present a UIImagePickerController so that the user can take and save a picture of each possession. The image will then be associated with a Possession instance, stored in an image store, and viewable in the possession’s detail view. Then, when the insurance company demands proof, the user has a visual record of owning that 70" HDTV.
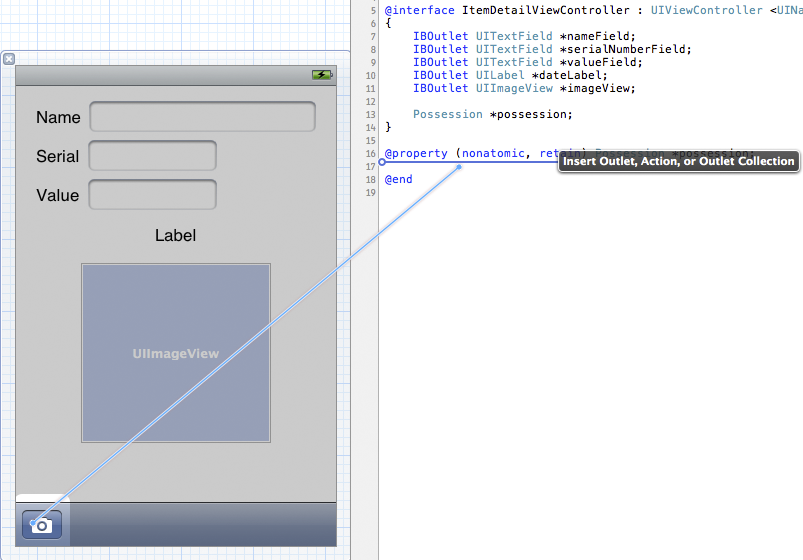
Because we want the image to appear in the possession’s detail view, your first step is to have the ItemDetailViewController get and display an image. An easy way to display an image is to put an instance of UIImageView on the screen. Open Homepwner.xcodeproj and click ItemDetailViewController.xib in the project navigator to open the interface in the canvas area. Then drag an instance of UIImageView onto the view, as shown in Figure 13.2.
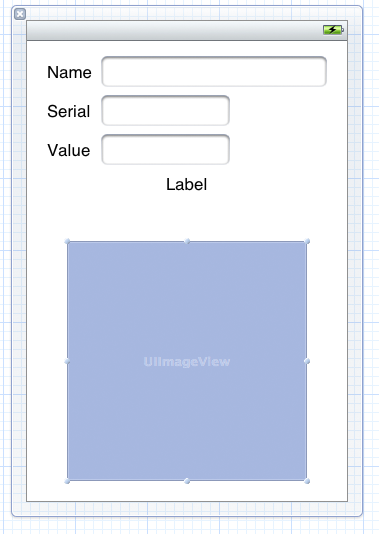
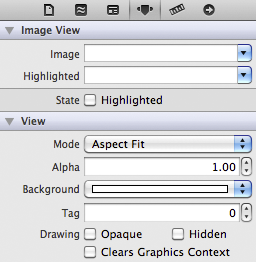
A UIImageView displays an image according to its contentMode property. This property determines where to position and how to resize the content within its frame. The default value for contentMode is UIViewContentModeCenter, which centers but does not resize the content to fit within the bounds of the view. If you keep the default, the large image produced by the camera will take up most of the screen. You have to change the contentMode of the image view so that it resizes the image.
Select the UIImageView and open the attributes inspector. Find the Mode attribute and change it to Aspect Fit, as shown in Figure 13.3. This will resize the image to fit within the bounds of the UIImageView.
Now, Option-click ItemDetailViewController.h in the project navigator to open it in the assistant editor. Control-drag from the UIImageView to the instance variable area in ItemDetailViewController.h. Name the outlet imageView and click Connect.
Because imageView is a new subview of ItemDetailViewController’s view that is instantiated when the XIB file is loaded, it needs to be released and its pointer cleared in viewDidUnload. In ItemDetailViewController.m, make the following changes.
- (void)viewDidUnload
{
[super viewDidUnload];
[nameField release];
nameField = nil;
[serialNumberField release];
serialNumberField = nil;
[valueField release];
valueField = nil;
[dateLabel release];
dateLabel = nil;
[imageView release];
imageView = nil;
}
Also release the image view in dealloc:
- (void)dealloc
{
[nameField release];
[serialNumberField release];
[valueField release];
[dateLabel release];
[imageView release];
[super dealloc];
}
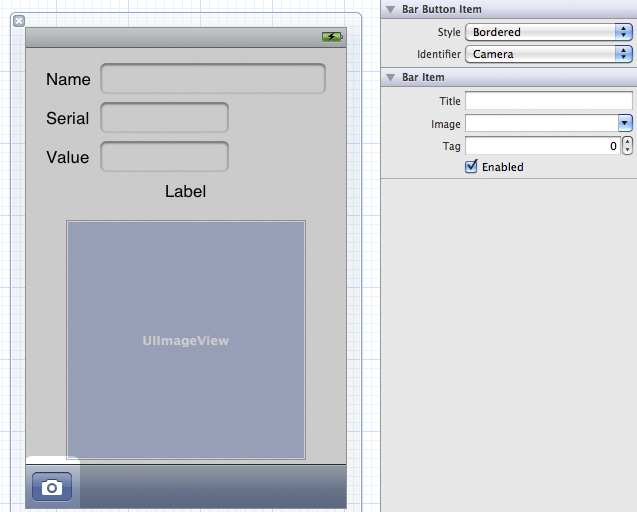
Now you need a button to initiate the photo-taking process. It would be nice to put this button on the navigation bar, but we will need the navigation bar for another button later. Instead, we will create an instance of UIToolbar and place it at the bottom of ItemDetailViewController’s view. In ItemDetailViewController.xib, drag a UIToolbar onto the bottom of the view.
A UIToolbar works a lot like a UINavigationBar in that you can add UIBarButtonItems to it. However, where a navigation bar has two bar button items, a toolbar has an array of items. You can place as many UIBarButtonItems in a toolbar as can fit on the screen.
By default, a new instance of UIToolbar created in a XIB file comes with one UIBarButtonItem. Select this bar button item and open the attribute inspector. Change the Identifier to Camera, and the item will show a camera icon (Figure 13.4).
The camera button needs to send a message to the instance of ItemDetailViewController when it is tapped. In previous exercises, you connected action methods in two steps: declaring them in the header file and then hooking them up in the XIB file. Just like you did with outlets, you can do both steps at once by opening a source file in the assistant editor and Control-dragging from a XIB file to the file. Option-click ItemDetailViewController.h in the project navigator to open it in the assistant editor.
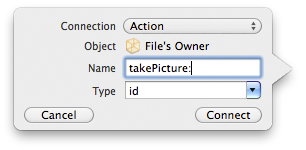
Select the camera button and Control-drag from the button to the method declaration area in ItemDetailViewController.h (Figure 13.5).
Let go of the mouse, and a window will appear that allows you to specify the type of connection you are creating. From the Connection pop-up menu, choose Action. Then, name this method takePicture: and click Connect (Figure 13.6).
Now the action method is declared in the header file, and the UIBarButtonItem instance in the XIB is hooked up to send this message to the ItemDetailViewController when tapped. There is also a stub for the method in ItemDetailViewController.m.
- (IBAction)takePicture:(id)sender
{
}
In the takePicture: method, you will instantiate a UIImagePickerController and present it on the screen. When creating an instance of UIImagePickerController, you must set its sourceType property and assign it a delegate.
The sourceType is a constant that tells the image picker where to get images. It has three possible values:
- UIImagePickerControllerSourceTypeCamera – The user will take a new picture.
- UIImagePickerControllerSourceTypePhotoLibrary – The user will be prompted to select an album and then a photo from that album.
- UIImagePickerControllerSourceTypeSavedPhotosAlbum – The user picks from the most recently taken photos.
Figure 13.7 shows the results of using each constant.

The first source type, UIImagePickerControllerSourceTypeCamera, won’t work on a device that doesn’t have a camera. So before using this type, you have to check for a camera by sending the UIImagePickerController class the message isSourceTypeAvailable:. Sending this message to UIImagePickerController with one of the source type constants returns a boolean value for whether the device supports that source type.
In addition to a source type, the UIImagePickerController instance needs a delegate to handle requests from its view. When the user taps the button on the UIImagePickerController’s interface, the delegate is sent the message imagePickerController:didFinishPickingMediaWithInfo:. (The delegate receives another message – imagePickerControllerDidCancel: – if the process was cancelled.)
Once the UIImagePickerController has a source type and a delegate, it’s time to put its view on the screen. Unlike other UIViewController subclasses you’ve used, an instance of UIImagePickerController is presented modally. When a view controller is modal, it takes over the entire screen until it has finished its work. To present a view modally, presentModalViewController:animated: is sent to the UIViewController whose view is on the screen. The view controller to be presented is passed to it, and its view slides up from the bottom of the screen.
In ItemDetailViewController.m, implement the method takePicture: to create, configure, and present the UIImagePickerController. (Remember – there’s already a stub for this method, so locate the stub in ItemDetailViewController.m and add the following code there.)
- (void)takePicture:(id)sender
{
UIImagePickerController *imagePicker =
[[UIImagePickerController alloc] init];
// If our device has a camera, we want to take a picture, otherwise, we
// just pick from photo library
if ([UIImagePickerController
isSourceTypeAvailable:UIImagePickerControllerSourceTypeCamera]) {
[imagePicker setSourceType:UIImagePickerControllerSourceTypeCamera];
} else {
[imagePicker setSourceType:UIImagePickerControllerSourceTypePhotoLibrary];
}
// This line of code will generate 2 warnings right now, ignore them
[imagePicker setDelegate:self];
// Place image picker on the screen
[self presentModalViewController:imagePicker animated:YES];
// The image picker will be retained by ItemDetailViewController
// until it has been dismissed
[imagePicker release];
}
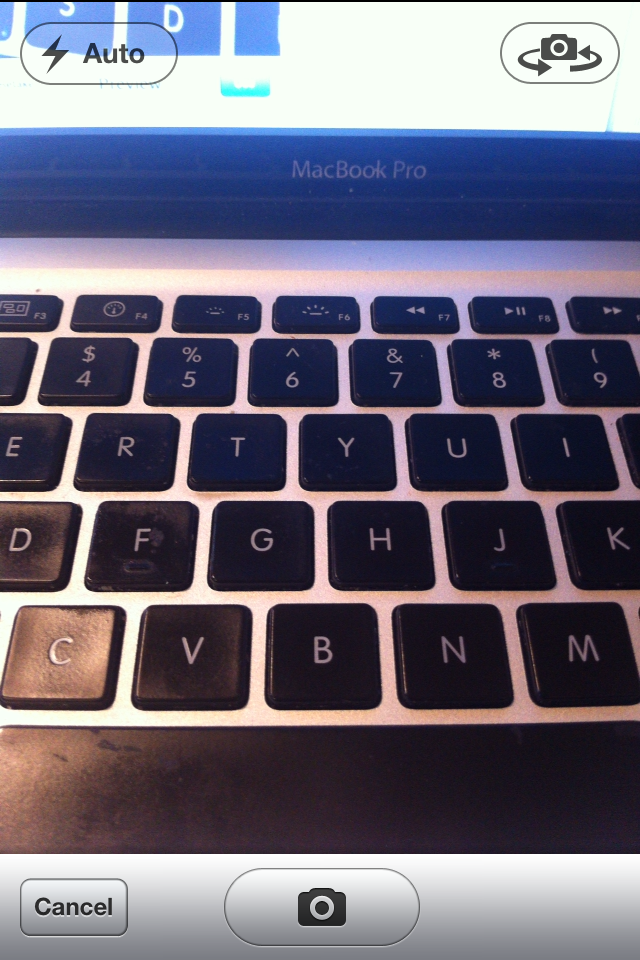
You can build and run the application now. Select a Possession to see its details and then tap the camera button on the UIToolbar. UIImagePickerController’s interface will appear on the screen (Figure 13.8), and you can take a picture (or choose an existing image if you don’t have a camera). Tapping the Use Photo button dismisses the UIImagePickerController.
But, oops – you don’t have a reference to the image anywhere in the code. You need to implement the delegate method imagePickerController:didFinishPickingMediaWithInfo: in ItemDetailViewController to hold on to the selected image. But before you implement this method, let’s take care of the two warnings that appeared during the last build telling you that ItemDetailViewController does not conform to the UIImagePickerControllerDelegate or the UINavigationControllerDelegate protocol. In ItemDetailViewController.h, add the protocols to the class declaration. (Why UINavigationControllerDelegate? UIImagePickerController is a subclass of UINavigationController.)
@interface ItemDetailViewController : UIViewController
<UINavigationControllerDelegate, UIImagePickerControllerDelegate>
{
That’s better. Now we’re all up to code.
When a photo is selected, the imagePickerController:didFinishPickingMediaWithInfo: message will be sent to the image picker’s delegate. In ItemDetailViewController.m, implement this method to put the image into the UIImageView that you created earlier.
- (void)imagePickerController:(UIImagePickerController *)picker
didFinishPickingMediaWithInfo:(NSDictionary *)info
{
// Get picked image from info dictionary
UIImage *image = [info objectForKey:UIImagePickerControllerOriginalImage];
// Put that image onto the screen in our image view
[imageView setImage:image];
// Take image picker off the screen -
// you must call this dismiss method
[self dismissModalViewControllerAnimated:YES];
}
Build and run the application again. Take a photo, and the image picker is dismissed and you are returned to the ItemDetailViewController’s view. Do you see your image? Oddly enough, you might see it or you might not. Let’s figure out what’s going on and fix the problem.
When a photo is taken, that image is loaded into memory. However, the image file is so large that it causes a low-memory warning. Recall that a low-memory warning gives the system the option of requiring view controllers to release their views if they are not currently visible. When a modal view controller is on the screen, its view is visible – and the view of the view controller that presented it is not. In our case, the low-memory warning destroys ItemDetailViewController’s view, and the imageView is no longer available when we try to set it.
To get around this problem, we must create a separate store for images. Instead of putting the image directly into the imageView, we will put it into this store. Then when the ItemDetailViewController’s view next appears on screen, we’ll have the ItemDetailViewController grab the image from the image store and put it into its own imageView. In general, this is a best practice: a view controller should re-populate its view’s subviews with data whenever it is sent the message viewWillAppear:, eliminating the possibility that a low-memory warning could wipe out its content.
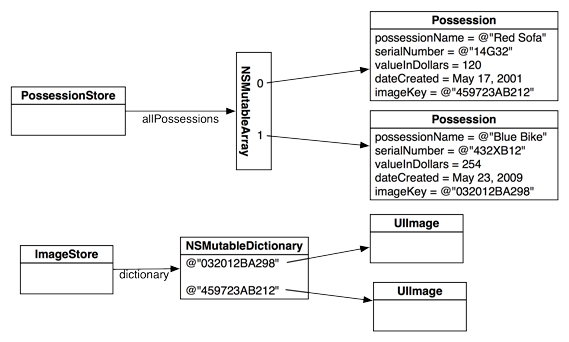
The image store will hold all the pictures the user will take. In Chapter 15, you will have the Possession objects write out their instance variables to a file, which will then be read in when the application starts. However, as we’ve found out, images tend to be very large, so it’s a good idea to keep them separate from the other possession data. The image store will fetch and cache the images as they are needed. It will also be able to flush the cache if the device runs low on memory.
All of that nifty saving/fetching/loading stuff comes later; in this chapter, the image store is little more than a dictionary of key-value pairs in which the keys are unique strings and the values are images. Create a new NSObject subclass called ImageStore. Open ImageStore.h and create its interface:
#import <UIKit/UIKit.h>
@interface ImageStore : NSObject
{
NSMutableDictionary *dictionary;
}
+ (ImageStore *)defaultImageStore;
- (void)setImage:(UIImage *)i forKey:(NSString *)s;
- (UIImage *)imageForKey:(NSString *)s;
- (void)deleteImageForKey:(NSString *)s;
@end
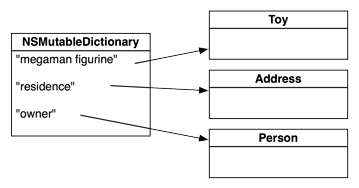
Notice that the dictionary is an instance of NSMutableDictionary. A dictionary is a collection object similar to an array. However, an array is an ordered list of pointers to objects that is accessed by an index. When you have an array, you can ask it for the object at the nth index:
// Put some object at the beginning of an array [someArray insertObject:someObject atIndex:0]; // Get that same object out someObject = [someArray objectAtIndex:0];
A dictionary’s objects are not ordered within the collection. So instead of accessing entries with an index, you use a key. The key is usually an instance of NSString.
// Add some object to a dictionary for the key "MyKey" [someDictionary setObject:someObject forKey:@"MyKey"]; // Get that same object out someObject = [someDictionary objectForKey:@"MyKey"];
An NSDictionary is useful when you want to access entries within a collection by name. In other development environments, this is called a hash map or hash table (Figure 13.9).
There can only be one object for each key. If you add an object to a dictionary with a key that matches the key of an object already present in the dictionary, the earlier object is removed. If you need to store multiple objects under one key, you can put them in an array and add the array to the dictionary.
Finally, note that a dictionary’s memory management is like that of an array. Whenever you add an object to a dictionary, the dictionary retains it, and whenever you remove an object from a dictionary, the dictionary releases it.
Like the PossessionStore, the ImageStore needs to be a singleton. In ImageStore.m, write the following code to ensure ImageStore’s singleton status.
static ImageStore *defaultImageStore = nil;
@implementation ImageStore
+ (id)allocWithZone:(NSZone *)zone
{
return [self defaultImageStore];
}
+ (ImageStore *)defaultImageStore
{
if (!defaultImageStore) {
// Create the singleton
defaultImageStore = [[super allocWithZone:NULL] init];
}
return defaultImageStore;
}
- (id)init
{
if (defaultImageStore) {
return defaultImageStore;
}
self = [super init];
if (self) {
dictionary = [[NSMutableDictionary alloc] init];
}
return self;
}
- (void)release
{
// no op
}
- (id)retain
{
return self;
}
- (NSUInteger)retainCount
{
return NSUIntegerMax;
}
Then, implement the three methods declared in the header file.
- (void)setImage:(UIImage *)i forKey:(NSString *)s
{
[dictionary setObject:i forKey:s];
}
- (UIImage *)imageForKey:(NSString *)s
{
return [dictionary objectForKey:s];
}
- (void)deleteImageForKey:(NSString *)s
{
if(!s)
return;
[dictionary removeObjectForKey:s];
}
Note that there is no dealloc method because once created, the store will exist for the life of the application.
When an image is added to the store, it will be put into a dictionary under a unique key, and the associated Possession object will be given that key. When the ItemDetailViewController wants an image from the store, it will ask its possession for the key and search the dictionary for the image. Add an instance variable to Possession.h to store the key.
NSDate *dateCreated; NSString *imageKey; } @property (nonatomic, copy) NSString *imageKey;
Synthesize this new property in the implementation file.
@implementation Possession @synthesize possessionName, serialNumber, valueInDollars, dateCreated; @synthesize imageKey;
You also need to release this object when a Possession is deallocated. Add this code to the dealloc method in Possession.m.
- (void)dealloc
{
[possessionName release];
[serialNumber release];
[dateCreated release];
[imageKey release];
[super dealloc];
}
The image keys need to be unique in order for your dictionary to work. While there are many ways to hack together a unique string, we’re going to use the Cocoa Touch mechanism for creating universally unique identifiers (UUIDs), also known as globally unique identifiers (GUIDs). Objects of type CFUUIDRef represent a UUID and are generated using the time, a counter, and a hardware identifier, which is usually the MAC address of the ethernet card.
However, CFUUIDRef is not an Objective-C object; it is a C structure and part of the Core Foundation API. Core Foundation is a C API that is included in template projects and contains the building blocks for applications, such as strings, arrays, and dictionaries. Core Foundation “classes” are prefixed with CF and suffixed with Ref. Other examples include CFArrayRef and CFStringRef.
Like Objective-C objects, Core Foundation structures have a retain count mechanism.
Many objects in Core Foundation have an Objective-C counterpart; for example, NSString * is the Objective-C counterpart of CFStringRef. However, CFUUIDRef does not have an Objective-C counterpart and, in fact, knows nothing at all about Objective-C. Thus, when it produces a UUID as a string, that string cannot be an NSString – it must be a CFStringRef.
Recall that your instance variable for the image key is of type NSString *. Do you have to change it to CFStringRef in order to work with CFUUIDRef? Nope. Many Core Foundation objects can simply be typecast as their Objective-C counterparts. Here’s an example:
// Create an instance of a CFStringRef CFStringRef someString = CFSTR("String"); // Turn it in to an NSString NSString *coolerString = (NSString *)someString;
We call this toll-free bridging. (And it works because the structures in memory are equivalent. How smart is that?)
At the top of ItemDetailViewController.m, import the header for ImageStore.
#import "ImageStore.h" @implementation ItemDetailViewController
Now, in ItemDetailViewController.m, make changes to imagePickerController:didFinishPickingMediaWithInfo: to create and use a key for a possession image.
- (void)imagePickerController:(UIImagePickerController *)picker
didFinishPickingMediaWithInfo:(NSDictionary *)info
{
NSString *oldKey = [possession imageKey];
// Did the possession already have an image?
if (oldKey) {
// Delete the old image
[[ImageStore defaultImageStore] deleteImageForKey:oldKey];
}
UIImage *image = [info objectForKey:UIImagePickerControllerOriginalImage];
// Create a CFUUID object - it knows how to create unique identifier strings
CFUUIDRef newUniqueID = CFUUIDCreate (kCFAllocatorDefault);
// Create a string from unique identifier
CFStringRef newUniqueIDString =
CFUUIDCreateString (kCFAllocatorDefault, newUniqueID);
// Use that unique ID to set our possessions imageKey
[possession setImageKey:(NSString *)newUniqueIDString];
// We used "Create" in the functions to make objects, we need to release them
CFRelease(newUniqueIDString);
CFRelease(newUniqueID);
// Store image in the ImageStore with this key
[[ImageStore defaultImageStore] setImage:image
forKey:[possession imageKey]];
// Put that image onto the screen in our image view
[imageView setImage:image];
// Take image picker off the screen
[self dismissModalViewControllerAnimated:YES];
}
In this method, we call the C functions CFUUIDCreate and CFUUIDCreateString. When the name of a C function contains the word Create, you are responsible for releasing its memory just as if you had sent the message alloc to a class. So you released these Core Foundation objects by calling the function CFRelease with the object as a parameter.
Now, when ItemDetailViewController’s view appears on the screen, it should grab an image from the ImageStore using the imageKey of the Possession. Then, it should place the image in the UIImageView. Add the following code to viewWillAppear: in ItemDetailViewController.m.
- (void)viewWillAppear:(BOOL)animated
{
[super viewWillAppear:animated];
[nameField setText:[possession possessionName]];
[serialNumberField setText:[possession serialNumber]];
[valueField setText:[NSString stringWithFormat:@"%d",
[possession valueInDollars]]];
NSDateFormatter *dateFormatter = [[[NSDateFormatter alloc] init]
autorelease];
[dateFormatter setDateStyle:NSDateFormatterMediumStyle];
[dateFormatter setTimeStyle:NSDateFormatterNoStyle];
[dateLabel setText:
[dateFormatter stringFromDate:[possession dateCreated]]];
[[self navigationItem] setTitle:[possession possessionName]];
NSString *imageKey = [possession imageKey];
if (imageKey) {
// Get image for image key from image store
UIImage *imageToDisplay =
[[ImageStore defaultImageStore] imageForKey:imageKey];
// Use that image to put on the screen in imageView
[imageView setImage:imageToDisplay];
} else {
// Clear the imageView
[imageView setImage:nil];
}
}
Notice that if no image exists in the image store for that key (or there is no key for that possession), the pointer to the image will be nil. When the image is nil, the UIImageView just won’t display an image.
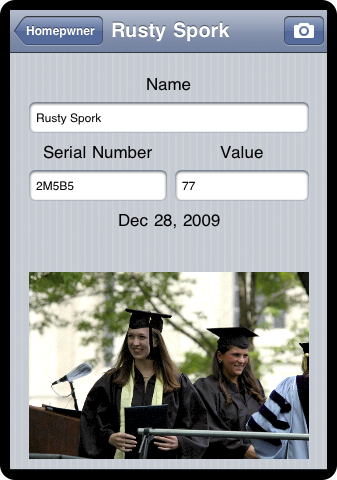
Build and run the application. Create a Possession and select it from the UITableView. Then, tap the camera button and take a picture. The image will appear as it should.
When the keyboard appears on the screen in the possession detail view, it obscures ItemDetailViewController’s imageView. This is annoying when you’re trying to see an image, so you’re going to implement the delegate method textFieldShouldReturn: to have the text field resign its first responder status to dismiss the keyboard. (This is why you hooked up the delegate outlets earlier.) But first, in ItemDetailViewController.h, have ItemDetailViewController conform to the UITextFieldDelegate protocol.
@interface ItemDetailViewController : UIViewController <UINavigationControllerDelegate, UIImagePickerControllerDelegate, UITextFieldDelegate>
In ItemDetailViewController.m, implement textFieldShouldReturn:.
- (BOOL)textFieldShouldReturn:(UITextField *)textField
{
[textField resignFirstResponder];
return YES;
}
It would be stylish to also dismiss the keyboard if the user taps anywhere on ItemDetailViewController’s view. We can dismiss the keyboard by sending the view the message endEditing:. This message causes the text field (as a subview of the view) to resign as first responder. Now let’s figure out how to get the view to send a message when tapped.
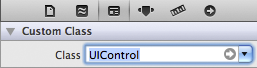
We have seen how classes like UIButton can send an action message to a target when tapped. Buttons inherit this target-action behavior from their superclass, UIControl. You’re going to change the view of ItemDetailViewController from an instance of UIView to an instance of UIControl so that it can handle touch events.
In ItemDetailViewController.xib, select the main view instance. Open the identity inspector and change the view’s class to UIControl (Figure 13.11).
Then, open ItemDetailViewController.h in the assistant editor. Control-drag from the view (now a UIControl) to the method declaration area of ItemDetailViewController. When the pop-up window appears, select Action from the Connection pop-up menu. Notice that the interface of this pop-up window is slightly different than one you saw when creating and connecting the UIBarButtonItem. A UIBarButtonItem is a simplified version of UIControl – it only sends its target an action message when it is tapped. A UIControl, on the other hand, can send action messages on a variety of events.
Therefore, you must choose the appropriate event type to trigger the action message being sent. In this case, you want the action message to be sent when the user taps on the view. Configure this pop-up window to appear as it does in Figure 13.12 and click Connect.

This will create a stub method in ItemDetailViewController.m. Enter the following code into that method.
- (IBAction)backgroundTapped:(id)sender
{
[[self view] endEditing:YES];
}
Build and run your application and test both ways of dismissing the keyboard.