
So far, you have seen four ways to show a view controller’s view: setting it as the root view controller of the window, pushing it onto a UINavigationController’s stack, adding it to a UITabBarController and presenting it modally.
In this chapter, we will look at UIPopoverController and more options for presenting modal view controllers. Some of these options are only available on the iPad, so we’ll start by making Homepwner a universal application – an application that runs natively on the iPad as well as the iPhone and iPod touch.
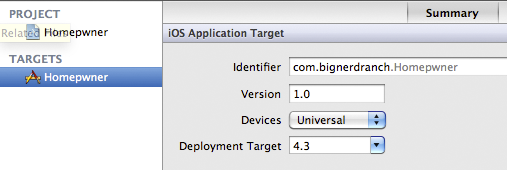
Open Homepwner.xcodeproj and select the Homepwner project from the project navigator. Then select the Homepwner target in the editor area. In the Summary pane, change the Devices pop-up to Universal (Figure 14.2). A sheet will drop down and ask if you want to copy and convert MainWindow.xib: choose No. (We’ll talk more about the option in a moment.)
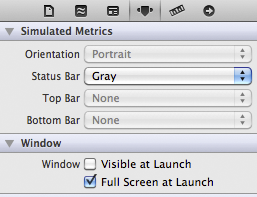
A universal application needs to size its window to fit the screen dimensions of the device. Open MainWindow.xib and select the Window object. Then reveal the utilities area and select the attributes inspector. Check the box for Full Screen at Launch (Figure 14.3).
`
Click on the Scheme pop-up button next to the Run button. You’ll see that there is now an iPad Simulator option. Select this option and build and run the application.
The ItemsViewController view looks great on the iPad, but if you select a row, you’ll see that the ItemDetailViewController and its subviews could use some work.
One way to improve the looks of the ItemDetailViewController’s interface on the iPadis to change the autoresizing masks of the subviews in ItemDetailViewController.xib so that when its view is resized to fit the iPad, all of the subviews are organized nicely. This is what you did when you universalized your HeavyRotation application.
Another way is to create two completely independent XIB files: one for the iPhone device family and the other for the iPad. This is most useful when you want to have a different interface on the iPad that takes advantage of the additional screen space. Just remember that you will have to recreate the entire view hierarchy and re-establish connections in the iPad version of the XIB file.
When you create separate XIB files for the two device families, you do not need to write any extra code to load the appropriate XIB file. Every UIViewController has a nibName that you pass in the initializer message. (If you pass nil, the nibName is effectively the name of the class.) When a view controller goes to load its view, it loads the XIB file that matches its nibName. However, if the application is running on an iPad, it first checks for a matching XIB file suffixed with ~ipad. If there is one, it loads that XIB file instead.
At this point, we’re not really concerned about the appearance of the ItemDetailViewController’s view, so we have another option: leave it as it is. But let’s do something about the painfully white background. In ItemDetailViewController’s viewDidLoad method, the background color of the view is set to be the groupTableViewBackgroundColor color. This color is not available on the iPad, which is why you get the all-white background instead. So when the application is running on an iPad, let’s set the color to closely match the background color of ItemsViewController’s view.
First, we need to check what type of device the application is running on. The object to ask is the UIDevice singleton. You access the object by sending the class method currentDevice to the UIDevice class. Then you can check the value of its userInterfaceIdiom property. At this time, there are only two possible values: UIUserInterfaceIdiomPad (for an iPad) and UIUserInterfaceIdiomPhone (for an iPhone or an iPod touch).
In ItemDetailViewController.m, modify viewDidLoad.
- (void)viewDidLoad
{
[super viewDidLoad];
UIColor *clr = nil;
if([[UIDevice currentDevice] userInterfaceIdiom] == UIUserInterfaceIdiomPad) {
clr = [UIColor colorWithRed:0.875 green:0.88 blue:0.91 alpha:1];
} else {
clr = [UIColor groupTableViewBackgroundColor];
}
[[self view] setBackgroundColor:clr];
}
Notice that the existing code for the iPhone is now in the else clause of the new if-else block. (Be sure to include that last closing brace!) Build and run the application on the iPad simulator or on an iPad. Navigate to the ItemDetailViewController and sigh in relief at the much nicer color.
iPad users expect applications to work in all orientations, so add the following method to both ItemsViewController.m and ItemDetailViewController.m:
- (BOOL)shouldAutorotateToInterfaceOrientation:(UIInterfaceOrientation)io
{
if ([[UIDevice currentDevice] userInterfaceIdiom] == UIUserInterfaceIdiomPad) {
return YES;
} else {
return (io == UIInterfaceOrientationPortrait);
}
}
Now that Homepwner can run on the iPad, let’s take advantage of some iPad-only ways to present view controllers, starting with UIPopoverController.