
Every iOS application has its own application sandbox. An application sandbox is a directory on the filesystem that is barricaded from the rest of the filesystem. Your application must stay in its sandbox, and no other application can access your sandbox.
The application sandbox contains a number of directories:
- application bundle
This directory contains all the resources and the executable. It is read-only.
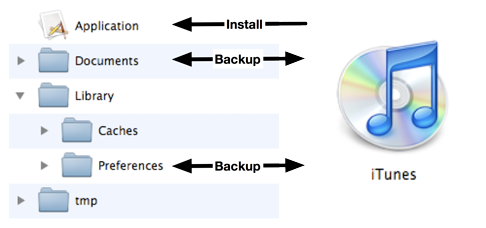
- Library/Preferences/
This directory is where any preferences are stored and where the Settings application looks for application preferences. Library/Preferences is handled automatically by the class NSUserDefaults (which you will learn about in Chapter 19) and is backed up when the device is synchronized with iTunes.
- tmp/
This directory is where you write data that you will use temporarily during an application’s runtime. You should remove files from this directory when done with them, and the operating system may purge them while your application is not running. It does not get backed up when the device is synchronized with iTunes. To get the path to the tmp directory in the application sandbox, you can use the convenience function NSTemporaryDirectory.
- Documents/
This directory is where you write data that the application generates during runtime and that you want to persist between runs of the application. It is backed up when the device is synchronized with iTunes. If something goes wrong with the device, files in this directory can be restored from iTunes. For example, in a game application, the saved game files would be stored here.
- Library/Caches/
This directory is where you write data that the application generates during runtime and that you want to persist between runs of the application. However, unlike the Documents directory, it does not get backed up when the device is synchronized with iTunes. A major reason for not backing up cached data is that the data can be very large and extend the time it takes to synchronize your device. Data stored somewhere else – like a web server – can be placed in this directory. If the user needs to restore the device, this data can be downloaded from the web server again.
We want Possessions to persist in Homepwner. (It’s not much fun if you have to enter all your possessions every time you start the application.) The data for the Possessions will be saved and loaded into a single file in the Documents directory of Homepwner’s sandbox. The PossessionStore will handle writing to and reading from the filesystem. To do this, the PossessionStore needs a path to the file in Documents containing the Possession data.
To get the full path for a directory in the sandbox, you use the C function NSSearchPathForDirectoriesInDomains. This function takes three parameters: the type of directory, the domain mask, and a boolean value that decides if it should expand a tilde (~) if one exists in the path. The first parameter is an NSSearchPathDirectory constant. The last two parameters are always the same on iOS: NSUserDomainMask and YES. For instance, to get the Documents directory for an application, you would call the function as follows:
NSArray *documentPaths = NSSearchPathForDirectoriesInDomains(NSDocumentDirectory, NSUserDomainMask, YES); NSString *ourDocumentPath = [documentPaths objectAtIndex:0];
Notice that NSSearchPathForDirectoriesInDomains returns an NSArray. This is because this function comes from Mac OS X where there could be multiple directories for the parameters. In iOS, however, there is only one directory for the possible constants, and it is safe to grab the first NSString from the array.
You can also get the path for the sandbox itself using the function NSHomeDirectory. Note that you cannot write files or create directories at the root-level of the sandbox. Any new directories or files must be created within one of the writeable directories in the sandbox: Documents, Library, or tmp. You can append the names of the directories to the string returned from this function.
NSString *sandboxPath = NSHomeDirectory(); // Once you have the full sandbox path, you can create a path from it NSString *documentPath = [sandboxPath stringByAppendingPathComponent:@"Documents"];
However, it is safer to use NSSearchPathForDirectoriesInDomains than NSHomeDirectory with an appended directory name. The name of a directory could change in future releases of the operating system or you could mistype the string you are appending.
Open the Homepwner project. In PossessionStore.h, declare a new method that specifies the name of the file on the filesystem that contains the data for all of the Possessions.
- (NSString *)possessionArchivePath;
In PossessionStore.m, implement this method so that it returns the full path to where the Possessions will be stored.
- (NSString *)possessionArchivePath
{
// The returned path will be Sandbox/Documents/possessions.data
// Both the saving and loading methods will call this method to get the same path,
// preventing a typo in the path name of either method
return pathInDocumentDirectory(@"possessions.data");
}
Notice the pathInDocumentDirectory function. That’s what you’ll create next. This function will return the full path of a file in the Documents directory when given the name of that file. It is not a part of an Objective-C class but a stand-alone C function. You’ll use this function many different places, so create a separate file for it. Use the NSObject template like before ( → → ) and name your subclass FileHelpers.
Now you’re going to remove the class interface and implementation from the two files. (The NSObject template is just a quick and easy way to create two new files with .h and .m suffixes.) Open FileHelpers.h, delete the interface declaration, and declare the new function. The file should look just like this:
#import <Foundation/Foundation.h> NSString *pathInDocumentDirectory(NSString *fileName);
In FileHelpers.m, delete the implementation block and define the pathInDocumentDirectory function. FileHelpers.m should look exactly like this:
#import "FileHelpers.h"
// To use this function, you pass it a file name, and it will construct
// the full path for that file in the Documents directory.
NSString *pathInDocumentDirectory(NSString *fileName)
{
// Get list of document directories in sandbox
NSArray *documentDirectories =
NSSearchPathForDirectoriesInDomains(NSDocumentDirectory,
NSUserDomainMask, YES);
// Get one and only document directory from that list
NSString *documentDirectory = [documentDirectories objectAtIndex:0];
// Append passed in file name to that directory, return it
return [documentDirectory stringByAppendingPathComponent:fileName];
}
This function will eventually be called from a number of different files and will have to be imported into each file that uses it, which is a bit of a nuisance. We can avoid this nuisance by importing FileHelpers.h into Homepwner’s precompiled header file. Every project has a precompiled header file (.pch), and this file is imported into every file in the project. Open Homepwner-Prefix.pch from the project navigator and import FileHelpers.h.
#ifdef __OBJC__ #import <Foundation/Foundation.h> #import <UIKit/UIKit.h> #import "FileHelpers.h" #endif
Now every file in the Homepwner project will effectively import FileHelpers.h. Note that if you modify a file that is imported in the precompiled header file, it forces your entire project to be recompiled. Thus, you should only import files into the precompiled header file that rarely or never change.