
Chapter 7. First Crossing
In this chapter we want to deal with the first thing for a traffic lights control system. Assume we have two crossing roads, and the most basic thing for our system will be to control the traffic lights for each direction. There is one thing the law asks us to consider for this system: Two crossing directions are never under any circumstance allowed to show green at the same time. We will keep this in mind while coming up with examples for our controller.
Controller Specifications
Let’s take a look at the specifications for the controller. We have two directions. The controller controls state transitions, probably by transitioning to the next state when some timer expires. The controller will change just one light at a time. For example, if the traffic light shows green for one direction and red for another one, then the controller changes the first direction to yellow before the red one is changed to red and yellow. Otherwise, we would enter an invalid state.
Thus we can simplify our controller to the case where we change one light at a time. We have to consider two previous light states for the two directions and will get two light states afterwards. We can assume that our controller changes just the first of the two states.
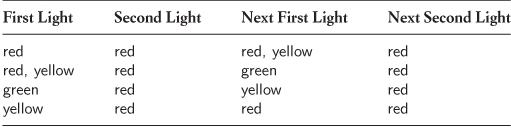
Let’s look at the valid transitions first, what I refer to as the happy path scenario. Most of my specifications start from this. When we have two red lights and change the first light then we will end up in red and yellow for the first light and red for the second light. After that, the controller will transition the red and yellow first light to the green state. The second light is kept red. From green we transition back to yellow and finally to red. We might end up with a table similar to the one in Table 7.1.
Table 7.1. Happy Path Scenario for Controller State Transitions
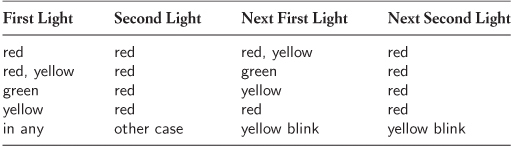
Let’s consider the invalid states next. Thinking through the remaining cases, I start to realize that any other case will lead to an invalid state, and I want the controller to switch to the blinking light then. Since the first light can change only when the second shows red, any other combination is invalid and will lead to a car accident if we don’t take care of it. For example, while the yellow light shows for the second direction, we shall not be allowed to change to anything other than red. If we changed to green, cars from the yellow direction could still pass the light. So, we can take a note on this in our table (see Table 7.2).
Table 7.2. All Controller State Transitions we have to Consider
With these pre-thoughts, let’s start with the implementation of the controller.
Driving the Controller
So far we have built traffic light colors as states in the system. As before, we will start with a test inside FitNesse. We will again start with the first acceptance criteria.
Let’s start the first test by creating a new suite called CrossingControl in FitNesse. We add the test page TwoCarCrossings to the new suite. In order to drive the behavior, we will focus on the happy path tests first. So, when one direction shows the green light and the second one shows red, when the green light changes to the next state, we should expect the green light to become yellow and the red light to stay red. Putting these conditions in a decision table yields the table shown in Listing 7.1.
Listing 7.1. The first test for our controller
1 !|FirstLightSwitchingCrossingController |
2 |first light|second light|first light?|second light?|
3 |green |red |yellow |red |
When executing this test, FitNesse tells us that the class FirstLightSwitchingCrossingController is missing. Do you remember the package we put our glue code in? We will put the new classes into the same package.
We could add an import table to the crossing test as we did for the light state test. However, this would yield duplication of the package name, eventually leading future maintainers of the system to adapt to our decision now. In the end we could get a test suite where the package name for the glue code is spread all over the place. In order to avoid this maintenance nightmare, let’s use a different approach for this test.
First, we create a new page under the TrafficLight suite called SetUp, permitting the default page type. We put the import table into the SetUp page and return to the test page for the light states. There is now a new collapsed section labeled SetUp. When we open it, we find out that our just-created setup page is included automatically by the framework. Let’s remove the duplicated import statement from the test by hitting the edit button and removing it.
Now, we can execute the test for our crossing controller. It tells us that it’s missing a class. We can implement the glue code by creating the class FirstLightSwitchingCrossingController in the package org.trafficlights.test.acceptance. After running the test with the empty class in place, FitNesse tells us that it tried to invoke two set functions and two query functions on that class—one setter and one query to verify the results for each light. We have to add these four functions to the class and re-execute the test. The resulting class is shown in Listing 7.2.
Listing 7.2. The first empty body for the controller glue code class
1 package org.trafficlights.test.acceptance;
2
3 import org.trafficlights.domain.LightState;
4
5 public class FirstLightSwitchingCrossingController {
6
7 public void setFirstLight(LightState state) {
8 }
9
10 public void setSecondLight(LightState state) {
11 }
12
13 public LightState firstLight() {
14 return LightState.UNKNOWN;
15 }
16
17 public LightState secondLight() {
18 return LightState.UNKNOWN;
19 }
20 }
We can now make the first test pass by returning the YELLOW state from the first light function and RED from the second light function. After making the changes and executing the FitNesse test, the first test passes, and we may check in these changes to the source code repository.
Now, as before, we may start to add more examples to the table. Since the table covers just switching the first light, we will start to iterate through the happy path cases where the second light is red, and the first light varies between the green, yellow, red and yellow, and red light. This results in the test examples as shown in Listing 7.3. They look similar to our specification table.
Listing 7.3. The basic happy path tests for the controller that switches the first light only
1 !|FirstLightSwitchingCrossingController |
2 |first light|second light|first light?|second light?|
3 |green |red |yellow |red |
4 |yellow |red |red |red |
5 |red, yellow|red |green |red |
6 |red |red |red, yellow |red |
When we run these examples, we notice that the second light does not need to change. In order to make this acceptance test pass, we can store the value of the first light in a local variable in our glue code and return the next state from the query firstLight (see Listing 7.4).
Listing 7.4. The body for the controller glue code class that actually switches the state
1 package org.trafficlights.test.acceptance;
2
3 import org.trafficlights.domain.LightState;
4
5 public class FirstLightSwitchingCrossingController {
6
7 LightState firstState;
8
9 public void setFirstLight(LightState state) {
10 firstState = state;
11 }
12
13 public void setSecondLight(LightState state) {
14 }
15
16 public LightState firstLight() {
17 return firstState.next();
18 }
19
20 public LightState secondLight() {
21 return LightState.RED;
22 }
23 }
Rerunning the tests gives us a pass, and we should check these changes into the source code repository again.
The thing that worries me is that we have not used the second light state. So far, there is no need for it. For the invalid states, though, we will have to remember both states and turn the second light to a yellow blinking light if the end configuration of the two light states is invalid according to the law requirements.
Before starting this development, we should make some adaptations to the current code. Introducing the changes for the invalid configurations later will make our life easier after refactoring the current code. Let’s take tiny steps while implementing the changes necessary for the validation of the two light states. First of all, I would like to store the second light state into a variable when the setter is invoked (see Listing 7.5).
Listing 7.5. The second light state is stored in a field
1 public class FirstLightSwitchingCrossingController {
2
3 LightState firstState;
4
5 LightState secondState;
6
7 ...
8
9 public void setSecondLight(LightState state) {
10 secondState = state;
11 }
12 ...
13 }
All tests are still passing after this change.
The next thing we should change before tackling an invalid configuration is returning the previously stored second light state from the query method (see Listing 7.6).
Listing 7.6. The second light state is stored in a field
1 public class FirstLightSwitchingCrossingController {
2
3 ...
4 public LightState secondLight() {
5 return secondState;
6 }
7
8 }
Tests are passing, check-in time.
Now, from the software design point of view, one thing is awkward. There are two setter methods and two queries. The query method for the second light state simply returns a previously stored value. That’s exactly how a query method should behave. But the query method for the first light state returns a changed value. The query method certainly has a side effect when executed. It changes the state of the first light—although not physically right now, but we are working toward changing this.
The query method for the first method should just return a value that was previously calculated. This is called Command/Query-Separation.1 But this leaves open the question of where I should change the state. In SLiM the execute() method of each fixture class is executed for a decision table after calling all setters. So, we should introduce an execute method to the FirstLightSwitchingController, which changes the state of the first light (see Listing 7.7).
Listing 7.7. The first LightState is changed within the execute method
1 public class FirstLightSwitchingCrossingController {
2 ...
3 public LightState firstLight() {
4 return firstState;
5 }
6
7 ...
8
9 public void execute() {
10 firstState = firstState.next();
11 }
12 }
Seeing all tests still passing, we know it’s time for us to share this progress with our colleagues through the source repository.
At this point we can introduce the first test, which leads to an invalid combination. Let’s take the first of the valid configurations and change the state of the second light in the second column. The resulting expected state should be the yellow blinking ones (see Listing 7.8).
Listing 7.8. The first invalid configuration
1 !|FirstLightSwitchingCrossingController |
2 |first light|second light|first light?|second light?|
3 |green |red |yellow |red |
4 |yellow |red |red |red |
5 |red, yellow|red |green |red |
6 |red |red |red, yellow |red |
7 |green |red, yellow |yellow blink|yellow blink |
I would expect the controller to avoid invalid configurations before and after switching one of the lights. Therefore let’s expect that the controller switches the traffic lights to a state in which car drivers become aware that something is wrong.
Since the validation logic is missing in the execute method, this new line in the table fails. In order to make this test pass, we have to check the two states for compatibility before switching the first state. The combination of a green light for one direction and a red and yellow light for another direction is invalid, since it would allow one direction to drive while the other direction expects to get green soon.
To the existing execute method of the glue code class we add a validation line that checks whether the first and second states should be shown together (see Listing 7.9).
Listing 7.9. A validation step is added to the controller before switching the light states
1 public class FirstLightSwitchingCrossingController {
2 ...
3 public void execute() {
4 if (!LightState.RED.equals(secondState)) {
5 firstState = LightState.UNKNOWN;
6 secondState = LightState.UNKNOWN;
7 return;
8 }
9 firstState = firstState.next();
10 }
11 }
In case the second light is not the red state, we get an invalid configuration and have to set both states to the invalid state: We indicate that there is something wrong. The return statement avoids any harm. We run the tests, see them all passing, but before we check in these changes, let’s clean up the execute() method.
First of all, the condition in the if clause should get its own method so that we can extend it later in case we find more conditions for invalid configurations—and I’m quite certain we will. Let’s extract a method to check for a proper light state configuration and call this method isValidLightStateConfiguration() (see Listing 7.10).
Listing 7.10. The validation method has been extracted from the if clause
1 public class FirstLightSwitchingCrossingController {
2 ...
3 public void execute() {
4 if (!isValidLightStateConfiguration()) {
5 firstState = LightState.UNKNOWN;
6 secondState = LightState.UNKNOWN;
7 return;
8 }
9 firstState = firstState.next();
10 }
11
12 private boolean isValidLightStateConfiguration() {
13 return LightState.RED.equals(secondState);
14 }
15 }
After running all the tests, we can extract the code that sets both light states to the invalid configuration. We can achieve this by putting the two lines that set the first and second states to the unknown state into a method called warningConfiguration() (see Listing 7.11).
Listing 7.11. The setting of a warning configuration has been extracted from the if body
1 public class FirstLightSwitchingCrossingController {
2 ...
3 public void execute() {
4 if (!isValidLightStateConfiguration()) {
5 warningConfiguration();
6 return;
7 }
8 firstState = firstState.next();
9 }
10
11 private boolean isValidLightStateConfiguration() {
12 return LightState.RED.equals(secondState);
13 }
14
15 private void warningConfiguration() {
16 firstState = LightState.UNKNOWN;
17 secondState = LightState.UNKNOWN;
18 }
19 }
After running all the tests, I am confident to check in our changes.
Now, we can start extending the invalid examples by permutating the remaining states. Since the examples are various in number, we should put the invalid tests into their own table (see Listing 7.12). While adding one example after another, you should notice that all of them are passing.
Listing 7.12. All permutated invalid configurations put into their own table
1 !2 Valid combinations
2
3 !|FirstLightSwitchingCrossingController |
4 |first light|second light|first light?|second light?|
5 |green |red |yellow |red |
6 |yellow |red |red |red |
7 |red, yellow|red |green |red |
8 |red |red |red, yellow |red |
9
10 !2 Invalid combinations
11
12 !|FirstLightSwitchingCrossingController |
13 |first light |second light|first light?|second light?|
14 |green |red, yellow |yellow blink|yellow blink |
15 |green |green |yellow blink|yellow blink |
16 |green |yellow |yellow blink|yellow blink |
17 |yellow |red, yellow |yellow blink|yellow blink |
18 |yellow |green |yellow blink|yellow blink |
19 |yellow |yellow |yellow blink|yellow blink |
20 |red, yellow |red, yellow |yellow blink|yellow blink |
21 |red, yellow |green |yellow blink|yellow blink |
22 |red, yellow |yellow |yellow blink|yellow blink |
23 |red |red, yellow |yellow blink|yellow blink |
24 |red |green |yellow blink|yellow blink |
25 |red |yellow |yellow blink|yellow blink |
26 |yellow blink|red |yellow blink|yellow blink |
27 |yellow blink|red, yellow |yellow blink|yellow blink |
28 |yellow blink|green |yellow blink|yellow blink |
29 |yellow blink|yellow |yellow blink|yellow blink |
The combination that does not work correctly is the one with the yellow blinking first light and the red light. If we already have an invalid configuration in one direction, we can expect the other direction to switch to an invalid configuration, too. In order to achieve this we need to add a case in the glue code for the unknown light state (see Listing 7.13).
Listing 7.13. UNKNOWN light stats are now supported
1 public class FirstLightSwitchingCrossingController {
2 ...
3 private boolean isValidLightStateConfiguration() {
4 return !LightState.UNKNOWN.equals(firstState)
&& LightState.RED.equals(secondState);
5 }
6
7 ...
8 }
Rerunning all the tests shows us that they are passing now. Let’s check in the results immediately.
Refactoring
As before, we could declare our work finished and move on. But I start to get worried about the design of the code as well as the design of the examples. Let’s see what we can do about this.
Refactoring the examples
For the examples, the split between the happy path examples and the invalid examples led to high redundancy in the expected outcome of the invalid combinations. The expectation for the second table is the same all the time. Thus we can get rid of the two columns on the right altogether and express the intent of the test by saying that the following examples are invalid combinations (see Listing 7.14).
Listing 7.14. The scenario table to remove redundant information from the invalid combinations
1 ...
2 !2 Invalid combinations
3
4 !|scenario |invalid combination|firstLight||secondLight|
5 |set first light |@firstLight |
6 |set second light|@secondLight |
7 |execute |
8 |check |first light |yellow blink |
9 |check |second light |yellow blink |
10 ...
In this case, we can achieve this by extracting the common part to a scenario table. A scenario table is similar to a function in a programming language. In other frameworks this would have been an extraction of a keyword. The scenario table outlines the procedure for one function.
Reading the first table from the top indicates that our scenario is called invalid combination and takes two parameters, the firstLight and secondLight (see line 4). It then executes the following steps. First it sets the first light, then the second (starting at line 5), calls some execute method (line 7), and checks the results after switching the first light (starting at line 8). This should yield a configuration with blinking lights for the first and second traffic light.
Scenario tables are used within SLiM in combination with script tables. Therefore, we can take the name of the class that we used for our decision table earlier and declare it as a script table actor. The script table actor works similarly to the first line in a decision table. The only difference is that you may declare multiple script table actors on a test page, while you may only have one class for decision tables (see line 11 in Listing 7.15). The final table (see Listing 7.15) states all the combinations of invalid light configurations. Line 13 expresses that the just defined scenario invalid combination will be called multiple times. Line 14 indicates which column will be which parameter to the scenario. From line 15 forth all the different combinations are referenced.
Listing 7.15. Redundant information eliminated from the invalid combinations
1 ...
2 !2 Invalid combinations
3
4 !|scenario |invalid combination|firstLight||secondLight|
5 |set first light |@firstLight |
6 |set second light|@secondLight |
7 |execute |
8 |check |first light |yellow blink |
9 |check |second light |yellow blink |
10
11 !|script|FirstLightSwitchingCrossingController|
12
13 !|invalid combination |
14 |firstLight |secondLight|
15 |green |red, yellow|
16 |green |green |
17 |green |yellow |
18 |yellow |red, yellow|
19 |yellow |green |
20 |yellow |yellow |
21 |red, yellow |red, yellow|
22 |red, yellow |green |
23 |red, yellow |yellow |
24 |red |red, yellow|
25 |red |green |
26 |red |yellow |
27 |yellow blink|red |
28 |yellow blink|red, yellow|
29 |yellow blink|green |
30 |yellow blink|yellow |
When we execute the tests, they all pass. The results now look a bit different than before. There is a collapsible section indicated by the arrow labeled “scenario” on each tested row of the invalid combination table. By clicking on it, it expands, and the result reveals each of the steps executed within the scenario (see Figure 7.1).
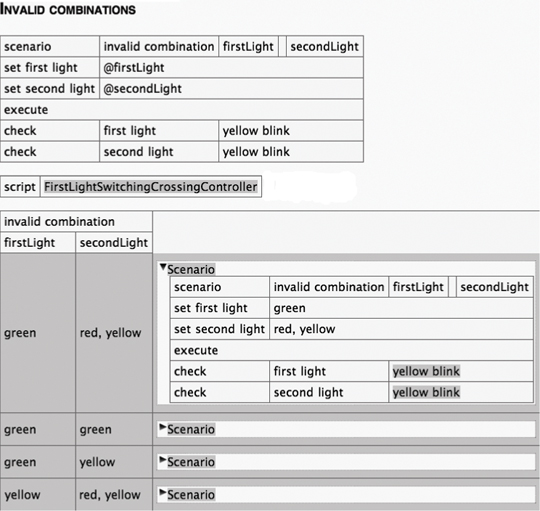
Figure 7.1. The scenario table results in a collapsible section
Scenario tables are automatically included from a page named after a convention similar to SetUp and TearDown pages. In order to make our test more condensed, let’s put the scenario definition into a page called ScenarioLibrary within the CrossingControl suite. After we rerun all of our tests after this extraction, we can check them in if they are still all passing.
There is one awkward thing in the scenario table as it stands right now. We directly reference the execute method. This makes reading the scenario table unnatural. We fix this by extracting a new public function from the execute body and using that instead. The name of the method should reveal its intent. Since our scenario table is the origin of our impression, we change the reference to execute() there first.
The question is what is a better way to express execute in this context? Oh, you suggest to call it “switch first light”? That’s a great name. Since we deal with switching lights, it seems more natural to name a function switchFirstLight() in this context (see Listing 7.16).
Listing 7.16. The scenario table now references a more transparent operation
1 !|scenario |invalid combination|firstLight||secondLight|
2 |set first light |@firstLight |
3 |set second light|@secondLight |
4 |switch first light |
5 |check |first light |yellow blink |
6 |check |second light |yellow blink |
Of course, all the tests using the scenario will fail if we execute them. So, we quickly extract a new method from the body of the execute() method and make it public (see Listing 7.17).
Listing 7.17. The body of the execute method gets extracted into the switchFirstLight() method
1 public class FirstLightSwitchingCrossingController {
2 ...
3 public void execute() {
4 switchFirstLight();
5 }
6
7 public void switchFirstLight() {
8 if (!isValidLightStateConfiguration()) {
9 warningConfiguration();
10 return;
11 }
12 firstState = firstState.next();
13 }
14 ...
15 }
When running the tests, we see immediately that our changes are ready for check-in.
Refactoring the Glue Code
So far we implemented the solution directly in the glue code class rather than providing a domain class for it. The controller concept seems to be fine, but while doing the invalid configurations I got suspicious that there is another concept missing. Reviewing our tests, let’s consider the concept of a light state validator that expresses what our domain model needs nicely. We want to validate whether the new light state configuration is going to be a valid combination of light states. Putting the responsibility into a validator sounds straightforward to me.
There are two other things I start worrying about. Our controller currently just handles two light states. In the future we may want to be able to switch between multiple directions—maybe left-turning vehicles get their own traffic lights for instance, or the three directions at a T-crossing are switched individually. Since we can assume that our controller will deal later with more directions, we should postpone any decision for more than one light state until we have to define examples for this case.
The other thing that came to my mind concerns what our controller does. The execute() method clearly just updates one of the light states. Maybe in the future there will be a need to switch more than one light at a time. To avoid premature optimization, let’s leave the current design and functionality as is. In the future, when our examples drive such changes, we can still introduce them.
So, the only relevant change I see now is a validator for two light states. This time I see where my solution is heading. We are going to introduce a strategy object to validate state changes before calling next() on one of the possible directions.
As a designer, I feel safe using small refactoring steps on the code that we already have. For the new validator class, we will use the isValidLightStateConfiguration() function as a basis (see Listing 7.18).
Listing 7.18. The function that we will refactor into its own class
1 private boolean isValidLightStateConfiguration() {
2 return !LightState.UNKNOWN.equals(firstState)
&& LightState.RED.equals(secondState);
3 }
We will be developing the validator class inside the glue code class and later move it to a package for production use. Before we do this, let’s analyze the function. So far it depends on the two light states. Before extracting this to its own class, we will introduce the two states as a parameter to the function (see Listing 7.19).
Listing 7.19. The validation function after introducing two parameters
1 public class FirstLightSwitchingCrossingController {
2 ...
3 public void switchFirstLight() {
4 if (!isValidLightStateConfiguration(firstState,
secondState)) {
5 warningConfiguration();
6 return;
7 }
8 firstState = firstState.next();
9 }
10
11 private boolean isValidLightStateConfiguration(
LightState firstState, LightState secondState) {
12 return !LightState.UNKNOWN.equals(firstState)
&& LightState.RED.equals(secondState);
13 }
14 ...
15 }
After rerunning the tests in FitNesse, we gain the confidence that we didn’t break anything by this movement.
Now we may refactor the isValidLightStateConfiguration(LightState, LightState) method into its own method object. In order to do this, we have to start with creating an empty validator class inside the CrossingController (see Listing 7.20).
Listing 7.20. The new empty validator class
1 public class FirstLightSwitchingCrossingController {
2 ...
3 private static class CrossingValidator {
4
5 }
6 }
Adding an empty class might not have broken anything, but to be sure about it, let’s rerun the tests. Now, we can move the isValidLightStateConfiguration(LightState, LightState) function to our empty class. The refactoring function in our IDE doesn’t provide us the choice to move the method to the CrossingValidator yet. In order to get this choice we have to introduce a new parameter—a CrossingValidator object (see Listing 7.21).
Listing 7.21. The validator is temporarily made a parameter to the validation function in order to move the method there
1 public class FirstLightSwitchingCrossingController {
2 ...
3 public void switchFirstLight() {
4 if (!isValidLightStateConfiguration(new
CrossingValidator(), firstState, secondState)) {
5 warningConfiguration();
6 return;
7 }
8 firstState = firstState.next();
9 }
10
11 private boolean isValidLightStateConfiguration(
CrossingValidator validator, LightState firstState,
LightState secondState) {
12 return !LightState.UNKNOWN.equals(firstState)
&& LightState.RED.equals(secondState);
13 }
14 ...
15 }
Since this might have broken something in the refactoring, we rerun the tests to feel safe. Now, the IDE offers suggestions to move the isValidLightStateConfiguration(LightState, LightState) function to our new CrossingValidator class. You can see the result in Listing 7.22.
Listing 7.22. The validator after moving the validation function there
1 public class FirstLightSwitchingCrossingController {
2 ...
3 public void switchFirstLight() {
4 if (!new CrossingValidator().
isValidLightStateConfiguration(firstState, secondState)) {
5 warningConfiguration();
6 return;
7 }
8 firstState = firstState.next();
9 }
10
11 ...
12 static class CrossingValidator {
13
14 boolean isValidLightStateConfiguration(
LightState firstState, LightState secondState) {
15 return !LightState.UNKNOWN.equals(
firstState) && LightState.RED.equals(secondState);
16 }
17
18 }
19 }
You’re right, we have to re-execute the tests to see that this step didn’t break anything. Green, OK. Let’s go on and clean up our code now. The new CrossingValidator() inside the if-clause bothers me. Let’s create a field to hold the validator and initialize it with the new validator by first extracting a local variable from the constructor call, and then turning that new variable into a field (see Listing 7.23).
Listing 7.23. The validator is turned into a field within the controller class
1 public class FirstLightSwitchingCrossingController {
2
3 private CrossingValidator validator = new
CrossingValidator();
4 ...
5 public void switchFirstLight() {
6 if (!validator.isValidLightStateConfiguration(
firstState, secondState)) {
7 warningConfiguration();
8 return;
9 }
10 firstState = firstState.next();
11 }
12 ...
13 }
Rerunning the tests gains me the confidence that we didn’t break anything. At this point we are nearly ready to turn the new validator class into its own top-level class. But before doing this I would like to rename the method isValidLightStateConfiguration() into something shorter. Method names should get shorter the more public the method is [Mar08a]. Thus far we have dealt with a protected function inside an inner class, so the length was quite right. But if we turn this now into a public method, we want to rename it before doing so. The new name that comes to mind that still expresses the intent is isValidConfiguration(), and we should rename the function to this new name. After that we can add the public modifiers to both the inner class as well as the method itself. While at it, we also drop the static modifier from the class declaration (see Listing 7.24).
Listing 7.24. The validator method after the rename
1 public class CrossingValidator {
2
3 public boolean isValidConfiguration(LightState
firstState, LightState secondState) {
4 return !LightState.UNKNOWN.equals(
firstState) && LightState.RED.equals(secondState);
5 }
6
7 }
Rerunning the tests tells us that the code still works flawlessly. Now we can ask the IDE to extract a top-level class from this inner class and move it into the domain package. Oh, sure, we have to execute the FitNesse tests as well. If they reveal no problem, we are fine with our changes.
Before we check in these changes, there is a problem. So far, all the classes in the domain package have their own unit tests in place as well as some tests in the acceptance test suite. But our new CrossingValidator is the first class without unit tests in the domain package. This could end in unhappy surprises for the developer who makes some adaptations and doesn’t or cannot run all of the acceptance tests—maybe when the acceptance test suite has grown a lot in both size and execution time. Since we are responsible for communicating what this class does, and we remember it right now, let’s retrofit some unit tests to the newly created class. As before, we find that JUnit’s parameterized tests express this in the most elegant way (see Listing 7.25).
Listing 7.25. The retrofitted unit tests for our validator class
1 package org.trafficlights.domain;
2
3 import static java.util.Arrays.*;
4 import static org.junit.Assert.*;
5 import static org.trafficlights.domain.LightState.*;
6
7 import java.util.List;
8
9 import org.junit.Test;
10 import org.junit.runner.RunWith;
11 import org.junit.runners.Parameterized;
12 import org.junit.runners.Parameterized.Parameters;
13
14 @RunWith(Parameterized.class)
15 public class CrossingValidatorTest {
16
17 @Parameters
18 public static List<Object[]> values() {
19 return asList(new Object[][] {
20 {RED, RED, true},
21 {GREEN, RED, true},
22 {YELLOW, RED, true},
23 {RED_YELLOW, RED, true},
24 {UNKNOWN, RED, false},
25 {GREEN, GREEN, false},
26 {YELLOW, GREEN, false},
27 {RED_YELLOW, GREEN, false},
28 {RED, GREEN, true},
29 });
30 }
31
32 private LightState firstState;
33 private LightState secondState;
34 private boolean valid;
35
36 public CrossingValidatorTest(LightState firstState,
LightState secondState,
37 boolean valid) {
38 this.firstState = firstState;
39 this.secondState = secondState;
40 this.valid = valid;
41 }
42
43 @Test
44 public void isValidConfiguration() {
45 assertEquals(valid, new CrossingValidator().
isValidConfiguration(firstState, secondState));
46 }
47 }
While retrofitting the unit tests, I notice a flaw in our design. The light state with RED as first light and GREEN as second light is valid, but our validator rejects it as invalid. This is surely going to bother us in the future when either of us forget about the particular implementation details. So, it’s a good thing that we started to develop those unit tests, and it shows the difference between our acceptance tests—which passed the requirements—and our unit tests—which revealed the problem in the design.
The problem originates from the fact that our controller does one validation for the light state configuration before switching the first state and after the switch in one function. But as we construct the validator, it checks the condition before the switch as well as after the speculated switch and delivers a result for both states.
This analysis leaves us with two options. Either we split up the validation into a pre-switch and post-switch validation, and make the change only if we get a valid configuration, or we leave the validator as is, but rename it to reflect this.
The disadvantage of the second approach would be that too much knowledge is put into the validator class. It would be a very specialized validator for a limited use—switching the first light. Also the validator would know too much about its use. As a designer, this does not seem right to me.
The first approach comes with the advantage that the validator’s purpose is clear. This advantage outweighs to me the double validation step. Therefore, let’s change the design of the controller. The first step in changing the design is to revisit the function that switches the first light. After switching the first light, we add a second validation step to the function, which should not break the existing behavior (see Listing 7.26).
Listing 7.26. We added a second validation after the light was switched
1 public class FirstLightSwitchingCrossingController {
2 ...
3 public void switchFirstLight() {
4 if (!validator.isValidConfiguration(firstState
, secondState)) {
5 warningConfiguration();
6 return;
7 }
8 firstState = firstState.next();
9
10 if (!validator.isValidConfiguration(firstState
, secondState)) {
11 warningConfiguration();
12 }
13 }
14 ...
15 }
Rerunning the acceptance tests shows that we did not break anything. Now, we may take care of the flawed validator, and our last unit test. The test for the combination of a red and a green light failed. This implies a missing condition in the validate function of our validator. Let’s add this (see Listing 7.27).
Listing 7.27. The corrected validation function
1 public class CrossingValidator {
2
3 public boolean isValidConfiguration(LightState
firstState, LightState secondState) {
4 if (LightState.UNKNOWN.equals(firstState))
return false;
5 if (LightState.RED.equals(secondState)) return
true;
6 if (LightState.RED.equals(firstState) &&
LightState.GREEN.equals(secondState)) return true;
7 return false;
8 }
9
10 }
The code now passes the tests. At this point we can extend the unit tests further. Let’s continue to permutate the states. When we get to the combination of RED and RED_YELLOW, we hit the next failing test (see Listing 7.28).
Listing 7.28. The tests up to the point where we hit another failing configuration
1 @RunWith(Parameterized.class)
2 public class CrossingValidatorTest {
3
4 @Parameters
5 public static List<Object[]> values() {
6 return asList(new Object[][] {
7 {RED, RED, true},
8 {GREEN, RED, true},
9 {YELLOW, RED, true},
10 {RED_YELLOW, RED, true},
11 {UNKNOWN, RED, false},
12 {GREEN, GREEN, false},
13 {YELLOW, GREEN, false},
14 {RED_YELLOW, GREEN, false},
15 {RED, GREEN, true},
16 {UNKNOWN, GREEN, false},
17 {GREEN, RED_YELLOW, false},
18 {YELLOW, RED_YELLOW, false},
19 {RED, RED_YELLOW, true},
20 });
21 }
22 ..
23 }
At this point we can extend the previous special condition. Since we are sure on the third line of the isValidConfiguration(LightState, LightState) method that the second light cannot be RED, we can remove the second part of that condition (see Listing 7.29).
Listing 7.29. The adapted validation function
1 public class CrossingValidator {
2
3 public boolean isValidConfiguration(LightState
firstState, LightState secondState) {
4 if (LightState.UNKNOWN.equals(firstState))
return false;
5 if (LightState.RED.equals(secondState)) return
true;
6 if (LightState.RED.equals(firstState)) return
true;
7 return false;
8 }
9
10 }
This code passes the tests, and we may continue adding more configurations to our parameterized test. The next failing test in my permutations is the combination of RED and UNKNOWN. A quick look into the validation function shows that we may resolve this by catching the blinking light condition as the second light (see Listing 7.30).
Listing 7.30. The validation function after adding the check for the second light to be blinking
1 public class CrossingValidator {
2
3 public boolean isValidConfiguration(LightState
firstState, LightState secondState) {
4 if (LightState.UNKNOWN.equals(firstState) ||
LightState.UNKNOWN.equals(secondState)) return false;
5 if (LightState.RED.equals(secondState)) return
true;
6 if (LightState.RED.equals(firstState)) return
true;
7 return false;
8 }
9
10 }
After seeing that this code passes the test, let’s finish the remaining permutations (see Listing 7.31). Without further failing tests, the code passes all the tests. Sure, let’s execute all the existing acceptance tests as well. They are all passing, so let’s check in our redesign into the repository.
Listing 7.31. The final unit tests for the validator
1 @RunWith(Parameterized.class)
2 public class CrossingValidatorTest {
3
4 @Parameters
5 public static List<Object[]> values() {
6 return asList(new Object[][] {
7 {RED, RED, true},
8 {GREEN, RED, true},
9 {YELLOW, RED, true},
10 {RED_YELLOW, RED, true},
11 {UNKNOWN, RED, false},
12 {GREEN, GREEN, false},
13 {YELLOW, GREEN, false},
14 {RED_YELLOW, GREEN, false},
15 {RED, GREEN, true},
16 {UNKNOWN, GREEN, false},
17 {GREEN, RED_YELLOW, false},
18 {YELLOW, RED_YELLOW, false},
19 {RED, RED_YELLOW, true},
20 {RED_YELLOW, RED_YELLOW, false},
21 {UNKNOWN, RED_YELLOW, false},
22 {GREEN, YELLOW, false},
23 {YELLOW, YELLOW, false},
24 {RED, YELLOW, true},
25 {RED_YELLOW, YELLOW, false},
26 {UNKNOWN, YELLOW, false},
27 {GREEN, UNKNOWN, false},
28 {YELLOW, UNKNOWN, false},
29 {RED, UNKNOWN, false},
30 {RED_YELLOW, UNKNOWN, false},
31 {UNKNOWN, UNKNOWN, false}
32 });
33 }
34 ...
35 }
And after this lesson, we both are surely going to add unit tests for our design early on the next time.
Summary
Let’s take a break. While doing so we should reflect over the past few minutes. We added a first crossing with two intersecting roads. We started to work our way from the light state and its changes to the controller, which has the responsibility for coordinating state changes between the two different directions, and preventing two opposing directions from showing the green light at the same time.
Example by example we first built everything into the glue code. After getting the acceptance tests to pass, we put on our designer hats and let our knowledge from implementing the glue code guide our next actions. This time we decided to refactor the code we had into a new concept within our design. While retrofitting unit tests to the code, we found out that we created a flawed design and changed the underlying design to express the intent more meaningfully. As a take-away, we found out that acceptance tests alone are not enough to guide our design. This is the main difference between TDD, which guides the design, and ATDD, which guides the requirements. TDD focuses on tiny unit tests. It thereby helps to move the design of the classes in a certain direction. ATDD, on the other hand, focuses on the requirements, the specification of the functionality. TDD deals with technical implementations; ATDD deals with acceptance criteria from a business perspective.
On the technology level, we saw decision tables used again, but also learned about scenario tables used similarly as decision tables. We could have transformed the successful tests for switching the first light as well and gotten rid of the last column merely mentioning the red state of the second light. We explicitly decided against this step, because this might obscure the outcome for the successful state changes for the test reader in the future. For the invalid state changes, the outcome is completely the same all the time. The decision to hide the repeated yellow blinking states was well put into the scenario table at this point. One additional reason to hide the yellow blink combination is that we now can change the representation of the invalid configuration in a single place for all tests that might be implemented in the future as well—as long as that scenario can be used.