2. Getting Your Workstation Ready for Joomla! Development
When we are developing programs for Joomla!, we normally run Joomla on our local workstation. So we need to install the web server software required to run Joomla on our local machine. In addition, we need to have some way to edit the PHP files and other files that compose a Joomla application.
Fortunately, all this software is freely available for download and can be set up on all the common operating systems, including Windows, Mac OS X, and Linux. Also, we will see that there are many free options for editing our Joomla program files.
In this chapter, we will show you how to get your workstation set up to run Joomla and to edit and create the files you will need to write your programs.
If you already have your workstation set up to run Joomla and to do Joomla development, you can skip the “Requirements to Run Joomla” section. If you are already using an integrated development environment (IDE) such as Eclipse or NetBeans, you can skip the “Tools of the Trade” section.
Requirements to Run Joomla
As discussed in Chapter 1, Joomla requires a web server (Apache or Microsoft Internet Information Services [IIS]), PHP, and a database (normally MySQL) in order to run. Each of these programs can be downloaded and installed separately from their respective websites. However, it is normally easier to install Apache, PHP, and MySQL as part of a combined package. On Mac OS X and Linux, these programs may already be installed by default.
It is important to understand that whether you install them individually or as a combined package, the end result is the same—to have Apache, PHP, and MySQL installed on your workstation. The only difference is the way they are installed and the specifics of each bundle. For example, the specific versions of each package will differ somewhat with each bundle, as well as the folder names and some of the specific default configuration settings.
This chapter assumes that we are creating a local environment for development work and testing. It also assumes that the test websites we work with here are not connected to the World Wide Web. Accordingly, we are not concerned with securing our server the way we would be if we were hosting an actual web application. Of course, we are still concerned with making sure that our Joomla programs are written to be safe from outside attacks.
If you are working on a remote site that is visible to the World Wide Web, be sure to protect the site, even during development. There are a number of ways you can do this, including using Apache’s .htaccess file to require a password to access the URL. You may want to consult with someone familiar with web and Joomla security in this case.
Apache DocumentRoot Folder
There is an important detail to know about any of these environments. As discussed earlier, the Apache web server is the program that provides the link between the browser and the website. When you install Apache locally, the URL http://localhost is mapped to a folder on your local workstation. When you type this URL into your browser, Apache will look for a file called either index.php or index.html in your DocumentRoot folder, which is a folder on your local computer.
For XAMPP installations, the DocumentRoot is normally C:xampphtdocs. For WampServer installations, it defaults to C:Program Fileswampwww.
You can change the DocumentRoot folder to another folder by editing the file httpd.conf in your apache/conf folder. For example, in XAMPP this file is in c:xamppapacheconf. For WampServer, you can edit the httpd.conf file inside the application by selecting Config Files → httpd.conf.
Once you have your DocumentRoot folder identified, you can decide where to install your Joomla files. Any URL you enter in the browser that starts with http://localhost will start at the DocumentRoot folder and work down the folder tree from that point.
For example, if your document root is c:xampphtdocs, you could install Joomla in a folder called c:xampphtdocsjoomla_developmentjoomla_25. In this case, the URL you would type to access the back end of this installation would be http://localhost/joomla_development/joomla_25/administrator. Apache will look for a file called index.php in the folder joomla_development/joomla_25/administrator under the DocumentRoot folder.
You could install Joomla directly in the DocumentRoot folder, but then you would be limited in what else you might install there. Using something similar to the example above makes it easy to have multiple projects going at one time, each in its own subfolder under DocumentRoot.
With this in mind, we are ready to discuss the different options for installing the required software on different platforms.
Getting Up-To-Date Instructions
The programs and bundles discussed here are constantly being updated with newer versions. Newer versions of Windows, Linux, and OS X are also introduced over time.
The information presented here is accurate (to the best of the authors’ knowledge) as of the time of writing, but this information may become out of date or incomplete because of changes to the web server or platform software.
For this reason, the website links presented here are the safest way to get up-to-date instructions. In addition to the links presented for each of the bundles, there is an article on the Joomla documentation website with detailed instructions here: http://docs.joomla.org/Setting_up_your_workstation_for_Joomla!_development. This article is kept up to date with changes as things change over time.
Windows Platforms
On the various Windows platforms (Windows 7, Windows Vista, and Windows XP), Apache, PHP, and MySQL are not installed by default. The two most popular bundled packages for setting up a dynamic web environment on Windows are XAMPP and WAMPP.
XAMPP (http://www.apachefriends.org/en/xampp.html) is probably the most popular package for Windows. It is easy to install and has good documentation. It also is available on Linux and Mac OS X. Detailed instructions for installing XAMPP on Windows is available at http://www.apachefriends.org/en/xampp-windows.html.
WampServer is another bundled package for Windows. It has the advantage of making it very easy to toggle between different versions of Apache, PHP, and MySQL. This is a great advantage if you need to test a program across different versions of PHP, for example. WampServer can be found at http://www.wampserver.com/en. It has an easy Windows installation process that is documented on the site.
Note About Microsoft IIS and SQL Server
Joomla can run on either the Apache web server or the Microsoft IIS web server. Because Apache has been supported the longest, and because the majority of Joomla production websites are run on Apache, most people use Apache for their development environment. If you are reading this chapter, you probably do not have a lot of experience setting up Joomla. In that case, we recommend using Apache for your development server.
Starting with Joomla version 2.5, the Microsoft SQL Server database is also supported. However, for basic Joomla development, it is recommended to use MySQL in your development environment.
Mac OS X Plaform
As previously mentioned, a version of XAMPP is available for Mac OS X. You can download it at http://www.apachefriends.org/en/xampp-macosx.html. With XAMPP, the default DocumentRoot folder is /Applications/XAMPP/htdocs/.
There is also a package called MAMP that is exclusively for Mac. You can download it at http://www.mamp.info/en/mamp/index.html. With MAMP, the default DocumentRoot folder is Applications/MAMP/htdocs.
Another option for both Mac OS X and Linux is to use the versions of Apache, MySQL, and PHP that are distributed as part of the native operating system. Because OS X is a derivative of Linux, these applications run natively on OS X.
If you are new to these programs, it is probably easier to use one of the existing bundles than to use the native versions. Also, the XAMPP and MAMP bundles normally contain more current versions of Apache, MySQL, and PHP than the versions that come bundled with the OS X operating system.
Apache may be installed by default on your OS X system. If so, it identifies a port on the computer as the “listening” port. If you then install a second version of Apache from XAMPP or MAMP, it will also try to use this same port and will not be able to operate correctly.
To fix this, you need to change one of the ports. Probably the simplest thing is to change the XAMPP or MAMP port to something like 8080.
In XAMPP, this is done by editing the file ApplicationsXAMPPxamppfilesetchttpd.conf and changing the line Listen 80 to Listen 8080.
In MAMP, you can change the port using the MAMP application Preferences Panel (which in turn edits the httpd.conf file). Again, you want to change the Listen port to 8080.
Linux Platforms
The considerations for Linux platforms are similar to those for OS X platforms. You have the option of using XAMPP or using native versions of Apache, MySQL, and PHP. For beginners, XAMPP is normally easier. The download information for XAMPP’s Linux version is at http://www.apachefriends.org/en/xampp-linux.html.
By default, the DocumentRoot folder will be located at /opt/lampp/htdocs/. As discussed earlier for Mac OS X, you may need to change the default “Listen” port if another instance of Apache is already running on your system. For XAMPP, the file you need to edit is /opt/lampp/etc/httpd.conf. Again, you need to change the line that says Listen 80 to something like Listen 8080.
Default Owner for Files and Folders
Default file and folder permissions on Linux and Mac OS X can cause problems when trying to install Joomla or edit Joomla files. You need to make sure that your Linux user is able to write to the folder where you install Joomla and to the Joomla files themselves.
The owner of all files created by Apache is set with the User and Group options in the httpd.conf file. By default, these are set to “daemon.” This means that you may not have write permission for the Joomla files and folders.
If this is a local site to be used only for testing and development, you can change the User and Group to be your login user. That way, you will have permission to create, edit, and delete the Joomla files and folders.
Tools of the Trade
Joomla developers can choose from a number of different tools for creating and editing the Joomla program files.
If you want a sure-fire way to start an impassioned discussion, ask a group of software developers what programs they like to use for writing their code. You will almost always get a variety of opinions about why this or that program is good or terrible.
Different people have very different views on this subject, and different Joomla developers use different development tools. There is no program that is the best for every person or every situation.
The following section attempts to discuss the pros and cons of the different options in a reasonably objective manner.
IDE versus Text Editor
When you install Joomla, all the source code for the program is loaded on your system in plain text files. The main file types included in the core installation are PHP (“.php”), XML (“.xml”), JavaScript (“.js”), CSS (“.css”), and SQL (“.sql”). All these file types are plain text files, which means that they can be edited with any text editor. So you can edit existing Joomla files and create new ones without any special software at all.
Given that, why would you want to go to the trouble of installing and learning a new software program just for Joomla development?
The answer, at least for many developers, is productivity.
IDE stands for integrated development environment. The goal of an IDE is to make developers more productive. For example, an IDE (like Eclipse or NetBeans discussed later in this chapter) provides the following functionality to make writing PHP programs easier:
• Identifies syntax errors in code as you type
• Automatically completes portions of code based on the known language syntax
• Automatically shows method and field information about a class being edited
• Allows you to compare two versions of a file (or two different files) to see the exact differences
• Makes it easy to search and replace across the entire code base
• Allows you to “look inside” your PHP programs with a debugger
You don’t always need an IDE to accomplish these things. However, an IDE provides one tool that does all of them.
Another advantage of an IDE is that it can bring different development tasks under one application. For example, many Joomla developers use version control software, such as Git or Subversion. These programs have plugins that work with IDEs so that you can use the version control software from inside the IDE. Automated builder software, like Phing or Ant, is another example. You can run these programs from inside the IDE. For many developers, this makes life easier and less confusing.
To some, using an IDE comes at a high price—namely, learning how to use it. Also, with an IDE you are more likely to encounter bugs in the development tool itself, since it is a more complex software program than an editor. Some people find this frustration is not worth the potential productivity gains.
To others, learning a new piece of software and tolerating the possibility of bugs is a small price to pay for the advantages offered by the IDE.
If you are planning to do a lot of Joomla development, it is probably worth your time to at least try an IDE to see how it works for you. If you don’t want to spend time learning how to use a new program and just want to jump into writing code, then perhaps using an IDE isn’t for you.
Open-Source IDE Choices
The two most popular IDEs for Joomla development are Eclipse and Netbeans. Both of them do a great job of helping the developer be more productive. Each is discussed in the following sections.
Eclipse
Although Eclipse has been the most popular IDE for Java development for years, its use for PHP development is more recent. In 2007, PDT (PHP Development Tools) was released for PHP developers. This is a set of plugins for Eclipse that adapt Eclipse to work with PHP.
At the present time, PDT version 3.0 is the latest release. The Eclipse project releases a new version every year in June, and a new PDT version is normally released at the same time. Eclipse can be downloaded from the Eclipse website at http://eclipse.org/downloads. Joomla developers would normally want the “Eclipse for PHP Developers” package.
Detailed instructions for setting up Eclipse for Joomla development are available on the Joomla documentation site at http://docs.joomla.org/Setting_up_your_workstation_for_Joomla!_development.
Eclipse is written in Java and runs on Windows, Linux, and Mac OS X platforms. It is free and open-source software. Although there is no formal data about which IDEs Joomla developers prefer, Eclipse is probably the most popular IDE among experienced Joomla developers, if for no other reason than that it was the first free IDE for PHP development.
Let’s take a closer look at how Eclipse can help with Joomla development. The first thing to understand about an IDE like Eclipse or NetBeans is the concept of a project. In most text editors, you edit one file at a time and the editor doesn’t know or care about other related files.
In an IDE, you create a project that holds a group of related files. If we are working on Joomla, for example, the entire Joomla application would be one project. This can be confusing at first but makes a lot of sense for Joomla development, since we are always working with groups of related files.
When you create a PHP project in Eclipse, you get a view called the PHP Explorer that allows you to browse the entire project and open any file for editing. Figure 2.1 shows the PHP Explorer view on the left, with one file open for editing in the upper right.
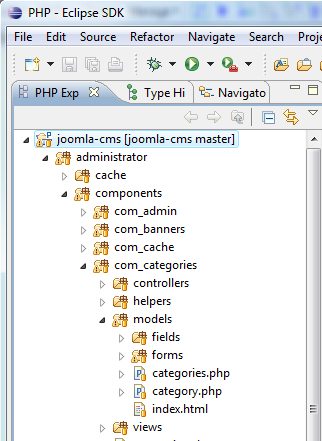
Figure 2.1. Eclipse PHP Explorer view example
Now let’s look at examples of the IDE features we discussed earlier. We’ll start with syntax highlighting. Figure 2.2 shows a PHP program open for editing in Eclipse. Different types of code are shown in different colors, making it easier to read the code.

Figure 2.2. Eclipse PHP editor syntax highlighting
Now let’s look at what happens if we make a mistake. In Figure 2.3, we left out the parentheses after the if statement.

Figure 2.3. Eclipse PHP editor showing syntax error
We see the red X symbol on the left and red underlines in two places. This immediately tells us that something is wrong with this code. Hovering the mouse on the red X shows the pop-up text in Figure 2.4. This pop-up text gives us information about what is wrong and how we might fix it.
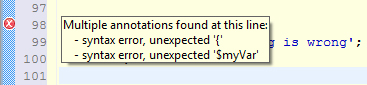
Figure 2.4. Pop-up error text
Another important feature is automatic code completion. This comes in several forms. The simplest form is giving you some characters in pairs. For example, in PHP when you type a left-parenthesis, you will almost always want a right-parenthesis as well. So the editor gives you both. This is also true for curly braces, quotes, and HTML elements.
Another form of code completion occurs when you want to type the name of a method. In Figure 2.5, we typed in $x = $this-> and then pressed Ctrl+Space.
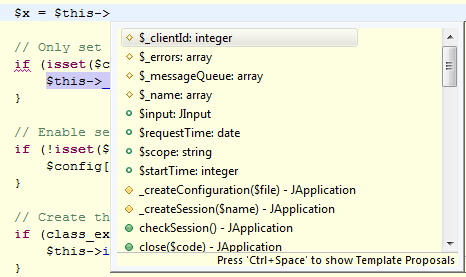
Figure 2.5. Eclipse PHP method selection
The editor knows that $this is an object of type JApplication, so it shows us all the fields and methods that are available for that class. We can choose one by clicking with the mouse or using the arrow keys. When we choose one, it will automatically insert the method or field name for us. This saves typing and reduces the chance of misspelling. Note that if we start typing a method name, the search window is updated to show only the names that match what we have typed.
It also can tell us about each of the methods. In Figure 2.6, we highlighted the redirect() method. On the right, it shows us the parameters and the documentation block for that method.
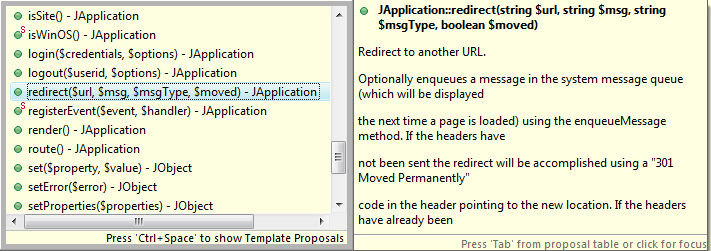
Figure 2.6. Eclipse method parameter list and documentation
This is a handy way to help us find the method that we need and is quicker than hunting through a separate file or window.
When we are editing a file, Eclipse can show us the list of fields and methods for that file in a separate view. In Figure 2.7, we see the edit area on the left and the Outline view on the right.
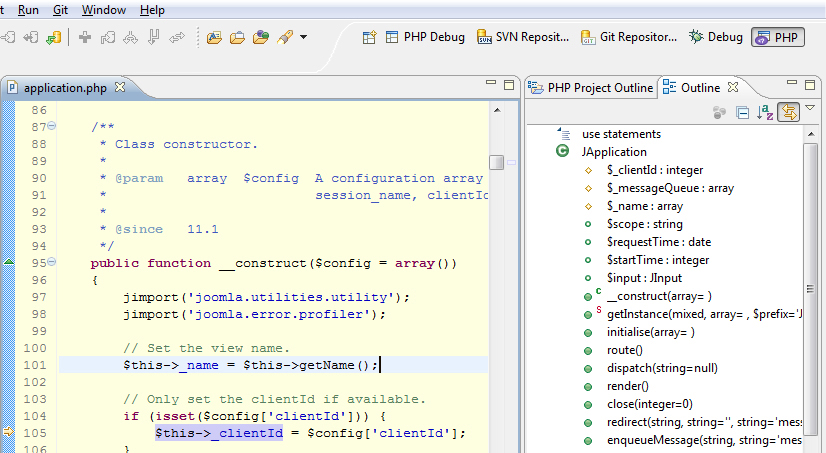
Figure 2.7. Eclipse Editor and Class Outline view
The Outline view shows us the fields and methods for the class being edited. We can also see an outline of the entire project in the PHP Project Outline view, as shown in Figure 2.8. In this view, we can look up any class in Joomla and see all its fields and methods.
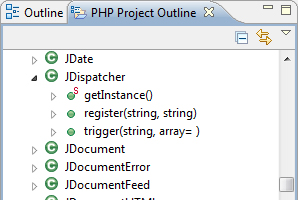
Figure 2.8. Eclipse PHP Project Outline view
Another handy feature of an IDE like Eclipse is the ability to quickly compare two versions of a file to see exactly what has changed. Figure 2.9 shows a comparison of the current version of a file with a version before some recent edits were made.
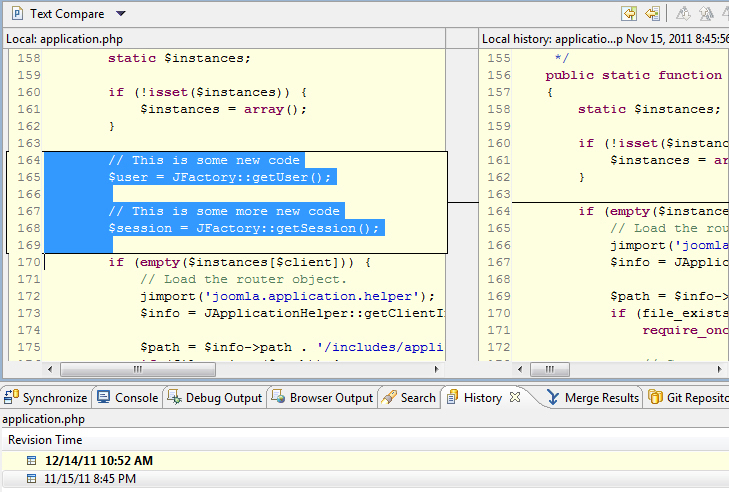
Figure 2.9. Eclipse file compare example
You can use the compare feature to compare different versions of the same file. This could be from local history (which Eclipse keeps for you automatically) or, if you are using version control software, from other versions in the repository.
When writing code, we often need to search across a group of programs, or the entire project, to see where a variable was used or where some other text appears. Eclipse provides a simple but powerful search capability. In Figure 2.10, we searched the project for occurrences of the phrase JFactory::getSession().

Figure 2.10. Eclipse search example
As a convenience, the search results are linked with the editor. For example, if we double-click on one of the lines in the search results, the target file is opened in the editor with the cursor placed at the line number where the text was found. We can also search and replace from this view.
Another feature that is important to many developers is the ability to use a debugger to “look inside” a running program.
First, a quick warning. If you are new to programming, this might seem intimidating to you and you absolutely do not need to ever use a debugger to develop programs for Joomla. In that case, just skim over the next few figures and don’t be alarmed.
On the other hand, if you are familiar with debuggers in general, you will find the Eclipse PHP debugger to be similar to other debuggers and relatively easy to learn and work with.
Eclipse works with a debugger called Xdebug to allow you to suspend and step through a PHP program. Figure 2.11 shows a Joomla program suspended.
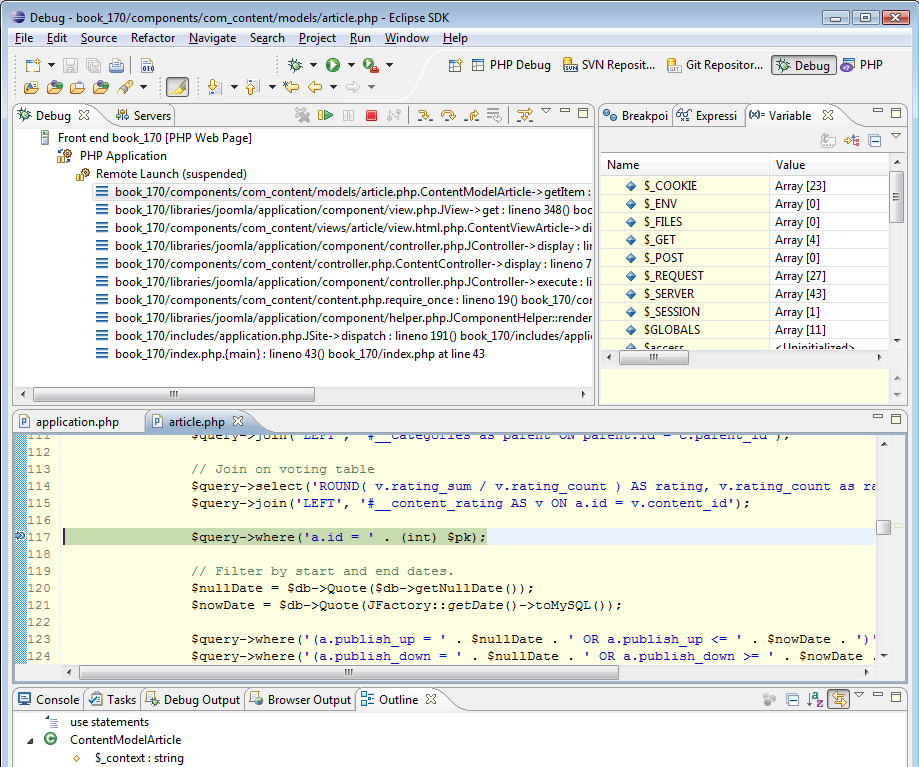
Figure 2.11. Eclipse debugger
In the upper left, we see what is called the stack. A blowup of this is shown in Figure 2.12.
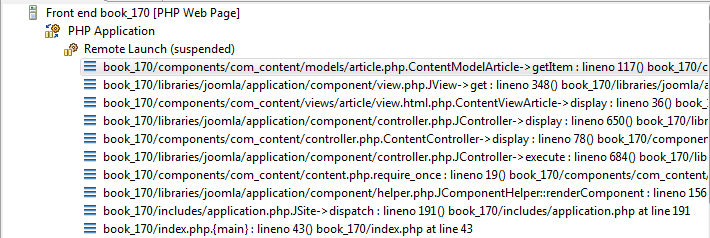
Figure 2.12. Eclipse PHP debugger stack example
This stack shows how we got to this point in the program. In this example, we started at index.php line 43 (the last line in the stack). That line, called the JSite-> dispatch method, in turn called the JComponentHelper::renderComponent method and so on, until we get to the top of the stack, where we have called the ContentModelArticle->getItem method.
The Variables view, shown in Figure 2.13, displays the value of every variable in scope at this point in the program.
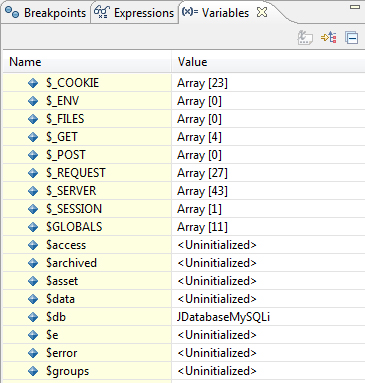
Figure 2.13. Eclipse debugger Variables view
Many other handy features in Eclipse help make Joomla development more efficient. The built-in Eclipse Help that is installed with the program has detailed information about the various features available.
One weakness of Eclipse for PHP developers is the relative lack of tutorials and user documentation, although the Joomla documentation site has some useful Eclipse articles.
PHPEclipse
PHPEclipse (http://www.phpeclipse.com) is another open-source PHP IDE with features similar to the Eclipse PDT program. It is supported outside the official Eclipse project family. At this time, PHPEclipse no longer appears to be actively developed, although it is still available for download.
NetBeans
The other major free and open-source IDE for PHP development is called NetBeans and is available for download at http://netbeans.org/downloads/index.html. Like Eclipse, NetBeans was originally developed for Java and is now available for a number of different programming languages.
One advantage of NetBeans is that it has excellent documentation available for PHP development, including video tutorials. For this reason, NetBeans is a good option for people who are new to using an IDE.
NetBeans has a similar feature set to Eclipse, including syntax highlighting, code completion, file compare, global search, and a debugger.
Like Eclipse and other IDEs, NetBeans organizes your work based on projects and allows you to easily explore the project to find the file you need. Figure 2.14 shows the Project view in NetBeans.
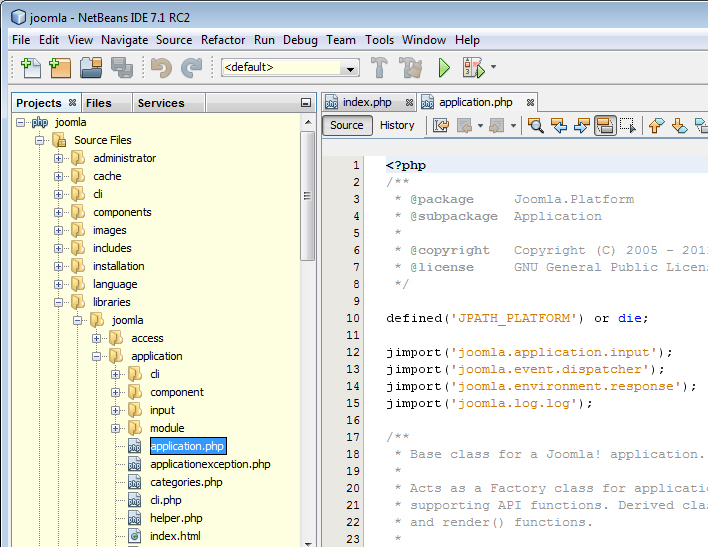
Figure 2.14. NetBeans Project view example
NetBeans for PHP supports syntax highlighting, error reporting, and code completion. Figure 2.15 shows the syntax highlighting in NetBeans.
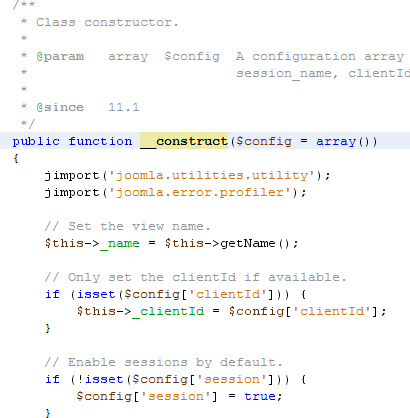
Figure 2.15. NetBeans syntax highlighting
Figure 2.16 shows NetBeans’s display of a PHP syntax error.
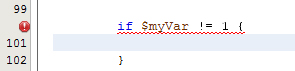
Figure 2.16. Syntax error in NetBeans
If we hover on the error marker, it shows us more information about the error, as shown in Figure 2.17.
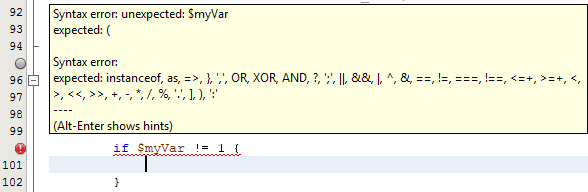
Figure 2.17. NetBeans pop-up error display
NetBeans has code completion that’s similar to Eclipse. For example, the JApplication code completion is shown in Figure 2.18, which was displayed by typing $x = $this-> and pressing Ctrl+Space. As with Eclipse, if we type the first part of the desired method, the list narrows to methods that match the typed letters.
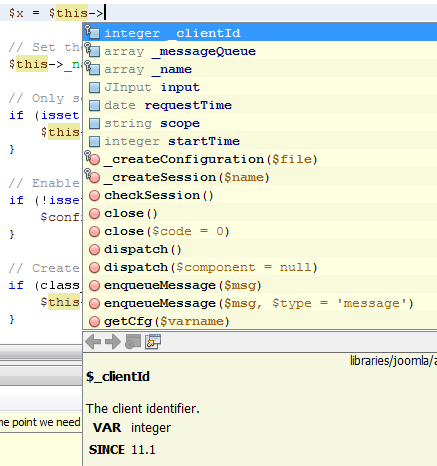
Figure 2.18. NetBeans PHP code completion
And we can see the parameters and documentation block for a method by highlighting that method, as shown in Figure 2.19.
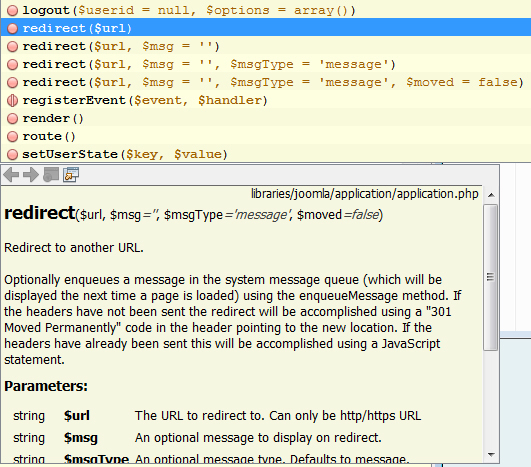
Figure 2.19. NetBeans code completion method documentation
NetBeans displays an outline of the class being edited that shows the methods and fields of the class. An example is shown in Figure 2.20.
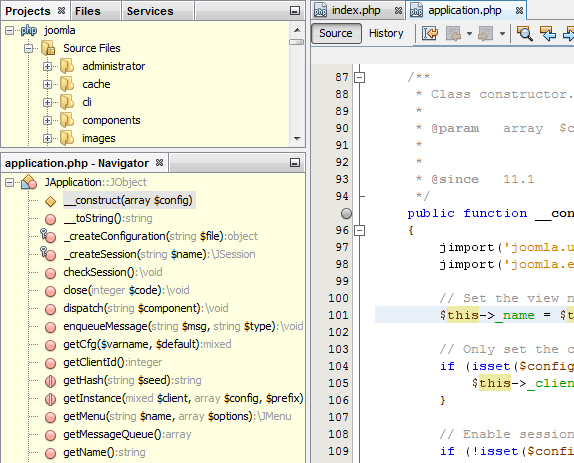
Figure 2.20. NetBeans navigator showing class methods
NetBeans includes a file compare feature, either for local history or for version control history. Figure 2.21 shows a comparison with an earlier version of the file.
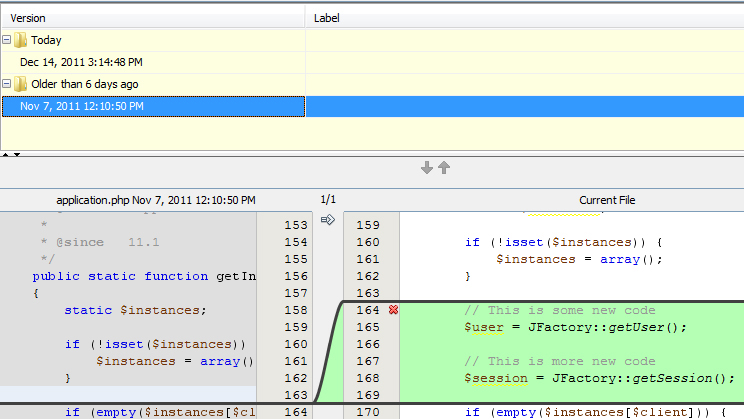
Figure 2.21. Compare editor in NetBeans
NetBeans allows you to search a project. An example is shown in Figure 2.22.
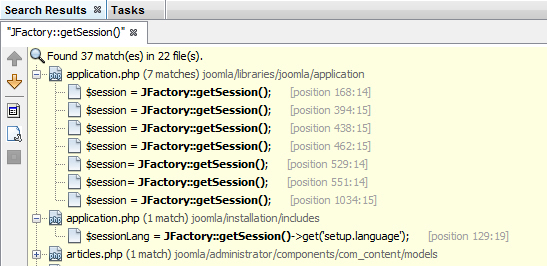
Figure 2.22. NetBeans search example
As with Eclipse, the search is linked to the editor, so you can double-click any line in the search results view and open that file for editing, with the cursor placed at that location.
NetBeans also includes an integrated debugger, again using the Xdebug program. Figure 2.23 shows a program suspended during a debug session.

Figure 2.23. NetBeans debug example
The NetBeans Variables view shows the values of all variables in scope at the point the program was suspended, as shown in Figure 2.24.
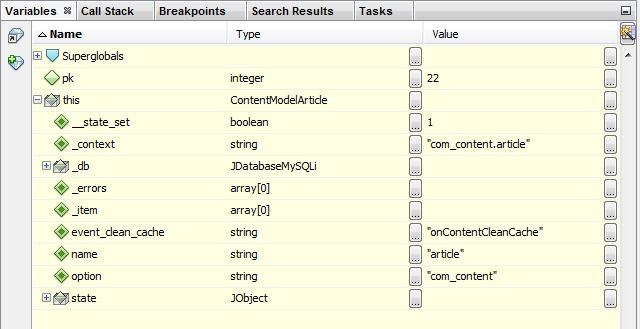
Figure 2.24. NetBeans debug Variables view
The NetBeans Call Stack view shows the call stack, as shown in Figure 2.25.
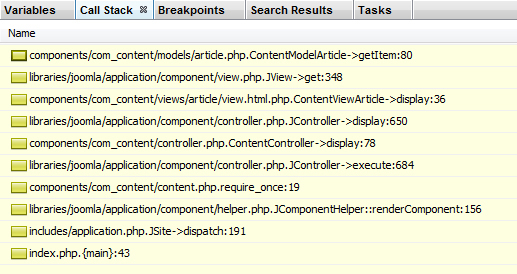
Figure 2.25. NetBeans debug Call Stack view
As with Eclipse, this lists all the method calls that brought us to this point in the program.
Eclipse or NetBeans?
Both NetBeans and Eclipse are full-featured IDEs that provide a number of useful functions for the Joomla developer. If either one of these were available for free, we would be fortunate. To have both of them available for free is that much better. If you plan to do more than a little PHP or Joomla development, it may be a good investment of time to give one of them a try.
So which one should you try? That’s a difficult call, but here are a few things to consider when making the decision:
• For PHP development, NetBeans has better documentation for beginners. It is also easier to configure and use the debugger. Some people think NetBeans is also simpler and easier to learn than Eclipse (although perhaps less configurable).
• Eclipse uses user-interface widgets that are native to each operating system, so Eclipse looks and feels like a native application on each platform. On Windows, it looks like other Windows applications and on Mac or Linux it looks like other Mac or Linux applications. NetBeans uses the Java SWING set of user-interface widgets and looks the same on all platforms. So it doesn’t look as much like a native application. For some people, this is an advantage of Eclipse.
• NetBeans as a PHP IDE has been around for less time than Eclipse, but it has caught up quickly in terms of feature set to the point that they are comparable, at least for the basic tasks.
• At this time, NetBeans does not support cross-platform line endings. If you are developing on Windows, for example, and need to have Linux line endings on your files, you will need to do a bit of extra work to put the Linux line endings on files you create in Windows. In Eclipse (or many other editors), this is just a simple configuration option. Hopefully, NetBeans will add this feature at some point.
If you are still undecided about which one to try, another option is to try out both and see which one works the best for you.
Commercial IDEs
Many commercially marketed IDEs work well for developing PHP programs:
• ZendStudio (http://www.zend.com/en/products/studio) is a popular commercial PHP IDE, based on Eclipse.
• Aptana Studio Pro (http://www.aptana.com) is another commercial PHP IDE that is highly recommended by some users. It is also based on Eclipse.
• Komodo IDE (http://www.activestate.com/komodo-ide) is another commercial IDE for PHP developers.
• Nusphere’s PhpED (http://www.nusphere.com/products/phped.htm) provides an integrated debugger and profiler as well as deployment functionality.
Text Editor Choices
If the previous section didn’t convince you to try an IDE, here are some simpler options.
Notepad++
Notepad++ is a simple-to-use but powerful open-source editor for Windows platforms that includes syntax highlighting and some code completion for a number of programming languages, including PHP. You can download it at http://notepad-plus-plus.org.
Figure 2.26 shows a Joomla PHP file open in Notepad++. As shown in the example, there is no error highlighting available.
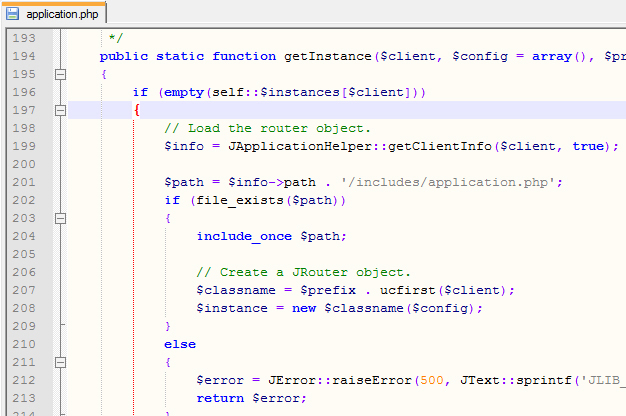
Figure 2.26. Notepad++ Editor
For Mac OS X users, Smultron (http://www.apple.com/downloads/macosx/development_tools/smultron.html) provides PHP syntax highlighting for PHP.
For Linux users, the standard system editor gedit provides PHP syntax highlighting.
It is also possible to use a standard text editor such as Notepad or vi that does not include PHP syntax highlighting. Any editor that can edit plain text will work fine to edit all the Joomla files. Obviously, the farther you move away from an IDE, the harder it will be to visually check if your code is correct and free of typographical errors.
It is also important to understand that you can use different programs on the same set of Joomla files. If a file is inside a defined project for an IDE, for example, it is still accessible from the file system and can be edited outside the IDE. So you can use different programs for different tasks if you like.
Other Tools
Other software tools can be helpful when doing Joomla development. Some of these are now discussed briefly.
Version Control Software
Version control software is considered essential for most software projects, including Joomla. Version control software tracks every change to the code base and allows a group of developers to make changes to the code base in an organized fashion. If a problem is encountered with a change made to the code, the change can be undone to fix the problem. Even if you are the only developer on a project, version control software can be enormously helpful. When you find a problem, you can “turn back the clock” to see where the problem was introduced. This often helps you narrow down the source of the problem.
The Joomla content management system (CMS) and platform projects use a program called Git (http://git-scm.com) and are hosted at Github (https://github.com/joomla). Other popular version control programs include Subversion (http://subversion.apache.org) and Mercurial (http://mercurial.selenic.com).
If you use an IDE, typically the version control software is included in the IDE. For example, Eclipse and NetBeans both support GIT, Subversion, and Mercurial.
Automatic Builder Software (Ant and Phing)
PHP files are run as scripts, directly from the text files. So there is no compile step for PHP programs as there is for Java or C programs.
Developers writing in languages that require compiling or building often use programs to automate this process. Two such programs are Phing and Ant. Ant was originally developed for working with C and Java programs. Phing is a PHP program for doing batch build operations in PHP projects.
Given that we don’t have to build PHP programs, why would we want a program like Ant or Phing? The answer is that sometimes it is handy to be able to automate repetitive batch jobs.
For example, if you are building a Joomla extension, one way to organize your work is to have two projects in the IDE. One project contains only your extension code and might be tied to a version control repository. The other project is a Joomla installation with the extension installed. This project allows you to test the extension inside a Joomla installation.
In this example, you will be testing the extension in the test project but tracking the code changes in the extension project. It might be convenient to be able to make code changes in the files inside the test project and then, once they work properly, to copy the files from the test project to the extension project. With Phing or Ant, you can automate the process of copying files from one project to another. You can also automate the process of creating zip archives for packaging your extensions.
A tutorial that discusses using Phing for this purpose is available in the Joomla documentation site at http://docs.joomla.org/Setting_up_your_workstation_for_extension_development.
Automated Test Programs
There is a strong trend in software development toward automated testing of software. Automated tests can be written once and then run frequently to detect errors that have been introduced into the code base as changes are made.
The Joomla project currently uses two types of automated testing: unit testing and system testing. Unit testing is used to test the Joomla platform. Unit tests use a PHP program called PHPUnit. This allows us to write tests that feed data directly to a PHP method and compare the actual results to the results we expect. If they are different, an error report is generated.
System testing tests the operation of the CMS from a user’s perspective by running a browser session under control of the test program. The browser does a sequence of data-entry commands, including mouse clicks and keyboard entries, simulating a user using the software. The document in the browser can be checked automatically inside the system test to make sure that certain information shows in the page. An error is reported if the expected information does not show on the page. Joomla uses a program called Selenium to create and run the system tests.
These automated tests are an important part of the Joomla development process. When changes are made, either in the form of bug fixes or in the form of enhancements, the automated tests can be run to help check that nothing was broken as a result of the changes.
Summary
In this chapter, we discussed how to get your workstation ready to start writing programs for Joomla. We discussed the options for installing the web server software on different platforms, including specific bundles for different operating systems. Then we discussed the two open-source IDEs for PHP, Eclipse, and NetBeans, and showed some examples of how they can help make you more productive with Joomla development.
We also briefly discussed editor options for people who don’t want to use an IDE.
Finally, we presented a quick description of version control software, such as Subversion or Mercurial; automatic builder software, such as Phing and Ant; and automated testing software.
At this point, we have our workstation set up and are ready to dive into the Joomla program itself.