
4. Extending Joomla! with Layout Overrides
Do you want to change the way something is shown on your Joomla! site? Add or remove some information? Do something wild and crazy to make the page look just the way you want it to? If so, then this chapter is for you.
Joomla makes it incredibly easy to change the way your website displays the contents of each page. What’s more, you can do this without needing to delve into the details of how the information on the page is put together and, honestly, without understanding much PHP programming.
As we will see, simply by copying and doing some simple editing of one or more files, we can take total control of how our information is shown on the page.
In this chapter, we start with the very basics of templates in Joomla. Then we show how layout overrides work—in other words, the code that makes the magic happen. Then we work through some examples, starting with a simple module and then working through some more advanced examples. These examples will illustrate the different types of layout overrides that are possible.
Finally, we discuss some things other than layouts that you can override in Joomla. These include language files, parameters, and even programming files.
Template Basics
Content is the information that is shown on a web page. Presentation includes everything about how the content is shown, including things like the layout on the page; the choice of fonts and colors; and any graphics, such as boxes, lines, pictures, or logos.
A fundamental goal of Joomla is to allow you to make changes to content and presentation independently. This is accomplished by using templates.
A template is a type of extension that controls every aspect of the presentation for the site. Recall in Chapter 2 that we did a quick demonstration of changing the entire appearance of the site just by changing the default template. In this section, we take a closer look at how that works.
Bear in mind that we do not go into detail about how to write templates for Joomla. That subject is very large and outside the scope of this book. This section is just to help you understand, from a developer point of view, what a template does and how it works.
Template Folders and Files
The default template for the Joomla front end is beez_20. If we look at the folder templates/beez_20, we see the folders and files shown in Figure 4.1.
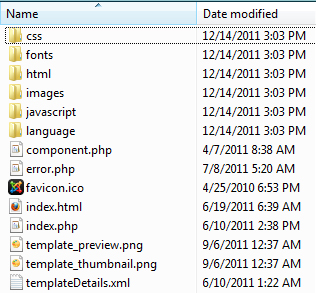
Figure 4.1. Beez_20 folders and files
The css folder, as you would expect, contains the CSS style sheets for the template. Likewise, the fonts folder contains any special fonts needed for the template.
The html folder is the folder where any layout override files are stored. In the case of beez_20, we only have one override file, called modules.php. This is a custom module chrome file. Module chrome is a term for PHP functions that provide some optional HTML markup in which the module code is placed. This is often called a wrapper for the module output. We discuss module chrome later in this chapter.
If we look at the folder templates/beez5/html, we see folders called com_contact and com_content. These folders contain override files for the Contacts and Content components.
We discuss how layouts work a bit later in this chapter. For now, the important thing to understand is that you need to put the layout override file in the correct folder inside your template to allow Joomla to find it and use it.
The images folder contains the images for the template, such as logos, buttons, icons, and so on.
The javascript folder contains any required JavaScript files needed for the template. With beez_20, for example, we have two JavaScript files, one that provides general functionality and one that lets the user change the font size.
We manage template options in the back end of Joomla using the Template Manager. This functionality requires language files to allow the text on the screen to be translated. These language files are stored in the language folder.
Below the folders we see a list of files. These are described in Table 4.1.
Table 4.1. Description of Template Files

Template index.php File
By convention, a Joomla template contains an index.php file that is literally the template for the pages on the site. (The main template file can be called anything, based on the value of the tmpl variable inside the request. The default value is index.php if tmpl is not specified.) The index.php file contains the outline of the page, with the placeholders to be filled in by the actual contents of each page.
In Chapter 3, we discussed how the render() method assembles a Joomla page. Specifically, we mentioned that the program makes a list of all the jdoc:include elements in the template’s index.php file and then fills in the blanks with the appropriate content for each element.
Let’s take a look at the index.php file for the atomic template. The atomic template is provided as part of the standard Joomla distribution as a very basic template that can be used as a starting point for creating new templates.
If you are unfamiliar with PHP programming, this would be a good time to get familiar with Appendix A, “Crash Course on PHP and Object-Oriented Programming.”
The index.php file is a great example of how the PHP language makes it very easy to mix PHP code with HTML code. The first part of the file, shown in Listing 4.1, is just a single block of PHP code in a single PHP element.
Listing 4.1. Opening PHP Element in index.php File
<?php
/**
* @package Joomla.Site
* @copyright Copyright (C) 2005 - 2012 Open Source Matters, Inc. All rights reserved.
* @license GNU General Public License version 2 or later; see LICENSE.txt
*/
defined('_JEXEC') or die;
/* The following line loads the MooTools JavaScript Library */
JHTML::_('behavior.framework', true);
/* The following line gets the application object for things like displaying the site name */
$app = JFactory::getApplication();
?>
This code ensures we are executing from within Joomla, loads the MooTools JavaScript library, and then gets an instance of the JApplicationSite object. We talk more about MooTools and JavaScript in Chapter 12.
The next block of code, shown in Listing 4.2, illustrates some important points about templates.
Listing 4.2. Second Code Block of Atomic index.php File
<?php echo '<?'; ?>xml version="1.0" encoding="<?php echo $this->_charset ?>" ?>
<!DOCTYPE html PUBLIC "-//W3C//DTD XHTML 1.0 Strict//EN" "http://www.w3.org/TR/xhtml1/DTD/xhtml1-strict.dtd">
<html xmlns="http://www.w3.org/1999/xhtml" xml:lang="<?php echo $this->language;?>" lang="<?php echo $this->language; ?>" dir="<?php echo $this->direction; ?>" >
<head>
<!-- The following JDOC Head tag loads all the header and meta information from your site config and content. -->
<jdoc:include type="head" />
<!-- The following five lines load the Blueprint CSS Framework (http://blueprintcss.org). If you don't want to use this framework, delete these lines. -->
<link rel="stylesheet" href="<?php echo $this->baseurl ?>/templates/ <?php echo $this->template ?>/css/blueprint/screen.css" type="text/css" media="screen, projection" />
<link rel="stylesheet" href="<?php echo $this->baseurl ?>/templates/ <?php echo $this->template ?>/css/blueprint/print.css" type="text/css" media="print" />
<!--[if lt IE 8]><link rel="stylesheet" href="blueprint/ie.css" type="text/css" media="screen, projection"><![endif]-->
<link rel="stylesheet" href="<?php echo $this->baseurl ?>/templates/ <?php echo $this->template ?>/css/blueprint/plugins/joomla-nav/screen.
css" type="text/css" media="screen" /> <?php echo $this->template ?>/css/blueprint/plugins/joomla-nav/ screen.css" type="text/css" media="screen" />
<!-- The following line loads the template CSS file located in the template folder. -->
<link rel="stylesheet" href="<?php echo $this->baseurl ?>/templates/ <?php echo $this->template ?>/css/template.css" type="text/css" />
<!-- The following four lines load the Blueprint CSS Framework and the template CSS file for right-to-left languages. If you don't want to use these, delete these lines. -->
<?php if($this->direction == 'rtl') : ?>
<link rel="stylesheet" href="<?php echo $this->baseurl ?>/templates/ <?php echo $this->template ?>/css/blueprint/plugins/rtl/screen.css" type="text/css" />
<link rel="stylesheet" href="<?php echo $this->baseurl ?>/templates/ <?php echo $this->template ?>/css/template_rtl.css" type="text/css" />
<?php endif; ?>
<!-- The following line loads the template JavaScript file located in the template folder. It's blank by default. -->
<script type="text/javascript" src="<?php echo $this->baseurl ?>/ templates/<?php echo $this->template ?>/js/template.js"></script>
</head>
First, notice that this file includes the HTML DOCTYPE declaration. The document type is controlled entirely by the template. This makes sense when we consider that the template controls the entire presentation of the site. If you want to see this in action in the Joomla sample data, you can go to the template manager, open the Beez5 – Default template style, and change the parameter called html version from xhtml to html5. Then display the Fruit Shop page and look at the page source code. You will see <!DOCTYPE html> instead of <!DOCTYPE html PUBLIC "-//W3C//DTD XHTML 1.0 Transitional//EN" "http://www.w3.org/TR/xhtml1/DTD/xhtml1-transitional.dtd">.
Second, notice that the template file contains the HTML head elements meta, title, and script. You can change these elements dynamically in code if you need to. For example, the title element is often changed for each page on the site. However, others can be defined here and can be used on all pages for the site.
The third important point about this file is that it is a normal PHP file. This means that we can execute any PHP commands we like. This opens up the possibility for doing some fun tricks in the template. We discuss one example of this later in this chapter.
One of the reasons PHP is so popular for creating web pages is that you can easily mix PHP and HTML elements together in any .php file. Consider this line from the index.php file:
<link rel="stylesheet" href="<?php echo $this->baseurl ?>/templates/ <?php echo $this->template ?>/css/blueprint/screen.css" type="text/css" media="screen, projection" />
This is just an HTML “link” element, but with a dynamic PHP twist. The href attribute contains two PHP elements. These elements are evaluated by the PHP interpreter and converted to their text values. Then these text values are inserted into the HTML exactly as if they were typed in as text.
So the PHP element “<?php echo $this->baseurl ?>” is converted to the value of the PHP variable “$this->baseurl” and the PHP element “<?php echo $this->template ?>” is converted to the value of the PHP variable “$this->template”.
For example, if the value of “$this->baseurl” is “http://myjoomlasite.org” and the value of “$this->template” is “atomic,” then the preceding code produces this exact text, just as if you had typed it in manually.
<link rel="stylesheet"
href="http://myjoomlasite.org/templates/atomic/css/blueprint/screen.css"
type="text/css" media="screen, projection" />
You can see a number of other places in the preceding code where PHP elements are inserted in the middle of HTML elements. See Appendix A for more information about PHP code and syntax.
Positions in Templates
Now let’s look at the rest of the index.php file from the atomic template. This is shown in Listing 4.3.
Listing 4.3. Last Part of Atomic index.php File
<body>
<div class="container">
<hr class="space" />
<div class="joomla-header span-16 append-1">
<h1><?php echo $app->getCfg('sitename'), ?></h1>
</div>
<?php if($this->countModules('atomic-search')) : ?>
<div class="joomla-search span-7 last">
<jdoc:include type="modules" name="atomic-search" style="none"
/>
</div>
<?php endif; ?>
</div>
<?php if($this->countModules('atomic-topmenu')) : ?>
<jdoc:include type="modules" name="atomic-topmenu" style="container"
/>
<?php endif; ?>
<div class="container">
<div class="span-16 append-1">
<?php if($this->countModules('atomic-topquote')) : ?>
<jdoc:include type="modules" name="atomic-topquote" style="none"
/>
<?php endif; ?>
<jdoc:include type="message" />
<jdoc:include type="component" />
<hr />
<?php if($this->countModules('atomic-bottomleft')) : ?>
<div class="span-7 colborder">
<jdoc:include type="modules" name="atomic-bottomleft"
style="bottommodule" />
</div>
<?php endif; ?>
<?php if($this->countModules('atomic-bottommiddle')) : ?>
<div class="span-7 last">
<jdoc:include type="modules" name="atomic-bottommiddle"
style="bottommodule" />
</div>
<?php endif; ?>
</div>
<?php if($this->countModules('atomic-sidebar')) : ?>
<div class="span-7 last">
<jdoc:include type="modules" name="atomic-sidebar" style="sidebar"
/>
</div>
<?php endif; ?>
<div class="joomla-footer span-16 append-1">
<hr />
©<?php echo date('Y'), ?> <?php echo $app->getCfg('sitename'), ?>
</div>
</div>
</body>
</html>
Except for the PHP elements, we read this file just as we would read a static HTML file. We define our body element with some div elements.
Notice in the fourth line we are doing the same thing we did earlier: We are getting the value of $app->getCfg('sitename') and then inserting that inside an h1 element.
There are two important things to understand about this section of the file. The first thing is that we have a number of jdoc:include HTML elements. The jdoc:include is not a standard HTML element. It is specific to Joomla. Recall in Chapter 3 we discussed how Joomla uses these elements as placeholders and replaces these elements with the text for the component, for messages, and for modules. The placement of the jdoc:include elements controls the placement of the text for each of these parts of the page.
In the middle of the table, we see these two lines of code:
<jdoc:include type="message" />
<jdoc:include type="component" />
These tell Joomla where to put any messages and where to put the component. Joomla only allows one component per page, so we only have one jdoc:include for components. Similarly, messages are displayed in one location, although more than one message can show on a page. A message might be a confirmation that an action was completed, a warning, or an error.
If we look at a jdoc:include element for a module, we see two additional attributes, as in the following:
<jdoc:include type="modules" name="atomic-search" style="none" />
The name attribute is the name of the module position. In the Module Manager, when you create a module, you assign it to a position. When Joomla renders the page, it finds and executes all the modules for each position in the template. Then, as with messages and the component, it inserts the output for the modules in place of the jdoc:include tag.
We also have an attribute called style. This is called the module chrome. Chrome was used to decorate cars in the old days, and the word is used here in the sense of providing a decorative framework on the page. So our chrome tells Joomla how we want to wrap or decorate our module. We discuss this in the section “Module Chrome.”
Alternative PHP If/Then/Else Syntax
As discussed earlier, a great feature of PHP is the ability to mix PHP elements in with HTML elements in the same file. To support this, PHP provides an alternative way to write if/then/else statements.
Look at the following code snippet, which was taken from the index.php file for the atomic template.
<?php if($this->countModules('atomic-bottomleft')) : ?>
<div class="span-7 colborder">
<jdoc:include type="modules" name="atomic-bottomleft" style="bottommodule" />
</div>
<?php endif; ?>
The logic flow here is as follows. We evaluate the expression inside the parentheses after the if—in this case, the following:
$this->countModules('atomic-bottomleft')
If this evaluates to the boolean true, then the lines between the if element and the endif element are sent to the browser. Otherwise, these lines are ignored.
Since the if statement is a self-contained PHP element, we can use normal HTML elements between the if and endif elements—in this case, a div element that contains a jdoc:include element.
We could have written this code in a single PHP element as follows:
<?php if($this->countModules('atomic-bottomleft')) {
echo '<div class="span-7 colborder">';
echo '<jdoc:include type="modules" name="atomic-bottomleft" style="bottommodule" />';
echo '</div>';
} ?>
Both code snippets output exactly the same text. However, the first one is superior. Someone familiar with HTML can easily read the HTML code in the first example. Also, an HTML editor can read and validate these lines.
To make matters even more confusing, there is a third way to write the same code, shown in the following example:
<?php if($this->countModules('atomic-bottomleft')) { ?>
<div class="span-7 colborder">
<jdoc:include type="modules" name="atomic-bottomleft" style="bottommodule" />
</div>
<?php } ?>
The only difference between this third example and our first one is here we use a left curly brace (instead of the colon) in the opening PHP tag and a right curly brace (instead of endif;) in the closing tag. This syntax also allows us to put HTML elements inside the PHP code block. However, it is not as readable as the first example. The first method is recommended and what is normally used in Joomla.
Similar syntax is available for the other PHP control statements, such as switch and for and foreach loops. They offer the same benefit of being able to enter normal HTML elements inside the PHP control block. See Appendix A for more examples of the alternative syntax.
How do we decide which syntax to use? The answer is simple. In Joomla, most files consist of a single PHP element and contain no HTML at all. This is because they don’t directly output any text to the browser. For these files, we always use the normal syntax with the curly braces.
The files that do contain HTML elements are template files and layout files. For these files, we normally use the alternative syntax.
It is important to understand that PHP doesn’t care which syntax we use. We choose based on which is easier for people to read. This is true of many choices we make in designing and writing code. It is very important for the code to be readable and understandable to people.
One universal truth about software is that, once implemented, software almost always has a longer life than the developers expected. This means that future programmers might be reading and maintaining your code long after you have moved on to other projects. That is why we always try to write code so that someone unfamiliar with it can easily understand it.
This is doubly important with open-source software like Joomla and most Joomla extensions. We cannot possibly anticipate all the places where our code might end up being used. But we can try to make it as clear, logical, and understandable as possible to help others who might want to use it.
Template Parameters
If we log in to the back end of Joomla and navigate to Extensions → Template Manager and then click Beez2 – Default to edit this template style, we see on the right-hand side of the screen the options shown in Figure 4.2.
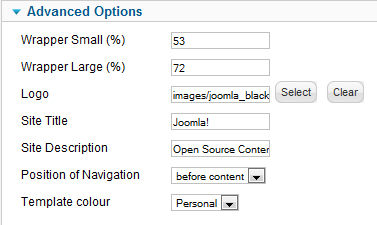
Figure 4.2. Beez_20 template parameters
This is our first of many examples of parameters in Joomla. Let’s look at where these come from, how they are used, and how they are stored in the database.
Parameters are defined in XML files. In this case, the file is the templates/beez_20/templateDetails.xml file, which also includes other information about the template.
The portion of the file that contains the parameter information is inside the config element. This is shown in Listing 4.4.
Listing 4.4. Beez_20 Template Parameter Definitions
<config>
<fields name="params">
<fieldset name="advanced">
<field name="wrapperSmall" class="validate-numeric" type="text" default="53"
label="TPL_BEEZ2_FIELD_WRAPPERSMALL_LABEL"
description="TPL_BEEZ2_FIELD_WRAPPERSMALL_DESC"
filter="int" />
<field name="wrapperLarge" class="validate-numeric" type="text" default="72"
label="TPL_BEEZ2_FIELD_WRAPPERLARGE_LABEL"
description="TPL_BEEZ2_FIELD_WRAPPERLARGE_DESC"
filter="int" />
<field name="logo" type="media"
hide_default="1"
label="TPL_BEEZ2_FIELD_LOGO_LABEL" description="TPL_BEEZ2_FIELD_LOGO_DESC" />
<field name="sitetitle" type="text" default=""
label="TPL_BEEZ2_FIELD_SITETITLE_LABEL"
description="TPL_BEEZ2_FIELD_SITETITLE_DESC"
filter="string" />
<field name="sitedescription" type="text" default=""
label="TPL_BEEZ2_FIELD_DESCRIPTION_LABEL"
description="TPL_BEEZ2_FIELD_DESCRIPTION_DESC"
filter="string" />
<field name="navposition" type="list" default="center"
label="TPL_BEEZ2_FIELD_NAVPOSITION_LABEL"
description="TPL_BEEZ2_FIELD_NAVPOSITION_DESC"
filter="word"
>
<option value="center">TPL_BEEZ2_OPTION_AFTER_CONTENT</option>
<option value="left">TPL_BEEZ2_OPTION_BEFORE_CONTENT</option>
</field>
<field name="templatecolor" type="list" default="nature"
label="TPL_BEEZ2_FIELD_TEMPLATECOLOR_LABEL"
description="TPL_BEEZ2_FIELD_TEMPLATECOLOR_DESC"
filter="word"
>
<option value="nature">TPL_BEEZ2_OPTION_NATURE</option>
<option value="personal">TPL_BEEZ2_OPTION_PERSONAL</option>
</field>
</fieldset>
</fields>
</config>
If we compare the XML file to the Advanced Options screen, we can see that the following is true:
• Each slider group is defined by a fieldset element in the XML file.
• Each option field is defined by a “field” element in the XML file.
• The attributes define the behavior of each parameter, as indicated in Table 4.2.
Table 4.2. Parameter Field Element Attributes
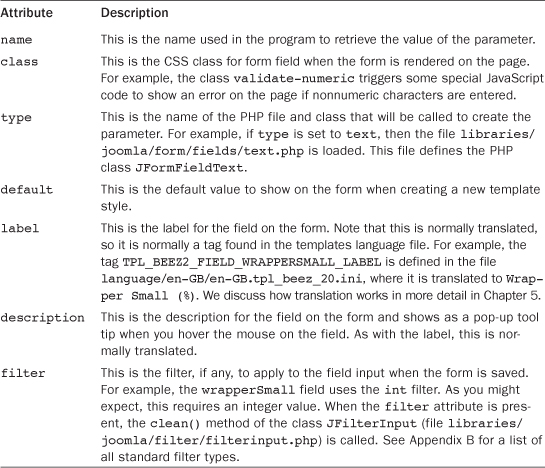
Note that the fieldset and field elements were added in Joomla version 1.6. They replace the params and param elements that were used in version 1.5.
Notice that the parameter named navposition has a type of list. This indicates that the user will select from a list of options in a drop-down list box. Each possible option is defined in a separate option element. Each option element has an attribute called “value,” which is the value passed to the form when this option is selected. The text for the “option” element is the text that will show in the list box. Note that this is normally translated, so it is a tag that will be defined in the language file for the template.
Next, let’s look at how parameters are stored in the Joomla database. If we look at the database table called #__template_styles, we find a row with the title column of Beez2 – Default. If we look at the params column for this row, we see the following value:
{"wrapperSmall":53,"wrapperLarge":72,"logo":"images/joomla_black.gif",
"sitetitle":"Joomla!","sitedescription":"Open Source Content
Management","navposition":"left","templatecolor":"personal"}
This text is in JSON format, which stands for JavaScript object notation. As of Joomla version 1.6, JSON is the format for saving Joomla parameters in the database.
If we look at Table 4.2, we can easily figure out how it works. The parameter name shows first, in quotes, before the colon. Then we see the parameter value after the quote. Each parameter is separated by a comma, and the whole thing is enclosed in curly braces.
You can see the complete definition of the JSON format at http://www.json.org. PHP includes the function json_decode, to convert JSON-formatted text to objects or arrays, and the function json_encode, to convert PHP arrays or objects to JSON-formatted text.
Note that all the parameters are stored in a single database column called parameters. This means that we can add new parameters without adding columns to the database. So, for example, a template style can contain any number of parameters, with whatever parameter names the template designer chooses. This approach of storing multiple parameters in one database column is used throughout Joomla and allows for very flexible parameter creation.
A disadvantage of this approach is that it is not as easy to use parameters in database queries.
Module Chrome
The jdoc:include element for modules (type="module") has an optional attribute called style. For example, in the index.php file for atomic, we see the following line:
<jdoc:include type="modules" name="atomic-topmenu" style="container" />
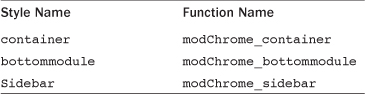
The container style tells Joomla to look for a function called modChrome_container in one of two files. The standard styles are included in the file templates/system/html/modules.php. Additional styles can be defined as functions in a modules.php file in your template’s HTML folder. For example, the atomic template defines three additional module styles in the file templates/atomic/html/modules.php as shown in Table 4.3.
Table 4.3. Atomic Template Module Styles
Note that these modules.php files do not declare PHP classes. Instead, they only declare functions. This has a subtle advantage when it comes to adding new chrome styles. Since we don’t have any class names, we don’t need a naming convention for any classes. We just need to find the PHP file and include it.
Let’s look at the modChrome_container function in the atomic modules.php file. This is shown in Listing 4.5.
Listing 4.5. Container Style from Atomic Template
function modChrome_container($module, &$params, &$attribs)
{
if (!empty ($module->content)) : ?>
<div class="container">
<?php echo $module->content; ?>
</div>
<?php endif;
}
This function is passed three arguments. The first, $module, is an object that contains the fields shown in Table 4.4.
Table 4.4. Fields in $module Object Passed to modChrome Functions
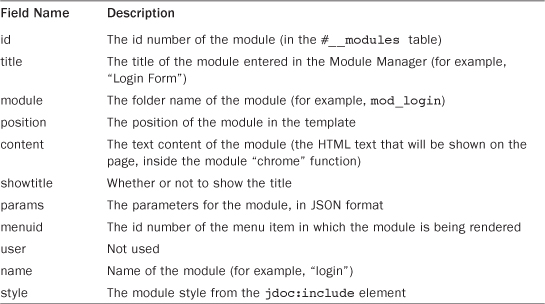
The second argument is a JRegistry object with the parameters for this module. This makes it convenient to check the value of any parameter inside the chrome function.
The third argument is an array of the attributes from the jdoc:include element (for example, name, style, and so on). Note that you can enter in any attributes in the jdoc:include tag and these will be available in the modChrome function. This can be useful for further customizing the appearance of modules.
Suppose, for example, that your module chrome had a border around it and you wanted to be able to set the border width when you created the position in the template. One way to implement this would be to add an attribute called border_width in the jdoc:include element and then read this attribute inside the chrome function to set the width (for example, using a different CSS class based on the border_width value).
Let’s look at the rest of the modChrome_container function. The first line checks to see if there is any content for this module. If not, nothing is shown. If there is content, it creates a div element and outputs the module’s content inside that element.
To see a more complex example, look at the file for beez_20 (templates/beez_20/html/modules.php).
In all cases, the actual output of the module is contained in the variable $module->content.
Since the modules.php function is supplied as part of your template, you can add as many styles as you like to customize the appearance of the modules on your site.
Copy Template
All layout override files are placed under a folder called templates/<template name>/html. So, for example, if your template is called my_beautiful_template, all the layout override files will be located under a folder called templates/my_beautiful_template/html.
This approach means that your override files are safely stored inside your template’s folder. However, this is only “safe” if the template is not a core template.
The core templates that ship with Joomla might be changed when you update to a newer Joomla version. This is fine if you are using the template as is and haven’t made any changes to any of its files. However, when we do overrides, we could be changing files and adding new ones.
It is easy to ensure that our customized override files will not be replaced when we upgrade to a newer Joomla version. All we need to do is use a template that is not included in the core distribution. For the purposes of this book, we will use a copy of the beez_20 template called beez_20_copy. There are two ways you can get this template:
• Create your own copy of beez_20 using the following instructions.
• Download the beez_20_copy.zip file from the book website here: http://joomlaprogrammingbook.com/downloads.html. Then install it using Extension Manager → Install.
Making a copy of a template is reasonably easy and a useful thing to know. Here are the steps:
1. Copy template folder to a new folder. In this case, we will use our operating system copy folder function to copy the templates/beez_20 folder (including all its subfolders and files) to a new folder called templates/beez_20_copy. Make sure you check that all of the files copied correctly.
2. Change the file names in the beez_20_copy XML file. Open the templates/beez_20_copy/templateDetails.xml file for editing. We just want to do a global search and replace, replacing beez_20 with beez_20_copy. This should do three replacements: the name element and the two language files inside the “language” elements.
3. Rename the language files. In step 2, we changed the name of the language files in the XML file. Now we need to actually rename these files in the file system as follows:
• en-GB.tpl_beez_20.ini to en-GB.tpl_beez_20_copy.ini
• en-GB.tpl_beez_20.sys.ini to en-GB.tpl_beez_20_copy.sys.ini
4. Copy these two files from templates/beez_20_copy/language/en-GB/ to language/en-GB/, again using your operating system file copy.
5. Discover and install. Joomla version 1.6 introduced a great new feature called Discover. This provides an alternative method for installing new extensions. When an extension is installed, two separate things happen:
• The files for the extension get copied to the correct folders in your Joomla installation.
• The Joomla database gets updated with the new extension information.
With Discover, we can manually copy the files into the folders and then tell Joomla to look for new extensions. When a new extension is discovered, we have the option to install it. This creates the correct entries for the extension in the Joomla database.
We’ll use this feature to install our new template. If we navigate to Extension Manager → Discover and press the Discover icon in the toolbar, Joomla will find our new template as shown in Figure 4.3.
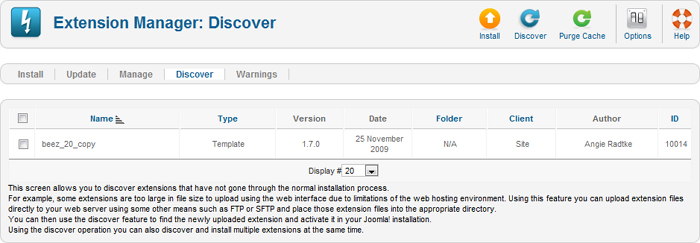
Figure 4.3. Install Discover
Now we can install the template by clicking on the select box and clicking the Install icon in the toolbar. When it has been installed, we will get a message saying “Discover Install Successful.”
Next, we want to make our beez_20_copy template the default template for the site. Navigate to the Extensions → Template Manager: Styles. Then select the new template and click the Make Default button (see Figure 4.4).
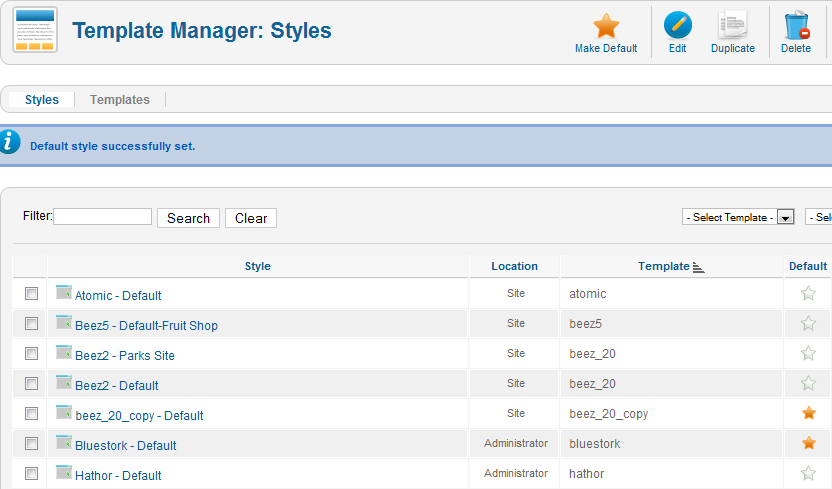
Figure 4.4. New template as default
Finally, if we want our new template to look like the original template, we need to change the style parameters for the new template style to match the old style. Click beez_20_copy – Default to open the Edit Style form, as shown in Figure 4.5.
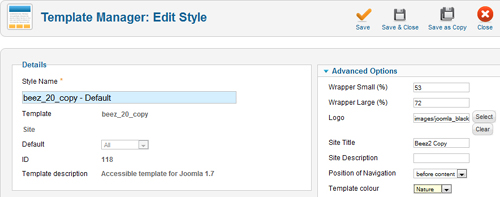
Figure 4.5. Edit style of new template
Set the fields as follows:
Logo: joomla_black.gif
Position of navigation: Before content
Template colour: Personal
With these settings, our new template should look exactly like the original beez_20 template.
At this point, we are ready to start creating layout overrides. Our override files will be stored in our own template, so our changes will not be lost when we update to a newer Joomla version.
Template Layout Override of Latest Articles Module
For our first example, let’s say that we want to change the way our Latest News module displays. Specifically, we want to include the first part of each article below the article’s title. To do this, we will create a template override for the layout for this module.
Module Configuration in Sample Data: loadposition
First, let’s look at how this module is set up in the sample data. In the back end of Joomla, navigate to Content → Article Manager and open the article called Latest News for editing. You should see a screen similar to that in Figure 4.6.
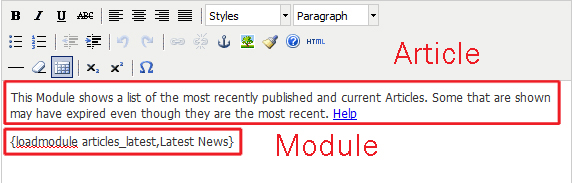
Figure 4.6. Latest Articles module article
Now this is a bit tricky. This is an article, but we are using the loadmodule plugin to insert the module into the body of the article. This is done with the text {loadmodule articleslatest,Latest News}. This command tells Joomla to insert the articles_latest module called “Latest News” into the body of this article at this point.
Close this and navigate to Extensions → Module Manager and open the Latest News module. You should see a screen similar to the one shown in Figure 4.7.
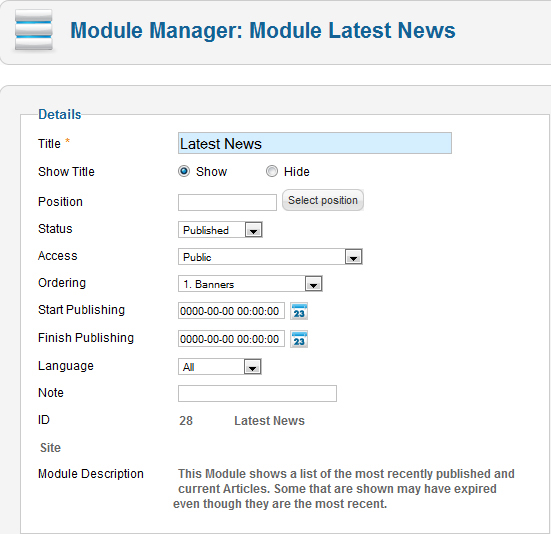
Figure 4.7. Latest News module
Now in the front end navigate to Using Joomla! → Using Extensions → Modules → Content Modules → Latest Articles. This will display the article called Latest Articles, as shown in Figure 4.8.
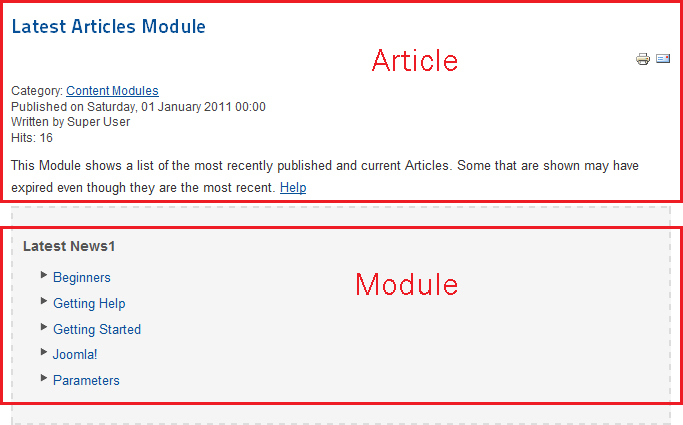
Figure 4.8. Latest Articles module screenshot
The first part of the screen is the first part of the article, before the {loadmodule} tag. The lower part of the screen is the actual Latest News module. We see that it is a simple list of article titles, where the titles are links to the articles.
Creating the Layout Override File
Now how do we start the process of customizing this layout? The first thing we need to do is find out where the original layout is located. For our example, the answer is in the modules/mod_articles_latest/tmpl folder. How did we know this? Recall in Chapter 3 that we show a table of the subfolder name for each module type name. In there, we can see that mod_articles_latest is the subfolder name for the Latest News module type.
The tmpl subfolder is where the layout files for modules are stored. In this case, there is just one layout, called default.php.
Now that we know where the standard layout is to be found, we need to know where to put our override file. The answer is in the html subfolder of our template folder. In our example, the folder is templates/beez_20_copy/html/mod_articles_latest. If we create a file in that folder called default.php, that file will be loaded instead of the standard default.php file for any page that is using the beez_20_copy template.
Recall from Chapter 3 that we always include an empty index.html file in each Joomla subfolder to prevent someone from browsing that subfolder to see its contents. For this reason, you should also copy an empty index.html file into the new templates subfolder (templates/beez_20_copy/html/mod_articles_latest).
Now let’s give it a try. First, create a new folder called templates/beez_20_copy/html/mod_articles_latest. Then copy the file modules/mod_articles_latest/tmpl/default.php to templates/beez_20_copy/html/mod_articles_latest/default.php.
The contents of this file are shown in Listing 4.6.
Listing 4.6. Latest News Module Layout File
<?php
/**
* @package Joomla.Site
* @subpackage mod_articles_latest
* @copyright Copyright (C) 2005 - 2012 Open Source Matters, Inc. All rights reserved.
* @license GNU General Public License version 2 or later; see LICENSE.txt
*/
// no direct access
defined('_JEXEC') or die;
?>
<ul class="latestnews<?php echo $moduleclass_sfx; ?>">
<?php foreach ($list as $item) : ?>
<li>
<a href="<?php echo $item->link; ?>">
<?php echo $item->title; ?></a>
</li>
<?php endforeach; ?>
</ul>
Since this is a layout file that is showing HTML elements, we use the alternative PHP syntax for the foreach loop. The file is small and simple. It just loops through a list of articles (the $list variable) and displays each title as a link element. The list is contained in a ul (unordered list) element, with each article’s title in an li (list item) element. Again, notice how PHP makes it easy to inject the value of variables inside HTML elements and attributes.
Now we’re going to have some fun with this file. First, we want to make sure we are really running the override file and not the standard file. An easy way to do this is to add some text to the override version of the file. Let’s add a heading on the line above the opening ul tag so that the first few lines now look like the following:
// no direct access
defined('_JEXEC') or die;
?>
<h1>My First Override</h1>
<ul class="latestnews<?php echo $moduleclass_sfx; ?>">
Now when we reload the article called Latest Articles Module, the module should display as shown in Figure 4.9.
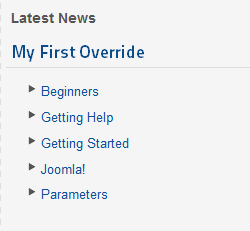
Figure 4.9. Test of layout override
If you don’t see this, check that you have the correct folder names and file name, and make sure you edited the version of the file in the templates/beez_20_copy/html/mod_articles_latest folder.
At this point, we know that Joomla is running our override file. Now we can get to work on customizing it to show the first part of each article.
Customizing the Layout
If we look again at the default.php file, we see that it is extracting the title and link for the article from a variable called $item. The PHP foreach command loops through an array, so we know that $list is an array of objects and that each object in the array is available in the $item variable.
We know that $item has at least two fields, link and title, because these are used in the layout. From this file, however, we don’t know what other information is available. Fortunately, there is an easy way to tell. If we add the command var_dump($item) to the file, inside the foreach loop, PHP will dump out the entire contents of $item so we can see what else it contains.
Here is what the modified file looks like:
<?php foreach ($list as $item) : ?>
<li>
<a href="<?php echo $item->link; ?>">
<?php echo $item->title; ?></a>
<?php var_dump($item);?>
</li>
<?php endforeach; ?>
Now when we reload the Latest Articles Module article, we see a long display showing us the var_dump output. A partial view of this is shown in Listing 4.7.
Listing 4.7. Output of var_dump Function
Beginners
object(stdClass)[539]
public 'id' => string '8' (length=1)
public 'title' => string 'Beginners' (length=9)
public 'alias' => string 'beginners' (length=9)
public 'title_alias' => string '' (length=0)
public 'introtext' => string '<p>If this is your first Joomla! site or
your first website, you have come to the right place. Joomla! will help
you get your website up and running quickly and easily.</p>
<p>Start off using your site by logging in using the administrator account
you created when you installed Joomla!.</p>
' (length=293)
public 'checked_out' => string '0' (length=1)
public 'checked_out_time' => string '0000-00-00 00:00:00' (length=19)
public 'catid' => string '19' (length=2)
If you use a PHP debugger, you can get the same information by inserting a break at the point where we added the var_dump command and then examining the variables inside the debugger.
This output tells us that $item is an object of the type stdClass. The stdClass object is built into PHP and is similar to an array. You access each field in a stdClass object using the notation <object variable>-><field name>. So in the standard layout we see the code $item->title, which gives us the title field inside the object called $item. The output also tells us the type of each field (string, integer, and so on), its value, and its length.
In this case, we can see that we have a large number of fields for the article available to us in the layout. For our example, we only need one—the introtext field. This field stores all the text for an article up to the Read More break. If there is no Read More break, it stores the entire article text.
Recall that our assignment is to include the first part of each article under the title. Our first idea might be to use the PHP substr function, which allows us to find part of a string based on position. Let’s say we want the first 50 characters of each article. We could modify the layout as follows:
<li>
<a href="<?php echo $item->link; ?>">
<?php echo $item->title; ?></a>
<?php echo substr($item->introtext, 0, 50) . '...'; ?>
</li>
The substr function takes three arguments, which are inside the parentheses. The first argument is the text we want to use, the second is where to start, and the third is how long we want our new text to be. In this case, we want to start at the beginning (which is 0, not 1), and use the first 50 characters.
If you are new to PHP, the dot (“.”) operator is called concatenate. That is just a fancy word for putting two string or text fields together into one field. So the . ‘...’ just adds three periods to the end of our text. This lets the reader know that there is more text in the article.
Let’s reload the page with our revised layout and look at the output, as shown in Figure 4.10.
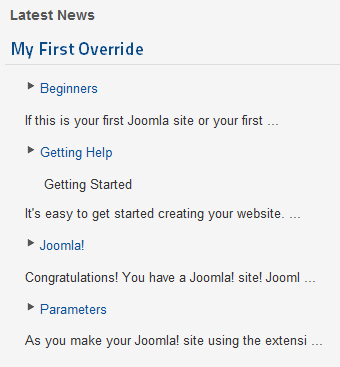
Figure 4.10. Override with introtext
Fixing a Problem Using the strip_tags Function
At first glance, this looks like what we want. We have the first portion of each article’s text under the title, followed by the “...” that we added.
If we take a closer look, however, we see a problem. The third article in the list should be Getting Started, but this is shown under the Getting Help article instead. What happened?
To answer this, let’s look at the Getting Help article’s text. If we go back to our var_dump output and look at the introtext for the Getting Help article, we see a long img tag, as shown in Listing 4.8.
Listing 4.8. Introtext of Getting Started Article
Getting Help
object(stdClass)[551]
public 'id' => string '21' (length=2)
public 'title' => string 'Getting Help' (length=12)
public 'alias' => string 'getting-help' (length=12)
public 'title_alias' => string '' (length=0)
public 'introtext' => string '<p><img class="image-left" src="administrator/templates/hathor/images/header/icon-48-help_header.png" border="0" /> There are lots of places you can get help with Joomla!. In many places in your site administrator you will see the help icon. Click on this for more information about the options and functions of items on your screen. Other places to get help are:</p>
<ul>
<li><a href="http://forum.joomla.org">Support Forums</a></li>
<li><a href="http://docs.joomla.org">Documentation</a></li>
<li><a href="' . . . (length=649)
When we took the first 50 characters of the introtext, we happened to get just the first part of the img tag, including the first part of the src attribute. So the HTML text for the Getting Started article was incorrectly placed inside the img tag.
Since we don’t know what HTML tags an article might have, and how long they might be, we have a bit of a problem. Fortunately, there is an easy solution. We can simply strip out the HTML using the PHP strip_tags function. This strips out all HTML tags from the text so we don’t have to worry about breaking the string in the middle of an HTML element.
The revised code looks like this:
<li>
<a href="<?php echo $item->link; ?>">
<?php echo $item->title; ?></a>
<p>
<?php echo substr(strip_tags($item->introtext), 0, 50) . '...'; ?>
</p>
</li>
If you are new to programming, this line of code could be confusing because we are putting the results of one function (strip_tags) inside a second function (substr). This is telling PHP to strip the tags from $item->introtext and then pass the result of that to the substr function. Then take the first 50 characters of that result, and add the “...”. Finally, echo all of that out to the browser.
Notice that we are putting our preview text inside a p element. We do this because the introtext won’t have any HTML in it. So putting it inside a p element will make sure it is valid HTML and formatted as a paragraph.
The output of our revised layout is shown in Figure 4.11.
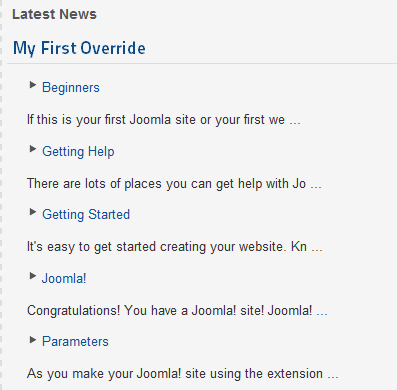
Figure 4.11. Output of layout with strip_tags function
This fixes our problem with the Getting Started article. Now we have all five of our articles and exactly 50 characters of text for each one.
There is one slight problem, however. Notice that in the second and third articles we are stopping in the middle of a word. It would be more professional to end the preview text at a word boundary.
Using the JHtmlString truncate Method
We could write our own method to fix this problem. For example, we could use the PHP function strrpos to find the last space in our preview text and only show the part up to that space.
However, we just happen to have a method already written in Joomla that does exactly this. It is called truncate() and is located in the Joomla library in the file libraries/joomla/html/html/string.php.
If we look at the code for this method, we see that it uses the method JString::substr instead of the standard PHP substr command. For example, we see this line of code:
$tmp = JString::substr($text, 0, $length);
Why do we do this? The answer relates back to the international scope of Joomla. Because we work in all major languages, we need to work correctly with the UTF-8 character set. This is the standard character set that allows us to display any character from any language, including Chinese, Greek, Korean, Arabic, and other languages that use non-Latin characters.
Some PHP string commands do not work correctly with all UTF-8 characters. For this reason, Joomla has its own set of string methods that do work with UTF-8 characters. These are located in the JString class (libraries/joomla/utilities/string.php). This class includes replacement functions for standard PHP string functions such as substr, strlen, str_split, strpos, and others. All the methods in JString are designed to work correctly with any UTF-8 characters, so these should be used any time you might be working with non-Latin characters.
Using the JHtmlString::truncate method gives us a chance to demonstrate two additional points:
1. A lot of useful methods already exist in the Joomla platform. So when you need a method to solve an issue, check to see if it already exists before writing it yourself.
2. When you want to use a platform class, you need to make that class available to the layout. We’ll show some different options for how to do this.
The Joomla library (or platform) contains many useful methods that solve common problems for web developers. The html folder in the library contains methods that are especially useful to web designers. A list of handy HTML methods is available in Appendix C. When you run into a problem that requires some programming, it is always a good idea to check to see if there is a solution already programmed in the platform.
It is worth pausing at this point and asking a question: How do we look through the methods available in the Joomla platform to see if there is something we can use?
There are several possible sources of information. In Appendix C we list some of the methods in the platform that are most useful for web designers. We can also go to the Code Summary page of the Joomla developer site at http://developer.joomla.org/code.html and click on the API Documentation link. This takes us to http://api.joomla.org. This site shows all the classes in the latest version of the Joomla platform. For example, if we select the Joomla-Platform package and then select HTML → Classes → JHtmlString, we see something similar to Figure 4.12.
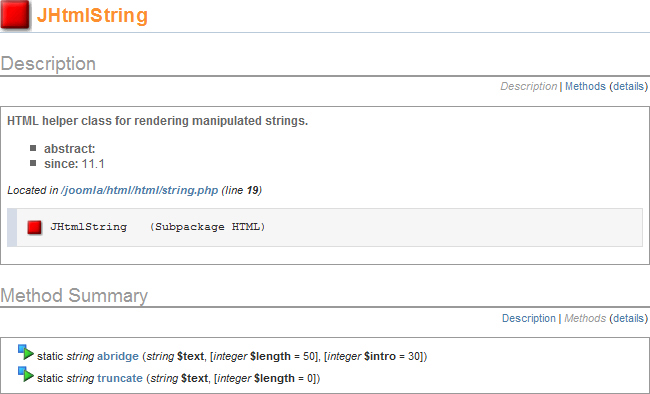
Figure 4.12. JHtmlString documentation
Note that this documentation is subject to change, so the screen you see may be different from Figure 4.12. However, it will have the same general information.
If we scroll down to the information about the truncate() method, we see the information shown in Figure 4.13.
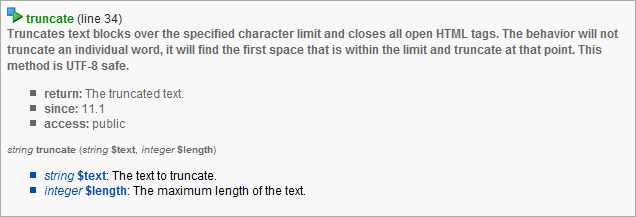
Figure 4.13. JHtmlString truncate method information
When you are trying to find out whether a Joomla platform method exists for a specific issue, you can also ask on the various Joomla developer communication channels. The important point is this: When you need a method to do something in Joomla, check to see if it already exists in the platform before writing your own.
The second thing we can demonstrate is how to add a library file to our layout. Notice in Figure 4.12, under Description, there is a line called “Located in.” This tells us where this file is located so we know how to include the file in our program. In this case, the file is located in joomla/html/html/string.php. Remember that all platform classes are located in the libraries folder, so the full path is libraries/joomla/html/html/string.php.
We will use the JLoader::register method to load the JHtmlString class. The register() method takes two arguments: the name of the class and the full path to the file. In this case, the class name is JHtmlString and the file path is libraries/joomla/html/html/string.php. We can use the constant JPATH_LIBRARIES to point to the location of the libraries folder, so the actual line of code to load the JHtmlString class is as follows:
JLoader::register('JHtmlString', JPATH_LIBRARIES.'/joomla/html/html/string.php'),
Recall from Chapter 3 that Joomla always loads a set of constants, including JPATH_LIBRARIES, to tell the system where various folders are located. It also loads some basic classes for the platform, including JLoader.
However, other classes need to be loaded as they are needed. The JHtmlString class is one of those. To load it, we just add the register() method to the beginning of our layout file (normally, just after the defined statement).
Now we can use that class in our layout. The code is shown in Listing 4.9.
Listing 4.9. Layout Using JHtml::
<?php
/**
* @version $Id: default.php 20196 2011-01-09 02:40:25Z ian $
* @package Joomla.Site
* @subpackage mod_articles_latest
* @copyright Copyright (C) 2005 - 2011 Open Source Matters, Inc. All rights reserved.
* @license GNU General Public License version 2 or later; see LICENSE.txt
*/
// no direct access
defined('_JEXEC') or die;
JLoader::register('JHtmlString', JPATH_LIBRARIES.'/joomla/html/html/string.php'),
?>
<h1>My First Override</h1>
<ul class="latestnews<?php echo $moduleclass_sfx; ?>">
<?php foreach ($list as $item) : ?>
<li>
<a href="<?php echo $item->link; ?>">
<?php echo $item->title; ?></a>
<p>
<?php echo JHtmlString::truncate(strip_tags($item->introtext), 53); ?>
</p>
</li>
<?php endforeach; ?>
</ul>
If we tried to use the JHtmlString class without the register() method, we would get a PHP error saying that the class JHtmlString could not be found.
Now that we have access to the methods of JHtmlString, we can use its truncate() method to break the introtext field at a word boundary. The line of code that actually does the work is
<?php echo JHtmlString::truncate(strip_tags($item->introtext), 53); ?>
This uses the syntax we got from the API documentation, where the first argument is the text to be truncated and the second is the maximum length of the string. We changed it from 50 to 53 and removed the “...” because the truncate method adds the periods for us and includes them in the length.
Now let’s reload the page and see what we have. Figure 4.14 shows an example.
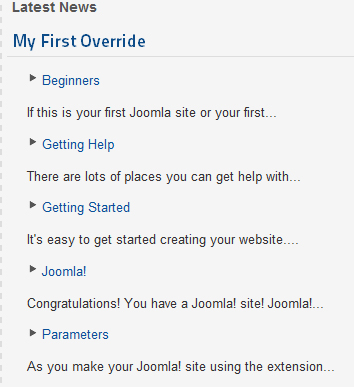
Figure 4.14. Output of layout with truncate method
Notice that now the preview text always breaks on a space instead of the middle of a word.
Using the JHtml::_ Syntax
At this point, we are almost done. However, there is one very nice programming trick we can use to finish this example. If we search the Joomla code base for places where we use the JHtmlString::truncate method, we won’t find that exact command anywhere. Instead, what we will find is something like this:
<?php echo JHTML::_('string.truncate', $item->introtext, $params->get('introtext_limit')); ?>
This statement is another way to call the exact same truncate() method. This is calling a function in the class JHTML called _ (underscore). (Important note: PHP class names are not case sensitive, so JHTML and JHtml refer to the same class. We should use JHtml because that is consistent with our naming convention, but PHP doesn’t care.)
The JHtml::_ method does a very cool thing. It interprets the first argument as follows. The first segment, string, is part of the class name. In this case, the full class name is JHtmlString (remember, it is not case sensitive). The second segment, truncate, is the method we want to call. The rest of the arguments are passed to this method. So, in this example, we pass the text and the maximum length.
Now here is the really great thing about using JHtml::_(): it automatically loads our class for us! So we don’t need to worry about loading the class, and we don’t need the JLoader::register() line in our layout.
Listing 4.10 shows the final code for the first layout, using the JHtml::_() syntax.
Listing 4.10. Final Layout with JHtml::_ Syntax
<?php
/**
* @version $Id: default.php 20196 2011-01-09 02:40:25Z ian $
* @package Joomla.Site
* @subpackage mod_articles_latest
* @copyright Copyright (C) 2005 - 2011 Open Source Matters, Inc. All rights reserved.
* @license GNU General Public License version 2 or later; see LICENSE.txt
*/
// no direct access
defined('_JEXEC') or die;
?>
<h1>My First Override</h1>
<ul class="latestnews<?php echo $moduleclass_sfx; ?>">
<?php foreach ($list as $item) : ?>
<li>
<a href="<?php echo $item->link; ?>">
<?php echo $item->title; ?></a>
<p>
<?php echo JHtml::_('string.truncate', strip_tags($item-> introtext), 53);?>
</p>
</li>
<?php endforeach; ?>
</ul>
Notice that we no longer have the JLoader::register() line. The output of this version is exactly the same as the prior version.
We covered a lot of topics in this section, but our work can be summarized into two steps:
1. We created the subfolder for our layout override file in our template and copied the standard layout file into this new subfolder.
2. We modified the layout override file to fit our needs. In this case, we just added some preview text from the article.
Now whenever we show this module using the beez_20_copy template, it will use our modified file instead of the standard file.
Change the Look of a Component: User Registration
We can override the layouts for components in exactly the same way as we did with modules. Let’s say, for example, that we want to change the layout of the front-end user registration to include an agreement that the user has to accept before registering.
Our first task is to find the layout file and put a copy of that file in the appropriate subfolder in the beez_20_copy template folder. Front-end user registration is a layout in the com_users component. If we look in the folder components/com_users/views we see a folder called registration. This has a subfolder called tmpl, which in turn has four files, as shown in Figure 4.15.
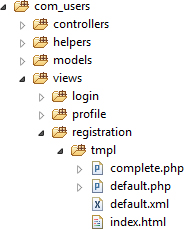
Figure 4.15. User registration layout files
The file default.php contains the user registration form. The file complete.php contains the layout for the screen that shows after the registration is completed.
The folder structure for component layout overrides is similar to what we did for modules. We need to create a subfolder called templates/beez_20_copy/html/<component name>/<view name>. In our example, this will be templates/beez_20_copy/html/com_users/registration.
Then we copy the default.php file from the components folder above to the new folder. When we have done this, the template folder structure should look like Figure 4.16.
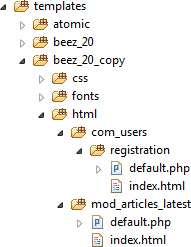
Figure 4.16. Registration layout override folder structure
With modules, we just put the override files in the subfolder with the module name. Components are a bit more complicated. They normally have multiple views, each of which can have its own default layout. Accordingly, we have to create a subfolder for each view under the component folder and then put the layout override files in that subfolder. Note that we have copied empty index.html files into the override folders to prevent someone from browsing directly to our folders.
Next, let’s make sure that we are running our override file. To do this, we can again add some text to the file and make sure it displays as expected. In Listing 4.11, we’ve added an h1 element with “My User Registration Override.”
Listing 4.11. New Heading to Check That Override Layout Is Executed
<div class="registration<?php echo $this->pageclass_sfx?>">
<h1>My User Registration Override</h1>
<?php if ($this->params->get('show_page_heading')) : ?>
<h1><?php echo $this->escape($this->params->get('page_heading')); ?></h1>
<?php endif; ?>
When we navigate to Home → Create an Account (with the Joomla sample data installed), we load the user registration form. If we have our beez_20_copy template defined as our default template, our modified layout file will show, as in Figure 4.17.
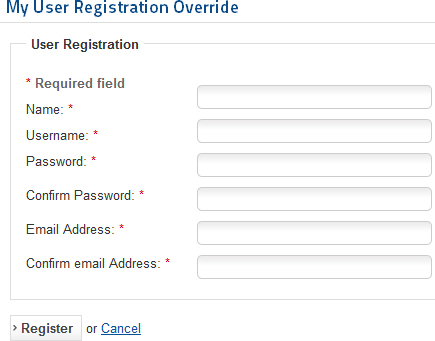
Figure 4.17. User registration override output with heading
Now we know we have everything set up correctly, so we can customize the file. We said in our example that we wanted the user to accept an agreement before they register. If we look at the layout file, we see that the Register button is at the end of the file. Listing 4.12 shows the code.
Listing 4.12. End of Layout File
<?php endforeach;?>
<div>
<button type="submit" class="validate" ><?php echo JText::_('JREGISTER'),?></button>
<?php echo JText::_('COM_USERS_OR'),?>
<a href="<?php echo JRoute::_(''),?>" title="<?php echo JText::_('JCANCEL'),?>"><?php echo JText::_('JCANCEL'),?></a>
<input type="hidden" name="option" value="com_users" />
<input type="hidden" name="task" value="registration.register" />
<?php echo JHtml::_('form.token'),?>
</div>
</form>
</div>
We want to insert the check box for our agreement just before the Register button code (highlighted in Listing 4.12). The modified version of the file is shown in Listing 4.13.
Listing 4.13. Layout with Terms of Service Check Box
<?php endforeach;?>
<div>
<fieldset>
<legend>Terms of Service</legend>
<p><input type="checkbox" /> I agree to the terms of service for this website.</p>
</fieldset>
<button type="submit" class="validate" ><?php echo JText::_('JREGISTER'),?></button>
<?php echo JText::_('COM_USERS_OR'),?>
<a href="<?php echo JRoute::_(''),?>" title="<?php echo JText::_('JCANCEL'),?>"><?php echo JText::_('JCANCEL'),?></a>
<input type="hidden" name="option" value="com_users" />
<input type="hidden" name="task" value="registration.register" />
<?php echo JHtml::_('form.token'),?>
</div>
</form>
</div>
We inserted a standard HTML fieldset element with a legend and a check box. The result displays as shown in Figure 4.18.
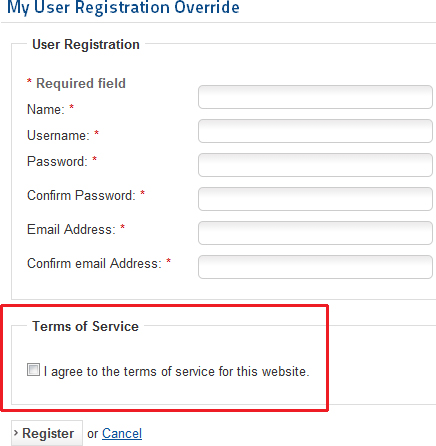
Figure 4.18. Registration form with terms of service
Notice that there are two limitations to this new form:
• We are not requiring that the user check the box before registering.
• The wording of the check box is hard-coded in English and will not be translated if the site is run in a different language.
In Chapter 5, we add a plugin that validates that the check box is actually checked. Later in this chapter we add a language file override and modify our form to allow the text to be translated into other languages.
Alternative Layouts
In the two examples so far, the overrides are “hard-coded” for a specific template. If we show any menu item using the beez_20_copy template, for example, Joomla will always use the override file for a module or a component view, if one exists in the beez_20_copy/html folder.
Joomla version 1.6 introduced a new feature called alternative layouts. This is a more flexible way to use overrides. Alternative layouts work almost the same as template overrides, with two differences:
• With template overrides, we want to keep the layout file name the same as the standard (default.php in our examples). With an alternative layout, we create the file with a different name.
• With template overrides, the override file is always used. With alternative layouts, we select which file to use when we create the module or the menu item.
Let’s demonstrate alternative layouts by renaming our Latest News module layout from default.php to preview.php. (Recall that it is in the templates/beez_20_copy/html/mod_articles_latest folder.) Now when we navigate to the Module Manager and open this module for editing, we can see our alternative layout as an option in the Advanced Options, as shown in Figure 4.19.
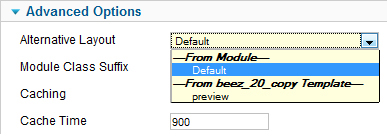
Figure 4.19. Alternative module layout example
We can use this same method to create alternative layouts for articles, contacts, news feeds, web links, category lists, and category blogs. These work the same as template overrides. If you name the alternative layout file something other than the standard layout name, it is treated as an alternative layout. You can set each component or category to use an alternative layout either in the component settings screen (for example, Article Manager → Settings) or for individual items (articles, contacts, news feeds, web links, or categories). You can read more about using alternative layouts on the Joomla documentation wiki (http://docs.joomla.org/Layout_Overrides_in_Joomla_1.6#Component_Alternative_Layouts).
There are two major advantages to alternative layouts. First, you can have multiple layouts for the same module, without needing multiple templates. Second, you can select a layout from a template even if you are not using that template to display the page.
The only requirements for naming an alternative layout are (1) that it is a different name from that of the standard layout and (2) that it doesn’t contain an “_” (underscore) in the name. Names with underscores are assumed to be sublayout files.
Adding a New Menu Item Layout
Also starting with Joomla version 1.6, it is possible to create alternative menu items. An alternative menu item includes a layout file and an XML file. Using the XML file, we can override the parameters for the menu item.
Creating an alternative menu layout is similar to creating a template override. Here are the steps:
1. Create a subfolder in the templates folder called templates/<your template name>/html/<component name>/<view name>/ (same as for template overrides).
2. Create one or more view PHP files and one menu item XML file. The main view file and the XML file must have the same name, and the name must be different from the standard file name.
3. If needed, create sublayout files, again using the same name as in (2) for the first segment of the sublayout file.
We can see how this works by changing our modified User Registration form from a template layout to an alternative menu item layout. To do this, we will follow these steps:
1. Rename default.php (in the folder templates/beez_20_copy/html/com_users/registration) to approval.php.
2. Copy components/com_users/views/registration/tmpl/default.xml to templates/beez_20_copy/html/com_users/registration/approval.xml.
3. If desired, add or remove any parameters from the XML file. In our example, we will add an optional check box for the user to indicate that he or she is at least 18 years old. We will modify the layout file to show a second check box if this parameter is set.
After we copy the files, our beez_20_copy folder should look like Figure 4.20.
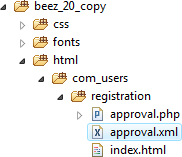
Figure 4.20. Alternative menu item files
Parameter Overrides
For each new menu item layout, we are creating a new XML file for our parameters. This gives us the opportunity to customize the parameters for the new menu item layout. We are free to add or remove parameters, and we can access any added parameters inside the layout file.
Let’s add a parameter for the second check box in our layout file. The revised XML file code is shown in Listing 4.14.
Listing 4.14. User Registration Alternative Menu Item XML File
<?xml version="1.0" encoding="utf-8"?>
<metadata>
<layout title="Registration with Approval" option="Approval">
<help
key="JHELP_MENUS_MENU_ITEM_USER_REGISTRATION"
/>
<message>
<![CDATA[COM_USER_REGISTRATION_VIEW_DEFAULT_DESC]]>
</message>
</layout>
<!-- Add fields to the parameters object for the layout. -->
<fields name="params">
<!-- Basic options. -->
<fieldset name="basic" label="COM_MENUS_BASIC_FIELDSET_LABEL">
<field
name="show_age_checkbox"
type="radio"
label="Show Age Checkbox"
description="Show or hide the age checkbox."
default="0" >
<option value="0">Hide</option>
<option value="1">Show</option>
</field>
</fieldset>
</fields>
</metadata>
This file is a copy of the components/com_users/views/registration/tmpl/default.xml file with some modifications.
We changed the title and option attributes. The title attribute is what will show when you create a new menu item. This should be different from the standard title so you know which menu item type you are creating.
The help element provides the key for the help system to know which article to load when the help icon is pressed. Since we don’t have a separate help file for our override, we leave this unchanged.
The last change is adding the field element for our new parameter. This is called show_age_checkbox and is a radio button parameter. It has two options, Hide or Show, with the default being Hide.
When a new menu item is created, this XML file is processed by the JForm classes in the Joomla library to render the options for the menu item.
Now let’s see what this looks like when we use the new alternative menu item. When we navigate to Menus → Main Menu and press the New icon and then press the Select button for the Menu Item Type field, we see Figure 4.21.
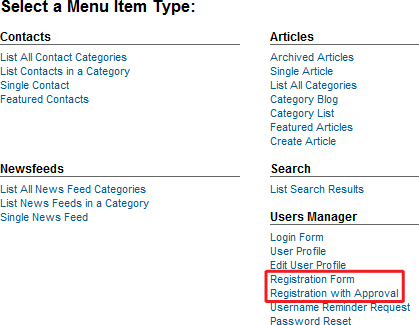
Figure 4.21. Menu item type list with alternative menu item type
Note that our new Registration with Approval menu item type is now listed. If we select that type, we see the New Menu Item screen. This now displays the Show Age Checkbox option, as shown in Figure 4.22.
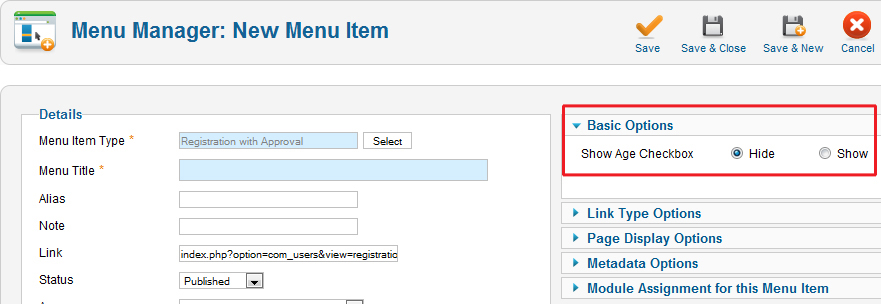
Figure 4.22. Menu item entry screen with custom options
Notice that our new option shows inside the Basic Options group.
Now let’s use our new parameter to conditionally add a second check box in our layout. The modified code for the revised layout is as follows:
<fieldset>
<legend>Terms of Service</legend>
<p><input type="checkbox" /> I agree to the terms of service for this website. </p>
<?php if ($this->params->get('show_age_checkbox')) : ?>
<p><input type="checkbox" /> I am at least 18 years old. </p>
<?php endif; ?>
</fieldset>
In this case, we have added code to check the new show_age_checkbox parameter. It is automatically made available in the $this->params field via the get() method. The parameter value is 0 for hide and 1 for show. A 0 in PHP evaluates to a boolean false inside the if condition. With this code, the age check box is only rendered if the option is set to Show, which is what we want.
Using our new alternative menu item, create a new menu item called My User Registration. Then try displaying the layout for both option values to make sure it works correctly.
How Do Layout Overrides Work?
The code behind module and component layout overrides is interesting and instructive. However, it makes more sense to do this once we have a more detailed understanding of the normal operation of modules and components. Accordingly, we discuss the code that implements module layouts in Chapter 6 and alternative menu items in Chapter 8.
Nonlayout Overrides
Joomla also allows us to override other aspects of our site. These include the following:
• Module chrome, which is the decoration around a module layout
• Language files
• Menu Item Parameter
These are discussed next.
Module Chrome: Add New Module Style
We discussed module chrome and styles earlier in this chapter. To see how this works, let’s create a new module style for our customized template.
The steps we need to take are as follows:
1. Create the new modChrome function in the modules.php file for our customized template.
2. Use the new style in a jdoc:include position declaration in our template’s index.php file.
3. Assign a module to this position.
To save a bit of time, we will copy the existing modChrome function called modChrome_table from the file templates/system/html/modules.php and paste it into the end of the template’s modules.php file (templates/beez_20_copy/html/modules.php). Then we will rename the PHP function modChrome_beezCopyFramed Table. The result is that the last part of the file templates/beez_20_copy/html/modules.php reads as shown in Listing 4.15.
Listing 4.15. New modChrome_framedTable Function
/*
* Customized module chrome example for beez_20_copy
*/
function modChrome_beez20_copyFramedTable ($module, &$params, &$attribs)
{ ?>
<table cellpadding="0" cellspacing="0" class="moduletable<?php echo htmlspecialchars($params->get('moduleclass_sfx')); ?>">
<?php if ($module->showtitle != 0) : ?>
<tr>
<th>
<?php echo $module->title; ?>
</th>
</tr>
<?php endif; ?>
<tr>
<td>
<?php echo $module->content; ?>
</td>
</tr>
</table>
<?php
}
This function is a simple and great example of mixing HTML and PHP in a layout. Notice that the "} ?>" in the fourth line closes the PHP tag so we can include HTML elements.
First we create an HTML table element. Then we check to see if we are supposed to show the module’s title. If so, we create a table heading (th) element for the table with the title. Finally, we output the content of the module in a table row (tr) and table cell (td) element.
There are several things to note about this. As mentioned earlier, this is a PHP function and not a method inside a PHP class. Because of this, this function is the very last thing in the file and is not wrapped inside a closing curly brace (}) for a class definition. So make sure you insert this at the very end of the modules.php file, after the last curly brace.
Notice also that we have included the template name beez20_copy as part of the function name. This is important if we plan to use this template in sites with other templates.
As you would expect, PHP will not allow us to name the same function twice, since it wouldn’t know which one to use. When we add a new template to the site, we don’t know what modChrome functions these templates might add in their modules.php files. By including our template name as part of the function name, we can be reasonably confident that it will not be the same as a name from another template (and therefore not cause a PHP error). This technique of adding a unique prefix to the name is sometimes called “namespacing.” We use a similar technique when we create keys for language files.
Now let’s modify our new style to include a 5-pixel border around the table. We’ll change the table element by adding a border attribute as follows:
function modChrome_beez20_copyFramedTable($module, &$params, &$attribs)
{ ?>
<table cellpadding="0" cellspacing="0" border="5" class="moduletable<?php echo htmlspecialchars($params->get('moduleclass_sfx')); ?>">
Now that we have our new style, we have to modify the template’s index.php file to create a position that uses this style. So we’ll edit the file templates/beez_20_copy/index.php and add a new position called position-7a. Recall that module positions are added using the jdoc:include tag. Here is a segment of the modified file, with the added code highlighted:
<div class="left <?php if ($showRightColumn==NULL){ echo 'leftbigger';} ?>" id="nav" >
<jdoc:include type="modules" name="position-7" style="beezDivision" headerLevel="3" />
<jdoc:include type="modules" name="position-7a" style="beez20_copyFramedTable" />
<jdoc:include type="modules" name="position-4" style="beezHide" headerLevel="3" state="0 " />
If this were going to be a real position for our template, we would also want to add this new position to the templateDetails.xml file. But we don’t need to for this example.
The last step is to change the module to use position-7a. We do this by going to the Module Manager and changing the position value, as shown in Figure 4.23.

Figure 4.23. Module manager with new position
Because we didn’t add the position to the templateDetails.xml file, it will not appear in the list of positions. So we must enter it manually. Let’s also change the module’s Menu Assignment to display On All Pages.
Now when we display our home page, the Latest News module shows with our new chrome style, as shown in Figure 4.24. (Note that we are again using the standard layout and not the override, because we renamed default.php to preview.php in the folder templates/beez_20_copy/html/mod_articles_latest.)

Figure 4.24. Output of new style
Next let’s use the attribute feature of chrome to allow the designer to set the border width inside the jdoc:include tag. We’ll change the function as follows:
{ ?>
<table cellpadding="0" cellspacing="0" border="<?php echo $attribs['border'] ?>" class="moduletable<?php echo htmlspecialchars($params->get('moduleclass_sfx')); ?>">
Here the value for the border attribute is being set using the PHP variable $attribs['border']. This value will be passed to the function based on attributes in the jdoc:include element. To use this, we need to modify the template index.php file as follows:
<jdoc:include type="modules" name="position-7a" style="beez20_copyFramedTable" border="2" headerLevel="3" />
In this case, we have set the value of border to 2 pixels. We can vary the border width for any position that uses the beez20_copyFramedTable style, just by setting the “border” attribute in the jdoc:include element.
What happens if we leave the border attribute out of the jdoc:include element? Before we try that, let’s go to Global Configuration → Server in the back end of our site and set the Error Reporting to Maximum, as shown in Figure 4.25.
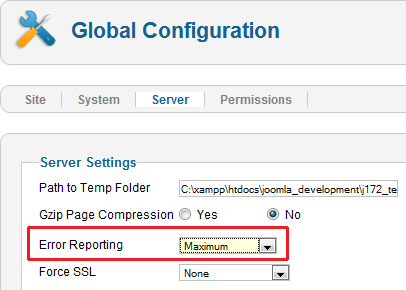
Figure 4.25. Server error reporting setting
It is strongly recommended to use this setting whenever you are writing code for Joomla, and we are about to see why. We’ll go back to the template index.php file and remove the border attribute from the jdoc:include element, as shown:
<jdoc:include type="modules" name="position-7a" style="beez20_copyFramedTable" />
Now when we display our module, we get a PHP Notice message, as shown in Figure 4.26. This is because we are referencing an array element, $attribs['border'] that is not defined. If we had our error reporting set to normal, we wouldn’t see this notice. When we are writing code, it is important to make the code as robust or “bulletproof” as possible. One example of this is to always make sure we have a variable defined before we try to use it.
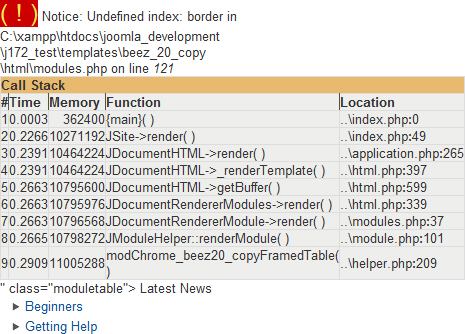
Figure 4.26. PHP notice for undefined array index
Once we realize our mistake, fixing it is easy. One way is to use the PHP function isset, along with the ternary operator, as follows:
function modChrome_beez20_copyFramedTable($module, &$params, &$attribs)
{ ?>
<?php $border = (isset($attribs['border'])) ? (int) $attribs['border'] : '1'; ?>
<table cellpadding="0" cellspacing="0" border="<?php echo $border ?>" class="moduletable<?php echo htmlspecialchars($params-> get('moduleclass_sfx')); ?>">
The PHP ternary operator returns a value based on whether a condition is true or not. It uses the following syntax:
<condition> ? <value if condition is true> : <value if condition is false>
In our example, we evaluate the expression isset($attribs['border']). If that is true, we set the variable $border equal to the integer value of $attribs['border']. Otherwise, we set $border to the value of 1.
We use the (int) function because the value of this attribute should always be an integer. If the user makes a mistake and sets the border attribute to a noninteger value, we will always have a valid value for the border attribute.
Note that we could have done the exact same thing with an if/then statement. However, the ternary operator does the work with one line of code.
Language Overrides: Add Translation to Our Override
Version 1.6 added a handy new feature for customizing the text that shows in Joomla. Two new folders are available for placing optional language override files: language/overrides for the front end and administrator/language/overrides for the back end.
Let’s look at an example. If we look at the language file administrator/language/en-GB/en-GB.ini, we see this line of text:
JACTION_EDIT="Edit"
The language key JACTION_EDIT is used in the ACL permissions—for example, in Global Configuration → Permissions to show the Edit permission.
We can override any language key value in the back end simply by creating an override file of the proper name and putting any language keys we like in that file. The naming convention for the file is xx-XX.override.ini, where xx-XX is the desired language identification. For the default Joomla language “en-GB,” the file is called en-GB.override.ini.
To try it, create a new file called administrator/language/overrides/en-GB.override.ini and put the following line in it:
JACTION_EDIT="Update"
Now when you display the Global Configuration → Permissions screen, you should see Update instead of Edit.
We can also use this same method to fix a problem in our User Registration alternative menu item. Recall that we have the following lines of code in this file:
<fieldset>
<legend>Terms of Service</legend>
<p><input type="checkbox" />I agree to the terms of service for this website. </p>
<?php if ($this->params->get('show_age_checkbox')) : ?>
<p><input type="checkbox" />I am at least 18 years old. </p>
<?php endif; ?>
</fieldset>
In this code block, we have three places where we are displaying English text. This practice is strongly discouraged when developing for Joomla, since so many Joomla users speak languages other than English.
Joomla has a handy feature, called Debug Language, that helps us check that all of our language strings are translated. If we go to Global Configuration → System and look at the Debug Settings group, we see Debug System and Debug Language, as shown in Figure 4.27.
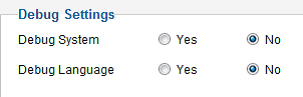
Figure 4.27. Debug settings in global configuration
Debug System is useful for troubleshooting database queries, and we demonstrate that in Chapter 11. Debug Language shows us whether literal strings are translated or not. If we set Debug Language to yes and show our alternative menu item for user registration, it looks like Figure 4.28.
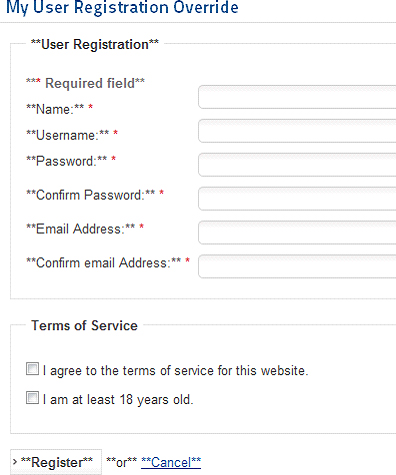
Figure 4.28. Override layout with language debug = yes
All the translated strings have "**" before and after the translated text. Note that the three strings that we added (“Terms of Service,” “I Agree . . . ,” and “I Am . . .”) do not have the "**". This indicates that these strings cannot be translated.
Using language override files, it is easy to make our layout override work with multiple languages. All we do is substitute our literal text with the method JText::_('DESIRED_TEXT_KEY'), as shown here:
<fieldset>
<legend><?php echo JText::_('BEEZ_20_COPY_TERMS_OF_SERVICE')?></legend>
<p><input type="checkbox" /> <?php echo JText::_('BEEZ_20_COPY_AGREE')?> </p>
<?php if ($this->params->get('show_age_checkbox')) : ?>
<p><input type="checkbox" /> <?php echo JText::_('BEEZ_20_COPY_AGE')?> </p>
<?php endif; ?>
</fieldset>
The argument for the JText::_() method is called the language key. Joomla will find that key value in one of the loaded language “.ini” files and return the value of that key.
There are two rules for keys. First, they may not contain spaces and may not be equal to a few reserved words (null, yes, no, true, false, on, off, and none). This is because Joomla uses the PHP function parse_ini_file() to process language files.
Second, each language key must be unique. Otherwise, we will change some other text value that we didn’t mean to change. The simplest way to ensure that we have a unique language key is to include the name of the extension as part of the key. Since we don’t have an extension in this example, we have used the name of our template as the first part of the key. That way we only have to make sure the rest of the key is unique within our template. This is another example of using a simple namespace to create a unique name.
The key values must be placed in double quotes. If you need to put double quotes inside a language string, you can use " or _QQ_. You can find examples of this in the core Joomla language files.
Now let’s look at the registration form with our modified layout, as shown in Figure 4.29. Our key values are surrounded by double question marks (??). This indicates that JText::_() could not find the keys in a language file. This is what we want because it indicates that our keys are unique and are not present in any loaded language files.
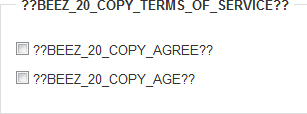
Figure 4.29. Registration form with missing language keys
The last step is to create our override language file with the new keys in it. Since this is a front-end screen, we need to create the front-end override file for the en-GB language. So the full name of the file will be language/overrides/en-GB.override.ini and its contents will be as follows:
; Example front-end language override file
; Keys for templates/beez_20_copy/html/com_users/registration/approval.php
layout file
BEEZ_20_COPY_TERMS_OF_SERVICE="Terms of Service"
BEEZ_20_COPY_AGE="I am at least 18 years old."
BEEZ_20_COPY_AGREE="I agree to the terms of service for this site."
Now when we display the form, our text is bracketed with the ** characters, indicating that the text is translated from a language file, as shown in Figure 4.30.
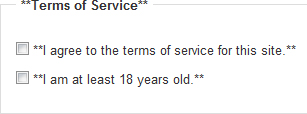
Figure 4.30. Registration form with translated text
Language overrides can be used in two different ways: (1) to change the text for an existing language key and (2) to provide translated text for a layout override. When we create an extension, we will typically create new language files for the extension and not use override files. We discuss language files for plugins, modules, and components in the following chapters.
As of Joomla version 2.5, we can create and edit language overrides using the Overrides tab in Extensions → Language Manager in the administrative back end. This accomplished exactly the same thing as we have done manually.
Table and Model Overrides
Joomla allows us to override the standard PHP classes used for tables (subclasses of the JTable class) and models (subclasses of the JModel class). The most flexible way to do this is using a plugin. This is discussed in Chapter 5.
Summary
In this chapter, we presented an overview of templates in Joomla and we demonstrated many of the ways that Joomla allows you to override the standard layouts. All of this was done with very little coding and without writing any new extensions.
We can customize a lot of existing core functionality in Joomla in this manner. However, to really see the power of extending Joomla, we need to create our own extensions. We address this in the following chapters.