
8. Components Part II: Views, JForm, and Front End
In the previous chapter, we looked at the controllers and models for the back end of the Weblinks component. In this chapter, we continue our look at the Weblinks component.
We start by examining the views and display methods, including an in-depth look at how the Weblinks Manager layout works. Then we explore the use of the JForm class in the Weblink Edit view. Finally, we look at the front end of Weblinks and discuss what is similar and different between the back end and front end of the component.
Views and the display() Method
Let’s now examine the view part of the model-view-controller (MVC) pattern, still in the back end. Recall that a view is shown when we have no task or the task is display. In this case, the WeblinksController class (the controller.php file relative to the component’s home folder administrator/components/com_weblinks/) is loaded. (All file names in this chapter are relative to this folder unless otherwise specified.) Its only method is display(), and it is responsible for displaying the two component views. The Weblinks view (plural) shows a list of Weblinks and is the default view for the component. The Weblink view (singular) allows adding or editing a single Weblink item.
Weblinks View
Let’s start with the Weblinks view. The code for the display() method of Weblinkscontroller is as follows:
public function display($cachable = false, $urlparams = false)
{
require_once JPATH_COMPONENT.'/helpers/weblinks.php';
// Load the submenu.
WeblinksHelper::addSubmenu(JRequest::getCmd('view', 'weblinks'));
$view = JRequest::getCmd('view', 'weblinks'),
$layout = JRequest::getCmd('layout', 'default'),
$id = JRequest::getInt('id'),
// Check for edit form.
if ($view == 'weblink' && $layout == 'edit' && !$this->checkEditId('com_weblinks.edit.weblink', $id)) {
// Somehow the person just went to the form - we don't allow that.
$this->setError(JText::sprintf('JLIB_APPLICATION_ERROR_UNHELD_ID', $id));
$this->setMessage($this->getError(), 'error'),
$this->setRedirect(JRoute::_('index.php?option=com_weblinks&view=weblinks', false));
return false;
}
parent::display();
return $this;
}
This method gets the view, layout, and Weblinks item id from the request. In this case, the view and layout are blank, so we get the default values of “weblinks” for the view and “default” for the layout. The id is also blank.
The next code block is skipped, since we are not in the Weblink view. Then we execute the parent’s display() method. Finally, we return the current object. Note that the return value is not used, since we called this method without assigning the result to a variable. However, by returning the object, we allow for “method chaining.” This is where we can use an object created by one method to call a second method.
For example, we could replace the following three lines of code,
$controller = JController::getInstance('Weblinks'),
$controller->execute(JRequest::getCmd('task'));
$controller->redirect();
with the following single line of code:
JController::getInstance('Weblinks')-> execute(JRequest::getCmd('task')->redirect();
This is because the getInstance() method returns a controller object, and that object has an execute() method. Because the execute() method again returns the controller object, we can use that object to call the redirect() method. The ability to do method chaining was added in version 5 of PHP.
JController display() Method
The WeblinksController class extends JController (libraries/joomla/application/component/controller.php), so parent::display() in WeblinksController executes the display() method of JController. The first part of the code is as follows:
public function display($cachable = false, $urlparams = false)
{
$document = JFactory::getDocument();
$viewType = $document->getType();
$viewName = JRequest::getCmd('view', $this->default_view);
$viewLayout = JRequest::getCmd('layout', 'default'),
$view = $this->getView($viewName, $viewType, '', array('base_path' => $this->basePath, 'layout' => $viewLayout));
// Get/Create the model
if ($model = $this->getModel($viewName)) {
// Push the model into the view (as default)
$view->setModel($model, true);
}
$view->assignRef('document', $document);
$conf = JFactory::getConfig();
This gets the document, which in our case is an instance of JDocumentHTML, and the type of view—in our case, HTML. The view name is “weblinks,” the layout is “default,” and the view class is WeblinksViewWeblinks. Then we get the model, which is WeblinksModelWeblinks, and we make this the default model for the view.
Then we set the layout for the view and create a class field called “document” and assign the document object ($document) to that field. Finally, we get the global configuration information and save it to a variable called $conf.
The next code block in the display() method (not shown here) checks to see if we have saved this page in a cache file and, if so, loads from the cache. If not, we execute the display() method of the view, in our case WeblinksViewWeblinks (views/weblinks/view.html.php).
WeblinksViewWeblinks display() Method
The code for this display() method is as follows:
public function display($tpl = null)
{
$this->state = $this->get('State'),
$this->items = $this->get('Items'),
$this->pagination = $this->get('Pagination'),
// Check for errors.
if (count($errors = $this->get('Errors'))) {
JError::raiseError(500, implode("
", $errors));
return false;
}
$this->addToolbar();
parent::display($tpl);
}
Here we actually start to create our page. The first three lines execute the getState(), getItems(), and getPagination() methods from our model. The get() method in the view finds the model name and looks for a method in the model called “get” plus the string in the argument (for example, “get” + “State”). Our model, Weblinks ModelWeblinks, extends JModelList, which in turn extends JModel.
In this case, the getState() method is inherited from the JModel class and getItems() and getPagnination() are inherited from JModelList. The getState() method returns the state object. This represents the current state of the screen, including the filters in effect, the page number, the ordering, and so on. The getItems() method returns the list of Weblink items for the screen. This is the information we will display in our list. The getPagination() returns the pagination object. This provides for the page numbers on the screen and for navigating through the items one page at a time.
Once we have what we need from the model, we check for errors. If there are none, we add the toolbar using the addToolbar() method. This adds the toolbar icons such as New, Edit, Publish, and so on. Recall that the toolbar comes from the administrative module mod_toolbar. This module works by displaying a global toolbar object. The addToolbar() method creates the toolbar icons in that object so they will be available to display when the mod_toolbar module is rendered later in the cycle.
Then we call the parent (JView) display() method (from the file libraries/joomla/application/component/view.php). This method has the following code:
function display($tpl = null)
{
$result = $this->loadTemplate($tpl);
if (JError::isError($result)) {
return $result;
}
echo $result;
}
Here we execute the loadTemplate() method of JView and save the results in a variable called $result. Then we use the PHP echo command to send that to the browser. Recall from Chapter 3 that when we execute the component, we have already turned on the output buffer with the ob_start() command. So when we issue the echo command here, it sends the output to the buffer, not to the browser.
The loadTemplate() method checks for template override files and loads any required language files. Then, assuming it finds the layout file correctly, it executes this code near the end of the method:
// start capturing output into a buffer
ob_start();
// include the requested template filename in the local scope
// (this will execute the view logic).
include $this->_template;
// done with the requested template; get the buffer and
// clear it.
$this->_output = ob_get_contents();
ob_end_clean();
return $this->_output;
The ob_start() command turns on output buffering. Then we include the template layout file. In our case, this will be the file views/weblinks/tmpl/default.php. Note that if we were using the Hathor administrative template instead of the default Bluestork template, we would load the Hathor override file administrator/templates/hathor/html/com_weblinks/weblinks/default.php.
This layout does not declare a class, so it is executed immediately and its output (the results of the echo commands) is saved in the buffer. The buffer is then copied into the field $this->_output, which is returned to the calling method (the $result variable in the previous code block).
Default Layout File
Now we get to the file where we are actually displaying the component output. It is helpful to see what each part of the layout is actually displaying. Figure 8.1 shows a screenshot of the Weblinks Manager: Weblinks screen with labels A-F on different parts of the screen. Let’s look at the layout file and see how each of these parts of the screen is displayed.
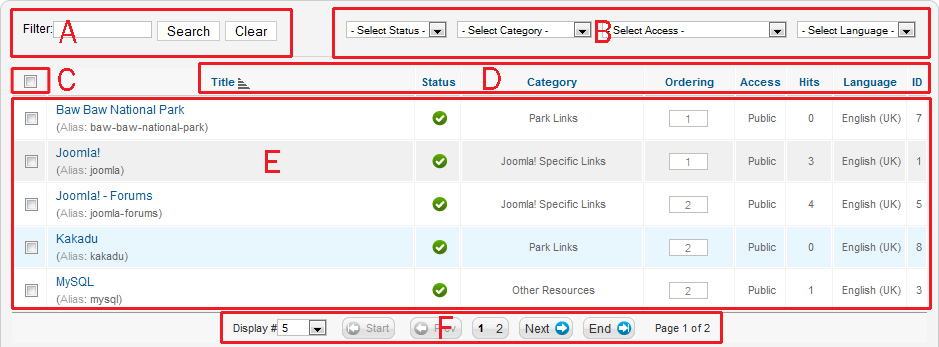
Figure 8.1. Weblinks Manager: Weblinks screenshot
Housekeeping
The first part of the file does some housekeeping tasks, as follows:
JHtml::addIncludePath(JPATH_COMPONENT.'/helpers/html'),
JHtml::_('behavior.tooltip'),
JHtml::_('script','system/multiselect.js', false, true);
$user = JFactory::getUser();
$userId = $user->get('id'),
$listOrder = $this->escape($this->state->get('list.ordering'));
$listDirn = $this->escape($this->state->get('list.direction'));
$canOrder = $user->authorise('core.edit.state', 'com_weblinks.category'),
$saveOrder = $listOrder == 'a.ordering';
The first line includes the "admnistrator/com_weblinks/helpers/html" path. This is important to understand for custom components. This allows us to include our own JHtml classes and methods that we can execute with the convenience method JHtml::_(). Recall that this method automatically loads a class for us if it hasn’t been loaded yet.
To use this, we just create a class called JHtml + <component name> (for example, JHtmlWeblinks) and put the file in the helpers folder of our component. For example, if we had a method called myGrid() in a JHtmlWeblinks class, we could execute it with the command JHtml::_('weblinks.mygrid', 'argument1', 'argument2').
Back in the layout we use JHtml::_('behavior.tooltip') to add the MooTools JavaScript code needed to show tooltips and also a second JavaScript file called multiselect.js. We discuss how JavaScript works in Chapter 12.
The next code block gets some variables we will need to do the layout, including how the list should be ordered and whether the current user can change the order. Because this script is loaded directly with an include statement, we are still in the scope of the WeblinksViewWebinks class where it was included. So $this refers to an instance (object) of that class.
The next line creates the opening HTML form tag for the form. The action is our current URL (index.php?option=com_weblinks&view=weblinks) and the method is “post.” So when we submit this form, we will reload the current screen and place the form variables in $_REQUEST.
Now we start to create the different parts of the form.
Section A: Title Filter
The code for section A in Figure 8.1 is as follows:
<div class="filter-search fltlft">
<label class="filter-search-lbl" for="filter_search"><?php echo JText::_('JSEARCH_FILTER_LABEL'), ?></label>
<input type="text" name="filter_search" id="filter_search" value="<?php echo $this->escape($this->state->get('filter.search')); ?>" title="<?php echo JText::_('COM_WEBLINKS_SEARCH_IN_TITLE'), ?>" />
<button type="submit"><?php echo JText::_('JSEARCH_FILTER_SUBMIT'), ?></button>
<button type="button" onclick="document.id('filter_search').value='';this.form.submit();"> <?php echo JText::_('JSEARCH_FILTER_CLEAR'), ?></button>
</div>
This creates the four elements in section A: the label, the input box, and the two buttons. As with other layout files, we are mixing HTML and PHP elements on the page. The clear button just sets the input value to blank and submits the form to reload the page.
Section B: Filter Select Lists
Section B in Figure 8.1 contains four filters. These allow the user to filter the list based on published status, category, access level, and language. The code for the status filter is as follows:
<select name="filter_published" class="inputbox" onchange="this.form.submit()">
<option value=""><?php echo JText::_('JOPTION_SELECT_PUBLISHED'),?></option>
<?php echo JHtml::_('select.options', JHtml::_('jgrid.publishedOptions'), 'value', 'text', $this->state->get('filter.state'), true);?>
</select>
This code creates an HTML select element on the form. The first option has a value of "" (empty string) and a label created by the translation of the language key “JOPTION_SELECT_PUBLISHED”. Then we call the method in the highlighted line. Let’s look at what this does.
In this example, JHtml::_('select.options', . . .) calls the method JHtmlSelect::options(), and JHtml::_('jgrid.publishedOptions') calls JHtmlJGrid::publishedOptions(). Recall that additional arguments after the first argument are passed as arguments to the method.
In this line of code we are calling JHtmlSelect::options() method. This method creates a list of option elements for an HTML select list. We pass these five arguments to the method:
• The array of values: Set as the result of JHtmlJGrid::publishedOptions() method, which is an array of objects for each possible published state (1 for published, 0 for unpublished, 2 for archived, –2 for trashed, and “*” for all)
• The name of the object variable: Set to “value”
• The name of the option text: Set to “text”
• The selected value: Set to $this->state->get('filter_state') (the current selected published state)
• Whether or not to translate the text and labels: Set to boolean true
The output of this code block is the following HTML code, which you can see if you look at the HTML page source for this element:
<select onchange="this.form.submit()" class="inputbox" name="filter_published">
<option value="">- Select Status -</option>
<option value="1">Published</option>
<option value="0">Unpublished</option>
<option value="2">Archived</option>
<option value="-2">Trashed</option>
<option value="*">All</option>
</select>
The highlighted HTML code is produced by the JHtmlSelect::options() method. Because we have set the onchange attribute to "this.form.submit()", the page automatically reloads any time this value is changed, using the new filter value to select the items.
Each of the filters in the form is set in the same way, using different JHtml methods to create the list of possible options for the select list:
• JHtmlCategory::options() builds the list of categories.
• JHtmlAccess::assetgroups() builds the options list of access levels.
• JHtmlContentLanguage::existing() builds the options list of available languages.
Section C: Check All Box
The check all box is created with the following code:
<input type="checkbox" name="checkall-toggle" value="" onclick="Joomla.checkAll(this)" />
When clicked, this calls the JavaScript checkAll() method from the file media/system/js/core.js. This method loops through all the check box elements and sets them to the value of this check box.
Section D: Sortable Column Headings
This form has seven column headings, each of which can be clicked to sort the list by that column. If the column heading is clicked a second time, the sort order is reversed.
The following code implements the first column heading for the Weblink title:
<?php echo JHtml::_('grid.sort', 'JGLOBAL_TITLE', 'a.title', $listDirn, $listOrder); ?>
This calls the method JHtmlGrid::sort() with the following arguments:
• title: “JGLOBAL_TITLE”
• order field: “a.title” (title column from #__weblinks table)
• current sort direction: $listDirn (set at the start of this file)
• selected ordering: $listOrder (set at the start of this file)
With this one line of code, we implement a great user feature. This same method is used for the other column headings.
Section E: Weblink Items
The list of Weblink items is output inside the HTML table body (tbody) element. Each Weblink is a table row (tr) and each column is a table cell (td).
As you might expect, we output the rows inside a PHP foreach loop as follows:
<?php foreach ($this->items as $i => $item) :
Recall that $this->items contains the array of items returned by the model. To start, we do some housekeeping for this item. We check the ordering, we get the category link, and then we check the user’s permissions to create new items, edit existing items, check in items, and edit the state. Then we output each column for this item.
The first column uses the JHtmlGrid::id() method to output a check box with the value of each Weblink item’s id. This method creates a check box with a name of “cid[]”. The brackets after the name indicate that the results are returned as an array of ids for all boxes that are checked. Some tasks operate on an array of items, such as publish, unpublish, archive, checkin, trash, and delete. These tasks read the array from the cid[] element of the request.
The next cell is a bit more complicated. If the item is checked out, we output the checkout icon with this code:
<?php echo JHtml::_('jgrid.checkedout', $i, $item->editor, $item->checked_out_time, 'weblinks.', $canCheckin); ?>
This calls JHtmlJGrid::checkedout() with the current row index, the name of the person who has checked it out, the time checked out, the task prefix (in our case, “weblinks.”), and a boolean value to indicate whether this user is authorized to check in the item. Recall that $canCheckin was set at the start of the foreach loop based on whether the current user has core.manage permission for the com_checkin component or whether they are the same user who has the item checked out. If the user is authorized to check the item in, the icon is shown as a link that initiates the checkin task for this id. In this case, the method outputs the following code:
<a class="jgrid hasTip" href="#" onclick="return listItemTask('cb0','weblinks.checkin')" title="Checkin::Super User<br />Wednesday, 01 June 2011<br />18:15">
<span class="state checkedout">
<span class="text">Checked out
</span>
</span>
</a>
In this case, the image (which comes from the class “jgrid span.checkedout” CSS selector) is a link that executes the “weblinks.checkin” task and checks the item in.
If the user cannot check the item in, the output HTML code is as follows:
<span class="jgrid hasTip" title="Checked out::Super User<br />Wednesday, 01 June 2011<br />18:08">
<span class="state checkedout">
<span class="text">Checked out
</span>
</span>
</span>
This is similar to the previous code except that there is no anchor element that links to a task.
Still in the same table cell, we show the Weblink title. If the user can edit it, we show it as a link to the item. Otherwise, we just show it as text. Finally, we show the alias for the item.
The Status column shows whether or not the item is published. We use JHtmlJGrid::published() to show this icon, as follows:
<?php echo JHtml::_('jgrid.published', $item->state, $i, 'weblinks.', $canChange, 'cb', $item->publish_up, $item->publish_down); ?>
This outputs the class to show the correct icon based on the current published state of the item. If the current user has edit.state permission and the item is published or unpublished, the icon is a link that toggles the state between published and unpublished. All this work is done for us by the JHtmlJGrid::published() method.
The next table cell just shows the category title, as follows:
<?php echo $this->escape($item->category_title); ?>
Notice that we process the title with the $this->escape() method. Because the title is entered in by a user, it is possible it could contain malicious code. The escape() method removes any characters that a hacker might enter to try to inject JavaScript or SQL code into our page. By default, subclasses of JView use the built-in PHP function htmlspecialchars() as the escape() method. However, this can be changed to any method by setting the $_escape field in the class (for example, in the class constructor method).
It is good practice to escape any string data that is entered by the user. In this form, we escape the filter search value, Weblink title, Weblink alias, category title, access level, and language title. If the value contains no special characters, it will be unchanged.
The next cell is the Ordering column. This is a somewhat complicated cell because it supports a very powerful feature. If the list is ordered by the Weblinks ordering (the ordering of each Weblink item within the category), then we have the option to change the ordering of individual Weblinks. This can be done in one of two ways. We provide up and down arrows to allow a Weblink to be moved up or down one position in the list. We also provide an input box where you can enter in the desired order number for one or more items and then have the entire list reordered.
This is further complicated by the fact that the list can be sorted in ascending or descending order. If it is sorted in descending order, the up and down arrows take on the opposite meaning.
The code for this cell is as follows:
<?php if ($canChange) : ?>
<?php if ($saveOrder) :?>
<?php if ($listDirn == 'asc') : ?>
<span><?php echo $this->pagination->orderUpIcon($i, ($item->catid == @$this->items[$i-1]->catid), 'weblinks.orderup', 'JLIB_HTML_MOVE_UP', $ordering); ?></span>
<span><?php echo $this->pagination->orderDownIcon($i, $this->pagination->total, ($item->catid == @$this->items[$i+1]->catid), 'weblinks.orderdown', 'JLIB_HTML_MOVE_DOWN', $ordering); ?></span>
<?php elseif ($listDirn == 'desc') : ?>
<span><?php echo $this->pagination->orderUpIcon($i, ($item->catid == @$this->items[$i-1]->catid), 'weblinks.orderdown', 'JLIB_HTML_MOVE_UP', $ordering); ?></span>
<span><?php echo $this->pagination->orderDownIcon($i, $this->pagination->total, ($item->catid == @$this->items[$i+1]->catid), 'weblinks.orderup', 'JLIB_HTML_MOVE_DOWN', $ordering); ?></span>
<?php endif; ?>
<?php endif; ?>
<?php $disabled = $saveOrder ? '' : 'disabled="disabled"'; ?>
<input type="text" name="order[]" size="5" value="<?php echo $item->ordering;?>" <?php echo $disabled ?> class="text-area-order" />
<?php else : ?>
<?php echo $item->ordering; ?>
<?php endif; ?>
Recall that we set the $canChange variable at the start of the foreach loop. If true, the current user can edit.state and check in the current Weblink. We need permission for the checkin action because, during the reorder, we temporarily check out the items and then check them back in after we are done.
In this case, we do the first code block inside the outer if statement. Then we check whether $saveOrder is true. Recall this was set at the start of the file and is true if we are sorting on the “a.ordering” column. If this is true, we move to the third if statement. Here we check to see if we are sorting in ascending or descending order. If ascending, we show the up arrow (from the orderUpIcon() method from our pagination object) and associate this with the weblinks.orderup task. We do the same for the order down icon, assigning it to the weblinks.orderdown task.
Things are a bit confusing if we are ordering in descending order. Because the list is reversed, the up arrow actually moves an item lower in the list. So we associate the up arrow with the weblinks.orderdown task and the down arrow with the weblinks.orderup task.
That is the end of the inner if code block. We then have two endif statements, so we are back in the outermost if code block. Here we set a variable called $disabled to blank if $saveOrder is true and the string “disabled=‘disabled’” otherwise. (Recall that we can put double quotes inside single quotes and vice versa.) This string is used to disable the order input box if we are not sorting by the ordering column. Then we show the ordering input box, which will be disabled if $saveOrder is not true.
The else code block is executed if the user doesn’t have permission to edit the item. In this case, we simply show the ordering without any arrows or input box.
The last four columns are very simple. We just show the access level, the number of hits, the language title (or “All” if it is an “*”), and the id of the item.
Section F: Pagination Controls
Just before the table body element (tbody), we have the following code:
<tfoot>
<tr>
<td colspan="10">
<?php echo $this->pagination->getListFooter(); ?>
</td>
</tr>
</tfoot>
This puts the output of the getListFooter() method of the pagination class into the table footer element. This one line of code creates all the controls shown in section F, including the Display # list, Start, Finish, page number, Next, and End buttons. That is a lot of functionality for one line of code! Recall that we got the pagination object from the getPagination() method of the model. This creates an instance of JPagination, which provides the buttons and links required to navigate through a list page by page.
Default View and Joomla! Platform
The Webinks Manager: Weblinks screen, shown in Figure 8.1, is a highly functional and easy-to-use screen that allows the site administrator to view and manage any number of Weblink items. It contains a lot of “moving parts,” such as filtering, sorting, batch operations, reordering, and pagination. It is also designed to protect from malicious code, and it includes checking in and out items to control different users who try to edit the same item at the same time.
Using the built-in methods provided by the Joomla platform, we are able to create this entire screen in about 180 lines of relatively simple HTML and PHP code. From a developer’s point of view, the great thing here is that we can use these exact same tools to build manager screens for our component extensions (which we do in Chapter 10).
WeblinksViewWeblink View
The last thing to understand about the back-end com_weblinks component is the display() method for WeblinksViewWeblink (views/weblink/view.html.php). Recall that this is the class used when we are adding or editing an individual Weblink item.
public function display($tpl = null)
{
$this->state = $this->get('State'),
$this->item = $this->get('Item'),
$this->form = $this->get('Form'),
// Check for errors.
if (count($errors = $this->get('Errors'))) {
JError::raiseError(500, implode("
", $errors));
return false;
}
$this->addToolbar();
parent::display($tpl);
}
This method is similar to the display() method we looked at earlier except that here we call the model’s getItem() method (instead of getItems()) and getForm() (instead of getPagination()). Recall that the JView::get() method executes the method from the model with the name get + the name in the argument.
We discussed the getState() method earlier in this chapter. The getItem() method just calls the parent’s (JModelAdmin) getItem() method. This method checks to see if we are editing an existing item. If so, it calls the $table->load($pk) method, where $pk is the Weblink item’s id. Then it creates a JRegistry object for the item’s params column.
Using JForm in Weblinks
In previous chapters, we saw examples of using the JForm class to display options—for example, when editing a template, plugin, or module. In those cases, each option was defined in an XML file and the options were rendered exactly as they were defined.
JForm can also be used to create complex forms with flexible layouts and dynamic properties. In Weblinks, we can see how these capabilities are used to create the form for editing an individual Weblink item.
WeblinksModel getForm() Method
The getForm() method gets the JForm object for the edit form. Figure 8.2 shows the methods called in this process.
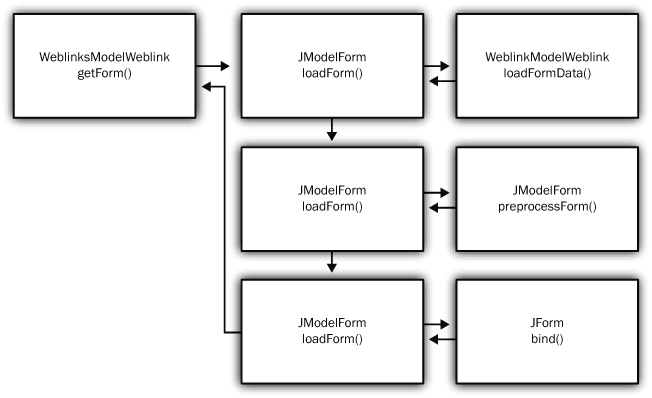
Figure 8.2. WeblinksModelWeblink getForm() methods
The program flow is a bit confusing because we are executing some methods from the parent classes. Recall from Figure 7.7 that WeblinksModelWeblink extends JModelAdmin, which in turn extends JModelForm. JModelForm extends JModel. In this example, we find the loadForm() and preprocessForm() methods in JModelForm and the bind() method in JForm.
The first part of the code for getForm() is as follows:
public function getForm($data = array(), $loadData = true)
{
// Initialise variables.
$app = JFactory::getApplication();
// Get the form.
$form = $this->loadForm('com_weblinks.weblink', 'weblink', array('control' => 'jform', 'load_data' => $loadData));
if (empty($form)) {
return false;
}
The highlighted line takes us to the loadForm() method of the parent class (JModelForm). The first argument, $name, is set to “com_weblinks.weblink”. The second argument, $source, is “weblink”, and $options is the associative array shown in the highlighted code.
In the loadForm() method, we see if we already have the form cached. If not, we execute this code using a try/catch block:
try {
$form = JForm::getInstance($name, $source, $options, false, $xpath);
if (isset($options['load_data']) && $options['load_data']) {
// Get the data for the form.
$data = $this->loadFormData();
} else {
$data = array();
}
// Allow for additional modification of the form, and events to be triggered.
// We pass the data because plugins may require it.
$this->preprocessForm($form, $data);
// Load the data into the form after the plugins have operated.
$form->bind($data);
} catch (Exception $e) {
$this->setError($e->getMessage());
return false;
}
If you are not familiar with try/catch blocks, please see the sidebar “Exceptions and Try/Catch Blocks”. We execute the getInstance() method inside the try block because this method can throw exceptions, and we have to have a catch block to process any exceptions.
Inside the getInstance() method, we check that $data is not blank. The variable $data can either be the name of an XML file or a string containing the XML for the form. In getInstance() we check the first character of $data. If it is “<,” we assume it is an XML string and try to create the form using the JForm load() method. In our example, $data contains the XML file name “weblink,” so we instead use the JForm loadFile() method to load the form with this file (models/forms/weblink.xml). Both of these methods create the form from the fieldset and field elements inside the XML code.
In the weblink.xml file, we define two fieldset elements that contain a number of field elements. We will see how these fields are used to render the form later in this chapter when we discuss the edit layout files.
The errors are handled cleanly in the getInstance() method. We just throw the proper type of exception for each error condition. The exceptions are handled in the catch block of the calling method, shown in the previous code block. In this case, we set the error based on the message from the exception object and return a boolean false.
Now, let’s get back to the loadForm() method in the previous code block. After we have set the $form variable with the JForm object, we check to see if we are loading data to the form. In the method signature for loadForm(), the third argument is an associative array called $options. In our example, we want to preload data for the form, so we include an element called “load_data” that is set to a boolean true.
If so, we execute the loadFormData() method. This gets any previously loaded data from the session. Normally, this will be empty. If we are editing an item for the first time or creating a new item, we call $this->getItem(), which creates a JObject with the fields for the form. If we have an existing item, we get the data for that item. For a new item, we get the default values or, if no default is specified in the field, we get an empty value.
When do we use the data from the session? Suppose the user has filled out the form to add a new item but has some invalid data in the form. Maybe they have a duplicate alias field or have left out the title. In this case, the save will not be successful, so the data is not saved in the database. It would be very frustrating if the user had to reenter all the fields to fix a single error. To handle this scenario, we save the entered data in the user’s session. Only after the save is successful do we clear this out of the session. That way, we either have data from the database, which we can get with getItem(), or we have data from the session, which we can get with getUserState().
The last thing we do in the loadFormData() method is check if there is a category in the request or the session. If so, we set that as the default for the data. Finally, we return the $data JObject to the calling loadForm() method. If we didn’t want to load data into our form, we simply set $data to an empty array.
The next line of code in loadForm() is important:
$this->preprocessForm($form, $data);
We use the method from JModelForm because it is not overridden in the subclasses JModelAdmin or WeblinksModelWeblink.
The code for this method is as follows:
protected function preprocessForm(JForm $form, $data, $group = 'content')
{
// Import the approriate plugin group.
JPluginHelper::importPlugin($group);
// Get the dispatcher.
$dispatcher = JDispatcher::getInstance();
// Trigger the form preparation event.
$results = $dispatcher->trigger('onContentPrepareForm', array($form, $data));
// Check for errors encountered while preparing the form.
if (count($results) && in_array(false, $results, true)) {
// Get the last error.
$error = $dispatcher->getError();
// Convert to a JException if necessary.
if (!JError::isError($error)) {
throw new Exception($error);
}
}
}
This method triggers the onContentPrepareForm event. This event was added in Joomla version 1.6 and is used just for JForm objects. It allows developers to write plugins to modify JForm objects before they are rendered in the browser. These plugins have available to them the JForm object ($form) and the data array ($data). We saw an example of using this event in Chapter 5 when we created the myregistration2.php plugin. There we used a plugin to add some new fields to the form. We can also use plugins to remove, validate, or edit JForm objects. This means that developers can create plugin extensions to modify any core form that uses JForm.
After the plugins have been executed, we check for errors. In case a plugin has returned an error that is not an Exception object, we convert it to an Exception and use the throw exception command to report the error back to the calling method.
At this point, we are back in the loadForm() method. The next thing we do is execute the bind() method, found all the way up the class hierarchy in the JForm class (because it is not overridden by any subclasses). This method checks that our JForm object has a valid JXMLElement defined in the XML field and that our $data variable is either an object or an array. It then matches the form fields with the data elements and sets the value of each form field.
At this point, we are back again to the loadForm() method, at the end of the try block. If any of the code executed in any of the methods called threw an exception, we will have exceptions to process. In this case, we execute the catch block, as follows:
} catch (Exception $e) {
$this->setError($e->getMessage());
return false;
}
Here all we do is set the error message for our model and return to the loadForm() method with a value of boolean false. If we did not throw any exceptions during the execution of the try block, we skip the catch block.
Saving the JForm Object in Memory
There is one last thing to note about the loadForm() method. Before we execute the try block, we see if we already have this form saved in memory. We check this with the following code:
// Create a signature hash.
$hash = md5($source.serialize($options));
// Check if we can use a previously loaded form.
if (isset($this->_forms[$hash]) && !$clear) {
return $this->_forms[$hash];
}
The idea of this code is simple. We want to save this form in case we need it again in this request cycle. Retrieving the form from memory is faster than rebuilding it from the XML file. Because we could have more than one JForm object active in the same cycle, we need to create a unique identifier for this specific form.
We do this using two PHP functions: md5() and serialize(). The serialize() function converts an object to a string, keeping all the information needed to convert it back to the original object. The md5() method takes any string as input and creates a 32-character string that is unique to the input string. The md5 string is used as a key for an associative array to store the serialized object. Using this technique, we know the following:
• The same JForm instance will always produce the same hash value.
• The value will be unique to this JForm (so we can have more than one JForm in memory and keep them separate in the array).
• The hash value is suitable for using in an associative array.
In our example, $options is an associative array with two elements, control (set to “jform”) and load_data (set to 1). The variable $source is “weblink”. The result of serialize($options) is
a:2:{s:7:"control";s:5:"jform";s:9:"load_data";b:1;}
The result of $source.serialize($options) is
weblinka:2:{s:7:"control";s:5:"jform";s:9:"load_data";b:1;}
Finally, $hash, the result of md5($source.serialize($options)) is
37ceb359374f97c561de59903862618e
Once we have the $hash value, we can check to see if we have this specific form already saved in the $this->_forms field. If so, it means that we have already loaded this exact same form so we can get the object from memory and save having to load it from an XML file. In this case, we get the object and just return, skipping the rest of the method.
After the try/catch block, when we have a valid form, we see the following code:
// Store the form for later.
$this->_forms[$hash] = $form;
This saves the form object in the array so it will be there if we need it again.
This technique of saving objects in associative arrays using a hash as the array key is a common technique used to save processing time in various places in Joomla.
Modifying Forms Dynamically
At this point, we have loaded the JForm object inside the getForm() method of the WeblinksModelWeblink class. Now we get to see an example of how we can modify the form inside our code before the form is displayed.
If we look at the rest of the getForm() method in WeblinksModelWeblink, we see a number of $form->setFieldAttribute() methods. For example, we see the following lines:
// Modify the form based on access controls.
if (!$this->canEditState((object) $data)) {
// Disable fields for display.
$form->setFieldAttribute('ordering', 'disabled', 'true'),
$form->setFieldAttribute('state', 'disabled', 'true'),
$form->setFieldAttribute('publish_up', 'disabled', 'true'),
$form->setFieldAttribute('publish_down', 'disabled', 'true'),
// Disable fields while saving.
// The controller has already verified this is a record you can edit.
$form->setFieldAttribute('ordering', 'filter', 'unset'),
$form->setFieldAttribute('state', 'filter', 'unset'),
$form->setFieldAttribute('publish_up', 'filter', 'unset'),
$form->setFieldAttribute('publish_down', 'filter', 'unset'),
}
The setFieldAttribute() is one of the powerful methods available to modify the form on the fly.
In this code block, we are checking for the case where a user can edit a Weblink item but doesn’t have permission to change the state of the item. Changing the state includes changing an item’s published status (state) and other information related to publishing. In this case, we want the user to still see the publishing fields on the form, but we want them to be disabled. So if the user doesn’t have edit state permission, we disable the fields in the form by setting the disabled attribute for these fields to true. When the form displays, those fields will be disabled. This overrides the values set for these attributes in the form’s XML file.
The second part of the code block deals with saving the form data to the database. As we have seen in previous examples, we cannot rely on HTML forms to protect our data. For example, a hacker can easily edit the form and change a disabled field to enabled. JForm contains a filter method that is triggered when you set the filter attribute. In this case, we set it to “unset,” which causes any value in that field to be set to null. This has the effect of using the current value (for an existing Weblink item) or the default value (for a new item).
With this technique, we can easily fine-tune our forms dynamically before they are rendered and again during the save process. As mentioned earlier, this same technique can be used in a custom plugin extension to modify core forms (using the onContent-PrepareForm event).
Rendering the JForm
The last step in the process is rendering the form in the browser. If we look at the folder for the Weblinks layout files, views/weblink/tmpl, we see files called edit.php and edit_params.php. These files create the layout using the JForm object.
The file edit.php does the layout for most of the form. The edit_params.php file, as you might expect, displays the parameters for the Weblink item.
Edit.php File
This file shows how easy it is to display JForm objects. The first part of the file is as follows:
defined('_JEXEC') or die;
JHtml::addIncludePath(JPATH_COMPONENT.'/helpers/html'),
JHtml::_('behavior.tooltip'),
JHtml::_('behavior.formvalidation'),
?>
<script type="text/javascript">
Joomla.submitbutton = function(task)
{
if (task == 'weblink.cancel' || document.formvalidator.isValid(document.id('weblink-form'))) {
<?php echo $this->form->getField('description')->save(); ?>
Joomla.submitform(task, document.getElementById('weblink-form'));
}
else {
alert('<?php echo $this->escape (JText::_('JGLOBAL_VALIDATION_FORM_FAILED'));?>'),
}
}
</script>
As with the layout discussed earlier in this chapter, we include a helpers folder for custom JHtml methods. Then we add two behaviors: tooltip and formvalidation. Recall that the JHtmlBehavior class contains methods to include JavaScript functions. The formvalidation() method allows us to trigger JavaScript form validation from attributes set in the JForm.
The next block of code is a script element that adds the JavaScript to trigger the form validation. We discuss how this code works in Chapter 12.
The next section of code is where we start to render the form:
<form action="<?php echo JRoute::_('index.php?option=com_weblinks&layout=edit&id='.(int) $this->item->id); ?>" method="post" name="adminForm" id="weblink-form" class="form-validate">
<div class="width-60 fltlft">
<fieldset class="adminform">
<legend><?php echo empty($this->item->id) ? JText::_('COM_WEBLINKS_NEW_WEBLINK') : JText::sprintf( 'COM_WEBLINKS_EDIT_WEBLINK', $this->item->id); ?></legend>
<ul class="adminformlist">
<li><?php echo $this->form->getLabel('title'), ?>
<?php echo $this->form->getInput('title'), ?></li>
<li><?php echo $this->form->getLabel('alias'), ?>
<?php echo $this->form->getInput('alias'), ?></li>
<li><?php echo $this->form->getLabel('catid'), ?>
<?php echo $this->form->getInput('catid'), ?></li>
<li><?php echo $this->form->getLabel('state'), ?>
<?php echo $this->form->getInput('state'), ?></li>
<li><?php echo $this->form->getLabel('access'), ?>
<?php echo $this->form->getInput('access'), ?></li>
<li><?php echo $this->form->getLabel('ordering'), ?>
<?php echo $this->form->getInput('ordering'), ?></li>
<li><?php echo $this->form->getLabel('language'), ?>
<?php echo $this->form->getInput('language'), ?></li>
<li><?php echo $this->form->getLabel('id'), ?>
<?php echo $this->form->getInput('id'), ?></li>
</ul>
<?php echo $this->form->getLabel('description'), ?>
<div class="clr"></div>
<?php echo $this->form->getInput('description'), ?>
</fieldset>
</div>
The first line creates our HTML form element, with the action attribute pointing us back to the same URL we are on. We also define the method of post, so the form fields will go into the $_REQUEST variable. Then we create a div element and show a legend element for the div. If we have an item id, we are editing an existing Weblink. Otherwise, we are adding a new Weblink.
Then we open an unordered list (ul) element. Inside this we begin to render our form fields, each inside a list item (li) element. For each, we echo the label with the getLabel() method and the input using the getInput() method. Each form field is referenced by its name. With these two lines of code per field, we can render the entire form in any order or layout we wish.
Notice that this layout doesn’t need to know what type of field is being rendered. Figure 8.3 shows the Weblinks edit screen. Title, alias, and URL are input elements. The fields category (catid), status, ordering, and language are select elements. The description form item shows the editor buttons and the area where the user can enter in a long description for the Weblink. Each of these JForm fields is rendered with the exact same two lines of code, using getLabel() and getInput().
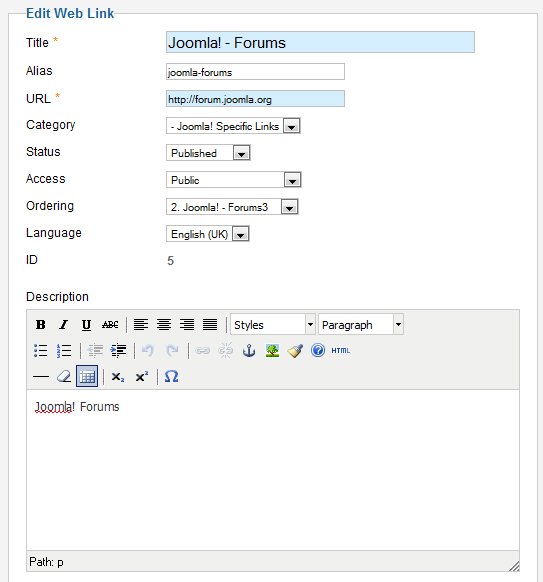
Figure 8.3. Weblinks edit screen
The next section of code displays the “sliders” on the right-hand side of the form. These are regions that can be expanded or contracted to show or hide different groups of fields. The code for the Publishing Options group is as follows:
<div class="width-40 fltrt">
<?php echo JHtml::_('sliders.start','newsfeed-sliders-'. $this->item->id, array('useCookie'=>1)); ?>
<?php echo JHtml::_('sliders.panel', JText::_('JGLOBAL_FIELDSET_PUBLISHING'), 'publishing-details'), ?>
<fieldset class="panelform">
<ul class="adminformlist">
<li><?php echo $this->form->getLabel('created_by'), ?>
<?php echo $this->form->getInput('created_by'), ?></li>
<li><?php echo $this->form->getLabel('created_by_alias'), ?>
<?php echo $this->form->getInput('created_by_alias'), ?></li>
<li><?php echo $this->form->getLabel('created'), ?>
<?php echo $this->form->getInput('created'), ?></li>
<li><?php echo $this->form->getLabel('publish_up'), ?>
<?php echo $this->form->getInput('publish_up'), ?></li>
<li><?php echo $this->form->getLabel('publish_down'), ?>
<?php echo $this->form->getInput('publish_down'), ?></li>
<?php if ($this->item->modified_by) : ?>
<li><?php echo $this->form->getLabel('modified_by'), ?>
<?php echo $this->form->getInput('modified_by'), ?></li>
<li><?php echo $this->form->getLabel('modified'), ?>
<?php echo $this->form->getInput('modified'), ?></li>
<?php endif; ?>
<?php if ($this->item->hits) : ?>
<li><?php echo $this->form->getLabel('hits'), ?>
<?php echo $this->form->getInput('hits'), ?></li>
<?php endif; ?>
</ul>
</fieldset>
The first line uses the JHtmlSliders::start() method to create the slider region. The next line uses the JHtmlSliders::panel() method to create the slider panel. All the fields in the fieldset will show inside the panel. The slider functionality is implemented using JavaScript and the MooTools framework, both of which we discuss in Chapter 12. However, the great thing is that we can use this functionality just by calling these methods.
Then we create the fieldset element and, as before, render each field using the getLabel() and getInput() methods. Note that for the last three fields, we place the code inside an if block. In this case, we don’t show these fields unless there is something in the fields to show.
The next line in edit.php is
<?php echo $this->loadTemplate('params'), ?>
Recall that this looks for a layout file called edit_params.php and displays that layout. If we look at that file (views/weblink/tmpl/edit_params.php), we see the following code:
$fieldSets = $this->form->getFieldsets('params'),
foreach ($fieldSets as $name => $fieldSet) :
echo JHtml::_('sliders.panel',JText::_($fieldSet->label), $name.'-params'),
if (isset($fieldSet->description) && trim($fieldSet->description)) :
echo '<p class="tip">'. $this->escape(JText::_($fieldSet->description)).'</p>';
endif;
?>
<fieldset class="panelform">
<ul class="adminformlist">
<?php foreach ($this->form->getFieldset($name) as $field) : ?>
<li><?php echo $field->label; ?>
<?php echo $field->input; ?></li>
<?php endforeach; ?>
</ul>
</fieldset>
<?php endforeach; ?>
This code demonstrates a shortcut we can use to render fields from our JForm object. Here we are rendering all the fields in order, each in an unordered list. In this case, we can loop through the fields in the JForm object instead of writing the two lines for each field.
We have two loops. The outer loop loops through each fieldset. The array of fieldsets was obtained using getFieldSets('params'). This gives us an array of all the fieldsets in the JForm in the group called “params”. Recall that in the XML for the JForm, we can optionally put fieldset elements inside fields elements. In the weblink.xml file we put the parameters inside a fields element with the name of “params”.
For each fieldset, we create the sliders panel using the fieldset label and show the description as a tooltip. Then we open the fieldset element and ul elements.
Then we start the inner loop, where we process each field. We use the method getFieldSet($name) to get the array of fields for that fieldset, where $name is the fieldset name attribute. Then we create the li element and again echo the field label and input. However, in this case we already have the JFormField object in the $field variable, so we use $field->label and $field->input instead of the getLabel() and getField() methods of JForm.
The advantage of using these foreach loops is that we don’t have to change this code if we add or delete fieldsets or fields in the XML file. Any fieldset and field elements inside the “params” fields element will be rendered exactly as it appears in the XML file. This technique is used to render the options fields for modules, plugins, templates, and languages. Component options use a similar technique, except that each fieldset element creates a tab in the options modal screen.
JForm includes many other methods for manipulating the form. This gives the developer control over how the form works for different users or situations.
Back-End Weblinks Summary
We have now seen all the important elements of the administrator com_weblinks component, including the installation files, helper methods, and options files. We have also used it as an example to understand in detail the MVC design pattern and how the controller handles tasks and uses the models and views to make the component work.
Front-End Weblinks Component
Now let’s look at the front-end side of Weblinks. Because we have examined the back-end Weblinks component in detail, here we will focus on the ways in which the front end of the component is similar to and different from the back end.
Similar Folder Structure and MVC Pattern
Table 8.1 lists the folders and top-level files for the front-end Weblinks component. These files are in the components/com_weblinks folder. (Note that file names for the rest of this chapter will be relative to this same folder.)
Table 8.1. Front-End Weblinks Component Folders

We can see that this organization is very similar to the organization of the back-end folders. As with the back end, we have folders for controllers, helpers, models, and views. Note that we don’t have an installation folder here. We only need one set of installation files, and these are by convention stored in the administrative back end. Also, we don’t have a tables folder. The #__weblinks table class only needs to be defined once. Again we have chosen to do that in the back end.
If we look at the top-level weblinks.php file, we see the following code to control the front end of the component:
$controller = JController::getInstance('Weblinks'),
$controller->execute(JRequest::getCmd('task'));
$controller->redirect();
This is exactly the same three lines of code used in the back end, and the process works the same way. We get the correct controller for the task. Then we execute that task. If the task is something other than display, we set the redirect to the desired display URL and execute that URL. If the task is display, then we display the page and don’t set any redirect.
As with the back end, we have a model for each view. In this case we have three views:
• Categories: Shows all the Weblinks categories in a hierarchical list
• Category: Shows the Weblinks in a single category
• Form: Displays the submit Weblink form
For each of these views, we have a model, a view class that extends JView, and one or more layout files that get included into the view class using the JView loadTemplate() method.
Two of the views, Categories and Category, only display information, so these are handled by the base controller, WeblinksController (controller.php). The Form view allows the user to enter and edit a Weblink. The controller WeblinksControllerWeblink handles the nondisplay tasks for this form. The tasks for this form are add, cancel, edit, and save. As with the back end, the add, cancel, and edit tasks are handled by the controller. The save() method calls the save() method of the model to actually save the data to the database.
There is one confusing thing about the file structure that is unique to this component. We have a model called WeblinksModelWeblink in the folder models/weblink.php. However, the model for the form, WeblinksModelForm, extends the administrator WeblinksModelWeblink class, not the front-end WeblinksModelWeblink class. At the start of the WeblinksModelForm class, we see this line of code:
require_once JPATH_COMPONENT_ADMINISTRATOR.'/models/weblink.php';
Then we see
class WeblinksModelForm extends WeblinksModelWeblink
Because we have loaded the WeblinksModelWeblink class from the folder administrator/components/models/weblink.php, when we extend the WeblinksModel Weblink class we are using the code from the back-end file. The WeblinksModelForm class inherits the save() method from the JModelAdmin class.
The front-end WeblinksModelWeblink is used when you click on a Weblink item. A Weblink item is different from other components. It will display an external Weblink, not a layout within this site. So we don’t have a view and layout for a single Weblink item. Why even have Weblinks at all? We can display external URLs without using any component. The answer is that the component allows us to do things we couldn’t do with just an external link, including the following:
• Organize our links into categories.
• Lay out the links by category.
• Restrict access levels for the links.
• Count the hits for the links.
• Allow users to submit links.
• Publish and unpublish the links.
The following is an example URL created for a Weblink item:
<site URL>/index.php/using-joomla/extensions/components/weblinks-
component/weblinks-single-category?task=weblink.go&id=5
Notice that it has the Weblinks item id and the task weblink.go. As we know from our earlier work, this executes the go() method in the WeblinksControllerWeblink. This is where we check the published status, check the access level for the user, and increment the hit counter.
To help with these tasks, we use the front-end WeblinksModelWeblink class. For example, we use the model’s getItem() method to get the Weblink item from the database, and we use the hit() method to increment the item’s hit counter (the number of times it has been accessed). If all this is successful, then we simply set the redirect to the external URL and it displays in the redirect cycle. Note that this is different from what we did in the back end. There, we set the redirect to link back to a screen in Weblinks (for example, the Weblinks Manager list or edit screen).
Menu Item Types
One important difference between the front and back end of Joomla is the way that menu items (the options on a menu) are created. In the back end, recall that we created three menu items in the Components menu, based on information in the menu and submenu elements in installation XML file (administrator/components/com_weblinks/weblinks.xml). We know in advance all the tasks the site administrator will need to do to use the Weblinks component, so we create the menu items to support these tasks.
In the front end, menus and menu items are completely user-defined. One site might have no menu items that use Weblinks while another site could have many menu items for different categories of Weblinks. To support this, the component provides the site administrator the tools to create and manage the menu items, but it is up to the administrator to decide which menu items to create.
The list of available menu item types is created by examining all the XML files in the layout folders of each component. In Weblinks, we have three XML files that create three menu item types, as shown in Table 8.2.
Table 8.2. Weblinks Menu Item Types

Recall in Chapter 4 that we discussed how to create alternative menu items by copying these base XML files and layout files into the template’s HTML folder and modifying them as needed. The structure of the core XML files is exactly the same as for the override XML files and other extension types. The outer element is a metadata element. Here we include a layout element with language keys for the title and option. These are defined in the administrator/language/en-GB/en-GB.com_weblinks.sys.ini file and display when you are showing the list of menu item types. We also can define a help element, as discussed previously. The message element shows a description of the layout (which shows in the tooltip when you are viewing the list of Menu Item Types).
The layout element for the Weblinks single category menu item type is as follows:
<layout title="com_weblinks_category_view_default_title" option="com_weblinks_category_view_default_option">
<help
key="JHELP_MENUS_MENU_ITEM_WEBLINK_CATEGORY"
/>
<message>
<![CDATA[com_weblinks_category_view_default_desc]]>
</message>
</layout>
The XML file will normally include definitions for options (parameters) that can be set for this instance of the menu item type. Each option is a field inside a fieldset element, which in turn is inside a fields element. These options are organized into two possible field elements: request and params.
Request Fields Element
The first fields element in the single category menu item XML file is as follows:
<!-- Add fields to the request variables for the layout. -->
<fields name="request">
<fieldset name="request">
<field name="id" type="category"
default="0"
description="COM_WEBLINKS_FIELD_SELECT_CATEGORY_DESC"
extension="com_weblinks"
label="COM_WEBLINKS_FIELD_SELECT_CATEGORY_LABEL"
required="true"
/>
</fieldset>
</fields>
Option values must be stored somewhere in the database. For menu items, we use the table #__menus and we store the values either in the link column or the params column.
Note that name attribute of the fields element is “request”. If we have a fields element with the name equal to request, we store the option in the link column, as a URL query, in the following format:
<name> + = + <value>
In the previous example, that would be
id=xx
where “xx” is the category id. When the URL for this menu item is loaded, this becomes part of the URL and is available in the $_REQUEST. The typical use for request fields is to hold the id of the main database row that is used for the menu item. For example, many menu items use category id, as above, or other item id fields, such as article or contact. In our example, the URL will point to a single category of subscriptions and we can get the category id from the request. In some cases, such as the Featured Article view, there is no single item or category id. In that case, there won’t be a request fieldset element.
As with other options we have seen, these options show on the screen in the order they appear in the XML file, grouped by fieldset. Each fieldset corresponds to a “slider” that can expand and contract as needed.
Params Fields Element
The next fields element in our XML file begins with the following code:
<!-- Add fields to the parameters object for the layout. -->
<fields name="params">
<fieldset name="basic" label="JGLOBAL_CATEGORY_OPTIONS">
<field name="spacer1" type="spacer" class="text"
label="JGLOBAL_SUBSLIDER_DRILL_CATEGORIES_LABEL"
/>
<field name="show_category_title" type="list"
label="JGLOBAL_SHOW_CATEGORY_TITLE"
description="JGLOBAL_SHOW_CATEGORY_TITLE_DESC"
>
<option value="">JGLOBAL_USE_GLOBAL</option>
<option value="0">JHIDE</option>
<option value="1">JSHOW</option>
</field>
The name attribute for this fields element is params. This will cause all the field elements inside this fields element to be stored as a JSON-encoded string in the params column of the #__menu table. Recall that the JTable class includes code to unpack this column into a JRegistry object (in the getItem() method) and to pack the JRegistry object back into a JSON string (in the bind() method).
The fields element can contain any number of fieldset elements and field elements. Again, they will display in the order they appear in the XML file, grouped in sliders by fieldset element.
Note that menu items also have standard options that show in most cases. These are the Link Type Options, Page Display Options, and the Metadata Options. These come from the file administrator/components/com_menus/models/forms/item_component.xml file and are rendered on the form after the options in the layout’s XML file. Some menu item types (External URL, Menu Item Alias, and Text Separator) don’t show all these standard options.
Front-End Routing
Recall from Chapter 3 that a router is a class that translates between a URL and an array of commands. It has two public methods, parse() and build(). The parse() method returns a JURI object. and returns an array of commands. The build() method does the opposite: it takes an array of commands and returns a JURI object.
SEF URL Background
In the administrative back end of the site, we don’t normally care about the aesthetics of the URL or whether a search engine can find the page. So a URL such as
administrator/index.php?option=com_categories&extension=com_weblinks
is fine as long as it gets us to where we want to go.
In the front end, things get a bit more complicated. This is because we care more about the appearance of the URL and we want search engines to be able to index the page and give it a good page ranking.
The first generation of websites were static HTML sites where each page was a separate HTML file. The URL simply contained the domain name plus the name of the HTML file—for example, http://www.mydomain.com/homepage.html or http://www.mydomain.com/cars/sportscars.html.
When dynamic websites first appeared, they generally used the query format similar to the previous back-end URL (for example, http://www.mydomain.com/index.php?option=com_category&view=blog&id=23). Initially, search engines such as Google or Yahoo were not good at indexing pages that used query strings in the URL, so dynamic pages did not achieve as high a ranking in search engines as static HTML pages. In response, Joomla and other CMS packages added the ability to use search-engine-friendly (SEF) URLs that looked more like the old static HTML URLs. In the meantime, search engines improved their ability to index URLs that contain queries. Now, search engines generally index URLs with query strings just as well as other URLs, so there is no longer a penalty for using queries in the URL.
Consequently, the term SEF URL is now somewhat of a misnomer. The main reason to use SEF URLs now is to present the website user with a more meaningful, human-friendly URL. SEF URLs have become a standard feature in most CMS software. In Joomla, the site administrator can select whether or not to use SEF URLs. In versions 1.6 and later, the default setting is to use SEF URLs. Also, a number of Joomla extensions provide alternative ways to create SEF URLs. It is believed that the great majority of Joomla sites today use SEF URLs.
A different but related subject is URL rewriting. If you have a popular website and you change the software that runs the site, you may have some pages that users have bookmarked and that have a high ranking in popular search engines. If the new software doesn’t have the same exact URL structure, it might not be able to display the page with that URL. In this case, you can create a mapping from the old URL to the new URL and thereby allow users to continue to use the old URL. In Joomla, you can use the redirect component for this, or you can use the rewrite capability of the web server software (such as Apache mod_rewrite).
Best-Fit URL Method
The issue of what URL to show when we show a page seems simple at first, but it can actually be somewhat complicated. The basic problem is that, in many cases, there is more than one way to show a page with essentially the same information.
Consider this example from the Weblinks component. If we load the sample data (for example for version 2.5), we will see a category called Sample Data-Weblinks (with id of 18). It has a child category called Joomla Specific Links (with id of 32), which in turn has a child category called Other Resources (33). We have two Weblinks menu items defined, one for a categories view (which shows the subcategories of Sample Data-Weblinks) and one for a single category view. The single category menu item is defined for category 32 (Joomla Specific Links).
This setup gives us two different ways to find the Weblinks for category 32:
• Select the Weblinks Single Category menu choice from the Using Joomla menu.
• Select the Weblinks Categories menu choice and then click on the link for Joomla Specific Links.
Similarly, we can show the links for category 33 either by clicking on the Other Resources link in the Weblinks Categories page or in the Weblinks Single Category page.
In these situations, we have to decide what URL to show. We could show a different URL depending on how the user navigated to this page. In the first example, we could show the Using Joomla category as its own menu item when you get there using the menu, but show it as a subcategory of the Categories menu item when you get there via the categories menu item.
Other things equal, however, it makes more sense to have the same URL for the same page of content. It is more intuitive and it makes it easier for search engines to catalog that content.
For this reason, the standard Joomla routers use a “best-fit” strategy. This means that the system tries to find an existing menu item that shows this content. If there is one, then we always use that URL when we show the page. If not, then we try to find the menu item that most closely matches the content.
We can see how this works looking at the previous examples. When we click on the Joomla Specific Links while in the categories view, the router looks for an existing menu item for this Weblinks category. Because it finds it, we return the URL for that menu item. The result is the same page and URL as if we had selected the Single Category menu item directly from the menu.
In the second example, we don’t have a menu item for category 33 (Other Resources). In this case, we have two choices. Because it is a subcategory of Joomla Specific Links, we could show it as a subcategory of the Single Category menu item. Or we could show it as a sub-subcategory of Sample Data-Weblinks from the categories menu item. In defining the router, we have decided that a single-category view is always to be preferred over the categories view. So we show the URL as a drill-down from the single category menu item. In other words, we show the URL for the single category menu item, followed by the child category id and alias.
We can see this in action with the following test. In the standard sample data, drilling down to the Other Resources category produces the following URL:
index.php/using-joomla/extensions/components/weblinks-component/
weblinks-single-category/33-other-resources
This shows the URL for the single category menu item and appends the current category’s id (33) and alias (other-resources) to it. We get this same URL whether we drill down from the Weblinks Categories menu item or the Weblinks Single Category menu item.
Next, go into the back end of Joomla and unpublish the Weblinks Single Category menu item. Then click on the Other Resources category from the Weblinks Categories page. Now the URL is as follows:
index.php/using-joomla/extensions/components/weblinks-component/
weblinks-categories/32-joomla-specific-links/33-other-resources
Because we no longer have the single category available, we choose the next closest option, which is the drill-down from the categories menu item. The categories menu item is associated with category 18 (Sample Data-Weblinks). This is the grandparent category of category 33. So we show the category path from category 18 down to the current category—in this case, first category 32, then category 33.
What if we don’t have any matching menu items? In the back end, unpublish both the categories and single category menu items. Now we don’t have a menu item to click, but we can manually enter in a URL in query form to show the Weblinks category, as follows:
index.php?option=com_weblinks&view=category&id=33
What we get is the Other Resources page, and we get the query form of the URL, just as we typed it in. The router is able to successfully load the component and view, but it cannot find an SEF URL that matches. Note also that when we load the page, we only get modules that are assigned to all menu items. This is because we don’t have an Itemid in the query. If we added one, we would get the modules, template, and language assigned to that menu item.
Building the URL
Now let’s look in more detail at how this is accomplished in the code. Let’s start with the layout file for the categories view. The file views/categories/tmpl/default_items.php is responsible for displaying the information for each individual Weblinks category. There we find the following code:
<span class="item-title"><a href="<?php echo JRoute::_(WeblinksHelperRoute::getCategoryRoute($item->id));?>">
<?php echo $this->escape($item->title); ?></a>
</span>
The highlighted line of code does two things. First, it executes the getCategoryRoute() method for the category id ($item->id is the category id). This creates a link in the form of a URL query. It passes the result of this link to the JRoute::_() method and that result is echoed as the URL inside the href attribute of the anchor element.
Get the Best-Fit Menu Item
In the getCategoryRoute() method (helpers/route.php), we find the menu item that is the best fit for the current category id. How do we do this?
There are two basic steps. The first step is to see if we have a single category menu item for the given category. If we find one, we return a URL that just points to that menu item and we are done.
If we don’t find an exact match, we look for a Weblinks menu item that points to one of the parent categories (parent, grandparent, and so on) of the current category. To do this, we create an array of all the parent categories for our current category. Then we check each of these against the list of Weblinks menu items. We check single category views first because we consider these a better match than the categories view. If we can’t find a single category for any of the parent categories, we check the categories view menu items. Finally, if we can’t find any Weblinks category or categories menu items that match any of the parent categories, we just use the currently active menu item to create the link.
Now let’s look at the code. The first part of getCategoryRoute() gets a JCategoryNode object for the current category. The key line of code is
$category = JCategories::getInstance('Weblinks')->get($id);
A little further on, after we have checked that we have a valid category, we see this code:
$needles = array(
'category' => array($id)
);
if ($item = self::_findItem($needles)) {
$link = 'index.php?Itemid='.$item;
}
This is where we try to find an exact match. We create an associative array with the view (category) and the category id. Then we see if this matches one of the existing menu items, using the _findItem() method.
Note that we use self:: instead of $this-> to call the _findItem() method. This is because _findItem() is a static method. The keyword self refers to “this class,” whereas the variable $this refers to “this object.” So we need to use self when calling static methods or referring to static fields when inside the class that defines them. The self keyword was introduced with PHP version 5.
If we find an exact match, we are done. If not, we execute this code block:
//Create the link
$link = 'index.php?option=com_weblinks&view=category&id='.$id;
if ($category) {
$catids = array_reverse($category->getPath());
$needles = array(
'category' => $catids,
'categories' => $catids
);
if ($item = self::_findItem($needles)) {
$link .= '&Itemid='.$item;
}
else if ($item = self::_findItem()) {
$link .= '&Itemid='.$item;
}
}
Here we create the link except for the category id. Then we create the list of the parent category ids for the current id using the getPath() method of the JCategoryNode class. In our example, recall that the parent of category 33 (Other Resources) is 32 (Joomla Specific Links) and in turn its parent is 18 (Sample Data-Weblinks). The getPath() method returns all the parent categories in an array in the format <id> + : + <alias>. So for category 33, getPath() returns:
0 => 18:sample-data-weblinks
1 => 32:joomla-specific-links
2 => 33:other-resources
The array_reverse just reverses the order so 33 is element 0 and 18 is element 3, as shown in the following:
0 => 33:other-resources
1 => 32:joomla-specific-links
2 => 18:sample-data-weblinks
This is saved in the $catids variable.
Then we create an array called $needles, which we will use to compare to the list of Weblinks menu items. The $needles variable is an associative array with two elements whose keys are “category” and “categories”. The value for both keys is the $catids array.
Then we call the method self::_findItem($needles) again. This time we have broadened the search to include any parent category and to include the categories menu item.
Because category is the first array key in $needles, we first search all the Weblinks menu items for a single category item to see if the category id matches one of the parent ids for our category. Failing that, we will repeat the process checking for Weblinks menu items with the view equal to categories.
In the _findItem() method, the first block of code is as follows:
protected static function _findItem($needles = null)
{
$app = JFactory::getApplication();
$menus = $app->getMenu('site'),
// Prepare the reverse lookup array.
if (self::$lookup === null) {
self::$lookup = array();
$component = JComponentHelper::getComponent('com_weblinks'),
$items = $menus->getItems('component_id', $component->id);
foreach ($items as $item)
{
if (isset($item->query) && isset($item->query['view'])) {
$view = $item->query['view'];
if (!isset(self::$lookup[$view])) {
self::$lookup[$view] = array();
}
if (isset($item->query['id'])) {
self::$lookup[$view][$item->query['id']] = $item->id;
}
}
}
}
The variable $menus holds a JMenuSite object. The WeblinksHelperRoute class has a static field called $lookup. Because it is static, we only need to set its values once. As long as this class stays in memory, the static fields will stay defined. In the if statement we check to see whether it has already been set. If so, we don’t set it again.
To set up the $lookup array, we use the getItems() method of JMenuSite to get all the menu items for the Weblinks component. This returns an array of standard class objects, each of which contains the fields for a Weblinks menu item.
Then we loop through the Weblinks menu items array and create an associative array where the key is the view from the menu item query and the value is another associative array. In this array, the key is the query id (the category id) and the value is the menu item id. In our example using the sample data, $lookup is defined as follows:
categories => array (0 => 438, 18 => 227)
category => array(32 => 274, 31 => 296)
(Note that the exact id numbers might change, based on sample data changes. However, the concept will be the same as shown here.) This shows that we have four Weblinks menu items defined: two that use the categories view and two that use the single category view. The categories menu items are 438, which points to category id 0 (the root category for the whole table), and 227, which points to category 18 (Sample Data-Weblinks). The single category menu items are 274, which points to category 32, and 296, which points to category 31.
Once we have $fields defined, we can find the best match for the current category, using the $needles array. The code for this is as follows:
if ($needles) {
foreach ($needles as $view => $ids)
{
if (isset(self::$lookup[$view])) {
foreach($ids as $id)
{
if (isset(self::$lookup[$view][(int)$id])) {
return self::$lookup[$view][(int)$id];
}
}
}
}
}
We loop through the $needles array by view. We first look at the category view and then at the categories view.
We loop through each of the $ids in the category hierarchy. Recall that we reversed the array order so that the current category (33) is first, then the parent (32), then that category’s parent (18), and so on. So we are looking in our exact order of preference. Therefore, as soon as we get a successful match on view and category id (in the shaded line), we simply return that menu item id, which is the value for that array element. The return command exits the method immediately.
Recall that the values in $needles include the category alias (for example, “33:other resources”). So $id will be in this format. For that reason, we use the (int) command to convert $id to just the category id (for example, 33) when we access the $lookup array.
The only other thing we have to do is allow for the case where there is no match. In that case, we simply return the current active menu item id. Then, back in the getCategoryRoute() method, we append the item id to the link (for example, “&Itemid=274”) and return the link.
At this point, we have a link that points to the menu item in the site that is the best fit for the current category id. It is one of the following, in order of priority:
• A Weblinks single category menu item for this category
• A Weblinks single category menu item for one of this category’s parent categories
• A Weblinks categories menu item for one of this category’s parent categories
• The currently active menu item
Find the Category Path from the Menu Item
Now that we have the Itemid of the best-fit menu item, we can finish the routing process. Recall that the line of code that started this was as follows:
echo JRoute::_(WeblinksHelperRoute::getCategoryRoute($item->id));
Now we pass this link to the JRoute::_() method. This method first gets the router, which in the front end will be JRouterSite (includes/router.php). Then it calls the build() method of JRouterSite.
If the SEF option is set to yes, the build() method takes a URL with a query (for example, index.php?option=com_weblinks&Itemid=274) and returns an SEF URL (for example, index.php/using-joomla/extensions/components/weblinks-component/weblinks-single-category).
The first thing the build() method does is call the build() method of its parent, JRouter. When the SEF option is set to yes, we then call the protected method _buildSefRoute() (back in the JRouterSite class). This method has the following code:
// Use the component routing handler if it exists
$path = JPATH_SITE . '/components/' . $component . '/router.php';
// Use the custom routing handler if it exists
if (file_exists($path) && !empty($query)) {
require_once $path;
$function = substr($component, 4).'BuildRoute';
$function = str_replace(array("-", "."), "", $function);
$parts = $function($query);
Here we check to see if we have a router provided for the component that uses the prescribed naming convention. It needs to be a file called router.php in the top-level component file, and it needs to contain a function called
<component name (less the "com_" part)> + "BuildRoute"
If such a file is found, the last line in the previous code block executes the function and returns an array called $parts.
In Weblinks, we have this file, called components/com_weblinks/router.php, and it has a method called WeblinksBuildRoute(). Note that this file does not declare a class; it only declares the build() and parse() functions.
Recall from the previous section that when we have a single-category menu item that points to this Weblinks category, we just use the routing for that menu item. So the WeblinksBuildRoute() method returns an empty array when the current category matches the category used in a category menu item.
On the other hand, when we are linking to a Weblinks category that doesn’t have an associated menu item, we have to find which (if any) parent category matches the best-fit menu item and then show the part of the category hierarchy that connects the menu item’s category to our current category. This is done in the following code:
if ($category) {
//TODO Throw error that the category either not exists or is unpublished
$path = $category->getPath();
$path = array_reverse($path);
$array = array();
foreach($path as $id)
{
if ((int) $id == (int)$menuCatid) {
break;
}
if ($advanced) {
list($tmp, $id) = explode(':', $id, 2);
}
$array[] = $id;
}
$segments = array_merge($segments, array_reverse($array));
}
This code is a bit tricky. At this point in the code, we know that we have a category that doesn’t have its own menu item. However, one of its parent categories probably does have a menu item. We know this because this link already contains the best-matching menu item.
In the $category variable we have a JCategoryNode object for the current category. Again we use getPath() to return the entire hierarchy for this category. Then the array_reverse command reverses the order of the elements in the array, just like we saw in the previous example.
Next, we loop through the parent categories. The key to understanding this is the highlighted code. As long as we don’t have a match, we add the $id to the $array variable. Then we loop again. When we finally get a match, we do the break command which exits the foreach loop.
The result is that the current category and all the parent categories up to (but not including) the matching category are added to the array. Then we reverse the order, so it is again starting at the top and working down the category hierarchy.
Finally, we use array_merge to add this to the $segments array. At the end of the method, we return this value. In our example of drilling down to the Other Resources category, $segments will contain one element:
0 => 33:other-resources
In the example where we unpublish the Weblinks Single Category menu item (so that the Weblinks Categories is the best fit), $segments will contain two elements:
0 => 33:other-resources, 1 => 32:joomla-specific-links
At this point, we return to the calling method, which is the _buildSefRoute() method of JRouterSite. There we combine these segments, putting a “/” between each, and add “component/” to the front of it. Finally, we set the path of the JURI object to this value.
At this point, we have created a URL that points to the closest-matching menu item. If necessary, we have also included the category path from the menu item’s category down to the current category. This provides us with a URL that is consistent, logical, and user-friendly.
Parsing the URL
In the build process, we start with a Weblinks category id and build a URL to take us to the category view for that category. We also need to be able to work in the opposite direction. That is, we need to be able to take an SEF URL created by the build() method and get a query that will take us to the correct view.
This process is similar to the build method described previously. Here we start with the $app->route() command in our top-level index.php file. This gets our JRouterSite object and executes its parse() method. As with the previous example, we call the parent’s parse() method, which in turn calls the JRouterSite_parseSefRoute() method. In this method we find the part of the SEF URL that specifies the menu item (for example, “components/weblinks-component/single-weblink-category”) and set the menu item based on that. We also strip off that part of the URL (the part that points to the menu item), leaving only the category path. Then we convert the category path to an array, splitting it at the “/” character, and change each segment to the format <id> + : + <alias>.
Then we call the component’s parse() method—in our case, WeblinksParseRoute(), passing the array of category path values. There we get the child categories for this menu item’s category. We compare each child category’s “slug” field (which is in the same format as the segments) to the passed-in array of categories. When we get a match, we create an associative array with id set to the category id and view set to “category”. This is returned to the calling method and these variables are added to the query of the URL.
In our example, the SEF URL is converted to the following array:
Itemid => 274, option => com_weblinks, id => 33, view => category
This is the information Joomla needs to correctly load the component and view.
Front-End News Feed View
One other important difference between the front and back end of Weblinks is the news feed view. In the core Weblinks component, we have the option of presenting a news feed for the single category view. A news feed allows someone to subscribe to this menu item and automatically receive updates as the page changes.
Joomla has this capability built in, so we don’t have to do much work to add news feeds to any component. Recall in the Edit Menu Item screen we have an option to show a feed link. If we look at the display() method of the views/category/view.html.php file, we call the method _prepareDocument(). At the end of that method, we see this code:
// Add alternative feed link
if ($this->params->get('show_feed_link', 1) == 1)
{
$link = '&format=feed&limitstart=';
$attribs = array('type' => 'application/rss+xml', 'title' => 'RSS 2.0'),
$this->document->addHeadLink(JRoute::_($link.'&type=rss'), 'alternate', 'rel', $attribs);
$attribs = array('type' => 'application/atom+xml', 'title' => 'Atom 1.0'),
$this->document->addHeadLink(JRoute::_($link.'&type=atom'), 'alternate', 'rel', $attribs);
}
If we have elected to show a feed link for this item, we create two links, one for the RSS 2.0 format and one for the Atom 1.0 format. We use the same JRoute::_() method as before, and we use this link as the argument for the addHeadLink() method of the JDocument class. This creates the link needed for a user to subscribe to the feed. For example, in Firefox, this link shows as a feed symbol just to the right of the URL.
Notice in the link we have “format=feed”. When we load that URL, that value is loaded into the request. When we create the document object for that URL, instead of our normal JDocumentHTML object, we create instead a JDocumentFeed object. In JController's display() method, we set the $viewType to “feed.” Then, when we execute the getView() method, we load the views/category/view.feed.php file instead of the view.html.php file.
The view.feed.php file is similar to the view.html.php file. The first thing to note is that it declares the same class, WeblinksViewCategory, as the view.html.php file. This is just a different format of the same information, so we give it the same class name. In any given request cycle, we will only have one of these classes loaded.
This class has one method, display(). Its code is very simple. We get the application and document objects and set the link field to the URL using the same method as in the previous section (JRoute::_() and WeblinksHelperRoute::getCategoryRoute()). Then we set some values for the view, including the number of items to show and the site’s e-mail and editor information. This is set up in the Global Configuration screen.
Then we get our items and category from the model. We loop through the items and create a URL for each one. We also remove any HTML code from the item’s title and convert the date to a string format. Then we create a new JFeedItem object and add the information to that object. Finally, we insert the JFeedItem object into our document using the addItem() method of JDocumentFeed.
That’s all there is to it. All the special formatting required for news feeds is handled automatically for us by the JDocumentFeed and JFeedItem classes. This same technique allows us to add a news feed for any component.
Summary
In this chapter we completed our examination of the Weblinks core component. We started with the view classes in the administrative back end. This included looking at the layout for the manager screen and the use of JForm for the edit screen. Then we reviewed the front end of the component and discussed the similarities and differences of the front and back end. We looked in detail at how SEF URLs are created and decoded and looked at how news feeds are generated.
The next two chapters apply what we learned to create our own component.