
12. JavaScript and MooTools in Joomla!
JavaScript enables improved user interaction with web applications and is becoming an increasingly important part of Joomla!. JavaScript is also a key component of AJAX (asynchronous JavaScript and XML). MooTools is a JavaScript framework that is included with Joomla. Using MooTools simplifies the process of creating and maintaining JavaScript functionality that works reliably across different browsers.
In this chapter, we discuss some basic concepts related to JavaScript and MooTools and how they are integrated into Joomla. Then we discuss the specific JavaScript features that are built into Joomla and how you can use these features in your programs. Finally, we show an example of using JavaScript to create an AJAX update of a Joomla page.
JavaScript is a full-featured programming language with its own subtleties and complexity. MooTools is a powerful framework with many core features and many more extensions. Trying to teach JavaScript and MooTools is beyond the scope of this book. Fortunately, Joomla is designed so that we can take advantage of many JavaScript and MooTools features without in-depth knowledge of JavaScript.
What Is JavaScript?
JavaScript is an event-driven programming language that runs inside the web browser. Like PHP, JavaScript is an interpreted language, meaning that the script files are executed directly, without being compiled. Unlike PHP, which runs on the web server, JavaScript runs on the client machine—for example, the user’s PC. Every modern browser includes a built-in JavaScript interpreter that can execute any JavaScript code that is included in a web page. Because it runs locally on the client machine, JavaScript can respond to events instantly, without requiring any communication with the server. For this reason, programs written in JavaScript work and feel more like desktop programs written in C, Java, or Basic than like typical web-based applications.
How Does JavaScript Work?
In Joomla, JavaScript code works along with PHP code. It does not replace PHP code or functionality. Instead, it enhances the functionality. JavaScript allows web-based Joomla applications to be more interactive than they would be with only PHP and HTML.
JavaScript works on the client side by modifying the HTML document on the fly. This can include adding, altering, or deleting HTML elements and attributes. JavaScript responds to events—things the user does or things the web browser does. Events include the following:
• Moving the mouse to or away from a specific HTML element
• Clicking on something
• Changing the value of a form
• Submitting a form
• Completing the process of loading a new HTML document
For example, when the mouse is moved over an element on the page, a JavaScript function can modify the HTML document in the browser’s memory to display a tooltip. The JavaScript function adds the tooltip HTML elements to the document and the tooltip shows on the page. When the mouse moves away from the element, the HTML is modified to remove the elements for the tooltip, and the tooltip disappears. This happens instantly, inside the browser’s working memory, without requiring any communication with the server.
JavaScript can also be used for AJAX requests. These are requests to the web server, similar to normal page load requests. The difference is that AJAX requests are done in the background, without interrupting the program flow. The user can continue using the application while the request is sent to the server and while the response comes back from the server.
These two capabilities of JavaScript—instant interaction with the user and background communication with the web server—allow developers to create a richer user experience in their web applications than would otherwise be possible.
JavaScript programs are included in an HTML page using the script element. The preferred method for adding JavaScript code to an HTML web page is to add one or more script elements to the head element of the page. In Joomla, this is often done using the JHTML behavior methods. For example, the code
JHtml::_('behavior.tooltip'),
adds the required JavaScript code for displaying tooltips to the HTML page.
What Is MooTools?
MooTools is a JavaScript framework. There are two important benefits of using a framework like MooTools. First, the framework provides a lot of built-in functionality. It includes built-in functions for things like sliders, tooltips, expandable trees, and other commonly used user-interface features. We can use these features in Joomla with simple application programming interface (API) calls, without having to write all the underlying JavaScript code.
The second benefit is browser compatibility. Although all modern browsers can run JavaScript, there are enough small differences in how JavaScript works in different browsers to make it difficult (and tedious) to write JavaScript code that works reliably in all environments. With a framework such as MooTools, the framework developers make sure that all its features work consistently in all supported browsers. Where there are compatibility problems in specific browsers, the code to work around those problems is built into the framework. The MooTools developers are experts in the nuances of different browsers’ JavaScript interpreters. That means users of MooTools (like us) don’t have to be. The code we write using the MooTools API will work correctly in all supported browsers.
In short, using a framework like MooTools saves us time when we are developing the application because we can take advantage of its built-in functionality. It also saves us time and problems maintaining the application because we don’t have to worry about testing and debugging problems arising from JavaScript differences in different browsers.
There are a number of other popular JavaScript frameworks available, including jQuery, Dojo, and Prototype. Each has its strengths and weaknesses and each has its supporters. Starting with version 1.5, the Joomla project decided to use MooTools. The main benefits of MooTools are as follows:
• It is lightweight and modular. We can use just the pieces we need and page loads are not slowed down noticeably.
• Like Joomla, MooTools uses object-oriented programming (OOP), so it is a good fit from a software engineering perspective.
• MooTools is closely aligned with how JavaScript works natively. It extends JavaScript but does not change the way you write JavaScript. Learning MooTools is a natural extension of learning JavaScript.
These benefits were important considerations in 2007, when the Joomla project leadership decided to use MooTools. It is the judgment of the Joomla Production Leadership Team that these advantages still pertain in 2012 and beyond. At this time, MooTools is a healthy open-source project that continues to be developed and improved, and there are no plans for Joomla to change to a different JavaScript framework in the foreseeable future.
As we discuss later in this chapter, it is possible for designers or extension developers to include other JavaScript frameworks in Joomla templates and extensions. Changes made to MooTools and to Joomla since version 1.6 make this process relatively easy. However, because MooTools is already included in every Joomla installation, and because it is integrated into the Joomla platform and content management system (CMS), Joomla developers are encouraged to use MooTools.
How JavaScript and MooTools Are Used in Joomla
Joomla is designed to follow the standards for unobtrusive JavaScript. This means the following
• The JavaScript code is separate from the HTML markup and selects the HTML elements to alter, based on element attributes, such as id or class.
• Most pages in Joomla are designed to “degrade gracefully.” If the browser’s JavaScript is disabled, the user should still be able to have access to all the site’s functionality, although perhaps with a less elegant user interface.
• The pages and functionality in Joomla should be accessible to people with visual or other disabilities. Enhancing the user experience with JavaScript should not, for example, interfere with screen readers for the visually impaired or prevent someone from using the application entirely with the keyboard (without a mouse).
Implementing JavaScript in Joomla normally involves invoking one of the JHTMLBehavior methods—for example, JHtml::_('behavior.tooltip'). The JHTMLBehaviour methods load the required JavaScript code into the HTML document header so it is available to be executed if called.
For some features, such as keep alive, that’s all we need to do. For others, such as tooltip, we need to make sure we have the right HTML markup to invoke the JavaScript behavior.
Built-In JavaScript Features
Table 12.1 shows the standard JavaScript behaviors available in Joomla version 2.5.
Table 12.1. Built-In JavaScript Behaviors
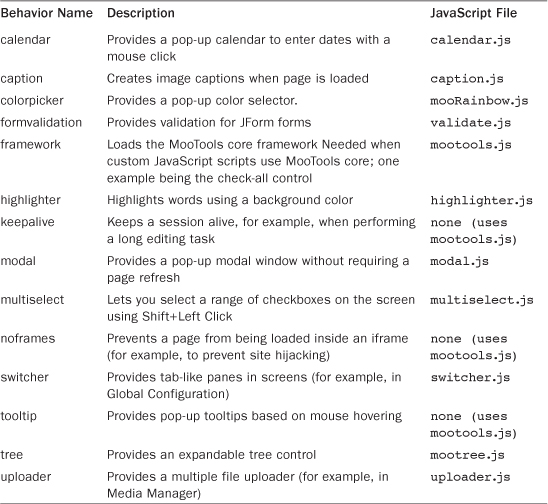
The JavaScript files are found in the folder media/system/js. Note that two copies of each JavaScript file are included in the Joomla package. The files listed in Table 12.1 are the files actually used in Joomla. They are compressed to minimize the file load times. For example, all spaces and comments are removed. A second copy of each file, with the text “-uncompressed” added to the file name, is included as well. The uncompressed copy has comments and normal formatting and is used for debugging, reading, and working on the code.
Each of these behaviors is discussed in the following sections.
Calendar
The calendar behavior creates the pop-up calendar, which allows the user to enter a date using a visual calendar widget. Figure 12.1 shows an example of the calendar widget from the article edit screen.
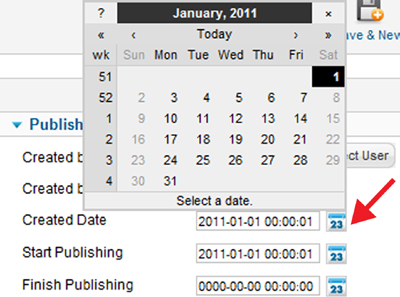
Figure 12.1. Calendar pop-up
This widget can be added to a page in one of two ways. The easiest way is to use a JForm field whose type attribute is set to calendar. For example, the following code is from the file administrator/components/com_content/models/forms/article.xml:
<field name="created" type="calendar"
label="COM_CONTENT_FIELD_CREATED_LABEL"
description="COM_CONTENT_FIELD_CREATED_DESC" class="inputbox" size="22"
format="%Y-%m-%d %H:%M:%S" filter="user_utc" />
The highlighted code tells JForm to render this field with a pop-up calendar. Recall that the type attribute determines which JFormField class is used for the field. Here we call the getInput() method of the JFormFieldCalendar class. Note that the last line of its getInput() method is as follows:
return JHtml::_('calendar', $this->value, $this->name, $this->id, $format, $attributes);
This calls the JHtml::calendar() method to render the calendar field.
If we need to use a calendar outside a JForm form, we can call the JHtml::calendar() method directly. In this case, we pass it arguments for the date value, the field name, the field id, the date format, and an array of any additional HTML attributes we want for the field. For example, the following code from the file administrator/components/com_banners/views/tracks/tmpl/default.php creates the begin date for the date filter in the Banner Manager: Tracks screen:
<?php echo JHtml::_('calendar', $this->state->get('filter.begin'),'filter_begin','filter_begin','%Y-%m-%d', array('size'=>10,'onchange'=>"this.form.fireEvent('submit'),this.form.submit()"));?>
In the HTML attributes array argument for this example, we are specifying a size of 10 and the onchange attribute. Here we cause the form to be submitted whenever this field is changed. That way, we reload the page with the correct items when we change the filter_begin field.
Either way that we use to create a calendar, it is not necessary to insert the JHtml::_('behavior.calendar') command. This is done for us in the JHtml::calendar() method.
Caption
The caption behavior automatically adds caption text below an image. To use this, we add two attributes to an img element:
• class="caption": Used as the selector for the JavaScript function
• title="<desired caption title>": The text to display in the caption
If the caption behavior is enabled, the following script element is added to the page:
<script type="text/javascript"
src="/joomla_development/j16_trunk/media/system/js/caption.js">
This JavaScript automatically selects any img elements with a class of “caption” and creates a centered caption under the image using the value of the title attribute for the caption text.
The caption behavior is a good example of unobtrusive JavaScript. Nothing is required to invoke the behavior other than the presence of these attributes. If the JavaScript is disabled, the behavior fails gracefully. The only impact is that the caption doesn’t display.
Colorpicker
This behavior, new in version 2.5, creates a pop-up control that allows a user to select a color value. Figure 12.2 shows an example of a colorpicker pop-up. The color is selected visually, by sliding the control across the color palette. The result is a standard six-digit hex color code.

Figure 12.2. Colorpicker pop-up control example
We can easily create a colorpicker control using JForm simply by specifying the type attribute as “color”. To create a colorpicker control without JForm, simply follow these two steps:
1. Add the code JHtml::_('behavior.colorpicker'), to load the required JavaScript file.
2. Create an input element with a type of “text” and a CSS class of “input-colorpicker”.
Form Validation
This behavior allows us to validate fields in forms using JavaScript. The advantage of validating with JavaScript is that we can immediately notify the user when a field is invalid, without waiting for the user to submit the form.
Figure 12.3 shows an example of the form validation behavior in the front-end Edit Your Profile screen.
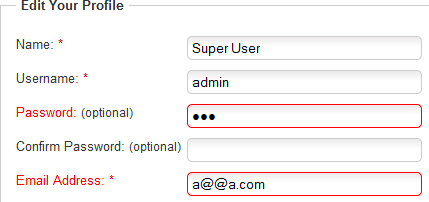
Figure 12.3. Form validation example
Here we entered an invalid password and e-mail address. In both cases, the fields are highlighted as soon as they are changed. We don’t have to click on the Submit button to see the errors.
Let’s look at how this works. In the XML file for this JForm (components/com_users/models/forms/profile.xml), we see the following code for the Password field:
<field name="password1" type="password"
autocomplete="off"
class="validate-password"
description="COM_USERS_DESIRED_PASSWORD"
field="password2"
filter="raw"
label="COM_USERS_PROFILE_PASSWORD1_LABEL"
message="COM_USERS_PROFILE_PASSWORD1_MESSAGE"
size="30"
validate="equals"
/>
By setting the class attribute to validate-password, we invoke the JavaScript password validation.
The XML code for the E-mail field is as follows:
<field name="email1" type="email"
description="COM_USERS_PROFILE_EMAIL1_DESC"
filter="string"
label="COM_USERS_PROFILE_EMAIL1_LABEL"
message="COM_USERS_PROFILE_EMAIL1_MESSAGE"
required="true"
size="30"
unique="true"
validate="email"
/>
Here we set the type attribute to e-mail. This tells JForm to use the JFormFieldEMail class to render this field. In that file (libraries/joomla/form/fields/email.php), we set the class attribute of this field to “validate-email.” This triggers the JavaScript e-mail validation.
We can also use this behavior to validate that a required field has been entered. To do that, we add a required attribute with a value of true. We can do this in the XML file for a JForm field or just add this as an attribute in our input element. All these validations are done in the JavaScript file media/system/js/validate.js. For the form validation behavior to work, we do the following:
• Call the JHtml::_('behavior.formvalidation') method to load the JavaScript into the page header.
• Make sure the form element includes a class attribute of “form-validate.”
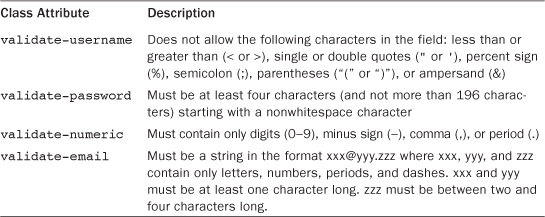
• Make sure the field includes either a required attribute equal to true or a class attribute equal to one of the values listed in Table 12.2. This is done in the XML file for a JForm field. (As noted above, the class attribute is added for us if the JForm field type is “email.”)
Table 12.2. Built-In Field Validation Types
Note that this JavaScript validation is separate from the validation done by the JFormRule class, which is triggered by the validate attribute of JForm fields. As discussed in Chapter 6, when we add a validate attribute in a JForm field, it invokes the test() method of the corresponding JFormRule class. In our e-mail example, we set the validate attribute to “email,” so we invoke the test() method of the JFormRuleEMail class. This method is run after we press the Submit button. Also note that this is different from filtering. Filtering actually changes values during the save process to remove potentially harmful characters.
Recall from other discussions in this book that we cannot rely on any type of form validation to protect us from hackers. This type of validation is important to provide a good user interface, but we still need to validate and filter data after the form is submitted to protect against malicious code.
Disabling the Submit or Save Action
As we have discussed, the JavaScript validation works locally in the browser. It doesn’t require us to press the Submit or Save button in order to validate the fields in the form. If we know from the JavaScript validation that some of the data on our form is invalid, we may want to disable the submit action until the form contains all valid data.
If we submit a form with invalid data, we should get validation errors back from the server and the form will not be accepted. So there is no point in submitting a form with invalid data, and it is less confusing to the user only to show one set of validation errors (rather than getting one set of error messages before the form is submitted and then a different set of messages after the form is submitted).
In the Joomla core programs, we normally disable the submit function when form validation has found errors. This is accomplished in two different ways, as follows:
• If the form has a button element with a type attribute of “submit” and class attribute of “validate,” the form validation will automatically validate the entire form and disable the submit action of this button if the form contains any invalid data.
• If the form doesn’t have a submit button, we can create a JavaScript function to intercept the submit action and only submit the form if the form is valid. This is the case for the back-end manager screens that have toolbars with multiple buttons for different tasks.
An example of the second method can be found in the back-end User Manager: Edit screen (administrator/components/com_users/views/user/tmpl/edit.php). There we see the following code:
<script type="text/javascript">
Joomla.submitbutton = function(task)
{
if (task == 'user.cancel' || document.formvalidator.isValid(document.id('user-form'))) {
Joomla.submitform(task, document.getElementById('user-form'));
}
}
</script>
This code creates a JavaScript function called Joomla.submitbutton. When the user clicks on any of the toolbar icons that submit the form, such as Save, Cancel, or Save & Close, this function is called. If the task is equal to “user.cancel”, or if the form is valid, the form is submitted by calling the Joomla.submitform function (which is defined in the media/system/js/core.js file). Otherwise, nothing happens, so the form is not submitted. This way the user is required to fix any invalid data before the form can be submitted.
Note that this is another example of unobtrusive JavaScript. The application is not relying on the JavaScript validation to ensure that the fields are valid. There are other methods that check for valid data—for example, JFormRule classes and the JTable validation methods. The JavaScript methods just improve the user interface by giving the user immediate feedback when invalid data is entered. If JavaScript is disabled, the form will still work, but with a less elegant user interface.
Framework
This behavior simply loads the MooTools framework as a script tag in the page header. You would use this when adding custom JavaScript code that relies on MooTools. It is not associated with any specific JavaScript functions. The code is as follows:
JHtml::_('behavior.framework'),
Highlighter
The highlighter behavior allows you to easily highlight selected words on the page. This is used in the Smart Seach component to highlight the search terms in an article, as shown in Figure 12.4.
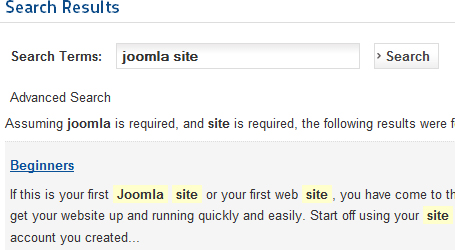
Figure 12.4. Highlighter example
To use the highlighter behavior, follow these steps:
1. Add the command JHtml::_('behavior.highlighter', $wordArray), where $wordArray is an array of the words you want to highlight.
2. Add the HTML code <br id="highlighter-start" /> just before the section of the document to be highlighted.
3. Add the HTML code <br id="highlighter-end" /> just after the section of the document to be highlighted.
Keepalive
This behavior allows Joomla to keep a session active for an indefinite period of time. Normally, when a user is using Joomla, we want the session to expire after a given amount of time. The default setting is 15 minutes. This is a security feature. For example, if a user is logged in to a sensitive area and leaves the computer without logging out, we would want the session to time out to lessen the chance of an unauthorized person gaining access to the site.
In some cases, however, the session timeout can cause problems. For example, a user might be editing a long article. It is easy to imagine a case where someone goes 15 minutes or longer without saving. If the session were to expire during this time, the user could lose all their work. What’s worse, the user would only find out about the problem after hitting the Save button (when it would be too late!).
To prevent this, we can invoke the keepalive behavior. All we need is the single line of code as follows:
JHtml::_('behavior.keepalive'),
This uses a built-in MooTools method to automatically make an AJAX request to the server one minute before the session would otherwise expire. The request is done in the background and causes the server to reset the session timeout. This has the effect of keeping the session alive indefinitely. Many of the component edit screens in Joomla use this behavior.
Modal
The modal behavior is used when we need to show a self-contained pop-up window inside a containing screen. Two examples in the Joomla core are as follows:
• Clicking on the Options toolbar icon in User Manager and other manager screens to edit the component-level configuration options
• Clicking on the Select/Change button to select an article for a Single Article menu item
In these cases, we need to make a request to the server to get data and then show that data. However, we don’t want to lose our current context. When we close the modal window, we want to continue our work in the screen where we opened the modal, right where we left off.
The modal behavior allows us to open a window inside our current document, work in that window, and close it when we are ready. When we close the modal window, we are returned to the parent window. As long as the modal window is open, we cannot work in the parent window.
In many cases, we display the modal window inside an iframe element. This allows us to have a second document inside the parent document.
To create a modal in Joomla, we need to do the following:
• Add the command JHthml::_('behavior.modal') to insert the JavaScript into the page header. We can pass a CSS class selector as an optional second argument. It defaults to “a.modal,” which will select an anchor element with a class attribute of “modal.”
• Create an anchor element with a class attribute of “modal” (or that matches the second argument of the behavior.modal command) and an href attribute that points to the URL to load in the modal window. If the modal will be rendered in an iframe element, include a rel attribute with the handler and size information.
• Create the view and layout for the contents of the modal. These are just like normal view and layout programs.
Let’s look at our two examples to see how this works.
User Configuration Modal
This screen is opened by clicking on the Options icon in the User Manager toolbar. Figure 12.5 shows an example of this screen.
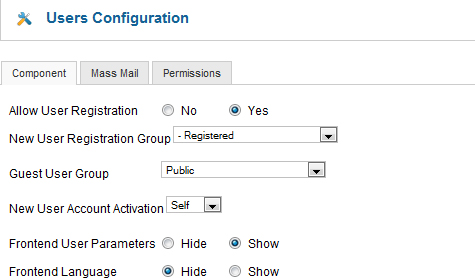
Figure 12.5. Users configuration modal example
Recall that the code for this button comes from the addToolbar() method of the UsersViewUsers class (administrator/components/com_users/views/users/view.html.php). There, we see this code:
JToolBarHelper::preferences('com_users'),
In that method, we see the following line of code:
$bar->appendButton('Popup', 'options', $alt, 'index.php?option=com_config&view=component&component='.$component.'&path='.$path.'&tmpl=component', $width, $height, $top, $left, $onClose);
This calls the fetchButton() method of the JButtonPopup class (libraries/joomla/html/toolbar/button/popup.php), passing the URL as the fourth argument. The URL points to the default layout of the component view in the com_config component.
In the fetchButton() method we find the following code to add the modal behavior:
JHtml::_('behavior.modal'),
Because the second argument is omitted, the default select of “a.modal” is used. Further on in the method we find the following code:
$html = "<a class="modal" href="$doTask" rel="{handler: 'iframe', size: {x: $width, y: $height}, onClose: function() {".$onClose."}}">
";
$html .= "<span class="$class">
";
Here we create the anchor with the class attribute of modal and with the URL in the href attribute. We also create an optional onClose function. This gives us the opportunity to call a JavaScript function when the modal window is closed. In this case, the function is empty, so no special processing occurs when the modal window is closed.
The end result is that we render the layout file administrator/components/com_config/views/component/tmpl/default.php inside the modal window in an iframe element. The great thing about this approach is that the code for this layout is just like a normal layout and is not affected by the fact that it is running in the modal window. The layout is opened inside the modal window when the Options button is clicked, and returns control to the parent window when it is closed.
Article Selector Modal
This screen is similar to the Article Manager except that it runs inside a modal window. It allows the user to search for and select one article. One place this is used is when you create a Single Article menu item, as shown in Figure 12.6.
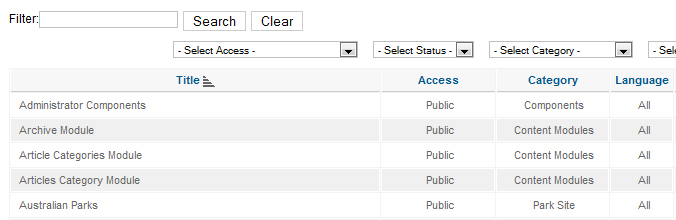
Figure 12.6. Article select modal example
A site might contain thousands of articles, far more than we would want to show in a list box. This modal window allows the user to select an article in a pop-up window that has the same pagination, search, and filtering options used in the Article Manager screen. This allows the user to find the desired article even when there are many to choose from. Note that this example is a bit different from the previous one because here we need to pass information about the selected article back to the parent window. Let’s look at how this works.
The Single Item Menu Item screen is a JForm that uses the XML file components/com_content/views/article/tmpl/default.xml. The element that renders the Select/Change Article modal is as follows:
<fields name="request">
<fieldset name="request"
addfieldpath="/administrator/components/com_content/models/fields">
<field name="id" type="modal_article"
label="COM_CONTENT_FIELD_SELECT_ARTICLE_LABEL"
required="true"
description="COM_CONTENT_FIELD_SELECT_ARTICLE_DESC"
/>
</fieldset>
</fields>
The type attribute loads the field from the getInput() method of JFormFieldModal_Article (administrator/components/com_content/models/fields/modal/article.php).
In that method, we first see code that is used to create a JavaScript function in the parent window called jSelectArticle_ plus the form’s id attribute. In this example, the function name will be jSelectArticle_jform_request_id. This code is as follows:
// Build the script.
$script = array();
$script[] = ' function jSelectArticle_'.$this->id.'(id, title, catid, object) {';
$script[] = ' document.id("'.$this->id.'_id").value = id;';
$script[] = ' document.id("'.$this->id.'_name").value = title;';
$script[] = ' SqueezeBox.close();';
$script[] = ' }';
// Add the script to the document head.
JFactory::getDocument()->addScriptDeclaration(implode("
", $script));
This creates the text of the JavaScript function and adds it to the document’s script element. The JavaScript function adds the article’s id and title to the document’s id and name form fields. This JavaScript function is added to the parent window’s document. We will see later that this function is called when the user clicks the article’s title in the modal window.
Later in the getInput() method we see this line of code creating the href URL:
$link = 'index.php?option=com_content&view=articles& layout=modal&tmpl=component&function=jSelectArticle_'.$this->id;
This points to the modal layout in the articles view of the com_content component.
Then we see this code creating the anchor element:
$html[] = ' <a class="modal" title="'. JText::_('COM_CONTENT_CHANGE_ARTICLE').'" href="'.$link. '&'.JSession::getFormToken().'=1" '" rel="{handler: 'iframe', size: {x: 800, y: 450}}">'. JText::_('COM_CONTENT_CHANGE_ARTICLE_BUTTON').'</a>';
As we expect, we have an anchor element with a class attribute set to “modal” and a rel attribute setting up the iframe information.
Notice that we add a function variable to the URL that loads the modal. This variable has the name of the parent’s JavaScript function (jSelectArticle_jform_request_id). The modal’s document does not include this JavaScript function. So what is this variable used for? The answer is that we need to know this function name when we create the anchor element for each listed article inside the modal window. Notice that we also add a form token to the URL. This allows us to ensure that this form is called from within a Joomla session.
At this point, we have the code in the parent window that creates the modal window and processes the return values from that window. The last step is the layout code for the modal window itself.
The modal window layout file in this case is administrator/components/com_content/views/articles/tmpl/modal.php. This code is very similar to the Article Manager layout (administrator/components/com_content/views/articles/tmpl/default.php) and also similar to the Weblinks Manager we discussed in Chapter 7. The main difference is what happens when the link for an article is clicked. In the Article Manager, when the user clicks the link for the article’s title, the article is opened for editing. In the modal window, clicking the link invokes the jSelectArticle_jform_request_id JavaScript function in the parent window. This passes the article’s id and title to the parent window, closes the modal window, and returns control to the parent window. Let’s see how that works.
The first thing we need to do is get the name of the JavaScript function we need to call when the link is clicked. Recall that this is included in the URL in a variable called function. The code that reads the function name is as follows:
$function = JRequest::getCmd('function', 'jSelectArticle'),
Recall from the discussion in Chapter 7 about the Weblinks Manager that the manager screen is a form that, when submitted, calls its own URL. This allows us to use the search and filtering features of the screen. We do the same technique in the modal screen as shown in the following code:
<form action="<?php echo JRoute::_('index.php?option=com_content&view=articles&layout=modal &tmpl=component&function='.$function.'&'.JSession::getFormToken().'=1'), ?>" method="post" name="adminForm" id="adminForm">
Note that we again include the function name in the URL. Also note that we again include the form token.
The key part of this layout that makes it different from the Article Manager is the link for each article. The code for this is as follows (inside the foreach loop):
<a class="pointer" onclick="if (window.parent) window.parent.<?php echo $this->escape($function);?> ('<?php echo $item->id; ?>', '<?php echo $this->escape(addslashes($item->title)); ?>', '<?php echo $this->escape($item->catid); ?>'),">
<?php echo $this->escape($item->title); ?></a>
Here we add a JavaScript function linked to the onclick event for the anchor element. In that function, we check that the parent window exists (meaning that we are indeed inside a modal window). If so, we execute a function called window.parent._jSelectArticle_jform_request_id function. This calls the jSelectArticle_jform_request_id function of the parent window. We pass the current article’s id, title, and category id to this function. (Note that we only use the first two arguments in this function. The category id argument is not used.)
Keep in mind that the parent window is loaded into memory the entire time we are working inside the modal window. So after the user selects the desired article (or closes the modal), the parent window continues to process at the point where the modal was opened.
The end result is that we get a pop-up modal window inside an iframe that allows the user to select an article. The modal window includes filters and pagination controls that allow the user to find and select the desired article, even if there are a large number of articles in the site. The modal screen is coded almost identically to the corresponding manager screen, making it easy to understand and maintain. Similar modal screens are used for selecting modules, contacts, and users.
Check All and Multiselect
These behaviors allow users to toggle on or off multiple check boxes on a form. The Check All allows you to add a “check all” check box to a form. This acts as a toggle to check or uncheck all the checkboxes on the form. The multiselect behavior allows the user to toggle a range of consecutive checkboxes.
Check All
Figure 12.7 shows an example from the Weblinks Manager screen with the arrow pointing to the check-all toggle.
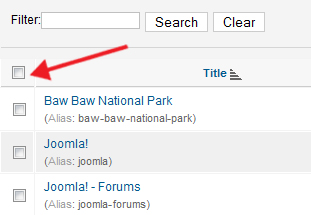
Figure 12.7. Multiselect example
To implement this behavior, follow these steps:
1. Make sure the core.js file is loaded—for example, with JHtml::_('behavior.framework') or one of the behaviors that includes loading the framework.
2. Add an input control of type check box with the onclick attribute equal to “Joomla.checkAll(this).”
3. Make sure the check boxes to be toggled on and off include the letters “cb” in the id attribute. For example, the standard for core manager screens is to label the checkboxes for each row “cbx,” where x is the row number 0-n.
Multiselect
Multiselect allows the user to toggle on or off a range of check boxes using Shift+Left Click. For example, if all the checkboxes are unchecked and you want to click boxes 2–8, you can click on box 2 and Shift+Left Click on box 8. This will check boxes 2–8. You can use the same technique to uncheck a consecutive group of boxes.
To enable this behavior, just add the code JHtml::_('behavior.multiselect') to the script.
Noframes
This behavior prevents a page from being loaded inside an iframe. This is a security feature to help prevent phishing attacks. For example, a link might direct a user to a site where the login screen is being run inside an iframe. To the user, the login could look exactly like the real site, and the hackers could collect sensitive login credentials. The noframes behavior prevents this type of forgery. In core it is used in the back-end login screens.
To implement this behavior, simply add the code JHtml::_('behavior.noframes') to the program file.
Switcher
This behavior allows the developer to create a tab-like interface in an HTML page. This is convenient when we want to show more information on a screen than will fit on one page. Figure 12.8 shows the Global Configuration screen, which uses the switcher behavior.
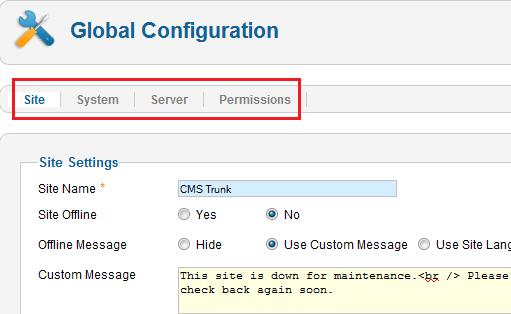
Figure 12.8. Switcher example screen
This is similar in function to submenus. When you click on each link, the information related to that “panel” (a div element in the document) of the form is displayed. The difference is, with the switcher, all the information for the entire screen is loaded in one request cycle. Only one panel of output is shown at a time, but they are all there in the document. So switching between panels is very fast and doesn’t require a new page load from the server. It is accomplished by unobtrusive JavaScript that changes the style attribute to hide all the panels except the one in view.
Let’s look at how this works in Global Configuration. If we look at the folder administrator/components/com_config/views/application/tmpl, we see 17 different layout files. The default.php is the first file loaded. The first part of that file is as follows:
defined('_JEXEC') or die;
// Load tooltips behavior
JHtml::_('behavior.formvalidation'),
JHtml::_('behavior.switcher'),
JHtml::_('behavior.tooltip'),
// Load submenu template, using element id 'submenu' as needed by behavior.switcher
$this->document->setBuffer($this->loadTemplate('navigation'), 'modules', 'submenu'),
Here we include the behavior.switcher to load the required JavaScript. Then we create the submenu links with the highlighted line of code. That code executes the default-navigation.php file and puts the output from that into the module position called submenu.
The default-navigation.php file has the following code:
<ul id="submenu" class="configuration">
<li><a href="#" onclick="return false;" id="site" class="active"> <?php echo JText::_('JSITE'), ?></a></li>
<li><a href="#" onclick="return false;" id="system"> <?php echo JText::_('COM_CONFIG_SYSTEM'), ?></a></li>
<li><a href="#" onclick="return false;" id="server"> <?php echo JText::_('COM_CONFIG_SERVER'), ?></a></li>
<li><a href="#" onclick="return false;" id="permissions"> <?php echo JText::_('COM_CONFIG_PERMISSIONS'), ?></a></li>
</ul>
This creates a ul element with an id of submenu. This is important. That is used by the JavaScript selector to indicate that this list of links will be used to switch between the different panels.
Each of the li elements has a link to one of the panels in the switcher screen. The id attribute corresponds to the name of each panel. Notice that the first link has a class attribute set to active. This indicates to the user that this is the active panel.
Now let’s go back to the default.php file. The next section of code there adds the JavaScript that enables the form validation behavior discussed earlier in this chapter. Then we see the following code:
<form action="<?php echo JRoute::_('index.php?option=com_config'),?>" id="application-form" method="post" name="adminForm" class="form-validate">
<?php if ($this->ftp) : ?>
<?php echo $this->loadTemplate('ftplogin'), ?>
<?php endif; ?>
<div id="config-document">
<div id="page-site" class="tab">
<div class="noshow">
<div class="width-60 fltlft">
<?php echo $this->loadTemplate('site'), ?>
<?php echo $this->loadTemplate('metadata'), ?>
</div>
<div class="width-40 fltrt">
<?php echo $this->loadTemplate('seo'), ?>
<?php echo $this->loadTemplate('cookie'), ?>
</div>
</div>
</div>
The first line creates a normal form. Then we load the ftp login page if the ftp option is enabled.
The next two lines of code are important for the switcher. The first highlighted line creates a div element with an id of “config-document.” This is the container element for all the panels that will be controlled by the switcher.
The second highlighted line creates the first panel. This is a div element with the id of page-xxx, where xxx matches the id of the anchor element in the submenu. It also needs to have a class of tab. Further down, we see the four highlighted lines of code. Each of these loads a layout into the desired place on the page. For example, the first one loads the default-site.php layout, and the second one loads the layout file called default-metadata.php.
The next line of code is as follows:
<div id="page-system" class="tab">
This creates the second panel that corresponds to the system link in the submenu. Further down we create the panel called page-server and then page-permissions. Each of these loads one or more layout scripts.
When the page is first loaded, the JavaScript function checks to see which panel should be visible. A cookie is used to remember which one the user was working in last. If there is no cookie, the first panel is visible by default.
The JavaScript function works as follows. It builds an array of the div elements with a class attribute of tab. These are the container elements for each tab panel. For the one visible panel, it dynamically creates a style attribute equal to "display: block;". For all the others, it creates one equal to "display: none;".
When the user clicks on a submenu link, this process is repeated. The div element corresponding to the clicked link is made visible (style = "display: block;") and the others are all made invisible (style = "display: none;"). This is done almost instantly in the working memory of the browser.
This approach is relatively simple and very flexible. Each individual layout file is very simple. If we need to move things around on the page or create new tabs, it is very easy to do. This technique is also used in core in the Site → System Information screen.
The following summarizes the requirements to use the switcher behavior:
• Add the switcher behavior to the layout.
• Create a layout similar to the default-navigation.php file discussed earlier. This should have a ul element with an id of “submenu” and class of “configuration.” In that, add li elements with anchor elements where each anchor element’s id is the name of the panel (for example, “site,” “system,” and so on).
• In the default layout, load this navigation layout (for example, in the submenu module position).
• Create one or more layouts for each of the panels.
• In the default layout, create a div element with an id of “config-document.”
• Inside that, create one div element for each of the panels. Each of these should have an id of “page-xxx” and a class of “tab.”
• Inside each of these div elements, use the loadTemplate() method to load the layout files for each part of the page.
Tooltip
The tooltip behavior allows you to create tooltip pop-up displays that show when the user hovers the mouse on a form element. This is normally used in Joomla to provide help text, as shown in Figure 12.9.
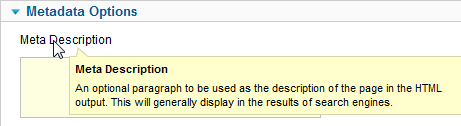
Figure 12.9. Tooltip example
All that is required to create a tooltip is to invoke the tooltip behavior and then create an element with a class attribute of “hasTip.” The text in the element’s title attribute will show in the tooltip. As an option, you can create a title and body text in the tooltip by creating a title attribute in the following format:
<title>::<body>
For example, in Figure 12.9 the title attribute is set as follows:
title="Meta Description::An optional paragraph to be used as the description of the page in the HTML output. This will generally display in the results of search engines."
Tooltips are created automatically by JForm. In this case, the label attribute is used as the tooltip title and the description attribute is used for the tooltip text. Recall that if these values are keys in the language file, they will be translated in the tooltip.
Yet another way to create a tooltip is by using the JHtml::tooltip() method. For example, the following line of code
echo JHtml::_('tooltip', 'My tooltip text.', 'My Tooltip Title', '', 'Hover on this text to see the tooltip.'),
produces the following HTML out produces the following HT put:
<span class="hasTip" title="My Tooltip Title::My tooltip text.">Hover on this text to see the tooltip.</span>
Tree
This behavior is used in the Media Manager to show the folders containing media files in a tree control. The user can click on the plus or minus icon to expand or collapse the tree. Figure 12.10 shows an example of this screen, with the tree fully expanded.

Figure 12.10. Tree behavior example
The tree behavior works like this. In our layout, we create an unordered list (ul) element with an anchor (a) element inside each list (li) element. These can be nested, so that inside an li element we could have another ul element and so on. An example of this structure is as follows:
<ul id="testtree">
<li><a href="test.html">Item One</a></li>
<li><a href="test.html">Item Two</a>
<ul>
<li><a href="test.html">Item Two Point One</a></li>
<li><a href="test.html">Item Two Point Two</a></li>
</ul>
</li>
<li><a href="test.html">Item Three</a>
</li>
</ul>
The JavaScript function reads the outer ul element based on its id attribute, creates a corresponding tree object, and hides the entire ul element. So we see the tree and not the list. The anchor values become the link URLs to use when the tree item is clicked. If the li element has a nested ul element, clicking on the +/– toggle expands or hides the nested list.
Trees can be useful when we are dealing with items in nested hierarchies, such as files or categories. Let’s look at how we could use the tree behavior to view article categories as a tree. To illustrate this, we will create a template override for the Articles → List all Categories menu item and change the layout to show a simple tree.
First, we need to create the override folder called templates/beez_20/html/com_content/categories. Then we create a file in this folder called default.php with the following code:
<?php
// no direct access
defined('_JEXEC') or die;
JHtml::addIncludePath(JPATH_COMPONENT.'/helpers'),
// testtree is the name of the div with the ul element to be converted to the tree
// Article Categories is the title for the root node of the tree
JHtml::_('behavior.tree', 'testtree', array(), array('text' => 'Article Categories'));
?>
<h1>MooTree Example Template Override</h1>
<div id="testtree_tree"></div>
<?php echo $this->loadTemplate('items'), ?>
This file calls the behavior.tree function with three arguments. The first argument, "testtree", is the id of the ul element to convert to the tree. The second (array()) is some optional parameters that we don’t use. The third argument allows us to specify the wording for the top-level node in the tree (in an associative array with a key of text). This defaults to “Root,” but in our example, we set it to Article Categories.
Then we create a heading element and an empty div element with the id attribute of "testtree_tree". This is required and will be the div element where the tree is created. The id of this div is the ul id plus _tree (in our example, testtree_tree).
The last line calls the layout file default_items.php, which we create in the same directory. The listing for that file is as follows:
<?php
// no direct access
defined('_JEXEC') or die;
?>
<ul id="testtree">
<?php foreach($this->items[$this->parent->id] as $id => $item) : ?>
<li><a href="<?php echo JRoute::_(ContentHelperRoute::getCategoryRoute($item->id));?>">
<?php echo $this->escape($item->title); ?> </a>
<?php if ($children = $item->getChildren(false)) : ?>
<ul>
<?php foreach ($children as $child) : ?>
<li><a href="<?php echo JRoute::_(ContentHelperRoute::getCategoryRoute($child->id));?>">
<?php echo $this->escape($child->title); ?> </a>
</li>
<?php endforeach; ?>
</ul>
<?php endif; ?>
</li>
<?php endforeach; ?>
</ul>
Here we are creating a ul element with an id of "testtree" that will be used to create the tree. We have two foreach loops. The outer loop creates an li element for each category in the list, using the category route for the anchor URL.
Then we check to see if there are child categories for each category. If so, we create an inner ul element for the child categories. Note that we only go one level down in this example, but we could continue down the tree in this same manner to any number of levels.
We can see this layout in action by navigating in the sample data to Home → Using Joomla! → Using Extensions (book_170/index.php/using-joomla/extensions). Figure 12.11 shows the override layout with the tree.
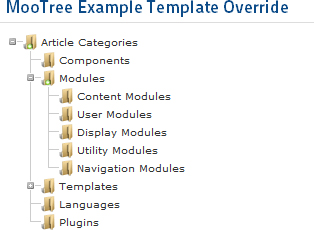
Figure 12.11. MooTree example
Uploader
This behavior is used in Media Manager when the Enable flash uploader option is set to yes. The uploader behavior displays the information about the files being uploaded and the progress of the operation. An example screen is shown in Figure 12.12.
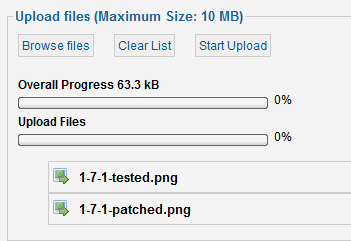
Figure 12.12. Media Manager upload status example
This behavior is closely linked to the media manager component and is not designed for general use. The MooTools library does include a number of status bars and related widgets to let the user know the status of a background process.
Using MooTools Extensions
In addition to the core MooTools functionality, MooTools maintains a website, http://mootools.net/forge, that lists many extensions to the basic framework. These extensions can be downloaded and used in your Joomla website.
Let’s demonstrate this with an easy-to-use extension written by Rouven Wessling called Grayscale Image Hover. This function changes an image from grayscale to color when you hover the mouse over it. Here are the steps to see this function work:
1. Download the archive file from http://mootools.net/forge/p/grayscale_image_hover.
2. Extract the files from this archive and copy the source code file grayscalehover.js to the folder templates/beez_20/javascript.
3. Add the following code to the template’s index.php file (templates/beez_20/index.php) after the last addScript() call:
$doc->addScript($this->baseurl. '/templates/beez_20/javascript/grayscalehover.js', 'text/javascript', true);
$grayscaleHover = "
window.addEvent('domready', function() {
new GrayscaleImages('img'),
});
";
$doc->addScriptDeclaration($grayscaleHover);
Here we add the new JavaScript source file so that we can use its functions. Then we add the JavaScript code to attach the new function to the domready event. In this example, we will change every img element to use the new function when the page is loaded.
To see this in action, navigate to the Australian Parks page in the sample data. The image initially shows in grayscale. If you hover the mouse over the image, the image gradually changes to color.
Other MooTools extensions can be added to your Joomla site following the same steps.
Using AJAX in Joomla
As previously mentioned, JavaScript is also used to handle asynchronous requests to the server. The advantage of this type of request is that it can be done in the background and doesn’t require a full page refresh. The JavaScript program runs continuously in the browser and can control the entire process.
One place where AJAX is used in Joomla is in the installation. It is beyond the scope of this chapter to present detailed instructions for creating AJAX-based extensions, and we won’t go into the details of how the JavaScript code works. Instead, we will look at the outlines of how this works, especially how the PHP and JavaScript work together.
The Joomla installation is a separate application with its own folder. These programs are normally executed once to install an instance of Joomla, and then the entire installation folder is deleted (for security purposes).
The entry point for a new Joomla installation is the file installation/index.php. That in turn runs the file installation/controller.php. There we load the required platform classes and path variables and then set the default view to “language” (the first screen in the Joomla installation). This executes the view JInstallationViewLanguage (installation/views/language/view.html.php) and the layout installation/views/language/tmp/default.php. The template for the installation is installation/template/index.php.
In the template index.php file, we see the following code to load the required JavaScript files:
// Load the JavaScript behaviors
JHtml::_('behavior.framework', true);
JHtml::_('behavior.keepalive'),
JHtml::_('behavior.tooltip'),
JHtml::_('behavior.formvalidation'),
JHtml::_('script', 'installation/template/js/installation.js', true, false, false, false);
?>
The last line loads the installation.js file, which is used to control the entire installation process.
Later in the index.php file we see the following JavaScript code in a script element:
<script type="text/javascript">
window.addEvent('domready', function() {
window.Install = new Installation('rightpad', '<?php echo JURI::current(); ?>'),
Locale.define('<?php echo JFactory::getLanguage()->getTag(); ?>', 'installation', {
sampleDataLoaded: '<?php echo JText::_('INSTL_SITE_SAMPLE_LOADED', true); ?>'
});
Locale.use('<?php echo JFactory::getLanguage()->getTag(); ?>'),
});
</script>
This code adds a JavaScript command to the “domready” event. This event fires when the HTML document is completely loaded. The code here creates a new Installation object, called Install, using the JavaScript file installation/template/js/installation.js. This file will take over control of the entire installation process from this point on. The language view, shown in Figure 12.13, has a Next button in the upper right corner.
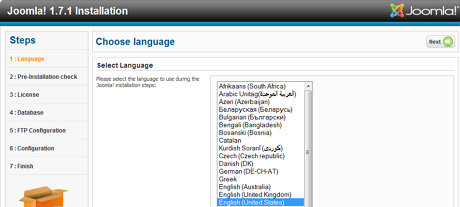
Figure 12.13. Installation screen
The onclick attribute for the Next button is Install.submitform(). This executes the submitform() function for the JavaScript Install object (created from the domready event when this page was loaded).
At this point, the JavaScript Install object is running the process. Instead of the pages being loaded by separate requests from the browser to the server, the Install object will send asynchronous requests to the server to update the existing data on the page.
The submitform() method of the Install object reads the task from the form (the element whose name attribute equals “task”) and uses that for the task in the request. The first request sent by Install includes task=setup.setlanguage&format=json. This is sent after the user clicks on the Next button in the Choose Language screen shown in Figure 12.13. This request is then sent asynchronously to the server. This means that the JavaScript program continues to run while the task is executed by the server.
This request is processed by the server just like a normal browser request, and we are back to running the normal Joomla PHP programs. In this case, we run the setlanguage() method of the JInstallationControllerSetup class (installation/controllers/setup.json.php). Note that the format=json in the URL causes the setup.json.php file to be loaded.
The setlanguage() method gets some data from the model, checks for errors, and then ends with the following code:
// Redirect to the next page.
$r->view = 'preinstall';
$this->sendResponse($r);
Here the variable $r is a JObject with the view field set to “preinstall,” the name of the next view in the installation process. We then call the sendResponse() method. This is where things get interesting.
The sendResponse() method checks for errors and then ends with the following code:
// Send the JSON response.
echo json_encode(new JInstallationJsonResponse($response));
// Close the application.
$app = JFactory::getApplication();
$app->close();
Here we are creating a new JInstallationJsonResponse object and echoing this object to the browser in a JSON-encoded format. In this case, the JSON text contains the session token, language, error status, and data with the name of the next view to display, similar to the following:
{"token":"c8de8295d8be5a299c66045157ba29df","lang": "en-US","error":false,"data":{"view":"preinstall"}}
After we echo this text to the browser, we close the application! In a normal request cycle, we might expect at this point to see some JSON-encoded text displayed in the browser. Instead, we are taken to the preinstall screen in the installation process. How does this work?
The key to understanding this is that this PHP code is running under the control of the JavaScript Installation class (the Install object). The AJAX request is sent using the post() method of the MooTools class Request.JSON. That class includes an event called onSuccess that is triggered when the request completes. At that time, the JavaScript program continues with the code for the onSuccess event for this request.
When we close the Joomla PHP application with the $app->close() method, control passes back to the JavaScript Install object, specifically to the code for the onSuccess event for this request. That code reads the JSON string echoed to the browser by the sendResponse() method. The code then gets the view from the data element of the JSON string—in this case, “preinstall”—and calls the goToPage() method, passing the view name as an argument. The goToPage() method then issues a new AJAX request to load the preinstall view, the next view in the installation process.
In the preinstall view, the Next button is defined to call the JavaScript function goToPage('license'). That directly loads the next view, called “license.”
As we go through the different installation screens, the pattern is as follows. If the screen needs to do a task other than display,
• The Next button invokes the submitform() method of the JavaScript Install object. That method reads the task from the task element of the form (normally a hidden element).
• The submitform() method sends a new AJAX request to process that task. After the task has completed, the PHP program for the task echoes a JSON-formatted string to the browser and closes the PHP application.
• The onSuccess event is fired and the Install object continues processing with the code for this event. In this case, the name of the next view to load is read from the JSON string and the view is loaded with another AJAX request.
If the screen just needs to load the next view, without any processing,
• The Next button invokes the goToPage() method of the JavaScript Install object for the next view.
• The goToPage() method creates an AJAX request to load the next view.
The process continues in this fashion until the installation is completed or the user terminates the process. The entire process is done with only two full page loads. The first one loads the initial language view. The second page load is done after the user deletes the installation folder and navigates to either the back or front end of the newly installed site.
We can see that this process is similar to the normal model-view-controller (MVC) pattern in Joomla, where one request cycle might be to run a task and the following cycle causes a layout to be displayed. The difference here is that the requests are asynchronous and the same JavaScript program is in memory the entire time and controls the entire process.
Using Other JavaScript Frameworks
It is relatively easy to use other JavaScript frameworks with Joomla. Here we will show an example of using the popular jQuery framework and MooTools on the same page. Here are the steps for the example:
1. In a test Joomla website, create a folder called components/com_test. This will hold our example files.
2. Download the jQuery framework from the jQuery website (http://docs.jquery.com/Downloading_jQuery#Download_jQuery). Here we use the file called jquery-1.6.4.js. Copy this file into the com_test folder.
3. In the com_test folder, create a file called noconflict.js with the following code:
/**
* noconflict.js file to demonstrate loading jQuery with MooTools
*/
jQuery.noConflict();
4. Also in the com_test folder, create a file called test.php with the following code:
<?php
// Test file to demonstrate loading MooTools and jQuery libraries
JHtml::_('behavior.framework'),
$document = JFactory::getDocument();
$document->addScript(JURI::root(true). '/components/com_test/jquery-1.6.4.js'),
$document->addScript(JURI::root(true). '/components/com_test/noconflict.js'),
$mootoolsStyle = "
// MooTools change font style on domready event
window.addEvent('domready',function() {
$$('p.test').setStyle('font-style','italic'),
}); ";
$document->addScriptDeclaration($mootoolsStyle);
$jqueryStyle = "
// jQuery change background color on document ready event
jQuery(document).ready(function($){
jQuery('p.test').css('background-color','#fafa99'),
}); ";
$document->addScriptDeclaration($jqueryStyle);
?>
<p class="test">MooTools sets this paragraph's text to italic,
and jQuery sets the background to yellow.</p>
In our test.php file, we use the behavior.framework to load MooTools. Then we use the addScript() method of JDocument to load the jQuery framework file (jquery-1.6.4.js) and the noconflict.js file. This second file causes jQuery to run in “no conflict” mode. By default, both jQuery and MooTools use “$” as a shortcut in the framework. When you use jQuery in no conflict mode, the “$” can still be used in MooTools. In this case, you can use jQuery (or some other assigned variable) to reference jQuery functions. It is important that the addScript() method for the noconflict.js file execute immediately after the addScript() for the jQuery framework file.
After we load the two frameworks and the no-conflict file, we demonstrate using both frameworks on the same page. Here we have created two functions. The first one uses MooTools to change our paragraph’s font style to italic. The second function uses jQuery to change the background color to yellow. Both functions are attached to the document ready event, so they are both called as soon as the document is loaded.
Finally, we include a paragraph element with a class called test. This is the element that both JavaScript functions will modify.
To see the results, load your test website with the URL <your URL>/index.php?option=com_test. Recall that this executes the file components/com_test/test.php. You should see a screen similar to Figure 12.14.

Figure 12.14. jQuery and MooTools example
(Note that we have error notices because our com_test component doesn’t have a row in the #__extensions table.)
As discussed earlier, it is recommended to use MooTools if possible for Joomla work because it is already included and saves having to load and maintain code for another framework. However, if needed, another framework can be used alongside MooTools, as demonstrated in this example.
Summary
In this chapter, we discussed what JavaScript and MooTools are and how they are used in Joomla websites. We looked at specific user-interface features that can be implemented with existing JavaScript methods. Finally, we outlined how AJAX can be used in Joomla, using the installation program as an example.
JavaScript offers the potential for building more user interaction into Joomla and for taking advantage of the benefits of AJAX. JavaScript is also a key component of building web services that can allow Joomla websites to serve information to other programs, such as mobile apps or other web servers. For these reasons, it is expected to grow in importance in Joomla applications in the future.