Just a Moment—Building a Time-Delay Loop
Sometimes it’s useful to build a time delay into a program. For example, you might have encountered programs that flash a message onscreen and then go on to something else before you can read the message. You end up being afraid that you’ve missed irretrievable information of vital importance. It would be much nicer if the program paused 5 seconds before moving on. The while loop is handy for producing this effect. A technique from the early days of personal computers was to make the computer count for a while to use up time:
long wait = 0;
while (wait < 10000)
wait++; // counting silently
The problem with this approach is that you have to change the counting limit when you change computer processor speed. Several games written for the original IBM PC, for example, became unmanageably fast when run on its faster successors. And these days a compiler might even deduce that it can just set to wait to 1000 and skip the loop. A better approach is to let the system clock do the timing for you.
The ANSI C and the C++ libraries have a function to help you do this. The function is called clock(), and it returns the system time elapsed since a program started execution. There are a couple complications, though. First, clock() doesn’t necessarily return the time in seconds. Second, the function’s return type might be long on some systems, unsigned long on others, and perhaps some other type on others.
But the ctime header file (time.h on less current implementations) provides solutions to these problems. First, it defines a symbolic constant, CLOCKS_PER_SEC, that equals the number of system time units per second. So dividing the system time by this value yields seconds. Or you can multiply seconds by CLOCKS_PER_SEC to get time in the system units. Second, ctime establishes clock_t as an alias for the clock() return type. (See the sidebar “Type Aliases,” later in this chapter.) This means you can declare a variable as type clock_t, and the compiler converts it to long or unsigned int or whatever is the proper type for your system.
Listing 5.14 shows how to use clock() and the ctime header to create a time-delay loop.
// waiting.cpp -- using clock() in a time-delay loop
#include <iostream>
#include <ctime> // describes clock() function, clock_t type
int main()
{
using namespace std;
cout << "Enter the delay time, in seconds: ";
float secs;
cin >> secs;
clock_t delay = secs * CLOCKS_PER_SEC; // convert to clock ticks
cout << "startinga
";
clock_t start = clock();
while (clock() - start < delay ) // wait until time elapses
; // note the semicolon
cout << "done a
";
return 0;
}
By calculating the delay time in system units instead of in seconds, the program in Listing 5.14 avoids having to convert system time to seconds in each loop cycle.
The do while Loop
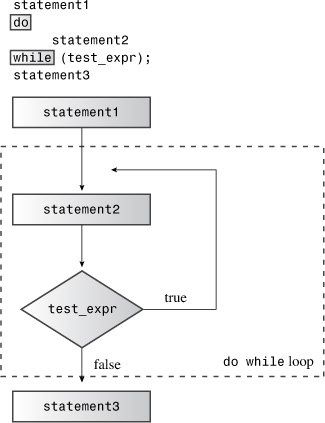
You’ve now seen the for loop and the while loop. The third C++ loop is the do while. It’s different from the other two because it’s an exit-condition loop. That means this devil-may-care loop first executes the body of the loop and only then evaluates the test expression to see whether it should continue looping. If the condition evaluates to false, the loop terminates; otherwise, a new cycle of execution and testing begins. Such a loop always executes at least once because its program flow must pass through the body of the loop before reaching the test. Here’s the syntax for the do while loop:
do
body
while (test-expression);
The body portion can be a single statement or a brace-delimited statement block. Figure 5.4 summarizes the program flow for do while loops.
Figure 5.4. The structure of do while loops.

Usually, an entry-condition loop is a better choice than an exit-condition loop because the entry-condition loop checks before looping. For example, suppose Listing 5.13 used do while instead of while. In that case, the loop would print the null character and its code before finding that it had already reached the end of the string. But sometimes a do while test does make sense. For example, if you’re requesting user input, the program has to obtain the input before testing it. Listing 5.15 shows how to use do while in such a situation.
// dowhile.cpp -- exit-condition loop
#include <iostream>
int main()
{
using namespace std;
int n;
cout << "Enter numbers in the range 1-10 to find ";
cout << "my favorite number
";
do
{
cin >> n; // execute body
} while (n != 7); // then test
cout << "Yes, 7 is my favorite.
" ;
return 0;
}
Here’s a sample run of the program in Listing 5.15:
Enter numbers in the range 1-10 to find my favorite number
9
4
7
Yes, 7 is my favorite.
The Range-Based for Loop (C++11)
The C++11 adds a new form of loop called the range-based for loop. It simplifies one common loop task—that of doing something with each element of an array, or, more generally, of one of the container classes, such as vector or array. Here is an example:
double prices[5] = {4.99, 10.99, 6.87, 7.99, 8.49};
for (double x : prices)
cout << x << std::endl;
Here x initially represents the first member of the prices array. After displaying the first element, the loop then cycles x to represent the remaining elements of the array in turn, so this code would print all five members, one per line. In short, this loop displays every value included in the range of the array.
To modify array values, you need a different syntax for the loop variable:
for (double &x : prices)
x = x * 0.80; //20% off sale
The & symbol identifies x as a reference variable, a topic we’ll discuss in Chapter 8, “Adventures in Functions.” The significance here is that this form of declaration allows the subsequent code to modify the array contents, whereas the first form doesn’t.
The range-based for loop also can be used with initialization lists:
for (int x : {3, 5, 2, 8, 6})
cout << x << " ";
cout << '
';
However, this loop likely will be used most often with the various template container classes discussed in Chapter 16.
Loops and Text Input
Now that you’ve seen how loops work, let’s look at one of the most common and important tasks assigned to loops: reading text character-by-character from a file or from the keyboard. For example, you might want to write a program that counts the number of characters, lines, and words in the input. Traditionally, C++, like C, uses the while loop for this sort of task. We’ll next investigate how that is done. If you already know C, don’t skim through the following sections too fast. Although the C++ while loop is the same as C’s, C++’s I/O facilities are different. This can give the C++ loop a somewhat different look from the C loop. In fact, the cin object supports three distinct modes of single-character input, each with a different user interface. Let’s look at how to use these choices with while loops.
