
8. Mood Lighting
Shooting When the Lights Get Low
There is no reason to put your camera away when the sun goes down. Your T3i has some great features that let you work with available light as well as the built-in flash. In this chapter, we will explore ways to push your camera’s technology to the limit in order to capture great photos in difficult lighting situations. We will also explore the use of flash and how best to utilize your built-in flash features to improve your photography. But let’s first look at working with low-level available light.
Poring Over the Picture
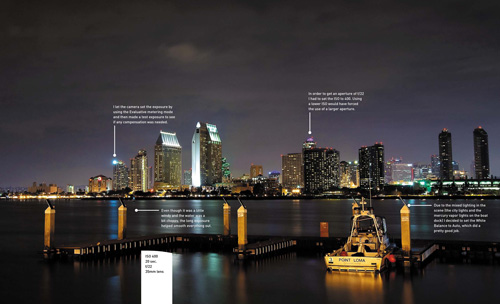
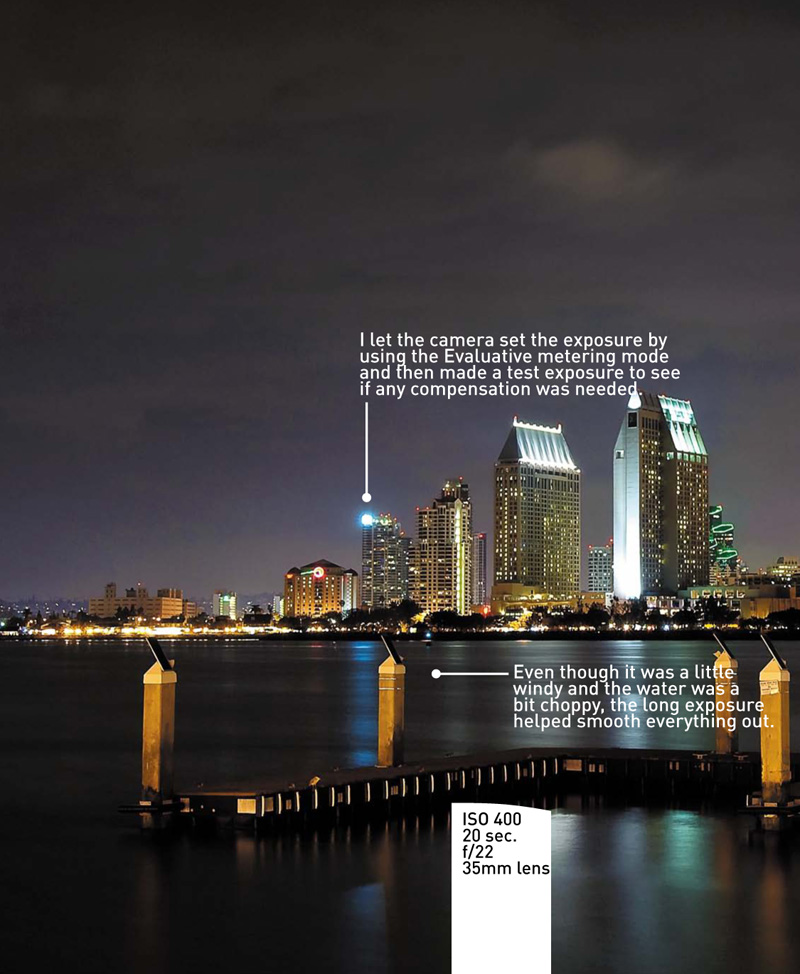
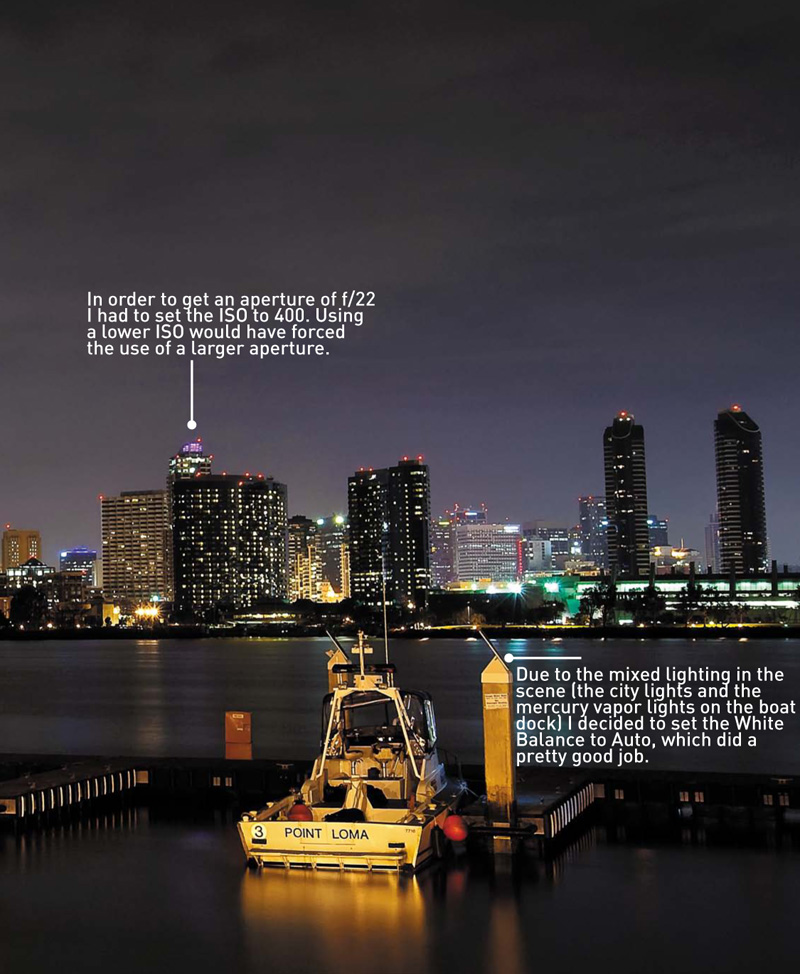
I recently spent a little time in Coronado, CA, just across the way from San Diego. One afternoon, while looking for somewhere to eat, I came across a Coronado Ferry Landing. Besides having some nice restaurants, it also had a great view across the bay of the San Diego skyline. I returned that night to capture some nighttime cityscapes.
Poring Over the Picture
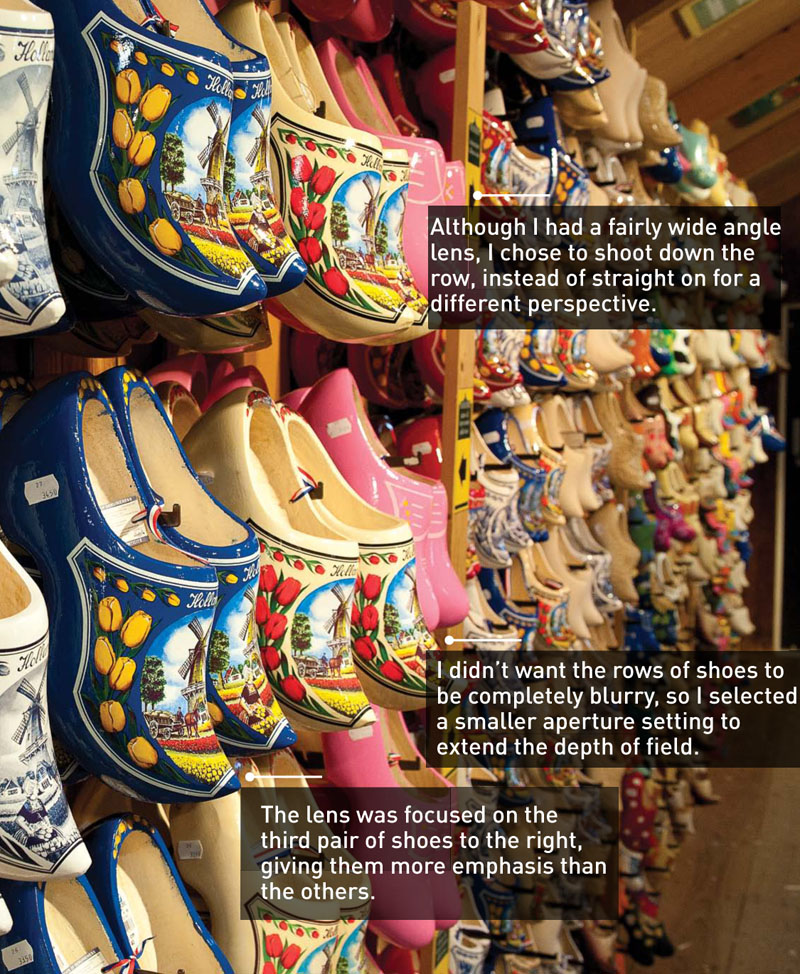
Traveling around Amsterdam and The Netherlands was a real photographic treat. It seemed that there was always something to point my camera at, no matter where I went. On this particular trip, my buddy Jeff Kelby and I had gone to see some of the famous windmills and ventured into this wooden shoe shop. When I saw the hundreds of shoes hanging on the wall I knew I couldn’t leave without getting at least one shot.


Raising the ISO: The Simple Solution
Let’s begin with the obvious way to keep shooting when the lights get low: raising the ISO (Figure 8.1). By now you know how to change the ISO: just press the ISO button on the top of the camera and turn the Main dial to adjust. In typical shooting situations, you should keep the ISO in the 100–800 range. This will keep your pictures nice and clean by keeping the digital noise to a minimum. But as the available light gets low, you might find yourself working in the higher ranges of the ISO scale, which could lead to more noise in your image.
Figure 8.1. The light inside this wooden shoe shop was fairly dim and forced me to raise the ISO to get the shot without having to use flash.

You could use the flash, but that has a limited range (15–20 feet) that might not work for you. Also, you could be in a situation where flash is prohibited, or at least frowned upon, like at a wedding or in a museum.
And what about a tripod in combination with a long shutter speed? That is also an option, and we’ll cover it a little further into the chapter. The problem with using a tripod and a slow shutter speed in low-light photography, though, is that it performs best when subjects aren’t moving. Besides, try to set up a tripod in a museum and see how quickly you grab the attention of the security guards.
So if the only choice to get the shot is to raise the ISO to 800 or higher, make sure that you turn on the High ISO Speed Noise Reduction feature. This custom menu function is set to Standard by default, but as you start using higher ISO values you should consider changing it to the Strong setting. (See Chapter 7 for setting the noise reduction features.)
To see the effect of High ISO Speed Noise Reduction, you need to zoom in and take a closer look (Figures 8.2 and 8.3).
Figure 8.2. Here is an enlargement of a flower shot without any ISO noise reduction.
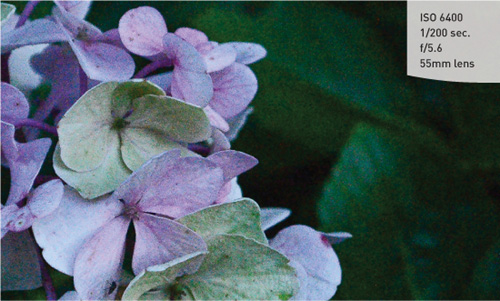
Figure 8.3. Here is the same flower with noise reduction set to Strong.

Raising the noise reduction to the Strong setting slightly increases the processing time for your images, so if you are shooting in the Continuous drive mode you might see a little reduction in the speed of your frames per second.
Using Very High ISOs
Is ISO 3200 just not enough for you? Well, in that case, you will need to turn on the ISO Expansion setting. This setting opens up two more stops of ISO, raising the new limit to an incredible 12800. The highest setting will not appear in your ISO scale as a number, but as H for 12800.
Setting up the ISO Expansion Feature
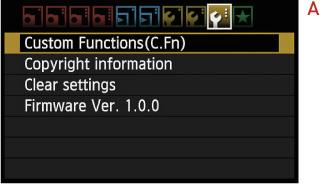
- Press the Menu button and locate the Custom Functions screen (A).
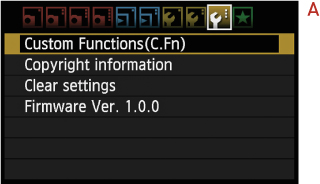
- The ISO Expansion setting is located in the C. Fn I: Exposure section. Highlight it and press Set.
- Locate the ISO Expansion menu and change the setting from Off to On (B).
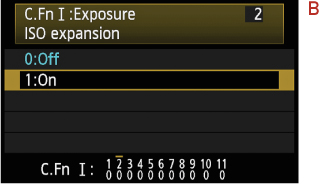
- Press the Menu button twice to exit, then press the ISO button to find the additional ISO settings of 6400 and H (12800).
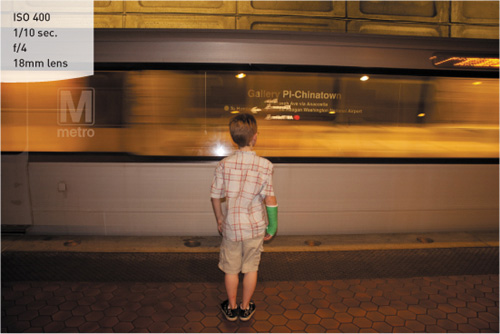
A word of warning about the expanded ISO settings: although it is great to have these high ISO settings available during low-light shooting, they should always be your last resort. Even with the High ISO Speed Noise Reduction turned on, the amount of visible noise will be extremely high. I can’t think of a situation where I ever need to use the 12800 (H) setting, but you might find yourself at a nighttime sporting event under the lights, which would require ISOs of 3200 or 6400 to improve your shutter speeds and capture the action (Figure 8.4).
Figure 8.4. The only way to get a fast-enough shutter speed during this night-time baseball game was to raise the ISO to 6400.

For a complete table listing of all the programmable custom functions, including the ISO Expansion feature, turn to page 251 in your owner’s manual.
Stabilizing the Situation
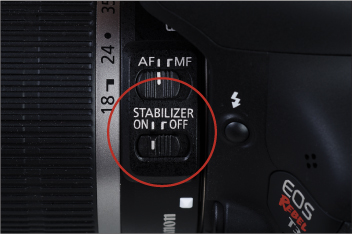
If you purchased your camera with one of the new image stabilization (IS) lenses, you already own a great tool to squeeze two stops of exposure out of your camera when shooting without a tripod (Figure 8.5). Typically, the average person can handhold their camera down to about 1/60 of a second before blurriness results due to hand shake. As the length of the lens is increased (or zoomed), the ability to handhold at slow shutter speeds (1/60 and slower) and still get sharp images is further reduced.
Figure 8.5. Set the Stabilizer to the On position when using longer shutter speeds while handholding your camera.
The Canon IS lenses contain small gyro sensors and servo-actuated optical elements, which correct for camera shake and stabilize the image. The IS function is so good that it is possible to improve your handheld photography by two or three stops, meaning that if you are pretty solid at a shutter speed of 1/60, the IS feature lets you shoot at 1/15, and possibly even 1/8 of a second (Figures 8.6 and 8.7).
Figure 8.6. This image was handheld with the IS turned off.
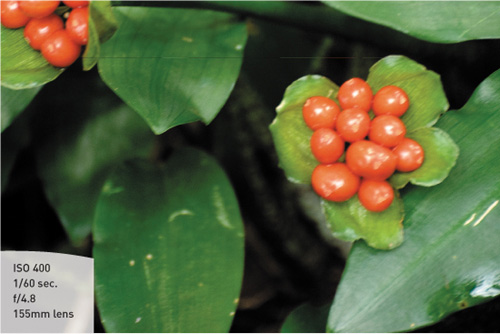
Figure 8.7. Here is the same subject shot with the same settings, but this time with IS turned on.

Focusing in Low Light
The T3i has a great focusing system, but occasionally the light levels might be too low for the camera to achieve an accurate focus. There are a few things that you can do to overcome this obstacle.
First, you should know that the camera utilizes contrast in the viewfinder to establish a point of focus. This is why your camera will not be able to focus when you point it at a white wall or a cloudless sky. It simply can’t find any contrast in the scene to work with. Knowing this, you might be able to use a single focus point in One Shot mode to find an area of contrast that is of the same distance as your subject. You can then hold that focus by holding down the shutter button halfway and recomposing your image.
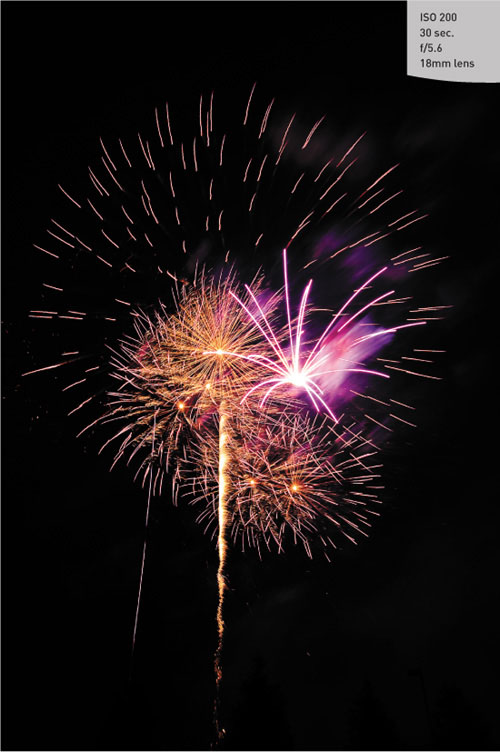
Then there are those times when there just isn’t anything there for you to focus on. A perfect example of this would be a fireworks display. If you point your lens to the night sky in any automatic focus (AF) mode, it will just keep searching for—and not finding—a focus point. On these occasions, you can simply turn off the autofocus feature and manually focus the lens (Figure 8.8). Look for the AF/MF switch on the side of the lens and slide it to the MF position.
Figure 8.8. Focusing on the night sky is best done in manual focus mode.
Don’t forget to put it back in AF mode at the end of your shoot.
Focus Assist
Another way to ensure good focus is to enable the T3i’s Focus Assist mode. Focus Assist uses a short burst from your pop-up flash to shine some light on the scene, which assists the autofocus system in locating more detail. This feature is automatically activated when shooting in the Basic zone (except in Landscape, Sports, and Flash Off modes for the following reasons: in Landscape mode, the subject is usually too far away; in Sports mode, the subject is probably moving; and in Flash Off mode, you’ve disabled the flash entirely). The Focus Assist should be enabled by default, but you can check the menu just to make sure.
Turning on the Focus Assist Feature
- Press the Menu button and then use the Main dial to get to the Custom Functions menu tab, highlight Custom Functions, and press the Set button (A).
- Use the left/right Cross keys to get to the C. Fn. III: Autofocus/Drive AF-assist beam firing feature and press the Set button (B).
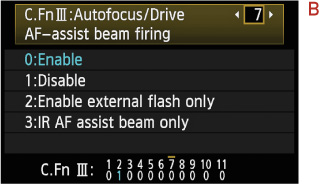
- If it is not enabled, highlight Enable and press the Set button.
- To use it when working in the Creative zone, simply press the flash button to raise the pop-up flash.
- With the flash in the “up” position, press the shutter button to focus and Focus Assist will activate if necessary.
If you don’t want the flash to fire during the actual exposure, you must first disable the flash.
Disabling the Flash
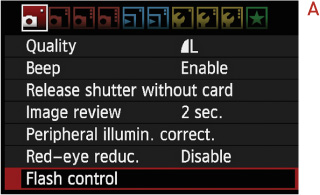
- Press the Menu button and then scroll the Main dial to highlight the first shooting menu (far left).
- Scroll down to Flash control and press the Set button (A).
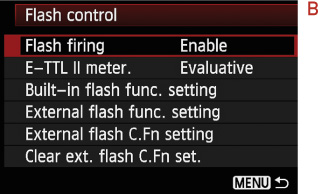
- Select Flash firing and press the Set button (B).
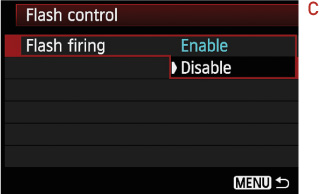
- Set the Flash firing option to Disable (C).
Shooting Long Exposures
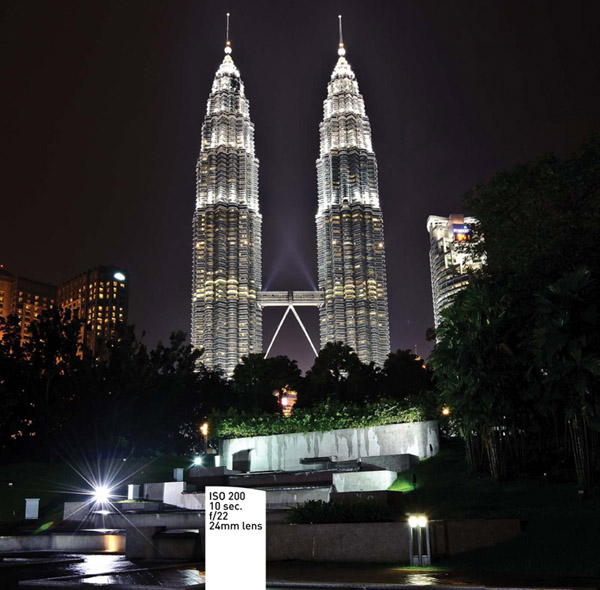
We have covered some of the techniques for shooting in low light, so let’s go through the process of capturing a night or low-light scene for maximum image quality (Figure 8.9). The first thing to consider is that in order to shoot in low light with a low ISO, you will need to use shutter speeds that are longer than you could possibly handhold (longer than 1/15 of a second). This will require the use of a tripod or stable surface for you to place your camera on. For maximum quality, the ISO should be low—somewhere at or below 400. The long exposure noise reduction should be turned on to minimize the effects of exposing for longer durations. (To set this up, see Chapter 7.)
Figure 8.9. A long exposure and a tripod were necessary to catch the lights of the San Diego skyline at night.

Once you have the noise reduction turned on, set your camera to Aperture Priority (Av) mode. This way, you can concentrate on the aperture that you believe is most appropriate and let the camera determine the best shutter speed. If it is too dark for the autofocus to function properly, try manually focusing. Finally, consider using a cable release (see the bonus chapter) to activate the shutter. If you don’t have one, check out the sidebar on using the self-timer (page 213). Once you shoot the image, you may notice some lag time before it is displayed on the rear LCD. This is due to the noise reduction process, which can take anywhere from a fraction of a second up to 30 seconds, depending on the length of the exposure.
Using the Built-In Flash
There are going to be times when you have to turn to your camera’s built-in flash to get the shot. The pop-up flash on the T3i is not extremely powerful, but with the camera’s advanced metering system it does a pretty good job of lighting up the night...or just filling in the shadows.
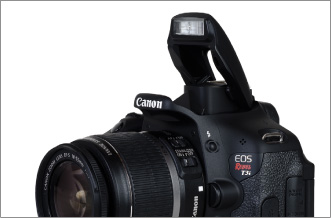
If you are working in the Creative zone, you will have to turn the flash on for yourself. To do this, just press the pop-up flash button located on the front of the camera (Figure 8.10). Once the flash is up, it is ready to go (Figure 8.11). It’s that simple.
Figure 8.10. A quick press of the pop-up flash button will release the built-in flash to its ready position.
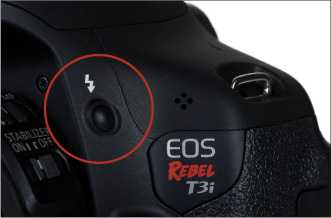
Figure 8.11. The pop-up flash in its ready position.
Shutter Speeds
The standard flash synchronization speed for your camera is between 1/60 and 1/200 of a second. When you are working with the built-in flash in the Basic zone, the camera will typically use a shutter speed of 1/60 of a second. The exception to this is when you use the Night Portrait mode, which will fire the flash with a slower shutter speed so that some of the ambient light has time to record in the image.
The real key to using the flash to get great pictures is to control the shutter speed. The goal is to balance the light from the flash with the existing light so that everything in the picture has an even illumination. Let’s take a look at the shutter speeds for the modes in the Creative zone.
Program (P): The shutter speed stays at 1/60 of a second. You can make changes to the aperture by pressing in the Av button on the back of the camera while turning the Main dial, but you risk over- or underexposing your image.

Shutter Priority (Tv): You can adjust the shutter speed to as fast as 1/200 of a second all the way down to 30 seconds. The lens aperture will adjust accordingly, but typically at long exposures the lens will be set to its largest aperture.

Aperture Priority (Av): This mode has three custom settings for adjusting the shutter speed when using the flash, depending on your needs. The whole point of this setting is to allow you to use the aperture of your choice while still getting good flash exposures.

The default value is Auto, which adjusts from 1/200 all the way down to 30 seconds, depending on the available light. As the aperture gets smaller, the shutter speeds will get longer. There are also two speed-limiting settings to choose from. The first is “1/200–1/60 sec. auto.” This limits the shutter speed to a maximum duration of 1/60 of a second. If you have the aperture open to an f-stop that has a very small opening for a proper exposure, the shutter speed indicator will flash, letting you know that you are risking underexposure. For all other exposures, the camera will moderate the shutter speed to a selection that is within the 1/60–1/200 range. The other setting is “1/200 sec. (fixed).” This setting maintains a shutter speed of 1/200 of a second no matter what the f-stop is set to. Your flash will try and vary its power output to meet the needs of the setting that you have selected.
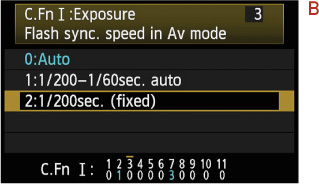
Setting the Sync Speed When Using Flash in Av Mode
- Press the Menu button and use the Main dial to get to the Custom Functions menu tab and then press the Set button.
- Select C. Fn I: Exposure / Flash sync. speed in Av mode using the Cross keys and press the Set button (A).
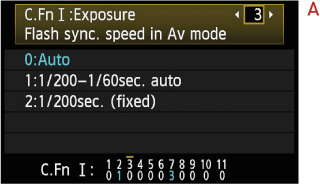
- Select the Av sync speed that you desire using the Cross keys and press Set once more (B).
Manual (M): Manual mode works the same as Tv mode, with a range of 1/200 down to 30 seconds. The difference, of course, is that you must manually set the f-stop.

A-DEP: The shutter speed for this mode stays at 1/60 of a second.
Generally speaking, I like to have my Mode dial set to the Shutter Priority (Tv) mode when shooting pictures with flash. This enables me to balance out the existing light with the flash, which sometimes requires longer shutter speeds.

Metering Modes
The built-in flash uses a technology called E-TTL II (Evaluative Through The Lens) metering to determine the appropriate amount of flash power to output for a good exposure. When you depress the shutter button, the camera quickly adjusts focus while gathering information from the entire scene to measure the amount of ambient light. As you press the shutter button down completely, a pre-flash occurs to meter the light off the subject from the flash, and a determination is made as to how much power is needed to balance the subject with the ambient light. This applies to all of the modes in the Creative zone, with the exception of Manual mode.
The default setting for the flash meter mode is Evaluative. The meter can be set to Average mode but should probably be avoided. Your best results will come from the E-TTL mode.
But if you have special metering needs, such as a background that is very light or dark, you might consider using the Flash Exposure (FE) Lock to meter off your subject and then recompose your image in the viewfinder.
This feature works much like the Automatic Exposure (AE) Lock function that was discussed in Chapter 6.
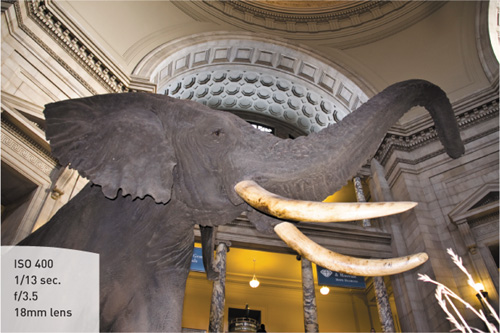
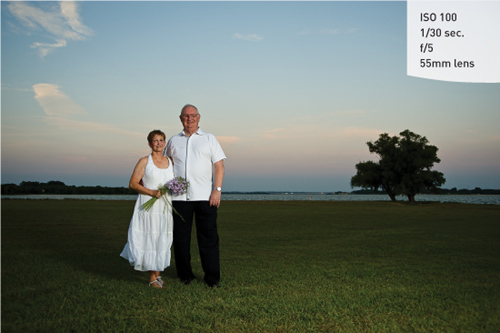
Figure 8.12. The pop-up flash was used to fill in shadows on the elephant while the long exposure time allowed the ambient light to illuminate the rest of the scene.
Using the FE Lock Feature
- Point the camera at the area that you want to base the flash exposure on. This is normally your subject.
- Press the AE/FE Lock button (*) (near the top right on the back of the camera) button to obtain the exposure setting. The flash will fire a small burst to evaluate the exposure and you will see FEL (Flash Exposure Lock) appear briefly in the viewfinder. The AE/FE Lock symbol (*) will also appear in the viewfinder next to the flash symbol.
- Recompose the scene as you like, and press the shutter button completely.
The FE Lock will cancel after each exposure, so you have to repeat these steps each time you need to lock the flash exposure.
Using the Average metering mode might also require that you tweak the flash output by using Flash Exposure Compensation. This is because the camera will be metering the entire scene to set the exposure, so you might have to add or subtract flash power to balance out the scene.
Compensating for the Flash Exposure
The E-TTL system will usually do an excellent job of balancing the flash and ambient light for your exposure, but it does have the limitation of not knowing what effect you want in your image. You may want more or less flash in a particular shot. You can achieve this by using the Flash Exposure Compensation feature.
Just as with exposure compensation, flash compensation allows you to dial in a change in the flash output in increments of 1/3 of a stop. You will probably use this most often to tone down the effects of your flash, especially when you are using the flash as a subtle fill light (Figures 8.13 and 8.14).
Figure 8.13. This shot was taken with the pop-up flash set to normal power. As you can see, it was trying too hard to illuminate my subject.
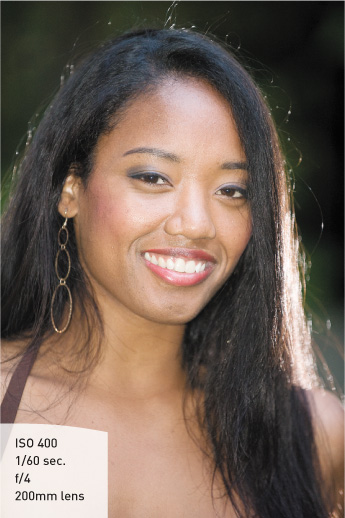
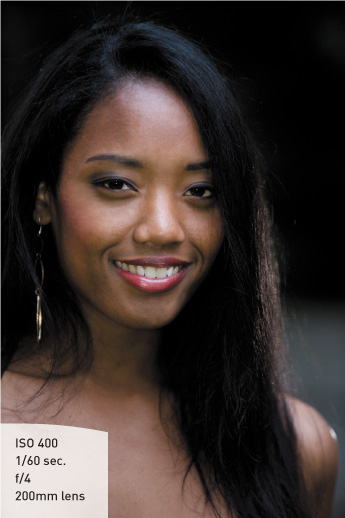
Figure 8.14. This image was made with the same camera settings. The difference is that the flash compensation was set to −1.3 stops.
Using the Flash Exposure Compensation Feature to Change the Flash Output
- Press the Q button to activate the Quick Control screen on the LCD.
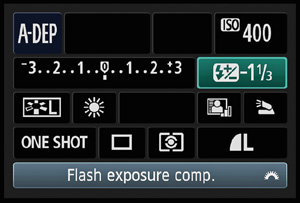
- Use the Cross keys to move the cursor to the Flash Exposure Compensation icon.
- Rotate the Main dial to adjust the flash compensation in 1/3-stop increments (left to subtract and right to add).
- Press the shutter button halfway to return to shooting mode, and then take the picture.
- Review your image to see if more or less flash compensation is required, and repeat these steps as necessary.
The Flash Exposure Compensation feature does not reset itself when the camera is turned off, so whatever compensation you have set will remain in effect until you change it. Your only clue to knowing that the flash output is changed will be the presence of the Flash Exposure Compensation symbol on the rear LCD so make sure you check it. It will disappear when there is zero compensation set.
Reducing Red-Eye
We’ve all seen the result of using on-camera flashes when shooting people: the dreaded red-eye! This demonic effect is the result of the light from the flash entering the pupil and then reflecting back as an eerie red glow. The closer the flash is to the lens, the greater the chance that you will get red-eye. This is especially true when it is dark and the subject’s pupils are dilated. There are two ways to combat this problem. The first is to get the flash away from the lens. That’s not really an option though if you are using the pop-up flash. Therefore, you will need to turn to the Red-Eye Reduction feature.
This is a simple feature that shines a light from the camera at the subject, causing their pupils to shrink, thus eliminating or reducing the effects of red-eye (Figure 8.15).
Figure 8.15. The picture on the left did not utilize Red-Eye Reduction, thus the glowing red eyes. Notice that the pupils on the image on the right, without red-eye, are smaller as a result of using the Red-Eye Reduction lamp.
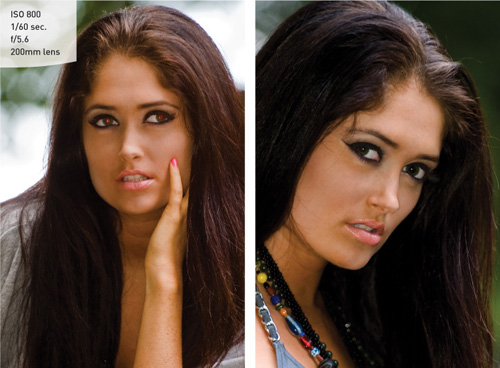
The feature is set to Off by default and needs to be turned on in the shooting menu.
Turning on the Red-Eye Reduction Feature
- Press the Menu button and then turn the Main dial to get to the first shooting menu.
- Use the Cross keys to scroll down to the Red-eye reduc. setting (A).
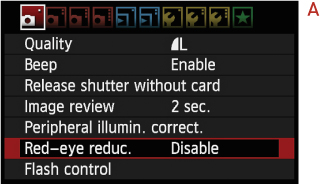
- Press the Set button and then, using the Cross keys, select Enable and press the Set button (B).
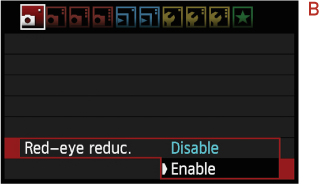
- Press the Menu button twice or the shutter release button to return to shooting mode.
To get the full benefit from the Red-Eye Reduction feature, you should hold down the shutter button halfway, which causes the reduction light to shine into your subject’s eyes. A small scale will appear in the viewfinder that shows how long to hold the shutter button before pressing completely. Once the countdown scale has reduced down to nothing, press the shutter button completely to take the picture.
Truth be told, I rarely shoot with red-eye reduction turned on because of the time it takes before being able to take a picture. If I am after candid shots and have to use the flash, I will take my chances on red-eye and try to fix the problem in my image-processing software. The Canon Image Browser software that comes with your T3i has a red-eye reduction feature that works really well.
2nd Curtain Sync
There are two flash synchronization modes in the T3i. There’s first curtain and second curtain. You may be asking, “What in the world does synchronization do, and what are these ‘curtains’?” Good question.
When your camera fires, there are two curtains that open and close to make up the shutter. The first curtain moves out of the way, exposing the camera sensor to the light. At the end of the exposure, the second curtain moves in front of the sensor, ending that picture cycle. In flash photography, timing is extremely important because the flash fires in milliseconds and the shutter is usually opening in tenths or hundredths of a second. To make sure these two functions happen in order, the camera usually fires the flash just as the first curtain moves out of the way (see the sidebar earlier in the chapter about flash sync).
In 2nd Curtain Sync mode, the flash will not fire until just before the second shutter curtain ends the exposure. So, why have this mode at all? Well, there might be times when you want to have a longer exposure to balance out the light from the background to go with the subject needing the flash. Imagine taking a photograph of a friend standing in Times Square at night with all the traffic moving about and the bright lights of the buildings and signs overhead. If the flash fires at the beginning of the exposure, and then the objects around the subject move, those objects will often blur the subject a bit. If the camera is set to 2nd Curtain Sync, though, all of the movement of the existing light is recorded first, and then the subject is “frozen” by the flash at the end by the exposure.
There is no right or wrong to it. It’s just a decision on what type of effect it is that you would like to create. Many times, 2nd Curtain Sync is used for artistic purposes or to record movement in the scene without it overlapping the flash-exposed subject (Figure 8.16). To make sure that the main subject is always getting the final pop of the flash, I leave my camera set to 2nd Curtain Sync.
Figure 8.16. Using 2nd Curtain Sync is most evident during long flash exposures.
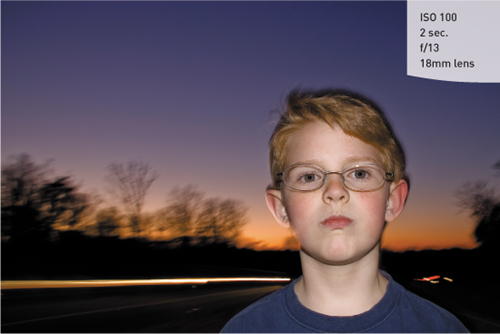
Using 1st Curtain Sync mode will give a similar effect, but the flash will fire at the beginning of the sequence (Figure 8.17). If you do intend to use a long exposure with first curtain synchronization, you need to have your subject remain fairly still so that any movement that occurs after the flash goes off will be minimized in the image.
Figure 8.17. 1st Curtain Sync is the default setting for flash photography and can be used for longer exposures as long as the subject remains still.
Setting Your Flash Sync Mode
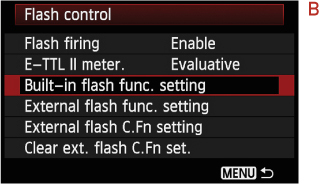
- Press the Menu button and navigate to first shooting menu, select Flash control, and press Set (A).

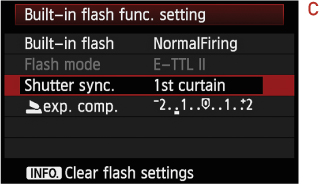
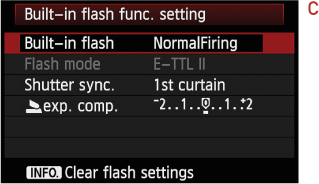
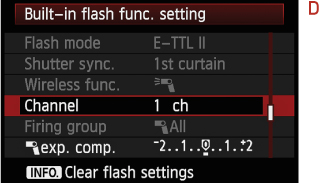
- Use the Cross keys to select Built-in flash func. setting, and then press the Set button (B).
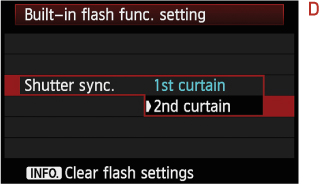
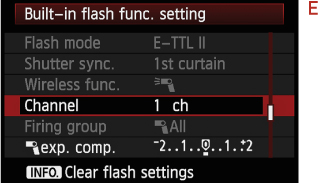
- Use the Cross keys once again to select the Shutter sync option (C), and then select either the 1st or 2nd curtain option for the type of flash sync that you desire (D).
Using an External Speedlite
One of the more exciting features of the T3i is its ability to control an off-camera flash by using the pop-up flash as the wireless controller. In years past, you needed to mount a controller flash unit on top of the camera (such as the ST-E2 transmitter), which meant spending additional money. Now you can simply purchase one of the wireless enabled Speedlites like the new 320EX and have complete control to move it away from the camera.
The biggest benefit to doing this is that you can get more natural-looking light by having the flash moved to the side of the camera. This gives you better and more natural-looking shadows. You can also do things like fire the external flash through umbrellas, softboxes, or simple diffusion panels to make the quality of light much softer and complimentary to your subject (Figure 8.18).
Figure 8.18. By moving the flash away from the camera and firing it through a shoot-through umbrella, you can achieve a much better quality of light that is more flattering to your subjects.
Using Off-Camera Flash
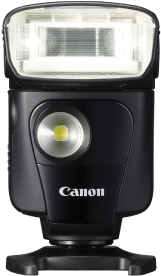
In order to use an off-camera Speedlite, you need to do two things. First, purchase the Speedlite. There are several models that allow you to use the wireless feature, and they range in price from around $250 for the 320EX all the way up to the top-of-the-line model, the 580EX with its nearly $500 price tag. Personally, I am a fan of the 320EX (Figure 8.19) because it allows me to use it off-camera but it also has the added benefit of having a built-in LED light that can be used as both a focus assist lamp and also a video recording light. It also has a pivoting head that allows the light to be bounced off of the ceiling to create softer, more flattering light.
Figure 8.19. The 320EX is a great Speedlite for starting out with flash.
Setting up Off-Camera Flash
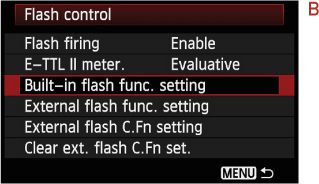
- Press the Menu button and then select the Flash control option in the first Shooting menu (A).

- Using the Cross-keys, select the Built-in flash func. setting option and press Set (B).
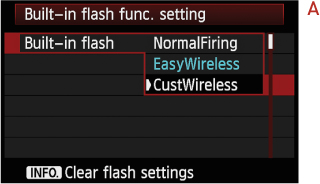
- Select Built-in flash and press Set (C).
- Choose which wireless option you want to use, Easy or Custom. If you select Easy, you are ready to start shooting (D). Simply pop up the built-in flash, turn on the Speedlite and set it to wireless mode, and start shooting. If you want to have more control, choose the Custom setting and adjust as follows.

- The only other option you need to set in the menu for Easy wireless is the channel number of the slave unit that you want to control (E).
Custom Wireless Settings
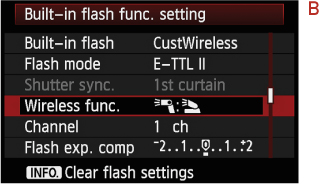
- To gain more control over your wireless slave flash, follow steps A–D above, but select the CustWireless option (A).
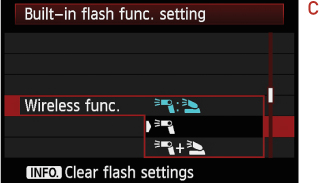
- Next, select how you want the built-in flash to operate. If you only want the built-in flash to control the slave unit and not have any effect on the actual image—i.e., you don’t want the built-in flash to fire—then highlight Wireless func. and press Set (B).
- Select the External speedlite only option (C).
- Select the Channel for the slave unit by highlighting the Channel option, pressing Set, and then using the up/down Cross keys to select the channel of your choice, 1–4 (D).
- Make sure the built-in flash is in the raised position, set up the wireless slave flash by turning it on and setting it to wireless with the appropriate channel, point the slave’s wireless sensor at the camera, and start shooting.
Wireless flash photography is a lot of fun and really lets you expand on the creative possibilities of your photography. You may find that you wish to add additional wireless flashes to your system, which is easily handled with the wireless technology built into your camera. If you want further direction and creative options, check out the Wireless Flash section of your manual (pages 189–199).
Chapter 8 Assignments
Now that we have looked at the possibilities of shooting after dark, it’s time to put it all to the test. These assignments cover the full range of shooting possibilities, both with flash and without. Let’s get started.
How steady are your hands?
It’s important to know just what your limits are in terms of handholding your camera and still getting sharp pictures. This will change depending on the focal length of the lens you are working with. Wider angle lenses are more forgiving than telephoto lenses, so check this out for your longest and shortest lenses. Using an 18–200mm zoom as an example, set your lens to 200mm and then, with the camera set to ISO 100 and the mode set to Tv, start taking pictures with lower and lower shutter speeds. Review each image on the LCD at a zoomed-in magnification to take note of when you start seeing visible camera shake in your images. It will probably be around 1/125 of a second for a 200mm lens.
Now do the same for the wide-angle setting on the lens. My limit is about 1/30 of a second. These shutter speeds are with the Image Stabilization feature turned off. If you have an IS lens, try it with and without the IS feature enabled to see just how slow you can set your shutter while getting sharp results.
Long exposures in the dark
If you don’t have a tripod, find a stable place to set your camera outside and try some long exposures. Set your camera to Av mode and then use the self-timer to activate the camera (this will keep you from shaking the camera while pressing the shutter button).
Shoot in an area that has some level of ambient light, be it a streetlight or traffic lights, or even a full moon. The idea is to get some late-night low-light exposures.
Reducing the noise in your long exposures
Now repeat the last assignment with the Long Exposure Noise Reduction set to On. Now look at the difference in the images that were taken before and after the noise reduction was enabled. For best results, perform this assignment and the previous assignment in the same shooting session using the same subject.
Getting creative with 2nd Curtain Sync
Now it’s time for a little creative fun. Set your camera up for 2nd Curtain Sync and start shooting. Moving targets are best. Experiment with Tv and Av modes to lower the shutter speeds and exaggerate the effect. Try using a low ISO so the camera is forced to use longer shutter speeds. Be creative and have some fun!
Share your results with the book’s Flickr group!
Join the group here: flickr.com/groups/canonrebelt3i600dfromsnapshotstogreatshots