
6. Working with Notifications
Applications often need to communicate with the user, even when the application isn’t actively running. Applications can alert users with text notifications, vibration, blinking lights, and even audio. In this chapter, you learn how to build different kinds of notifications into your Android applications.
Notifying the User
Applications can use notifications to greatly improve the user’s experience. For example:
• An email application might notify a user when new messages arrive. A news reader application might notify a user when there are new articles to read.
• A game might notify a user when a friend has signed in, or sent an invitation to play, or beat a high score.
• A weather application might notify a user of special weather alerts.
• A stock market application might notify the user when certain stock price targets are met. (Sell now before it’s too late!)
Users appreciate these notifications because they help drive application workflow, reminding the users when they need to launch the application. However, there is a fine line between just enough and too many notifications. Application designers need to consider carefully how they should employ the use of notifications so as not to annoy users or interrupt them without good reason. Each notification should be appropriate for the specific application and the event the user is being notified of. For example, an application should not put out an emergency style notification (think flashing lights, ringing noises, and generally making a “to-do”) simply to notify the user that his picture has been uploaded to a website or that new content has been downloaded.
The Android platform provides a number of different ways of notifying the user. Notifications are often displayed on the status bar at the top of the screen. Notifications may involve
• Textual information
• Graphical indicators
• Vibration of the device
• Control over the indicator light

Although the Android SDK provides APIs for creating a variety of notifications, not all notifications are supported by all devices. For example, the indicator light and vibrate features are not available on all Android devices. There is also a degree of variation between how different devices handle notifications. Always test any notification implementations on target devices.
Now let’s look at how to use these different kinds of notifications in your application. But, first, let’s talk a little about compatibility.
A Word on Compatibility
Notifications have been around since the beginning of the Android platform. They’ve undergone some changes, but the basics have pretty much stayed the same. However, over time, there are some areas that have changed enough to no longer work the way they originally did. While we’re not attempting to cover every single type of notification or option allowed for notifications in this book, even this overview covers at least one area that behaves differently on different versions of Android. We point out these areas as we come across them.
Additionally, a new method of creating notifications was introduced in API Level 11. As of this writing, API Level 11 and above covers just 3.9 percent of the market, so we feel most people will still want to know about the older method, which we introduce first. We go over the new method when we reach the changed notification mechanism.
Notifying with the Status Bar
The standard location for displaying notifications and indicators on an Android device is the status bar that runs along the top of the screen. Typically, the status bar shows information such as the current date and time. It also displays notifications (such as incoming SMS messages) as they arrive—in short form along the bar and in full if the user pulls down the status bar to see the notification list. The user can clear the notifications by pulling down the status bar and pressing the Clear button.
Developers can enhance their applications by using notifications from their applications to inform the user of important events. For example, an application might want to send a simple notification to the user whenever new content has been downloaded. A simple notification has a number of important components:
• An icon (appears on status bar and full notification)
• Ticker text (appears on status bar)
• Notification title text (appears in full notification)
• Notification body text (appears in full notification)
• An intent (launches if the user clicks on the full notification)
In this section, you learn how to create this basic kind of notification.

Many of the code examples provided in this chapter are taken from the SimpleNotifications application. The source code for this application is provided for download on the book’s websites.
Using the NotificationManager Service
All notifications are created with the help of the NotificationManager. The NotificationManager (in the android.app package) is a system service that must be requested. The following code demonstrates how to obtain a valid NotificationManager object using the getSystemService() method:
NotificationManager notifier = (NotificationManager)
getSystemService(Context.NOTIFICATION_SERVICE);
The NotificationManager is not useful without having a valid Notification object to use with the notify() method. The Notification object defines what information displays to the user when the Notification is triggered. This includes text that displays on the status bar, a couple of lines of text that display on the expanded status bar, an icon displayed in both places, a count of the number of times this Notification has been triggered, and a time for when the last event that caused this Notification took place.
Creating a Simple Text Notification with an Icon
You can set the icon and ticker text, both of which display on the status bar, through the constructor for the Notification object, as follows:
Notification notify = new Notification(
R.drawable.ic_stat_notify, "Hello!", System.currentTimeMillis());
Additionally, you can set notification information through public member variable assignment, like this:
notify.icon = R.drawable.ic_stat_notify;
notify.tickerText = "Hello!";
notify.when = System.currentTimeMillis();
You need to set a couple more pieces of information before the call to the notify() method takes place. First, you need to make a call to the setLatestEventInfo() method, which configures a View that displays in the expanded status bar. Here is an example:
Intent toLaunch = new Intent
(SimpleNotificationsActivity.this,
SimpleNotificationsActivity.class);
PendingIntent intentBack = PendingIntent.getActivity
(SimpleNotificationsActivity.this, 0, toLaunch, 0);
notify.setLatestEventInfo(SimpleNotificationsActivity.this,
"Hi there!", "This is even more text.", intentBack);
Next, use the notify() method to supply the notification’s title and body text as well as the Intent triggered when the user clicks on the notification. In this case, we’re using our own Activity so that when the user clicks on the notification, our Activity launches again.

When the expanded status bar is pulled down, the current Activity lifecycle is still treated as if it were the top (displayed) Activity. Triggering system notifications while running in the foreground, though, isn’t particularly useful. An application that is in the foreground is better suited using a Dialog or Toast to notify the user, not by using notifications.
Working with the Notification Queue
Now the application is ready to actually notify the user of the event. All that is needed is a call to the notify() method of the NotificationManager with an identifier and the Notification we configured. This is demonstrated with the following code:
private static final int NOTIFY_1 = 0x1001;
// ...
notifier.notify(NOTIFY_1, notify);
The identifier matches up a Notification with any previous Notification instances of that type. When the identifiers match, the old Notification is updated instead of creating a new one. You might have a Notification that some file is being downloaded. You can update the Notification when the download is complete, instead of filling the notification queue with a separate Notification, which quickly becomes obsolete. This Notification identifier needs to be unique only in your application.
The notification displays as an icon and ticker text showing up on the status bar. This is shown at the top of Figure 6.1.
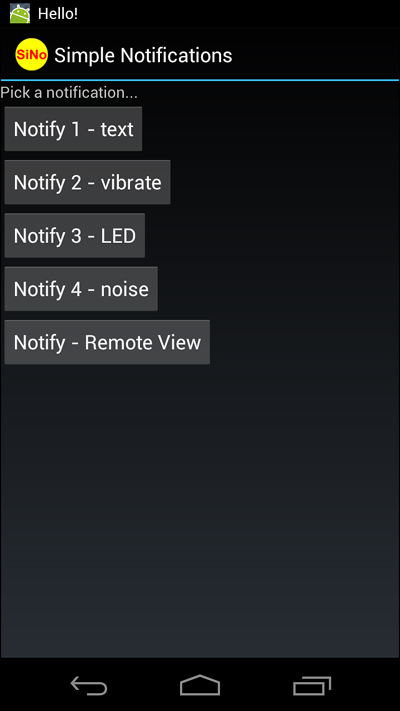
Figure 6.1. Status bar notification showing an icon and ticker text.
Shortly after the ticker text displays, the status bar returns to normal with each notification icon shown. If the users expand the status bar, they see something like what is shown in Figure 6.2.
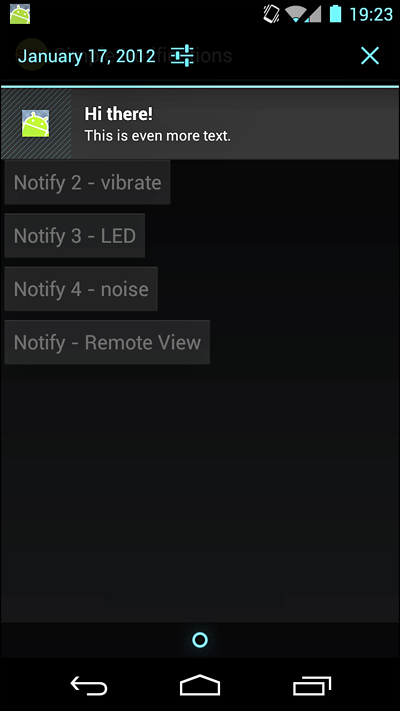
Figure 6.2. Expanded status bar showing the icon, both text fields, and the time of the notification.
Updating Notifications
You don’t want your application’s notifications piling up in the notification bar. Therefore, you might want to reuse or update notifications to keep the notification list manageable. For example, there is no reason to keep a notification informing the user that the application is downloading File X when you now want to send another notification saying File X has finished downloading. Instead, you can simply update the first notification with new information.
When the notification identifiers match, the old notification is updated. When a notification with matching identifier is posted, the ticker text does not draw a second time. To show the user that something has changed, you can use a counter. The value of the number member variable of the Notification object tracks and displays this. For instance, we can set it to the number 4, as shown here:
notify.number = 4;
This is displayed to the user as a small number over the icon. This is only displayed in the status bar and not in the expanded status bar, although an application can update the text to also display this information. Figure 6.3 (left) shows what this might look like in the status bar.

Figure 6.3. Status bar notification with the count of “4” showing over the icon on left; the count of “4” shows in the pull-down area on right.
On API Level 11 and higher, simply setting the notify number does nothing. The look of the notification count has changed, too, and instead only displays when the whole notification tray is expanded (far right side). To show the notification count indicator, use the Notification.Builder class. Figure 6.3 (right) shows how this might look. Here’s the code:
Intent toLaunch = new Intent(SimpleNotificationsActivity.this,
SimpleNotificationsActivity.class);
Notification notify = new Notification.Builder(this)
.setWhen(System.currentTimeMillis())
.setSmallIcon(R.drawable.ic_stat_notify)
.setAutoCancel(true)
.setContentTitle("Hi there!")
.setTicker("Hello!")
.setNumber(4)
.setContentIntent(
PendingIntent.getActivity(
SimpleNotificationsActivity.this, 0,
toLaunch, 0))
.setContentText("Hello from down here!").getNotification();
notifier.notify(NOTIFY_6, notify);
As you can see from the code, the idea is basically the same, just coded a little differently. This method works only on API Level 11 or later.
Clearing Notifications
When a user clicks on the notification, the Intent assigned is triggered. At some point after this, the application might want to clear the notification from the system notifications queue. This is done through a call to the cancel() method of the NotificationManager object. For instance, the notification we created earlier can be canceled with the following call:
notifier.cancel(NOTIFY_1);
This cancels the notification that has the same identifier. However, if the application doesn’t care what the user does after clicking on the notification, there is an easier way to cancel notifications. Simply set a flag to do so, as shown here:
notify.flags |= Notification.FLAG_AUTO_CANCEL;
Setting the Notification.FLAG_AUTO_CANCEL flag causes notifications to be canceled when the user clicks on them. This is convenient and easy for the application when just launching the intent is good enough.
The Notification object is a little different from other Android objects you might have encountered. Most of the interaction with it is through direct access to its public variables instead of through helper methods. This is useful for a background application or service, as discussed in Chapter 2, “Working with Services.” The Notification object can be kept around and only the values that need to be changed can be modified. After any change, the Notification needs to be posted again by calling the notify() method.
Vibrating the Phone
Vibration is a great way to enable notifications to catch the attention of a user in noisy environments or alert the user when visible and audible alerts are not appropriate (though a vibrating phone is often noisy on a hard desktop surface). Android notifications give a fine level of control over how vibration is performed. However, before the application can use vibration with a notification, an explicit permission is needed. The following XML in your application’s AndroidManifest.xml file is required to use vibration:
<uses-permission
android:name="android.permission.VIBRATE" />
The vibrate feature must be tested on the device. The emulator does not indicate vibration in any way. Also, some Android devices do not support vibration.
Without this permission, the vibrate functionality does not work nor are there any errors. With this permission enabled, the application is free to vibrate the phone however it wants. This is accomplished by describing the vibrate member variable, which determines the vibration pattern. An array of long values describes the vibration duration. Thus, the following line of code enables a simple vibration pattern that occurs whenever the notification is triggered:
notify.vibrate = new long[] {0, 200, 200, 600, 600};
This vibration pattern vibrates for 200 milliseconds and then stops vibrating for 200 milliseconds. After that, it vibrates for 600 milliseconds and then stops for that long. To repeat the Notification alert, a notification flag can be set so it doesn’t stop until the user clears the notification.
notify.flags |= Notification.FLAG_INSISTENT;
An application can use different patterns of vibrations to alert the user to different types of events or even present counts. For instance, think about a grandfather clock with which you can deduce the time based on the tones that are played.
Blinking the Lights
Blinking lights are a great way to pass information silently to the user when other forms of alert are not appropriate. The Android SDK provides reasonable control over a multicolored indicator light, when such a light is available on the device. Users might recognize this light as a service indicator or battery level warning. An application can also take advantage of this light, by changing the blinking rate or color of the light.
Indicator lights are not available on all Android devices. Also, the emulator does not display the light’s state. This mandates testing on actual hardware.
You must set a flag on the Notification object to use the indicator light. Then, the color of the light must be set and information about how it should blink. The following block of code configures the indicator light to shine green and blink at rate of 1 second on and 1 second off:
notify.flags |= Notification.FLAG_SHOW_LIGHTS;
notify.ledARGB = Color.GREEN;
notify.ledOnMS = 1000;
notify.ledOffMS = 1000;
Although you can set arbitrary color values, a typical physical implementation of the indicator light has three small LEDs in red, green, and blue. Although the colors blend reasonably well, they won’t be as accurate as the colors on the screen. For instance, on the T-Mobile G1, the color white looks a tad pink.
On some devices, certain notifications appear to take precedence when it comes to using the indicator light. For instance, the light on the T-Mobile G1 is always solid green when plugged in to a USB port, regardless of other applications trying to use the indicator light. Additionally, on the Nexus One, the color trackball is not lit unless the screen is off. You must unplug the phone from the USB port for the colors to change.
An application can use different colors and different blinking rates to indicate different information to the user. For instance, the more times an event occurs, the more urgent the indicator light could be. The following block of code shows changing the light based on the number of notifications that have been triggered:
notify.number++;
notify.flags |= Notification.FLAG_SHOW_LIGHTS;
if (notify.number < 2) {
notify.ledARGB = Color.GREEN;
notify.ledOnMS = 1000;
notify.ledOffMS = 1000;
} else if (notify.number < 3) {
notify.ledARGB = Color.BLUE;
notify.ledOnMS = 750;
notify.ledOffMS = 750;
} else if (notify.number < 4) {
notify.ledARGB = Color.WHITE;
notify.ledOnMS = 500;
notify.ledOffMS = 500;
} else {
notify.ledARGB = Color.RED;
notify.ledOnMS = 50;
notify.ledOffMS = 50;
}
The blinking light continues until the Notification is cleared by the user. The use of the Notification.FLAG_INSISTENT flag does not affect this as it does vibration effects.
Color and blinking rates can also be used to indicate other information. For instance, temperature from a weather service can be indicated with red and blue plus blink rate. Use of such colors for passive data indication can be useful even when other forms would work. It is far less intrusive than annoying, loud ringers or harsh, vibrating phone noises. For instance, a simple glance at the device can tell the user some useful piece of information without the need to launch any applications or change what he is doing.
Making Noise
Sometimes, the device has to make noise to get the user’s attention. Luckily, the Android SDK provides a means for this using the Notification object. Begin by configuring the audio stream type to use when playing a sound. Generally, the most useful stream type is STREAM_NOTIFICATION. You can configure the audio stream type on your notification as follows:
notify.audioStreamType = AudioManager.STREAM_NOTIFICATION;
Now, assign a valid Uri object to the sound member variable and that sound plays when the notification is triggered. The following code demonstrates how to play a sound that is included as a project resource:
notify.sound = Uri.parse(
ContentResolver.SCHEME_ANDROID_RESOURCE +
"://com.androidbook.simplenotifications/" +
R.raw.fallbackring);
By default, the audio file is played once. As with the vibration, the Notification.FLAG_INSISTENT flag can be used to repeat incessantly until the user clears the notification. No specific permissions are needed for this form of notification.
The sound file used in this example is included in the project as a raw resource. However, you can use any sound file on the device. Keep in mind that the sound files available on a given Android device vary.
Customizing the Notification
Although the default notification behavior in the expanded status bar tray is sufficient for most purposes, developers can customize how notifications are displayed if they so choose. To do so, developers can use the RemoteViews object to customize the look and feel of a notification.
The following code demonstrates how to create a RemoteViews object and assign custom text to it:
RemoteViews remote =
new RemoteViews(getPackageName(), R.layout.remote);
remote.setTextViewText(R.id.text1, "Big text here!");
remote.setTextViewText(R.id.text2, "Red text down here!");
notify.contentView = remote;
To better understand this, here is the layout file remote.xml referenced by the preceding code:
<LinearLayout
xmlns:android="http://schemas.android.com/apk/res/android"
android:orientation="vertical"
android:layout_width="fill_parent"
android:layout_height="fill_parent">
<TextView
android:id="@+id/text1"
android:layout_width="fill_parent"
android:layout_height="wrap_content"
android:textSize="31dp"
android:textColor="#ddd" />
<TextView
android:id="@+id/text2"
android:layout_width="fill_parent"
android:layout_height="wrap_content"
android:textSize="18dp"
android:textColor="#f00" />
</LinearLayout>
This particular example is similar to the default notification but does not contain an icon. The setLatestEventInfo() method is normally used to assign the text to the default layout. In this example, we use our custom layout instead. The Intent still needs to be assigned, though, as follows:
Intent toLaunch = new Intent
(SimpleNotificationsActivity.this, SimpleNotificationsActivity.class);
PendingIntent intentBack = PendingIntent.getActivity
(SimpleNotificationsActivity.this, 0, toLaunch, 0);
notify.contentIntent = intentBack;
notifier.notify(NOTIFY_5, notify);
The end result looks something like Figure 6.4.
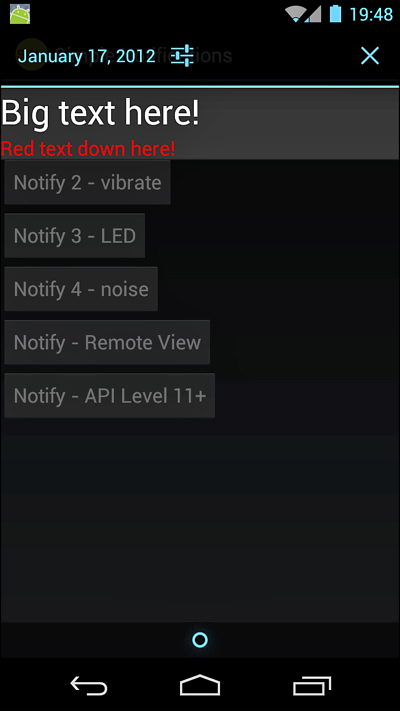
Figure 6.4. Custom notification showing with just two lines of text.
Using a custom notification layout can provide better control over the information on the expanded status bar. Additionally, it can help differentiate your application’s notifications from other applications by providing a themed or branded appearance.
The size of the area that a layout can use on the expanded status bar is fixed for a given device. However, the exact details might change from device to device. Keep this in mind when designing a custom notification layout. Additionally, be sure to test the layout on all target devices in all modes of screen operation so that you can be sure the notification layout draws properly.
The default layout includes two fields of text: an icon and a time field for when the notification was triggered. Users are accustomed to this information. An application, where feasible and where it makes sense, should try to conform to at least this level of information when using custom notifications.
Designing Useful Notifications
As you can see, the notification capabilities on the Android platform are quite robust—so robust that it is easy to overdo it and make your application tiresome for the user. Here are some tips for designing useful notifications:
• Only use notifications when your application is not in the foreground. When in the foreground, use Toast or Dialog controls.
• Allow the user to determine what types (text, lights, sound, and vibration) and frequency of notifications she receives, as well as what events to trigger notifications for.
• Whenever possible, update and reuse an existing notification instead of creating a new one.
• Clear notifications regularly so as not to overwhelm the user with dated information.
• When in doubt, generate “polite” notifications (read as quiet).
• Make sure your notifications contain useful information in the ticker, title, and body text fields and launch sensible intents.
The notification framework is lightweight yet powerful. However, some applications such as alarm clocks or stock market monitors might also need to implement their own alert windows above and beyond the notification framework provided. In this case, they may use a background service and launch full Activity windows upon certain events. In Android 2.0 and later, developers can use the WindowManager.LayoutParams class to enable activity windows to display, even when the screen is locked with a keyguard.
Summary
Applications can interact with their users outside the normal activity boundaries by using notifications. Notifications can be visual, auditory, or use the vibrate feature of the device. Various methods can customize these notifications to provide rich information to the user. Special care must be taken to provide the right amount of appropriate information to the user without the application becoming a nuisance or the application being installed and forgotten about.
References and More Information
Android Dev Guide: “Notifying the User”:
http://d.android.com/guide/topics/ui/notifiers/index.html
Android Dev Guide: “Creating Status Bar Notifications”:
http://d.android.com/guide/topics/ui/notifiers/notifications.html
Android Reference for the NotificationManager class:
http://d.android.com/reference/android/app/NotificationManager.html
Android Reference for the Nofitication.Builder class:
http://d.android.com/reference/android/app/Notification.Builder.html