
9. Designing Accessible Applications
Android devices are as varied as their users. As the platform has matured and grown, its audience has become more diverse. The Android SDK includes numerous features and services for the benefit of users with physical impairments. Those users without impairments can also benefit from improved accessibility features such as speech recognition and text-to-speech services, especially when they are not paying complete attention to the device (such as when driving). In this chapter, we explore some of the accessibility features of Android devices and discuss how to make your applications accessible to as many different kinds of users as possible.
Exploring the Accessibility Framework
Accessibility is a commonly overlooked aspect of application development, but one that is becoming increasingly more important as time goes on. Many of the newest Android devices are well suited for new user audiences, and the addition of the Android Accessory Development Kit (ADK) for building hardware accessories makes the issue that much more relevant.
Perhaps it would surprise you to know that the same sort of technology that drives Apple’s Siri speech-recognizing assistant has been available on the Android platform for quite some time, if developers want to leverage it. Because speech recognition and Text-To-Speech applications are all the rage and their technologies are often used for navigation applications (especially because many states are passing laws making driving while using a mobile device without hands-free operation illegal), we look at these two technologies in a little more detail.
Android applications can leverage speech input and output. Speech input can be achieved using speech recognition services and speech output can be achieved using Text-To-Speech services. Not all devices support these services. However, certain types of applications—most notably hands-free applications such as directional navigation—often benefit from the use of these types of input.
Some of the accessibility features available in the Android SDK include the following:
• The Speech Recognition Framework.
• The Text-To-Speech (TTS) Framework.
• The ability to create and extend accessibility applications in conjunction with the Android Accessibility Framework. See the following packages to get started writing accessibility applications: android.accessibilityservice and android.view.accessibility. There are also a number of accessibility applications, such as KickBack, SoundBack, and TalkBack, that ship with the platform. For more information, see the device settings under Settings, Accessibility.
There are a number of subtle things you can do to greatly improve how users with disabilities can navigate your applications. For example, you can:
• Enable haptic feedback (that vibration you feel when you press a button, rather like a rumble pack game controller) on any View object (API Level 3 and higher). See the setHapticFeedbackEnabled() method of the View class.
• Specify rich descriptions of visual controls, such as providing a text description for an ImageView control. This can be performed on any View control (API Level 4 and higher) and makes audio-driven screen navigation (for the visually impaired) much more effective. This feature is often helpful for the visually impaired. See the setContentDescription() method of the View class.
• Review and enforce the focus order of screen controls. You can finely control screen navigation and control focus, overriding default behavior as necessary. See the focus-oriented methods of the View class for details on how to explicitly set focus order of controls on the screen.
• If you implement custom View controls, it is your responsibility to send appropriate events to the accessibility service. To do this, your custom View control must implement the AccessibilityEventSource interface (android.view.Accessibility.AccessibilityEventSource) and fire off AccessibilityEvent events (android.view.Accessibility.AccessibilityEvent) that let accessibility tools know what your control has done. The behavior of these changed with API Level 14. The Android 4.0 platform overview document, available at http://developer.android.com/sdk/android-4.0.html (http://goo.gl/Epxq4), discusses some of these changes in behavior.
• Assume users may configure their devices for larger font sizes, and similar settings, and do not design screens that are overly cluttered or “break” under these conditions.
• Support alternative input methods, such as directional pads and trackballs, and do not assume your users will rely solely on touch screen navigation.

Many of the most powerful accessibility features were added in later versions of the Android SDK, so check the API level for a specific class or method before using it in your application.
 Using Android Lint to Detect Common Accessibility Issues
The Android Lint Tool is used to detect common coding and configuration mistakes. It has a section for accessibility. Enabling this in your Android Link Preferences will help catch known accessibility issues. Currently, this will only detect missing contentDescription fields on ImageViews, but may eventually detect more accessibility issues.
Leveraging Speech Recognition Services
Speech services are available in the Android SDK in the android.speech package. The underlying services that make these technologies work might vary from device to device; some services might require a network connection to function properly.
Let’s begin with speech recognition. You can enhance an application with speech recognition support by using the speech recognition framework provided in the Android SDK. Speech recognition involves speaking into the device microphone and enabling the software to detect and interpret that speech and translate it into a string.
There are several different methods of leveraging speech recognition in your application. First, the default Android keyboard (available in API Level 7+, as shown in Figure 9.1) and many third-party input methods have a microphone that can be used by users whenever they are presented with an input opportunity, such as on an EditText field. Second, applications can start a built-in speech recognition activity that will return text results (API Level 3+). Finally, applications can directly leverage the SpeechRecognizer class (API Level 8+) to more closely control the recognition and results.
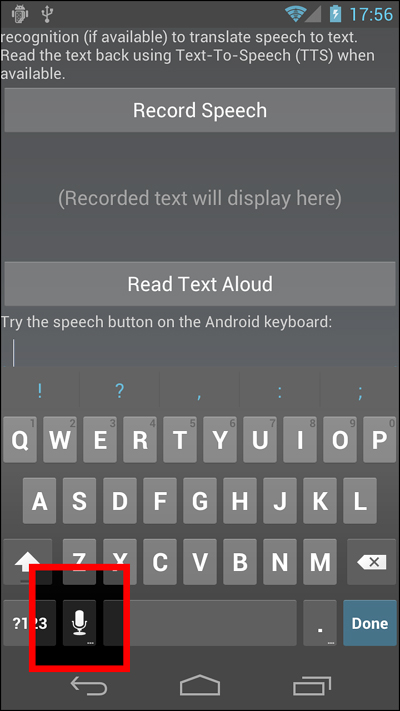
Figure 9.1. The Speech Recording option is available on many software keyboards.
Using the built-in recognition activity has some advantages. First, your application needs no permissions, such as record audio and network access. (Although it does currently require network access, it does not require the permission because it’s a different application handling the request.) Second, it’s simple to use for developers and familiar to users (see Figure 9.2). However, the disadvantage is that you can’t easily enable long-form dictation with it. For that, the SpeechRecognizer class should be used. That said, the default input method for EditText fields may already allow for long-form, such as the continuous voice type available in Android 4.0.
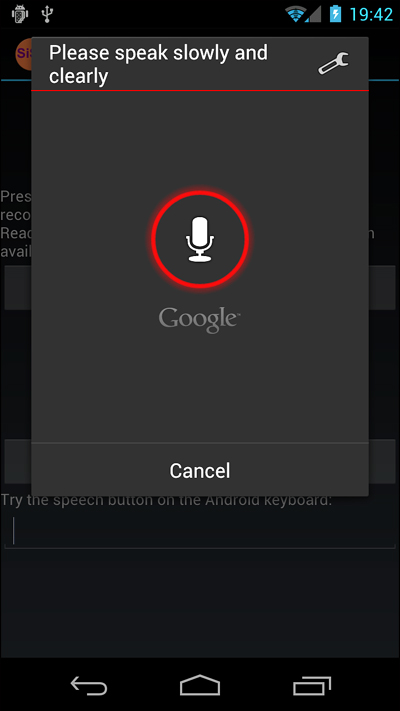
Figure 9.2. Recording speech with the RecognizerIntent.
Many of the code examples provided in this section are taken from the SimpleSpeech application. The source code for this application is provided for download on the book’s websites. Speech services are best tested on a real Android device. We used a Galaxy Nexus running API Level 14 in our testing.
You can use the android.speech.RecognizerIntent intent to launch the built-in speech recorder. This launches the recorder (shown in Figure 9.2), allowing the user to record speech.
The sound file is sent to an underlying recognition server for processing, so this feature is not practical for devices that don’t have a reasonable network connection. You can then retrieve the results of the speech recognition processing and use them in your application. Note that you might receive multiple results for a given speech segment.

Speech recognition technology is continually evolving and improving. Be sure to enunciate clearly when speaking to your device. Sometimes it might take several tries before the speech recognition engine interprets your speech correctly.
The following code demonstrates how an application can be enabled to record speech using the RecognizerIntent intent:
public class SimpleSpeechActivity extends Activity
{
private static final int VOICE_RECOGNITION_REQUEST = 1;
@Override
public void onCreate(Bundle savedInstanceState) {
super.onCreate(savedInstanceState);
setContentView(R.layout.main);
}
public void recordSpeech(View view) {
Intent intent =
new Intent(RecognizerIntent.ACTION_RECOGNIZE_SPEECH);
intent.putExtra(RecognizerIntent.EXTRA_LANGUAGE_MODEL,
RecognizerIntent.LANGUAGE_MODEL_FREE_FORM);
intent.putExtra(RecognizerIntent.EXTRA_PROMPT,
"Please speak slowly and clearly");
startActivityForResult(intent, VOICE_RECOGNITION_REQUEST);
}
@Override
protected void onActivityResult(int requestCode,
int resultCode, Intent data) {
if (requestCode == VOICE_RECOGNITION_REQUEST &&
resultCode == RESULT_OK) {
ArrayList<String> matches = data.getStringArrayListExtra(
RecognizerIntent.EXTRA_RESULTS);
TextView textSaid = (TextView) findViewById(R.id.TextSaid);
textSaid.setText(matches.get(0));
}
super.onActivityResult(requestCode, resultCode, data);
}
}
In this case, the intent is initiated through the click of a Button control, which causes the recordSpeech() method to be called. The RecognizerIntent is configured as follows:
• The Intent action is set to ACTION_RECOGNIZE_SPEECH to prompt the user to speak and send that sound file in for speech recognition.
• An Intent extra called EXTRA_LANGUAGE_MODEL is set to LANGUAGE_MODEL_FREE_FORM to simply perform standard speech recognition. There is also another language model especially for web searches called LANGUAGE_MODEL_WEB_SEARCH.
• An Intent extra called EXTRA_PROMPT is set to a string to display to the user during speech input.
After the RecognizerIntent object is configured, the intent can be started using the startActivityForResult() method, and then the result is captured in the onActivityResult() method. The resulting text is then displayed in the TextView control called TextSaid. In this case, only the first result provided in the results is displayed to the user. So, for example, the user can press the button initiating the recordSpeech() method, say “We’re going to need a bigger boat,” and that text is then displayed in the application’s TextView control, as shown in Figure 9.3.
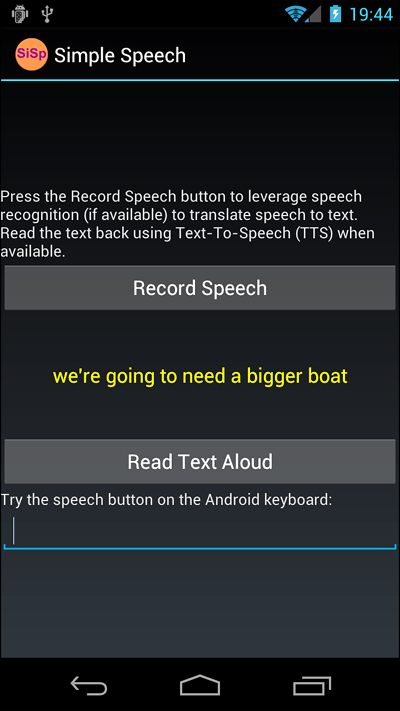
Figure 9.3. The text string resulting from the RecognizerIntent.
Leveraging Text-To-Speech Services
The Android platform includes a TTS engine (android.speech.tts) that enables devices to perform speech synthesis. You can use the TTS engine to have your applications “read” text to the user. You might have seen this feature used frequently with location-based service (LBS) applications that allow hands-free directions. Other applications use this feature for users who have reading or sight problems. The synthesized speech can be played immediately or saved to an audio file, which can be treated like any other audio file.
To provide TTS services to users, an Android device must have both the TTS engine (available in Android SDK 1.6 and higher) and the appropriate language resource files. In some cases, the user must install the appropriate language resource files (assuming that the user has space for them) from a remote location. The users can install the language resource files by going to Settings, Voice Input & Output Settings, Text-to-Speech, Install Voice Data. Unlike some other settings pages, this one doesn’t have a specific intent action defined under android.provider.Settings. You might also need to do this on your devices. Additionally, the application can verify that the data is installed correctly or trigger the installation if it’s not.
For a simple example, let’s have the device read back the text recognized in our earlier speech recognition example. First, we must modify the activity to implement the TextToSpeech.OnInitListener interface, as follows:
public class SimpleSpeechActivity extends Activity
implements TextToSpeech.OnInitListener
{
// class implementation
}
Next, we need to initialize TTS services in your Activity:
TextToSpeech mTts = new TextToSpeech(this, this);
Initializing the TTS engine happens asynchronously. The TextToSpeech.OnInitListener interface has only one method, onInit(), that is called when the TTS engine has finished initializing successfully or unsuccessfully. Here is an implementation of the onInit() method:
@Override
public void onInit(int status) {
Button readButton = (Button) findViewById(R.id.ButtonRead);
if (status == TextToSpeech.SUCCESS) {
int result = mTts.setLanguage(Locale.US);
if (result == TextToSpeech.LANG_MISSING_DATA
|| result == TextToSpeech.LANG_NOT_SUPPORTED) {
Log.e(DEBUG_TAG, "TTS Language not available.");
readButton.setEnabled(false);
} else {
readButton.setEnabled(true);
}
} else {
Log.e(DEBUG_TAG, "Could not initialize TTS Engine.");
readButton.setEnabled(false);
}
}
We use the onInit() method to check the status of the TTS engine. If it is initialized successfully, the Button control called readButton is enabled; otherwise, it is disabled. The onInit() method is also the appropriate time to configure the TTS engine. For example, you should set the language used by the engine using the setLanguage() method. In this case, the language is set to American English. The voice used by the TTS engine uses American pronunciation.
The Android TTS engine supports a variety of languages, including English (in American or British accents), French, German, Italian, and Spanish. You can just as easily have enabled British English pronunciation using the following language setting in the onInit() method implementation instead:
int result = mTts.setLanguage(Locale.UK);
We amused ourselves trying to come up with phrases that illustrate how the American and British English TTS services differ. The best phrase we came up with was: “We adjusted our schedule to search for a vase of herbs in our garage.”
Feel free to send us your favorite locale-based phrases, and we will post them on the book’s websites. Also, any amusing misinterpretations of the voice recognition are also welcome (for example, we often had “our garage” come out as “nerd haha”).
Finally, you are ready to actually convert some text into a sound file. In this case, we grab the text string currently stored in the TextView control (where we set using speech recognition in the previous section) and pass it to TTS using the speak() method:
public void readText(View view) {
TextView textSaid = (TextView) findViewById(R.id.TextSaid);
mTts.speak((String) textSaid.getText(),
TextToSpeech.QUEUE_FLUSH, null);
}
The speak() method takes three parameters: the string of text to say, the queuing strategy, and the speech parameters. The queuing strategy can either add some text to speak to the queue or flush the queue—in this case, we use the QUEUE_FLUSH strategy, so it is the only speech spoken. No special speech parameters are set, so we simply pass in null for the third parameter. Finally, when you are done with the TextToSpeech engine (such as in your Activity class’s onDestroy() method), make sure to release its resources using the shutdown() method:
mTts.shutdown();
Now, if you wire up a Button control to call the readText() method when clicked, you have a complete implementation of TTS. When combined with the speech recognition example discussed earlier, you can develop an application that can record a user’s speech, translate it into a string, display that string on the screen, and then read that string back to the user. In fact, that is exactly what the sample project called SimpleSpeech does.
Summary
The Android platform includes extensive accessibility features, including speech recognition, text-to-speech support, and many subtle accessibility features peppered throughout the user interface classes of the Android SDK. All Android applications should be reviewed for basic accessibility features, such as providing text labels to graphical controls for eyes-free app navigation purposes. Other applications might benefit from more comprehensive accessibility controls.
Give some thought to providing accessibility features, such as providing View metadata, in your applications. There’s no excuse for not doing so. Your users appreciate these small details, which make all the difference in terms of whether or not certain users can use your application at all. Also, make sure your quality assurance team verifies accessibility features as part of its testing process.
References and More Information
Android Dev Guide: “Designing for Accessibility”:
http://d.android.com/guide/practices/design/accessibility.html
The Eyes-Free Project:
http://code.google.com/p/eyes-free/
YouTube: Leveraging Android Accessibility APIs to Create an Accessible Experience:
http://www.youtube.com/watch?v=BPXqsPeCneA
Android SDK Documentation regarding the android.speech.tts package:
http://d.android.com/reference/android/speech/tts/package-summary.html
Android SDK Documentation regarding the android.speech package:
http://d.android.com/reference/android/speech/package-summary.html