
13. Using Location-Based Services APIs
![]()
Whether for safety or for convenience, location-based features on cell phones are mostly standard these days. As such, incorporating location information, navigation, and mapping features into your project can make your application much more robust.
In this chapter, you learn how to leverage location-based services available in the Android SDK. You learn how to determine the location of the device using a particular device hardware provider, such as a built-in Global Positioning Systems (GPS) unit. You also learn how to translate raw location coordinates into descriptive location names—and how to do the reverse. Finally, we explore a couple of different methods for mapping and utilities that work with the maps.
 Using Global Positioning Services (GPS)
The Android SDK provides the means for accessing location via a built-in GPS hardware, when it’s available. Generally speaking, just about every Android phone has some LBS capabilities. For example, in the United States, emergency services use mobile phone location information. That said, not all Android devices are phones, nor do all phones enable consumer-usage of LBS services. If GPS features are disabled, or an Android device does not have LBS hardware, the Android SDK provides additional APIs for determining alternate location providers. These other providers might have advantages and disadvantages in terms of power use, speed, and accuracy of reporting.

Many of the code examples provided in this chapter are taken from the SimpleLocation application. The source code for this application is provided for download on the book’s websites.
Using GPS Features in Your Applications
LBS services and hardware such as a built-in precision GPS are optional features for Android devices. In addition to requiring the appropriate permissions, you can specify which optional features your application requires in the Android Manifest file. You can declare that your application uses or requires specific LBS services using the <uses-feature> tag of the Android Manifest file. Although this tag is not enforced by the Android operating system, it enables popular publication mechanisms such as the Android Market to filter your app and provide it only to users with appropriate devices. If your application functions well only on devices with some sort of method for determining the current location, you can use the following <uses-feature> tag in your application’s manifest file:
<uses-feature android:name="android.hardware.location" />
If your application requires a precise location fix (that is, the device has functional GPS hardware, not just cell tower triangulation or other such mechanisms), use the following <uses-feature> tag instead:
<uses-feature android:name="android.hardware.location.gps" />
Determining the Location of the Device
To determine device location, you need to perform a few steps and make some choices. The following list summarizes this process:
1. Retrieve an instance of the LocationManager using a call to the getSystemService() method using the LOCATION_SERVICE.
2. Add an appropriate permission to the AndroidManifest.xml file, depending on what type of location information the application needs.
3. Choose a provider using either the getAllProviders() method or the getBestProvider() method.
4. Implement a LocationListener class.
5. Call the requestLocationUpdates() method with the chosen provider and the LocationListener object to start receiving location information.
Specific permissions are not needed to retrieve an instance of the LocationManager object. Instead, the permissions determine the available providers. The following code retrieves an instance of the LocationManager object:
import android.location.*;
...
LocationManager location =
(LocationManager)getSystemService(Context.LOCATION_SERVICE);
The following block of XML provides the application with both coarse and fine location permissions when added within the AndroidManifest.xml permissions file:
<uses-permission
android:name="android.permission.ACCESS_FINE_LOCATION" />
<uses-permission
android:name="android.permission.ACCESS_COARSE_LOCATION" />
Requesting fine permission implies coarse support as well, but it’s helpful to be explicit. Now that the application has permissions to use location information and the LocationManager object is valid, we must determine what provider to use for location information. The following code configures a Criteria object and requests the provider based on this information:
Criteria criteria = new Criteria();
criteria.setAccuracy(Criteria.NO_REQUIREMENT);
criteria.setPowerRequirement(Criteria.NO_REQUIREMENT);
String bestProvider = location.getBestProvider(criteria, true);
The setAccuracy() method can take values for ACCURACY_COARSE and ACCURACY_FINE that can be used (along with the appropriate permissions) to request a provider that the application has permissions to use. You can use the setPowerRequirement() method to find a provider that fits certain power use requirements, such as POWER_HIGH or POWER_LOW. The Criteria object also enables us to specify whether the provider can incur a monetary cost to the user, whether altitude is needed, and some other details. If the application has specific requirements, this is where you set them. However, setting these criteria doesn’t imply that the provider is available to the user. Some flexibility might be required to allow use on a broad range of devices. A Boolean parameter of the getBestProvider() method enables the application to ask for only enabled providers.
Using the provider returned by the getBestProvider() method, the application can request the location. Before doing so, however, the application needs to provide an implementation of LocationListener. The LocationListener implementation consists of several methods: to tell the application whether the provider has been disabled or enabled; to give the status about the provider (such as the number of satellites the GPS receiver can see); and to tell the application location information. The following is a sample implementation for the last method, the onLocationChanged() method:
public void onLocationChanged(Location location) {
String locInfo = String.
format("Current loc = (%f, %f) @ (%f meters up)",
location.getLatitude(), location.getLongitude(),
location.getAltitude() );
if (lastLocation != null) {
float distance = location.distanceTo(lastLocation);
locInfo += String.
format("
Distance from last = %f meters", distance);
}
lastLocation = location;
status.setText(locInfo);
}
The onLocationChanged() method receives a Location object with the most recent location information from the chosen provider. In this example, the application merely prints out the location, including the altitude, which might be returned by the provider. Then, it uses a utility method of the Location object, distanceTo(), to calculate how far the device has moved since the last time onLocationChanged() was called.
It is up to the application to determine how to use this location information. The application might want to turn the location information into an address, display the location on an embedded map, or launch the built-in Maps application (if the Google applications are installed) centered at the location.
To use many LBS services, you should use Android Virtual Device (AVD) configurations that target the Android SDK with the Google APIs. Using the Google APIs target puts applications like the Maps on the emulator. Other times, LBS design and testing are best done on a real Android device.
Locating Your Emulator
The Android emulator can simulate location-based services, but as you would expect, it does not have any “underlying hardware” to get a real satellite fix. The Android SDK provides a means to simulate location data with the use of a single location point, GPX file, or KML file. This works only with the emulator, not the physical device, but it can be useful for testing your location-based application.
Geocoding Locations
Determining the latitude and longitude is useful for precise location, tracking, and measurements; however, it’s not usually descriptive to users. The Android SDK provides some helper methods to turn raw location data into addresses and descriptive place names. These methods can also work in reverse, turning place names or addresses into raw location coordinates.

According to the Android documentation, AVDs that target the Google APIs enable developers to test on emulator instances with the “Google experience.” The Google APIs provide the capability to use Google Maps as well as a backend geocoder service. Although it is not documented, not all AVD API Levels support these geocoder services. For example, AVDs for API Level 6 with the Google APIs provide geocoder services, whereas AVDs with API Levels 7 and 8 with the Google APIs do not (as of this writing). When you use an AVD without backend geocoder services, you simply get an exception stating there is no backend service. The code in this chapter is best run in an emulator running an AVD with API Level 6 plus the Google APIs, or on a real device with true geocoder backend services.
The Geocoder object can be used without any special permissions. The following block of code demonstrates using the Geocoder object to get the location names of a Location object passed into the onLocationChanged() method of a LocationListener:
if (Geocoder.isPresent()) {
Geocoder coder = new Geocoder(this);
try {
List<Address> addresses = coder.getFromLocation(
location.getLatitude(), location.getLongitude(), 3);
if (addresses != null) {
for (Address namedLoc : addresses) {
String placeName = namedLoc.getLocality();
String featureName = namedLoc.getFeatureName();
String country = namedLoc.getCountryName();
String road = namedLoc.getThoroughfare();
locInfo.append(String.format("[%s][%s][%s][%s]
",
placeName, featureName, road, country));
int addIdx = namedLoc.getMaxAddressLineIndex();
for (int idx = 0; idx <= addIdx; idx++) {
String addLine = namedLoc.getAddressLine(idx);
locInfo.append(String.format("Line %d: %s
", idx,
addLine));
}
}
}
} catch (IOException e) {
Log.e("GPS", "Failed to get address", e);
}
} else {
Toast.makeText(GPSActivity.this, "No geocoding available",
Toast.LENGTH_LONG).show();
}
You can extract information from the results of the call to the getFromLocation() method in two ways, both of which are demonstrated. Note that a particular location might have multiple Address results in the form of a List<Address> object. Typically, the first Address is the most detailed, and the subsequent Address objects have less detail and describe a broader region.
The first method is to query for specific information, such as by using the getFeatureName() method or the getLocality() method. These methods are not guaranteed to return useful information for all locations. They are useful, though, when you know you need only a specific piece of general information, such as the country.
The second method for querying information is by “address lines.” This is generally used for displaying the “address” of a location to the user. It might also be useful to use the location in directions and in other cases where a street address is desired. That said, the addresses returned might not be complete. Simply use the getMaxAddressLineIndex() and getAddressLine() methods to iterate through the addresses. Figure 13.1 shows a sample location with three resulting addresses.

Figure 13.1. Image showing location geocoded to three “addresses.”
The Geocoder object also supports using named locations or address lines to generate latitude and longitude information. The input is forgiving and returns reasonable results in most cases. For instance, all the following returns valid and correct results: “Eiffel Tower,” “London, UK,” “Iceland,” “BOS,” “Yellowstone,” and “1600 Pennsylvania Ave, DC.”
The following code demonstrates a button handler for computing location data based on user input of this kind:
public void onClick(View v) {
if (Geocoder.isPresent()) {
String placeName = name.getText().toString();
try {
// coder initialized elsewhere
List<Address> geocodeResults = coder
.getFromLocationName(placeName, 3);
StringBuilder locInfo = new StringBuilder("Results:
");
double lat = 0f;
double lon = 0f;
for (Address loc : geocodeResults) {
lat = loc.getLatitude();
lon = loc.getLongitude();
locInfo.append("Location: ").append(lat)
.append(", ").append(lon).append("
");
}
results.setText(locInfo);
} catch (IOException e) {
Log.e("GeoAddress", "Failed to get location info", e);
}
} else {
Toast.makeText(GeoAddressActivity.this,
"No geocoding available", Toast.LENGTH_LONG).show();
}
}
The result of the call to the getFromLocationName() method is a List of Address objects, much like the previous example. Figure 13.2 shows the results for entering Eiffel Tower.
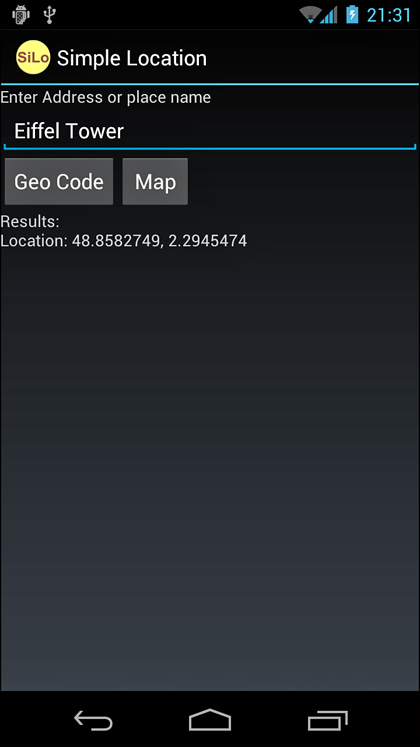
Figure 13.2. The results for geocoding the term “Eiffel Tower.”
Always assume that you will get more than one result. It is good form to provide a picker for the user to select from the results and choose the most appropriate location. Another good way to confirm with the user that they entered the correct location is to map it. We now discuss a couple of different methods for mapping locations using Google Maps.
Geocoding operations typically require a network connection and therefore should not be run on the main UI thread. Instead, perform geocoding tasks in a separate thread so as not to cause your application responsiveness to degrade.
Mapping Locations
The Android SDK provides two different methods to show a location with Google Maps. The first method is to use a location Uri to launch the built-in Google Maps application with the specified location. The second method is to use a MapView embedded within your application to display the map location.
Mapping Intents
In the previous section, we demonstrated how to determine the latitude and longitude for a place name. Now we map the location using the built-in maps application. The following block of code demonstrates how to perform this:
String geoURI = String.format("geo:%f,%f", lat, lon);
Uri geo = Uri.parse(geoURI);
Intent geoMap = new Intent(Intent.ACTION_VIEW, geo);
startActivity(geoMap);
The first task is to create a String that conforms to the URI handled by the mapping application. In this case, it’s geo: followed by the latitude and longitude. This URI is then used to create a new Uri object for creating a new ACTION_VIEW Intent. Finally, we call the startActivity() method. If the latitude and longitude are valid, such as the location for the Hoover Dam, the screen would look like Figure 13.3.
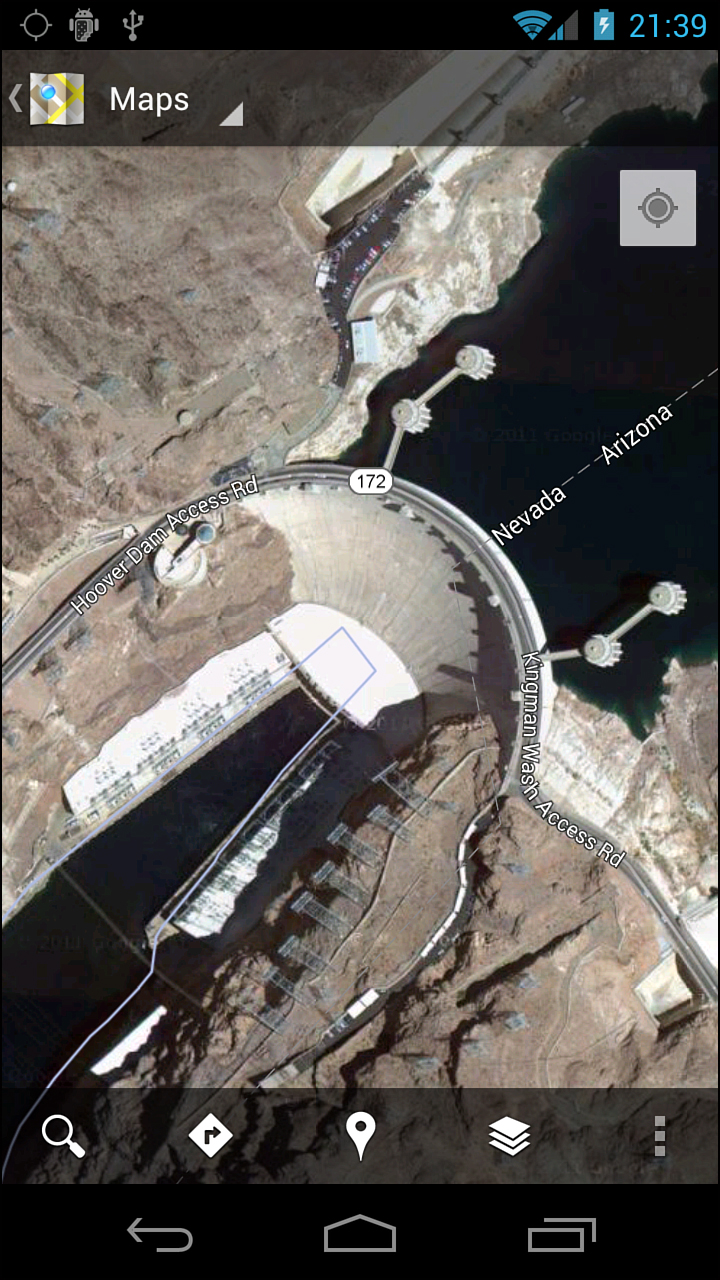
Figure 13.3. The resulting map for geocoding the term “Hoover Dam” and launching a geo URI.
Using this method of mapping launches the user into a built-in mapping application—in this case, Google Maps. If the application does not want to bother with the details of a full mapping application or does not need to provide any further control over the map, this is a fast-and-easy method to use. Users are typically accustomed to the controls of the mapping application on their device, too.
Mapping Views
Sometimes, though, we want to have the map integrated into our application for a more seamless user experience. Let’s add a small map to our geocoding example to show the location immediately to the users when they enter a place name.
The following block of XML shows the change needed in the layout file to include a widget called the MapView:
<com.google.android.maps.MapView
android:id="@+id/map"
android:apiKey="yourMapKey"
android:layout_width="fill_parent"
android:layout_height="wrap_content" />
As you might have already noticed, the MapView XML is a little different. First, the tag name is the fully qualified name. And second, an apiKey attribute is needed. We get to the key in a moment.
The AndroidManifest.xml file also needs to be modified to allow the use of the MapView with Google Maps. Here are the two changes needed:
<application
...
<uses-library
android:name="com.google.android.maps" />
</application>
<uses-permission
android:name="android.permission.INTERNET" />
Both of these permission lines are required. The MapView object specifically requires the INTERNET permission and its library must be referenced explicitly. Otherwise, an error occurs.
Finally, you can use a MapView only within a MapActivity. Accessing a MapView from outside a MapActivity results in an error. The MapActivity is similar to a normal Activity, but it requires implementing the isRouteDisplayed() method. This method must return true if a route will be displayed. Otherwise, false must be returned. Here is the default implementation for when no route is displayed:
@Override
protected boolean isRouteDisplayed() {
// we do not display routes
return false;
}
Now the application can use the MapView to display locations to the user. The following block of code demonstrates retrieval of a MapController object, which is used to control the location that the MapView displays:
MapView map = (MapView) findViewById(R.id.map);
map.setSatellite(true);
final MapController mapControl = map.getController();
mapControl.setZoom(17);
These lines of code set the display to show the satellite view, which is visually interesting. The MapController object then sets the zoom level of the map. Larger values are zoomed in farther, with 1 zoomed all the way out. The given value, 17, usually shows a few city blocks, but there are some areas where even this is too close for the data available. In a moment, we talk about how to easily give control of this to the user.
Building on the previous example, the following lines of code are added to the button handler for geocoding a place name:
GeoPoint newPoint = new
GeoPoint((int)(lat * 1E6), (int)(lon * 1E6));
mapControl.animateTo(newPoint);
In this case, we create a new GeoPoint to use with the animateTo() method. A GeoPoint object uses microdegrees, so we must multiply the result of the geocoding by 1E6 (1,000,000 or one million). The animateTo() method smoothly animates the MapView to the new location. How much of the interim mapping data displays depends on the speed of the Internet connection and what mode the MapView is in. The setCenter() method can set the center of the map.
Finally, this is almost enough to test the results. However, there is one last thing you need to take care of. You need to get a Google Maps API Key from Google to use its API and mapping services.
Getting Your Debug API Key
To use a MapView in your applications, you must obtain a Google Maps API Key from Google. The key is generated from an MD5 fingerprint of a certificate that you use to sign your applications.
For production distribution, you need to follow these steps, substituting your release distribution signing certificate. For testing purposes, you can use the debug certificate that is created by the Android SDK.
You need to do the following to generate the appropriate API key:
1. Generate an MD5 fingerprint for your debug certificate.
2. Sign in to http://code.google.com/android/maps-api-signup.html with a Google account.
3. Accept the Terms of Service.
4. Paste in the fingerprint from Step 1.
5. Save the Android Maps API key presented on the next screen.
The first step is performed on your development machine. Locate the debug certificate used by the Android SDK. On all platforms, the filename is debug.keystore by default. If you use Eclipse, the location of the file is listed under the Android Build preferences. Using this file, you then need to execute the following command (make sure the Java tools are in your path):
keytool -list -keystore /path/to/debug.keystore -storepass android
The result is the fingerprint that you must paste into the form on step 4. Read the Terms of Service carefully before proceeding. Although the terms allow many types of applications, you need to make sure your application is allowed and that your anticipated usage is acceptable to Google.
The default debug keystore on the Android SDK lasts for only one year and is unique to a developer’s computer. We highly recommend making a debug key that lasts longer and can be shared among team members. This enables your Google Maps API key to last much longer. In addition, you won’t have to uninstall apps from a shared device before you can install one with someone else’s debug key. Luckily, it’s easy to do this using the keytool command-line tool with the following command:
keytool -genkey -keypass android -keystore debug.keystore
alias androiddebugkey -storepass android
-validity 10000
-dname "CN=Android Debug,O=Android,C=US"
This command generates a valid debug keystore that can be shared among team members and lasts for 10,000 days. After creating it, make sure you reference it from Eclipse if it’s not in the default location.
When you have successfully completed the steps to get your key, you can then reference your map key in the Layout file definition for the MapView you use. Now, when you execute the code, you should be presented with a screen that looks like Figure 13.4.
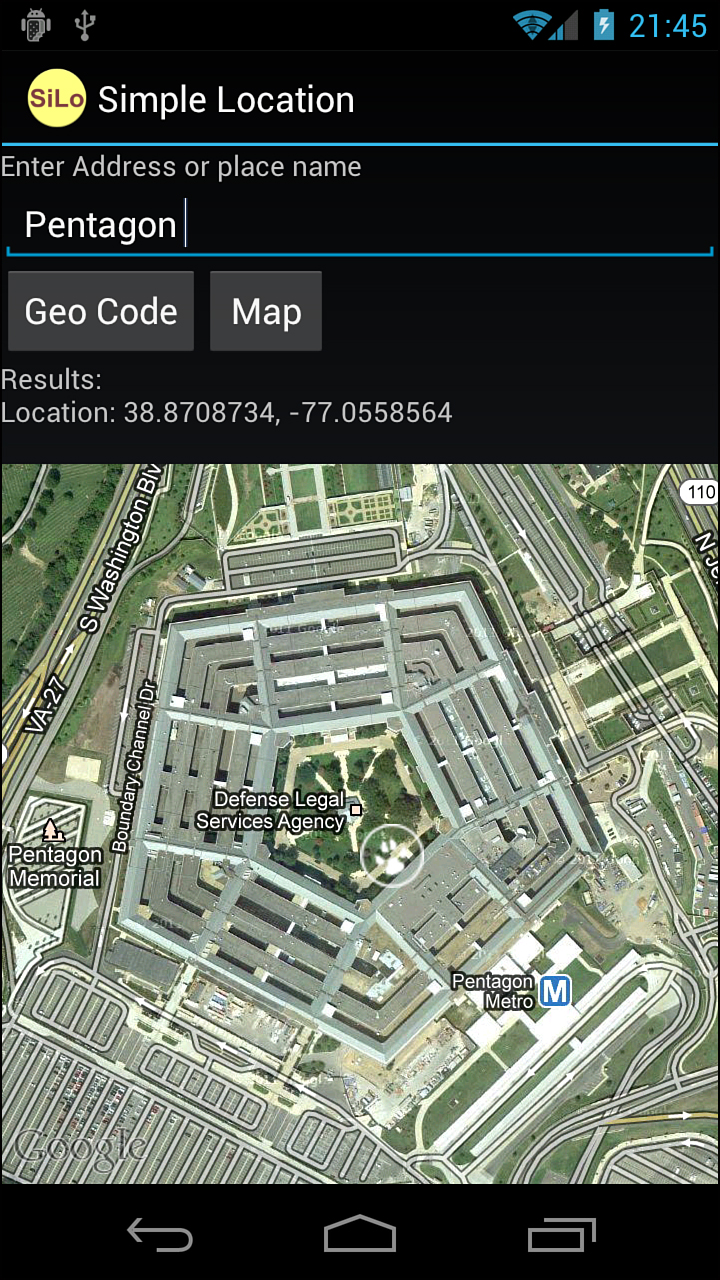
Figure 13.4. MapView results for geocoding the term “Pentagon.”
If you work on multiple development machines or work as part of a team, you need to have an API key for everyone’s debug certificate. Alternatively, you can copy the debug certificate from one machine to other machines so that the signing and check against the Android Maps API key is successful. This can save you time because you don’t have to modify the code or layout files for each developer on the team.
Panning the Map View
Sometimes the locations returned either do not show the exact location that the user wants or the user might want to determine where in the world they are by exploring the map a bit. One way to do this is through panning the map. Luckily, this is as easy as enabling clicking from within the layout file:
<com.google.android.maps.MapView
android:id="@+id/map"
android:clickable="true"
android:apiKey="mapApiKey"
android:layout_width="fill_parent"
android:layout_height="wrap_content" />
Now, if the user searches for “Giza Pyramids,” panning east will find a recognizable statue, as shown in Figure 13.5.
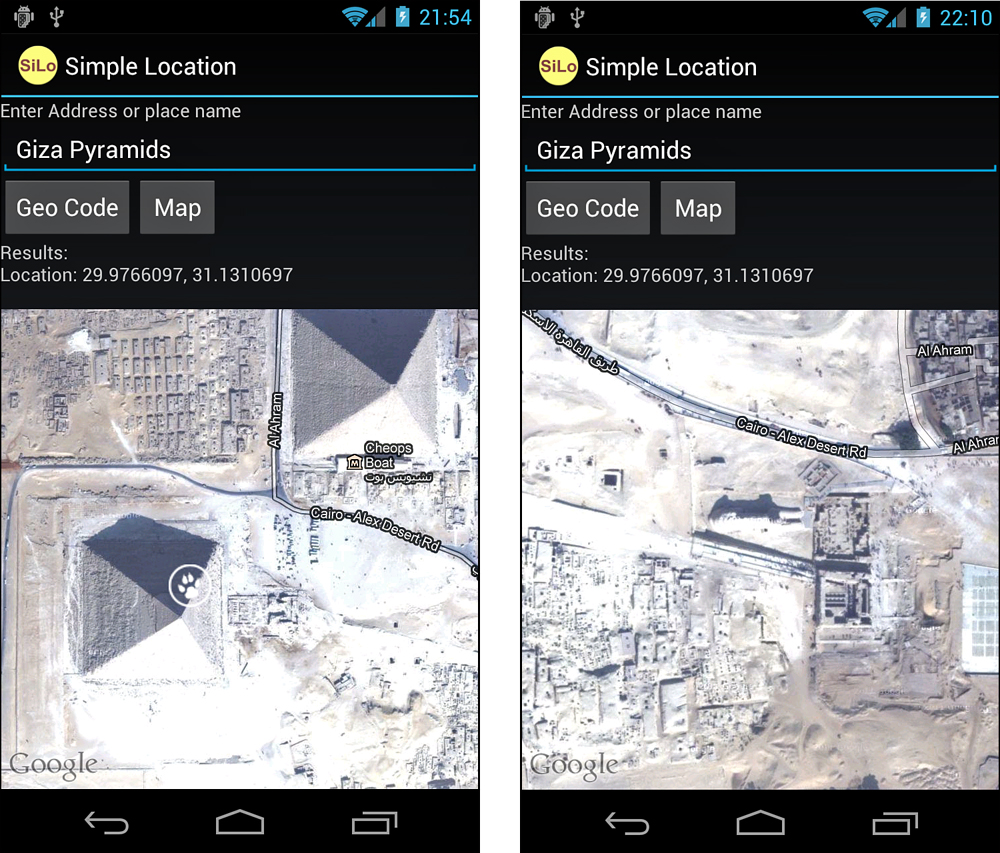
Figure 13.5. Results for “Giza Pyramids” on the left, panned east to the Sphinx on the right.
Zooming the Map View
Other times, panning won’t help users. They might want to zoom in or out from the same location. Our application does not have to again implement the zoom controls, though. Instead, simply enable the built-in zoom controls as follows:
map.setBuiltInZoomControls(true);
When the user clicks on the map, the zoom controls fade in to view and are functional, as shown in Figure 13.6.

Figure 13.6. On the left, you see a bird’s eye view of the town of Wilmington, but zoom in to the south and you see “The Long Man of Wilmington,” as shown on the right.
Marking the Spot
Now that panning and zooming works, users might lose track of their position. Sure, they could just search again, but wouldn’t it be more helpful if we marked the point of interest directly on the map? The Android SDK provides a few different ways to do this. One way is to use the MapView as a container for an arbitrary View object that can be assigned using a GeoPoint instead of typical screen or View coordinates. Another way is to use ItemizedOverlay, which is especially useful if you have more than one place to mark. Finally, you can manually draw items over the map using the Overlay and implement the onDraw() method.
For the place name finder example, we use the first method. Assuming you have a suitable map marker as a drawable resource, the following code demonstrates how to do this:
GeoPoint newPoint = new GeoPoint((int)(lat * 1E6), (int)(lon*1E6));
// add a view at this point
MapView.LayoutParams mapMarkerParams = new
MapView.LayoutParams(LayoutParams.WRAP_CONTENT,
LayoutParams.WRAP_CONTENT,
newPoint, MapView.LayoutParams.TOP_LEFT );
ImageView mapMarker = new ImageView(getApplicationContext());
mapMarker.setImageResource(R.drawable.paw);
map.addView(mapMarker, mapMarkerParams);
The MapView layout parameters enable you to set a GeoPoint. Doing this enables the added View to stay put at a geographic location and pan with the map, as shown in Figure 13.7.
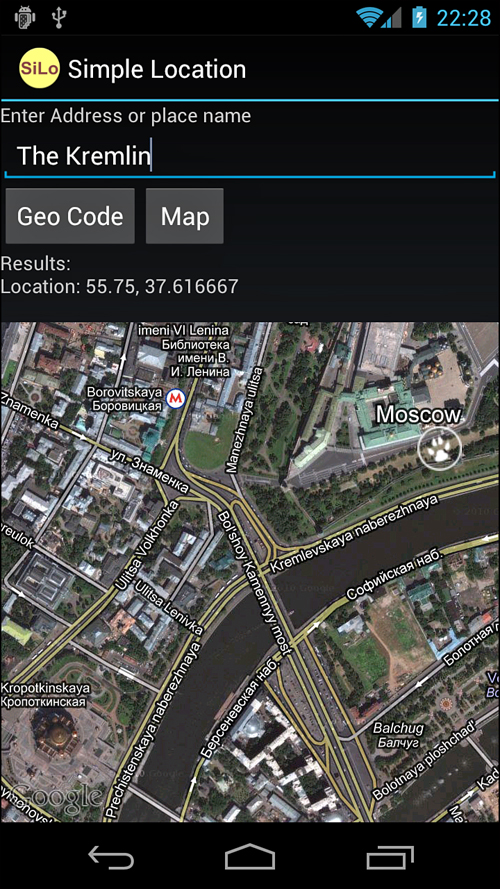
Figure 13.7. “The Kremlin” at the top right of the marker (paw print in a circle).
Keep in mind that the added View sticks around as long as the MapView does. If the application needs to present multiple locations to the user, though, there is a simpler way. Just use the ItemizedOverlay object.
In this example, a static ItemizedOverlay is created to represent the chain of backpacker huts in the White Mountains along the Appalachian Trail:
private class HutsItemizedOverlay
extends ItemizedOverlay<OverlayItem> {
public HutsItemizedOverlay(Drawable defaultMarker) {}
protected OverlayItem createItem(int i) {}
public int size() {}
}
To do this, we provide implementations for each of the required methods of ItemizedOverlay<OverlayItem>. First, we define the constructor:
public HutsItemizedOverlay(Drawable defaultMarker) {
super(defaultMarker);
boundCenterBottom(defaultMarker);
populate();
}
The Drawable passed in is one that we define later in the onCreate() method of MapActivity. The system does not provide a default marker. The call to the boundCenterBottom() method is made so that the map coordinates are at the center bottom and the shadow is cast from the bottom of the marker, which is a more natural look. The default shadow is from the top. If, however, we’d rather turn off the shadow completely, you can override the draw() method, as follows:
@Override
public void draw(Canvas canvas, MapView mapView, boolean shadow) {
super.draw(canvas, mapView, false);
}
Finally, in the constructor, we call the populate() method. This should be done as soon as the location data is available. Because we have it statically compiled into the application, we call it before returning. The populate() method calls our implementation of the createItem() method for as many items as we defined in our implementation of the size() method. Here is the implementation of our createItem() method, along with a small array of hut locations, in no particular order:
public GeoPoint hutPoints[] = new GeoPoint[] {
// Lakes of the Clouds
new GeoPoint(44258793, -71318940),
// Zealand Falls
new GeoPoint(44195798, -71494402),
// Greanleaf
new GeoPoint(44160372, -71660385),
// Galehead
new GeoPoint(44187866, -71568734),
// Carter Notch
new GeoPoint(44259224, -71195633),
// Mizpah Spring
new GeoPoint(44219362, -71369473),
// Lonesome Lake
new GeoPoint(44138452, -71703064),
// Madison Spring
new GeoPoint(44327751, -71283283)
};
@Override
protected OverlayItem createItem(int i) {
OverlayItem item = new OverlayItem(hutPoints[i], null, null);
return item;
}
In the array, we’ve multiplied all the location values by one million so that they are in microdegrees, as required by the GeoPoint object. Within the createItem() method, the location array is indexed with the passed-in value. Neither of the two text fields, Title and Snippet, are used at this time, so they are set to null. The maximum index value is determined by the size() method, which, in this case, merely has to return the length of the array:
@Override
public int size() {
return hutPoints.length;
}
The necessary ItemizedOverlay<OverlayItem> class is now implemented. Next, the application needs to tell the MapView about it. The following code demonstrates how to do this in the onCreate() method of our MapActivity:
@Override
protected void onCreate(Bundle data) {
super.onCreate(data);
setContentView(R.layout.huts);
Drawable marker = getResources().getDrawable(R.drawable.paw);
HutsItemizedOverlay huts = new HutsItemizedOverlay(marker);
MapView map = (MapView)findViewById(R.id.map);
map.setSatellite(true);
List<Overlay> overlays = map.getOverlays();
overlays.add(huts);
FrameLayout zoomFrame = (FrameLayout)
findViewById(R.id.map_zoom_holder);
zoomFrame.addView(map.getZoomControls());
}
First, the Drawable is retrieved from the resources. Next, we instantiate the HutsItemizedOverlay object. The OverlayItems in it need to be added to the ones that might already exist within the MapView. The getOverlays() method of MapView returns a list of the current Overlay objects. Calling the add() method on this list inserts our new ones for each hut. Finally, the zoom controls are added to the MapView so that the user can zoom in and out. After launching this application and zooming in on New Hampshire, the user should see a screen like Figure 13.8.
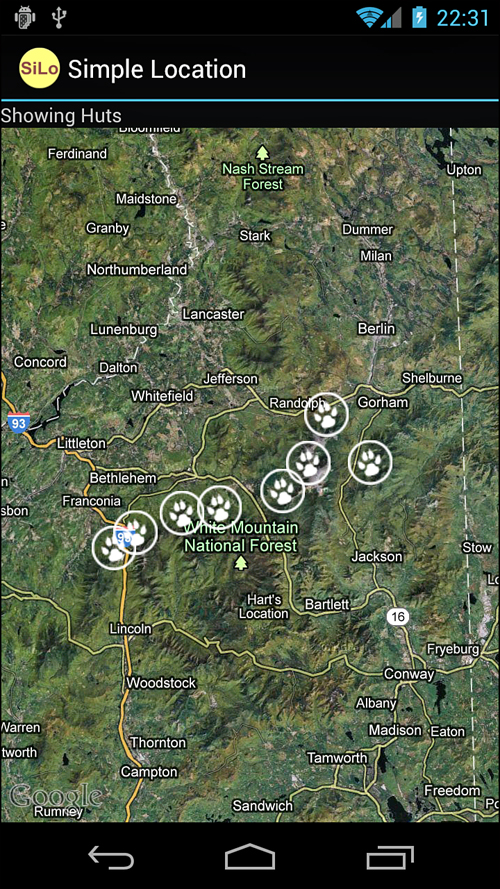
Figure 13.8. A map with markers at each of the Appalachian Mountain Huts of New Hampshire.
Forcing the user to pan and zoom to the location of the huts is not user-friendly. Two utility methods that the ItemizedOverlay<OverlayItem> class provides return values for the span of the location of the items. Combining this functionality with an override to the default behavior of the getCenter() method, which normally returns the location of the first item, enables the map to start to draw at a convenient zoom level covering all the huts. You can add this block of code to the onCreate() method to do just that:
MapController mapControl = map.getController();
mapControl.setCenter(huts.getCenter());
mapControl.zoomToSpan(
huts.getLatSpanE6(), huts.getLonSpanE6());
The getCenter() method computes the average latitude and the average longitude across all the given hut locations. You can provide a central point or you can place the first item near the center of all the points requiring no override of the getCenter() method.
Doing More with Location-Based Services
You have been introduced to a number of different location tools provided on Android; however, you should be aware of several more.
The LocationManager supports proximity alerts, which are alerts that trigger a PendingIntent when the device comes within some distance of a location. This can be useful for warning the user of an upcoming turn in directions, for scavenger hunts, or help in geocaching.
You saw how to do ItemizedOverlays. In general, you can assign your own Overlays to draw custom objects and Views on the given Canvas. This is useful for drawing pop-up information for locations, putting logos over the map that don’t move with the map, or putting hints for scavenger hunts over the map. This functionality is similar to displaying photos at a given location, which are often provided on Google Maps at famous locations.
The GpsStatus, GpsStatus.Listener, and GpsSatellite classes provide more detailed information about the GPS satellites used by the GPS engine. The GpsStatus and its Listener subclass monitor the GPS engine and get a list of the satellites used. The GpsSatellite class represents the current state of an individual satellite used by the GPS engine with state information such as satellite elevation and whether the particular satellite was used in the most recent GPS fix.
LBS applications are a popular category of Android applications. LBS services are like networking services: sometimes unreliable or unresponsive. Make sure to consider application responsiveness when designing LBS applications. This means completing LBS-related tasks asynchronously using threads or AsyncTask as well as considering Android services.
Summary
The Android SDK with Google Maps support is available to developers who register for a key, and it can be used to enhance Android applications with location-rich information. Some applications want to build in seamless map support, whereas others might just launch the built-in map application for the user to leverage. Developers can add to the information provided on the map by using various types of overlays to include even more information to the user. The opportunities for using location-based services to improve Android applications are only just beginning to be explored.
References and More Information
Android Dev Guide: “Location and Maps”:
http://d.android.com/guide/topics/location/index.html
Get your own Google Maps API key:
http://code.google.com/android/add-ons/google-apis/mapkey.html