
14. Using Android Multimedia APIs
![]()
Multimedia—whether we’re talking about images, videos, or audio—has become a key driver of mobile device sales. Many modern “smart-devices” have built-in cameras to capture and display still images, video, and sophisticated music playback abilities. Your basic smartphone has at least one camera, sometimes two if you count the front-facing cameras used for video chat and self portraits. In this chapter, you learn how to capture still images using the camera, and you learn how to record and play back audio and video files.
Working with Multimedia
The Android SDK provides a variety of methods for applications to incorporate audio and visual media, including support for many different media types and formats. Individual Android devices and developers can extend the list of supported media to other formats. Not every Android device has the same multimedia capabilities. Always verify the capabilities of target devices before publication.
The multimedia features of the Android platform generally fall into three categories:
• Still images (recorded with the camera)
• Audio (recorded with the microphone, played back with speakers or audio output)
• Video (recorded with the camera and microphone, played back with speakers or video output)
Multimedia hardware such as a built-in camera, speakers, and audio or video output ports are optional features for Android devices.
In addition to requiring the appropriate permissions, you can specify which optional features your application requires within the Android Manifest file. You can do this using the <uses-feature> tag of the Android Manifest file to declare that your application uses the camera. Remember, though, that the <uses-feature> tag is not enforced by the Android platform. Instead, application stores such as the Android Market use this data to filter which applications to sell to certain devices.
Any application that requests the CAMERA permission is assumed to use all camera features. If your application accesses the camera, but can function properly without it, you can also set the android:required field of <uses-feature> to false. However, if your application requires a microphone and a camera with autofocus but not a flash to be present on the device, you can set the camera features your application requires specifically, like this:
<uses-feature android:name="android.hardware.microphone" />
<uses-feature android:name="android.hardware.camera" />
<uses-feature android:name="android.hardware.camera.autofocus" />

Many of the code examples provided in this chapter are taken from the SimpleMultimedia application. The source code for this application is provided for download on the book websites.
 Working with the Camera
Many Android devices have at least one camera for capturing images and video. If the user’s device has built-in camera hardware, the user can capture still images using the Camera object (android.hardware.Camera) of the Android SDK. You can use these images in a variety of ways, such as by customizing the home screen wallpaper using the WallpaperManager class.
Beginning in Android 4.0 (API Level 14), the system broadcasts when a new picture or video has been taken with the camera. Your applications can listen for these events and react to them.
Capturing Still Images Using the Camera
The Camera object controls the camera on devices that have camera support enabled. The preview feature of the camera relies on the assignment of a SurfaceHolder of an appropriate type. This enables applications to control the placement and size of the preview area that the camera can use.
Follow these steps to add camera capture capability to an application without having to draw preview frames (the CameraSurfaceView displays the camera view):
1. Create a new class extending SurfaceView and implement SurfaceHolder.Callback. For this example, we name this class CameraSurfaceView.
2. In the surfaceCreated() method, get an instance of the Camera object.
3. In the surfaceChanged() method, configure and apply the Camera.Parameters; then call the startPreview() method.
4. Add a method in CameraSurfaceView for capturing images.
5. Add the CameraSurfaceView to an appropriate layout.
6. Include some way, such as a button, for the user to trigger the capturing of images.
7. Implement a PictureCallback class to handle the storing of the captured image.
8. Add the android.permission.CAMERA permission to the AndroidManifest.xml file.
9. Release the Camera object in the surfaceDestroyed() method.
Let’s start by looking at the CameraSurfaceView class:
import android.hardware.Camera;
import android.view.SurfaceHolder;
import android.view.SurfaceView;
private class CameraSurfaceView extends SurfaceView
implements SurfaceHolder.Callback {
private SurfaceHolder mHolder;
private Camera camera = null;
public CameraSurfaceView(Context context) {
super(context);
mHolder = getHolder();
mHolder.addCallback(this);
mHolder.setType(
SurfaceHolder.SURFACE_TYPE_PUSH_BUFFERS);
}
public void surfaceChanged(SurfaceHolder holder,
int format, int width, int height) {
}
public void surfaceCreated(SurfaceHolder holder) {
}
public void surfaceDestroyed(SurfaceHolder holder) {
}
public boolean capture(Camera.PictureCallback
jpegHandler) {
}
}
The constructor for the CameraSurfaceView configures the SurfaceHolder, including setting the SurfaceHolder type to SURFACE_TYPE_PUSH_BUFFERS, which is used by the camera internals. The constructor is appropriate for calling from an Activity’s onCreate() method. When the display is ready, the surfaceCreated() method is called. Here we instantiate the Camera object:
public void surfaceCreated(SurfaceHolder holder) {
camera = Camera.open();
camera.setPreviewDisplay(mHolder);
}
The Camera object has a static method to retrieve a usable instance. Because the Surface is now available, the configured holder can now be assigned to it. Information about the Surface might not yet be available, but at the next call to the surfaceChanged() method, the camera parameters will be assigned and the preview will start, as shown here:
public void surfaceChanged(SurfaceHolder holder,
int format, int width, int height) {
List<Camera.Size> sizes = params.getSupportedPreviewSizes();
Camera.Size pickedSize = getBestFit(sizes, width, height);
if (pickedSize != null) {
params.setPreviewSize(pickedSize.width, pickedSize.height);
camera.setParameters(params);
}
camera.startPreview();
}
The surfaceChanged() method provides the application with the proper width and height for use with the camera preview. After assigning this to the Camera object, the preview starts. At this point, the users see whatever is in front of the camera on their device. If, however, you debug this within the emulator, you see a black-and-white checkerboard with an animated square on it, as shown in Figure 14.1. This is the simulated camera preview, so camera testing can take place, to some extent, on the emulator.
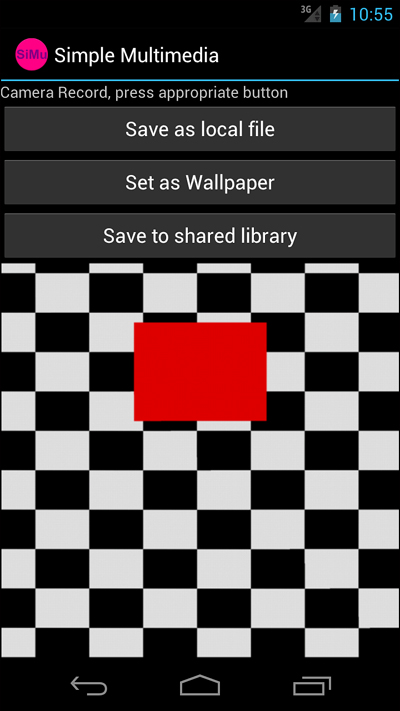
Figure 14.1. Emulator screen showing simulated camera view.

The format parameter passed in to the surfaceChanged() method is not related to the format parameter of the setPreviewFormat() method of the Camera object.
When the Surface is no longer displayed, the surfaceDestroyed() method is called. Here is an implementation of the surfaceDestroyed() method suitable for this example:
public void surfaceDestroyed(SurfaceHolder holder) {
camera.stopPreview();
camera.release();
camera = null;
}
In the surfaceDestroyed() method, the application stops the preview and releases the Camera object. If the CameraSurfaceView is used again, the surfaceCreated() method is called again, so this is the appropriate place to perform this operation.
The final step required to capture a still image is to add some way to call the takePicture() method of the Camera object. CameraSurfaceView can provide public access to the Camera object, but in this example, we provide a method to perform this within the CameraSurfaceView class:
public boolean capture(Camera.PictureCallback jpegHandler) {
if (camera != null) {
camera.takePicture(null, null, jpegHandler);
return true;
} else {
return false;
}
}
You can also use the takePicture() method to assign a callback suitable to play a shutter sound, or any other action just before the image is collected from the sensor. In addition, you can assign a PictureCallback to get raw data from the camera.
The CameraSurfaceView object is now ready for use in an Activity. For this example, an Activity with a layout that contains a FrameLayout widget for positioning the preview is used. Here is a sample implementation of assigning the cameraView to the layout:
final CameraSurfaceView cameraView = new
CameraSurfaceView(getApplicationContext());
FrameLayout frame = (FrameLayout) findViewById(R.id.frame);
frame.addView(cameraView);
Next, a Button click handler calls the capture() method of the CameraSurfaceView object. A sample implementation is shown here:
public void onClick(View v) {
cameraView.capture(new Camera.PictureCallback() {
public void onPictureTaken(byte[] data,
Camera camera) {
FileOutputStream fos;
try {
String filename = "capture.jpg";
fos = openFileOutput(filename,
MODE_WORLD_READABLE);
fos.write(data);
fos.close();
} catch (Exception e) {
Log.e("Still", "Error writing file", e);
}
}
});
}
The data that comes back from the callback can be written out directly to a JPEG file in the application file directory. If written as shown, though, the captured image is usable only by the application. In some cases, this might be suitable. However, the application might want to share the image with the rest of the device, for example, by including it within the Pictures application, which uses the MediaStore content provider. You do this by using the ContentResolver object to place an entry for the image in the media library.

As with all lengthy operations, you should perform large file system writes from a separate thread to keep the application interface as responsive as possible.
Configuring Camera Mode Settings
You can use the Camera class to configure the specific capture settings for a picture. Many of the capture settings are stored in the Camera.Parameters class, and set in the Camera class using the setParameters() method.
Working with Common Camera Parameters
Let’s take a closer look at the Camera.Parameters class. Some of the most interesting camera parameters are:
• Flash modes (where flash hardware is available)
• Focus types (fixed point, depth of field, infinity, and so on)
• White balance settings (fluorescent, incandescent, and so on)
• Scene modes (snow, beach, fireworks, and so on)
• Effects (photo negative, sepia, and so on)
• Anti-banding settings (noise reduction)
Different parameters are supported by different devices, so always check for support before trying to enable parameters. Use the Camera.Parameters class to determine what camera features are supported. For example, you can use the set of methods called getSupportedFlashModes(), getSupportedFocusModes(), and so on. Also, the Camera.Parameters class contains methods to access more technical camera settings, such as exposure compensation and EXIF information.
The Camera class received a major upgrade in Android 4.0. Application developers now have much finer camera control, including the ability to set focus or metering areas, enable continuous auto-focusing, and more. See the Camera class documentation for details.
Zooming the Camera
The camera zoom setting is controlled using the startSmoothZoom() and stopSmoothZoom() methods of the Camera class. As you might expect, you can set zoom parameters using the Camera.Parameters class. Useful zoom methods in the Camera.Parameters class include
• Determining whether zooming is supported with isZoomSupported()
• Determining whether smooth zooming is supported with isSmoothZoomSupported()
• Determining the maximum zoom value with getMaxZoom()
• Retrieving the current zoom value with getZoom()
• Setting the current zoom value with setZoom()
• Calculating the zoom increments (for example, 1x, 2x, and 10x) with getZoomRatios()
Depending on the features available for a specific camera, zoom might be digital, optical, or some combination of the two.
Sharing Images
Storing an image in the local application directory, as demonstrated, might work for some applications; however, other applications might find it useful if the image goes in the shared image library on the device. The ContentResolver can be used in conjunction with the MediaStore object to push the image into the shared image library. The following example demonstrates storing the still image taken by the camera as an image file in the MediaStore content provider, using the same camera image callback:
public void onPictureTaken(byte[] data, Camera camera) {
Log.v("Still", "Image data received from camera");
try {
Bitmap bm = BitmapFactory.decodeByteArray(
data, 0, data.length);
String fileUrl = MediaStore.Images.Media.
insertImage(getContentResolver(), bm,
"Camera Still Image",
"Camera Pic Sample App Took");
if (fileUrl == null) {
Log.d("Still", "Image Insert failed");
return;
} else {
Uri picUri = Uri.parse(fileUrl);
sendBroadcast(new Intent(
Intent.ACTION_MEDIA_SCANNER_SCAN_FILE,
picUri));
}
} catch (Exception e) {
Log.e("Still", "Error writing file", e);
}
}
The image is turned into a Bitmap object, which is passed into the insertImage() method. This method creates an entry in the shared image library. After the image is inserted, we use the returned URL to create a Uri object representing the new image’s location, which we instruct the media scanner to pick up by broadcasting a specialized intent. To determine whether the scan completed successfully, you can make a call to the static MediaScannerConnection.scanFile() method, and provide a MediaScannerConnection.OnScanCompletedListener class implementation.
Now the image is available to all applications that use the MediaStore content provider, such as the Pictures application.
To use the MediaStore with the emulator, you must have a mounted SD card image.
Additionally, although it’s technically not necessary to force the media scanner to scan for new images, we’ve found that the Pictures application on the emulator and device might crash if the MediaStore does not perform a scan before trying to access the image. It’s a good idea to send the Intent or use the MediaScannerConnection class.
Assigning Images as Wallpapers
Wallpapers are a great way for users to personalize their phones with interesting and fun images. The WallpaperManager class is used for all wallpaper interaction. You learn more about it in Chapter 22, “Extending Android Application Reach,” when you create Live Wallpaper. For now, use it to set still image wallpapers.
The current wallpaper can be retrieved with a call to the getDrawable() or peekDrawable() methods. The methods getDesiredMinimumHeight() and getDesiredMinimumWidth() enable the application to programmatically determine the size that a wallpaper should be on the particular device. Finally, you can assign wallpaper through the setResource(), setBitmap(), and setStream() methods.
The following callback of the Camera object sets the wallpaper:
public void onPictureTaken(byte[] data, Camera camera) {
Bitmap recordedImage =
BitmapFactory.decodeByteArray(data, 0, data.length);
try {
WallpaperManager wpManager = WallpaperManager
.getInstance(StillImageActivity.this);
wpManager.setBitmap(recordedImage);
} catch (Exception e) {
Log.e("Still", "Setting wallpaper failed.", e);
}
}
The image is copied locally for the wallpaper, so the original doesn’t need to be kept, which is good in this case because it was never written to disk. You can remove the wallpaper completely with a call to the clear() method.
Finally, your application needs the android.permission.SET_WALLPAPER permission in the AndroidManifest.xml file.
Prior to API Level 5 (Android 2.0), simple wallpaper commands were handled directly through the Context object. See the Android SDK documentation on the Context.setWallpaper() and Context.getWallpaper() methods for further information.
Choosing from Various Device Cameras
Many of the newer Android devices, especially the newer smartphones, have front-facing cameras and the main camera. Since API Level 9, the Android SDK has provided a method for accessing multiple cameras on devices. Leveraging the front-facing camera lends itself to all kinds of interesting application features in the realm of self portraiture and video chat.
All device cameras are accessed using the Camera class. To determine which camera is the front-facing camera, you need to iterate through the available cameras on the device and look for those with the front-facing attribute, as follows:
private int findFirstFrontFacingCamera() {
int foundId = -1;
int numCams = Camera.getNumberOfCameras();
for (int camId = 0; camId < numCams; camId++) {
CameraInfo info = new CameraInfo();
Camera.getCameraInfo(camId, info);
if (info.facing == CameraInfo.CAMERA_FACING_FRONT) {
foundId = camId;
break;
}
}
return foundId;
}
Here, we use the getNumberOfCameras() method of the Camera class to iterate over each camera instance and retrieve its CameraInfo. We then check the facing field to determine whether the camera is a CAMERA_FACING_FRONT (or CAMERA_FACING_BACK if we were looking for other cameras besides the default). If so, we have found a front-facing camera to use. After you’ve detected an appropriate camera, you can use it as you would the normal device camera, as discussed earlier in this chapter.
Working with Video
In recent years, video has become commonplace on devices. Most devices on the market now can record and play back video, and this is no different with Android, although the specific video features might vary from device to device.
Recording Video
Android applications can record video using the MediaRecorder class. Using MediaRecorder is a matter of following a few simple steps:
1. Instantiate a new MediaRecorder object.
2. Set the video source.
3. Set the video output format.
4. Set the video size to record (optional).
5. Set the video frame rate (optional).
6. Set the video encoder.
7. Set the file to record to. (The extension must match output format.)
8. Set the preview surface.
9. Prepare the object for recording.
10. Start the recording.
11. Stop and release the recording object when finished.
Using some standard button controls, you can create an Activity to record and play back video using the preceding steps. The onClick() method for a record button might look like this:
public void onClick(View v) {
if (videoRecorder == null) {
videoRecorder = new MediaRecorder();
}
String pathForAppFiles =
getFilesDir().getAbsolutePath();
pathForAppFiles += RECORDED_FILE;
videoRecorder.setVideoSource(
MediaRecorder.VideoSource.CAMERA);
videoRecorder.setOutputFormat(
MediaRecorder.OutputFormat.MPEG4 );
videoRecorder.setVideoSize(640, 480);
videoRecorder.setVideoFrameRate(30);
videoRecorder.setVideoEncoder(
MediaRecorder.VideoEncoder.H264);
videoRecorder.setOutputFile(pathForAppFiles);
videoRecorder.setPreviewDisplay(surface);
videoRecorder.prepare();
videoRecorder.start();
// button handling and other behavior here
}
The videoRecorder object is instantiated and given some video configuration values for the recording source. There are several values for each video configuration setting; however, supported values can vary by device.
A Stop button configured with an onClick() handler might look like this:
public void onClick(View v) {
if (videoRecorder!= null) {
videoRecorder.stop();
videoRecorder.release();
videoRecorder = null;
}
// button handling and other behavior here
}
Finally, applications wanting to record video require the explicit permission android.permission.CAMERA set in the AndroidManifest.xml file.
Beginning in Android 4.0 (API Level 14), you can take still photos during video sessions if the device supports this feature. To do this, first check that the device supports this feature using the isVideoSnapshotSupported() method, and then call the takePicture() method of the Camera class.
Playing Video
The simplest way to play back video with the Android SDK is to use the VideoView control along with the MediaController widget to provide basic video controls. The following is an implementation of an onCreate() method in an Activity that demonstrates a workable video playback solution:
@Override
protected void onCreate(Bundle savedInstanceState) {
super.onCreate(savedInstanceState);
setContentView(R.layout.moving);
VideoView vv = (VideoView) findViewById(R.id.video);
MediaController mc = new MediaController(this);
Uri video = Uri.parse(MOVIE_URL);
vv.setMediaController(mc);
vv.setVideoURI(video);
}
The Android emulator doesn’t play video files particularly well in all screen resolutions. Instead, it’s best to test video code on the device.
A simple layout file with these controls might look like Figure 14.2. The MediaController presents a nice ProgressBar that shows download completion and the current location. The use of the setAnchorView() method of the MediaController is not needed when used with the setMediaController() method of the VideoView class—it’s automatically set to the VideoView.
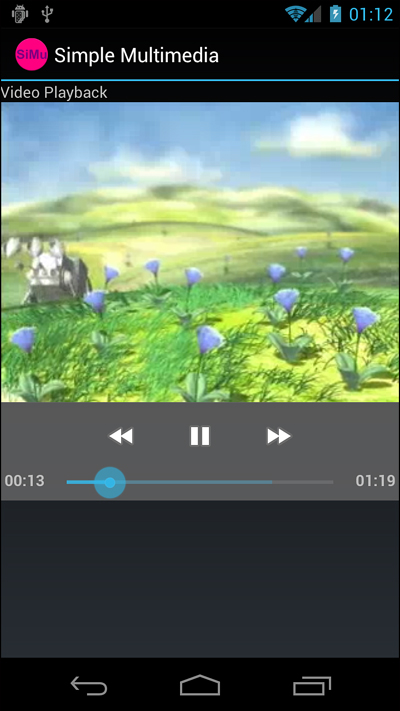
Figure 14.2. Screen showing video playback with default media controller displayed.
The call to the setVideoURI() method automatically starts playback. You can create a listener for when playback finishes using the setOnCompletionListener() method of the ViewView. The VideoView object has several other helpful methods, such as getDuration() and direct control over playback through methods such as pause(). For finer control over the media, or for an alternate way to play back media, you can use the MediaPlayer object. Use of it is similar to using the Camera class—you need a SurfaceHolder.
The MediaController can’t be retrieved from a layout file XML definition by a call to findViewById(). It must be instantiated programmatically and uses the Context of the Activity class, not the application Context.
When the URI to the video points to an Internet resource, your application will require the android.permission.INTERNET permission in the manifest file.
Working with Face Detection
Beginning in Android 4.0 (API Level 14), the Camera class supports face detection. To detect faces, you can register a Camera.FaceDetectionListener. Then start the Camera and call the startFaceDetection() method to begin detecting faces. When a face is detected, you’ll get an onFaceDetection() callback event, which returns an array of Camera.Face objects you can inspect. The Camera.Face class encapsulates a plethora of information about the face, including a bounded rectangle representing the facial area, a number of Point objects where the eyes and mouth of the face are thought to be located, as well as a numeric score for how confident the face detection engine is that you’ve detected a human face. When you’re done, call stopFaceDetection(). For more information about face detection, see the most recent Camera class documentation.
Working with Audio
Much like video, the Android SDK provides methods for audio playback and recording. Audio files can be resources, local files, or Uri objects to shared or network resources. Audio recording takes place through the built-in microphone on the device, if one is present (typically a requirement for a phone because one speaks into it quite often).
Recording Audio
The MediaRecorder object of the Android SDK provides audio recording functionality. Using it is a matter of following a few simple steps you should now find familiar:
1. Instantiate a new MediaRecorder object.
2. Set the audio source.
3. Set the audio format to record with.
4. Set the file format to store the audio in.
5. Set the file to record to.
6. Prepare the object for recording.
7. Start the recording.
8. Stop and release the recording object when finished.
Using a couple simple buttons, you can create a simple Activity to record and play back audio using the preceding steps. The onClick() method for a record button might look like this:
public void onClick(View v) {
if (audioRecorder == null) {
audioRecorder = new MediaRecorder();
}
String pathForAppFiles =
getFilesDir().getAbsolutePath();
pathForAppFiles += RECORDED_FILE;
audioRecorder.setAudioSource(
MediaRecorder.AudioSource.MIC);
audioRecorder.setOutputFormat(
MediaRecorder.OutputFormat.DEFAULT);
audioRecorder.setAudioEncoder(
MediaRecorder.AudioEncoder.DEFAULT);
audioRecorder.setOutputFile(pathForAppFiles);
audioRecorder.prepare();
audioRecorder.start();
// button handling and other behavior here
}
The audioRecorder object is instantiated, if necessary. The default values for the recording source and output file work fine for our purposes. Of note are the values for CAMCORDER, which uses a microphone in the direction of the camera, and various voice values that can be used to record calls (beware of local laws) and choose the proper microphone for voice recognition uses.
If you find that recording does not start, check the file extension used. For instance, when using the MPEG4 container, the Android SDK requires that the file extension is .mp4; otherwise, the recording does not start.
A stop button is configured with an onClick() handler that looks like this:
public void onClick(View v) {
if (audioRecorder != null) {
audioRecorder.stop();
audioRecorder.release();
audioRecorder = null;
}
// button handling and other behavior here
}
Finally, applications that want to record audio require the explicit permission android.permission.RECORD_AUDIO set within the AndroidManifest.xml file.
Now it is time to add the playback functionality, so we can listen to the audio we just recorded.
Playing Audio
The MediaPlayer object can be used to play audio. The following steps are required to prepare a file for playback:
1. Instantiate a new MediaPlayer object.
2. Set the path to the file using the setDataSource() method.
3. Call the prepare() method of the MediaPlayer object.
4. Call the start() method to begin playback.
5. Playback can then be stopped with a call to the stop() method.
The onClick() handler for a button to play the recorded audio from the previous example might look like the following:
public void onClick(View v) {
if (player == null) {
player = new MediaPlayer ();
}
try {
String audioFilePath =
getFilesDir().getAbsolutePath();
audioFilePath += RECORDED_FILE;
player.setDataSource(audioFilePath);
player.prepare();
player.start();
} catch (Exception e) {
Log.e("Audio", "Playback failed.", e);
}
}
The audio data source can be a local file path, valid file object, or valid Uri to an audio resource. You can programmatically stop the sound playback by a call to the stop() method. You can set a MediaPlayer.OnCompletionListener object to get a callback when the playback finishes. When done with the MediaPlayer object, you should use a call to the release() method to free up any resources it might be using, much like the releasing of the MediaRecorder object.
The AudioManager (android.media.AudioManager) is a system service. You can request the AudioManager by calling the getSystemService(Context.AUDIO_SERVICE) method. You can use the AudioManager to inspect, manage, and modify device-wide audio settings. A number of new APIs were added to the AudioManager in the Android 2.2 SDK for managing audio focus—that is, how multiple audio sources playing at the same time give one another “right of way,” and so forth. This functionality can be crucial for audio-streaming applications like podcast and music players.
Sharing Audio
Audio can be shared with the rest of the system. The ContentResolver can send the file to the MediaStore content provider. The following code snippet shows how to configure an audio entry in the audio library on the device:
ContentValues values = new ContentValues(9);
values.put(MediaStore.MediaColumns.TITLE, "RecordedAudio");
values.put(MediaStore.Audio.Media.ALBUM,
"Your Groundbreaking Album");
values.put(MediaStore.Audio.Media.ARTIST, "Your Name");
values.put(MediaStore.Audio.Media.DISPLAY_NAME,
"The Audio File You Recorded In Media App");
values.put(MediaStore.Audio.Media.IS_RINGTONE, 1);
values.put(MediaStore.Audio.Media.IS_MUSIC, 1);
values.put(MediaStore.MediaColumns.DATE_ADDED,
System.currentTimeMillis() / 1000);
values.put(MediaStore.MediaColumns.MIME_TYPE, "audio/mp4");
values.put(MediaStore.Audio.Media.DATA, pathForAppFiles);
Uri audioUri = getContentResolver().insert(
MediaStore.Audio.Media.EXTERNAL_CONTENT_URI, values);
if (audioUri == null) {
Log.d("Audio", "Content resolver failed");
return;
}
Setting these values enables the recorded audio to be used by different audio-oriented applications on the device. For example, setting the IS_MUSIC flag enables the audio file to appear in the various sections of the music player and be sorted by its album information. Setting the IS_RINGTONE flag enables the audio file to appear in the list of ringtones for the device.
Periodically, the device scans for new media files. However, to speed up this process, a BroadcastIntent can be sent telling the system about new audio files. The following code demonstrates this for the audio added to the content library:
sendBroadcast(new Intent(
Intent.ACTION_MEDIA_SCANNER_SCAN_FILE,audioUri));
After this intent is broadcast is handled, the audio file immediately appears in the designated applications.
Searching for Multimedia
You can use the search intent called android.intent.action.MEDIA_SEARCH to search for multimedia on a given device. You can also register an intent filter with your application to show up as a source for multimedia with this action. For example, you can perform a search for a specific artist and song like this:
Intent searchMusic = new Intent(
android.provider.MediaStore.INTENT_ACTION_MEDIA_SEARCH);
searchMusic.putExtra(android.provider.MediaStore.EXTRA_MEDIA_ARTIST,
"Cyndi Lauper");
searchMusic.putExtra(android.provider.MediaStore.EXTRA_MEDIA_TITLE,
"I Drove All Night");
searchMusic.putExtra(android.provider.MediaStore.EXTRA_MEDIA_FOCUS,
"audio/*");
startActivity(searchMusic);
If you load up a bunch of music on your device (such as Cyndi Lauper’s “I Drove All Night”) and launch this intent, you are then directed straight to the song you requested. Note that if you have many music apps installed, you might need to select an appropriate one (such as the Music application) the first time you send the Intent.
If you don’t have any music on your device, but have several music apps, you may be prompted to pick the app that you want to perform this search. For example, Figure 14.3 shows what happens on one of our devices.
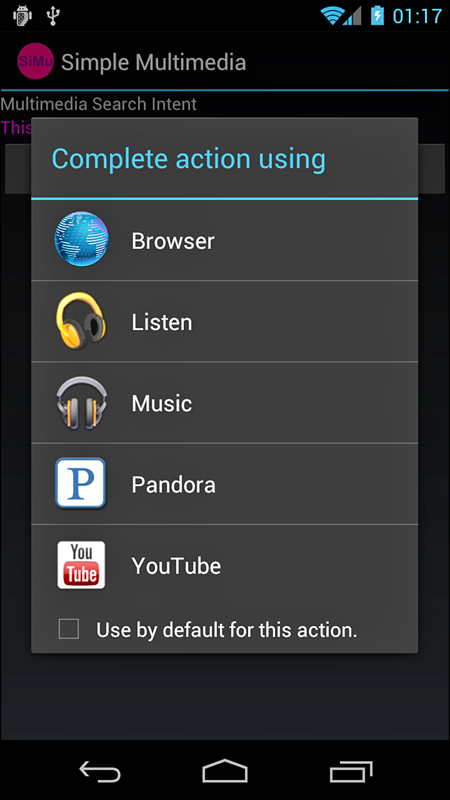
Figure 14.3. Screen showing video playback with default media controller displayed.
Working with Ringtones
Much like wallpapers, ringtones are a popular way to personalize a device. The Android SDK provides a variety of ways to manage ringtones through the RingtoneManager object. You can assign the recorded audio from the previous example as the current ringtone with the following static method call:
RingtoneManager.setActualDefaultRingtoneUri(
getApplicationContext(),
RingtoneManager.TYPE_RINGTONE, audioUri);
The type can also be TYPE_ALARM or TYPE_NOTIFICATION to configure sounds of other system events that use audio tones. To successfully perform this operation, though, the application must have the android.permission.WRITE_SETTINGS permission set in the AndroidManifest.xml file. You can also query the default ringtone with a call to the static RingtoneManager.getActualDefaultRingtoneUri() method. You can use the resulting Uri to play the ringtone, which might be useful in applications that want to alert the user.
Summary
Use of multimedia in many applications can dramatically increase their appeal, usefulness, and even usability. The Android SDK provides a variety of APIs for recording audio, video, and images using the camera and microphone hardware; it also provides the capability to play audio and video and display still images. Newer devices support more fine-tuned camera usage, including application-level access to front-facing cameras and face-detection capabilities. Multimedia can be private to a specific application or shared among all applications using the MediaStore content provider.
References and More Information
Android Dev Guide: “Audio and Video”:
http://d.android.com/guide/topics/media/index.html
Android supported media formats:
http://d.android.com/guide/appendix/media-formats.html
Android SDK documentation on the Camera class:
http://d.android.com/reference/android/hardware/Camera.html
Android SDK documentation on the android.media package:
http://d.android.com/reference/android/media/package-summary.html
Android SDK documentation on the MediaPlayer class:
http://d.android.com/reference/android/media/MediaPlayer.html