
17. Using Android’s Optional Hardware APIs
The Android Software Development Kit provides a variety of application programming interfaces for accessing low-level hardware features on the device. In addition to the camera, Android devices have other hardware resources that developers can take advantage of in their applications, such as Wi-Fi, NFC, Bluetooth radios, and a variety of USB connectivity options. In this chapter, you explore the optional hardware APIs provided as part of the Android SDK.
Working with Bluetooth
Bluetooth APIs have been available since API Level 5, though not all Android devices have Bluetooth hardware. However, this is a popular consumer feature that Android developers can use to their advantage. When Bluetooth hardware is present, Android applications can
• Scan for and discover Bluetooth devices and interact with the Bluetooth adapter.
• Establish RFCOMM connections and transfer data to and from devices via data streams.
• Maintain point-to-point and multipoint connections with Bluetooth devices and manage multiple connections.
The Bluetooth APIs are part of the android.bluetooth package. As you might expect, the application must have permission to use the Bluetooth services. The android.permission.BLUETOOTH permission is required to connect to Bluetooth devices. Similarly, Android applications must have the android.permission.BLUETOOTH_ADMIN permission to administer Bluetooth hardware and related services, which includes managing tasks, enabling or disabling the hardware, and performing discovery scans.
The Bluetooth APIs are divided into several useful classes, including the following:
• The BluetoothAdapter class represents the Bluetooth radio hardware on the local device.
• The BluetoothDevice class represents a remote Bluetooth device.
• The BluetoothServerSocket class is used to open a socket to listen for incoming connections and provides a BluetoothSocket object when a connection is made.
• The BluetoothSocket class is used by the client to establish a connection to a remote device. After the device is connected, the BluetoothSocket object is used by both sides to handle the connection and retrieve the input and output streams.

Many of the code examples provided in this section are taken from the SimpleWireless application. This source code for the SimpleWireless application is provided for download on the book’s websites.
Checking for the Existence of Bluetooth Hardware
The first thing to do when trying to enable Bluetooth functionality in your application is to establish whether or not the device has a Bluetooth radio. You can do this by calling and checking the return value of the BluetoothAdapter class’s static method called getDefaultAdapter().
BluetoothAdapter btAdapter = BluetoothAdapter.getDefaultAdapter();
if (btAdapter == null) {
Log.d(DEBUG_TAG, "No bluetooth available.");
// ...
} else {
// bt available
}
Applications that use Bluetooth should declare as such in the Android manifest file to ensure installation only on compatible devices. You can use the <uses-feature> manifest tag to indicate this application requirement, such as this: <uses-feature android:name="android.hardware.bluetooth" />.
Enabling Bluetooth
After you have determined that the device has a Bluetooth radio, you need to check to see whether it is enabled using the BluetoothAdapter class method called isEnabled(). If the Bluetooth adapter is enabled, you can proceed. Otherwise, you need to request that it is turned on. This can be done in several ways:
• Fire off the BluetoothAdapter.ACTION_REQUEST_ENABLE intent using the startActivityForResult() method. This launches an Activity that enables the user to choose to turn on the Bluetooth adapter. If the result is RESULT_OK, then Bluetooth has been enabled; otherwise, the user canceled the Bluetooth-enabling process.
• Call the BluetoothAdapter enable() method. This method should be used only by applications that need to explicitly enable the Bluetooth radio. It requires the BLUETOOTH_ADMIN permission. In addition, it should be performed only as the result of a direct request from the user, such as through a button, menu item, or query dialog.
• The process of making an Android device discoverable also automatically enables Bluetooth. This can be achieved by firing off the BluetoothAdapter.ACTION_REQUEST_DISCOVERABLE intent using the startActivityForResult() method. This launches an Activity that presents the user with a choice to make the device discoverable for a set amount of time.
Querying for Paired Devices
You can use the BluetoothAdapter to query for available Bluetooth devices to connect to. The getBondedDevices() method returns a set of BluetoothDevice objects that represent the devices paired to the Bluetooth adapter.
Set<BluetoothDevice> pairedBtDevices = btAdapt.getBondedDevices();
Discovering Devices
Bluetooth devices must be discovered and paired to the adapter before use. You can use the BluetoothAdapter to start and stop the discovery process for available Bluetooth devices to connect to. The startDiscovery() method starts the discovery process asynchronously. This method requires the android.permission.BLUETOOTH_ADMIN permission.
After you have initiated the discovery process, your application needs to register to receive broadcasts for the following Intent actions:
• ACTION_DISCOVERY_STARTED: Occurs when the discovery process initiates
• ACTION_FOUND: Occurs each time a remote Bluetooth device is found
• ACTION_DISCOVERY_FINISHED: Occurs when the discovery process completes
The discovery process is resource and time-intensive. You can use the isDiscovering() method to test whether the discovery process is currently underway. The cancelDiscovery() method can be used to stop the discovery process. This method should also be used any time a connection is about to be established with a remote Bluetooth device.
Establishing Connections Between Devices
The general idea behind connecting two devices via Bluetooth is for one device to find the other device via whatever means necessary, depending upon whether it be a previously paired device or found through discovery. After it’s found, the device calls the connect() method. Both devices then have a valid BluetoothSocket object that can be used to retrieve the InputStream and OutputStream objects for initiating data communications between the two devices.
Now, that’s where the theory ends and reality sets in. If it’s the same application running on both devices, as it usually is, this means both devices should find a remote device and both should be discoverable so they can also be found, as well as open a listening socket via the BluetoothServerSocket object so they can receive incoming connection requests, and be able to connect to the other device. Add to that the fact that both the calls to the accept() method of the BluetoothServerSocket class and to the connect() method of the BluetoothSocket class are blocking synchronous calls, and you can quickly see you need to use some threads here. Discovery also uses a fair amount of the Bluetooth hardware resources, so you need to cancel and then later restart this process as appropriate. Performing discovery during a connection or even while attempting a connection likely leads to negative device performance.
The short code listings provided in the Bluetooth section are taken from the SimpleWireless application. The full source code for this application is provided for download on the book’s websites. The code required to establish and maintain connections between two devices is lengthy. Therefore, we have chosen to discuss it broadly here and not to include full Bluetooth code listings in this section. Instead, please consult the sample project for a complete implementation of Bluetooth, including the ability to cause one device to make a “ping” sound (sonar style) on the other device.
Figure 17.1 shows a reasonable layout for a Bluetooth implementation and the threads used in the SimpleWireless project.
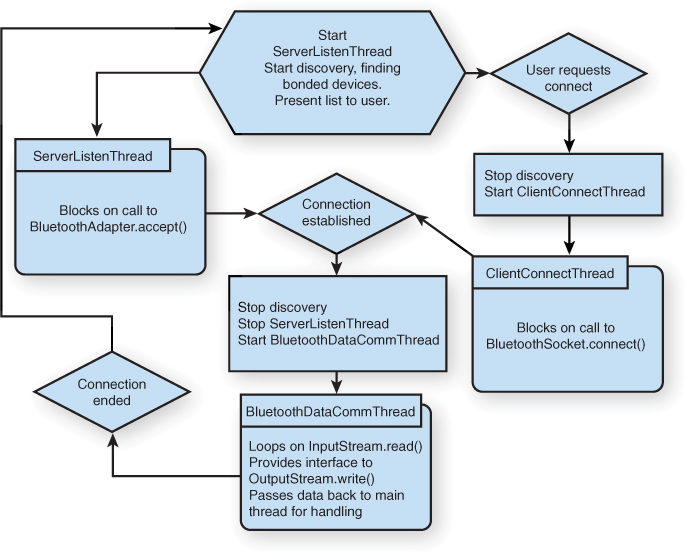
Figure 17.1. Diagram showing behavior flow for a Bluetooth application on Android.
Working with USB
The Android platform supports a variety of flexible USB-related features. Android devices can act as both USB peripherals (client devices) or USB hosts, depending on the circumstances. This expands the opportunities available for developers to extend the reach of their applications to a variety of situations. Android devices can act as remote controllers or be controlled by accessories. You can even use the Android Open Accessory Development Kit (ADK) to create new Android hardware accessories.
To debug on devices while they are connected to USB hardware, you can use adb over a network connection.

Not all Android devices support USB host and accessory modes, so make sure you declare the appropriate <uses-feature> tags in your Android manifest file to make sure your application is installed only on compatible Android devices.
 Developing Android Accessories with the ADK
Want to develop your own Android accessories? Check out the Open Accessory Development Kit, available in Android 3.1. Based on Arduino, you can purchase development boards from a number of suppliers and get hacking. For more information about the ADK, see the Android Dev Guide at http://d.android.com/guide/topics/usb/adk.html.
Working with USB Accessories
In accessory mode, the approved accessory acts as a controller, providing power to the Android device. Data can be transferred in both directions. The USB accessory APIs can be found under the android.hardware.usb package; they were introduced in Android 3.1 (API Level 12).
Your application can interface with USB accessories by accessing the USB system service using the Context.getSystemService() method. You can use the UsbManager class (android.hardware.usb.UsbManager) to discover and communicate with any USB accessories connected to the device.
The UsbManager class has a getAccessoryList() method, which lists all connected USB accessories available to the application. You can also set up a broadcast receiver to be notified when specific USB accessories are connected. Each USB accessory is represented as an UsbAccessory (android.hardware.usb.UsbAccessory) object. In order to connect to a USB accessory, you need to request permission from the user. When your application has received permission to communicate with the accessory, it can open a connection to the accessory and communicate using streams; this communication should be handled off the main UI thread. When it is complete, you can terminate your application’s connection to the accessory.
Applications that rely on USB accessories have numerous Android Manifest file configuration details to consider. At minimum, applications should declare a <uses-feature> tag with the android.hardware.usb.accessory feature and set their minimum SDK to API Level 12 or higher. See the Android SDK class documentation for more details.
The USB accessory APIs were back-ported to Android 2.3.4 (API Level 10, though not Android 2.3.3, which is also API Level 10) as part of the third-party Google Add-on library so many more devices now support this functionality. There are subtle differences when working with the add-on version of the USB accessory APIs. This add-on is available for download in the Android SDK Manager.
Working as a USB Host
In host mode, the Android device acts as a controller, providing power to the connected USB device. Data can be transferred in both directions. The USB hosts APIs, and it can be found under the android.hardware.usb package. It was introduced in Android 3.1 (API Level 12).
Your application can interface with USB devices by accessing the USB system service using the Context.getSystemService() method. You can use the UsbManager class (android.hardware.usb.UsbManager) to discover and communicate with any USB devices available. You can also set up a broadcast receiver to be notified when specific USB devices are connected.
The UsbManager class has a getDeviceList() method that lists all connected USB devices available to the application. Each USB device is represented as a UsbDevice (android.hardware.usb.UsbDevice) object. To connect to a USB device, you need to request permission from the user. After your application has received permission to communicate with the device, it can open a connection to the device; this communication should be handled off the main UI thread. The Android SDK includes a number of classes for facilitating communication, including the UsbInterface, UsbEndpoint, UsbDeviceConnection, and UsbRequest classes (see the android.hardware.usb package for class details). After it is complete, you can terminate your application’s connection to the device.
Applications that act as USB hosts have numerous Android Manifest file configuration details to consider. At minimum, applications should declare a <uses-feature> tag with the android.hardware.usb.host feature and set their minimum SDK to API Level 12 or higher. See the Android SDK class documentation for more details.
Working with Android Beam
Near Field Communications (NFC) isn’t a new technology, but lately it’s been gaining traction with Google’s introduction of NFC in Android handsets starting with API Level 9, expanded in API Level 10, and simplified in API Level 14. Previously, you’d be lucky to find it in anything but Nokia devices. The most recent incarnation of NFC technology from Google is called Android Beam, which is an easy-to-market name for NDEF (NFC Data Exchange Format) Push over NFC, and is available in API Level 14 and later.
Read on for a brief introduction to using Android Beam in your applications.
The code listings in this section are taken from the SimpleWireless application. The full source code for this application is provided for download on the book’s websites.
Enabling Android Beam Sending
In fact, sending is enabled by default and triggers automatically. When another NFC device is in range, the system shrinks the current screen of the foreground application and displays a message, “Touch to beam” (see Figure 17.2). If your application has no data to send, nothing happens.
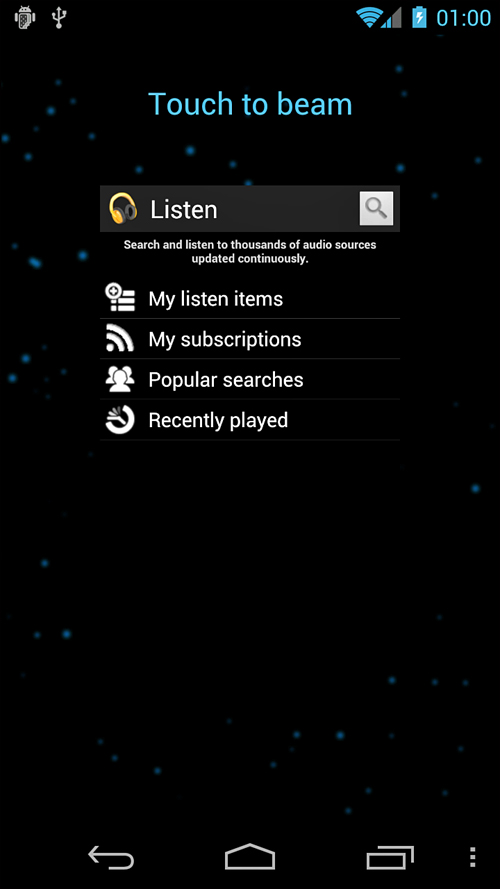
Figure 17.2. An app (Listen) in “Touch to beam” mode when near another NFC device.
What you want to know about is sending data with this tap. That’s easy; just get an instance of the NfcAdapter class and call the setNdefPushMessageCallback() method with a valid CreateNdefMessageCallback instance. For example:
mNfcAdapter.setNdefPushMessageCallback(new CreateNdefMessageCallback() {
@Override
public NdefMessage createNdefMessage(NfcEvent event) {
Time time = new Time();
time.setToNow();
String message = messageToBeam.getText().toString();
String text = (message + "
[Sent @ "
+ time.format("%H:%M:%S") + "]");
byte[] mime = MIMETYPE.getBytes(Charset.forName("US-ASCII"));
NdefRecord mimeMessage = new NdefRecord(
NdefRecord.TNF_MIME_MEDIA, mime,
new byte[0], text.getBytes());
NdefMessage msg = new NdefMessage(
new NdefRecord[] { mimeMessage,NdefRecord.
createApplicationRecord("com.androidbook.simplewireless") });
return msg;
}
}, this);
The implementation of the createNdefMessage() method gets a String from an EditText control (messageToBeam), adds the time to it, and encapsulates it inside an NdefRecord object that is, itself, encapsulated in an NdefMessage. This message is returned and the system pushes it to the other device. You can register to be informed when the message has been successfully sent using the setOnNdefPushCompleteCallback() method of the NfcAdapter.
Receiving Android Beam Messages
Receiving messages is even more straightforward. Your Activity needs a new intent filter. Conveniently, NDEF messages come in as normal Intent objects.
<intent-filter>
<action android:name="android.nfc.action.NDEF_DISCOVERED" />
<category android:name="android.intent.category.DEFAULT" />
<data android:mimeType="application/com.androidbook.simplewireless" />
</intent-filter>
Then you need to check the Intent contents to see whether it has an NDEF message. If so, extract the data you’re looking for out of it (see Figure 17.3). This is just reversing the NdefMessage and NdefRecord creation from previously.
@Override
public void onResume() {
super.onResume();
// Did we receive an NDEF message?
Intent intent = getIntent();
if (NfcAdapter.ACTION_NDEF_DISCOVERED.equals(intent.getAction())) {
try {
Parcelable[] rawMsgs = intent
.getParcelableArrayExtra(NfcAdapter.EXTRA_NDEF_MESSAGES);
// we created the message, so we know the format
NdefMessage msg = (NdefMessage) rawMsgs[0];
NdefRecord[] records = msg.getRecords();
byte[] firstPayload = records[0].getPayload();
String message = new String(firstPayload);
mStatusText.setText(message);
} catch (Exception e) {
Log.e(DEBUG_TAG, "Error retrieving beam message.", e);
}
}
}
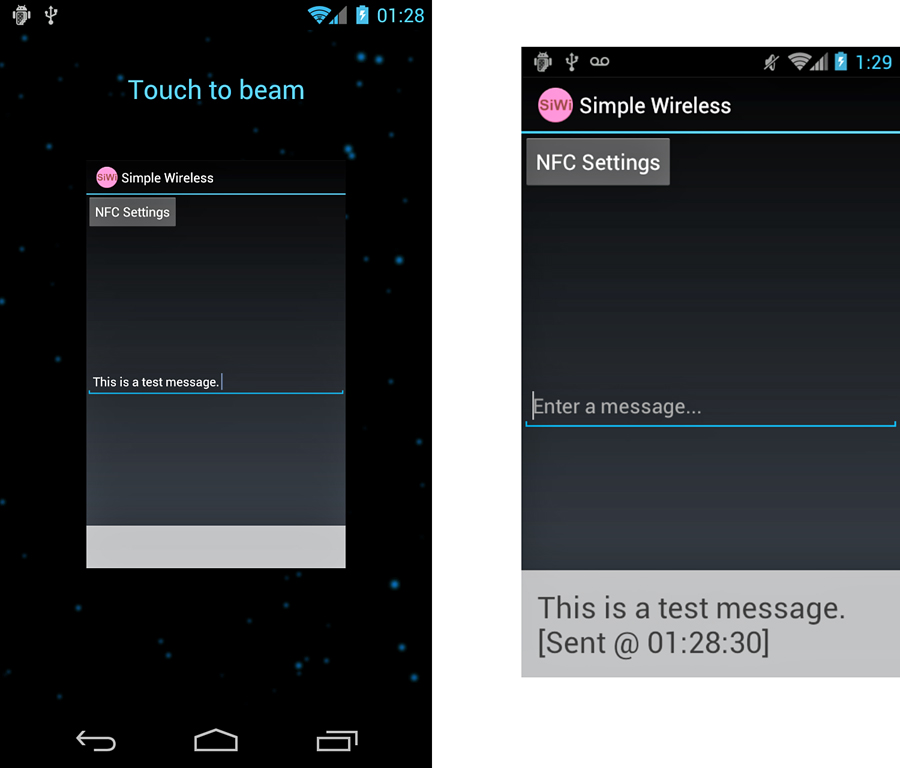
Figure 17.3. Sending the message (left) and receiving it (right).
Incorporating Android Beam into your applications can be that easy. Looking to do something more complex? Check out the resources at the end of this chapter for further reading on NFC topics.
Configuring the Manifest File for Android Beam
Android Beam requires API Level 14. Using NFC requires the android.permission.NFC permission to be added to the application’s Android manifest file. Additionally, android.hardware.nfc should be added as a <uses-feature> value to help app stores filter your application correctly to devices that have NFC hardware.
<uses-sdk
android:minSdkVersion="14"
android:targetSdkVersion="14" />
<uses-permission android:name="android.permission.NFC" />
<uses-feature
android:name="android.hardware.nfc"
android:required="true" />
Working with Wi-Fi
Developers can also integrate Wi-Fi features into their applications in two main ways; they can work with the Wi-Fi system service to find and connect to various Wi-Fi networks. Newer versions of the Android SDK also support Wi-Fi Direct, which helps facilitate connections.
Introducing Wi-Fi Direct
Wi-Fi Direct is a relatively new standard that attempts to solve the problems and difficulties with ad-hoc Wi-Fi—namely configuration and connection management. In doing so, a host Wi-Fi direct device basically becomes an access point and variation of the Protected Setup protocol is used to connect the two devices. With the longer range, faster data communications and simpler networking than Bluetooth, some think Wi-Fi Direct will ultimately replace Bluetooth for certain kinds of connections.
Wi-Fi Direct functionality first appeared in the Android SDK in the Android 4.0 (API Level 14). In fact, the Galaxy Nexus, the flagship Android 4.0 smartphone that shipped in late 2011, was one of the first Android devices to support Wi-Fi Direct for use by developers. The first certified Wi-Fi Direct smartphone was actually the Samsung Galaxy S Android device, back in November 2010, but no Android API was available at that time.
Using Wi-Fi Direct on Android is fairly straightforward; start by checking out the peer-to-peer Wi-Fi package android.net.wifi.p2p. Using the WifiP2pManager class (android.net.wifi.p2p.WifiP2pManager), you configure several callback classes that are used to asynchronously get the status of requests you make. You can also configure a broadcast receiver to handle various notifications as the state of Wi-Fi Direct changes, both in response to your requests and in changing availability of devices.
In terms of permissions, there is no distinction between regular Wi-Fi and Internet access and Wi-Fi Direct and peer-to-peer networking access. Thus, you need permissions for INTERNET, ACCESS_WIFI_STATE, ACCESS_NETWORK_STATE, CHANGE_WIFI_STATE, and CHANGE_NETWORK_STATE. Wi-Fi Direct requires API Level 14.
The fastest way to get started with exploring Wi-Fi Direct in code is using the WifiDirectDemo sample application that ships with the Android SDK. To create this project in Eclipse, simply choose New Android Project, Create project from existing sample, choose AOSP API 14, and then choose WiFiDirectDemo from the list of samples. Alternately, the source for the sample can be browsed online at http://developer.android.com/resources/samples/WiFiDirectDemo/index.html (http://goo.gl/2iJrX).
Monitoring Wi-Fi State
The Wi-Fi sensor can read network status and determine nearby wireless access points. The Android SDK provides a set of APIs for retrieving information about the Wi-Fi networks available to the device and Wi-Fi network connection details. This information can be used for tracking signal strength, finding access points of interest, or performing actions when connected to specific access points. This section describes how to get Wi-Fi information. However, if you are looking for information on networking, it is more thoroughly discussed as part of Chapter 11, “Using Android Networking APIs.”
The following samples require two explicit permissions in the AndroidManifest.xml file. The CHANGE_WIFI_STATE permission is needed when an application is accessing information about Wi-Fi networks that can turn on the Wi-Fi radio, thus changing its state. The ACCESS_WIFI_STATE permission is also needed to request any information from the Wi-Fi device. You can add these to the AndroidManifest.xml file as follows:
<uses-permission
android:name="android.permission.CHANGE_WIFI_STATE" />
<uses-permission
android:name="android.permission.ACCESS_WIFI_STATE" />
The next thing the application needs is an instance of the WifiManager object. It is a system service, so the getSystemService() method works.
WifiManager wifi =
(WifiManager) getSystemService(Context.WIFI_SERVICE);
Now that the WifiManager object is available, the application can do something interesting or useful with it. First, the application performs a Wi-Fi scan to see what access points are available in the local area. You need to complete a few steps to perform a scan:
1. Start the scan with the startScan() method of the WifiManager object.
2. Register a BroadcastReceiver for the SCAN_RESULTS_AVAILABLE intent.
3. Call getScanResults() to get a list of ScanResult objects.
4. Iterate over the results and do something with them.
You can perform the first two steps with the following code:
wifi.startScan();
registerReceiver(rcvWifiScan,
new IntentFilter(WifiManager.SCAN_RESULTS_AVAILABLE_ACTION));
The sample BroadcastReceiver object, shown here, performs the last two steps. It is called regularly until the stopScan() method is called on the WifiManager object.
rcvWifiScan = new BroadcastReceiver() {
public void onReceive(Context context, Intent intent) {
List<ScanResult> resultList = wifi.getScanResults();
int foundCount = resultList.size();
Toast.makeText(WiFi.this,
"Scan done, " + foundCount + " found",
Toast.LENGTH_SHORT).show();
ListIterator<ScanResult> results = resultList.listIterator();
String fullInfo = "Scan Results :
";
while (results.hasNext()) {
ScanResult info = results.next();
String wifiInfo = "Name: " + info.SSID +
"; capabilities = " + info.capabilities +
"; sig str = " + info.level + "dBm";
Log.v("WiFi", wifiInfo);
fullInfo += wifiInfo + "
";
}
status.setText(fullInfo);
}
};
The ScanResult object contains a few more fields than demonstrated here. However, the SSID, or name, property is probably the most recognizable to users. The capabilities property lists such things as what security model can be used (such as “WEP”). The signal strength (level), as given, isn’t all that descriptive for most users.
However, the WifiManager object provides a couple of helper methods for dealing with signal levels. The first is the calculateSignalLevel() that effectively turns the number into a particular number of “bars” of strength. You can use the second, compareSignalLevel(), to compare the relative signal strengths of two results.
The emulator does not provide Wi-Fi emulation but the WifiManager APIs do work. However, there are not any results when you use them. Perform testing of Wi-Fi APIs on actual hardware that has a functional Wi-Fi radio.
You can use the WifiManager object to list known access points. These are typically access points that the user has configured or connected to in the past. The following code demonstrates the use of the getConfiguredNetworks() method:
ListIterator<WifiConfiguration> configs =
wifi.getConfiguredNetworks().listIterator();
String allConfigs = "Configs:
";
while (configs.hasNext()) {
WifiConfiguration config = configs.next();
String configInfo = "Name: " + config.SSID +
"; priority = " + config.priority;
Log.v("WiFi", configInfo);
allConfigs += configInfo + "
";
}
status.setText(allConfigs);
The returned WifiConfiguration object does not include all the fields that it could. For instance, it does not fill any network key fields. It does, however, fill in similar fields to those found in the ScanResults object. This can be used, for instance, to notify the users when they are in range of known Wi-Fi networks if their devices are set to not automatically connect.
You can use the WifiManager object to configure Wi-Fi networks, get the state of the Wi-Fi radio, and more. See the android.net.wifi package for more information.
Summary
Unlike many other mobile platforms, Android allows substantial access to the underlying hardware as well as devices attached via USB. Application developers can create new and exciting applications that leverage the Bluetooth, Wi-Fi, and Wi-Fi Direct technologies. They can also create applications that enable the device to act as a USB host or accessory. Developers can even use the ADK to develop their own Android USB accessories. It is important to remember that different devices have different underlying hardware. Always verify the functionality available on each target platform during the planning stage of your Android project.
References and More Information
Android Dev Guide: “Bluetooth”:
http://d.android.com/guide/topics/wireless/bluetooth.html
Android sample application, Bluetooth Chat:
http://d.android.com/resources/samples/BluetoothChat/index.html
Android SDK documentation on the android.net.wifi.p2p package:
http://d.android.com/reference/android/net/wifi/p2p/package-summary.html
Android Dev Guide: “Wi-Fi Direct”:
http://d.android.com/guide/topics/wireless/wifip2p.html
Wikipedia entry on Wi-Fi Direct:
http://en.wikipedia.org/wiki/Wi-Fi_Direct
Android Dev Guide: “Near Field Communication”:
http://d.android.com/guide/topics/nfc/index.html
Android SDK documentation on the android.nfc package:
http://d.android.com/reference/android/nfc/package-summary.html
Android Dev Guide: “USB Host and Accessory”:
http://d.android.com/guide/topics/usb/index.html
Android Dev Guide: “Android Open Accessory Development Kit”: