
Hour 15. Putting It All Together: Building an OS X Application
What You’ll Learn in This Hour:
• How to use a shared framework in your project
• How to add a second view component with a controller independent from the application delegate
• How to incorporate an embedded framework project into your application to accommodate interproject dependencies
So far in this book, you’ve learned all about the Xcode interface and how to use it to construct the necessary component pieces of an OS X application. In this hour, you refresh what you’ve learned about the interface and the tools for building components, while going through the process of building a complete Objective-C-based Cocoa application. The application we build in this hour is kind of like a very simple Etch A Sketch. It takes X and Y coordinate values as input, plots the points and draws lines between them in a graphical view, and lists the coordinates that you’ve entered in a browser. This hour does not cover every possible functionality, but by the time you have finished, you should have a good idea of how to add features like editing the points list in the doodle or connecting it up to more interesting sources of coordinate data than just what you can enter from the keyboard.
Like Hour 14, “Planning for Reuse: Frameworks and Libraries,” this hour is a bit longer than some of the others. This is partly because what you have already learned is somewhat involved and requires a thorough walkthrough here. And, it is partly because even though Xcode keeps getting better and better, Apple still needs to smooth out some rough spots. After all, it doesn’t take wandering too far off the path to end up with an application that looks all right but works all wrong.
The best way to work through this hour is to download the associated source code from http://teachyourselfxcode/ and follow along using the source code provided in the Hour 15 directory. We want to focus on the Xcode features that you need to know about and use, and not dilute that information with details that are purely about Objective-C or Cocoa. So, this book shows only the portions of the code directly relevant to how you’re working with Xcode in the project.
Getting Started
Let’s start at the very beginning:
1. Launch Xcode, and then choose File, New, New Project to create a new project. The familiar new project dialog opens, as shown in Figure 15.1. Because we’re building an Objective-C/Cocoa application, select the Cocoa Application template and click Next.
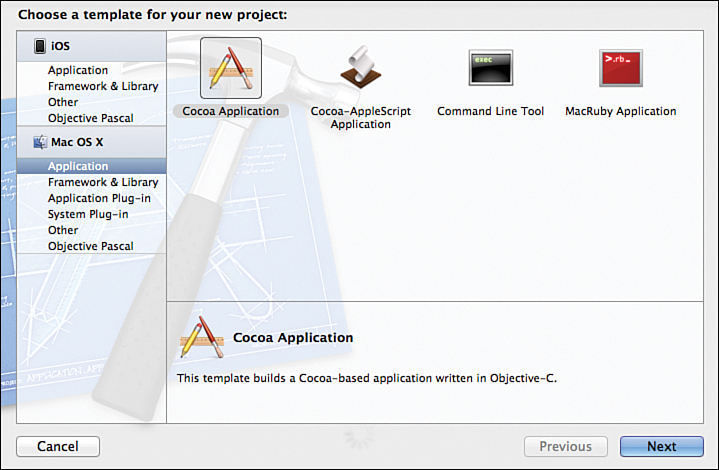
Figure 15.1. Selecting the Cocoa Application template.
2. In the next dialog, shown in Figure 15.2, fill in your application name, company name, and a class prefix.

Figure 15.2. Setting options, including class prefix.
The company name is covered in an earlier hour. The class prefix should be a few capital letters, and by prepending it onto all of your class names and methods, it is used to disambiguate between the SuperAwesomeClass that you wrote and the decidedly less-super-awesome SuperAwesomeClass that some other guy coincidentally named his class, as well. Apple uses NS (from NextStep) as the prefix for all of their class and method names. You can use your initials; how likely is it that the guy who stole your class name also has the same initials as you? Unless you have a good reason not to, use the same class prefix in all your work. That way, you can readily recall it, and you will not have to try to remember what prefix went with what class, and you can always easily identify your class methods among the other calls in the code you write.
Did You Know?
Although the class prefix is a great way to distinguish your classes and methods among many with possibly similar names, Xcode does nothing to actually enforce adherence to this suggestion, and in fact, at least as currently as Xcode 4.2.1, the only thing it does with the class prefix you specify is prepend the names of the very first class implementation. It appears to then promptly forget that the setting exists.
I’m naming my application BeeLine, and I have chosen SGF for my class prefix. Unless you plan to submit your application to the Apple App Store, you can leave the App Store category set to None.
3. Leave the Create Document-Based Application check box unchecked (because we build a single-window application in this hour). A document-based application is the type that, similar to Preview, opens multiple independent windows, each containing a different document, and each using the same menu and control structure.
4. Uncheck (if it is checked) the Use Core Data check box. Our demo application does not use Core Data, although we extend it to use Core Data for storage in Hour 17, “Attaching Big Data: Using Core Data in Your Applications.”
5. Select Automatic Reference Counting and also select Unit Tests, if not already selected.
6. Click Next, find a good place to store your project, select the option to create a local Git repository, and then click Create. After a few moments as things are set up on disk, the main Xcode interface opens. You’re now ready to roll.
Figure 15.3 shows the almost-default configuration of the interface after it launches. I dragged a PNG image of one of my bees into the App Icon box. I used a PNG with a transparent background so that the bee shows in the shape of the bee, instead of as a square with a bee in it.
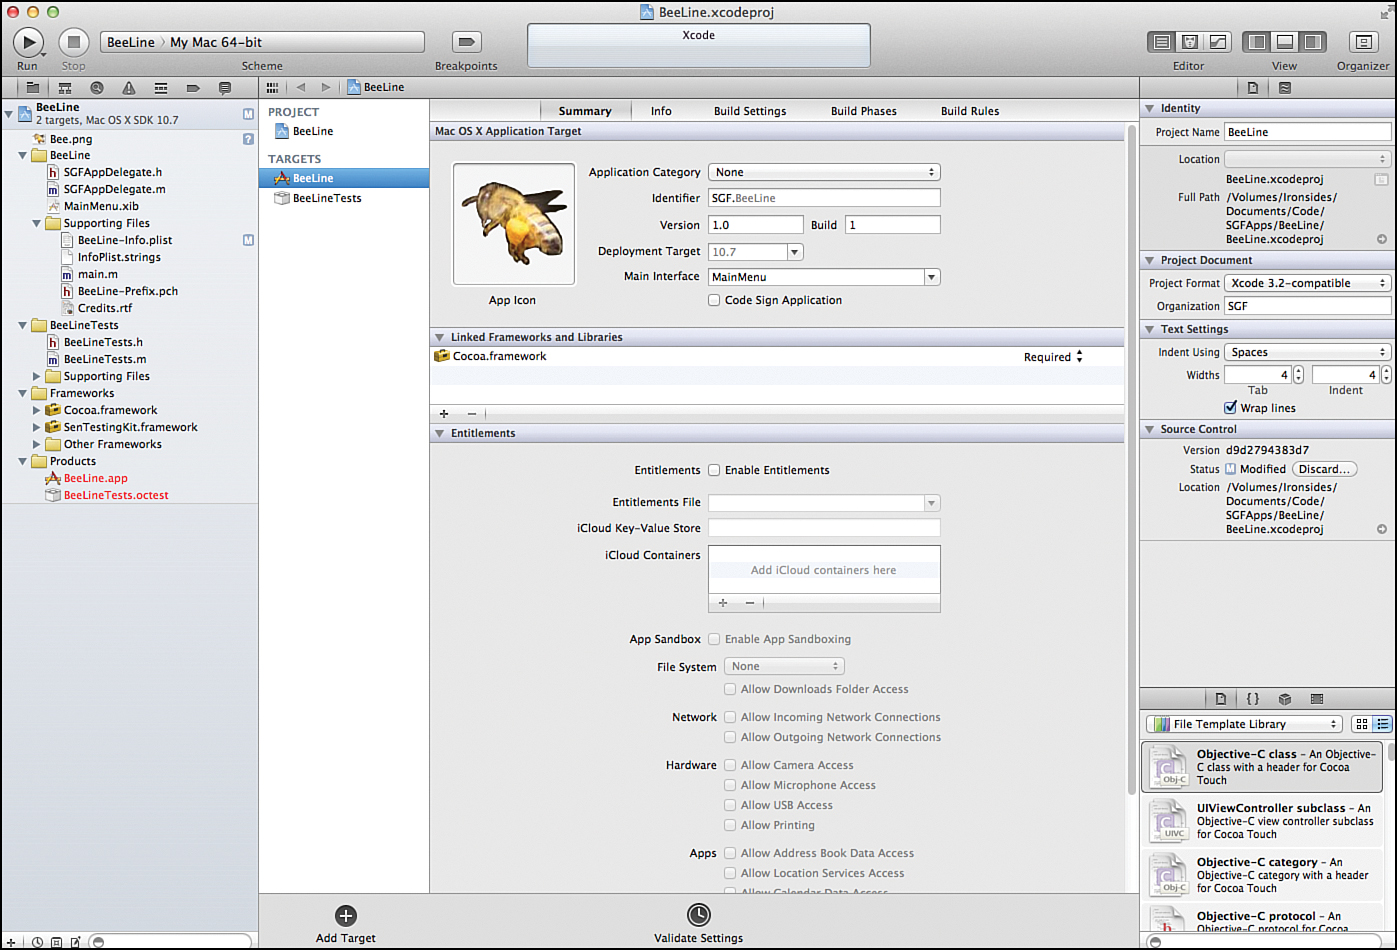
Figure 15.3. The default interface with the App Icon filled in.
Because we’re just starting, the rest of the configurable information in the Editor area can be left alone. Once your app is famous and it is time to release version 2, this is where you return to update things such as the version setting. We also leave the Entitlements section alone. The Entitlements section is where you can configure settings to restrict your application to a “sandbox,” limiting its access to other applications and peripherals on the computer, and where you can configure access and limitations to iCloud-based data storage.
If you browse the groups and files with which Xcode has populated the Navigator, you’ll see that it has created an Application Delegate class prepended with the class prefix you specified, as well as a default NIB file for your interface, the required main.m file, some unit-test skeleton code, and the basic plist files needed to get up and running. If you were to build and run your application at this point, it actually would run successfully, but it would not do much interesting.
Unless you plan to adopt test-driven development, which we cover in Hour 18, “Test Early, Test Often,” the first thing you need to do is create the elements of your user interface. Of course, you can change these later if you decide that they’re not quite what you need. Unlike traditional programming environments, however, where you start with some sort of “main” routine and insert code to tell it which routines to call, with Cocoa, you start with an interface and you tell the interface elements which methods to invoke.
Creating the Interface
Select the NIB file, and the Interface Builder editor will load in the Editor area. Front and center is a mostly blank window with a graph-paper background, and along the left is a dock with a few less-than-helpful shapes. The shapes in the dock are representatives and proxies for certain elements of your code and for elements of your user interface. They’re necessary because you connect things in the interface with things in the code by Control-dragging from elements in one onto the other. From top to bottom, the items that appear in the default Interface Builder editor dock are a wireframe cube, solid red cube, and default application icon that represent the file’s owner, first responder, and the application, respectively.
These are followed by a sort of pull-down menu icon that represents the application’s default menu, a window-like icon that represents the main window, and two transparent blue cubes, the first a proxy for the application delegate, and the second representing the Font Manager. We do not use the Font Manager in this project.
At the top of the Interface Builder editor, you see the menu for your application, and if you hover your cursor over items in the Interface Builder editor dock, they identify themselves for you, as shown in Figure 15.4.
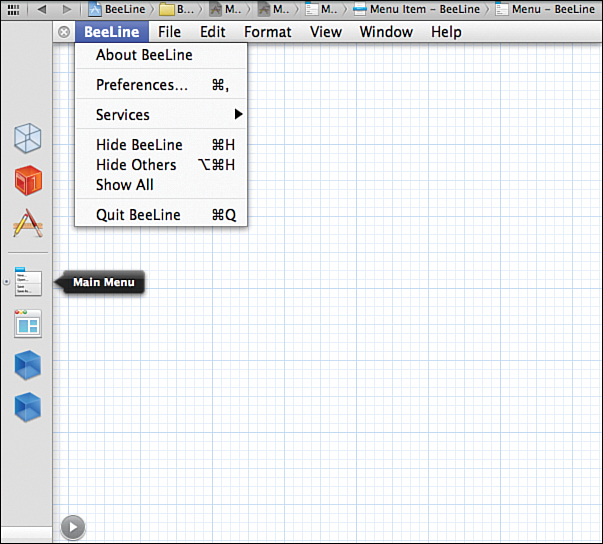
Figure 15.4. To find out what the items are in the Interface Builder editor dock, hover your cursor over them.
By the Way
Note the tiny dot to the left of the Main Menu proxy in the dock in Figure 15.4. This dot indicates that that interface element is currently displayed. You have to use the X (close) icon on an item that is displayed to hide it again.
If you click the next proxy down, the Window proxy, it opens in the Interface Builder editor window, as well, as shown in Figure 15.5. If you previously had one of the menus dropped from the menu bar, as I did in Figure 15.4, you need to click its title in the menu bar again to close it; otherwise, it will be open and might hide the application window you’re trying to edit.

Figure 15.5. The Window proxy also opens in the Interface Builder editor.
Now that you have the window displayed and ready to edit, you can start adding interface elements, as follows:
1. In the Utilities, click the little box icon, shown in Figure 15.6, to show the Object Library.
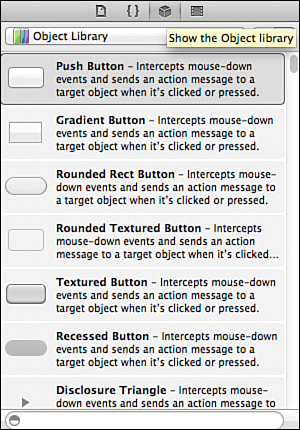
Figure 15.6. When you click the box icon, the Object Library displays.
2. We use a custom view in this project, so scroll down the Objects list until you see the Custom View item. Drag an instance of it into your interface. If you choose Layout Views from the Object Library drop-down list, you can find the Custom View somewhat more easily.
3. Position it in the interface as shown in Figure 15.7, and drop it there.
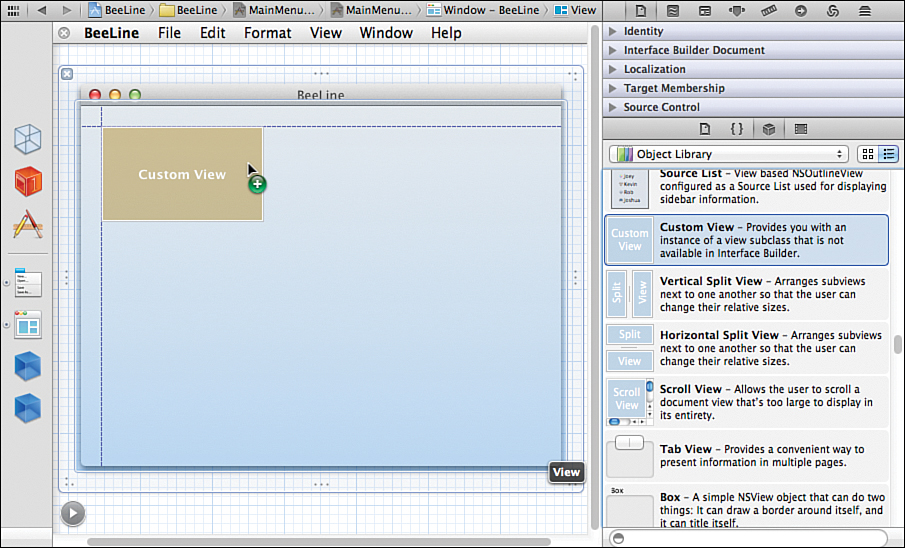
Figure 15.7. Position the Custom View item in your interface.
4. Drag the lower-right corner down to size it appropriately within the window, as shown in Figure 15.8. I am making mine 320x320.
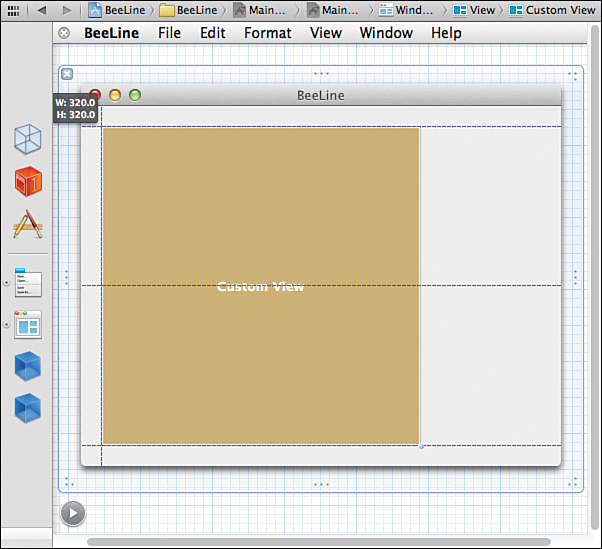
Figure 15.8. Sizing the custom view.
By the Way
Do not worry about ultimate precision in placing items in this view. The automatic guides and the notifier indicating the size are useful, but you can configure exact pixel-positioning values from a different panel in the Utilities. We look at that one when Xcode messes up the size on one of our text fields, later in this hour.
5. Now we need two Text Field and two Label controls, a Push Button control, and a Browser data view. You can find the Text Field, Label, and Push Button controls under Controls in the Object Library drop-down, and you can find Browser under Data Views. Find each of these and drag them in to the interface and position them as shown in Figure 15.9.
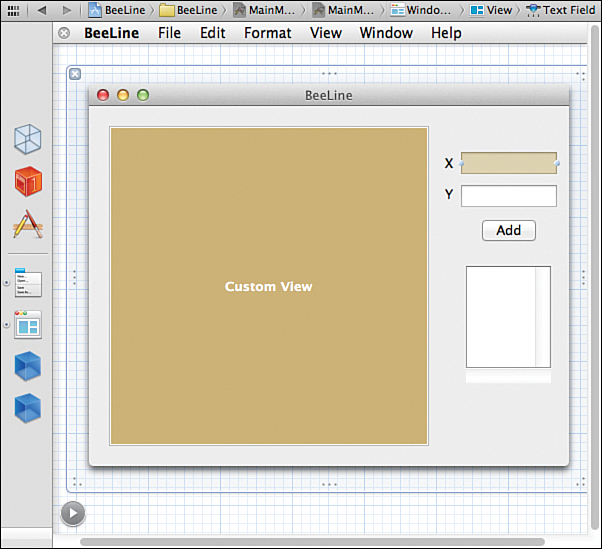
Figure 15.9. Adding two text fields, two labels, a push button, and a browser to the interface.
6. Select your first text field, and find the Attributes Inspector in the Utilities (also shown in Figure 15.9). The Attributes Inspector icon, if not obvious, looks a bit like a superhero’s utility belt. Use View, Utilities, Show Attributes Inspector as an easy way to make it visible.
7. In the Text Field area, enter a value into the Title field. While you are in this area, you can also assign text alignment, text color, and other properties for the text to be displayed.
When you press Return with your value in the Title field of the Text Field area in the Attributes Inspector, the Interface Builder updates its version of the text field to match the value. You might think that you should probably be able to edit this value directly in the Interface Builder editor itself. After all, you can click in the text field and enter a value. You probably should be right. Unfortunately, however, at least some of the time, if you try this, you’ll either end up editing the Text Field Cell rather than the text field itself, or you’ll edit the Text Field properly, but Xcode will decide to shrink your text field to fit your default value. Figure 15.10 shows the difference in the Interface Builder highlighting when you have accidentally selected the Text Field Cell, and Figure 15.11 shows what happens if Xcode shrinks your text field to match your default value.
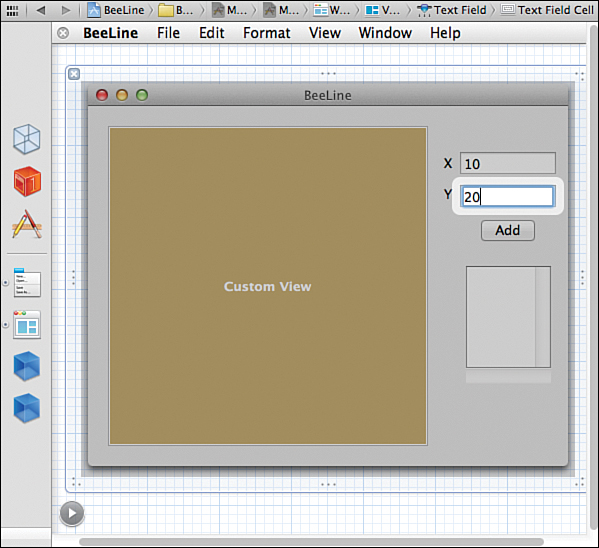
Figure 15.10. At least some of the time, when you click the text field in the Interface Builder editor, you end up editing the Text Field Cell rather than the Text Field.
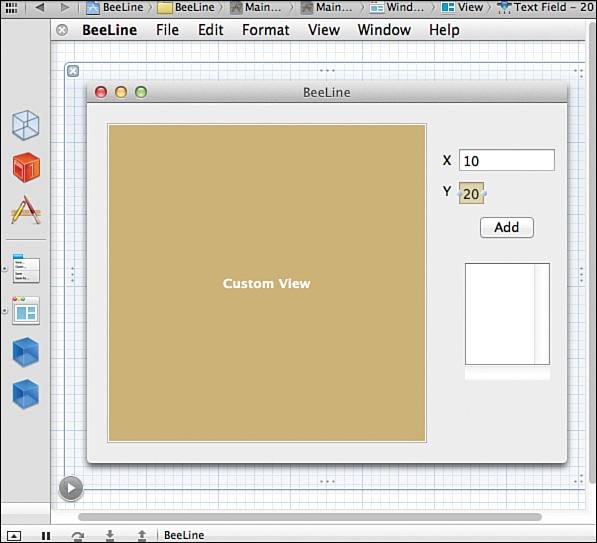
Figure 15.11. Xcode often automatically shrinks your text field to fit your default value when you edit the Text Field directly in the Interface Builder editor.
If Xcode messes up your nice layout like this (or if you need to apply finer control to your interface layout than you can accomplish by drag and drop), you can fix it using the Size Inspector, by clicking the icon in Utilities that looks a little bit like a Band-Aid (or by choosing View, Utilities, Show Size Inspector), as shown in Figure 15.12. Once in the Size Inspector, you can adjust the width of the field that Xcode accidentally shrunk to match the size of the remaining correct field.
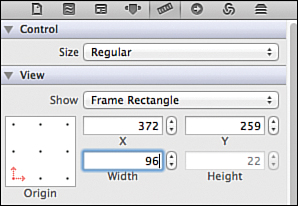
Figure 15.12. In the Size Inspector, you can adjust the width of the text field that Xcode previously adjusted.
Attaching Code
Now it is time to start building and assigning functionality to the interface elements. Because Cocoa interface components serve as the initiators of most of the functionality in Cocoa applications, you attach this functionality by creating Objective-C classes for each interface component that has complex functionality. For BeeLine, we start with the custom view, as follows:
1. In the Utilities, click the icon for the File Template Library, as shown in Figure 15.13. Somewhat surprisingly, it looks a bit like a file icon. You can also make this easier by choosing OS X from the File Template drop-down.
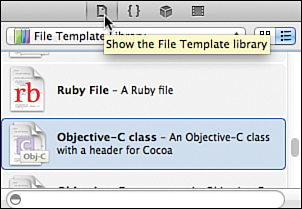
Figure 15.13. Opening the File Template Library.
2. Scroll down in the list of file templates until you find the Objective-C class template, and drag a copy of it over into the Navigator.
3. Drop it in the main application group, beneath your application proxy, as shown in Figure 15.14.
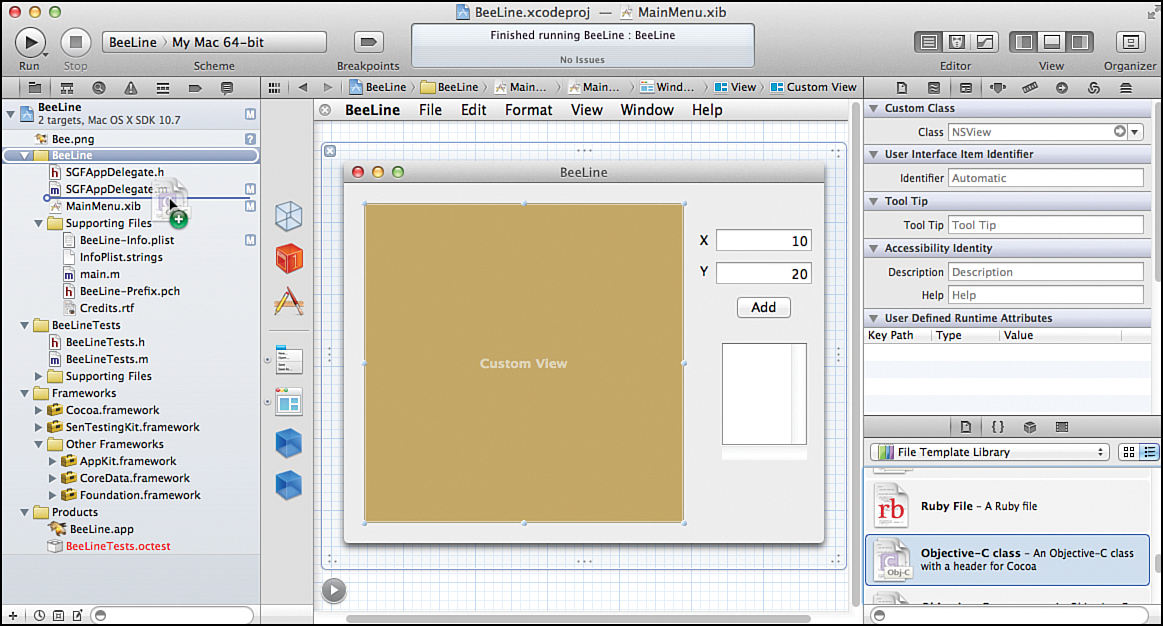
Figure 15.14. Dragging the Objective-C class template to the main application.
4. A dialog pops up, as shown in Figure 15.15, in which you assign a name under which to save your file, the group in which to assign it, and the targets to which it belongs. I named my class QuartzGrough.
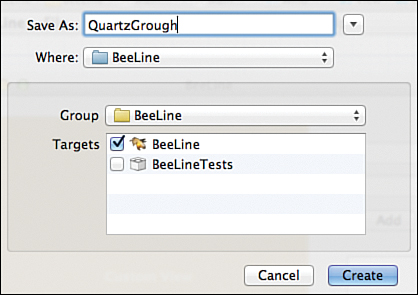
Figure 15.15. Assigning a name, group, and targets to the file that you just dragged in to the main application.
Did You Know?
If you’re paying attention, you’ve just caught me ignoring the “always use your unique private class prefix” mantra that I suggested you adhere to earlier. Partly I’m doing this because you’re going to meet lots of lazy code where that naming best practice hasn’t been obeyed, so you ought to get some experience seeing the mishmash, and partly I’m doing this because Xcode has some nice tools for helping you fix this kind of sloppiness (which you learn how to use later).
5. Select the .h file for your class in the Navigator. It will open for editing in the main Editor area. By default, it is going to #import Foundation.h, and it will declare an NSObject class. We’re going to attach this class to our custom view, so we need the class declaration to match.
6. To find out the appropriate class, select your NIB file in the Navigator, click the Window proxy in the Interface Builder editor dock if it is not already visible, and then select Custom View on the main window of the interface.
7. Now go to the Utilities and click the Identity Inspector icon, as shown in Figure 15.16. This icon looks a little bit like an application window. In the Class field under Custom Class, you’ll see that the custom view is specifically an NSView (also shown in Figure 15.16). Or, choose View, Utilities, Show Identity Inspector.
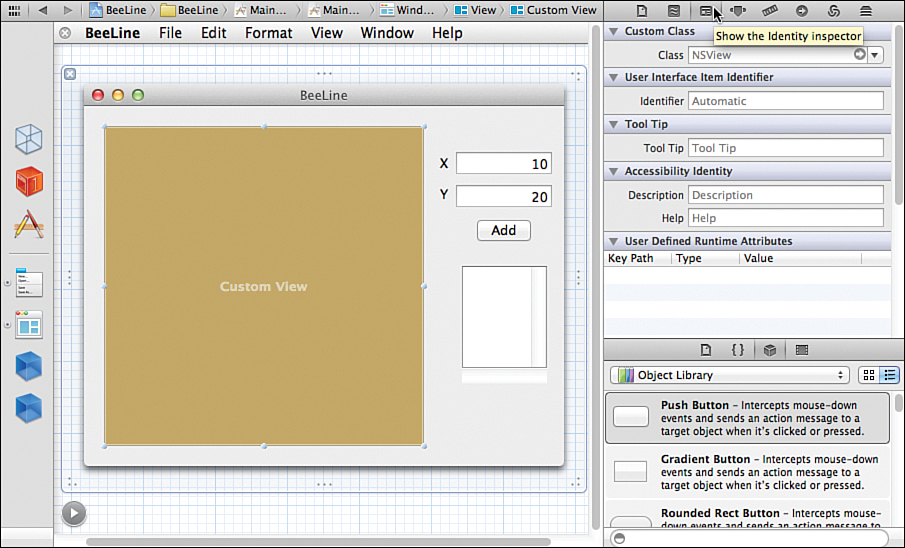
Figure 15.16. In the Identity Inspector, we see that the custom view is an NSView.
8. Use the Navigator to return to editing your new class .h file, and change the NSObject declaration for the class to an NSView declaration.
9. Also change the #import to load Cocoa.h rather than Foundation.h, as shown in Figure 15.17.
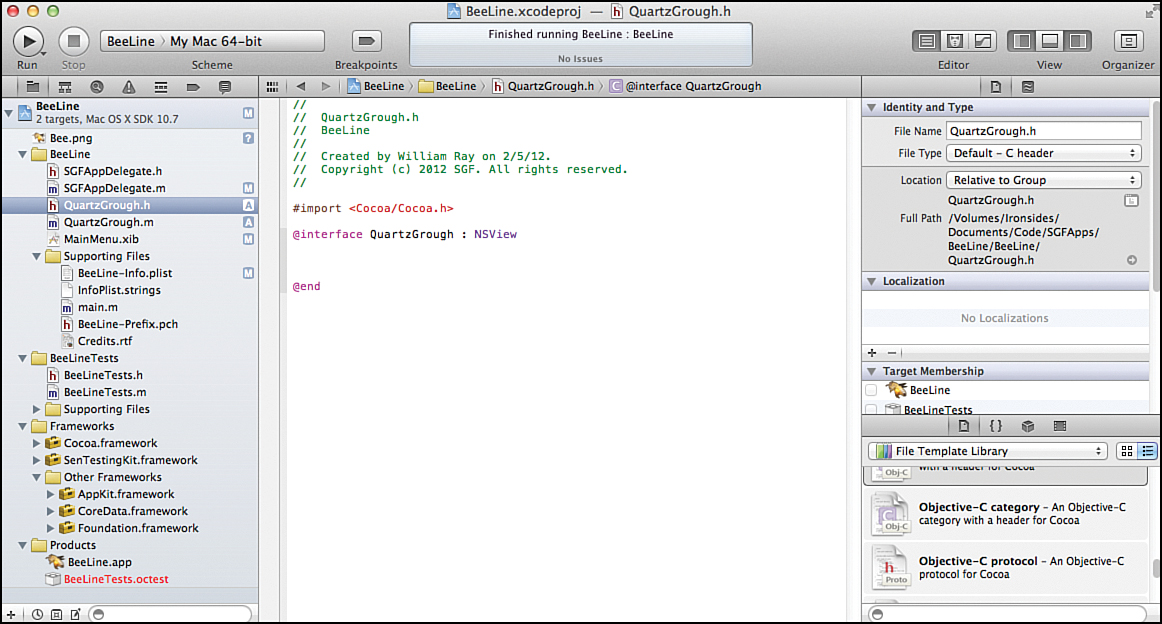
Figure 15.17. We have changed the NSObject declaration to NSView and the Foundation.h #import to Cocoa.h.
10. Switch back to editing the NIB file and select Custom View again.
11. Bring up the Identity Inspector in the Utilities. Remember that the Custom View region is an NSView, and you’ve just declared your class to inherit from NSView, so you can use your class to run the custom view.
12. To attach the custom view to your class, change the class for the custom view so that it uses your class rather than the default NSView. Click in the Class field under Custom Class and find your new class in the list. Select it, as shown in Figure 15.18, and you should see the custom view change name to match the class you’re writing.
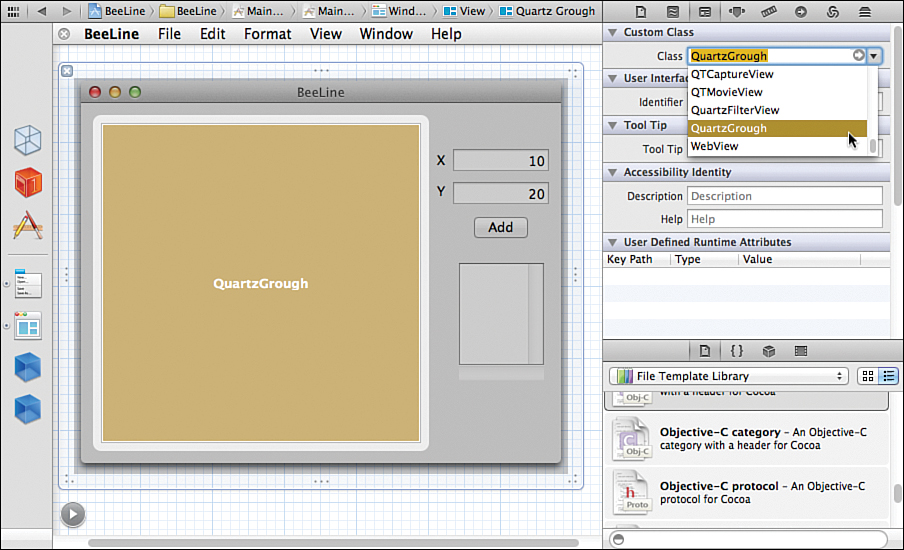
Figure 15.18. Changing the default NSView class to our custom class.
Build and run your application, and you should see a surprisingly functional replicate of the interface you just designed. The menus are there, you can edit text in the text fields, and the button “clicks.” Of course, nothing happens when you click the button because you have not written the code to add functionality yet. But, quite a lot of your application is already working, and all via just for a couple lines of code and dragging some icons around.
Despite everything that’s going right with your application so far, if you try to resize your application’s window, you’ll see that some issues are still left to address, as shown in Figure 15.19. Specifically, the interface components are where they belong at the default window size, but they do not move and scale appropriately when you resize the window.
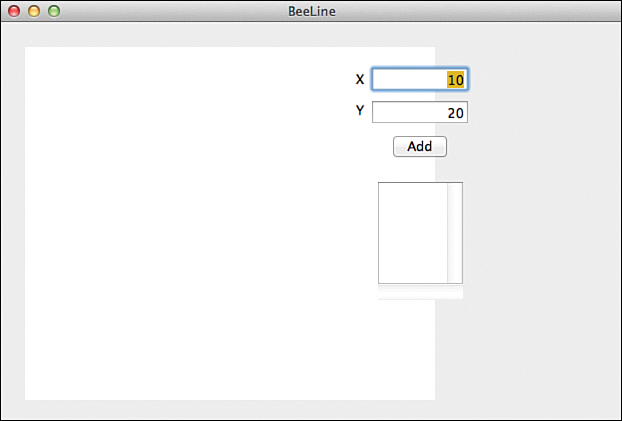
Figure 15.19. Interface components are not where they should be if we resize the window.
So, return to the Size Inspector in the Utilities, and under the View heading, adjust the autosizing parameters as appropriate for where you’ve positioned your interface elements.
With where I positioned my X and Y coordinate text fields I want them to stay glued at a fixed distance from the right side of the window and at a fixed distance from the top of the window. I do not want them to resize, just move with the window boundaries. This configuration is applied to both my X and Y coordinate text fields in Figure 15.20, and the result on the interface is shown. You should apply similar settings to the other interface elements so that they behave more appropriately.
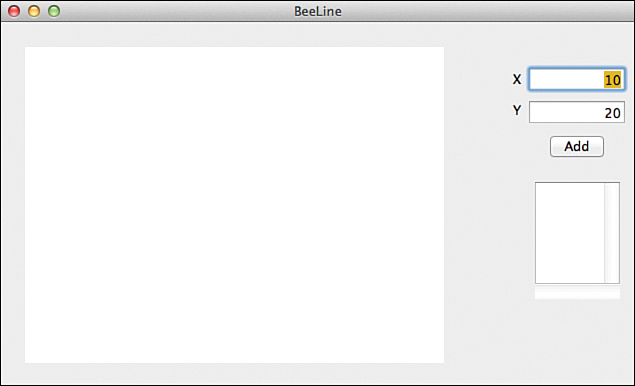
Figure 15.20. After we adjust settings in the Size Inspector, the text fields stay a fixed distance from the window boundaries.
Inserting Interface Object References into the Code
Now that we have the class types in agreement between our new class and the custom view, it’s time to give the code a handle on the interface object:
1. Select the NIB file in the Navigator to open your interface in the Interface Builder editor once again.
2. Click the Assistant Editor icon in the top icon bar of the main Xcode interface. You can find the Assistant Editor icon in the group of three editor icons at the top right; it looks either like a butler’s shirt or one of those gigantic pay-per-view binoculars that line scenic vistas at tourist traps. The source editor opens beside the Interface Builder editor. Both are cramped in the central main Editor area in Xcode, so you might want to hide the Navigator and Utilities to win some extra room to work. Alternatively, choose View, Assistant Editor, Show Assistant Editor.
In the source editor, you should see the header file for your application delegate. This is where you need to declare the (in-code) objects that will correspond to the interface objects you have created in the Interface Builder editor. You can do this by writing all the associated code yourself, but it is much easier to simply Control-drag your interface elements into the application delegate header file, positioning them after the @property declaration for the window.
3. Add a #import “QuartzGrough.h” line, and a @class QuartzGrough; line following it, after any other #import statements in the app delegate header.
4. Starting with the QuartzGrough view, Control-drag each of the interface components from the interface into the application delegate header file in the Assistant Editor.
Figure 15.21 shows the beginning of this process for the QuartzGrough view. To help you remember which interface component you’re working with, as you drag, a blue line connects the interface component you’re connecting and your current drop target. After you drop the connection into the .h file, a mini-dialog opens, requesting additional details, as shown in Figure 15.22. For the view, we’re creating an outlet, which is to say an element from which data can be read and written. I’m calling it myGroughGraph. The QuartzGrough type is assigned by default.
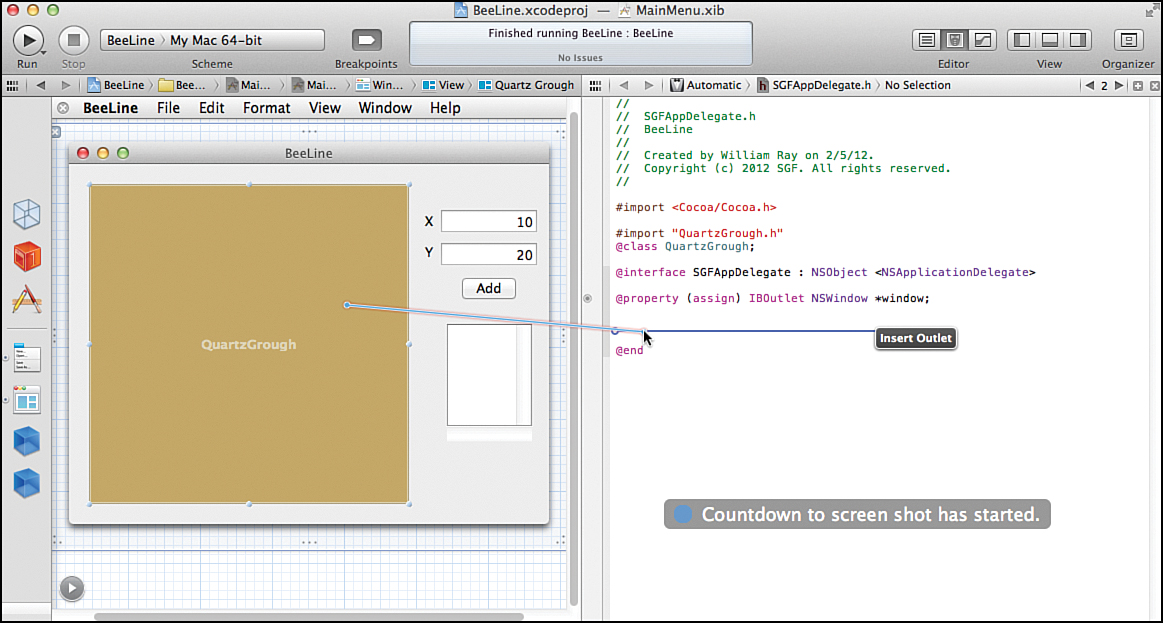
Figure 15.21. You can declare interface objects in code by Control-dragging to the appropriate interface component.
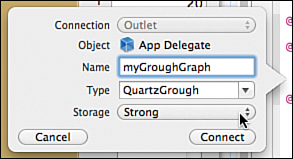
Figure 15.22. Providing Xcode additional details for the interface object code.
5. Leave Storage set to Strong unless you know when and why not to.
6. After you have the details filled in correctly, click Connect. An @property for your new outlet will appear in the header file.
7. Unless you want to do something fancy, the default functionality of the NSTextFields in your text fields will suffice, so just Control-drag those over to the application delegate header without creating new classes for them. Figure 15.23 shows the settings I used for one of my text fields. The other one is the same, except it is named YCoord.
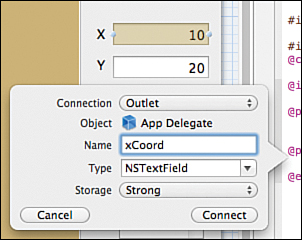
Figure 15.23. For the X and Y coordinate boxes, the default NSTextField should be fine.
Did You Know?
Pay attention when selecting the text fields. Just like when you entered default values for the text fields, it is easy to end up selecting the NSTextFieldCell rather than the NSTextField. If this happens to you, you’ll see something similar to Figure 15.24 when you drop the connection in the header. The highlighting around the text field in the interface is distinctly different, and if you’re paying attention you’ll see that the outlet dialog also reflects that you’re creating a connection for the wrong type.

Figure 15.24. Be careful when selecting the text fields, because you could end up selecting the NSTextFieldCell rather than the NSTextField.
We’re going to ignore the browser for now and come back to create a connection for that later, so the last thing you need to connect is the button. The button interface object differs from the view and the text fields, in that it is a direct-acting object that needs to invoke a method immediately when you click it, rather than a passive object that simply sets or displays the contents of a variable.
8. Control-drag and drop the button into the header, as you have for the view and text field elements.
9. In the mini-dialog that appears, you need to change the Connection type from Outlet to Action and specify a name, as shown in Figure 15.25.
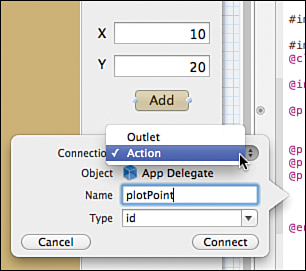
Figure 15.25. When setting up the button, choose the Action connection type and name it whatever message you want to appear when the button is clicked.
The name you provide corresponds to the message that the button will send to the application delegate when the button is clicked, so I’m calling my action plotPoint.
10. Click Connect. Note that it creates the declaration for an instance method of type IBAction in the application delegate header.
11. Select the implementation (.m) file for the application delegate in the Navigator.
You will see that a number of @synthesize directives have been added at the top to match the outlets you declared in the header. At the bottom of the file, you see that Xcode has inserted a default method implementation for your action.
12. To finally achieve some not-so-instant gratification that all this clicking and twiddling is actually doing something, add an NSLog() call as something for the plotPoint action to do. It is not quite plotting a point, but it will be gratifying to see that clicking the button actually can do something other than make the button turn blue. The code added to the plotPoint action, the BeeLine interface during a button click, and the resulting output in the Debug area are shown in Figure 15.26. Houston, we have click-off.
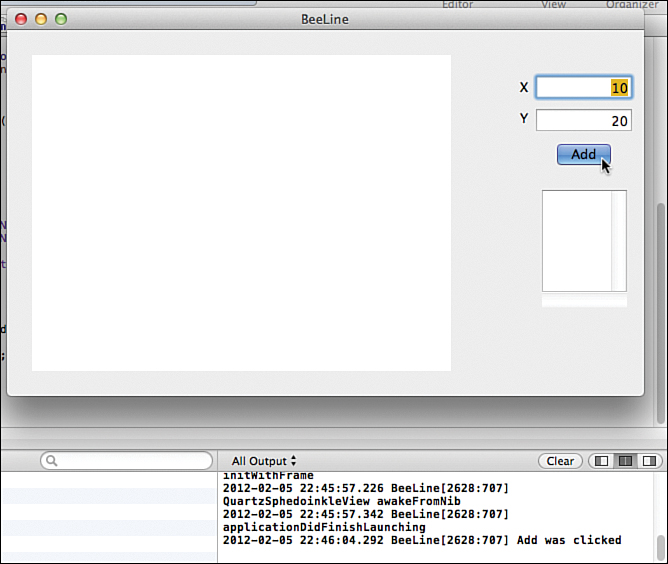
Figure 15.26. With the addition of NSLog() to the code, when we click the button, it not only turns blue, but also provides output that we have clicked the button.
Tying Things Together
Now we want to make our main interface actually do something with the interface components that it knows about. Right now, the application delegate knows the contents of the text fields and knows that the View area belongs to a QuartzGrough named myGroughGraph.
To communicate these values from the application delegate into our QuartzGrough, and invoke a method there when the push button is clicked, we need additional code. In QuartzGrough.h, we need to declare some properties that can move Cartesian coordinates in and out of myGroughGraph and a method that can be called to ask myGroughGraph to take action. We can do that that by adding properties to QuartzGrough named anX and anY, and an instance method plotUpdate. In QuartzGrough.m, we need to implement that function so that it can do something when asked. Finally, in the application delegate, within the IBAction method for the button, we need to collect the values from the text fields and assign these values into our QuartzGrough variables, and then we need to set up a call to ask the QuartzGrough method to do something. The code snippets for each of these steps are shown in Listings 15.1, 15.2, and 15.3, respectively.
Listing 15.1. The Header Additions That Enable External Code to Communicate with a QuartzGrough Instance
@property (assign) float anX;
@property (assign) float anY;
- (void) plotUpdate;
Did You Know?
In Listing 15.1, you can see that I’ve added anX and anY properties, but that I immediately assign those into other variables in Listing 15.2. Although some additional code is necessary to make this design completely useful, I’m doing this to separate the “interface” to the QuartzGrough from the internal variables it uses for calculations. I only want anX and anY to function as an interface that other classes can write data into and that QuartzGrough can read data from. I assign these into internal instance variables normX and normY as soon as plotUpdate gets them, to free up the interface.
Listing 15.2. An Implementation of the plotUpdate Method
-(void) plotUpdate
{
normX = anX + 1.0;
normY = anY + 1.0;
[self update];
}
To use these interface variables and methods, the application delegate communicates with the QuartzGrough instance by setting the anX and anY instance variables in the QuartzGrough and then sending a message to the QuartzGrough’s plotUpdate method.
Listing 15.3. The App Delegate Code Necessary to Communicate Coordinates and a Request to Plot to the QuartzGrough
- (IBAction)plotPoint:(id)sender
{
myGroughGraph.anX = [[xCoord stringValue] floatValue];
myGroughGraph.anY = [[yCoord stringValue] floatValue];
[myGroughGraph plotUpdate];
}
Once again, it is time to test the application. So, click Run. When the interface opens, type some values into the text fields and click the Add button. As shown in Figure 15.27, the Debug area output demonstrates that the application delegate is receiving the button-click and reporting it (“Add was clicked”), and it is then immediately calling the QuartzGrough method in myGroughGraph (AnX = ...). My variables appear to be arriving in the QuartzGrough intact, as the values it is reporting are what I entered.
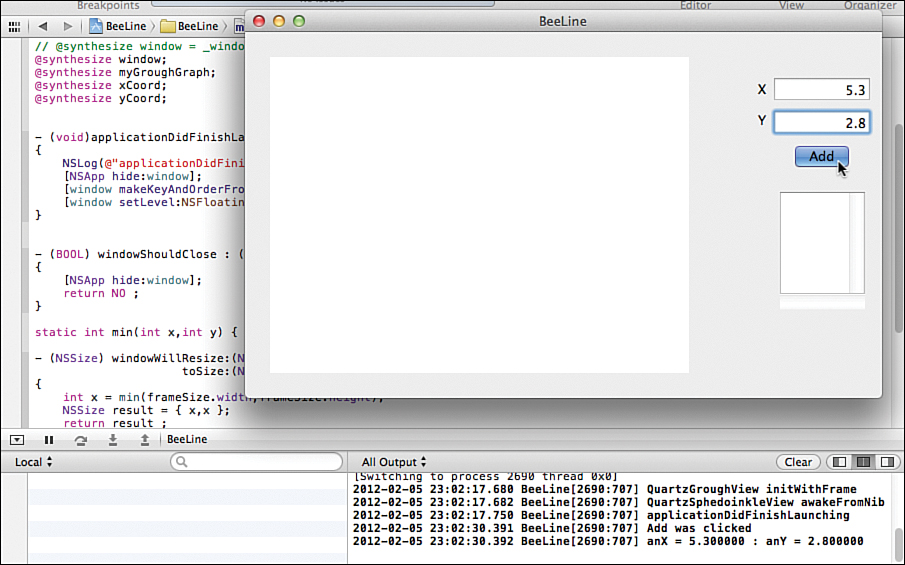
Figure 15.27. Testing shows that the variables are working correctly, as the values agree with what was entered.
Without detailing the rest of the code here (you can find a copy in the Hour 15 (V1) subdirectory of the code available at http://teachyourselfxcode/), if you add graphics-drawing code to the GroughGraph.m implementation, and call it from plotUpdate, you’ll actually have a program that takes user input from you and plots it in the view, as shown in Figure 15.28. Okay, so it is not quite App Store material yet, but when you stop to consider just how much functionality this represents, and how few lines of code are required to produce the results, it is really quite impressive.
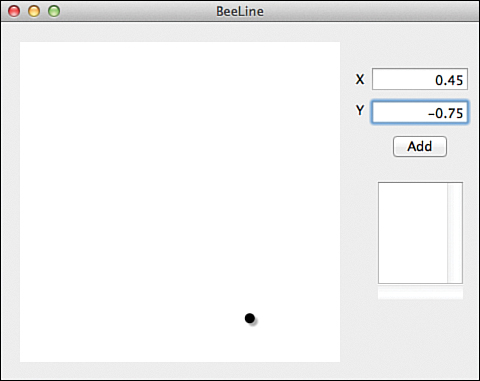
Figure 15.28. Our application can now draw some graphics.
Increasing Functionality with a Framework
Plotting a point at some coordinates we specify is neat, but just one point in the display gets kind of boring. What we have at the moment is essentially a view and a controller, with no underlying model to hold data. To enhance functionality, we need a storage mechanism for the data we enter. It should support adding items and traversing through an ordered list of items from start to finish. Functions to insert and delete items would probably be nice, too. We could write a custom class for that model right here in our code, but coincidentally, in the last hour we built a framework that supplies a linked list class, and it provides exactly the sort of functionality we need.
Adding a framework to a project so that you can use its functionality is fairly simple (although, again, Apple has not quite yet pulled all the loose ends together in Xcode, so it is not as simple as it could be), but you can accomplish this in a couple of different ways, and the process differs depending on what kind of framework you have.
Adding a Shared Framework
If your framework is a shared framework (that is, one that is available for all installed software to use; for example, in /Library/Frameworks), the process for adding it to your project begins in the Summary tab for your project. I previously installed the doubly linked list we created in Hour 14 as a shared library in /Library/Frameworks as the framework ListsToo.framework.
To add a shared framework, follow these steps:
1. To add ListsToo.framework to the BeeLine project, select the top-level Project icon in the Navigator.
2. Select your application from the Targets list in the Editor area.
3. Click the Summary tab. Beneath the version and icon details for your application target, you’ll see a Linked Frameworks and Libraries section with a + icon beneath it to add items.
4. Click the +, as shown in Figure 15.29. A dialog opens, like that shown in Figure 15.30.
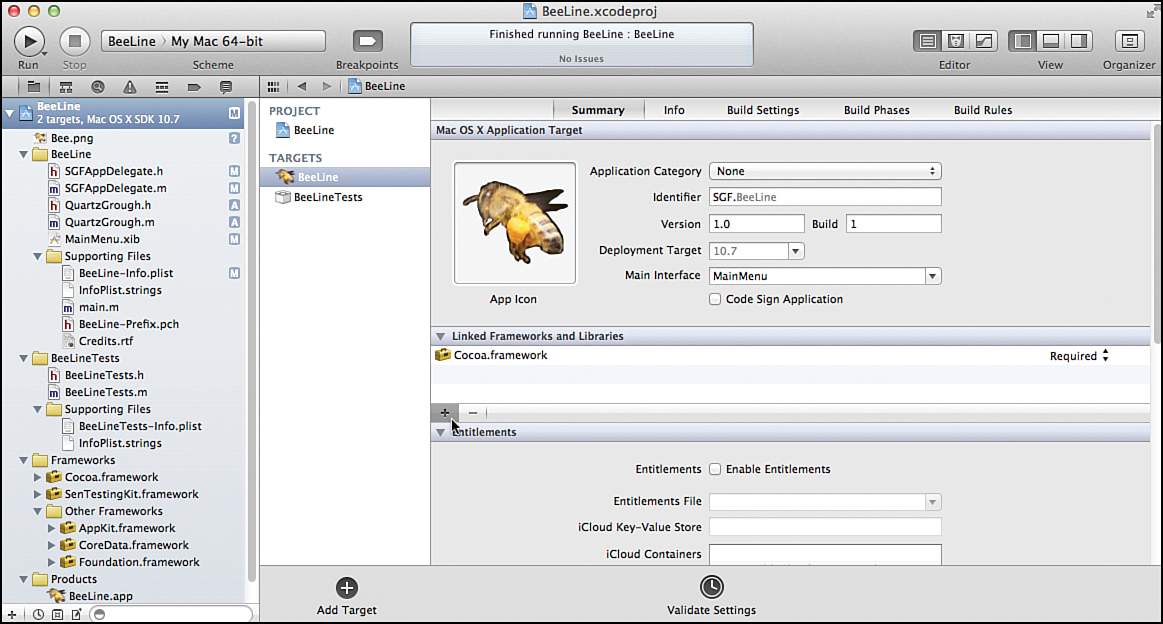
Figure 15.29. Clicking the + to add our shared framework to the project.
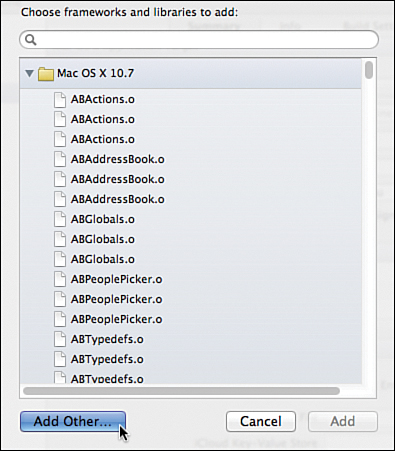
Figure 15.30. In the dialog that appears, click the Add Other button.
Unfortunately, frameworks that are not either default Apple frameworks or ones that are actually present in your project will not show up in the list, so instead of being able to simply select from this list, you must navigate to where your framework is located.
5. Click the Add Other button. When you do so, a file-browser dialog opens. Again, unfortunately, Apple has made the /Library folder hidden by default, so you cannot easily browse to it.
6. Press Command-Shift-G to open a path-entry field.
7. Type /Library/Frameworks into the Go to the folder: field, and then click Go, as shown in Figure 15.31.
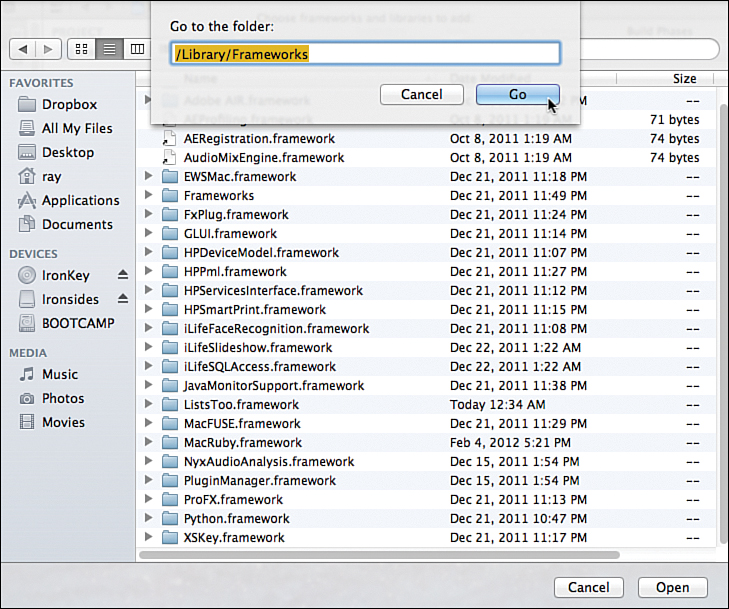
Figure 15.31. After typing Command-Shift-G, enter the path to your shared framework.
8. Navigate to and select the ListsToo.framework from the file browser.
9. Click Open.
If you’ve done everything right, back in the Summary tab, you’ll find ListsToo.framework has been added to the list of Linked Frameworks and Libraries
Next, we need to connect the functionality from ListsToo into our application code. This is quite easy. Just add an #import for <ListsToo/ListsToo.h> to the GroughGraph.h header file, and all the exposed method interfaces in ListsToo become available to BeeLine. A simple declaration of a pointer to a ListsToo object at the top of the GroughGraph.m implementation, and Beeline now has a handle to ListsToo that can be populated by a ListsToo instance.
To utilize this instance, we just need to treat it as we previously did for testing ListsToo in its testing module. We need to create objects that store our data, in this case X and Y coordinates for Cartesian points, acquire pointers to those objects, and populate the ListsToo item void* storage with these pointers.
Listing 15.4 shows the code necessary to start using the ListsToo framework for storing the pair of values from our X and Y text fields each time we click the Add button. The only real complication beyond what you saw when implementing ListsToo in Hour 14 is that we cannot initialize the first ListsToo item until after we have received our first Add click.
To accomplish this delay, I added a Boolean-valued “plotting” variable to QuartzGrough that is initialized to false when an instance is created. The plotUpdate method (which eventually is invoked when Add is clicked) checks that variable, and if it has not yet been flipped to true, it initializes the ListsToo list with the incoming X and Y values, and then flips the plotting variable to true. Subsequent clicks on Add (and calls to plotUpdate) find “plotting” to be true and append to the ListsToo list instead of initializing it.
Figure 15.32 shows the result after entering two different pairs of values and clicking Add twice. Note that you now see output from the ListsToo walkList method in the Debug area, as well, and that it is reporting that we have a list with two items in it.
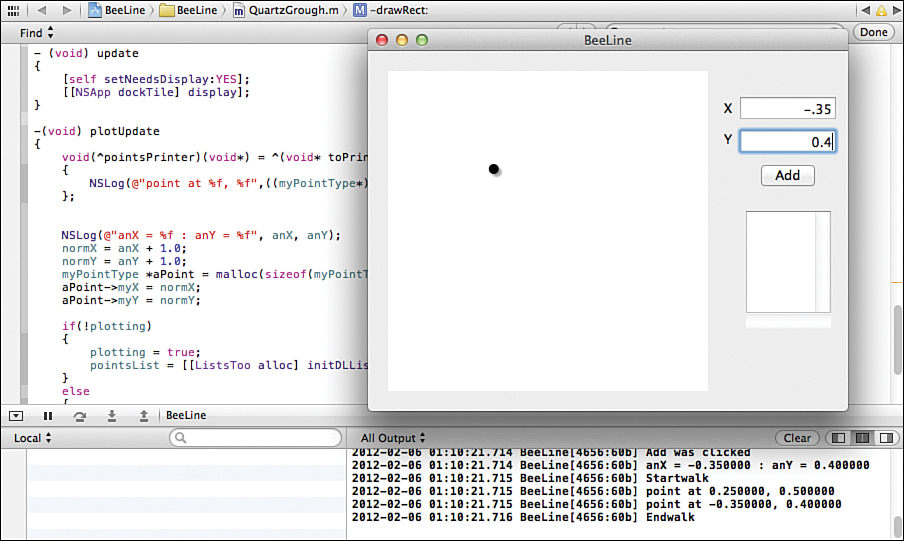
Figure 15.32. Here we have entered two different pairs of values and clicked Add twice.
Listing 15.4. Enabling QuartzGrough.m to Use the ListsToo Framework
typedef struct myPointType myPointType;
struct myPointType {
float myX;
float myY;
};
ListsToo *pointsList;
bool plotting = false;
-(void) plotUpdate
{
void(^pointsPrinter)(void*) = ^(void* toPrint)
{
NSLog(@"point at %f, %f",((myPointType*)toPrint)->myX - 1.0,
((myPointType*)toPrint)->myY - 1.0);
};
normX = anX + 1.0;
normY = anY + 1.0;
myPointType *aPoint = malloc(sizeof(myPointType));
aPoint->myX = normX;
aPoint->myY = normY;
if(!plotting)
{
plotting = true;
pointsList = [[BetterList alloc] initDLList: aPoint];
}
else
{
[pointsList append:aPoint];
}
[self update];
[pointsList walkList:pointsPrinter];
}
A little detail here might slip by you. Don’t let it. We’re using the walkList method. While implementing the ListsToo framework, we used it for debugging output, but methods that take anonymous code blocks like this are quite powerful, and certainly aren’t limited to simple debugging output. You can use the walkList method for just about anything where you need to iterate over the entire list and do something with each item.
BeeLine is still only plotting one of the points, but that’s only because the QuartzGrough drawRect method does not know anything about the list of points yet. It’s still working from the current normX and normY variables that are passed in from the text fields. If we update the drawRect code as shown in Listing 15.5, fancier things will happen, as shown in Figure 15.33.
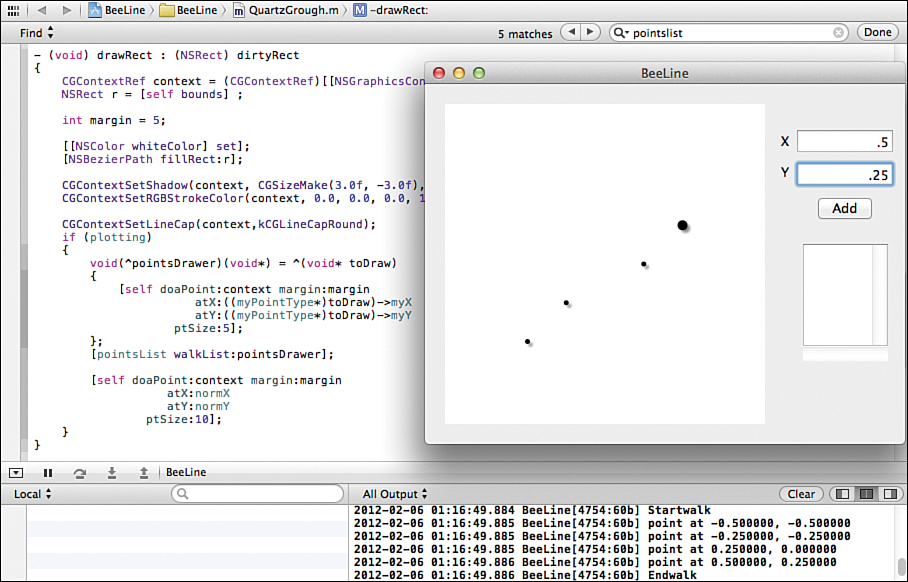
Figure 15.33. After updating the drawRect code, we now have four dots in this instance.
In Listing 15.5, you see that you can update the drawing code to plot all points in the pointsList by just using the ListsToo walkList iterator and handing it an anonymous block that renders the points. Note that this is a fairly subtle change to the code. Where before drawRect used a single invocation of doaPoint, sending the current values of normX and normY, we now build a strikingly similar invocation of doaPoint into an anonymous code block, and we hand that block off to the ListsToo walkList method. When the list iterates over itself, it calls our anonymous block for each point for us (quite a convenience). We’re invoking doaPoint one extra time after traversing the entire list of points, using a different point radius, just to provide some visual context to our point display.
Listing 15.5. Using the ListsToo walkList Iterator and Handing It an Anonymous Block
- (void) drawRect : (NSRect) dirtyRect
{
CGContextRef context = (CGContextRef)[[NSGraphicsContext currentContext] graphicsPort];
NSRect r = [self bounds] ;
int margin = 5;
[[NSColor whiteColor] set];
[NSBezierPath fillRect:r];
CGContextSetShadow(context, CGSizeMake(3.0f, -3.0f), 2.0f);
CGContextSetRGBStrokeColor(context, 0.0, 0.0, 0.0, 1.0);
CGContextSetLineCap(context,kCGLineCapRound);
if (plotting)
{
void(^pointsDrawer)(void*) = ^(void* toDraw)
{
[self doaPoint:context margin:margin
atX:((myPointType*)toDraw)->myX
atY:((myPointType*)toDraw)->myY
ptSize:5];
};
[pointsList walkList:pointsDrawer];
[self doaPoint:context margin:margin
atX:normX
atY:normY
ptSize:10];
}
}
Just a few more lines of code and you can have BeeLine drawing lines between the points, as well. If you want to experiment with the project at this stage, you can find a copy in the Hour 15 (V2) subdirectory of the code available at http://teachyourselfxcode.com/.
Adding a Second View
Right now, you have an application with an underlying data model (an instance of ListsToo) that holds and manipulates a list of points, a view (our QuartzGrough subclass of NSView) that plots those points, and a controller instantiated in your application delegate. When you built the interface, however, you included a browser component that we have not yet discussed. The browser component is there to provide a second view of the model, but it still needs to be connected.
As was the case for the QuartzGrough, connecting this view requires a fair amount of flipping between items in the Interface Builder editor. We do it slightly differently this time, however. When we connected the QuartzGrough, we only intended for it to be used as a display for the data, and it was our only view in the application. Therefore, subclassing the NSView in QuartzGrough and connecting it through the application delegate was an adequate solution. For our new view, we want to develop additional interaction functionality beyond using it as a simple display, and adding that code to the app delegate would be inelegant. So for this interface component, we create a separate delegate class and that requires a few more steps.
Just as you did with the QuartzGrough, you first need to add a class to handle the view, as follows:
1. Follow the same steps you used to create the QuartzGrough header and implementation files and create a new PointsBrowser class.
2. Select your NIB file in the Navigator. Because interface elements are connected to code by Control-dragging, we need a representative for our new class in the Interface Builder editor, but there isn’t one provided by default.
3. Reveal the Utilities if they’re hidden, and select the Object Library (again, the little box) icon.
4. Find the object proxy for an NSObject; it looks like the other blue proxy object box icons that are in the Interface Builder editor dock.
5. Drag it over to the dock, as shown in Figure 15.34.
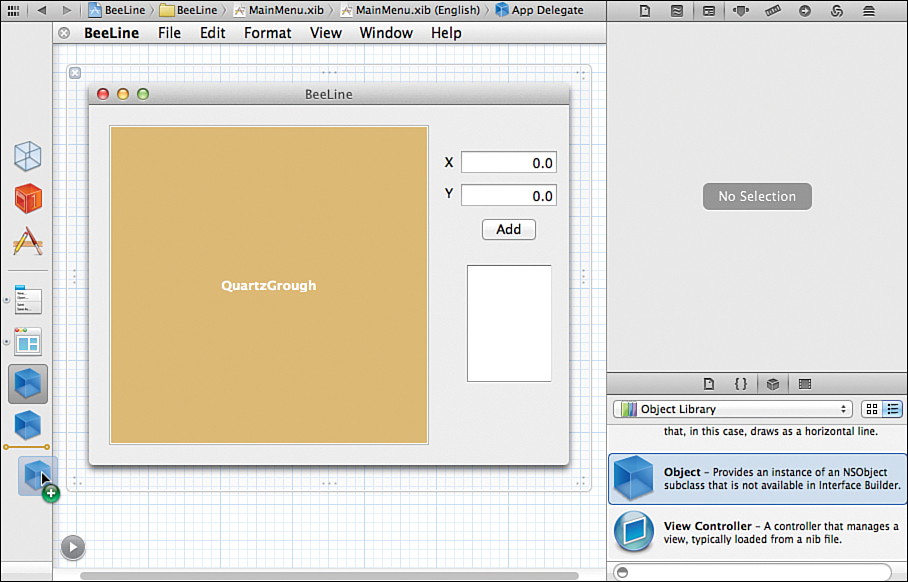
Figure 15.34. Adding the NSObject proxy to the Interface Builder editor dock.
6. Leaving that proxy icon selected in the dock, select the Identity Inspector in the Utilities, and find the new class you just created, as shown in Figure 15.35.
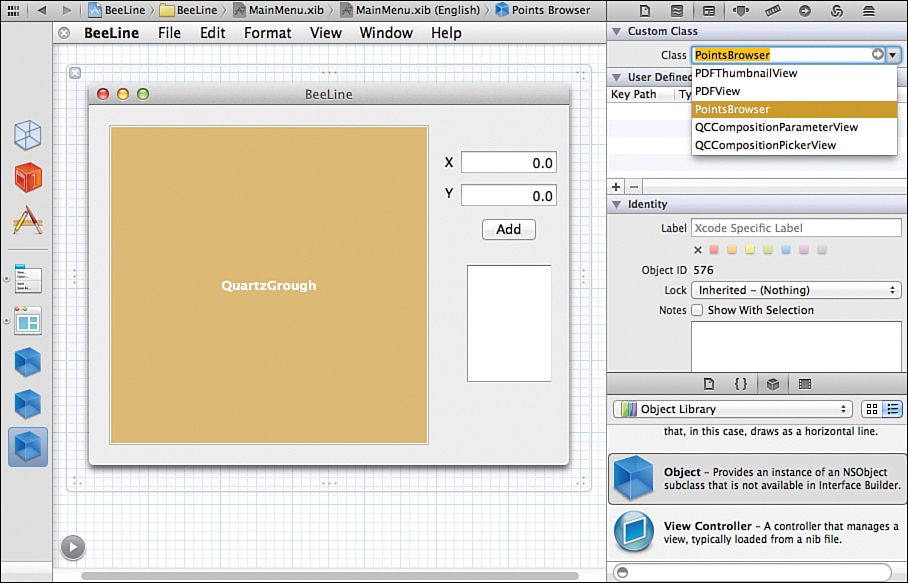
Figure 15.35. Finding the new class in the Identity Inspector while selecting the proxy icon in the dock.
7. Control-drag from the Browser component in the interface and drop it onto the new proxy you just created in the Interface Builder editor dock. In the tiny dialog that appears, indicate that this connection is for a delegate.
Back in your app delegate, you need to add appropriate @properties and @synthesize lines to the header and implementation, but these need to be created for your PointsBrowser delegate object, not for the NSBrowser it represents.
8. Open the NIB file in the Editor area, and open the Assistant Editor window. The app delegate header should open beside the Interface Builder editor.
9. Control-drag the blue-box proxy icon for your PointsBrowser class over to the app delegate header and drop it below your other @properties directive lines.
10. The familiar connection-property dialog pops up, where you provide a name and optionally set the storage type. In this case, either weak or strong storage is fine. I named the property ptsBrowser and set the storage type to strong.
By the Way
Although a much better topic for an Objective-C book, a weak storage type indicates that the Automatic Reference Counting (ARC) memory-cleanup magic should treat this property as owned by some other object than the application delegate. The strong type indicates that the app delegate is the owner. Because the program cannot run after the application delegate is deallocated, it really doesn’t matter whether ARC thinks that something else owns the browser object. If, however, you were attaching the browser to, for example, a window that might close, while another window adopted the same browser, the weak storage would let you manage the allocation and deallocation of the browser separately from the creation and destruction of the windows.
11. While you’re looking at the app delegate header, add an #import for the header for your new class (#import “PointsBrowser.h”).
12. Also add the class to the @class directive for the App delegate.
13. Right-click the proxy icon for the PointsBrowser class in the Interface Builder editor dock.
14. In the heads-up dialog (HUD) that appears, click and drag from the open circle in the New Referencing Outlet line up to the app delegate proxy in the dock, as shown in Figure 15.36.
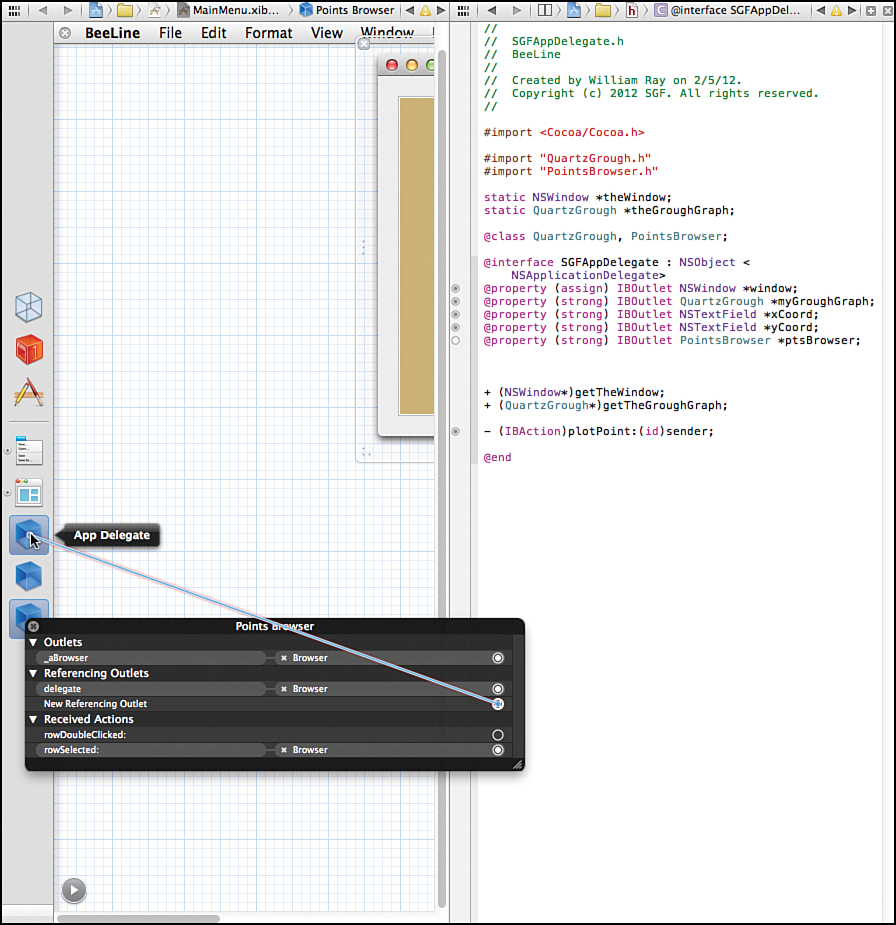
Figure 15.36. Clicking and dragging the New Referencing Outlet to the app delegate proxy in the HUD.
15. Another HUD appears. In it, select the name of the property you just added to the app delegate for this object (in this case, ptsBrowser).
Finally, you need to set up the outlet connection between the NSBrowser and the PointsBrowser delegate itself.
16. With the Interface Builder editor and the Assistant Editor still open, click in the jump bar above the display of the app delegate header and navigate your way to the PointsBrowser.h header.
17. Control-click and drag from the NSBrowser component in the interface into the PointsBrowser.h header to create an outlet connection.
18. Give the outlet a name and choose a storage type. (I chose _aBrowser and strong storage.)
After all of this fiddling, which is certainly more involved than what we did to get the NSView working, but which also gives us more flexibility, we are finally ready to start connecting data and actions to our browser.
19. Use the Navigator to open the PointsBrowser.m implementation file.
20. Scroll down to just above the @end directive and define a new IBAction method as shown in Listing 15.6. This method explicitly declares an Interface Builder action type that we can then connect things to using the Interface Builder editor.
Listing 15.6. Declaring a Method with an IBAction Type Makes It Available as a Connectable Action Method in the Interface Builder Editor
- (IBAction) rowSelected: (id)sender
{
NSBrowserCell *cell = [_aBrowser selectedCellInColumn: 0];
NSLog(@"ptsBrowser: selected <%@> at %d",cell.stringValue,
[cell.representedObject intValue]);
}
21. Navigate to the PointsBrowser.h header and add the declaration for the rowSelected method so that it can be called by other classes.
22. Select the NIB file in the Navigator and return to the Interface Builder editor.
23. Right-click the proxy for PointsBrowser in the Interface Builder editor dock. You’ll see that you now have an available Received Action for the new rowSelected IBAction you just created.
24. Click in the empty circle in the rowSelected line.
25. Drag a connection to the browser component of the interface and drop the connection there.
The code necessary to actually program the behavior of the NSBrowser requires more Cocoa expertise than possible to cover in this book. However, if you want to experiment further, you can find a copy in the Hour 15 (V3) subdirectory of the code available at http://teachyourselfxcode/. When you run it, you’ll find that the NSBrowser populates itself with points as you add them, as shown in Figure 15.37, and the Debug area properly reports selections from the NSBrowser, as shown in Figure 15.38.

Figure 15.37. NSBrowser has been programmed to populate itself with points as you add them.
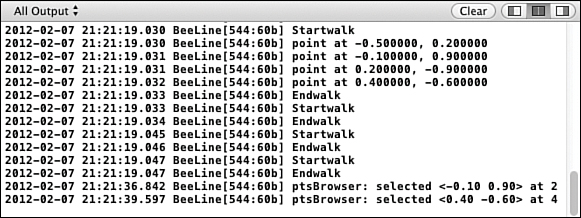
Figure 15.38. Debug output reports the correct points from the NSBroswer.
Did You Know?
One thing to pay attention to in the sample code is how the PointsBrowser class gets access to the ListsToo instance being used by the QuartzGrough. Although not the most elegant solution, the app delegate has access to both the myGroughGraph instance of QuartzGrough, and the ptsBrowser instance of PointsBrowser. By adding a bare pointer to a ListsToo object in the PointsBrowser class, and exposing an instance method to set this pointer to an already extant ListsToo object, we enable the app delegate to extract the pointer of myGroughGraph’s ListsToo object (myGroughGraph->pointsList) and send that into ptsBrowser for its use.
From a code-elegance perspective, it is probably better if the app delegate itself owns pointsList and hands that variable off to both the graphical view and the browser view. Hindsight is the mother of refactoring!
Switching to an Embedded Framework
Using shared frameworks is great when a systemwide one is in place to do what you want to do. However, using shared frameworks places a lot of restrictions on what you can do. For example, you cannot conveniently distribute your application to anyone who doesn’t have your shared framework installed. Nor can you conveniently edit the functionality of the framework if it does not do exactly what you want. If you have access to the framework project, as in this case, you can insert the framework project within your application project as a subproject, and then set it up to incorporate the built framework within the application bundle so that it is always available with your application when you distribute it.
For this example, I use a version of the ListsToo framework we built previously, renamed here to BetterList. To add BetterList to the BeeLine project, I deleted ListsToo from the BeeLine project and opened a Finder window so that I could see the BetterList project. You can find a copy of the files for starting at this point in the Hour 15 (V4) subdirectory of the code available at http://teachyourselfxcode/. I’ve already made all the in-code changes to BeeLine to reference the BetterList class rather than the ListsToo class. To add BetterList as an embedded framework, follow these steps:
1. Open the BeeLine project in Xcode.
2. Switch to the Finder and navigate to the directory that contains the BetterLists.xcodeproj project file.
3. Position this Finder window so that you can see the Navigator for the BeeLine Xcode project behind it.
4. Drag the BetterList project into the BeeLine project and drop it immediately beneath the BeeLine project, as shown in Figure 15.39. It should appear as an indented blue project group, beneath the BeeLine project group.
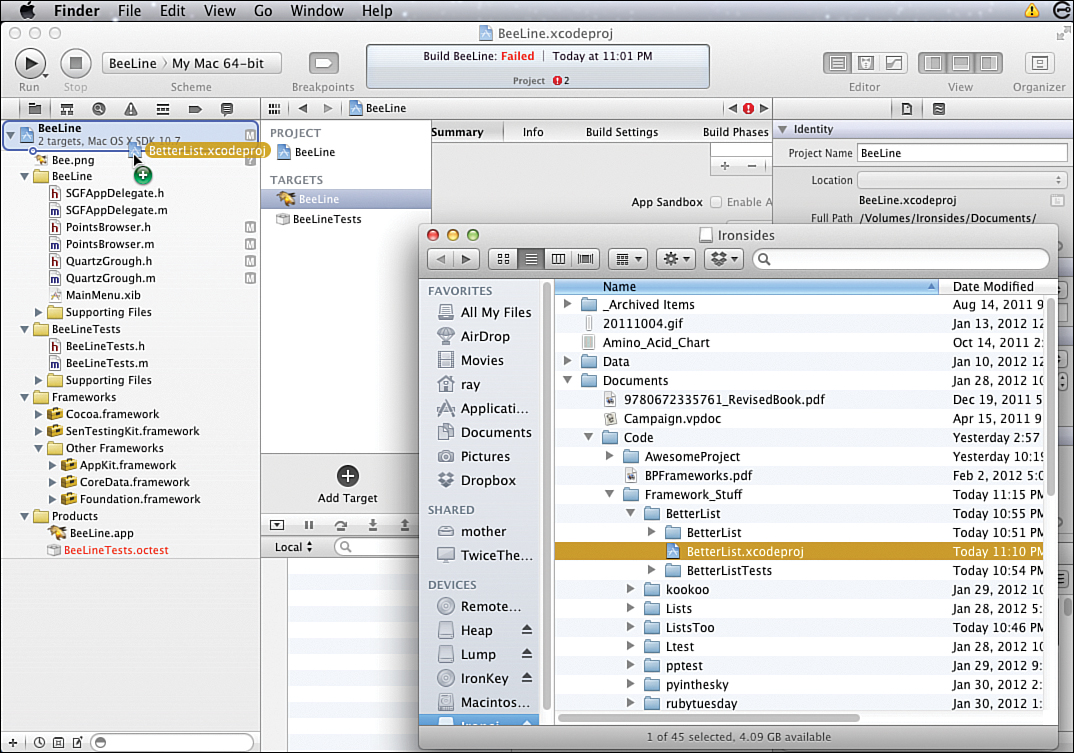
Figure 15.39. Inserting a framework project into the current project
5. Under the File menu, click Project Settings and change the derived data location. Unless you know exactly what you’re doing, click the Advanced button and change the build location to Locations Specified by Targets, as shown in Figure 15.40.
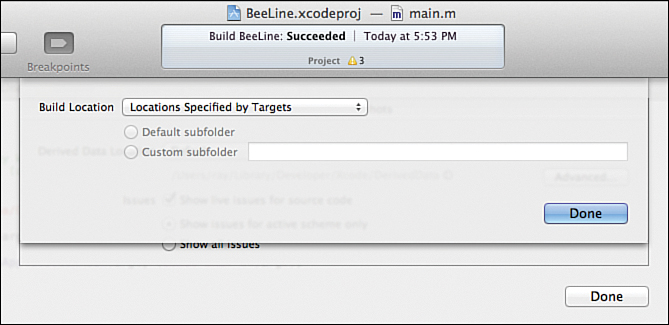
Figure 15.40. Changing the derived data location to Locations Specified by Targets makes it easier for your project to find header files and libraries.
I expect that in future versions of Xcode the default derived data location option will become much more useful. For now, though, it induces one more layer of confusion with Xcode as to where you should look for header files and libraries, and life is much easier if you simply let the projects assert control.
Linking up this embedded framework is a bit more involved than linking to a shared framework. For one thing, we want changes to the BetterList framework to automatically appear for the BeeLine application, so the BeeLine project needs to know that it should try to rebuild the BetterList framework if that framework needs rebuilt. To accomplish this, we need to configure the dependencies portion of the build process to indicate the dependency between BeeLine and BetterList.
6. Select the BeeLine project in the Navigator and the BeeLine target in the Editor area.
7. Display the Build Phases tab at the top of the Editor area.
8. Open the Target Dependencies item if it is not already open, and then click the + icon (Add Items button) for dependencies, as shown in Figure 15.41.
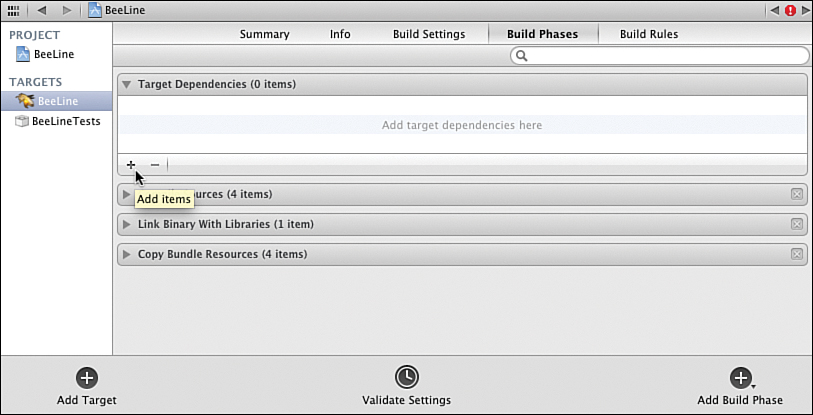
Figure 15.41. Including our framework project, BetterList, as a dependency for our BeeLine project.
9. A drop-down dialog appears. Select the BetterList framework.
10. Click Add.
By the Way
If you cannot select the framework under BetterList, or if it doesn’t appear, or if the BetterList.xcodeproj group in the Navigator appears as just a single line with no group-reveal triangle, it is because you have the BetterList project open somewhere else (for example, in another Xcode window). Close it and just work with it from within this project. Likewise, if you have BetterList open from within this project, and you also try to open it by double-clicking its icon in the Finder, Xcode will say unpleasant things. Best to only open each project in one place at a time.
Next, you need to add a new build phase.
11. Still in the Build Phases tab of the Editor area for the BeeLine target, click the large + icon above New Build Phase at the bottom of the editor.
12. A pop-up menu appears. Select the Add Copy Files option, as shown in Figure 15.42.
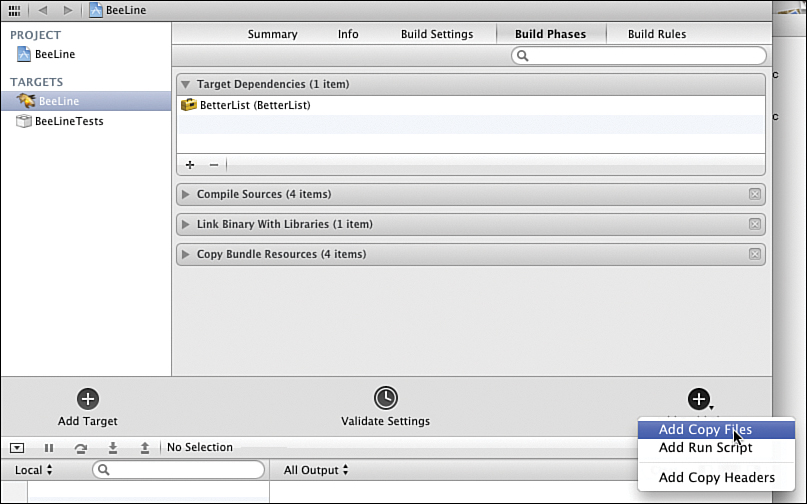
Figure 15.42. Adding a new Build Phase that copies files.
13. A new build phase group, titled Copy Files, appears at the bottom of the list of build phases. Click the + icon in it to add files.
14. In the dialog that appears, navigate to the BetterList.framework in the BetterList products group, select it, and click Add.
15. Back in the Copy Files build phase, change the destination to Frameworks.
When you have finished, the new build phase should appear as shown in Figure 15.43.
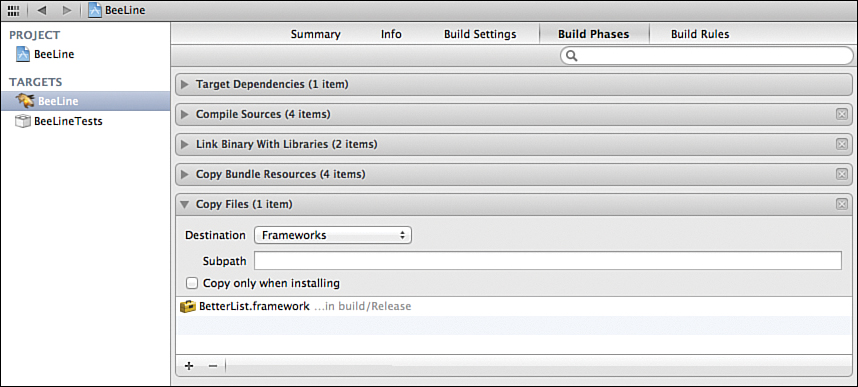
Figure 15.43. A new build phase that copies files to the BetterList framework has been successfully added.
16. Now, click the disclosure triangle for the Copy Files phase to collapse the list under it.
17. Then click and drag the Copy Files phase up until it is just beneath the Target Dependencies phase, as shown in Figure 15.44.
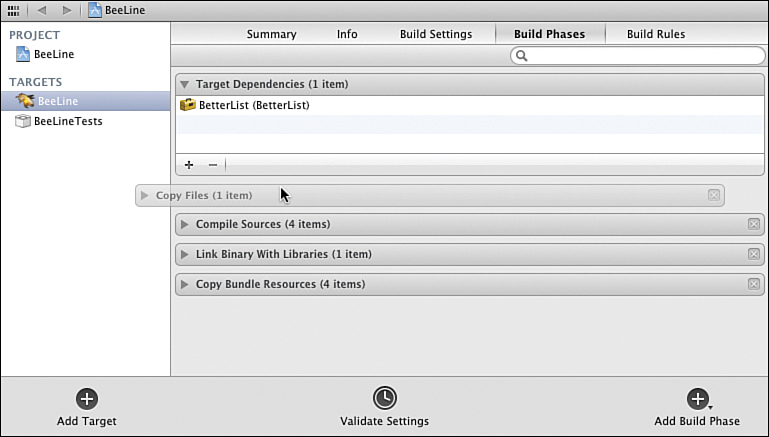
Figure 15.44. Moving the Copy Files build phase to just below the Target Dependencies phase.
18. Drop the Copy Files phase there.
You still need to tell BeeLine that it needs to link with the BetterList framework. You might think that you could open the Link Binary with Libraries phase and just add BetterList from there. However, you currently have about even odds that although the BetterList.framework appeared under the Workspace when you added it to the Copy Files phase it won’t appear there if you click Add for the Link phase. This is probably an Xcode bug.
19. To work around an apparent bug in the Link section of the build phases, return to the Summary tab for the BeeLine target. Clicking + to add BetterList.framework to the Linked Frameworks and Libraries group, may or may not work here, either. Instead, open the Products group under BetterLists in the Navigator and drag the BetterLists.framework from the Project Navigator into the Editor area. Locate the Linked Frameworks and Libraries group in the Editor area and drop the BetterLists.framework under Cocoa.framework. If you go back and check the build phases, you’ll find that it’s been added to the correct group there, too.
A tiny bit of additional configuration needs to be completed, and you’ll be back up and running, only now using an embedded framework that you can edit conveniently and directly in your main project and that itself gets inserted into your application bundle so that everything gets copied when you distribute your application.
20. Select the BetterList project in the Navigator, and the BetterList framework target in the Editor area.
21. Open the build phases for the BetterList framework target.
22. Verify that the BetterList.h file is in the public headers group, or add it back if it has disappeared. You can do this as was shown in Hour 14, or if Xcode is feeling particularly helpful, you can drag it straight from the Navigator into the Public header group.
By the Way
Whether Xcode lets you drag files from the Navigator into the Editor area currently (with Xcode 4.2.1) seems to be a bit hit-and-miss. If you target your click on the name of the thing you are trying to drag, instead of its icon, you (again with Xcode 4.2.1) maximize your chances of success.
At this point, you should be able to run BeeLine again, and it should function as before. Even better, if you go into BetterList.m and comment out those annoying NSLog() lines that report the beginning and end of a walkList traversal, and then click Run for BeeLine, it rebuilds BetterList for you, before building Beeline, with results as shown in Figure 15.45.
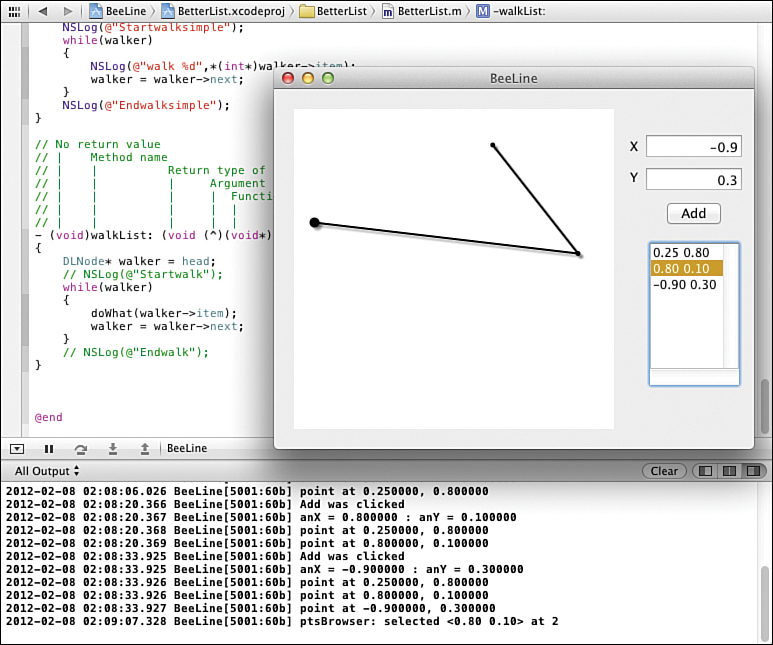
Figure 15.45. Now clicking Run for BeeLine also rebuilds BetterList before rebuilding BeeLine.
Finally, just to wrap up, if you want to distribute your application (and who doesn’t), you need to make one more tweak, this time to the BetterLists build configuration. When Xcode runs your application, it applies some magic to make the embedded framework functional, no matter where the framework itself specifies that it should be installed. If you try to run your BeeLine application from the Finder at this point, however, it complains that it cannot find the required framework. This behavior seems peculiar, because the complaint you’ll get is actually generated by the framework, regarding its installation location. Your app is in fact finding the framework where it thinks it belongs, and is then being directed to where the framework isn’t, by the framework itself. It seems that the entire world outside of Apple thinks that this ought to be a bug, whereas Apple thinks that this is perfectly logical. I’m a big fan of Apple, but I vote with the rest of the world on this one: I cannot think of any reason that the framework, which the application has clearly already found, cannot run in place without modification. Apple disagrees, so we have one more thing to do: We need to inform BetterList that it is expected to live within an application instead of in the default shared library location.
23. Select the BetterLists subproject in the Navigator, and the BetterList framework target in the Editor area. Open the BetterList framework’s build settings. Select the All option and dig around for the installation directory value. If it helps, you can use the Search field with a search such as “directory” to limit the displayed options.
24. The Installation Directory option for BetterLists will, by default, be set to /Library/Frameworks. Double-click the /Library/Frameworks value, and (depending seemingly on the phase of the moon) you will either be able to edit it directly in place or a small editor dialog will appear where you can change the value.
25. Change the installation directory from its current value, which probably will not appear as literally /Library/Frameworks in the editor dialog, but instead as a macro-substitution variable that expands to /Library/Frameworks in use, to @execution_path/../Frameworks, as shown in Figure 15.46.
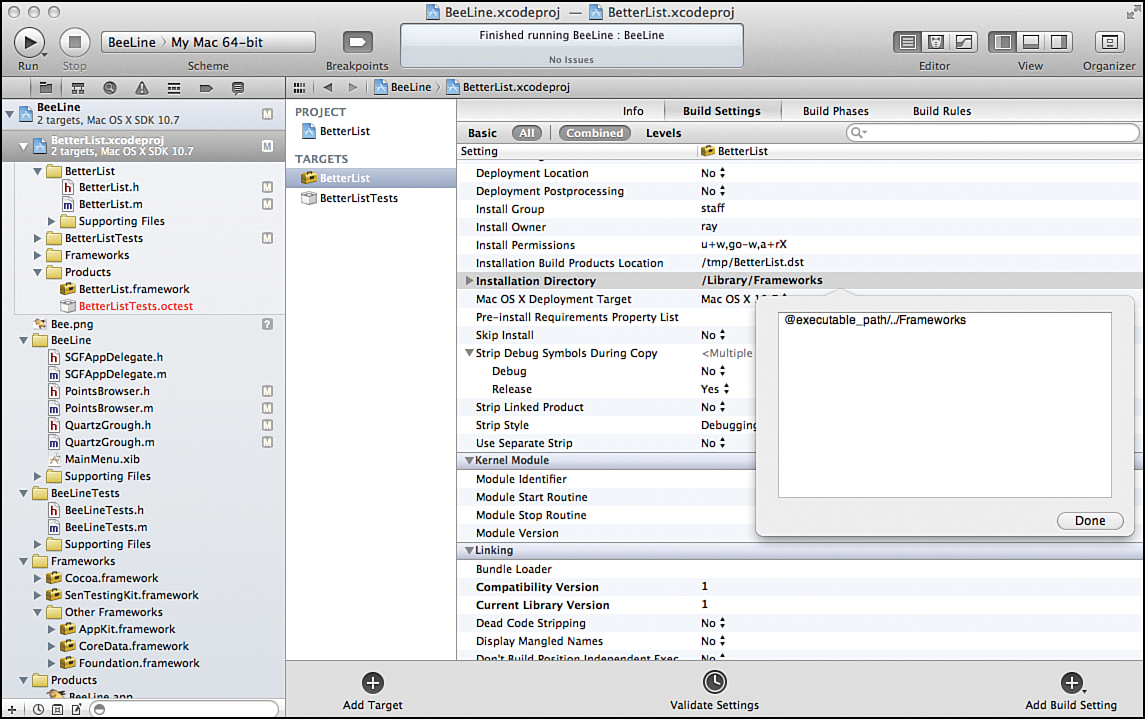
Figure 15.46. Changing the Installation Directory option so that the framework knows to look for itself in a directory parallel to the path of any executable that it tries to use.
This directive is a “magic value” that tells the framework that it is okay to look for itself in a Frameworks directory that is in parallel to the path of any executable that is trying to use it.
Also pay attention to values of the Deployment Location, Deployment Postprocessing, and Skip Install options. These values interact in some completely nonintuitive ways, but thankfully, to make things work the way you want them to work, they should all be set to No.
26. Make the setting change to the installation directory and click Done. Then, because Xcode currently displays some difficulty in getting this setting to actually stick the first time it is set, select the BeeLine project in the Navigator, and then reselect the BetterList project and the build settings for the BetterList target again, and verify that the installation directory really shows up as @execution_path/../Frameworks. If it does not, just repeat the previous steps to set it, until Xcode finally gives in.
27. Reselect the BeeLine project and choose Product, Build For, Build For Running from the menu. Back in the Finder, you’ll find your BeeLine application in the Release subdirectory of the build directory that is in parallel to the BeeLine.xcodeproj file. Launching it in the Finder should now give you the same experience as running it within Xcode (although all those annoying log messages are now going into your console logs).
Summary
In this hour, you practiced the skills you learned in previous hours, putting them all together to build a working OS X application. You learned how to build a single-window, single-view application, and then updated it with a second view with an independent controller. You also learned how to use shared frameworks and how to embed frameworks for those times when you need to edit and test the framework at the same time as the application. Keep the workflow you practiced in this hour in mind as you work through the following hours in the book. Being able to construct a working OS X application is a prerequisite for each of them.
Q&A
Q. Could the NSView component of the interface be handled by an independent controller, as was done for the NSBrowser?
A. Yes. In fact, that is the preferred way to do things. Many OS X applications, however, are built with the controller for one or more views embedded in the application delegate. That does not mean that this is a good way to do things, but it was important for you to see both styles (and you get to fix it in the next hour, when you convert this OS X application into an iOS app).
Q. Is a project limited to building one executable application?
A. No. You can incorporate subprojects for additional applications using the same method we used for incorporating the embedded framework, or you can just add additional targets to your existing project. Subprojects have the convenience that they carry around their own individual build environments and can be worked on independently from the main project. Additional targets, however, handle code completion and argument checking better (although this advantage is possibly due to a bug in the symbol processing for subprojects) and can be better controlled for compiling subsets of executables by using schemes.
Workshop
Quiz
1. Why does the framework subproject you just included in your application refuse to let you access its contents?
2. Where can you find your finished .app application?
3. Where do your NSLog() messages go when you’re running your application from the Finder rather than in Xcode?
Answers
1. Because you still have the framework project open in another, independent Xcode window.
2. If you set the project to use derived-data directories as specified by targets, you’ll find a build directory inside your project directory, and your application will be in either the Debug or Release subdirectory of this build directory. If you left the derived-data location at the default, your application is in a pseudo-randomly named subdirectory of ~/Library/Developer/Xcode/DerivedData/. If you want to find it, try reading the final lines of the most recent build entry in the Log Navigator tab of the Navigator.
3. They are sent to the system console device. You can browse these logs using the Console.app application in /Applications/Utilities.
Activities
1. Modify the PointsBrowser class so that when an item is selected in the NSBrowser the list insertion point is moved from the end of the list to after the selected item.
2. Refactor the code so that the QuartzGrough does not own the point list model, but instead receives it from its parent.