
5. Composing Shots

Well-defined diagonal lines lead the plane into the hangar and guide the viewer’s eyes to the primary subject. Photo by Alex Lindsay.
The act of composition is the actual framing of the shot. How you compose the frame has a great impact on how a viewer perceives information. A tight shot can convey an emotional response, whereas a point-of-view shot can place the viewer into the action. You’ll find that the art of cinema has several shot types to choose from and even its own language to help those involved in creating film and video.
An additional challenge to pay attention to is how shots lead into each other. Professional filmmakers rarely string a bunch of shots into a pretty montage. Rather, they plan out a sequence of different angles that helps tell the story.
Poring Over the Footage
Changing the angle of the camera can really make a difference in a shot. This shot is from the Las Vegas strip. With all sorts of neon signage, I wanted to simplify the frame. Placing my camera at the base of the sign gave me a clear sky and let me fill more of the frame. I particularly liked the way the signs created strong lines that would intersect at a dramatic angle. An additional benefit of this angle is how the animated arrows on the signs pointed upward as they rippled on and off.


Poring Over the Footage
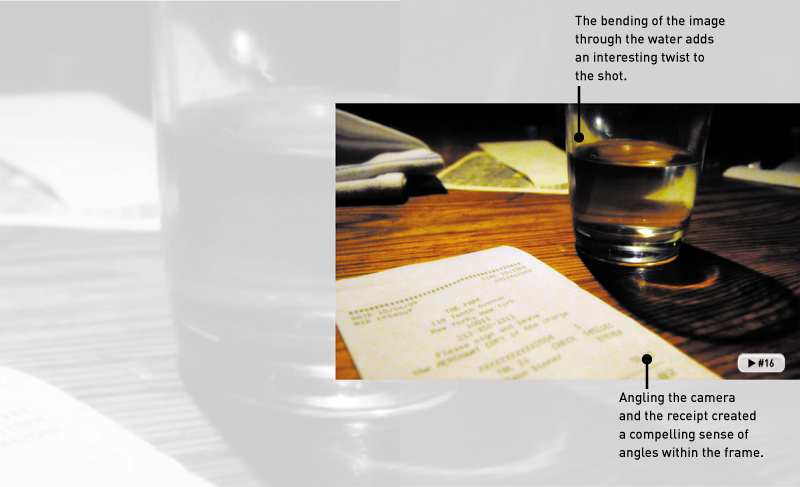
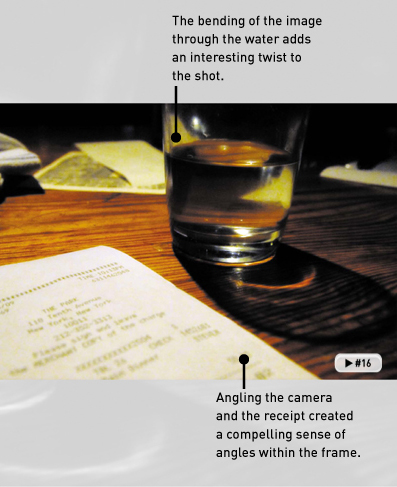
The use of strong angles can guide a viewer’s eyes through a scene. This shot takes a simple environment and adds drama. The lines in the wood intersect with the edges of the receipt. The camera is off center as well as tilted to add additional perspective to the shot.
Poring Over the Footage
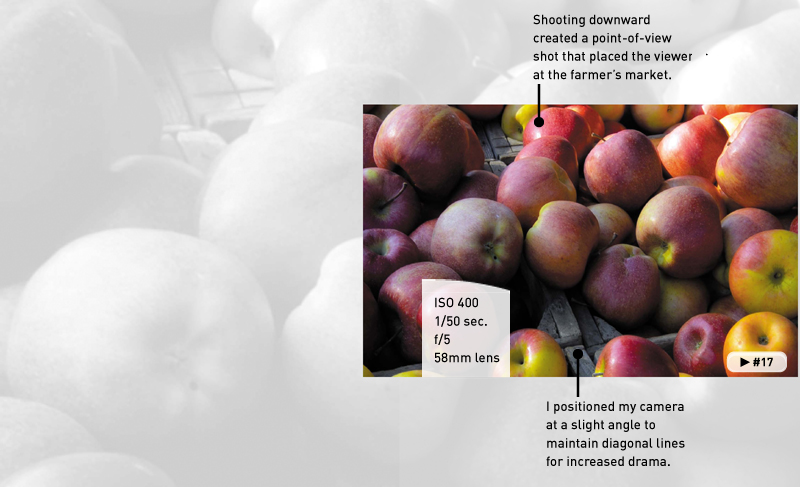
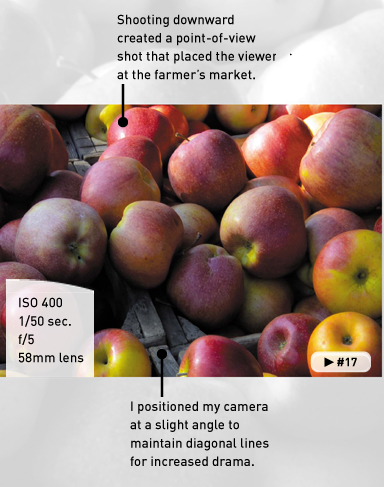
This shot is a much simpler scene at a farmer’s market in Washington, D.C. Here I wanted to put the viewer into my shoes. I positioned the camera at eye level above the produce and tilted down. While shooting the scene, several shoppers’ hands reached in from all sides to examine the produce.
Shot Types
With film and video productions, a series of multiple shots are often used for each scene—a process referred to as getting coverage. Combining multiple angles can tell the story best (by letting you show interesting details or emotions). Using multiple shots lets you control the pace of action through editing. The different angles can also be used to cover up mistakes or condense a long interview.
Through the years, these shots have developed a language of their own. Knowing the most common shot types and their associated terminology allows crew members to communicate easily with each other on set. It’s essential that you frame a shot right when you shoot it because video is a low-resolution medium. Unlike with photography, you cannot crop video after the fact.
It’s important to move the camera from time to time when taking multiple shots. If you merely zoom from a wide shot to a tight shot (which is often called a jump cut), the resulting edit will feel abrupt. For the smoothest editing, be sure to physically move the camera when changing composition. Change your shot? Then you better shuffle your feet and move to a new location.
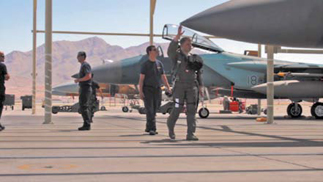
Figure 5.1. Seeing the entire location helps give the viewer a sense of the environment. Photos in this series by Doug Daulton, Alex Lindsay, and Richard Harrington.

Figure 5.2. The wide shot might be tighter than the master shot and is designed to show one or more subjects from head to toe.

Figure 5.3. Although still relatively loose, this composition is a little more intimate than a standard wide shot because it lets you better see body language and facial reactions.

Figure 5.4. For a medium shot, the subject and the location are given equal weight.
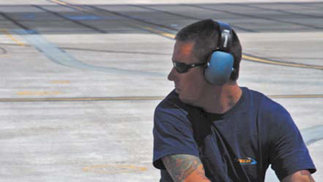
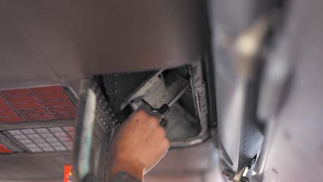
Figure 5.6. Using a shallow depth of field setting makes this close-up shot even more effective.
Shot Angles
You need to pay attention to not only to your composition when framing shots, but also the angle and height of the camera (Figure 5.7). By adjusting where the camera is positioned in relation to the subject, you can impact the viewer’s perception of the subject.
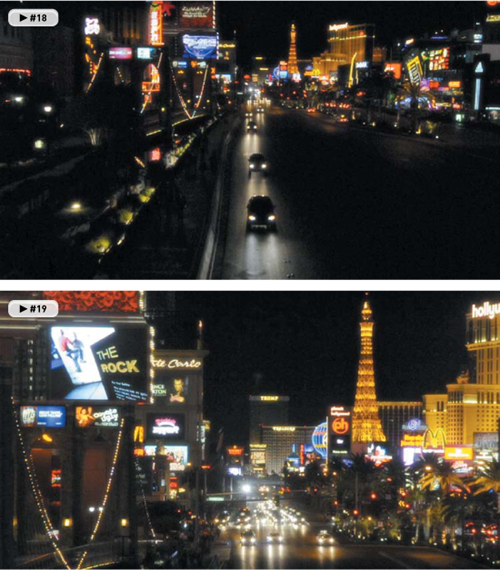
Figure 5.7. To get more variety between shots, I zoomed and moved the camera to the right as well as changed the height and angle of my tripod.

Figure 5.8. My subject is lower than my eye level, so I adjusted the height of the camera to place the viewer at the same height as a child.
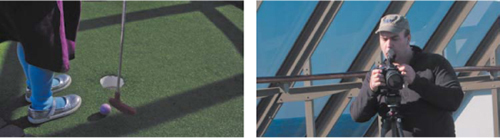
Figure 5.9. Looking down on the golf club, ball, and hole felt natural because it matches the memory and experience of the viewer.

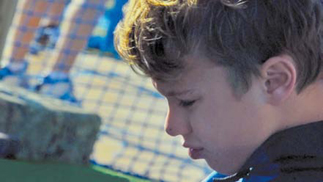
Figure 5.11. Canting the camera at a slight angle, I was able to better frame the subject, who was deeply focused (and bent over) a golf ball.
Cinematic Composition
Be sure to think about composition before pressing the Record button on your camera. Earlier in this chapter you learned common framing techniques. But in videography, movement influences the composition.
The framing you choose will often need to vary throughout the shot. If the subject is moving, you’ll need to adjust your framing. In the following sections I offer four useful rules that I find essential when designing compelling shots for a video or film project.
Eye Line
The eye line is basically where your subject is looking in the frame (Figure 5.12). For interviews, your subject’s eye line may vary a bit. Normal framing is to have your subject look slightly off camera (towards an interviewer who traditionally stands next to the camera). Having a subject look directly into the camera is usually reserved for situations like on-camera spokespeople or newscasters.
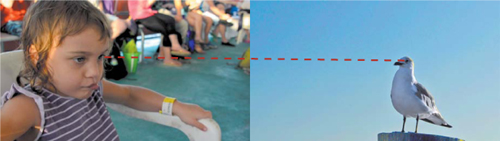
Figure 5.12. When you want to create a relationship between a subject in your video and the subject’s environment, be sure to pay attention to eye lines.
If more than one person is in your scene, you may need to think about where people are looking in relation to each other. Often, you’ll want viewers to feel as though both subjects are looking at each other (or perhaps the same item). To do this, you need to line up the subjects’ gaze with the object being gazed at. This is largely done by framing, which influences how a viewer interprets eye lines. Always try to incorporate a little “look room” by leaving a bit more space on the side the subjects are facing. In other words, try to avoid centering the subjects in most cases and frame them so the more open side of the frame is on the same side as their eyes.
Rule of Thirds
As a photographer, you’re probably familiar with the rule of thirds concept (Figure 5.13). Essentially, three vertical and three horizontal lines that are equidistant divide the screen, creating nine sections on the screen (like a tic-tac-toe board). The intersections of these parts serve as reference points that can be used when framing a shot. The common belief is that points of visual interest naturally occur at one third or two thirds of the way up (or across) the video frame. These points often work well for positioning objects in the frame.
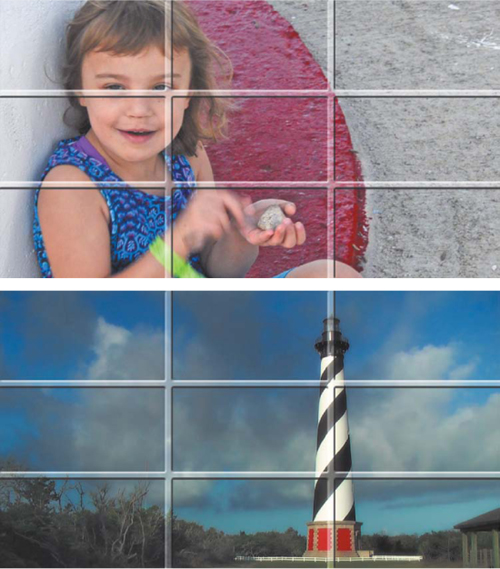
Figure 5.13. The subject of the portrait and the object in the scene are placed using the rule of thirds.
If you’re framing a portrait-style shot, consider framing the shot so the eyes of the subject are placed at the left or right intersection. This is the most traditional framing for an interview, because it easily allows for a weighted area of the screen to be empty of a subject and show the background. Of course, as with all rules, the rule of thirds can be broken. Just be sure you are consciously deciding to ignore or break the rule.
180 Degree Rule
When shooting two or more people in a scene (or even dominant objects), you need to be mindful of the 180 degree rule (Figure 5.14). This rule draws an imaginary line through the scene; one that should not be crossed. By keeping the camera on one side of the frame (essentially up to a 180 degree arc), eye lines remain constant. This lets the viewer feel more comfortable and makes the relationship between subjects clearer.
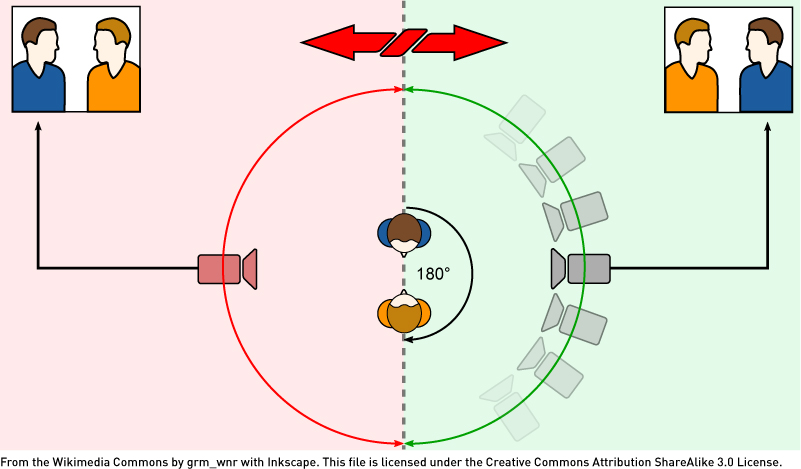
Figure 5.14. This diagram shows the 180 degree rule. If the camera moves beyond a 180 degree arc, the characters will appear to switch places on the screen.
When you start a scene, try to draw a virtual line through the scene. It’s up to you to decide where to place the line originally, but you shouldn’t change it once you start rolling. If the camera physically crosses the line for a consecutive shot, the direction in which your subjects are looking or moving will seem to flip in the camera. This can be very disorienting to the audience and should generally be avoided.
Sequencing Shots
Shooting video is much more than capturing the action in one long shot. Most finished videos will contain a collection of shorter shots edited together (Figure 5.15). These shots are intercut and switch every few seconds. There are several reasons for using this approach:
• Visual interest. Most viewers have come to expect faster editing paces (just look at a film cut in the 1950s compared to a new release). The speed at which you switch angles and composition during an edit may be dictated by genre or personal tastes, but one wide shot just won’t work for most viewers.
• Technical necessity. You may need to hide something in the scene with an edit. It might be an exposure change as you go from indoors to outdoors. Or perhaps you need to minimize a continuity error, such as your subject doing an on-camera demonstration slightly differently the second time through.
• Emotional impact. Changing angles and composition has a profound effect on the viewer. Knowing when to go in for a close-up or cut to a reaction shot is a learned skill, but one that is essential to building an exciting video that’s enjoyable to watch.

Figure 5.15. Instead of shooting one long, continuous shot as my children explored the Swiss Family Treehouse, I took several shorter shots to create a more compelling story.
Repeating Action
So, if you need to cut all your angle shots together, how do you pull it off? The most common approach to getting adequate coverage is to repeat the action of the scene. This means shooting the scene and then asking your subjects to repeat what they were doing (Figure 5.16). You should then change your composition and move your camera to a different position.
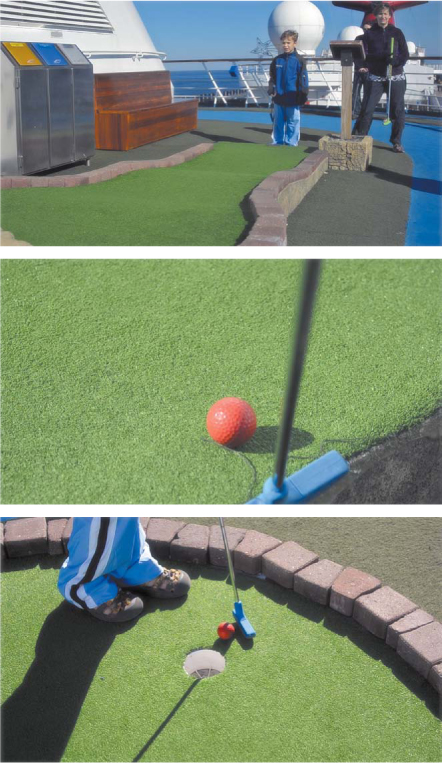
Figure 5.16. By having my son play through each hole twice—as well as using the word freeze—I was able to get proper coverage of the scene.
Here are a few ways to plan your coverage:
• If you’re shooting a scripted or narrative video, you’ll likely repeat the scene several times. You should first shoot the master shot to get coverage all the way through, and then move the camera around and get “insert” shots of key moments to cut in.
• If you’re recording an interview or a live-action demonstration, you should shoot all the way through. Along the way, make mental (or even actual) notes of “pickup” or “insert” shots and go back and get them to add in.
• If you’re shooting an action scene, ask your talent to freeze or hold. When you get to a desired cut point, pause the action. Quickly move your camera and recompose your shot. Then let the action continue. Even if you can’t freeze the scene, you may still be able to reposition quickly enough and edit out the rough spots for a more condensed video.
Making a Shot List
You might think that the best Hollywood directors are creative geniuses; however, they have a more important character trait in common. They are great planners who aren’t afraid to intensely analyze a script or a location and map out the best angles to tell their stories.
For a successful shoot, it’s a great idea to build a detailed plan. Your goal should be to think about the scene or location ahead of time. Try to list all the shots you’ll need and determine the number of shots and style of shots you want to shoot. Be sure to identify elements like the location and participants, and then specify the angles you’ll need.
By making a detailed shot list, you can literally check off shots as you shoot. Typically, I use a spreadsheet application like Apple Numbers or Microsoft Excel. I can then sync the list to my phone and read it on the go. When it comes time to edit my footage, the shot list helps me identify the shots I have to work with. The extra planning at the outset will dramatically speed up your editing as well.
Chapter 5 Assignments
Now that you’ve learned the language of cinema, it’s time to put the knowledge into action. You’ll quickly discover that taking the time to actually think about composition (as well as study it) will dramatically improve the quality of your shooting and editing.
Shoot Each Shot Type
Evaluate a location and attempt to shoot each shot type listed in the chapter. Try moving the camera between each shot, but follow the 180 degree rule discussed in this chapter as well.
Change Your Angle
Try shooting the same shot from different angles. Start at eye level, and then move your camera higher and then lower in the frame. Analyze how the shooting angle changes the feeling of the scene.
Make a Shot List
Watch an episode of your favorite TV show. Create a shot list for a few scenes. Look for patterns within the show and analyze how the cinematography affects your enjoyment of the story being told.
Share your results with the book’s Vimeo group!
Join the group here: vimeo.com/groups/DSLRVideoFSTGS