7. Shooting in Low Light
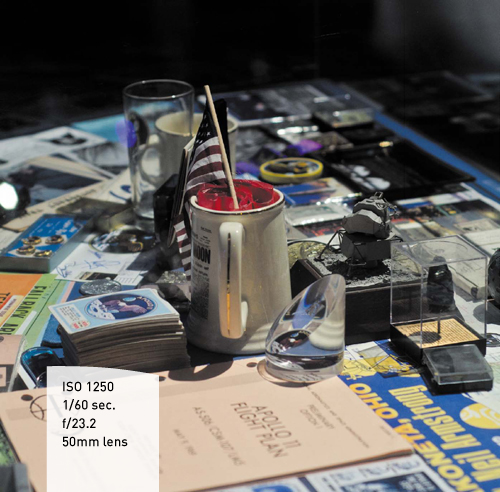
Shooting a group of stationary objects, I let the shadows and shallow depth of field create an interesting frame.
Let’s continue to explore the skills you’ll need to shoot in different situations. This chapter discusses conditions in which low-light levels will pose a challenge. Low light makes focus and exposure difficult. Note that this chapter builds upon what you learned in Chapter 4, “Exposure and Focus.” If you’ve been skipping around the book, it’s best to read Chapter 4 before continuing with this chapter.
You’ll use low-light shooting strategies when shooting in such situations as trying to capture an indoor performance, like a play or concert; shooting outdoors at night or early in the morning; or shooting a tour of a museum or gallery.
For this chapter, I spent the day shooting at the United States Astronaut Hall of Fame—a museum that showcases the human side of space exploration. I shot the whole day using just a 50mm prime lens, which is an affordable addition to any kit and makes low-light shooting easier.
Poring Over the Footage
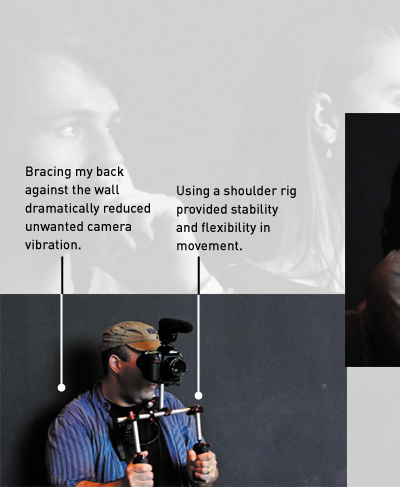
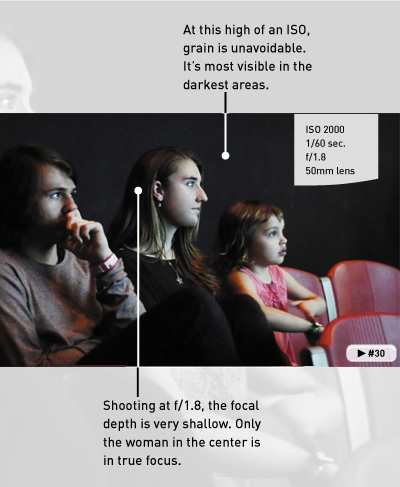
The museum first presents visitors with a movie showcase before venturing into the exhibits. Shooting in this environment was tough because the front of the room had lots of light, but the rest was pitch black. This shot matches the conditions you’d find at a concert or performance. I opened my lens all the way, but it still wasn’t enough. I needed to push the ISO higher than my comfort level just to get a usable shot. In fact, the shot still had to be brightened in my nonlinear editor to produce an image I was happy with.
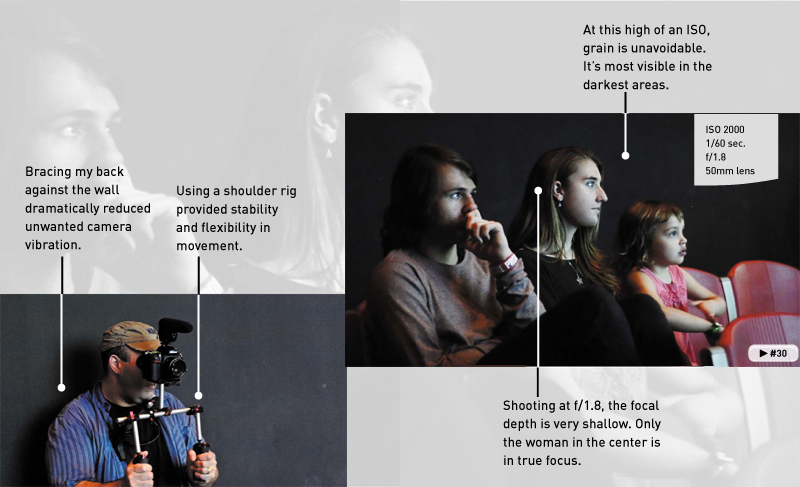
Photo by Vanelli.
Poring Over the Footage
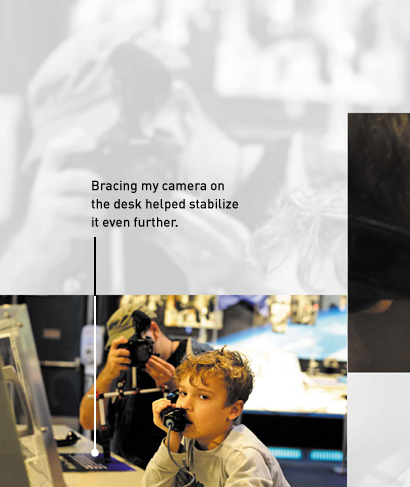
Continuing to shoot at the museum, I moved into the exhibit space. More light was available in the exhibit space, although it was fairly low light to accommodate the exhibits (many of which were backlit). Because my subject was relatively stationary, as was I, I was able to slow down my shutter to let more light in. This allowed me to also use a smaller aperture, which increased my depth of field. The shooting conditions were still tricky but easier than the previous shot.

Photo by Vanelli.
The Challenge of Shooting in Low Light
It is essential to first clarify what I mean by low light. Low light does not mean sitting in a room with the shades drawn and the lights off. Low light does not mean a lunar eclipse. Low light means shooting in an environment that has dimmed lights, or candlelight, or perhaps the light of the moon. Just remember that your eyes are far better at seeing in low light than a DSLR shooting video.
But perhaps you might want to protest because you’ve probably taken some great pictures at night using a tripod. I believe you; so have I. However, the exposure time typically ranges between 1 and 10 seconds. Remember that when shooting video, you are capturing upward of 24 to 60 images every second. Shooting video in poor light is tough, but it doesn’t mean you shouldn’t try.
Common Scenarios
I generally consider low-light shooting to be one of those scenarios where the light is challenging and I can’t change it. In other words, I have to make significant changes to my shooting style or equipment (Figure 7.1) because I am not allowed to or it would be impossible to modify the venue’s lighting. This could include situations such as:
• Concerts or performances. These settings can be tricky to shoot in because sometimes stage lighting is dramatic, but more often it is very high contrast.
• Weddings and ceremonies. Houses of worship are frequently dimly lit or rely heavily on candlelight and natural-light sources.
• Museums. Museums can be particularly problematic because many seem to fear tripods.
• Outdoor shooting at night. An overcast night, a night camping in the woods, or even just a rural area can be pretty lean on lighting.
• Sunrise/sunset. During dawn and dusk, light changes are quick! Be prepared to make rapid changes to your camera settings, or you’ll quickly lose the ability to get a proper exposure.

Figure 7.1. When shooting in low light, a tripod is essential. When you’ve found the shot, lock it off and take your hands off the tripod to reduce any further vibration.
Gear Matters
While shooting under low light, you’ll rely heavily on your equipment. With less light to work with, you’ll need to get as much light into the camera as possible. When you can’t control the lighting, there are three measures you can take to improve your chances of capturing sharp-looking footage.
Full-frame sensor
If you need to do a lot of shooting in low light, consider purchasing a camera with a full-frame sensor (or you might already own one). These types of cameras can capture a significant amount of light, but you must also use a higher-quality lens with them. A full-frame camera system (Figure 7.2) is definitely more expensive but is often the tool of choice for wedding and event photographers as well as photojournalists.
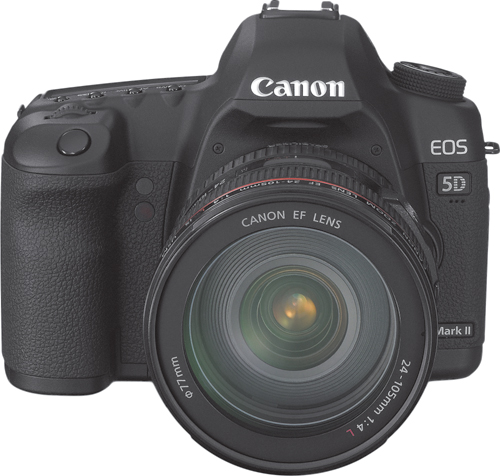
Figure 7.2. Some DSLR cameras, like the Canon 5D Mark II, offer full-frame image sensors. Image courtesy of Canon.
Full-frame cameras that shoot video include:
• Canon EOS 5D Mark II
• Nikon D3S
• Canon EOS-1D X
Fast lenses
As you’ve already learned, aperture matters. If you’ll be shooting in low light, chances are the kit lens that came with your camera will fail when shooting video in low light.
If you need the flexibility of a zoom, be prepared to pay a lot of money. Very fast zoom lenses are expensive. Because of the way a zoom lens works, the fastest lens you’ll find will top out at f/2.8. These fast zooms are also heavy (Figure 7.3). Although I own one and love it, you need to be aware that the lens has its own collar and foot to attach it to a tripod. If you leave one of these lenses hanging off the front of your camera, you risk damaging your camera from the hanging weight.
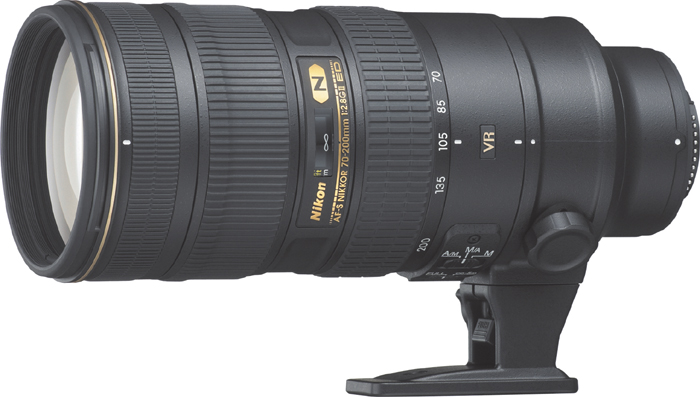
Figure 7.3. The AF-S NIKKOR 70–200mm f/2.8 lens provides a constant f-stop at all zoom levels. Image courtesy Nikon.
A far cheaper option is to use prime lenses. These lenses let in a lot more light, and the f/1.8 models can be quite affordable. Prime lenses are also readily available with speeds of f/1.4 and f/1.2. A 50mm f/1.8 lens (Figure 7.4), often called a “nifty-fifty,” is one of the cheapest lenses sold by Nikon and Canon.

Figure 7.4. The AF NIKKOR 50mm f/1.8D has an MSRP of less than $150 USD. You can skip the more expensive f/1.4 version, which is much more expensive and doesn’t really add any benefit to shooting video. Image courtesy Nikon.
A stable tripod
Shooting in low light gets a lot more difficult when you introduce motion. The viewer will often forgive a blurry subject who zips through the frame when the background is solid and stable (as well as clear). However, if you have extra movement in the whole shot from a bobbling camera, getting the shot gets a lot rougher.
Although a fluid-head tripod is ideal, the truth is that any tripod is a big help for shooting in low light. Remember to get a stable platform for the camera, and spread the tripod legs out wide. The tripod will dramatically reduce the slight camera movements that can destroy your shots.
Finding Focus
Shooting in the dark makes finding focus challenging. Some DSLR cameras will use an autofocus assist light that can help illuminate your subject so the camera can find focus. Of course, using this feature may prove pointless (if you’re more than a few feet away) and annoying to others (if you’re at a concert or ceremony).
Focusing your DSLR will typically be a manual affair for low-light shooting (Figure 7.5). Be sure to switch your camera into Manual focus mode. You can use the zoom button for the Live View panel to see a larger image before you start rolling. If you’re dealing with a moving subject, a loupe can really come in handy. Most loupes will magnify the image on screen 2.5 to 3 times, making it easier to see focus. If you are using a dedicated electronic viewfinder or monitor, you may have a focus assist or focus in red option that will work as well.
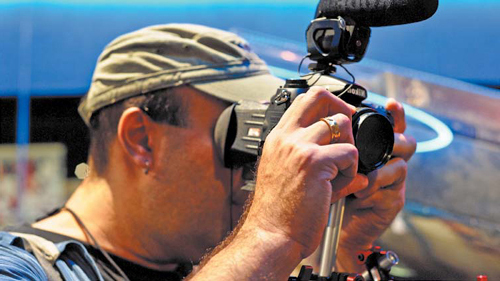
Figure 7.5. Before trying to manually focus, make sure you flip the camera’s autofocus switch to manual so you don’t strip lenses or camera gears.
Changing Your F-stop
Low-light shooting really pushes your lenses. So, I usually switch to prime lenses in these scenarios (Figure 7.6). I typically carry 28, 35, and 50mm prime lenses for low-light shooting. These are affordable lenses and offer a range of coverage. If I know I’ll to need to shoot at some distance, I’ll add a 200mm prime lens to my kit.
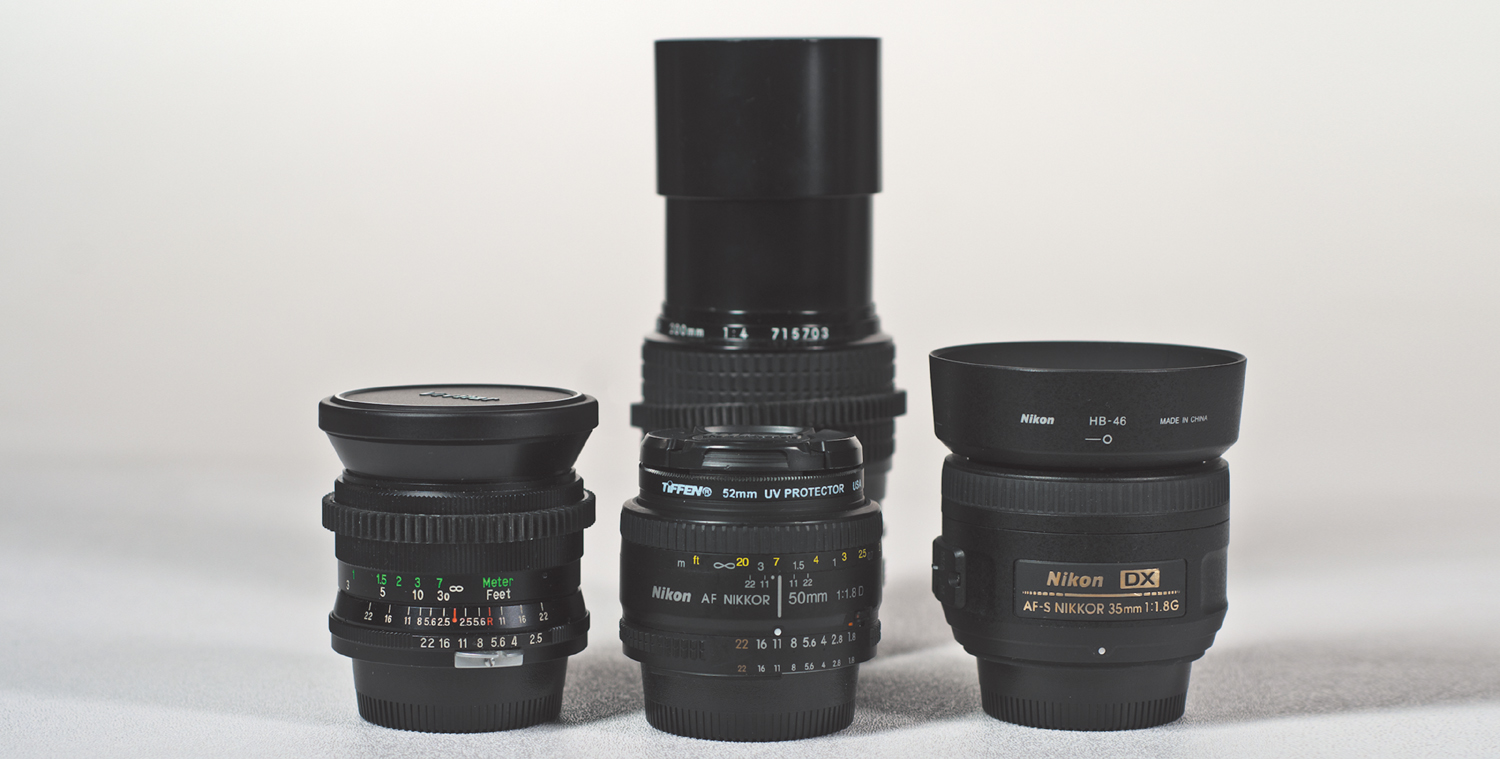
Figure 7.6. This old Vivitar prime lens cost me less than $50 from a local camera shop. It also offers great manual control rings for both focus and aperture.
You might think that purchasing these four lenses sounds out of reach until you hear that I bought three of the four from a local camera store as used lenses. Older prime lenses work great for video and are often very affordable. Just be sure to take your camera body with you when you’re shopping. Most stores will let you attach the lens and test it out in the store. I’m always on the lookout for older primes with low f-stops, manual focus, and aperture rings.
How Low Can You Go?
Even though your lens may have a very low f-stop, you may not be able to use it. As you open up the lens to let in more light, your depth of field will decrease (Figure 7.7). If you’re dealing with a stationary subject and have a tripod, open up the lens wide. But if you or your subject is moving, having a focal plane less than a foot deep makes focusing impossible. Remember to use all three sides of the exposure triangle. Set your aperture wide, but also readjust your ISO and shutter speed (more on both next).
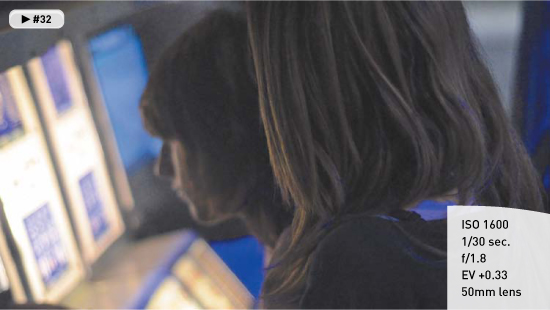
Figure 7.7. I opened up my lens all the way to let in the most light. Even though I’m only a few feet away from my subjects, I’m only able to keep one of the two in focus at this f-stop. I slowed the shutter speed to allow more light in (because my subjects weren’t moving and I was using a tripod), which let me drop the ISO and avoid more noise.
Manual Controls
Why would you want to change the camera’s aperture in the middle of a shot? Well, there are lots of reasons. Perhaps you’re panning from one area to another where the lighting varies. Or maybe cloud coverage is blowing through and your light levels are varying greatly. Or you might be shooting at sunrise or sunset when lighting levels change quickly (Figure 7.8).
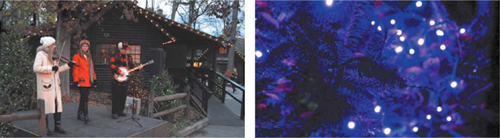
Figure 7.8. These two shots were taken only 20 minutes apart. When the sun goes down, it’s often a fast transition. The left shot was shot at f/9.0, whereas the right was at f/2.8. The same lens was used for both shots.
Most new lenses rely on the camera to control aperture using its dials or menus. The only problem with this approach is that you can’t really make a change without stopping the current file that’s recording. If you look for prime lenses, or older used lenses, you may find some that have a manual aperture ring, which allows you to make changes to the aperture while shooting.
The aperture ring may need to be unlocked to work (Figure 7.9). You’ll often find a notched switch, which can be unlocked so that you can turn the aperture ring freely to change your f-stop.
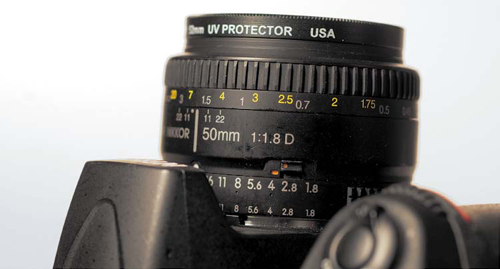
Figure 7.9. Most aperture rings need to be unlocked in order to rotate them manually. Look for a bright tab near the back of the lens.
Unwanted Changes When Zooming
Most zoom lenses have a variable aperture, which means that the more you zoom in, the less light that passes through. One of my favorite lenses covers a wide focal range, the 28–300mm lens. This is a great lens for shooting all day long when on vacations or walkabouts because I can travel light. However, it is a terrible lens to use for low-light shooting for two reasons.
First, all zoom lenses will have higher f-stops than primes. Second, as I change composition by zooming, I have to remember to adjust my ISO and shutter speed to compensate for changes in aperture. This constant juggling is necessary; otherwise, there’s more color correction to do in post to adjust for the variance in exposure.
If you really want to use a zoom lens and shoot in low light, plan to pony up some money for an expensive lens. You can get lenses with a constant aperture, but these lenses often cost (much) more than your original camera body.
Raising Your ISO
Changing your ISO will be the easiest change you can make when shooting in low light. You won’t need to buy a new lens, and you should be able to access the setting easily. Newer cameras are much more forgiving than they used to be when it comes to ISO. This is due mainly to improvements in the actual image sensors used. You might have been trained to never use an ISO setting over 800 in the past. However, this rule can often be broken with few repercussions with the new breed of cameras on the market.
Changing on the Fly
One of the features I look for when shopping for a DSLR is a physical button for ISO (Figure 7.10). If your camera has one, it makes it a lot easier to access while recording because you won’t have to stop the current clip and go searching through menus. Also, your DSLR may have additional function buttons on the front that can be mapped within your camera’s menus. Being able to push a physical button and turn a command dial allows you to make minor changes on the fly. ISO is the most frequent change you’ll make while recording video, so make sure you can do it easily.
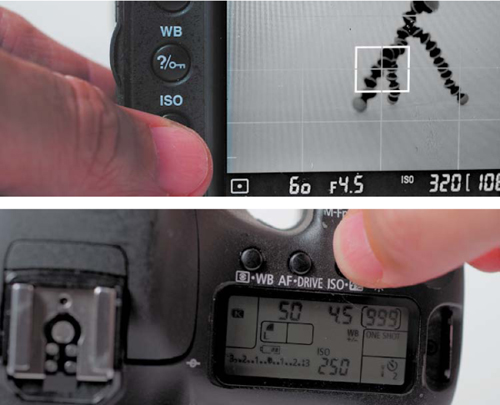
Figure 7.10. A dedicated ISO button can really come in handy to make easy adjustments to your camera setting.
How High Can You Go?
The only way to know your camera’s limits is to push it to its “breaking point.” I recommend you perform a simple test to check your camera’s capabilities. Ideally, you’ll mount the camera to a tripod or set it down on a ledge or table to minimize movement.
1. Place your camera in a mostly dark room or in an area without much light.
2. Set your camera to ISO 100.
3. Make sure your camera is set to record sound.
4. Start to record and call out the ISO settings.
5. After 10 seconds, switch your camera to the next ISO and audibly call out its numeric setting.
6. Continue until you reach your maximum ISO (Figure 7.11).
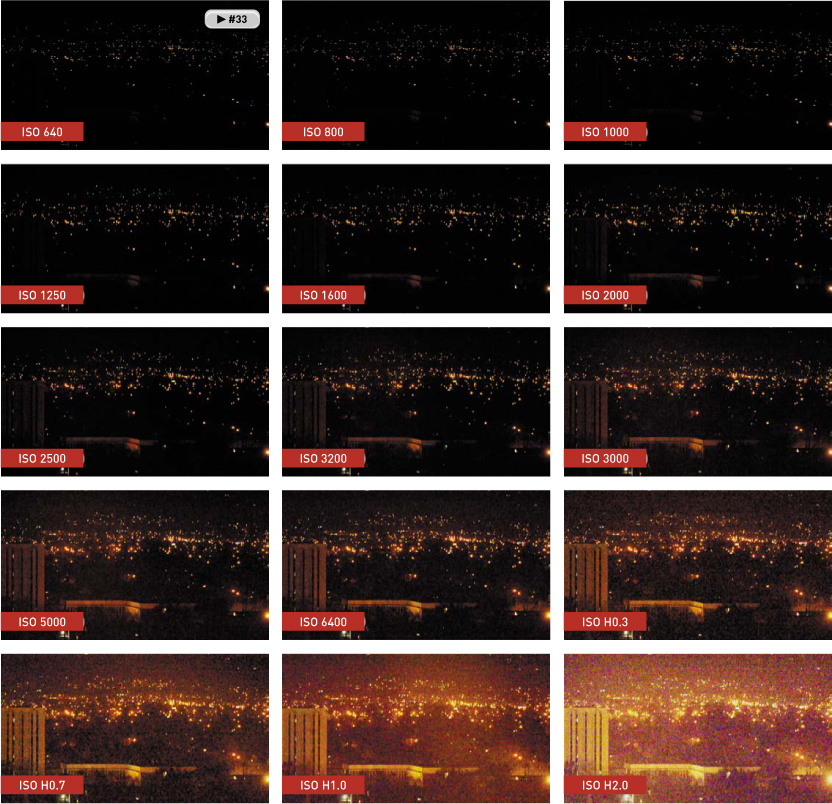
Figure 7.11. Here I’ve run through the upper ISO settings on my camera to test for noise.
7. Open the file on your computer.
8. Set the file to full-size playback (depending on the resolution of your file some pixels may be cut off). You need to view the file at 100 percent to clearly see the noise.
9. Play back the file and look for noise in the file. Be sure to carefully watch the changes that occur.
You may notice that ISO settings stair-step each other, meaning that the first ISO that looks bad may not be the highest ISO setting. Often, the higher ISO will result in a clean image. This is due to differences in how the sensor processes the digital signal.
10. Be sure to note how the camera performs in your stress test.
It’s not a bad idea to repeat this test in real-world settings as well. If you know that you have to record your child’s recital or a friend’s concert, go to the dress rehearsal or even a different performance and try out your camera under the available light at the venue. You’ll be glad you did.
Adjusting Shutter Speed
The adjustment you’ll make the least when shooting video is shutter speed. Changing shutter speed will either freeze or stretch the action (Figure 7.12). In either case, making too big of a change will produce an image that’s unusable. Open the shutter for too long and your footage will just look blurry; open the shutter for too short a time and the shot will just get darker (and stutter).
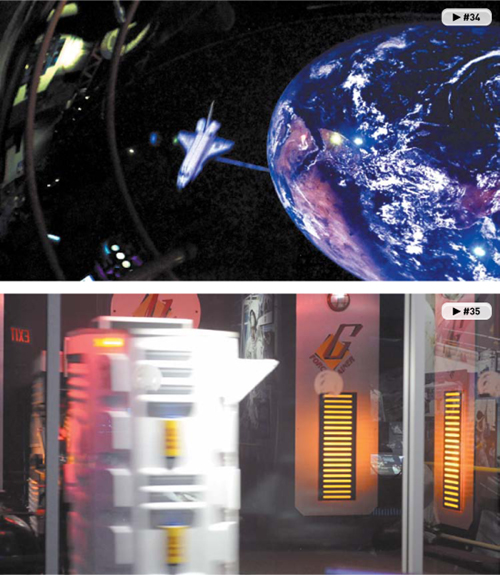
Figure 7.12. The amount of motion blur on the moving objects is largely determined by the shutter speed. Notice that the stationary objects are quite sharp, but the faster-moving objects have streaks.
The Target Shutter Speed
Although I discussed the target shutter speed in Chapter 4, the information bears repeating. Remember that you need to shoot in Manual mode with your DSLR if you want to control the shutter speed properly. Here’s the easiest way to calculate the correct shutter speed (Figure 7.13).
1. Check your frame rate. (In this case let’s use 24 fps.)
2. Multiply the frame rate by two. (In this case that equals 48.)
3. Place that number below the number one to make a fraction. (In this case 1/48.)
4. Choose the closest shutter speed to that fraction that’s available on your camera.
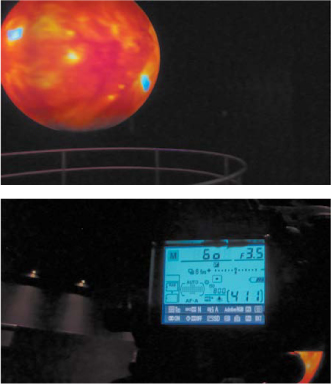
Figure 7.13. Normally, your shutter speed will be set to 1/60 or 1/50 of a second.
The Reality of Shutter Speed
Knowing the rules means that you should also know when to break them. Although there is a set shutter speed to produce natural motion, you may need to choose a different speed to get a desirable exposure. After adjusting your aperture and your ISO, the last adjustment at your disposal (that can be made in-camera) is shutter speed.
Lowering the shutter speed allows more light to reach your camera’s sensor. It also may allow you to decrease the aperture (giving you a deeper depth of field). If your subject is not moving much, shooting at 1/30 of a second often works. If you shoot at an even slower shutter speed, your footage will probably look soft.
Shooting at Sunrise or Sunset
When talking to photographers or cinematographers, you may hear them talk longingly about the golden hour or magic hour. This time refers to the first and last hour of sunlight each day. The golden hour (Figure 7.14) is often considered the best light by many and truly offers a unique look that can be very attractive.
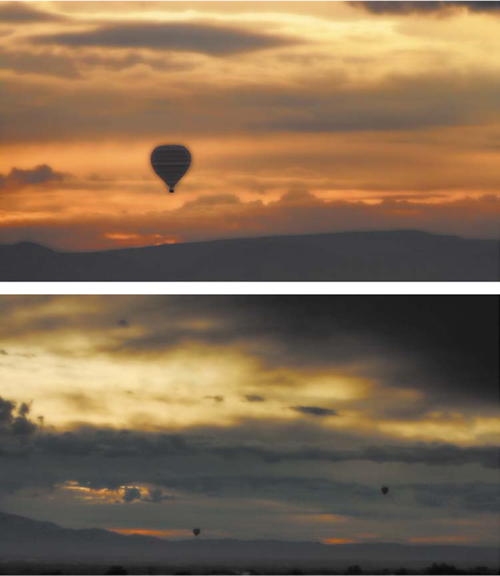
Figure 7.14. When shooting at sunrise, you’ll need to let some items fall into silhouette. Both of these shots were taken at the same location using a fast 28mm lens. The aperture was set to f/2.8 to let in a lot of light.
The lighting during sunrise and sunset tends to be soft and nicely diffused. The hue is often warm with rich shadows as well. The best feature is how the skies can become quite dramatic with varied colors and mellow glows. If you’re shooting landscapes, skylines, or nature, this is a great time to get stunning images.
Position Is Everything
So the question is, are you shooting to capture the sunrise and sunset (such as a beautiful shot of the sun cresting over the ocean’s edge), or are you just trying to shoot at a time when the sun is the only light you have? In either case you need to know the position of the sun:
• Shooting a sunrise. A sunrise is much trickier to catch because you can’t always tell where the sun is going to pop up (you need to know more than just “in the east”). The entire horizon may start to glow, but choosing exactly how to compose the shot is challenging. I rely on my compass and SunPath calculator to show me the sun’s path. This makes it easier to compose a good shot where the sun rises in my frame, because I generally choose to center the sun.
• Shooting a sunset. Attempting to shoot a sunset is pretty easy. You just follow the sun as it goes down. If you lose track of the sun setting, look west.
• Shooting a subject during these times. When shooting a subject at sunrise or sunset, try to keep the light in front of your subject (and to your back). You may need to turn or rotate as needed. Eventually, the light may become so diffused and soft that you’ll be able to let it backlight your subject.
Be Prepared for Fast Changes
Keep in mind that the golden hour may not be an actual hour. This type of light is determined by the altitude of the sun. The closer you are to the equator, the shorter the time will be, and the farther you are from the equator, the longer the time will last. In fact, during certain seasons (like winter), there may not be a golden hour.
Also, realize that the posted sunrise and sunset is when the sun actually crosses the horizon. So the great light will often start before the technical sunrise and last slightly longer than the setting sun.
In all cases, you should have a fast lens attached to your camera and be ready to change aperture settings. If you’re shooting a sunrise and don’t have much to focus on, make sure the lens is set to the Infinity setting for focus distance.
Figure 7.15. The shot on the top is video. Despite boosting the ISO, I couldn’t get a solid exposure on my zoom lens (which stopped at f/2.8). Switching to shooting time-lapse video (bottom), the exposure is much better.
Chapter 7 Assignments
By now you should be feeling pretty comfortable with the exposure triangle (unless of course you’ve been skipping around the book). So take your gear and head out for some low-light shooting.
Check Your Depth of Field
Experiment with your camera’s aperture and determine its impact on your depth of field. Place your camera on a tripod, attach your fastest lens, and focus on an object. Set the aperture open all the way. Increase your aperture and notice how much of your scene stays in focus. Step through your different aperture settings and explore the differences (you may need to stop recording to change aperture).
Test Your ISO Settings
In the section “How High Can You Go?” I provided a detailed ISO test. That wasn’t a suggestion; you really need to test your camera and figure out its limits. Go for it.
Shoot the Sun
Get up early or stay up late, it’s up to you, but try to shoot a sunrise or sunset. Determine your golden hour and shoot during that time. You can visit http://bit.ly/goldenhourcalc to help you determine the best shooting time.
Share your results with the book’s Vimeo group!
Join the group here: vimeo.com/groups/DSLRVideoFSTGS