
Chapter 9. Designing Cost-Effective Tests
Writing changeable code is an art whose practice relies on three different skills.
First, you must understand object-oriented design. Poorly designed code is naturally difficult to change. From a practical point of view, changeability is the only design metric that matters; code that’s easy to change is well-designed. Because you have read this far it’s only fair to assume that your efforts will pay off and that you have acquired a foundation from which to begin the practice of designing changeable code.
Second, you must be skilled at refactoring code. Not in the casual sense of “go into the application and fling some things around,” but in the real, grown-up, bulletproof sense defined by Martin Fowler in Refactoring: Improving the Design of Existing Code:
Refactoring is the process of changing a software system in such a way that it does not alter the external behavior of the code yet improves the internal structure.
Notice the phrase does not alter the external behavior of the code. Refactoring, as formally defined, does not add new behavior, it improves existing structure. It’s a precise process that alters code via tiny, crab-like steps and carefully, incrementally, and unerringly transforms one design into another.
Good design preserves maximum flexibility at minimum cost by putting off decisions at every opportunity, deferring commitments until more specific requirements arrive. When that day comes, refactoring is how you morph the current code structure into one that will accommodate the new requirements. New features will be added only after you have successfully refactored the code.
If your refactoring skills are weak, improve them. The need for ongoing refactoring is an outgrowth of good design; your design efforts will pay full dividends only when you can refactor with ease.
Finally, the art of writing changeable code requires the ability to write high-value tests. Tests give you confidence to refactor constantly. Efficient tests prove that altered code continues to behave correctly without raising overall costs. Good tests weather code refactorings with aplomb; they are written such that changes to the code do not force rewrites of the tests.
Writing tests that can perform this trick is a matter of design and is the topic of this chapter.
An understanding of object-oriented design, good refactoring skills, and the ability to write efficient tests form a three-legged stool upon which changeable code rests. Well-designed code is easy to change, refactoring is how you change from one design to the next, and tests free you to refactor with impunity.
Intentional Testing
The most common arguments for having tests are that they reduce bugs and provide documentation, and that writing tests first improves application design.
These benefits, however valid, are proxies for a deeper goal. The true purpose of testing, just like the true purpose of design, is to reduce costs. If writing, maintaining, and running tests consumes more time than would otherwise be needed to fix bugs, write documentation, and design applications tests are clearly not worth writing and no rational person would argue otherwise.
It is common for programmers who are new to testing to find themselves in the unhappy state where the tests they write do cost more than the value those tests provide, and who therefore want to argue about the worth of tests. These are programmers who believed themselves highly productive in their former test-not lives but who have crashed into the test-first wall and stumbled to a halt. Their attempts at test-first programming result in less output, and their desire to regain productivity drives them to revert to old habits and forgo writing tests.
The solution to the problem of costly tests, however, is not to stop testing but instead to get better at it. Getting good value from tests requires clarity of intention and knowing what, when, and how to test.
Knowing Your Intentions
Testing has many potential benefits, some obvious, others more obscure. A thorough understanding of these benefits will increase your motivation to achieve them.
Finding Bugs
Finding faults, or bugs, early in the development process yields big dividends. Not only is it easier to find and fix a bug nearer in time to its creation, but getting the code right earlier rather than later can have unexpected positive effects on the resulting design. Knowing that you can (or can’t) do something early on may cause you to choose alternatives in the present that alter the design options available in the future. Also, as code accumulates, embedded bugs acquire dependencies. Fixing these bugs late in the process may necessitate changing a lot of dependent code. Fixing bugs early always lowers costs.
Supplying Documentation
Tests provide the only reliable documentation of design. The story they tell remains true long after paper documents become obsolete and human memory fails. Write your tests as if you expect your future self to have amnesia. Remember that you will forget; write tests that remind you of the story once you have.
Deferring Design Decisions
Tests allow you to safely defer design decisions. As your design skills improve you will begin to write applications that are sprinkled with places where you know the design needs something but you don’t yet have enough information to know exactly what. These are the places where you are awaiting additional information, valiantly resisting the forces that compel you to commit to a specific design.
These “pending” decision points are often coded as slightly embarrassing, extremely concrete hacks hidden behind totally presentable interfaces. This situation occurs when you are aware of just one concrete case in the present but you fully expect new cases to arrive in the near future. You know that at some point you will be better served by code that handles these many concrete cases as a single abstraction, but right now you don’t have enough information to anticipate what that abstraction will be.
When your tests depend on interfaces you can refactor the underlying code with reckless abandon. The tests verify the continued good behavior of the interface and changes to the underlying code do not force rewrites of the tests. Intentionally depending on interfaces allows you to use tests to put off design decisions safely and without penalty.
Supporting Abstractions
When more information finally arrives and you make the next design decision, you’ll change the code in ways that increase its level of abstraction. Herein lies another of the benefits of tests on design.
Good design naturally progresses toward small independent objects that rely on abstractions. The behavior of a well-designed application gradually becomes the result of interactions among these abstractions. Abstractions are wonderfully flexible design components but the improvements they provide come at one slight cost: While each individual abstraction might be easy to understand, there is no single place in the code that makes obvious the behavior of the whole.
As the code base expands and the number of abstractions grows, tests become increasingly necessary. There is a level of design abstraction where it is almost impossible to safely make any change unless the code has tests. Tests are your record of the interface of every abstraction and as such they are the wall at your back. They let you put off design decisions and create abstractions to any useful depth.
Exposing Design Flaws
The next benefit of tests is that they expose design flaws in the underlying code. If a test requires painful setup, the code expects too much context. If testing one object drags a bunch of others into the mix, the code has too many dependencies. If the test is hard to write, other objects will find the code difficult to reuse.
Tests are the canary in the coal mine; when the design is bad, testing is hard.
The inverse, however, is not guaranteed to be true. Costly tests do not necessarily mean that the application is poorly designed. It is quite technically possible to write bad tests for well-designed code. Therefore, for tests to lower your costs, both the underlying application and the tests must be well-designed.
Your goal is to gain all of the benefits of testing for the least cost possible. The best way to achieve this goal is to write loosely coupled tests about only the things that matter.
Knowing What to Test
Most programmers write too many tests. This is not always obvious because in many cases the cost of these unnecessary tests is so high that the programmers involved have given up testing altogether. It’s not that they don’t have tests. They have a big, but out-of-date test suite; it just never runs. One simple way to get better value from tests is to write fewer of them. The safest way to accomplish this is to test everything just once and in the proper place.
Removing duplication from testing lowers the cost of changing tests in reaction to application changes, and putting tests in the right place guarantees they’ll be forced to change only when absolutely necessary. Distilling your tests to their essence requires having a very clear idea about what you intend to test, one that can be derived from design principles you already know.
Think of an object-oriented application as a series of messages passing between a set of black boxes. Dealing with every object as a black box puts constraints on what others are permitted to know and limits the public knowledge about any object to the messages that pierce its boundaries.
Well-designed objects have boundaries that are very strong. Each is like the space capsule shown in Figure 9.1. Nothing on the outside can see in, nothing on the inside can see out and only a few explicitly agreed upon messages can pass through the predefined airlocks.
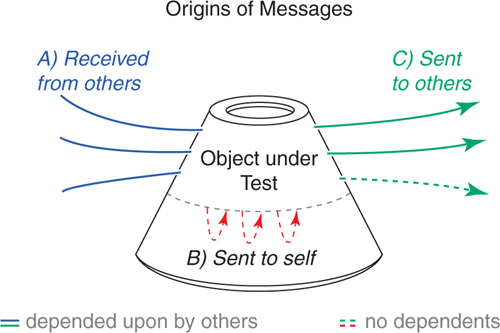
Figure 9.1. Objects under test are like space capsules, messages breach their boundaries.
This willful ignorance of the internals of every other object is at the core of design. Dealing with objects as if they are only and exactly the messages to which they respond lets you design a changeable application, and it is your understanding of the importance of this perspective that allows you to create tests that provide maximum benefit at minimum cost.
The design principles you are enforcing in your application apply to your tests as well. Each test is merely another application object that needs to use an existing class. The more the test gets coupled to that class, the more entangled the two become and the more vulnerable the test is to unnecessarily being forced to change.
Not only should you limit couplings, but the few you allow should be to stable things. The most stable thing about any object is its public interface; it logically follows that the tests you write should be for messages that are defined in public interfaces. The most costly and least useful tests are those that blast holes in an object’s containment walls by coupling to unstable internal details. These over-eager tests prove nothing about the overall correctness of an application but nonetheless raise costs because they break with every refactoring of underlying class.
Tests should concentrate on the incoming or outgoing messages that cross an object’s boundaries. The incoming messages make up the public interface of the receiving object. The outgoing messages, by definition, are incoming into other objects and so are part of some other object’s interface, as illustrated in Figure 9.2.

Figure 9.2. One object’s outgoing message is another’s incoming.
In Figure 9.2, messages that are incoming into Foo make up Foo’s public interface. Foo is responsible for testing its own interface and it does so by making assertions about the results that these messages return. Tests that make assertions about the values that messages return are tests of state. Such tests commonly assert that the results returned by a message equal an expected value.
Figure 9.2 also shows Foo sending messages to Bar. A message sent by Foo to Bar is outgoing from Foo but incoming to Bar. This message is part of Bar’s public interface and all tests of state should thus be confined to Bar. Foo need not, and should not, test these outgoing messages for state. The general rule is that objects should make assertions about state only for messages in their own public interfaces. Following this rule confines tests of message return values to a single place and removes unnecessary duplication, DRYing out your tests and lowering maintenance costs.
The fact that you need not test outgoing messages for state does not mean outgoing messages need no tests at all. There are two flavors of outgoing messages, and one of them requires a different kind of test.
Some outgoing messages have no side effects and thus matter only to their senders. The sender surely cares about the result it gets back (why else send the message?), but no other part of the application cares if the message gets sent. Outgoing messages like this are known as queries and they need not be tested by the sending object. Query messages are part of the public interface of their receiver, which already implements every necessary test of state.
However, many outgoing messages do have side effects (a file gets written, a database record is saved, an action is taken by an observer) upon which your application depends. These messages are commands and it is the responsibility of the sending object to prove that they are properly sent. Proving that a message gets sent is a test of behavior, not state, and involves assertions about the number of times, and with what arguments, the message is sent.
Here, then, are the guidelines for what to test: Incoming messages should be tested for the state they return. Outgoing command messages should be tested to ensure they get sent. Outgoing query messages should not be tested.
As long as your application’s objects deal with one another strictly via public interfaces, your tests need know nothing more. When you test this minimal set of messages, no change in the private behavior of any object can affect any test. When you test outgoing command messages only to prove they get sent, your loosely coupled tests can tolerate application changes without being forced to change in turn. As long as the public interfaces remain stable, you can write tests once and they will keep you safe forever.
Knowing When to Test
You should write tests first, whenever it makes sense to do so.
Unfortunately, judging when it makes sense to do so can be a challenge for novice designers, rendering this advice less than helpful. Novices often write code that is far too coupled; they combine unrelated responsibilities and bind many dependencies into every object. Their applications are tightly woven tapestries of entangled code where no object lives in isolation. It is very hard to retroactively test these applications because tests are reuse and this code can’t be reused.
Writing tests first forces a modicum of reusability to be built into an object from its inception; it would otherwise be impossible to write tests at all. Therefore, novice designers are best served by writing test-first code. Their lack of design skills may make this bafflingly difficult but if they persevere they will at least have testable code, something that may not otherwise be true.
Be warned, however, that writing tests first is no substitute for and does not guarantee a well-designed application. The reusability that results from test-first is an improvement over nothing at all but the resulting application can still fall far short of good design. Well-intentioned novices often write expensive, duplicative tests around messy, tightly coupled code. It is an unfortunate truth that the most complex code is usually written by the least qualified person. This does not reflect an innate complexity of the underlying task, rather a lack of experience on the part of the programmer. Novice programmers don’t yet have the skills to write simple code.
The overcomplicated applications these novices produce should be viewed as triumphs of perseverance; it’s a miracle these applications work at all. The code is hard. The applications are difficult to change and every refactoring breaks all the tests. This high cost of change can easily start a downward productivity spiral that is discouraging for all concerned. Changes cascade throughout the application, and the maintenance cost of tests makes them seem costly relative to their worth.
If you are a novice and in this situation, it’s important to sustain faith in the value of tests. Done at the correct time and in the right amounts, testing, and writing code test-first, will lower your overall costs. Gaining these benefits requires applying object-oriented design principles everywhere, both to the code of your application and to the code in your tests. Your new-found knowledge of design already makes it easier to write testable code, most of the remainder of this chapter illustrates how to apply these design principles during the construction of tests. Because well-designed applications are easy to change, and well-designed tests may very well avoid change altogether, these overall design improvements pay off dramatically.
Experienced designers garner subtler improvements from testing-first. It’s not that they can’t benefit from it or that they’ll never discover something unexpected by following its dictates, rather that the gains accrued from forced reuse are ones they already have. These programmers already write loosely coupled, reusable code; tests add value in other ways.
It is not unheard of for experienced designers to “spike” a problem, that is, to do experiments where they just write code. These experiments are exploratory, for problems about whose solution they are uncertain. Once clarity is gained and a design suggests itself, these programmers then revert to test-first for production code.
Your overall goal is to create well-designed applications that have acceptable test coverage. The best way to reach this goal varies according to the strengths and experience of the programmer.
This license to use your own judgment is not permission to skip testing. Poorly designed code without tests is just legacy code that can’t be tested. Don’t overestimate your strengths and use an inflated self-view as an excuse to avoid tests. While it sometimes makes sense to write a bit of code the old fashioned way, you should err on the side of test-first.
Knowing How to Test
Anyone can create a new Ruby testing framework and sometimes it seems that everyone has. The next shiny new framework may contain a feature that you just can’t live without; if you understand the costs and benefits, feel free to choose any framework that suits you.
However, there are many good reasons to stay within the testing mainstream. The frameworks with the most use have the best support. They are speedily updated to ensure compatibility with new releases of Ruby (and of Rails) and so present no obstacle to keeping current. Their large user base biases them towards maintaining backward compatibility; it’s unlikely they’ll change in such a way as to force a rewrite of all your tests. And because they are widely adopted, it’s easy to find programmers who have experience using them.
As of this writing, the mainstream frameworks are MiniTest, from Ryan Davis and seattle.rb and bundled with Ruby as of version 1.9, and RSpec, from David Chelimsky and the RSpec team. These frameworks have different philosophies and while you may naturally lean towards one or the other, both are excellent choices.
Not only must you choose a framework, you must grapple with alternative styles of testing: Test Driven Development (TDD) and Behavior Driven Development (BDD). Here the decision is not so clear-cut. TDD and BDD may appear to be in opposition but they are best viewed as on a continuum like Figure 9.3, where your values and experience dictate the choice of where to stand.

Figure 9.3. BDD and TDD should be viewed as on a continuum.
Both styles create code by writing tests first. BDD takes an outside-in approach, creating objects at the boundary of an application and working its way inward, mocking as necessary to supply as-yet-unwritten objects. TDD takes an inside-out approach, usually starting with tests of domain objects and then reusing these newly created domain objects in the tests of adjacent layers of code.
Past experience or inclination may render one style more suitable for you than the other, but both are completely acceptable. Each has costs and benefits, some of which will be explored in the next sections on writing tests.
When testing, it’s useful to think of your application’s objects as divided into two major categories. The first category contains the object that you’re testing, referred to from now on as the object under test. The second category contains everything else.
Your tests must obviously know things about the first category, that is, about the object under test, but they should remain as ignorant as possible about the second. Pretend that the rest of the application is opaque, that the only information available during the test is that which can be gained from looking at the object under test.
Once you dial your testing focus down to the specific object under test, you’ll need to choose a testing point-of-view. Your tests could stand completely inside of the object under test, with effective access to all of its internals. This is a bad idea, however, because it allows knowledge that should be private to the object to leak into the tests, increasing coupling between them and raising the likelihood that changes to code will require changes in tests. It’s better for tests to assume a viewpoint that sights along the edges of the object under test, where they can know only about messages that come and go.
Testing Incoming Messages
Incoming messages make up an object’s public interface, the face it presents to the world. These messages need tests because other application objects depend on their signatures and on the results they return.
These first tests use code from the examples in Chapter 3, Managing Dependencies. Following is a reminder of those Wheel and Gear classes, as they were when entangled together. Gear creates an instance of the Wheel class deep inside its gear_inches method, on line 24 below.
The remainder of this chapter contains tests for code that appeared previously in this book. These code samples served earlier to explain the principles of object-oriented design; here they will illustrate how to test different components of design. The following tests don’t cover every line of code you’ve seen, but they do test every concept you’ve learned in this book.
1 class Wheel
2 attr_reader :rim, :tire
3 def initialize(rim, tire)
4 @rim = rim
5 @tire = tire
6 end
7
8 def diameter
9 rim + (tire * 2)
10 end
11 # ...
12 end
13
14 class Gear
15 attr_reader :chainring, :cog, :rim, :tire
16 def initialize(args)
17 @chainring = args[:chainring]
18 @cog = args[:cog]
19 @rim = args[:rim]
20 @tire = args[:tire]
21 end
22
23 def gear_inches
24 ratio * Wheel.new(rim, tire).diameter
25 end
26
27 def ratio
28 chainring / cog.to_f
29 end
30 # ...
31 end
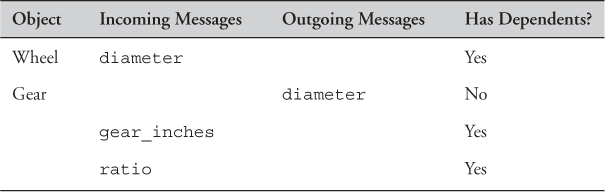
Table 9.1 shows the messages (other than those that return simple attributes) that cross these object’s boundaries. Wheel responds to one incoming message, diameter (which in turn is sent by, or outgoing from, Gear) and Gear responds to two incoming messages, gear_inches and ratio.
Table 9.1. Incoming and Outgoing Messages by Object.
The opening paragraph of this section stated that every incoming message is part of an object’s public interface and so must be tested. Now it’s time to add a slight caveat to this rule.
Deleting Unused Interfaces
Incoming messages ought to have dependents. As you can see from Table 9.1, this is true for diameter, gear_inches, and ratio where they are incoming messages. Some object other than the original implementer depends on each of these messages.
If you draw this table for the object under test and find a purported incoming message that does not have dependents, you should view that message with great suspicion. What purpose is served by implementing a message that no one sends? It’s not really incoming at all, it’s a speculative implementation that reeks of guessing about the future and clearly anticipates requirements that do not exist.
Do not test an incoming message that has no dependents; delete it. You application is improved by ruthlessly eliminating code that is not actively being used. Such code is negative cash flow, it adds testing and maintenance burdens but provides no value. Deleting unused code saves money right now, if you do not do so you must test it.
Overcome any reluctance that you feel; practicing this pruning will teach you its value. Until such time as you are completely convinced of the rightness of this strategy you may console yourself with the knowledge that in extremity you can recover deleted code from revision control. Regardless of whether you do it with joy or in pain, delete the code. Unused code costs more to keep than to recover.
Proving the Public Interface
Incoming messages are tested by making assertions about the value, or state, that their invocation returns. The first requirement for testing an incoming message is to prove that it returns the correct value in every possible situation.
The following code shows a test of Wheel’s diameter method. Line 4 creates an instance of Wheel and line 6 asserts that this Wheel has a diameter of 29.
1 class WheelTest < MiniTest::Unit::TestCase
2
3 def test_calculates_diameter
4 wheel = Wheel.new(26, 1.5)
5
6 assert_in_delta(29,
7 wheel.diameter,
8 0.01)
9 end
10 end
This test is extremely simple and it invokes very little code. Wheel has no hidden dependencies so no other application objects get created as a side effect of running this test. Wheel’s design allows you to test it independently of every other class in your application.
Testing Gear is a bit more interesting. Gear requires a few more arguments than Wheel, but even so the overall structure of these two tests is very similar. In the gear_inches test below, line 4 creates a new instance of Gear and line 10 makes assertions about the results of the method.
1 class GearTest < MiniTest::Unit::TestCase
2
3 def test_calculates_gear_inches
4 gear = Gear.new(
5 chainring: 52,
6 cog: 11,
7 rim: 26,
8 tire: 1.5 )
9
10 assert_in_delta(137.1,
11 gear.gear_inches,
12 0.01)
13 end
14 end
This new gear_inches test looks a lot like Wheel’s diameter test but don’t be fooled by appearances. This test has entanglements that the diameter test did not have. Gear’s implementation of gear_inches unconditionally creates and uses another object, Wheel. Gear and Wheel are coupled in the code and in the tests, though it’s not obvious here.
The fact that Gear’s gear_inches method creates and uses another object effects how long this test runs and how likely it is to suffer unintended consequences as a result of changes to unrelated parts of the application. The coupling that creates this problem, however, is hidden inside of Gear and so totally invisible in this test. The test’s purpose is to prove that gear_inches returns the right result and it certainly fulfills that requirement, but the way the underlying code is structured adds hidden risk.
If Wheels are expensive to create, the Gear test pays that cost even though it has no interest in Wheel. If Gear is correct but Wheel is broken, the Gear test might fail in a misleading way, at a place far distant from the code you’re trying to test.
Tests run fastest when they execute the least code and the volume of external code that a test invokes is directly related to your design. An application constructed of tightly coupled, dependent-laden objects is like a tapestry where pulling on one thread drags the entire rug along. When tightly coupled objects are tested, a test of one object runs code in many others. If the code were such that Wheel were also coupled to other objects, this problem is magnified; running the Gear test would then create a large network of objects, any of which might break in a maddeningly confusing way.
These problems are manifested in, but are not unique to, the tests. Because tests are the first reuse of code, this problem is but a harbinger of things to come for your application as a whole.
Isolating the Object Under Test
Gear is a simple object but attempts to test its gear_inches method have already unearthed hidden complexity. The goal of this test is ensure that gear inches are calculated correctly but it turns out that running gear_inches relies on code in objects other than Gear.
This exposes a broader design problem; when you can’t test Gear in isolation, it bodes ill for the future. This difficulty in isolating Gear for testing reveals that it is bound to a specific context, one that imposes limitations that will interfere with reuse.
Chapter 3 broke this binding by removing the creation of Wheel from Gear. Here’s a copy of the code that made that transition; Gear now expects to be injected with an object that understands diameter.
1 class Gear
2 attr_reader :chainring, :cog, :wheel
3 def initialize(args)
4 @chainring = args[:chainring]
5 @cog = args[:cog]
6 @wheel = args[:wheel]
7 end
8
9 def gear_inches
10 # The object in the'wheel' variable
11 # plays the 'Diameterizable' role.
12 ratio * wheel.diameter
13 end
14
15 def ratio
16 chainring / cog.to_f
17 end
18 # ...
19 end
This transition of code is paralleled by a transition of thought. Gear no longer cares about the class of the injected object, it merely expects that it implement diameter. The diameter method is part of the public interface of a role, one that might reasonably be named Diameterizable.
Now that Gear is decoupled from Wheel, you must inject an instance of Diameterizable during every Gear creation. However, because Wheel is the only application class that plays this role, your runtime options are severely limited. In real life, as the code currently exists, every Gear that you create will of necessity be injected with an instance of Wheel.
As circular as this sounds, injecting a Wheel into Gear is not the same as injecting a Diameterizable. The application code looks exactly the same, granted, but its logical meaning differs. The difference is not in the characters that you type but in your thoughts about what they mean. Freeing your imagination from an attachment to the class of the incoming object opens design and testing possibilities that are otherwise unavailable. Thinking of the injected object as an instance of its role gives you more choices about what kind of Diameterizable to inject into Gear during your tests.
One possible Diameterizable is, obviously, Wheel, because it clearly implements the correct interface. The next example makes this very prosaic choice; it updates the existing test to accommodate the changes to the code by injecting an instance of Wheel (line 6) during the test.
1 class GearTest < MiniTest::Unit::TestCase
2 def test_calculates_gear_inches
3 gear = Gear.new(
4 chainring: 52,
5 cog: 11,
6 wheel: Wheel.new(26, 1.5))
7
8 assert_in_delta(137.1,
9 gear.gear_inches,
10 0.01)
11 end
12 end
Using a Wheel for the injected Diameterizable results in test code that exactly mirrors the application. It is now obvious, both in the application and in the tests, that Gear is using Wheel. The invisible coupling between these classes has been publicly exposed.
This test is fast enough but this adequate speed is quite by accident. It’s not that the gear_inches test has been carefully isolated and thus decoupled from other code; not at all, it’s just that all the code coupled to this test runs quickly as well.
Notice also that it’s not obvious here (or anywhere else for that matter) that Wheel is playing the Diameterizable role. The role is virtual, it’s all in your head. Nothing about the code guides future maintainers to think of Wheel as a Diameterizable.
However, despite the invisibility of the role and this coupling to Wheel, structuring the test in this way has one very real advantage, as the next section shows.
Injecting Dependencies Using Classes
When the code in your test uses the same collaborating objects as the code in your application, your tests always break when they should. The value of this cannot be underestimated.
Here’s a simple example. Imagine that Diameterizable's public interface changes. Another programmer goes into the Wheel class and changes the diameter method’s name to width, as shown in line 8 below.
1 class Wheel
2 attr_reader :rim, :tire
3 def initialize(rim, tire)
4 @rim = rim
5 @tire = tire
6 end
7
8 def width # <—— used to be 'diameter'
9 rim + (tire * 2)
10 end
11 # ...
12 end
Imagine further that this programmer failed to update the name of the sent message in Gear. Gear still sends diameter in its gear_inches method, as you can see in this reminder of Gear’s current code:
1 class Gear
2 # ...
3 def gear_inches
4 ratio * wheel.diameter # <—- obsolete
5 end
6 end
Because the Gear test injects an instance of Wheel and Wheel implements width but Gear sends diameter, the test now fails:
1 Gear
2 ERROR test_calculates_gear_inches
3 undefined method 'diameter'
This failure is unsurprising, it is exactly what should happen when two concrete objects collaborate and the receiver of a message changes but its sender does not. Wheel has changed and as a result Gear needs to change. This test fails as it should.
The test is simple and the failure obvious because the code is so concrete, but like all concretions it works only for this specific case. Here, for this code, the test above is good enough, but there are other situations in which you are better served to locate and test the abstraction.
A more extreme example illuminates the problem. If there are hundreds of Diameterizables, how do you decide which is most intention revealing to inject during the test? What if Diameterizables are extremely costly, how do you avoid running lots of unnecessary, time-consuming code? Common sense suggests that if Wheel is the only Diameterizable and it is fast enough, the test should just inject a Wheel, but what if your choice is less obvious?
Injecting Dependencies as Roles
The Wheel class and the Diameterizable role are so closely aligned that it’s hard to see them as separate concepts, but understanding what happened in the previous test requires making a distinction. Gear and Wheel both have relationships with a third thing, the Diameterizable role. As you can see in Figure 9.4, Diameterizable is depended on by Gear and implemented by Wheel.
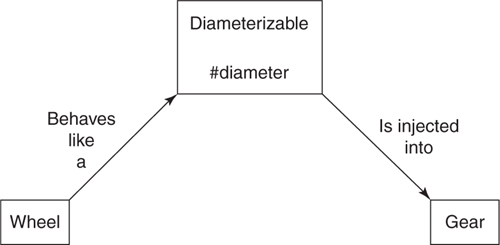
Figure 9.4. Gear depends upon Diameterizable; Wheel implements it.
This role is an abstraction of the idea that disparate objects can have diameters. As with all abstractions, it is reasonable to expect this abstract role to be more stable than the concretion from which it came. However in the specific case above the opposite is true.
There are two places in the code where an object depends on knowledge of Diameterizable. First, Gear thinks that it knows Diameterizable’s interface; that is, it believes it can send diameter to the injected object. Second, the code that created the object to be injected believes that Wheel implements this interface; that is, it expects Wheel to implement diameter. Now that Diameterizable has changed, there’s a problem. Wheel has been updated to implement the new interface but unfortunately Gear still expects the old one.
The whole point of dependency injection is that it allows you to substitute different concrete classes without changing existing code. You can assemble new behavior by creating new objects that play existing roles and injecting these objects where those roles are expected. Object-oriented design tells you to inject dependencies because it believes that specific concrete classes will vary more than these roles, or conversely, roles will be more stable than the classes from which they were abstracted.
Unfortunately, the opposite just happened. In this example it was not the class of the injected object that changed, it was the interface of the role. It is still correct to inject a Wheel but now incorrect to send that Wheel the diameter message.
When a role has a single player, that one concrete player and the abstract role are so closely aligned that the boundaries between them are easily blurred and it is a practical fact that sometimes this blurring doesn’t matter. In this case Wheel is the only player of Diameterizable and you don’t currently expect to have others. If Wheels are cheap, injecting an actual Wheel has little negative effect on your tests.
When the application code can only be written one way, mirroring that arrangement is often the most effective way to write tests. Doing so permits tests to correctly fail regardless of whether the concretion (the name of the Wheel class) or the abstraction (the interface to the diameter method) changes.
However, this is not always true. Sometimes there are forces at work that drive you to wish to forgo the use of Wheel in your tests. If your application contains many different Diameterizables you might want to create an idealized one so your tests clearly convey the idea of this role. If all Diameterizables are expensive, you may want to fake a cheap one to make your tests run faster. If you are doing BDD, your application might not yet contain any object that plays this role; you may be forced to manufacture something just to write the test.
Creating Test Doubles
This next example explores the idea of creating a fake object, or test double, to play the Diameterizable role. For this test, assume Diameterizable’s interface has reverted to the original diameter method and that diameter is again correctly implemented by Wheel and sent by Gear. Line 2 below creates a fake, DiameterDouble. Line 13 injects this fake into Gear.
1 # Create a player of the 'Diameterizable' role
2 class DiameterDouble
3 def diameter
4 10
5 end
6 end
7
8 class GearTest < MiniTest::Unit::TestCase
9 def test_calculates_gear_inches
10 gear = Gear.new(
11 chainring: 52,
12 cog: 11,
13 wheel: DiameterDouble.new)
14
15 assert_in_delta(47.27,
16 gear.gear_inches,
17 0.01)
18 end
19 end
A test double is a stylized instance of a role player that is used exclusively for testing. Doubles like this are very easy to make; nothing hinders you from creating one for every possible situation. Each variation is like an artist’s sketch. It emphasizes a single interesting feature and allows the underlying object’s other details to recede to the background.
This double stubs diameter, that is, it implements a version of diameter that returns a canned answer. DiameterDouble is quite limited, but that’s the whole point. The fact that it always returns 10 for diameter is perfect. This stubbed return value provides a dependable foundation on which to construct the test.
Many test frameworks have built-in ways to create doubles and to stub return values. These specialized mechanisms can be handy, but for simple test doubles it’s fine to use plain old Ruby objects, as does the example above.
DiameterDouble is not a mock. It’s easy to slip into the habit of using the word “mock” to describe this double, but mocks are something else entirely and will be covered later in this chapter in the section Testing Outgoing Messages.
Injecting this double decouples the Gear test from the Wheel class. It no longer matters if Wheel is slow because DiameterDouble is always fast. This test works just fine, as running it shows:
1 GearTest
2 PASS test_calculates_gear_inches
This test uses a test double and is therefore simple, fast, isolated, and intention revealing; what could possibly go wrong?
Living the Dream
Imagine now that the code undergoes the same alternations as before: Diameterizable’s interface changes from diameter to width and Wheel gets updated but Gear does not. This change once again breaks the application. Remember that the previous Gear test (which injected a Wheel instead of using a double) noticed this problem right away and began to fail with an undefined method 'diameter' error.
Now that you’re injecting DiameterDouble, however, here’s what happens when you re-run the test:
1 GearTest
2 PASS test_calculates_gear_inches
The test continues to pass even though the application is definitely broken. This application cannot possibly work; Gear sends diameter but Wheel implements width.
You have created an alternate universe, one in which tests cheerfully report that all is well despite the fact that the application is manifestly incorrect. The possibility of creating this universe is what causes some to warn that stubbing (and mocking) makes for brittle tests. However, as is always true, the fault here is with the programmer, not the tool. Writing better code requires understanding the root cause of this problem, which in turn necessitates a closer look at its components.
The application contains a Diameterizable role. This role originally had one player, Wheel. When GearTest created DiameterDouble, it introduced a second player of the role. When the interface of a role changes, all players of the role must adopt the new interface. It’s easy, however, to overlook role players that were constructed specifically for tests and that is exactly what happened here. Wheel got updated with the new interface but DiameterDouble did not.
Using Tests to Document Roles
It’s no wonder this problem occurs; the role is nearly invisible. There’s no place in the application where you can point your finger and say “This defines Diameterizable.” When remembering that the role even exists is a challenge, forgetting that test doubles play it is inevitable.
One way to raise the role’s visibility is to assert that Wheel plays it. Line 6 below does just this; it documents the role and proves that Wheel correctly implements its interface.
1 class WheelTest < MiniTest::Unit::TestCase
2 def setup
3 @wheel = Wheel.new(26, 1.5)
4 end
5
6 def test_implements_the_diameterizable_interface
7 assert_respond_to(@wheel, :diameter)
8 end
9
10 def test_calculates_diameter
11 wheel = Wheel.new(26, 1.5)
12
13 assert_in_delta(29,
14 wheel.diameter,
15 0.01)
16 end
17 end
The implements_the_diameterizable_interface test introduces the idea of tests for roles but is not a completely satisfactory solution. It is, in fact, woefully incomplete. First, it cannot be shared with other Diameterizables. Other players of this role would have to duplicate this test. Next, it does nothing to help with the “living the dream” problem from the Gear test. Wheel’s assertion that it plays this role does not prevent Gear’s DiameterDouble from becoming obsolete and allowing the gear_inches test to erroneously pass.
Fortunately, the problem of documenting and testing roles has a simple solution, one that will be thoroughly covered in the subsequent section, Proving the Correctness of Ducks. For now it’s enough to recognize that roles need tests of their own.
The goal of this section was to prove public interfaces by testing incoming messages. Wheel was cheap to test. The original Gear test was more expensive because it depended on a hidden coupling to Wheel. Replacing that coupling with an injected dependency on Diameterizable isolated the object under test but created a dilemma about whether to inject a real or a fake object.
This choice between injecting real or fake objects has far-reaching consequences. Injecting the same objects at test time as are used at runtime ensures that tests break correctly but may lead to long running tests. Alternatively, injecting doubles can speed tests but leave them vulnerable to constructing a fantasy world where tests work but the application fails.
Notice that the act of testing did not, by itself, force an improvement in design. Nothing about testing made you remove the coupling and inject the dependency. While it’s true that the outside-in approach of BDD provides more guidance than does TDD, neither practice prevents a naïve designer from writing Wheel and then embedding the creation of a Wheel deep inside of Gear. This coupling doesn’t make tests impossible, it just raises costs. Reducing the coupling is up to you and relies on your understanding of the principles of design.
Testing Private Methods
Sometimes the object under test sends messages to itself. Messages sent to self invoke methods that are defined in the receiver’s private interface. These private messages are like proverbial trees falling in empty forests; they do not exist, at least as far as the rest of your application is concerned. Because sends of private methods cannot be seen from outside of the black box of the object under test, in the pristine world of idealized design they need not be tested.
However, the real world is not so neat and this simple rule does not completely suffice. Dealing with private methods requires judgment and flexibility.
Ignoring Private Methods During Tests
There are many excellent reasons to omit tests of private methods.
First, such tests are redundant. Private methods are hidden inside the object under test and their results cannot be seen by others. These private methods are invoked by public methods that already have tests. A bug in a private method can certainly break the overall application but this failure will always be exposed by an existing test. Testing private methods is never necessary.
Second, private methods are unstable. Tests of private methods are therefore coupled to application code that is likely to change. When the application changes the tests will be forced to change in turn. It’s easy to create a situation where precious time is spent performing ongoing maintenance on unnecessary tests.
Finally, testing private methods can mislead others into using them. Tests provide documentation about the object under test. They tell a story about how it expects to interact with the world at large. Including private methods in this story distracts the readers from its main purpose and encourages them to break encapsulation and to depend on these methods. Your tests should hide private methods, not expose them.
Removing Private Methods from the Class Under Test
One way to sidestep this entire problem is to avoid private methods altogether. If you have no private methods, you need not be concerned for their tests.
An object with many private methods exudes the design smell of having too many responsibilities. If your object has so many private methods that you dare not leave them untested, consider extracting the methods into new object. The extracted methods form the core of the responsibilities of the new object and so make up its public interface, which is (theoretically) stable and thus safe to depend upon.
This strategy is a good one, but unfortunately is only truly helpful if the new interface is indeed stable. Sometimes the new interface is not, and it is at this point that theory and practice part ways. This new public interface will be exactly as stable (or as unstable) as was the original private interface. Methods don’t magically become more reliable just because they got moved. It is costly to couple to unstable methods—regardless of whether they are portrayed as public or private.
Choosing to Test a Private Method
Times of great uncertainly call for drastic measures. It is therefore occasionally defensible to fling a bit of smelly code into place and hide the mess until better information arrives. Hiding messes is easily done; just wrap the offending code in a private method.
If you create a mess and never fix it your costs will eventually go up, but in the short term, for the right problem, having enough confidence to write embarrassing code can save money. When your intention is to defer a design decision, do the simplest thing that solves today’s problem. Isolate the code behind the best interface you can conceive and hunker down and wait for more information.
Applying this strategy can result in private methods that are wildly unstable. Once you’ve made this leap it’s reasonable to consider compounding your sins by testing these unstable methods. The application code is ugly and will undergo frequent change; the risk of breaking something is ever-present. These tests are costly and will likely be forced to change in lock-step with the underlying code, but every other option for keeping things running may be more expensive.
These tests of private methods aren’t necessary in order to know that a change broke something, the public interface tests still serve that purpose admirably. Tests of private methods produce error messages that directly pinpoint the failing parts of private code. These more specific errors are tight couplings that increase maintenance costs, but they make it easier to understand the effects of changes and so they take some of the pain out of refactoring complex private code.
Reducing the barriers to refactoring is important, because refactor you will. That’s the whole point. The mess is temporary, you intend to refactor out of it. As more design information arrives, these private methods will improve. Once the fog clears and a design reveals itself, the methods will become more stable. As stability improves, the cost of maintaining and the need for tests will go down. Eventually it will be possible to extract the private methods into a separate class and safely expose them to the world.
The rules-of-thumb for testing private methods are thus: Never write them, and if you do, never ever test them, unless of course it makes sense to do so. Therefore, be biased against writing these tests but do not fear to do so if this would improve your lot.
Testing Outgoing Messages
Outgoing messages, as you know from the “What to Test” section, are either queries or commands. Query messages matter only to the object that sends them, while command messages have effects that are visible to other objects in your application.
Ignoring Query Messages
Messages that have no side effects are known as query messages. Here’s a simple example, where Gear’s gear_inches method sends diameter.
1 class Gear
2 # ...
3 def gear_inches
4 ratio * wheel.diameter
5 end
6 end
Nothing in the application other than the gear_inches method cares that diameter gets sent. The diameter method has no side effects, running it leaves no visible trace, and no other objects depend on its execution.
In the same way that tests should ignore messages sent to self, they also should ignore outgoing query messages. The consequences of sending diameter are hidden inside of Gear. Because the overall application does not need this message to be sent, your tests need not care.
Gear’s gear_inches method depends on the result that diameter returns, but tests to prove the correctness of diameter belong in Wheel, not here in Gear. It is redundant for Gear to duplicate those tests, maintenance costs will increase if it does. Gear’s only responsibility is to prove that gear_inches works correctly and it can do this by simply testing that gear_inches always returns appropriate results.
Proving Command Messages
Sometimes, however, it does matter that a message get sent; other parts of your application depend on something that happens as a result. In this case the object under test is responsible for sending the message and your tests must prove it does so.
Illustrating this problem requires a new example. Imagine a game where players race virtual bicycles. These bicycles, obviously, have gears. The Gear class is now responsible for letting the application know when a player changes gears so the application can update the bicycle’s behavior.
In the following code, Gear meets this new requirement by adding an observer. When a player shifts gears the set_cog or set_chainring methods execute. These methods save the new value and then invoke Gear’s changed method (line 20). This method then sends changed to observer, passing along the current chainring and cog.
1 class Gear
2 attr_reader :chainring, :cog, :wheel, :observer
3 def initialize(args)
4 # ...
5 @observer = args[:observer]
6 end
7
8 # ...
9
10 def set_cog(new_cog)
11 @cog = new_cog
12 changed
13 end
14
15 def set_chainring(new_chainring)
16 @chainring = new_chainring
17 changed
18 end
19
20 def changed
21 observer.changed(chainring, cog)
22 end
23 # ...
24 end
Gear has a new responsibility; it must notify observer when cogs or chainrings change. This new responsibility is just as important as its previous obligation to calculate gear inches. When a player changes gears the application will be correct only if Gear sends changed to observer. Your tests should prove this message gets sent.
Not only should they prove it, but they also should do so without making assertions about the result that observer’s changed method returns. Just as Wheel’s tests claimed sole responsibility for making assertions about the results of its own diameter method, observer’s tests are responsible for making assertions about the results of its changed method. The responsibility for testing a message’s return value lies with its receiver. Doing so anywhere else duplicates tests and raises costs.
To avoid duplication you need a way to prove that Gear sends changed to observer that does not force you to rely on checking what comes back when it does. Fortunately, this is easy; you need a mock. Mocks are tests of behavior, as opposed to tests of state. Instead of making assertions about what a message returns, mocks define an expectation that a message will get sent.
The test below proves that Gear fulfills its responsibilities and it does so without binding itself to details about how observer behaves. The test creates a mock (line 4) that it injects in place of the observer (line 8). Each test method tells the mock to expect to receive the changed message (lines 12 and 17) and then verifies that it did so (lines 14 and 20).
1 class GearTest < MiniTest::Unit::TestCase
2
3 def setup
4 @observer = MiniTest::Mock.new
5 @gear = Gear.new(
6 chainring: 52,
7 cog: 11,
8 observer: @observer)
9 end
10
11 def test_notifies_observers_when_cogs_change
12 @observer.expect(:changed, true, [52, 27])
13 @gear.set_cog(27)
14 @observer.verify
15 end
16
17 def test_notifies_observers_when_chainrings_change
18 @observer.expect(:changed, true, [42, 11])
19 @gear.set_chainring(42)
20 @observer.verify
21 end
22 end
This is the classic usage pattern for a mock. In the notifies_observers_when_cogs_change test above, line 12 tells the mock what message to expect, line 13 triggers the behavior that should cause this expectation to be met, and then line 14 asks the mock to verify that it indeed was. The test passes only if sending set_chainring to gear does something that causes observer to receive changed with the given arguments.
Notice that all the mock did with the message was remember that it received it. If the object under test depends on the result it gets back when observer receives changed, the mock can be configured to return an appropriate value. This return value, however, is beside the point. Mocks are meant to prove messages get sent, they return results only when necessary to get tests to run.
The fact that Gear works just fine even after you mock observer's changed method such that it does absolutely nothing proves that Gear doesn’t care what that method actually does. Gear’s only responsibility is to send the message; this test should restrict itself to proving Gear does so.
In a well-designed application, testing outgoing messages is simple. If you have proactively injected dependencies, you can easily substitute mocks. Setting expectations on these mocks allows you to prove that the object under test fulfills its responsibilities without duplicating assertions that belong elsewhere.
Testing Duck Types
The Testing Incoming Messages section in this chapter wandered into the territory of testing roles, but while it introduced the issue, it did not provide a satisfactory resolution. It’s time to return to that topic and examine how to test duck types. This section shows how to create tests that role players can share and then returns to the original problem and uses shareable tests to prevent test doubles from becoming obsolete.
Testing Roles
The code for this first example comes from the Preparer duck type of Chapter 5, Reducing Costs with Duck Typing. These first few code samples repeat part of the lesson from Chapter 5; feel free to skim down to the first test if you have a clear memory of the problem.
Here’s a reminder of the original Mechanic, TripCoordinator, and Driver classes:
1 class Mechanic
2 def prepare_bicycle(bicycle)
3 #...
4 end
5 end
6
7 class TripCoordinator
8 def buy_food(customers)
9 #...
10 end
11 end
12
13 class Driver
14 def gas_up(vehicle)
15 #...
16 end
17 def fill_water_tank(vehicle)
18 #...
19 end
20 end
Each of these classes has a reasonable public interface, yet when Trip used these interfaces to prepare a trip it was forced to check the class of each object to determine which message to send, as shown here:
1 class Trip
2 attr_reader :bicycles, :customers, :vehicle
3
4 def prepare(preparers)
5 preparers.each {|preparer|
6 case preparer
7 when Mechanic
8 preparer.prepare_bicycles(bicycles)
9 when TripCoordinator
10 preparer.buy_food(customers)
11 when Driver
12 preparer.gas_up(vehicle)
13 preparer.fill_water_tank(vehicle)
14 end
15 }
16 end
17 end
The case statement above couples prepare to three existing concrete classes. Imagine trying to test the prepare method or the consequences of adding a new kind of preparer into this mix. This method is painful to test and expensive to maintain.
If you come upon code that uses this antipattern but does not have tests, consider refactoring to a better design before writing them. It’s always dangerous to make changes in the absence of tests, but this teetering pile of code is so fragile that refactoring it first might well be the most cost-effective strategy. The refactoring that fixes this problem is simple and makes all subsequent change easier.
The first part of the refactoring is to decide on Preparer’s interface and to implement that interface in every player of the role. If the public interface of Preparer is prepare_trip, the following changes allow Mechanic, TripCoordinator, and Driver to play the role:
1 class Mechanic
2 def prepare_trip(trip)
3 trip.bicycles.each {|bicycle|
4 prepare_bicycle(bicycle)}
5 end
6
7 # ...
8 end
9
10 class TripCoordinator
11 def prepare_trip(trip)
12 buy_food(trip.customers)
13 end
14
15 # ...
16 end
17
18 class Driver
19 def prepare_trip(trip)
20 vehicle = trip.vehicle
21 gas_up(vehicle)
22 fill_water_tank(vehicle)
23 end
24 # ...
25 end
Now that Preparers exist, Trip’s prepare method can be vastly simplified. The following refactoring alters Trip’s prepare method to collaborate with Preparers instead of sending unique messages to each specific class:
1 class Trip
2 attr_reader :bicycles, :customers, :vehicle
3
4 def prepare(preparers)
5 preparers.each {|preparer|
6 preparer.prepare_trip(self)}
7 end
8 end
Having done these refactorings you are positioned to write tests. The above code contains a collaboration between Preparers and a Trip, which can now be thought of as a Preparable. Your tests should document the existence of the Preparer role, prove that each of its players behaves correctly, and show that Trip interacts with them appropriately.
Because several different classes act as Preparers, the role’s test should be written once and shared by every player. MiniTest is a low ceremony testing framework and it supports sharing tests in the simplest possible way, via Ruby modules.
Here’s a module that tests and documents the Preparer interface:
1 module PreparerInterfaceTest
2 def test_implements_the_preparer_interface
3 assert_respond_to(@object, :prepare_trip)
4 end
5 end
This module proves that @object responds to prepare_trip. The test below uses this module to prove that Mechanic is a Preparer. It includes the module (line 2) and provides a Mechanic during setup via the @object variable (line 5).
1 class MechanicTest < MiniTest::Unit::TestCase
2 include PreparerInterfaceTest
3
4 def setup
5 @mechanic = @object = Mechanic.new
6 end
7
8 # other tests which rely on @mechanic
9 end
The TripCoordinator and Driver tests follow this same pattern. They also include the module (lines 2 and 10 below) and initialize @object in their setup methods (lines 5 and 13).
1 class TripCoordinatorTest < MiniTest::Unit::TestCase
2 include PreparerInterfaceTest
3
4 def setup
5 @trip_coordinator = @object = TripCoordinator.new
6 end
7 end
8
9 class DriverTest < MiniTest::Unit::TestCase
10 include PreparerInterfaceTest
11
12 def setup
13 @driver = @object = Driver.new
14 end
15 end
Running these three tests produces a satisfying result:
1 DriverTest
2 PASS test_implements_the_preparer_interface
3
4 MechanicTest
5 PASS test_implements_the_preparer_interface
6
7 TripCoordinatorTest
8 PASS test_implements_the_preparer_interface
Defining the PreparerInterfaceTest as a module allows you to write the test once and then reuse it in every object that plays the role. The module serves as a test and as documentation. It raises the visibility of the role and makes it easy to prove that any newly created Preparer successfully fulfills its obligations.
The test_implements_the_preparer_interface method tests an incoming message and as such belongs with the receiving object’s tests, which is why the module gets included in the tests of Mechanic, TripCoordinator, and Driver. Incoming messages, however, go hand-in-hand with outgoing messages and you must test both sides of this equation. You have proven that all receivers correctly implement prepare_trip, now you must also prove that Trip correctly sends it.
As you know, proving that an outgoing message gets sent is done by setting expectations on a mock. The following test creates a mock (line 4), tells it to expect prepare_trip (line 6), triggers Trip’s prepare method (line 8), and then verifies that the mock received the proper message (line 9).
1 class TripTest < MiniTest::Unit::TestCase
2
3 def test_requests_trip_preparation
4 @preparer = MiniTest::Mock.new
5 @trip = Trip.new
6 @preparer.expect(:prepare_trip, nil, [@trip])
7
8 @trip.prepare([@preparer])
9 @preparer.verify
10 end
11 end
The test_requests_trip_preparation test lives directly in TripTest. Trip is the only Preparable in the application so there’s no other object with which to share this test. If other Preparables arise the test should be extracted into a module and shared among Preparables at that time.
Running this test proves that Trip collaborates with Preparers using the correct interface:
1 TripTest
2 PASS test_requests_trip_preparation
This completes the tests of the Preparer role. It’s now possible to return to the problem of brittleness when using doubles to play roles in tests.
Using Role Tests to Validate Doubles
Now that you know how to write reusable tests that prove an object correctly plays a role you can use this technique to reduce the brittleness caused by stubbing.
The earlier section, Testing Incoming Messages, introduced the “living the dream” problem. The final test in that section contained a misleading false positive, in which a test that should have failed instead passed because of a test double that stubbed an obsolete method. Here’s a reminder of that faultily passing test:
1 class DiameterDouble
2
3 def diameter # The interface changed to 'width',
4 10 # but this double and Gear both
5 end # still use 'diameter'.
6 end
7
8 class GearTest < MiniTest::Unit::TestCase
9 def test_calculates_gear_inches
10 gear = Gear.new(
11 chainring: 52,
12 cog: 11,
13 wheel: DiameterDouble.new)
14
15 assert_in_delta(47.27,
16 gear.gear_inches,
17 0.01)
18 end
19 end
The problem with this test is that DiameterDouble purports to play the Diameterizable role but it does so incorrectly. Now that Diameterizable’s interface has changed DiameterDouble is out-of-date. This obsolete double enables the test to bumble along in the mistaken belief that Gear works correctly, when in actual fact GearTest only works when combined with its similarly confused test double. The application is broken but you cannot tell it by running this test.
You last saw WheelTest in the Using Tests to Document Roles section, where it was attempting to counter this problem by raising the visibility of Diameterizable’s interface. Here’s an example where line 6 proves that Wheel acts like a Diameterizable that implements width:
1 class WheelTest < MiniTest::Unit::TestCase
2 def setup
3 @wheel = Wheel.new(26, 1.5)
4 end
5
6 def test_implements_the_diameterizable_interface
7 assert_respond_to(@wheel, :width)
8 end
9
10 def test_calculates_diameter
11 # ...
12 end
13 end
With this test, you now hold all the pieces needed to solve the brittleness problem. You know how to share tests among players of a role, you recognize that you have two players of the Diameterizable role, and you have a test that any object can use to prove that it correctly plays the role.
The first step in solving the problem is to extract test_implements_the_diameterizable_interface from Wheel into a module of its own:
1 module DiameterizableInterfaceTest
2 def test_implements_the_diameterizable_interface
3 assert_respond_to(@object, :width)
4 end
5 end
Once this module exists, reintroducing the extracted behavior back into WheelTest is a simple matter of including the module (line 2) and initializing @object with a Wheel (line 5):
1 class WheelTest < MiniTest::Unit::TestCase
2 include DiameterizableInterfaceTest
3
4 def setup
5 @wheel = @object = Wheel.new(26, 1.5)
6 end
7
8 def test_calculates_diameter
9 # ...
10 end
11 end
At this point WheelTest works just as it did before the extraction, as you can see by running the test:
1 WheelTest
2 PASS test_implements_the_diameterizable_interface
3 PASS test_calculates_diameter
It’s gratifying that the WheelTest still passes but this refactoring serves a broader purpose than that of merely rearranging the code. Now that you have an independent module that proves that a Diameterizable behaves correctly, you can use the module to prevent test doubles from silently becoming obsolete.
The GearTest below has been updated to use this new module. Lines 9 through 15 define a new test class, DiameterDoubleTest. DiameterDoubleTest is not about Gear per se, its purpose is to prevent test brittleness by ensuring the ongoing soundness of the double.
1 class DiameterDouble
2 def diameter
3 10
4 end
5 end
6
7 # Prove the test double honors the interface this
8 # test expects.
9 class DiameterDoubleTest < MiniTest::Unit::TestCase
10 include DiameterizableInterfaceTest
11
12 def setup
13 @object = DiameterDouble.new
14 end
15 end
16
17 class GearTest < MiniTest::Unit::TestCase
18 def test_calculates_gear_inches
19 gear = Gear.new(
20 chainring: 52,
21 cog: 11,
22 wheel: DiameterDouble.new)
23
24 assert_in_delta(47.27,
25 gear.gear_inches,
26 0.01)
27 end
28 end
The fact that DiameterDouble and Gear are both incorrect has been allowing previous versions of this test to pass. Now that the double is being tested to ensure it honestly plays its role, running the test finally produces an error:
1 DiameterDoubleTest
2 FAIL test_implements_the_diameterizable_interface
3 Expected #<DiameterDouble:...> (DiameterDouble)
4 to respond to #width.
5 GearTest
6 PASS test_calculates_gear_inches
The GearTest still passes erroneously but that’s not a problem because DiameterDoubleTest now informs you that DiameterDouble is wrong. This failure causes you to correct DiameterDouble to implement width, as shown on line 2 below:
1 class DiameterDouble
2 def width
3 10
4 end
5 end
After this change, re-running the test produces a failure in GearTest:
1 DiameterDoubleTest
2 PASS test_implements_the_diameterizable_interface
3
4 GearTest
5 ERROR test_calculates_gear_inches
6 undefined method 'diameter'
7 for #<DiameterDouble:0x0000010090a7f8>
8 gear_test.rb:35:in 'gear_inches'
9 gear_test.rb:86:in 'test_calculates_gear_inches'
10
Now that DiameterDoubleTest passes, GearTest fails. This failure points directly to the offending line of code in Gear. The tests finally tell you to change Gear’s gear_inches method to send width instead of diameter, as in this example:
1 class Gear
2
3 def gear_inches
4 # finally, 'width' instead of 'diameter'
5 ratio * wheel.width
6 end
7
8 # ...
9 end
Once you make this final change, the application is correct and all tests correctly pass:
1 DiameterDoubleTest
2 PASS test_implements_the_diameterizable_interface
3
4 GearTest
5 PASS test_calculates_gear_inches
Not only does this test pass, but it will continue to pass (or fail) appropriately, no matter what happens to the Diameterizable interface. When you treat test doubles as you would any other role player and test them to prove their correctness, you avoid test brittleness and can stub without fear of consequence.
The desire to test duck types creates a need for shareable tests for roles, and once you acquire this role-based perspective you can use it to your advantage in many situations. From the point of view of the object under test, every other object is a role and dealing with objects as if they are representatives of the roles they play loosens coupling and increases flexibility, both in your application and in your tests.
Testing Inherited Code
You’ve finally arrived at the last challenge, testing inherited code. This section is much like the previous ones in that it recapitulates a previously seen example and then proceeds to test it. The example used here is the final Bicycle hierarchy from Chapter 6, Acquiring Behavior Through Inheritance. Even though that hierarchy eventually proved unsuitable for inheritance, the underlying code is fine and serves admirably as a basis for these tests.
Specifying the Inherited Interface
Here’s the Bicycle class as you last saw it in Chapter 6:
1 class Bicycle
2 attr_reader :size, :chain, :tire_size
3
4 def initialize(args={})
5 @size = args[:size]
6 @chain = args[:chain] || default_chain
7 @tire_size = args[:tire_size] || default_tire_size
8 post_initialize(args)
9 end
10
11 def spares
12 { tire_size: tire_size,
13 chain: chain}.merge(local_spares)
14 end
15
16 def default_tire_size
17 raise NotImplementedError
18 end
19
20 # subclasses may override
21 def post_initialize(args)
22 nil
23 end
24
25 def local_spares
26 {}
27 end
28
29 def default_chain
30 '10-speed'
31 end
32 end
Here is the code for RoadBike, one of Bicycle’s subclasses:
1 class RoadBike < Bicycle
2 attr_reader :tape_color
3
4 def post_initialize(args)
5 @tape_color = args[:tape_color]
6 end
7
8 def local_spares
9 {tape_color: tape_color}
10 end
11
12 def default_tire_size
13 '23'
14 end
15 end
The first goal of testing is to prove that all objects in this hierarchy honor their contract. The Liskov Substitution Principle declares that subtypes should be substitutable for their supertypes. Violations of Liskov result in unreliable objects that don’t behave as expected. The easiest way to prove that every object in the hierarchy obeys Liskov is to write a shared test for the common contract and include this test in every object.
The contract is embodied in a shared interface. The following test articulates the interface and therefore defines what it means to be a Bicycle:
1 module BicycleInterfaceTest
2 def test_responds_to_default_tire_size
3 assert_respond_to(@object, :default_tire_size)
4 end
5
6 def test_responds_to_default_chain
7 assert_respond_to(@object, :default_chain)
8 end
9
10 def test_responds_to_chain
11 assert_respond_to(@object, :chain)
12 end
13
14 def test_responds_to_size
15 assert_respond_to(@object, :size)
16 end
17
18 def test_responds_to_tire_size
19 assert_respond_to(@object, :size)
20 end
21
22 def test_responds_to_spares
23 assert_respond_to(@object, :spares)
24 end
25 end
Any object that passes the BicycleInterfaceTest can be trusted to act like a Bicycle. All of the classes in the Bicycle hierarchy must respond to this interface and should be able to pass this test. The following example includes this interface test in the abstract superclass BicycleTest (line 2), and in the concrete subclass RoadBikeTest (line 10):
1 class BicycleTest < MiniTest::Unit::TestCase
2 include BicycleInterfaceTest
3
4 def setup
5 @bike = @object = Bicycle.new({tire_size: 0})
6 end
7 end
8
9 class RoadBikeTest < MiniTest::Unit::TestCase
10 include BicycleInterfaceTest
11
12 def setup
13 @bike = @object = RoadBike.new
14 end
15 end
Running the test tells a story:
1 BicycleTest
2 PASS test_responds_to_default_chain
3 PASS test_responds_to_size
4 PASS test_responds_to_tire_size
5 PASS test_responds_to_chain
6 PASS test_responds_to_spares
7 PASS test_responds_to_default_tire_size
8
9 RoadBikeTest
10 PASS test_responds_to_chain
11 PASS test_responds_to_tire_size
12 PASS test_responds_to_default_chain
13 PASS test_responds_to_spares
14 PASS test_responds_to_default_tire_size
15 PASS test_responds_to_size
Don’t be alarmed that the parts of BicycleTest and RoadBikeTest run in different orders; random test ordering is a feature of MiniTest.
The BicycleInterfaceTest will work for every kind of Bicycle and can be easily included in any new subclass. It documents the interface and prevents accidental regressions.
Specifying Subclass Responsibilities
Not only do all Bicycles share a common interface, the abstract Bicycle superclass imposes requirements upon its subclasses.
Confirming Subclass Behavior
Because there are many subclasses, they should share a common test to prove that each meets the requirements. Here’s a test that documents the requirements for subclasses:
1 module BicycleSubclassTest
2 def test_responds_to_post_initialize
3 assert_respond_to(@object, :post_initialize)
4 end
5
6 def test_responds_to_local_spares
7 assert_respond_to(@object, :local_spares)
8 end
9
10 def test_responds_to_default_tire_size
11 assert_respond_to(@object, :default_tire_size)
12 end
13 end
This test codifies the requirements for subclasses of Bicycle. It doesn’t force subclasses to implement these methods, in fact, any subclass is free to inherit post_initialize and local_spares. This test just proves that a subclass does nothing so crazy that it causes these messages to fail. The only method that must be implemented by subclasses is default_tire_size. The superclass implementation of default_tire_size raises an error; this test will fail unless the subclass implements its own specialized version.
RoadBike acts like a Bicycle so its test already includes the BicycleInterfaceTest. The test below has been changed to include the new BicycleSubclassTest; RoadBike should also act like a subclass of Bicycle.
1 class RoadBikeTest < MiniTest::Unit::TestCase
2 include BicycleInterfaceTest
3 include BicycleSubclassTest
4
5 def setup
6 @bike = @object = RoadBike.new
7 end
8 end
Running this modified test tells an enhanced story:
1 RoadBikeTest
2 PASS test_responds_to_default_tire_size
3 PASS test_responds_to_spares
4 PASS test_responds_to_chain
5 PASS test_responds_to_post_initialize
6 PASS test_responds_to_local_spares
7 PASS test_responds_to_size
8 PASS test_responds_to_tire_size
9 PASS test_responds_to_default_chain
Every subclass of Bicycle can share these same two modules, because every subclass should act both like a Bicycle and like a subclass of Bicycle. Even though it’s been a while since you’ve seen the MountainBike subclass, you can surely appreciate the ability to ensure that MountainBikes are good citizens by simply adding these two modules to its test, as shown here:
1 class MountainBikeTest < MiniTest::Unit::TestCase
2 include BicycleInterfaceTest
3 include BicycleSubclassTest
4
5 def setup
6 @bike = @object = MountainBike.new
7 end
8 end
The BicycleInterfaceTest and the BicycleSubclassTest, combined, take all of the pain out of testing the common behavior of subclasses. These tests give you confidence that subclasses aren’t drifting away from the standard, and they allow novices to create new subclasses in complete safety. Newly arrived programmers don’t have to scour the superclasses to unearth requirements, they can just include these tests when they write new subclasses.
Confirming Superclass Enforcement
The Bicycle class should raise an error if a subclass does not implement default_tire_size. Even though this requirement applies to subclasses, the actual enforcement behavior is in Bicycle. This test is therefore placed directly in BicycleTest, as shown on line 8 below:
1 class BicycleTest < MiniTest::Unit::TestCase
2 include BicycleInterfaceTest
3
4 def setup
5 @bike = @object = Bicycle.new({tire_size: 0})
6 end
7
8 def test_forces_subclasses_to_implement_default_tire_size
9 assert_raises(NotImplementedError) {@bike.default_tire_size}
10 end
11 end
Notice that line 5 of BicycleTest supplies a tire size, albeit an odd one, at Bicycle creation time. If you look back at Bicycle’s initialize method you’ll see why. The initialize method expects to either receive an input value for tire_size or to be able retrieve one by subsequently sending the default_tire_size message. If you remove the tire_size argument from line 5, this test dies in its setup method while creating a Bicycle. Without this argument, Bicycle can’t successfully get through object initialization.
The tire_size argument is necessary because Bicycle is an abstract class that does not expect to receive the new message. Bicycle doesn’t have a nice, friendly creation protocol. It doesn’t need one because the actual application never creates instances of Bicycle. However, the fact that the application doesn’t create new Bicycles doesn’t mean this never happens. It surely does. Line 5 of the BicycleTest above clearly creates a new instance of this abstract class.
This problem is ubiquitous when testing abstract classes. The BicycleTest needs an object on which to run tests and the most obvious candidate is an instance of Bicycle. However, creating a new instance of an abstract class can range from difficult and impossible. This test is fortunate in that Bicycle’s creation protocol allows the test to create a concrete Bicycle instance by passing tire_size, but creating a testable object is not always this easy and you may find it necessary to employ a more sophisticated strategy. Fortunately, there’s an easy way to overcome this general problem that will be covered below in the section Testing Abstract Superclass Behavior.
For now, supplying the tire_size argument works just fine. Running BicycleTest now produces output that looks more like that of an abstract superclass:
1 BicycleTest
2 PASS test_responds_to_default_tire_size
3 PASS test_responds_to_size
4 PASS test_responds_to_default_chain
5 PASS test_responds_to_tire_size
6 PASS test_responds_to_chain
7 PASS test_responds_to_spares
8 PASS test_forces_subclasses_to_implement_default_tire_size
Testing Unique Behavior
The inheritance tests have so far concentrated on testing common qualities. Most of the resulting tests were shareable and ended up being placed in modules (BicycleInterfaceTest and BicycleSubclassTest), although one test (forces_subclasses_to_implement_default_tire_size) did get placed directly into BicycleTest.
Now that you have dispensed with the common behavior, two gaps remain. There are as yet no tests for specializations, neither for the ones provided by the concrete subclasses nor for those defined in the abstract superclass. The following section concentrates on the first; it tests specializations supplied by individual subclasses. The section after moves the focus upward in the hierarchy and tests behavior that is unique to Bicycle.
Testing Concrete Subclass Behavior
Now is the time to renew your commitment to writing the absolute minimum number of tests. Look back at the RoadBike class. The shared modules already prove most of its behavior. The only thing left to test are the specializations that RoadBike supplies.
It’s important to test these specializations without embedding knowledge of the superclass into the test. For example, RoadBike implements local_spares and also responds to spares. The RoadBikeTest should ensure that local_spares works while maintaining deliberate ignorance about the existence of the spares method. The shared BicycleInterfaceTest already proves that RoadBike responds correctly to spares, it is redundant and ultimately limiting to reference that method directly in this test.
The local_spares method, however, is clearly RoadBike’s responsibility. Line 9 below tests this specialization directly in RoadBikeTest:
1 class RoadBikeTest < MiniTest::Unit::TestCase
2 include BicycleInterfaceTest
3 include BicycleSubclassTest
4
5 def setup
6 @bike = @object = RoadBike.new(tape_color: 'red')
7 end
8
9 def test_puts_tape_color_in_local_spares
10 assert_equal 'red', @bike.local_spares[:tape_color]
11 end
12 end
Running RoadBikeTest now shows that it meets its common responsibilities and also supplies its own specializations:
1 RoadBikeTest
2 PASS test_responds_to_default_chain
3 PASS test_responds_to_default_tire_size
4 PASS test_puts_tape_color_in_local_spares
5 PASS test_responds_to_spares
6 PASS test_responds_to_size
7 PASS test_responds_to_local_spares
8 PASS test_responds_to_post_initialize
9 PASS test_responds_to_tire_size
10 PASS test_responds_to_chain
Testing Abstract Superclass Behavior
Now that you have tested the subclass specializations it’s time to step back and finish testing the superclass. Moving your focus up the hierarchy to Bicycle reintroduces a previously encountered problem; Bicycle is an abstract superclass. Creating an instance of Bicycle is not only hard but the instance might not have all the behavior you need to make the test run.
Fortunately, your design skills provide a solution. Because Bicycle used template methods to acquire concrete specializations you can stub the behavior that would normally be supplied by subclasses. Even better, because you understand the Liskov Substitution Principle, you can easily manufacture a testable instance of Bicycle by creating a new subclass for use solely by this test.
The test below follows just such a strategy. Line 1 defines a new class, StubbedBike, as a subclass of Bicycle. The test creates an instance of this class (line 15) and uses it to prove that Bicycle correctly includes the subclass’s local_spares contribution in spares (line 23).
It remains convenient to sometimes create an instance of the abstract Bicycle class, even though this requires passing the tire_size argument, as on line 14. This instance of Bicycle continues to be used in the test on line 18 to prove that the abstract class forces subclasses to implement default_tire_size.
These two kinds of Bicycles coexist peacefully in the test, as you see here:
1 class StubbedBike < Bicycle
2 def default_tire_size
3 0
4 end
5 def local_spares
6 {saddle: 'painful'}
7 end
8 end
9
10 class BicycleTest < MiniTest::Unit::TestCase
11 include BicycleInterfaceTest
12
13 def setup
14 @bike = @object = Bicycle.new({tire_size: 0})
15 @stubbed_bike = StubbedBike.new
16 end
17
18 def test_forces_subclasses_to_implement_default_tire_size
19 assert_raises(NotImplementedError) {
20 @bike.default_tire_size}
21 end
22
23 def test_includes_local_spares_in_spares
24 assert_equal @stubbed_bike.spares,
25 { tire_size: 0,
26 chain: '10-speed',
27 saddle: 'painful'}
28 end
29 end
The idea of creating a subclass to supply stubs can be helpful in many situations. As long as your new subclass does not violate Liskov, you can use this technique in any test you like.
Running BicycleTest now proves that it includes subclass contributions on the spares list:
1 BicycleTest
2 PASS test_responds_to_spares
3 PASS test_responds_to_tire_size
4 PASS test_responds_to_default_chain
5 PASS test_responds_to_default_tire_size
6 PASS test_forces_subclasses_to_implement_default_tire_size
7 PASS test_responds_to_chain
8 PASS test_includes_local_spares_in_spares
9 PASS test_responds_to_size
One last point: If you fear that StubbedBike will become obsolete and permit BicycleTest to pass when it should fail, the solution is close at hand. There is already a common BicycleSubclassTest. Just as you used the Diameterizable InterfaceTest to guarantee DiameterDouble’s continued good behavior, you can use BicycleSubclassTest to ensure the ongoing correctness of StubbedBike. Add the following code to BicycleTest:
1 # Prove the test double honors the interface this
2 # test expects.
3 class StubbedBikeTest < MiniTest::Unit::TestCase
4 include BicycleSubclassTest
5
6 def setup
7 @object = StubbedBike.new
8 end
9 end
After you make this change, running BicycleTest produces this additional output:
1 StubbedBikeTest
2 PASS test_responds_to_default_tire_size
3 PASS test_responds_to_local_spares
4 PASS test_responds_to_post_initialize
Carefully written inheritance hierarchies are easy to test. Write one shareable test for the overall interface and another for the subclass responsibilities. Diligently isolate responsibilities. Be especially careful when testing subclass specializations to prevent knowledge of the superclass from leaking down into the subclass’s test.
Testing abstract superclasses can be challenging; use the Liskov Substitution Principle to your advantage. If you leverage Liskov and create new subclasses that are used exclusively for testing, consider requiring these subclasses to pass your subclass responsibility test to ensure they don’t accidentally become obsolete.
Summary
Tests are indispensable. Well-designed applications are highly abstract and under constant pressure to evolve; without tests these applications can neither be understood nor safely changed. The best tests are loosely coupled to the underlying code and test everything once and in the proper place. They add value without increasing costs.
A well-designed application with a carefully crafted test suite is a joy to behold and a pleasure to extend. It can adapt to every new circumstance and meet any unexpected need.