
Chapter 14. Designing workflow
Workflow, in the context of a unified content strategy, defines how people and tasks interact to create, update, manage, and deliver content. It is the embodiment of the content lifecycle discussed in Chapter 1, “Content: The lifeblood of an organization.” Workflow moves content from task to task, ensuring that the business rules specific to your organization are followed, for example, having sign-off occur at the appropriate levels. This chapter describes the concept of workflow and its benefits, and takes you through the basics of designing workflow to support your unified content lifecycle.
Once you’ve determined what your workflow processes should be, you can select tools to support and automate them.
What is workflow?
Workflow, as its name implies, is the way work or tasks flow through a cycle on their way to getting a job done. Workflow helps organizations perform tasks in an efficient and repeatable manner.
When a workflow is used on a small scale, it does not need to be automated. However, when numerous people and activities are involved in a process, human-controlled workflows can be problematic; steps can be missed, work forgotten or misplaced, and approvals omitted, all delaying the finished product. With automated workflow, organizations can create repeatable processes to ensure that all stages of a project are completed in the proper order. But before automating a workflow, you must first design and test it to ensure that its processes are consistent with your unified content lifecycle.
When designing workflow, you represent it in a diagram, showing the various tasks involved in a project. Your workflow representation not only illustrates all the tasks and people who perform them, it also shows where your processes need to be simplified before you automate them. Just as you’re improving the way you create and manage content, you’re also improving the processes involved through the content lifecycle.
Components of workflow
• Roles (players): the people who do the tasks, identified by their roles
• Responsibilities (tasks): the steps to complete a particular piece of work; everything that must get done within a process
• Processes: the flow of tasks, as performed by the various players, showing the interactions and interdependencies among players
These components are described in more detail further in this chapter.
Benefits of workflow
We can compare building information products to building a house. Houses are constructed according to blueprints, and information products are constructed according to the information models that define them. After the blueprint is completed and signed off, the builders follow processes to make sure all the construction tasks happen in the correct order. Some tasks are dependent on others, some are concurrent, and at some stages the building inspectors, the architects, and the home owners review the completed work before construction of the next stage can proceed. In the construction industry, timing and planning are critical. The blueprint simply lays out the plan; the workflow ensures that it gets done properly. Accordingly, workflow is tracked throughout construction, ensuring that:
• Materials are delivered in the order they are used (for example, concrete before shingles, framing materials before windows).
• Other players (sub-trades) come in when they’re supposed to (for example, electricians can’t do their part before the frame is up), and concurrent jobs are scheduled appropriately so that time isn’t wasted.
• Approvals are done at the right time and in the correct order (for example, inspection of the electrical work has to be done before the walls are up, which would obscure the wiring).
Workflow in a unified content lifecycle is similar to the workflow that builders follow. Creating information products should progress in a logical, well-designed flow to ensure that tasks and approvals are completed in the right order, by the right people. In the content management world, good workflow design ensures that:
• Departments that should be creating content—or that should at least know about it—aren’t left out.
• Content and all other supporting elements, such as graphics, are created in the right order (for example, content is written before graphics are created, ensuring the graphics support the content).
• Content is reviewed at the right time, by the right people, eliminating reviews and approvals that have to be redone if additional changes are made.
• Departments are notified when content is published (for example, customer service staff are notified when a new brochure is published so that they can familiarize themselves with the new information in preparation for phone inquiries).
• Efforts aren’t duplicated, and content is consistent (for example, different departments don’t end up creating different versions of the same content).
• Work isn’t held up at any given stage of the workflow.
• Content is stored in the right place after it’s written, reviewed, approved, and delivered.
An effective workflow is really the organized and managed application of common sense, as governed by the business rules of your organization.
Improving and simplifying processes
Workflows have a tendency to get more complicated over time, as people and departments ask for changes and additions to the workflows to meet needs that occasionally crop up. For example, a problem with a description may have occurred in the past, so a department asked for an extra check to be built into the process. Rather than handling this as an exception, the organization made a change, and forever after, all other content elements have been subjected to the same check. Or you may be sending information to a department for approval even though they don’t need to approve the information; they just need to know that a change is taking place. A notification is all they need, but you’re including them in the approval workflow, adding an unnecessary step (and delay) to the process.
As you diagram your current process, work with all the players to simplify it. Cut out the extra steps, streamline what has to happen, and identify who needs to deal with the information. You only want to implement the best practice, most efficient, and streamlined workflows. Like the information modeling process, where you need to understand what your current models are so you can develop new ones, the workflow process is forward looking. You look back to understand and document your existing processes so you can develop new and better ones.
So identify what the new process needs to do, not what your old workflow did, and strip away all the superfluous paths that have accumulated over time.
To improve or simplify a process, you analyze and change the tasks, and then test the process to make sure the work will flow properly. Tasks may be eliminated or combined, and their sequence and the location where they’re performed may be changed, as can the person who performs the task. Benefits of such change include higher efficiency and lower costs.
Higher efficiency
With a well-designed workflow, the work is easier and faster, and the tasks require fewer steps to complete. Tasks are handled concurrently wherever possible, and “what ifs” are built into the processes, eliminating delays.
Lower costs
Costs are lowered in a variety of ways:
• Eliminating duplicate effort saves time and money.
• Ensuring that content is consistent and accurate lowers rework costs.
• Ensuring that content is ready when needed streamlines the process and reduces or eliminates costly delays.
Depicting workflow
A good workflow system must be capable of supporting your business needs. And although it seems self-evident, you must first determine what you need your workflow to do before attempting to implement it. Ad hoc system design is a bad idea, although we’ve seen it attempted time and again! You need to figure out (given certain business situations) how tasks such as authoring, editing, reviewing, approval, publishing, and distribution should flow throughout your organization, and what should happen if, at any given stage, a task cannot be completed as dictated by the workflow.
Workflow can be designed within a CMS or outside it. In the best case, the analysis and upfront design takes place before a CMS is chosen. In addition, each CMS has its own method of defining and diagramming the workflow within itself. These systems are powerful, but they tend to be somewhat complicated and are really designed for implementers rather than subject matter experts (SMEs). We don’t advocate using the built-in workflow within any particular system during the investigation and design phase.
We find that using simpler tools helps separate the ideas from the eventual implementation and makes it easier for nonspecialists (non-workflow specialists, that is) to be involved in the definition and design in a significant way.
Because workflow describes the flow of tasks, we like to depict them diagrammatically in a linear flowchart or swimlane diagram (see Figure 14.1).
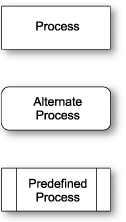
Figure 14.1. Flowchart process shapes.
Flowcharts
Linear flowcharts depict a process from beginning to end, often using flowcharting symbols to indicate the type of tasks in the process. Flowcharting symbols illustrate such things as which task is a process, which task is a decision, which task is a predefined process, which task is a manual operation, and so on. Many people become frustrated trying to remember what the many different symbols mean, and their frustration is compounded if there are no clear task descriptions accompanying the symbols. Therefore, we recommend a simpler approach: boxes with clear task descriptions written in them. This technique is especially effective when using swimlane diagrams (the method we prefer).
Swimlane diagrams
Swimlane diagrams show processes in “lanes” (like the lanes you swim laps in) to depict tasks that occur concurrently, illustrating who does what and when. Swimlane diagrams are known by many other names, among them process maps, business process maps, process responsibility diagrams, and LOV (line of visibility) charts. As in a pool, where swimmers are expected to stay in their own lanes, the people or groups responsible for doing the work—the players—stay in their process lanes. By showing each lane, these diagrams allow the players to see how what they do depends on what others do, and vice versa. Arrows connect tasks and show the flow of work. When work changes hands from one role to another, the arrows cross from one lane to the other. Figure 14.2 illustrates the manual reuse process using a swimlane diagram. (Note that players are shown by their role, followed by the name of their department in parentheses.)
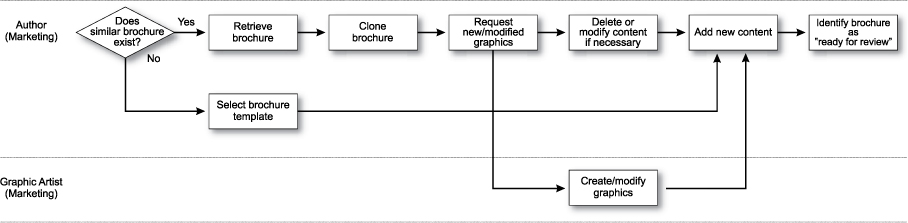
Figure 14.2. Manual reuse workflow.
Figure 14.3 illustrates the automatic reuse process. Note the similarities and the dissimilarities in the process compared with the manual reuse process.
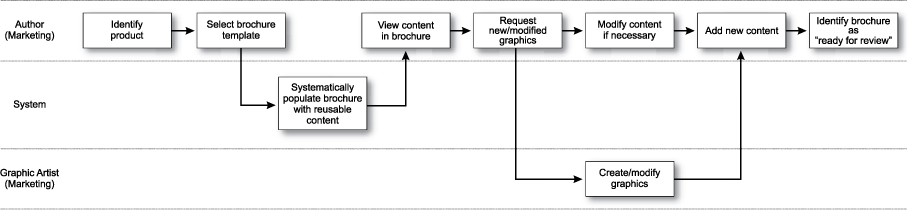
Figure 14.3. Automatic reuse workflow.
Swimlane diagrams or flowcharts?
How should you depict your workflow? It really depends on what you want to depict.
Linear flowcharts are useful if you want to show all the tasks within a process with a view to simplifying them. This technique can be effective when you need buy-in from others in your organization. However, linear flowcharts that detail every step, including handoffs and wait tasks, may end up being many feet long. Their size alone may convince others that the process should be simplified.
We like to use swimlane diagrams because they show the interdependencies of tasks. They help players understand the existing processes and they help define the “to be” workflow. A swimlane diagram shows all roles and all tasks as they relate to each other, which is critical in a unified content strategy.
Nevertheless, you should always attempt to simplify the workflow prior to its automation, whatever type of diagram you use to document it.
Roles, responsibilities, and processes
Workflow consists of roles (the players who participate in the process), responsibilities (the tasks the players are responsible for), and processes (the workflows that connect all the players and tasks together and define the path that each task must take).
Developing, managing, and delivering content involves many people with different skills, and spans many tasks over an extended period of time. Content comprises many elements: text, images (and potentially video and sound), layout and design, and so on. This multifaceted nature of content introduces complexity into its development process. Many different departments create content in a number of different formats for a number of different audiences; after content is created and delivered, it must be stored so it can be accessed later on.
Who is a player?
Generally, a player is any person or group that handles the work between the initial event and the completion of the process. Players and roles sound similar, but they are not the same. The “player” identifies an individual or individual job function (such as engineer) within the organization. In terms of workflow this is not the same as a “role”. An individual player may have more than one role in the workflow.
Take an engineer for example. She may “wear more than one hat” during a product lifecycle. She may be a part of the design team, an SME for the training department, a resource for the sales department, and an SME and reviewer for the documentation department.
We can see that the engineer, although a player, is not an individual role in terms of workflow. Instead we see:
Player = Engineer
Role = Designer or
SME or
Test Engineer or
Reviewer
This means that we don’t describe the Player as “engineer” in the workflow. Instead we identify the roles as SME, Reviewer, and so on. The CMS is also a player; it performs tasks, just as people do. The role of a player may be very complex or as simple as being notified that a new product or new information is available. Regardless of the complexity—or simplicity—of each role, the workflow must accommodate all roles. If you leave out roles, you will not have an accurate depiction of all the project phases, which could unnecessarily delay your project.
Some common roles include:
Authors
Authors are anyone involved with creating content of any type (for example, text or graphics). Authors should have full permission to create, modify, and delete their own content, but not anyone else’s.
Reviewers
Reviewers check content for such things as accuracy, completeness, and appropriateness. Reviewers are usually limited to making comments about the content without changing it.
Editors
Editors review and make changes to content; the scope of their changes depends on their role as either substantive or copy editors. Editors can also be reviewers, but unlike reviewers, their permissions allow them to modify the content.
Approvers
Approvers provide the final sign-off for content before it is “posted” or published. Approvers can also be reviewers, and while their permissions are similar to the reviewers’ permissions, approvers have the final authority to determine if the content is ready to go to the public.
The workflow doesn’t tell the players how to do their part; it tells them that they have a part, what that part is, and when it must be done. The workflow must also allow for alternatives if players aren’t available when they’re required.
Depicting roles
In a swimlane diagram, we depict the “swimmer,” that is, the person or department performing the tasks, at the beginning of the swimlane. We use the name of the role, for example, Information Architect or the Publications Department, rather than the individual employee’s name. If a department has more than one function, and if, for the sake of clarity, you need to identify the portion of the department that’s involved in the workflow, ensure that you do so when naming the role on the swimlane. For example, in some companies, the functions of Marketing and Sales are in one department. But these functions, while related, are quite different. You probably don’t want to get marketing input from a salesperson or vice versa. In this case, you’d want to make very clear which part of the department you want to perform the specified task.
Responsibilities (tasks)
Two of the most common questions people ask us when charting their workflows are “What is a task? And how do I know what to include?” A task is a particular series of actions that accomplish a particular goal. Our rule of thumb is if it must “get done,” then it’s a task and you need to show it. To determine all the tasks within a workflow, you need to talk to the various players about their responsibilities, keeping the discussion focused on one particular process, not on all the activities of the player or their department.
When discussing the task with the players, try to keep in mind the content that the task is related to. The content is the thing that must be created and reviewed. It must move from one state to another. Think about what must be done to move it from its initial state to its final state. It’s a way of thinking that could result in a group saying, “We need X done on the content and X is not currently done by any of our current roles. We need a new role.”
Types of tasks
You can categorize tasks into four types:
1. Tasks that add value (work tasks)
When value is added to a task, the work is changed in some way. Content may be written, approved, revised, returned for correction, have metadata added to it, and so on. Work is being performed on a work item, including inspection or validation activities. This is also known as “work time,” and it advances the progress of the workflow as a whole.
2. Tasks that move the work along (transport tasks)
A transport task is one that moves the work along but does not change a work item (for example, content isn’t written or edited); instead, it moves the work item from task to task in the workflow. People tend to exclude these tasks from their workflow, but transport tasks are critical to include because they illustrate important parts of the process, such as how a work item gets to the next person. Also, a transport task that moves information to a different location may take longer. In a transport task, include information on how the work item is transported, for example, “route first draft by email to supervisor in head office” or “courier original artwork to ad agency.”
3. Notification tasks
At many stages of the process, the system must notify various players that the content has changed state. The most important of these is when the content has been changed and is now ready for players to interact with. For example, they must review, edit, comment on, or approve it.
It’s crucial to define these notifications (including when they are sent, to whom, and what that player’s reaction should be), so the implementers can program them into the system.
4. Tasks that introduce a delay (wait tasks)
When a task introduces a delay, the subsequent task cannot proceed until the previous one is finished. A task that introduces a delay may not actually do anything to the work item; instead, it pauses the process temporarily. Most tasks introduce a delay simply by their nature; after all, it takes time for work to get done or transported. Sometimes when a delay is introduced, the next task may still be able to proceed. For example, while waiting for graphics, an author may still be able to complete a draft, and then insert the graphics when they arrive. However, a delay-introducing task means that the next task has to wait for a prerequisite task to be done. An example of this might be “wait for content from marketing before completing draft.” While waiting, the author can do other work, but not work that moves this process along. It’s important to include these types of delays because they give you a more accurate depiction of how long a process will take.
Writing task descriptions
Regardless of the type of task, we recommend writing tasks consistently in a verb-noun format. Anyone who reads a workflow diagram should be able to understand it, so you make it a practice to avoid cryptic descriptions such as “Form CP-13.” A task is something that is performed and, accordingly, should be written as an action. Don’t write “Form CP-13” as a task, because it might mean nothing to anyone other than the person who created the description. Worse still, it might mean totally different things to different people in different departments. It’s better to define the task as “submit graphics request on Form CP-13.” Optionally, you can include “how” information in your step, for example, “sort graphics requests” could become “sort graphics requests by due date,” which provides additional information on how the task should be completed. You can also use qualifiers to modify the noun, for example, “sort graphics requests from marketing by their due date.”
The more descriptive you can make your task, the better. Tasks must never be open to interpretation.
Although the task name must convey its result (the result of “sort graphics request by due date” is that graphics requests are sorted by due date), don’t write the task by focusing on the result, for example, “graphics requests are sorted.” That’s not a task description, that’s the definition of an output, or task result. The task name should focus on, and begin with, the verb—the action of performing the task.
It’s not necessary to include players in the task description because they’re indicated in the swimlane diagram, and all the tasks belonging to a particular role are put in the lane for that role (see Figure 14.4).
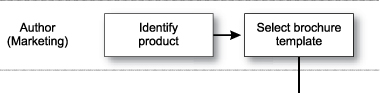
Figure 14.4. The Author (Marketing) lane.
The system can have tasks as well. It can do such things as publish content to PDF, post content to the website, and notify a reviewer that content is ready to review. These tasks are programmed by a system developer or integrator, and to be included in workflow they must be available in your system.
Depicting tasks
In a swimlane diagram, tasks are shown in the swimlane of the player who does the task, using descriptive text to depict each task.
Processes (flow)
A process has a start point and an end point between which various tasks are performed, usually by a number of different people located in different places, often using different equipment or systems. A process comprises the tasks and responsibilities as performed by the various players, and the workflow must illustrate the entire process from beginning to end.
So, where to start? First, you need to decide where your process begins and where it ends. Then start examining and eventually charting everything that happens in between.
Processes may start outside the system, but the automated workflow starts when a task can be managed by the system. For example, the process to create a web product page may start with a meeting to discuss the requirements for the page. But the meeting may occur long before the system takes the content and routes it. This isn’t to say that you might not capture the meeting in a set of minutes with action items. In fact, you can store the meeting minutes in the content management system, designating them as “content of record” for access by team members. When you’re depicting workflow, you may also include such tasks as “determine project requirements” and “hold meetings.” Even though they’re not managed by the workflow system, it’s a good idea to include such tasks; they form part of the entire process and may be overlooked if not described. However, the automated workflow starts when work begins on the action items, such as when the specification is created or when the marketing writer begins to write. At whichever point the process must be managed automatically, workflow begins. If you include project management, requirement definition tasks, or any tasks that aren’t managed through the system in your swimlane diagrams, you should indicate where the automated workflow begins; the automated tasks form your requirements for selecting and configuring a workflow system.
It can also be difficult to determine the end of the workflow. For example, a web product page is posted to the Web or an eBook has been released, but it’s modified over time to remain current. You could include the updates in the initial creation workflow, but it probably makes sense to end the workflow when the page has been posted or the eBook is released. Then you could create an additional workflow that handles the content when it needs to be updated, modified, or corrected.
In a sense, the entire workflow process is like a virtual assembly line on which the various players perform various tasks to support the unified content lifecycle. For example, research and development develops a new version of a software package, marketing gets the word out to potential customers, SMEs review the existing documentation to determine which elements can be used as is and which should be revised, technical publications makes the necessary changes, and so on. After all the tasks on the assembly line are complete, the last task is to notify the person who started the process, thus ending it.
Your company may also have specific processes for different types of projects. For example, you could develop workflows to support the content lifecycle for:
• New products/services
• Updates to existing products/services
• Discontinued products/services (for service and support issues)
You may also need to develop workflows for special situations, such as emergency notification of changes to your products. Depending on how complex they are, each of your workflows may also be broken down into various supporting workflows, but they must all relate to the common goal. That is, don’t have separate workflows for the various tasks in individual departments unless you can link them to a top-level content lifecycle workflow. For example, in the construction industry, there are workflows for the framing, the electrical work, and the plumbing, but they all relate to the master plan and depend on one another. Likewise, in a unified content strategy there may be workflows for writing user documentation, for developing collateral and graphics, and for creating training materials. All the processes form part of an overall project and are dependent on one another.
Business rules often govern workflow
Usually, processes are also governed by business rules specific to your organization. Business rules include such things as:
• Budgets that dictate how much can be spent on any given task
• Hours of work in which tasks can be completed
• Union (or other association) job descriptions that govern who can perform a certain task and under which conditions
• Physical location of the company that dictates where a task is performed (physical location can affect such things as handoffs and transport tasks, as well as translation and localization)
• Suppliers that your company does business with and their particular constraints
When determining your workflow, you need to consider the business rules specific to your environment.
Depicting processes
Processes are shown in swimlane diagrams with specific start and end points, and with all lanes completed with all relevant tasks, including such things as handoffs and delays. Where a task is performed by two players at the same time you can use various methods to indicate that they’re taking place in parallel. You can stack the images as we’ve done with Review and Final Approval in Figure 14.5. You can also draw a box around or shade parallel tasks to make it clear that they’re happening at the same time. Use arrows to connect the flow of tasks and to show when they transfer to another role or lane.

Figure 14.5. Sample review and approval workflow.
Documenting your existing workflow can be a great first step toward an effective unified content strategy, but your ultimate goal is to try to improve—or simplify—your current processes. Accordingly, your first draft flowcharts may show processes in their current state, but your unified content lifecycle workflows could show your processes as they will support your unified content strategy.
Designing effective workflow
The components of an effective workflow are players, their responsibilities (or tasks), and the processes they all follow. Designing an effective workflow involves analysis of players and their tasks, as well as identification of patterns and interactions, then documenting of detailed tasks, followed by testing.
To design effective workflow, follow these steps, referring to your content lifecycle:
• Understand your current workflow. In most cases organizations have only a vague idea of how their content is created and managed. We recommend that before you design your new workflow, you examine, and if necessary, document your current workflow. It’s hard to know where you want to go if you don’t know where you are. You need to ensure you understand your current workflow and learn what doesn’t work, what works but could be better, and what works really well. Only when you have a solid understanding of what your current problems and successes are should you attempt to develop a new workflow.
• Determine a starting point for your new workflow. Usually a process starts with an incoming event, such as a new eBook or app coming to the market, or a request to update existing documentation. A starting point can also be a crisis that you need to respond to. If you include tasks that are not part of the automated workflow, indicate where automated workflow begins.
• Figure out a logical place for the workflow to end. This is typically when the incoming event that triggered the beginning has been handled satisfactorily. In a unified content lifecycle, content must be stored in the repository for the event to be considered complete.
• Identify all players from the beginning to the end of the workflow. Identify players by their roles rather than by their names. A task should be associated with a role to accommodate people moving in and out of jobs. If tasks are assigned to roles, then the task stays with the role regardless of where particular people move in your organization. If you assign tasks to people, you’ll need to go into your workflow system and make changes every time those people change jobs.
• Remember that your CMS is a player too. It will handle notifications, reports, and all of the bothersome tracking that we hate doing. If you don’t define what you want the system to do, employees will end up tracking files and sending notifications—exactly what we don’t want to happen.
• Sketch the tasks. Start by identifying all the tasks that belong to each player, including when they’re waiting for something else to happen, or when they’re handing off work to someone else. Remember to write tasks clearly so that everyone who looks at the flow knows exactly what the task is about. (You may omit notification in your first iteration, allowing you to focus more clearly on the tasks themselves. However, notification must be included before your workflow can be considered complete.) Look for potential bottlenecks that may slow your workflow down, such as one player having too many tasks at a certain stage, while other players wait for those tasks to be done so they can contribute theirs. Can tasks be delegated to other roles? Can tasks be completed concurrently?
• Identify interaction patterns among players and tasks. When are players working alone and when are they working with others? A critical component of workflow involves designing the interactions among players and their tasks. Who relies on whom or on what information? When there are numerous interactions, there may also be bottlenecks; look for potential bottlenecks that may slow down your workflow, such as information not being ready so one player is delayed in performing a task. Can you build in an alternative?
• Allocate time frames for tasks. In addition to selecting a start and end for the entire workflow, you should allocate start and end times for each task. When is each task complete, and how much time should you allow from the time a task is assigned until it is completed? How much leeway should you build into the time frame?
• Identify notification patterns—determine who needs to know what at any given stage of the workflow.
• Identify approval patterns. Who’s responsible for reviewing work items throughout the workflow? It’s important to distinguish approval from notification. Sometimes a department only needs to know about what you’re doing; they don’t necessarily have to approve it. Make sure all your approvals are valid.
• Determine all the “what ifs” that may knock your workflow off its path. Try to think of everything that could derail your workflow. For example, what happens if an approver is away? Can work be routed to someone else for approval? What happens to other tasks if a deadline is missed?
• Once all roles are identified, tasks are sketched, and notification and approval patterns are identified, examine your workflow to see if it can be simplified.
• Repeat these steps for all the workflow processes you need to support your unified content lifecycle, for example, workflow for new projects, workflow for different types of new products, and workflow for updates to existing content.
Now that your workflow is documented, you can focus on selecting a workflow system to support your design. It’s important to design your workflow before selecting a workflow system because you need to make sure the system will do what you need it to do. For example, if notification is important to keep your workflow moving, you want to make sure that a workflow system will send notifications automatically.
Summary
A unified content strategy requires unified processes that are supported by a well-designed workflow. A workflow representation shows how tasks are assigned to the appropriate players and how tasks and players interact. It also shows the dependencies within the workflow. A well-designed workflow saves time and reduces duplicate work and potential errors. To design an effective workflow:
• Select start and end points.
• Determine everything that has to happen in between, assigning tasks to roles. Remember to accommodate business rules specific to your organization.
• Identify all the interactions, dependencies, notifications, and approvals.
• Determine what you want the system to do for you.
• Incorporate the “what ifs.”
• Document your workflow in swimlane diagrams that show players’ roles in the appropriate swimlanes.
• Review and simplify your documented workflow where possible.