
8. JavaScript: Control Statements II
Who can control his fate?
—William Shakespeare
Not everything that can be counted counts, and not every thing that counts can be counted.
—Albert Einstein
Objectives
In this chapter you’ll:
• Learn the essentials of counter-controlled repetition
• Use the for and do...while repetition statements to execute statements in a program repeatedly.
• Perform multiple selection using the switch selection statement.
• Use the break and continue program-control statements
• Use the logical operators to make decisions.
8.2 Essentials of Counter-Controlled Repetition
8.4 Examples Using the for Statement
8.5 switch Multiple-Selection Statement
8.6 do...while Repetition Statement
8.7 break and continue Statements
Summary | Self-Review Exercises | Answers to Self-Review Exercises | Exercises
8.1. Introduction
In this chapter, we introduce JavaScript’s remaining control statements (with the exception of for...in, which is presented in Chapter 10). In later chapters, you’ll see that control statements also are helpful in manipulating objects.
8.2. Essentials of Counter-Controlled Repetition
Counter-controlled repetition requires:
1. The name of a control variable (or loop counter).
2. The initial value of the control variable.
3. The increment (or decrement) by which the control variable is modified each time through the loop (also known as each iteration of the loop).
4. The condition that tests for the final value of the control variable to determine whether looping should continue.
To see the four elements of counter-controlled repetition, consider the simple script shown in Fig. 8.1, which displays lines of HTML5 text that illustrate the seven different font sizes supported by HTML5. The declaration in line 11 names the control variable (counter), reserves space for it in memory and sets it to an initial value of 1. The declaration and initialization of counter could also have been accomplished by these statements:
var counter; // declare counter
counter = 1; // initialize counter to 1
Lines 15–16 in the while statement write a paragraph element consisting of the string “HTML5 font size” concatenated with the control variable counter’s value, which represents the font size. An inline CSS style attribute sets the font-size property to the value of counter concatenated with ex.
Line 17 in the while statement increments the control variable by 1 for each iteration of the loop (i.e., each time the body of the loop is performed). The loop-continuation condition (line 13) in the while statement tests whether the value of the control variable is less than or equal to 7 (the final value for which the condition is true). Note that the body of this while statement executes even when the control variable is 7. The loop terminates when the control variable exceeds 7 (i.e., counter becomes 8).
1 <!DOCTYPE html>
2
3 <!-- Fig. 8.1: WhileCounter.html -->
4 <!-- Counter-controlled repetition. -->
5 <html>
6 <head>
7 <meta charset = "utf-8">
8 <title>Counter-Controlled Repetition</title>
9 <script>
10
11 var counter = 1; // initialization
12
13 while ( counter <= 7 ) // repetition condition
14 {
15 document.writeln( "<p style = 'font-size: " +
16 counter + "ex'>HTML5 font size " + counter + "ex</p>" );
17 ++counter; // increment
18 } //end while
19
20 </script>
21 </head><body></body>
22 </html>
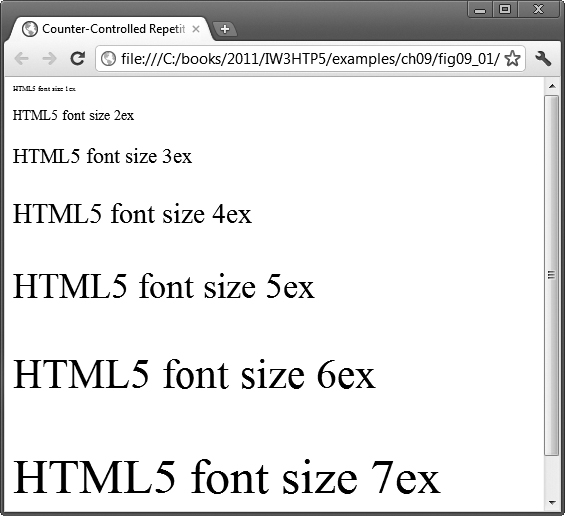
Fig. 8.1. Counter-controlled repetition.
8.3. for Repetition Statement
The for repetition statement conveniently handles all the details of counter-controlled repetition. Figure 8.2 illustrates the power of the for statement by reimplementing the script of Fig. 8.1. The outputs of these scripts are identical.
1 <!DOCTYPE html>
2
3 <!-- Fig. 8.2: ForCounter.html -->
4 <!-- Counter-controlled repetition with the for statement. -->
5 <html>
6 <head>
7 <meta charset="utf-8">
8 <title>Counter-Controlled Repetition</title>
9 <script>
10
11 // Initialization, repetition condition and
12 // incrementing are all included in the for
13 // statement header.
14 for ( var counter = 1; counter <= 7; ++counter )
15 document.writeln( "<p style = 'font-size: " +
16 counter + "ex'>HTML5 font size " + counter + "ex</p>" );
17
18 </script>
19 </head><body></body>
20 </html>
Fig. 8.2. Counter-controlled repetition with the for statement.
When the for statement begins executing (line 14), the control variable counter is declared and initialized to 1. Next, the loop-continuation condition, counter <= 7, is checked. The condition contains the final value (7) of the control variable. The initial value of counter is 1. Therefore, the condition is satisfied (i.e., true), so the body statement (lines 15–16) writes a paragraph element in the body of the HTML5 document. Then, variable counter is incremented in the expression ++counter and the loop continues execution with the loop-continuation test. The control variable is now equal to 2, so the final value is not exceeded and the program performs the body statement again (i.e., performs the next iteration of the loop). This process continues until the control variable counter becomes 8, at which point the loop-continuation test fails and the repetition terminates.
The program continues by performing the first statement after the for statement. (In this case, the script terminates, because the interpreter reaches the end of the script.)
Figure 8.3 takes a closer look at the for statement at line 14 of Fig. 8.2. The for statement’s first line (including the keyword for and everything in parentheses after it) is often called the for statement header. Note that the for statement “does it all”—it specifies each of the items needed for counter-controlled repetition with a control variable. Remember that a block is a group of statements enclosed in curly braces that can be placed anywhere that a single statement can be placed, so you can use a block to put multiple statements into the body of a for statement, if necessary.
A Closer Look at the for Statement’s Header
Figure 8.3 uses the loop-continuation condition counter <= 7. If you incorrectly write counter < 7, the loop will execute only six times. This is an example of the common logic error called an off-by-one error.
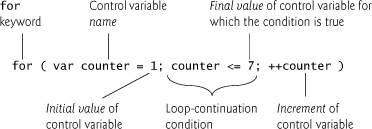
Fig. 8.3. for statement header components.
General Format of a for Statement
The general format of the for statement is
for ( initialization; loopContinuationTest; increment )
statements
where the initialization expression names the loop’s control variable and provides its initial value, loopContinuationTest is the expression that tests the loop-continuation condition (containing the final value of the control variable for which the condition is true), and increment is an expression that increments the control variable.
Optional Expressions in a for Statement Header
The three expressions in the for statement’s header are optional. If loopContinuationTest is omitted, the loop-continuation condition is true, thus creating an infinite loop. One might omit the initialization expression if the control variable is initialized before the loop. One might omit the increment expression if the increment is calculated by statements in the loop’s body or if no increment is needed. The two semicolons in the header are required.
Arithmetic Expressions in the for Statement’s Header
The initialization, loop-continuation condition and increment portions of a for statement can contain arithmetic expressions. For example, assume that x = 2 and y = 10. If x and y are not modified in the body of the loop, then the statement
for ( var j = x; j <= 4 * x * y; j += y / x )
is equivalent to the statement
for ( var j = 2; j <= 80; j += 5 )
Negative Increments
The “increment” of a for statement may be negative, in which case it’s really a decrement and the loop actually counts downward.
Loop-Continuation Condition Initially false
If the loop-continuation condition initially is false, the for statement’s body is not performed. Instead, execution proceeds with the statement following the for statement.
 Error-Prevention Tip 8.1
Although the value of the control variable can be changed in the body of a for statement, avoid changing it, because doing so can lead to subtle errors.
Flowcharting a for Statement
The for statement is flowcharted much like the while statement. For example, Fig. 8.4 shows the flowchart of the for statement in lines 14–17 of Fig. 8.2. This flowchart makes it clear that the initialization occurs only once and that incrementing occurs after each execution of the body statement. Note that, besides small circles and arrows, the flowchart contains only rectangle symbols and a diamond symbol.

Fig. 8.4. for repetition statement flowchart.
8.4. Examples Using the for Statement
The examples in this section show methods of varying the control variable in a for statement. In each case, we write the appropriate for header. Note the change in the relational operator for loops that decrement the control variable.
a. Vary the control variable from 1 to 100 in increments of 1.
for ( var i = 1; i <= 100; ++i )
b. Vary the control variable from 100 to 1 in increments of -1 (i.e., decrements of 1).
for ( var i = 100; i >= 1; --i )
c. Vary the control variable from 7 to 77 in steps of 7.
for ( var i = 7; i <= 77; i += 7 )
d. Vary the control variable from 20 to 2 in steps of -2.
for ( var i = 20; i >= 2; i -= 2 )
 Common Programming Error 8.1
Not using the proper relational operator in the loop-continuation condition of a loop that counts downward (e.g., using i <= 1 instead of i >= 1 in a loop that counts down to 1) is a logic error.
Summing Integers with a for Statement
Figure 8.5 uses the for statement to sum the even integers from 2 to 100. Note that the increment expression (line 13) adds 2 to the control variable number after the body executes during each iteration of the loop. The loop terminates when number has the value 102 (which is not added to the sum), and the script continues executing at line 16.
1 <!DOCTYPE html>
2
3 <!-- Fig. 8.5: Sum.html -->
4 <!-- Summation with the for repetition structure. -->
5 <html>
6 <head>
7 <meta charset = "utf-8">
8 <title>Sum the Even Integers from 2 to 100</title>
9 <script>
10
11 var sum = 0;
12
13 for ( var number = 2; number <= 100; number += 2 )
14 sum += number;
15
16 document.writeln( "The sum of the even integers " +
17 "from 2 to 100 is " + sum );
18
19 </script>
20 </head><body></body>
21 </html>
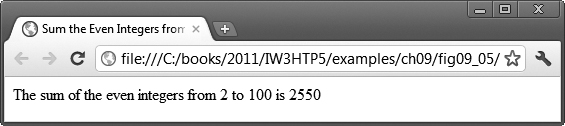
Fig. 8.5. Summation with the for repetition structure.
The body of the for statement in Fig. 8.5 actually could be merged into the rightmost (increment) portion of the for header by using a comma, as follows:
for ( var number = 2; number <= 100; sum += number, number += 2)
;
In this case, the comma represents the comma operator, which guarantees that the expression to its left is evaluated before the expression to its right. Similarly, the initialization sum= 0 could be merged into the initialization section of the for statement.
 Good Programming Practice 8.1
Although statements preceding a for statement and in the body of a for statement can often be merged into the for header, avoid doing so, because it makes the program more difficult to read.
Calculating Compound Interest with the for Statement
The next example computes compound interest (compounded yearly) using the for statement. Consider the following problem statement:
A person invests $1000.00 in a savings account yielding 5 percent interest. Assuming that all the interest is left on deposit, calculate and print the amount of money in the account at the end of each year for 10 years. Use the following formula to determine the amounts:
a = p (1 + r)n
where
p is the original amount invested (i.e., the principal)
r is the annual interest rate
n is the number of years
a is the amount on deposit at the end of the nth year.
This problem involves a loop that performs the indicated calculation for each of the 10 years the money remains on deposit. Figure 8.6 presents the solution to this problem, displaying the results in a table. Lines 9–18 define an embedded CSS style sheet that formats various aspects of the table. The CSS property border-collapse (line 11) with the value collapse indicates that the table’s borders should be merged so that there is no extra space between adjacent cells or between cells and the table’s border. Lines 13–14 specify the formatting for the table, td and th elements, indicating that they should all have a 1px solid black border and padding of 4px around their contents.
1 <!DOCTYPE html>
2
3 <!-- Fig. 8.6: Interest.html -->
4 <!-- Compound interest calculation with a for loop. -->
5 <html>
6 <head>
7 <meta charset = "utf-8">
8 <title>Calculating Compound Interest</title>
9 <style type = "text/css">
10 table { width: 300px;
11 border-collapse: collapse;
12 background-color: lightblue; }
13 table, td, th { border: 1px solid black;
14 padding: 4px; }
15 th { text-align: left;
16 color: white;
17 background-color: darkblue; }
18 tr.oddrow { background-color: white; }
19 </style>
20 <script>
21
22 var amount; // current amount of money
23 var principal = 1000.00; // principal amount
24 var rate = 0.05; // interest rate
25
26 document.writeln("<table>" ); // begin the table
27 document.writeln(
28 "<caption>Calculating Compound Interest</caption>" );
29 document.writeln(
30 "<thead><tr><th>Year</th>" ); // year column heading
31 document.writeln(
32 "<th>Amount on deposit</th>" ); // amount column heading
33 document.writeln( "</tr></thead><tbody>" );
34
35 // output a table row for each year
36 for ( var year = 1; year <= 10; ++year )
37 {
38 amount = principal * Math.pow( 1.0 + rate, year );
39
40 if ( year % 2 !== 0 )
41 document.writeln( "<tr class='oddrow'><td>" + year +
42 "</td><td>" + amount.toFixed(2) + "</td></tr>" );
43 else
44 document.writeln( "<tr><td>" + year +
45 "</td><td>" + amount.toFixed(2) + "</td></tr>" );
46 } //end for
47
48 document.writeln( "</tbody></table>" );
49
50 </script>
51 </head><body></body>
52 </html>
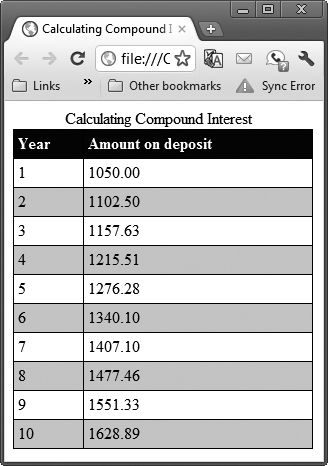
Fig. 8.6. Compound interest calculation with a for loop.
Outputting the Beginning of an HTML5 table
Lines 22–24 declare three variables and initialize principal to 1000.0 and rate to .05. Line 26 writes an HTML5 <table> tag, and lines 27–28 write the caption that summarizes the table’s content. Lines 29–30 create the table’s header section (<thead>), a row (<tr>) and a column heading (<th>) containing “Year.” Lines 31–32 create a table heading for “Amount on deposit”, write the closing </tr> and </thead> tags, and write the opening tag for the body of the table (<body>).
Performing the Interest Calculations
The for statement (lines 36–46) executes its body 10 times, incrementing control variable year from 1 to 10 (note that year represents n in the problem statement). JavaScript does not include an exponentiation operator—instead, we use the Math object’s pow method. Math.pow(x, y) calculates the value of x raised to the yth power. Method Math.pow takes two numbers as arguments and returns the result. Line 38 performs the calculation using the formula given in the problem statement.
Formatting the table Rows
Lines 40–45 write a line of HTML5 markup that creates the next row in the table. If it’s an odd-numbered row, line 41 indicates that the row should be formatted with the CSS style class oddrow (defined on line 18)—this allows us to format the background color differently for odd- and even-numbered rows to make the table more readable. The first column is the current year value. The second column displays the value of amount. Line 48 writes the closing </tbody> and </table> tags after the loop terminates.
Number Method toFixed
Lines 42 and 45 introduce the Number object and its toFixed method. The variable amount contains a numerical value, so JavaScript represents it as a Number object. The toFixed method of a Number object formats the value by rounding it to the specified number of decimal places. On line 34, amount.toFixed(2) outputs the value of amount with two decimal places, which is appropriate for dollar amounts.
A Warning about Displaying Rounded Values
Variables amount, principal and rate represent numbers in this script. Remember that JavaScript represents all numbers as floating-point numbers. This feature is convenient in this example, because we’re dealing with fractional parts of dollars and need a type that allows decimal points in its values.
Unfortunately, floating-point numbers can cause trouble. Here’s a simple example of what can go wrong when using floating-point numbers to represent dollar amounts displayed with two digits to the right of the decimal point: Two dollar amounts stored in the machine could be 14.234 (which would normally be rounded to 14.23 for display as a dollar amount) and 18.673 (which would normally be rounded to 18.67). When these amounts are added, they produce the internal sum 32.907, which would normally be rounded to 32.91 for display purposes. Thus your printout could appear as:

but a person adding the individual numbers as printed would expect the sum to be 32.90. You’ve been warned!
8.5. switch Multiple-Selection Statement
Previously, we discussed the if single-selection statement and the if...else double-selection statement. Occasionally, an algorithm will contain a series of decisions in which a variable or expression is tested separately for each of the values it may assume, and different actions are taken for each value. JavaScript provides the switch multiple-selection statement to handle such decision making. The script in Fig. 8.7 demonstrates three different CSS list formats determined by the value the user enters.
1 <!DOCTYPE html>
2
3 <!-- Fig. 8.7: SwitchTest.html -->
4 <!-- Using the switch multiple-selection statement. -->
5 <html>
6 <head>
7 <meta charset = "utf-8">
8 <title>Switching between HTML5 List Formats</title>
9 <script>
10
11 var choice; // user's choice
12 var startTag; // starting list item tag
13 var endTag; // ending list item tag
14 var validInput = true; // true if input valid else false
15 var listType; // type of list as a string
16
17 choice = window.prompt( "Select a list style:
" +
18 "1 (numbered), 2 (lettered), 3 (roman numbered)", "1" );
19
20 switch ( choice )
21 {
22 case "1":
23 startTag = "<ol>";
24 endTag = "</ol>";
25 listType = "<h1>Numbered List</h1>";
26 break;
27 case "2":
28 startTag = "<ol style = 'list-style-type: upper-alpha'>";
29 endTag = "</ol>";
30 listType = "<h1>Lettered List</h1>";
31 break;
32 case "3":
33 startTag = "<ol style = 'list-style-type: upper-roman'>";
34 endTag = "</ol>";
35 listType = "<h1>Roman Numbered List</h1>";
36 break;
37 default:
38 validInput = false;
39 break;
40 } //end switch
41
42 if ( validInput === true )
43 {
44 document.writeln( listType + startTag );
45
46 for ( var i = 1; i <= 3; ++i )
47 document.writeln( "<li>List item " + i + "</li>" );
48
49 document.writeln( endTag );
50 } //end if
51 else
52 document.writeln( "Invalid choice: " + choice );
53
54 </script>
55 </head><body></body>
56 </html>
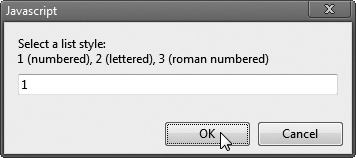
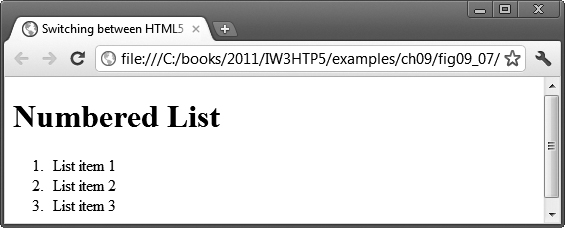


Fig. 8.7. Using the switch multiple-selection statement.
Line 11 declares the variable choice. This variable stores the user’s choice, which determines what type of HTML5 ordered list to display. Lines 12–13 declare variables startTag and endTag, which will store the HTML5 tags that will be used to create the list element. Line 14 declares variable validInput and initializes it to true. The script uses this variable to determine whether the user made a valid choice (indicated by the value of true). If a choice is invalid, the script sets validInput to false. Line 15 declares variable listType, which will store an h1 element indicating the list type. This heading appears before the list in the HTML5 document.
Lines 17–18 prompt the user to enter a 1 to display a numbered list, a 2 to display a lettered list and a 3 to display a list with roman numerals. Lines 20–40 define a switch statement that assigns to the variables startTag, endTag and listType values based on the value input by the user in the prompt dialog. We create these different lists using the CSS property list-style-type, which allows us to set the numbering system for the list. Possible values include decimal (numbers—the default), lower-roman (lowercase Roman numerals), upper-roman (uppercase Roman numerals), lower-alpha (lowercase letters), upper-alpha (uppercase letters), and more.
The switch statement consists of a series of case labels and an optional default case (which is normally placed last). When the flow of control reaches the switch statement, the script evaluates the controlling expression (choice in this example) in the parentheses following keyword switch. The value of this expression is compared with the value in each of the case labels, starting with the first case label. Assume that the user entered 2. Remember that the value typed by the user in a prompt dialog is returned as a string. So, the string 2 is compared to the string in each case in the switch statement. If a match occurs (case "2":), the statements for that case execute. For the string 2 (lines 28–31), we set startTag to an opening ol tag with the style property list-style-type set to upper-alpha, set endTag to "</ol>" to indicate the end of an ordered list and set listType to "<h1>Lettered List</h1>". If no match occurs between the controlling expression’s value and a case label, the default case executes and sets variable validInput to false.
The break statement in line 31 causes program control to proceed with the first statement after the switch statement. The break statement is used because the cases in a switch statement would otherwise run together. If break is not used anywhere in a switch statement, then each time a match occurs in the statement, the statements for that case and all the remaining cases execute.
Next, the flow of control continues with the if statement in line 42, which tests whether the variable validInput is true. If so, lines 44–49 write the listType, the startTag, three list items (<li>) and the endTag. Otherwise, the script writes text in the HTML5 document indicating that an invalid choice was made (line 52).
Flowcharting the switch Statement
Each case can have multiple actions (statements). The switch statement is different from others in that braces are not required around multiple actions in a case of a switch. The general switch statement (i.e., using a break in each case) is flowcharted in Fig. 8.8.
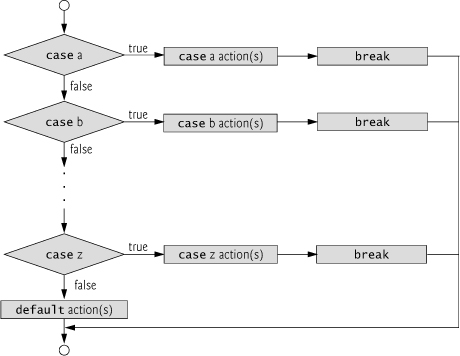
Fig. 8.8. switch multiple-selection statement.
The flowchart makes it clear that each break statement at the end of a case causes control to exit from the switch statement immediately. The break statement is not required for the last case in the switch statement (or the default case, when it appears last), because program control simply continues with the next statement after the switch statement. Having several case labels listed together (e.g., case 1: case 2: with no statements between the cases) simply means that the same set of actions is to occur for each of these cases.
8.6. do...while Repetition Statement
The do...while repetition statement is similar to the while statement. In the while statement, the loop-continuation test occurs at the beginning of the loop, before the body of the loop executes. The do...while statement tests the loop-continuation condition after the loop body executes—therefore, the loop body always executes at least once. When a do...while terminates, execution continues with the statement after the while clause. It’s not necessary to use braces in a do...while statement if there’s only one statement in the body.
The script in Fig. 8.9 uses a do...while statement to display each of the six different HTML5 heading types (h1 through h6). Line 11 declares control variable counter and initializes it to 1. Upon entering the do...while statement, lines 14–16 write a line of HTML5 text in the document. The value of control variable counter is used to create the starting and ending header tags (e.g., <h1> and </h1>) and to create the line of text to display (e.g., This is an h1 level head). Line 17 increments the counter before the loop-continuation test occurs at the bottom of the loop.
1 <!DOCTYPE html>
2
3 <!-- Fig. 8.9: DoWhileTest.html -->
4 <!-- Using the do...while repetition statement. -->
5 <html>
6 <head>
7 <meta charset = "utf-8">
8 <title>Using the do...while Repetition Statement</title>
9 <script>
10
11 var counter = 1;
12
13 do {
14 document.writeln( "<h" + counter + ">This is " +
15 "an h" + counter + " level head" + "</h" +
16 counter + ">" );
17 ++counter;
18 } while ( counter <= 6 );
19
20 </script>
21
22 </head><body></body>
23 </html>
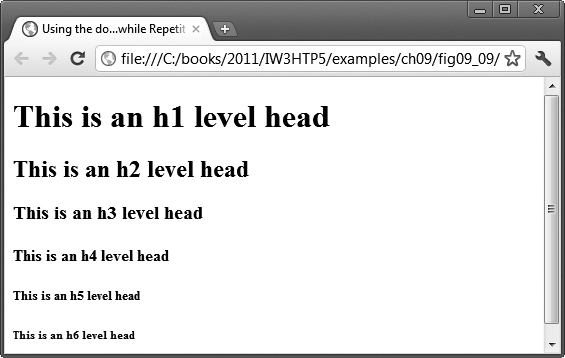
Fig. 8.9. Using the do...while repetition statement.
Flowcharting the do...while Statement
The do...while flowchart in Fig. 8.10 makes it clear that the loop-continuation test does not occur until the action executes at least once.
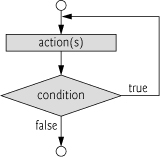
Fig. 8.10. do...while repetition statement flowchart.
Infinite loops are caused when the loop-continuation condition never becomes false in a while, for or do...while statement. To prevent this, make sure that there’s not a semicolon immediately after the header of a while or for statement. In a counter-controlled loop, make sure that the control variable is incremented (or decremented) in the body of the loop. In a sentinel-controlled loop, the sentinel value should eventually be input.
8.7. break and continue Statements
In addition to the selection and repetition statements, JavaScript provides the statements break and continue to alter the flow of control. Section 8.5 demonstrated how break can be used to terminate a switch statement’s execution. This section shows how to use break in repetition statements.
break Statement
The break statement, when executed in a while, for, do...while or switch statement, causes immediate exit from the statement. Execution continues with the first statement after the structure. Figure 8.11 demonstrates the break statement in a for repetition statement. During each iteration of the for statement in lines 13–19, the script writes the value of count in the HTML5 document. When the if statement in line 15 detects that count is 5, the break in line 16 executes. This statement terminates the for statement, and the program proceeds to line 21 (the next statement in sequence immediately after the for statement), where the script writes the value of count when the loop terminated (i.e., 5). The loop executes line 18 only four times.
1 <!DOCTYPE html>
2
3 <!-- Fig. 8.11: BreakTest.html -->
4 <!-- Using the break statement in a for statement. -->
5 <html>
6 <head>
7 <meta charset = "utf-8">
8 <title>
9 Using the break Statement in a for Statement
10 </title>
11 <script>
12
13 for ( var count = 1; count <= 10; ++count )
14 {
15 if ( count == 5 )
16 break; // break loop only if count == 5
17
18 document.writeln( count + " " );
19 } //end for
20
21 document.writeln(
22 "<p>Broke out of loop at count = " + count + "</p>" );
23
24 </script>
25 </head><body></body>
26 </html>
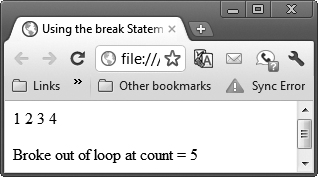
Fig. 8.11. Using the break statement in a for statement.
continue Statement
The continue statement, when executed in a while, for or do...while statement, skips the remaining statements in the body of the statement and proceeds with the next iteration of the loop. In while and do...while statements, the loop-continuation test evaluates immediately after the continue statement executes. In for statements, the increment expression executes, then the loop-continuation test evaluates. Improper placement of continue before the increment in a while may result in an infinite loop.
Figure 8.12 uses continue in a for statement to skip line 19 if line 16 determines that the value of count is 5. When the continue statement executes, the script skips the remainder of the for statement’s body (line 19). Program control continues with the increment of the for statement’s control variable (line 14), followed by the loop-continuation test to determine whether the loop should continue executing. Although break and continue execute quickly, you can accomplish what they do with the other control statements, which many programmers feel results in better engineered software.
1 <!DOCTYPE html>
2
3 <!-- Fig. 8.12: ContinueTest.html -->
4 <!-- Using the continue statement in a for statement. -->
5 <html>
6 <head>
7 <meta charset = "utf-8">
8 <title>
9 Using the continue Statement in a for Statement
10 </title>
11
12 <script>
13
14 for ( var count = 1; count <= 10; ++count )
15 {
16 if ( count == 5 )
17 continue; // skip remaining loop code only if count == 5
18
19 document.writeln( count + " " );
20 } //end for
21
22 document.writeln( "<p>Used continue to skip printing 5</p>" );
23
24 </script>
25
26 </head><body></body>
27 </html>
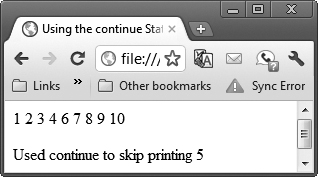
Fig. 8.12. Using the continue statement in a for statement.
8.8. Logical Operators
So far, we’ve studied only simple conditions such as count <= 10, total > 1000 and number != sentinelValue. These conditions were expressed in terms of the relational operators >, <, >= and <=, and the equality operators == and !=. Each decision tested one condition. To make a decision based on multiple conditions, we performed these tests in separate statements or in nested if or if...else statements.
JavaScript provides logical operators that can be used to form more complex conditions by combining simple conditions. The logical operators are && (logical AND), || (logical OR) and ! (logical NOT, also called logical negation).
&& (Logical AND) Operator
Suppose that, at some point in a program, we wish to ensure that two conditions are both true before we choose a certain path of execution. In this case, we can use the logical && operator, as follows:
if ( gender == 1 && age >= 65 )
++seniorFemales;
This if statement contains two simple conditions. The condition gender == 1 might be evaluated to determine, for example, whether a person is a female. The condition age >= 65 is evaluated to determine whether a person is a senior citizen. The if statement then considers the combined condition
gender == 1 && age >= 65
This condition is true if and only if both of the simple conditions are true. If this combined condition is indeed true, the count of seniorFemales is incremented by 1. If either or both of the simple conditions are false, the program skips the incrementing and proceeds to the statement following the if statement. The preceding combined condition can be made more readable by adding redundant parentheses:
( gender == 1 ) && ( age >= 65 )
The table in Fig. 8.13 summarizes the && operator. The table shows all four possible combinations of false and true values for expression1 and expression2. Such tables are often called truth tables. JavaScript evaluates to false or true all expressions that include relational operators, equality operators and/or logical operators.
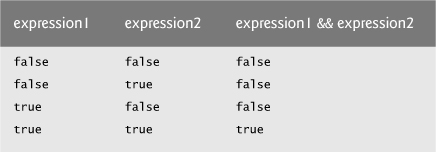
Fig. 8.13. Truth table for the && (logical AND) operator.
|| (Logical OR) Operator
Now let’s consider the || (logical OR) operator. Suppose we wish to ensure that either or both of two conditions are true before we choose a certain path of execution. In this case, we use the || operator, as in the following program segment:
if ( semesterAverage >= 90 || finalExam >= 90 )
document.writeln( "Student grade is A" );
This statement also contains two simple conditions. The condition semesterAverage >= 90 is evaluated to determine whether the student deserves an “A” in the course because of a solid performance throughout the semester. The condition finalExam >= 90 is evaluated to determine whether the student deserves an “A” in the course because of an outstanding performance on the final exam. The if statement then considers the combined condition
semesterAverage >= 90 || finalExam >= 90
and awards the student an “A” if either or both of the simple conditions are true. Note that the message "Student grade is A" is not printed only when both of the simple conditions are false. Figure 8.14 is a truth table for the logical OR operator (||).

Fig. 8.14. Truth table for the || (logical OR) operator.
The && operator has a higher precedence than the || operator. Both operators associate from left to right. An expression containing && or || operators is evaluated only until truth or falsity is known. Thus, evaluation of the expression
gender == 1 && age >= 65
stops immediately if gender is not equal to 1 (i.e., the entire expression is false) and continues if gender is equal to 1 (i.e., the entire expression could still be true if the condition age >= 65 is true). Similarly, the || operator immediately returns true if the first operand is true. This performance feature for evaluation of logical AND and logical OR expressions is called short-circuit evaluation.
! (Logical Negation) Operator
JavaScript provides the ! (logical negation) operator to enable you to “reverse” the meaning of a condition (i.e., a true value becomes false, and a false value becomes true). Unlike the logical operators && and ||, which combine two conditions (i.e., they’re binary operators), the logical negation operator has only a single condition as an operand (i.e., it’s a unary operator). The logical negation operator is placed before a condition to choose a path of execution if the original condition (without the logical negation operator) is false, as in the following program segment:
if ( ! ( grade == sentinelValue ) )
document.writeln( "The next grade is " + grade );
The parentheses around the condition grade == sentinelValue are needed because the logical negation operator has a higher precedence than the equality operator. Figure 8.15 is a truth table for the logical negation operator.

Fig. 8.15. Truth table for operator ! (logical negation).
In most cases, you can avoid using logical negation by expressing the condition differently with an appropriate relational or equality operator. For example, the preceding statement may also be written as follows:
if ( grade != sentinelValue )
document.writeln( "The next grade is " + grade );
Boolean Equivalents of Nonboolean Values
An interesting feature of JavaScript is that most nonboolean values can be converted to a boolean true or false value (if they’re being used in a context in which a boolean value is needed). Nonzero numeric values are considered to be true. The numeric value zero is considered to be false. Any string that contains characters is considered to be true. The empty string (i.e., the string containing no characters) is considered to be false. The value null and variables that have been declared but not initialized are considered to be false. All objects (such as the browser’s document and window objects and JavaScript’s Math object) are considered to be true.
Operator Precedence and Associativity
Figure 8.16 shows the precedence and associativity of the JavaScript operators introduced up to this point. The operators are shown top to bottom in decreasing order of precedence.
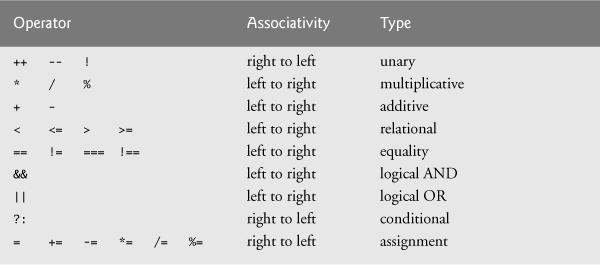
Fig. 8.16. Precedence and associativity of the operators discussed so far.
8.9. Web Resources
The Deitel JavaScript Resource Center contains links to some of the best JavaScript resources on the web. There you’ll find categorized links to JavaScript tools, code generators, forums, books, libraries, frameworks and more. Also check out the tutorials for all skill levels, from introductory to advanced. Be sure to visit the related Resource Centers on HTML5 (www.deitel.com/HTML5/) and CSS3 (www.deitel.com/css3/).
Summary
Section 8.2 Essentials of Counter-Controlled Repetition
• Counter-controlled repetition requires: the name of a control variable, the initial value of the control variable, the increment (or decrement) by which the control variable is modified each time through the loop, and the condition that tests for the final value of the control variable to determine whether looping should continue.
Section 8.3 for Repetition Statement
• The for statement (p. 253) conveniently handles all the details of counter-controlled repetition with a control variable.
• The for statement’s first line (including the keyword for and everything in parentheses after it) is often called the for statement header (p. 254).
• You can use a block to put multiple statements into the body of a for statement.
• The for statement takes three expressions: an initialization, a condition and an expression.
• The three expressions in the for statement are optional. The two semicolons in the for statement are required.
• The initialization, loop-continuation condition and increment portions of a for statement can contain arithmetic expressions.
• The “increment” of a for statement may be negative, in which case it’s called a decrement and the loop actually counts downward.
• If the loop-continuation condition initially is false, the body of the for statement is not performed. Instead, execution proceeds with the statement following the for statement.
Section 8.4 Examples Using the for Statement
• JavaScript does not include an exponentiation operator. Instead, we use the Math object’s pow method for this purpose. Math.pow(x, y) calculates the value of x raised to the yth power.
• Floating-point numbers can cause trouble as a result of rounding errors.
• To prevent implicit conversions in comparisons, which can lead to unexpected results, JavaScript provides the strict equals (===) and strict does not equal (!==) operators.
Section 8.5 switch Multiple-Selection Statement
• JavaScript provides the switch multiple-selection statement (p. 263), in which a variable or expression is tested separately for each of the values it may assume. Different actions are taken for each value.
• The CSS property list-style-type (p. 263) allows you to set the numbering system for the list. Possible values include decimal (numbers—the default), lower-roman (lowercase roman numerals), upper-roman (uppercase roman numerals), lower-alpha (lowercase letters), upper-alpha (uppercase letters), and more.
• The switch statement consists of a series of case labels and an optional default case (which is normally placed last, p. 263). When the flow of control reaches the switch statement, the script evaluates the controlling expression in the parentheses following keyword switch. The value of this expression is compared with the value in each of the case labels, starting with the first case label (p. 263). If the comparison evaluates to true, the statements after the case label are executed in order until a break statement is reached.
• The break statement is used as the last statement in each case to exit the switch statement immediately.
• Each case can have multiple actions (statements). The switch statement is different from other statements in that braces are not required around multiple actions in a case of a switch.
• The break statement is not required for the last case in the switch statement, because program control automatically continues with the next statement after the switch statement.
• Having several case labels listed together (e.g., case 1: case 2: with no statements between the cases) simply means that the same set of actions is to occur for each case.
Section 8.6 do...while Repetition Statement
• The do...while statement (p. 264) tests the loop-continuation condition after the loop body executes—therefore, the loop body always executes at least once.
Section 8.7 break and continue Statements
• The break statement, when executed in a repetition statement, causes immediate exit from the statement. Execution continues with the first statement after the repetition statement.
• The continue statement, when executed in a repetition statement, skips the remaining statements in the loop body and proceeds with the next loop iteration. In while and do...while statements, the loop-continuation test evaluates immediately after the continue statement executes. In for statements, the increment expression executes, then the loop-continuation test evaluates.
Section 8.8 Logical Operators
• JavaScript provides logical operators that can be used to form more complex conditions by combining simple conditions. The logical operators are && (logical AND; p. 268), || (logical OR; p. 268) and ! (logical NOT, also called logical negation; p. 268).
• The && operator is used to ensure that two conditions are both true before choosing a certain path of execution.
• JavaScript evaluates to false or true all expressions that include relational operators, equality operators and/or logical operators.
• The || (logical OR) operator is used to ensure that either or both of two conditions are true before choosing choose a certain path of execution.
• The && operator has a higher precedence than the || operator. Both operators associate from left to right.
• An expression containing && or || operators is evaluated only until truth or falsity is known. This is called short-circuit evaluation (p. 270).
• JavaScript provides the ! (logical negation) operator to enable you to “reverse” the meaning of a condition (i.e., a true value becomes false, and a false value becomes true).
• The logical negation operator has only a single condition as an operand (i.e., it’s a unary operator). The logical negation operator is placed before a condition to evaluate to true if the original condition (without the logical negation operator) is false.
• The logical negation operator has a higher precedence than the equality operator.
• Most nonboolean values can be converted to a boolean true or false value. Nonzero numeric values are considered to be true. The numeric value zero is considered to be false. Any string that contains characters is considered to be true. The empty string (i.e., the string containing no characters) is considered to be false. The value null and variables that have been declared but not initialized are considered to be false. All objects (e.g., the browser’s document and window objects and JavaScript’s Math object) are considered to be true.
Self-Review Exercises
8.1 State whether each of the following is true or false. If false, explain why.
a. The default case is required in the switch selection statement.
b. The break statement is required in the last case of a switch selection statement.
c. The expression ( x > y && a < b ) is true if either x > y is true or a < b is true.
d. An expression containing the || operator is true if either or both of its operands is true.
8.2 Write a JavaScript statement or a set of statements to accomplish each of the following tasks:
a. Sum the odd integers between 1 and 99. Use a for statement. Assume that the variables sum and count have been declared.
b. Calculate the value of 2.5 raised to the power of 3. Use the pow method.
c. Print the integers from 1 to 20 by using a while loop and the counter variable x. Assume that the variable x has been declared, but not initialized. Print only five integers per line. [Hint: Use the calculation x % 5. When the value of this expression is 0, start a new paragraph in the HTML5 document.]
d. Repeat Exercise 8.2(c), but using a for statement.
8.3 Find the error in each of the following code segments, and explain how to correct it:
a.
x = 1;
while ( x <= 10 );
++x;
}
b.
switch ( n )
{
case 1:
document.writeln( "The number is 1" );
case 2:
document.writeln( "The number is 2" );
break;
default:
document.writeln( "The number is not 1 or 2" );
break;
}
c. The following code should print the values from 1 to 10:
n = 1;
while ( n < 10 )
document.writeln( n++ );
Answers to Self-Review Exercises
8.1
a. False. The default case is optional. If no default action is needed, then there’s no need for a default case.
b. False. The break statement is used to exit the switch statement. The break statement is not required for the last case in a switch statement.
c. False. Both of the relational expressions must be true for the entire expression to be true when using the && operator.
d. True.
8.2
a.
sum = 0;
for ( count = 1; count <= 99; count += 2 )
sum += count;
b.
Math.pow( 2.5, 3 )
c.
x = 1;
document.writeln( "<p>" );
while ( x <= 20 ) {
document.write( x + " " );
if ( x % 5 == 0 )
document.write( "</p><p>" );
++x;
}
d.
document.writeln( "<p>" );
for ( x = 1; x <= 20; x++ ) {
document.write( x + " " );
if ( x % 5 == 0 )
document.write( "</p><p>" );
}
document.writeln( "</p>" );
8.3
a. Error: The semicolon after the while header causes an infinite loop, and there’s a missing left brace.
Correction: Replace the semicolon by a {, or remove both the ; and the }.
b. Error: Missing break statement in the statements for the first case.
Correction: Add a break statement at the end of the statements for the first case. Note that this missing statement is not necessarily an error if you want the statement of case 2: to execute every time the case 1: statement executes.
c. Error: Improper relational operator used in the while continuation condition.
Correction: Use <= rather than <, or change 10 to 11.
Exercises
8.4 Find the error in each of the following segments of code. [Note: There may be more than one error.]
a.
For ( x = 100, x >= 1, ++x )
document.writeln( x );
b. The following code should print whether integer value is odd or even:
switch ( value % 2 ) {
case 0:
document.writeln( "Even integer" );
case 1:
document.writeln( "Odd integer" );
}
c. The following code should output the odd integers from 19 to 1:
for ( x = 19; x >= 1; x += 2 )
document.writeln( x );
d. The following code should output the even integers from 2 to 100:
counter = 2;
do {
document.writeln( counter );
counter += 2;
} While ( counter < 100 );
8.5 What does the following script do?
1 <!DOCTYPE html>
2
3 <!-- Exercise 8.5: ex08_05.html -->
4 <html>
5 <head>
6 <meta charset = "utf-8">
7 <title>Mystery</title>
8 <script>
9
10 document.writeln( "<table>" );
11
12 for ( var i = 1; i <= 7; i++ )
13 {
14 document.writeln( "<tr>" );
15
16 for ( var j = 1; j <= 5; j++ )
17 document.writeln( "<td>(" + i + ", " + j + ")</td>" );
18
19 document.writeln( "</tr>" );
20 } // end for
21
22 document.writeln( "</table>" );
23
24 </script>
25 </head><body />
26 </html>
8.6 Write a script that finds the smallest of several nonnegative integers. Assume that the first value read specifies the number of values to be input from the user.
8.7 Write a script that calculates the product of the odd integers from 1 to 15, then outputs HTML5 text that displays the results.
8.8 Modify the compound interest program in Fig. 8.6 to repeat its steps for interest rates of 5, 6, 7, 8, 9 and 10 percent. Use a for statement to vary the interest rate. Use a separate table for each rate.
8.9 One interesting application of computers is drawing graphs and bar charts (sometimes called histograms). Write a script that reads five numbers between 1 and 30. For each number read, output HTML5 text that displays a line containing the same number of adjacent asterisks. For example, if your program reads the number 7, it should output HTML5 text that displays *******.
8.10 (“The Twelve Days of Christmas” Song) Write a script that uses repetition and a switch structures to print the song “The Twelve Days of Christmas.” You can find the words at the site
www.santas.net/twelvedaysofchristmas.htm
8.11 A mail-order house sells five different products whose retail prices are as follows: product 1, $2.98; product 2, $4.50; product 3, $9.98; product 4, $4.49; and product 5, $6.87. Write a script that reads a series of pairs of numbers as follows:
a. Product number
b. Quantity sold for one day
Your program should use a switch statement to determine each product’s retail price and should calculate and output HTML5 that displays the total retail value of all the products sold last week. Use a prompt dialog to obtain the product number and quantity from the user. Use a sentinel-controlled loop to determine when the program should stop looping and display the final results.
8.12 Assume that i = 1, j = 2, k = 3 and m = 2. What does each of the given statements print? Are the parentheses necessary in each case?
a. document.writeln( i == 1 );
b. document.writeln( j == 3 );
c. document.writeln( i >= 1 && j < 4 );
d. document.writeln( m <= 99 && k < m );
e. document.writeln( j >= i || k == m );
f. document.writeln( k + m < j || 3 - j >= k );
g. document.writeln( !( k > m ) );
8.13 Given the following switch statement:
1 switch ( k )
2 {
3 case 1:
4 break;
5 case 2:
6 case 3:
7 ++k;
8 break;
9 case 4:
10 --k;
11 break;
12 default:
13 k *= 3;
14 } //end switch
15
16 x = k;
What values are assigned to x when k has values of 1, 2, 3, 4 and 10?