
18. Database: SQL, MySQL, LINQ and Java DB
It is a capital mistake to theorize before one has data.
—Arthur Conan Doyle
Now go, write it before them in a table, and note it in a book, that it may be for the time to come for ever and ever.
—The Holy Bible, Isaiah 30:8
Get your facts first, and then you can distort them as much as you please.
—Mark Twain
I like two kinds of men: domestic and foreign.
—Mae West
Objectives
In this chapter, you’ll:
• Learn fundamental relational database concepts.
• Learn Structured Query Language (SQL) capabilities for retrieving data from and manipulating data in a database.
• Configure a MySQL user account.
• Create MySQL databases.
• Learn fundamental concepts of Microsoft’s Language Integrated Query (LINQ)
18.3 Relational Database Overview: A books Database
18.4.4 Merging Data from Multiple Tables: INNER JOIN
18.5.1 Instructions for Setting Up a MySQL User Account
18.5.2 Creating Databases in MySQL
18.6 (Optional) Microsoft Language Integrate Query (LINQ)
18.6.1 Querying an Array of int Values Using LINQ
18.6.2 Querying an Array of Employee Objects Using LINQ
18.6.3 Querying a Generic Collection Using LINQ
18.8 (Optional) Querying a Database with LINQ
18.8.1 Creating LINQ to SQL Classes
18.8.2 Data Bindings Between Controls and the LINQ to SQL Classes
18.9 (Optional) Dynamically Binding LINQ to SQL Query Results
18.9.1 Creating the Display Query Results GUI
18.9.2 Coding the Display Query Results Application
Summary | Self-Review Exercises | Answers to Self-Review Exercises | Exercises
18.1. Introduction
A database is an organized collection of data. There are many different strategies for organizing data to facilitate easy access and manipulation. A database management system (DBMS) provides mechanisms for storing, organizing, retrieving and modifying data for many users. Database management systems allow for the access and storage of data without concern for the internal representation of data.
Today’s most popular database systems are relational databases. A language called SQL—pronounced “sequel,” or as its individual letters—is the international standard language used almost universally with relational databases to perform queries (i.e., to request information that satisfies given criteria) and to manipulate data. [Note: As you learn about SQL, you’ll see some authors writing “a SQL statement” (which assumes the pronunciation “sequel”) and others writing “an SQL statement” (which assumes that the individual letters are pronounced). In this book we pronounce SQL as “sequel.”]
Programs connect to, and interact with, a relational database via an interface—software that facilitates communication between a database management system and a program. For example, Java developers can use the JDBC interface to interact with databases. Similarly, ASP.NET programmers communicate with databases and manipulate their data through interfaces provided by .NET.
18.2. Relational Databases
A relational database is a logical representation of data that allows the data to be accessed without consideration of its physical structure. A relational database stores data in tables. Figure 18.1 illustrates a sample table that might be used in a personnel system. The table name is Employee, and its primary purpose is to store the attributes of employees. Tables are composed of rows, and rows are composed of columns in which values are stored. This table consists of six rows. The Number column of each row is the table’s primary key—a column (or group of columns) with a unique value that cannot be duplicated in other rows. This guarantees that each row can be identified by its primary key. Good examples of primary-key columns are a social security number, an employee ID number and a part number in an inventory system, as values in each of these columns are guaranteed to be unique. The rows in Fig. 18.1 are displayed in order by primary key. In this case, the rows are listed in increasing order, but we could also use decreasing order.
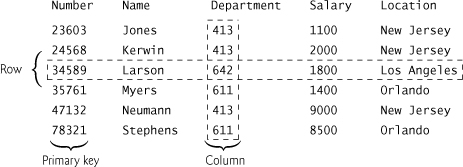
Fig. 18.1. Employee table sample data.
Rows in tables are not guaranteed to be stored in any particular order. As we’ll demonstrate in an upcoming example, programs can specify ordering criteria when requesting data from a database.
Each column represents a different data attribute. Rows are normally unique (by primary key) within a table, but particular column values may be duplicated between rows. For example, three different rows in the Employee table’s Department column contain number 413.
Different users of a database are often interested in different data and different relationships among the data. Most users require only subsets of the rows and columns. Queries specify which subsets of the data to select from a table. You use SQL to define queries. For example, you might select data from the Employee table to create a result that shows where each department is located, presenting the data sorted in increasing order by department number. This result is shown in Fig. 18.2. SQL is discussed in Section 18.4.

Fig. 18.2. Result of selecting distinct Department and Location data from table
18.3. Relational Database Overview: A books Database
We now overview relational databases in the context of a sample books database we created for this chapter. Before we discuss SQL, we discuss the tables of the books database. We use this database to introduce various database concepts, including how to use SQL to obtain information from the database and to manipulate the data. We provide a script to create the database. You can find the script in the examples directory for this chapter. Section 18.5.2 explains how to use this script. The database consists of three tables: Authors, AuthorISBN and Titles.
Authors Table
The Authors table (described in Fig. 18.3) consists of three columns that maintain each author’s unique ID number, first name and last name. Figure 18.4 contains sample data from the Authors table of the books database.
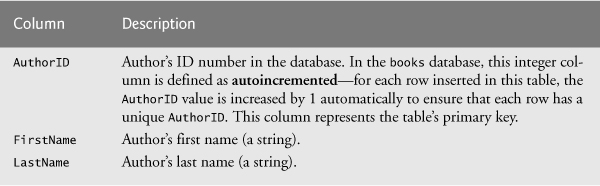
Fig. 18.3. Authors table from the books database.
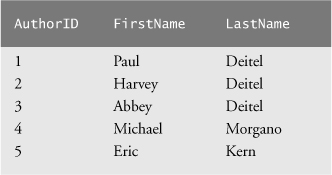
Fig. 18.4. Sample data from the Authors table.
AuthorISBN Table
The AuthorISBN table (described in Fig. 18.5) consists of two columns that maintain each ISBN and the corresponding author’s ID number. This table associates authors with their books. Both columns are foreign keys that represent the relationship between the tables Authors and Titles—one row in table Authors may be associated with many rows in table Titles, and vice versa. The combined columns of the AuthorISBN table represent the table’s primary key—thus, each row in this table must be a unique combination of an AuthorID and an ISBN. Figure 18.6 contains sample data from the AuthorISBN table of the books database. [Note: To save space, we have split the contents of this table into two columns, each containing the AuthorID and ISBN columns.] The AuthorID column is a foreign key—a column in this table that matches the primary-key column in another table (i.e., AuthorID in the Authors table). Foreign keys are specified when creating a table. The foreign key helps maintain the Rule of Referential Integrity—every foreign-key value must appear as another table’s primary-key value. This enables the DBMS to determine whether the AuthorID value for a particular book is valid. Foreign keys also allow related data in multiple tables to be selected from those tables for analytic purposes—this is known as joining the data.

Fig. 18.5. AuthorISBN table from the books database.
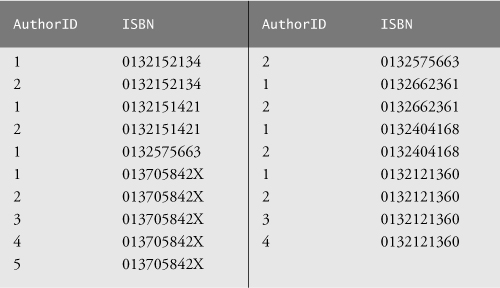
Fig. 18.6. Sample data from the AuthorISBN table of books.
Titles Table
The Titles table described in Fig. 18.7 consists of four columns that stand for the ISBN, the title, the edition number and the copyright year. The table is in Fig. 18.8.
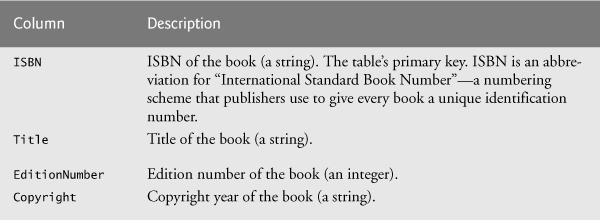
Fig. 18.7. Titles table from the books database.
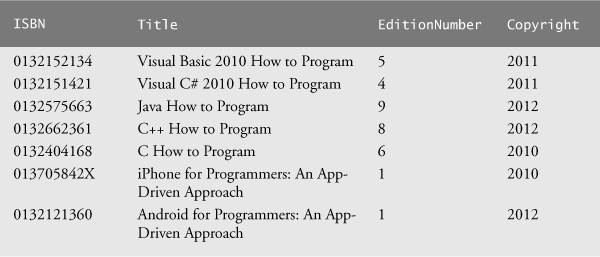
Fig. 18.8. Sample data from the Titles table of the books database.
Entity-Relationship (ER) Diagram
There’s a one-to-many relationship between a primary key and a corresponding foreign key (e.g., one author can write many books). A foreign key can appear many times in its own table, but only once (as the primary key) in another table. Figure 18.9 is an entity-relationship (ER) diagram for the books database. This diagram shows the database tables and the relationships among them. The first compartment in each box contains the table’s name and the remaining compartments contain the table’s columns. The names in italic are primary keys. A table’s primary key uniquely identifies each row in the table. Every row must have a primary-key value, and that value must be unique in the table. This is known as the Rule of Entity Integrity. Again, for the AuthorISBN table, the primary key is the combination of both columns.
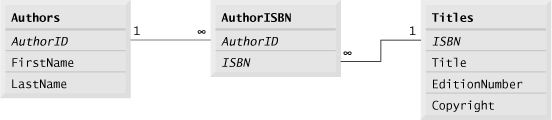
Fig. 18.9. Table relationships in the books database.
 Common Programming Error 18.1
Not providing a value for every column in a primary key breaks the Rule of Entity Integrity and causes the DBMS to report an error.
Providing the same primary-key value in multiple rows causes the DBMS to report an error.
The lines connecting the tables (Fig. 18.9) represent the relationships between the tables. Consider the line between the AuthorISBN and Authors tables. On the Authors end of the line is a 1, and on the AuthorISBN end is an infinity symbol (∞), indicating a one-to-many relationship in which every author in the Authors table can have an arbitrary number of books in the AuthorISBN table. The relationship line links the AuthorID column in Authors (i.e., its primary key) to the AuthorID column in AuthorISBN (i.e., its foreign key). The AuthorID column in the AuthorISBN table is a foreign key.
Providing a foreign-key value that does not appear as a primary-key value in another table breaks the Rule of Referential Integrity and causes the DBMS to report an error.
The line between Titles and AuthorISBN illustrates another one-to-many relationship; a title can be written by any number of authors. In fact, the sole purpose of the AuthorISBN table is to provide a many-to-many relationship between Authors and Titles—an author can write many books and a book can have many authors.
18.4. SQL
We now overview SQL in the context of our books database. The next several subsections discuss the SQL keywords listed in Fig. 18.10 in the context of SQL queries and statements. Other SQL keywords are beyond this text’s scope. To learn other keywords, refer to the SQL reference guide supplied by the vendor of the DBMS you’re using.
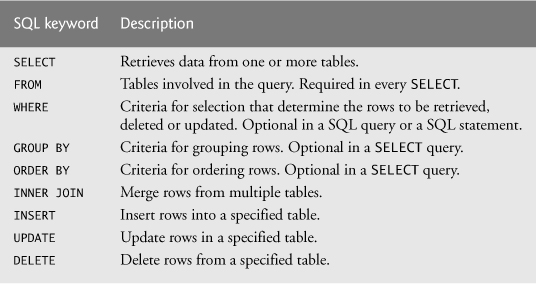
Fig. 18.10. SQL query keywords.
18.4.1. Basic SELECT Query
Let us consider several SQL queries that extract information from database books. A SQL query “selects” rows and columns from one or more tables in a database. Such selections are performed by queries with the SELECT keyword. The basic form of a SELECT query is
SELECT * FROM tableName
in which the asterisk (*) wildcard character indicates that all columns from the tableName table should be retrieved. For example, to retrieve all the data in the Authors table, use
SELECT * FROM Authors
Most programs do not require all the data in a table. To retrieve only specific columns, replace the * with a comma-separated list of column names. For example, to retrieve only the columns AuthorID and LastName for all rows in the Authors table, use the query
SELECT AuthorID, LastName FROM Authors
This query returns the data listed in Fig. 18.11.
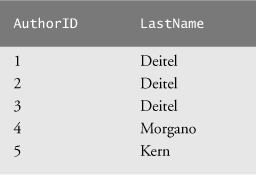
Fig. 18.11. Sample AuthorID and LastName data from the Authors table.
 Software Engineering Observation 18.1
In general, you process results by knowing in advance the order of the columns in the result—for example, selecting AuthorID and LastName from table Authors ensures that the columns will appear in the result with AuthorID as the first column and LastName as the second. Programs typically process result columns by specifying the column number in the result (starting from 1 for the first column). Selecting columns by name avoids returning unneeded columns and protects against changes to the order of the columns in the table(s) by returning the columns in the exact order specified.
If you assume that the columns are always returned in the same order from a query that uses the asterisk (*), the program may process the results incorrectly.
18.4.2. WHERE Clause
In most cases, it’s necessary to locate rows in a database that satisfy certain selection criteria. Only rows that satisfy the selection criteria (formally called predicates) are selected. SQL uses the optional WHERE clause in a query to specify the selection criteria for the query. The basic form of a query with selection criteria is
SELECT columnName1, columnName2, ... FROM tableName WHERE criteria
For example, to select the Title, EditionNumber and Copyright columns from table Titles for which the Copyright date is greater than 2010, use the query
SELECT Title, EditionNumber, Copyright
FROM Titles
WHERE Copyright > '2010'
Strings in SQL are delimited by single (') rather than double (") quotes. Figure 18.12 shows the result of the preceding query.
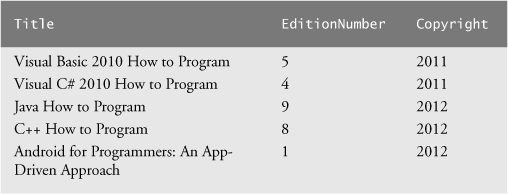
Fig. 18.12. Sampling of titles with copyrights after 2005 from table Titles.
Pattern Matching: Zero or More Characters
The WHERE clause criteria can contain the operators <, >, <=, >=, =, <> and LIKE. Operator LIKE is used for pattern matching with wildcard characters percent (%) and underscore (_). Pattern matching allows SQL to search for strings that match a given pattern.
A pattern that contains a percent character (%) searches for strings that have zero or more characters at the percent character’s position in the pattern. For example, the next query locates the rows of all the authors whose last name starts with the letter D:
SELECT AuthorID, FirstName, LastName
FROM Authors
WHERE LastName LIKE 'D%'
This query selects the two rows shown in Fig. 18.13—three of the five authors have a last name starting with the letter D (followed by zero or more characters). The % symbol in the WHERE clause’s LIKE pattern indicates that any number of characters can appear after the letter D in the LastName. The pattern string is surrounded by single-quote characters.
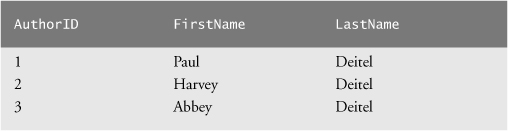
Fig. 18.13. Authors whose last name starts with D from the Authors table.
 Portability Tip 18.1
See the documentation for your database system to determine whether SQL is case sensitive on your system and to determine the syntax for SQL keywords.
Read your database system’s documentation carefully to determine whether it supports the LIKE operator as discussed here.
Pattern Matching: Any Character
An underscore ( _ ) in the pattern string indicates a single wildcard character at that position in the pattern. For example, the following query locates the rows of all the authors whose last names start with any character (specified by _), followed by the letter o, followed by any number of additional characters (specified by %):
SELECT AuthorID, FirstName, LastName
FROM Authors
WHERE LastName LIKE '_o%'
The preceding query produces the row shown in Fig. 18.14, because only one author in our database has a last name that contains the letter o as its second letter.

Fig. 18.14. The only author from the Authors table whose last name contains o as the second letter.
18.4.3. ORDER BY Clause
The rows in the result of a query can be sorted into ascending or descending order by using the optional ORDER BY clause. The basic form of a query with an ORDER BY clause is
SELECT columnName1, columnName2, ... FROM tableName ORDER BY column ASC
SELECT columnName1, columnName2, ... FROM tableName ORDER BY column DESC
where ASC specifies ascending order (lowest to highest), DESC specifies descending order (highest to lowest) and column specifies the column on which the sort is based. For example, to obtain the list of authors in ascending order by last name (Fig. 18.15), use the query
SELECT AuthorID, FirstName, LastName
FROM Authors
ORDER BY LastName ASC

Fig. 18.15. Sample data from table Authors in ascending order by LastName.
Sorting in Descending Order
The default sorting order is ascending, so ASC is optional. To obtain the same list of authors in descending order by last name (Fig. 18.16), use the query
SELECT AuthorID, FirstName, LastName
FROM Authors
ORDER BY LastName DESC
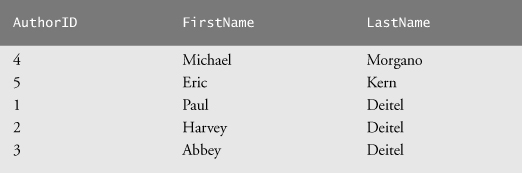
Fig. 18.16. Sample data from table Authors in descending order by LastName.
Sorting By Multiple Columns
Multiple columns can be used for sorting with an ORDER BY clause of the form
ORDER BY column1 sortingOrder, column2 sortingOrder, ...
where sortingOrder is either ASC or DESC. The sortingOrder does not have to be identical for each column. The query
SELECT AuthorID, FirstName, LastName
FROM Authors
ORDER BY LastName, FirstName
sorts all the rows in ascending order by last name, then by first name. If any rows have the same last-name value, they’re returned sorted by first name (Fig. 18.17).
Combining the WHERE and ORDER BY Clauses
The WHERE and ORDER BY clauses can be combined in one query, as in
SELECT ISBN, Title, EditionNumber, Copyright
FROM Titles
WHERE Title LIKE '%How to Program'
ORDER BY Title ASC
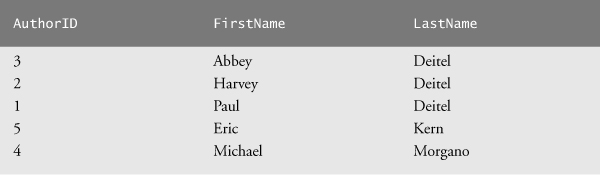
Fig. 18.17. Sample data from Authors in ascending order by LastName and FirstName.
which returns the ISBN, Title, EditionNumber and Copyright of each book in the Titles table that has a Title ending with "How to Program" and sorts them in ascending order by Title. The query results are shown in Fig. 18.18.
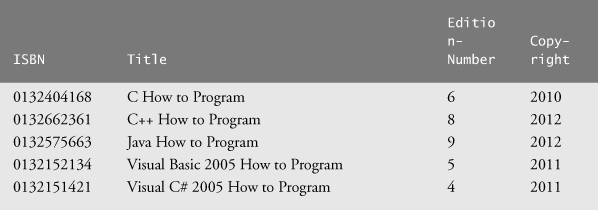
Fig. 18.18. Sampling of books from table Titles whose titles end with How to Program in ascending order by Title.
18.4.4. Merging Data from Multiple Tables: INNER JOIN
Database designers often split related data into separate tables to ensure that a database does not store data redundantly. For example, in the books database, we use an AuthorISBN table to store the relationship data between authors and their corresponding titles. If we did not separate this information into individual tables, we’d need to include author information with each entry in the Titles table. This would result in the database’s storing duplicate author information for authors who wrote multiple books. Often, it’s necessary to merge data from multiple tables into a single result. Referred to as joining the tables, this is specified by an INNER JOIN operator, which merges rows from two tables by matching values in columns that are common to the tables. The basic form of an INNER JOIN is:
SELECT columnName1, columnName2, ...
FROM table1
INNER JOIN table2
ON table1.columnName = table2.columnName
The ON clause of the INNER JOIN specifies the columns from each table that are compared to determine which rows are merged. For example, the following query produces a list of authors accompanied by the ISBNs for books written by each author:
SELECT FirstName, LastName, ISBN
FROM Authors
INNER JOIN AuthorISBN
ON Authors.AuthorID = AuthorISBN.AuthorID
ORDER BY LastName, FirstName
The query merges the FirstName and LastName columns from table Authors with the ISBN column from table AuthorISBN, sorting the result in ascending order by LastName and FirstName. Note the use of the syntax tableName.columnName in the ON clause. This syntax, called a qualified name, specifies the columns from each table that should be compared to join the tables. The “tableName.” syntax is required if the columns have the same name in both tables. The same syntax can be used in any SQL statement to distinguish columns in different tables that have the same name. In some systems, table names qualified with the database name can be used to perform cross-database queries. As always, the query can contain an ORDER BY clause. Figure 18.19 shows the results of the preceding query, ordered by LastName and FirstName. [Note: To save space, we split the result of the query into two parts, each containing the FirstName, LastName and ISBN columns.]
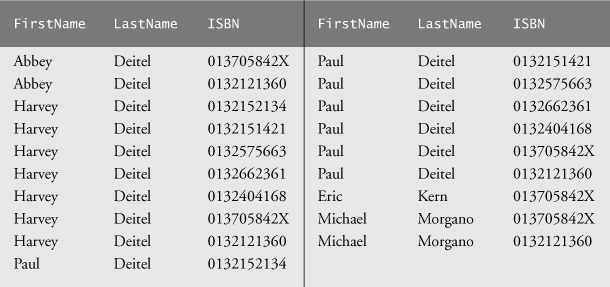
Fig. 18.19. Sampling of authors and ISBNs for the books they have written in ascending order by LastName and FirstName.
Software Engineering Observation 18.2
If a SQL statement includes columns with the same name from multiple tables, the statement must precede those column names with their table names and a dot (e.g., Authors.AuthorID).
Failure to qualify names for columns that have the same name in two or more tables is an error.
18.4.5. INSERT Statement
The INSERT statement inserts a row into a table. The basic form of this statement is
INSERT INTO tableName ( columnName1, columnName2, ..., columnNameN )
VALUES ( value1, value2, ..., valueN )
where tableName is the table in which to insert the row. The tableName is followed by a comma-separated list of column names in parentheses (this list is not required if the INSERT operation specifies a value for every column of the table in the correct order). The list of column names is followed by the SQL keyword VALUES and a comma-separated list of values in parentheses. The values specified here must match the columns specified after the table name in both order and type (e.g., if columnName1 is supposed to be the FirstName column, then value1 should be a string in single quotes representing the first name). Always explicitly list the columns when inserting rows. If the table’s column order changes or a new column is added, using only VALUES may cause an error. The INSERT statement
INSERT INTO Authors ( FirstName, LastName )
VALUES ( 'Sue', 'Red' )
inserts a row into the Authors table. The statement indicates that values are provided for the FirstName and LastName columns. The corresponding values are 'Sue' and 'Smith'. We do not specify an AuthorID in this example because AuthorID is an autoincremented column in the Authors table. For every row added to this table, the DBMS assigns a unique AuthorID value that is the next value in the autoincremented sequence (i.e., 1, 2, 3 and so on). In this case, Sue Red would be assigned AuthorID number 6. Figure 18.20 shows the Authors table after the INSERT operation. [Note: Not every database management system supports autoincremented columns. Check the documentation for your DBMS for alternatives to autoincremented columns.]

Fig. 18.20. Sample data from table Authors after an INSERT operation.
It’s normally an error to specify a value for an autoincrement column.
SQL delimits strings with single quotes ('). A string containing a single quote (e.g., O’Malley) must have two single quotes in the position where the single quote appears (e.g., 'O''Malley'). The first acts as an escape character for the second. Not escaping single-quote characters in a string that’s part of a SQL statement is a SQL syntax error.
18.4.6. UPDATE Statement
An UPDATE statement modifies data in a table. Its basic form is
UPDATE tableName
SET columnName1 = value1, columnName2 = value2, ..., columnNameN = valueN
WHERE criteria
where tableName is the table to update. The tableName is followed by keyword SET and a comma-separated list of column name/value pairs in the format columnName = value. The optional WHERE clause provides criteria that determine which rows to update. Though not required, the WHERE clause is typically used, unless a change is to be made to every row. The UPDATE statement
UPDATE Authors
SET LastName = 'Black'
WHERE LastName = 'Red' AND FirstName = 'Sue'
updates a row in the Authors table. The statement indicates that LastName will be assigned the value Black for the row in which LastName is equal to Red and FirstName is equal to Sue. [Note: If there are multiple rows with the first name “Sue” and the last name “Red,” this statement will modify all such rows to have the last name “Black.”] If we know the AuthorID in advance of the UPDATE operation (possibly because we searched for it previously), the WHERE clause can be simplified as follows:
WHERE AuthorID = 6
Figure 18.21 shows the Authors table after the UPDATE operation has taken place.
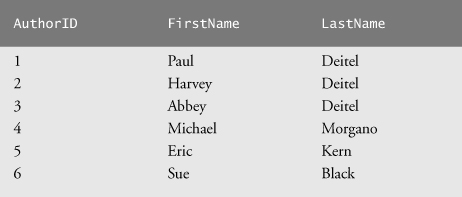
Fig. 18.21. Sample data from table Authors after an UPDATE operation.
18.4.7. DELETE Statement
A SQL DELETE statement removes rows from a table. Its basic form is
DELETE FROM tableName WHERE criteria
where tableName is the table from which to delete. The optional WHERE clause specifies the criteria used to determine which rows to delete. If this clause is omitted, all the table’s rows are deleted. The DELETE statement
DELETE FROM Authors
WHERE LastName = 'Black' AND FirstName = 'Sue'
deletes the row for Sue Black in the Authors table. If we know the AuthorID in advance of the DELETE operation, the WHERE clause can be simplified as follows:
WHERE AuthorID = 5
Figure 18.22 shows the Authors table after the DELETE operation has taken place.

Fig. 18.22. Sample data from table Authors after a DELETE operation.
18.5. MySQL
In 1994, TcX, a Swedish consulting firm, needed a fast and flexible way to access its tables. Unable to find a database server that could accomplish the required task adequately, Michael Widenius, the principal developer at TcX, decided to create his own database server. The resulting product was called MySQL (pronounced “my sequel”), a robust and scalable relational database management system (RDBMS).
MySQL, now owned by Oracle, is a multiuser, multithreaded (i.e., allows multiple simultaneous connections) RDBMS server that uses SQL to interact with and manipulate data. The MySQL Manual (www.mysql.com/why-mysql/topreasons.html) lists numerous benefits of MySQL. A few important benefits include:
1. Scalability. You can embed it in an application or use it in massive data warehousing environments.
2. Performance. You can optimize performance based on the purpose of the database in your application.
3. Support for many programming languages. Later chapters demonstrate how to access a MySQL database from PHP (Chapter 19).
4. Implementations of MySQL for Windows, Mac OS X, Linux and UNIX.
5. Handling large databases (e.g., tens of thousands of tables with millions of rows).
For these reasons and more, MySQL is the database of choice for many businesses, universities and individuals. MySQL is an open source software product. [Note: Under certain situations, a commercial license is required for MySQL. See www.mysql.com/about/legal for details]
MySQL Community Edition
MySQL Community Edition is an open-source database management system that executes on many platforms, including Windows, Linux, and Mac OS X. Complete information about MySQL is available from www.mysql.com. The data-driven web applications in Chapter 19 manipulate MySQL databases using the version of MySQL that you installed with XAMPP in Chapter 17.
18.5.1. Instructions for Setting Up a MySQL User Account
For the MySQL examples to execute correctly, you need to set up a user account so you can create, delete and modify databases. Open the XAMPP control panel and start the MySQL server, then follow the steps below to set up a user account:
1. Next, you’ll start the MySQL monitor so you can set up a user account. (The following commands assume that you followed the default installation instructions for XAMPP as discussed in Chapter 17.) In Windows, open a Command Prompt and execute the command
mysql -h localhost -u root
In Mac OS X, open a Terminal window and execute the command
/Applications/XAMPP/xamppfiles/bin/mysql -h localhost -u root
In Linux, open a shell and execute the command
/opt/lamp/bin/mysql -h localhost -u root
The -h option indicates the host (i.e., computer) on which the MySQL server is running—in this case your local computer (localhost). The -u option indicates the user account that will be used to log in to the server—root is the default user account that is created during installation to allow you to configure the server. Once you’ve logged in, you’ll see a mysql> prompt at which you can type commands to interact with the MySQL server.
2. At the mysql> prompt, type
USE mysql;
and press Enter to select the built-in database named mysql, which stores server information, such as user accounts and their privileges for interacting with the server. Each command must end with a semicolon. To confirm the command, MySQL issues the message “Database changed.”
3. Next, you’ll add the iw3htp user account to the mysql built-in database. The mysql database contains a table called user with columns that represent the user’s name, password and various privileges. To create the iw3htp user account with the password password, execute the following commands from the mysql> prompt:
create user 'iw3htp'@'localhost' identified by 'password';
grant select, insert, update, delete, create, drop, references,
execute on *.* to 'deitel'@'localhost';
This creates the user account iw3htp with the password password with and privileges needed to create the databases used in Chapter 19 and manipulate them.
4. Type the command
exit;
to terminate the MySQL monitor.
18.5.2. Creating Databases in MySQL
For each MySQL database we use in Chapter 19, we provide a SQL script in a .sql file that sets up the database and its tables. You can execute these scripts in the MySQL monitor. In this chapter’s examples directory, you’ll find the following scripts:
• books.sql—creates the books database discussed in Section 18.3
• products.sql—creates the Products database used in Section 19.9
• mailinglist.sql—creates the MailingList database used in Section 19.11
• URLs.sql—creates the URL database used in Exercise 19.9.
Executing a SQL Script
To execute a SQL script:
1. Start the MySQL monitor using the username and password you created in Section 18.5.1. In Windows, open a Command Prompt and execute the command
mysql -h localhost -u iw3htp -p
In Mac OS X, open a Terminal window and execute the command
/Applications/XAMPP/xamppfiles/bin/mysql -h localhost -u iw3htp -p
In Linux, open a shell and execute the command
/opt/lamp/bin/mysql -h localhost -u iw3htp -p
The -p option prompts you for the password for the iw3htp user account. When prompted, enter the password password.
2. Execute the script with the source command. For example:
source books.sql;
creates the books database.
3. Repeat Step 2 for each SQL script now, so the databases are ready for use in Chapter 19.
4. Type the command
exit;
to terminate the MySQL monitor.
18.6. (Optional) Microsoft Language Integrate Query (LINQ)
[Note: Sections 18.6–18.9 support the database-driven C# ASP.NET examples in Chapters 20–22, which assume that you already know C#. Chapters 23–25 also use LINQ to access databases from Visual Basic ASP.NET examples. Those chapters assume that you already know Visual Basic. For more information on LINQ in VB, visit the site msdn.microsoft.com/en-us/library/bb397910.aspx.]
The next several sections introduce C#’s LINQ (Language Integrated Query) capabilities. LINQ allows you to write query expressions, similar to SQL queries, that retrieve information from a wide variety of data sources, not just databases. We use LINQ to Objects in this section to query arrays and Lists, selecting elements that satisfy a set of conditions—this is known as filtering.
18.6.1. Querying an Array of int Values Using LINQ
First, we demonstrate querying an array of integers using LINQ. Repetition statements that filter arrays focus on the process of getting the results—iterating through the elements and checking whether they satisfy the desired criteria. LINQ specifies the conditions that selected elements must satisfy. This is known as declarative programming—as opposed to imperative programming (which we’ve been doing so far) in which you specify the actual steps to perform a task. The next several statements assume that the integer array
int[] values = { 2, 9, 5, 0, 3, 7, 1, 4, 8, 5 };
is declared. The query
var filtered =
from value in values
where value > 4
select value;
specifies that the results should consist of all the ints in the values array that are greater than 4 (i.e., 9, 5, 7, 8 and 5). It does not specify how those results are obtained—the C# compiler generates all the necessary code automatically, which is one of the great strengths of LINQ. To use LINQ to Objects, you must import the System.Linq namespace (line 4).
The from Clause and Implicitly Typed Local Variables
A LINQ query begins with a from clause, which specifies a range variable (value) and the data source to query (values). The range variable represents each item in the data source (one at a time), much like the control variable in a foreach statement. We do not specify the range variable’s type. Since it is assigned one element at a time from the array values, which is an int array, the compiler determines that the range variable value should be of type int. This is a C# feature called implicitly typed local variables, which enables the compiler to infer a local variable’s type based on the context in which it’s used.
Introducing the range variable in the from clause at the beginning of the query allows the IDE to provide IntelliSense while you write the rest of the query. The IDE knows the range variable’s type, so when you enter the range variable’s name followed by a dot (.) in the code editor, the IDE can display the range variable’s methods and properties.
The var Keyword and Implicitly Typed Local Variables
You can also declare a local variable and let the compiler infer the variable’s type based on the variable’s initializer. To do so, the var keyword is used in place of the variable’s type when declaring the variable. Consider the declaration
var x = 7;
Here, the compiler infers that the variable x should be of type int, because the compiler assumes that whole-number values, like 7, are of type int. Similarly, in the declaration
the compiler infers that y should be of type double, because the compiler assumes that floating-point number values, like -123.45, are of type double. Typically, implicitly typed local variables are used for more complex types, such as the collections of data returned by LINQ queries.
The where Clause
If the condition in the where clause evaluates to true, the element is selected—i.e., it’s included in the results. Here, the ints in the array are included only if they’re greater than 4. An expression that takes an element of a collection and returns true or false by testing a condition on that element is known as a predicate.
The select Clause
For each item in the data source, the select clause determines what value appears in the results. In this case, it’s the int that the range variable currently represents. A LINQ query typically ends with a select clause.
Iterating Through the Results of the LINQ Query
The foreach statement
foreach ( var element in filtered )
Console.Write( " {0}", element );
displays the query results. A foreach statement can iterate through the contents of an array, collection or the results of a LINQ query, allowing you to process each element in the array, collection or query. The preceding foreach statement iterates over the query result filtered, displaying each of its items.
LINQ vs. Repetition Statements
It would be simple to display the integers greater than 4 using a repetition statement that tests each value before displaying it. However, this would intertwine the code that selects elements and the code that displays them. With LINQ, these are kept separate, making the code easier to understand and maintain.
The orderby Clause
The orderby clause sorts the query results in ascending order. The query
var sorted =
from value in values
orderby value
select value;
sorts the integers in array values into ascending order and assigns the results to variable sorted. To sort in descending order, use descending in the orderby clause, as in
orderby value descending
An ascending modifier also exists but isn’t normally used, because it’s the default. Any value that can be compared with other values of the same type may be used with the orderby clause. A value of a simple type (e.g., int) can always be compared to another value of the same type.
var sortFilteredResults =
from value in filtered
orderby value descending
select value;
var sortAndFilter =
from value in values
where value > 4
orderby value descending
select value;
generate the same results, but in different ways. The first query uses LINQ to sort the results of the filtered query presented earlier in this section. The second query uses both the where and orderby clauses. Because queries can operate on the results of other queries, it’s possible to build a query one step at a time, and pass the results of queries between methods for further processing.
More on Implicitly Typed Local Variables
Implicitly typed local variables can also be used to initialize arrays without explicitly giving their type. For example, the following statement creates an array of int values:
var array = new[] { 32, 27, 64, 18, 95, 14, 90, 70, 60, 37 };
Note that there are no square brackets on the left side of the assignment operator, and that new[] is used to specify that the variable is an array.
An Aside: Interface IEnumerable<T>
As we mentioned, the foreach statement can iterate through the contents of arrays, collections and LINQ query results. Actually, foreach iterates over any so-called IEnumerable<T> object, which just happens to be what a LINQ query returns. IEnumerable<T> is an interface that describes the functionality of any object that can be iterated over and thus offers methods to access each element.
C# arrays are IEnumerable<T> objects, so a foreach statement can iterate over an array’s elements. Similarly, each LINQ query returns an IEnumerable<T> object. Therefore, you can use a foreach statement to iterate over the results of any LINQ query. The notation <T> indicates that the interface is a generic interface that can be used with any type of data (for example, ints, strings or Employees).
18.6.2. Querying an Array of Employee Objects Using LINQ
LINQ is not limited to querying arrays of primitive types such as ints. It can be used with most data types, including strings and user-defined classes. It cannot be used when a query does not have a defined meaning—for example, you cannot use orderby on objects that are not comparable. Comparable types in .NET are those that implement the IComparable interface. All built-in types, such as string, int and double implement IComparable. Figure 18.23 presents the Employee class we use in this section. Figure 18.24 uses LINQ to query an array of Employee objects.
1 // Fig. 18.23: Employee.cs
2 // Employee class with FirstName, LastName and MonthlySalary properties.
3 public class Employee
4 {
5 private decimal monthlySalaryValue; // monthly salary of employee
6
7 // auto-implemented property FirstName
8 public string FirstName { get; set; }
9
10 // auto-implemented property LastName
11 public string LastName { get; set; }
12
13 // constructor initializes first name, last name and monthly salary
14 public Employee( string first, string last, decimal salary )
15 {
16 FirstName = first;
17 LastName = last;
18 MonthlySalary = salary;
19 } // end constructor
20
21 // property that gets and sets the employee's monthly salary
22 public decimal MonthlySalary
23 {
24 get
25 {
26 return monthlySalaryValue;
27 } // end get
28 set
29 {
30 if ( value >= 0M ) // if salary is nonnegative
31 {
32 monthlySalaryValue = value;
33 } // end if
34 } // end set
35 } // end property MonthlySalary
36
37 // return a string containing the employee's information
38 public override string ToString()
39 {
40 return string.Format( "{0,-10} {1,-10} {2,10:C}",
41 FirstName, LastName, MonthlySalary );
42 } // end method ToString
43 } // end class Employee
Fig. 18.23. Employee class.
1 // Fig. 18.24: LINQWithArrayOfObjects.cs
2 // LINQ to Objects using an array of Employee objects.
3 using System;
4 using System.Linq;
5
6 public class LINQWithArrayOfObjects
7 {
8 public static void Main( string[] args )
9 {
10 // initialize array of employees
11 Employee[] employees = {
12 new Employee( "Jason", "Red", 5000M ),
13 new Employee( "Ashley", "Green", 7600M ),
14 new Employee( "Matthew", "Indigo", 3587.5M ),
15 new Employee( "James", "Indigo", 4700.77M ),
16 new Employee( "Luke", "Indigo", 6200M ),
17 new Employee( "Jason", "Blue", 3200M ),
18 new Employee( "Wendy", "Brown", 4236.4M ) }; // end init list
19
20 // display all employees
21 Console.WriteLine( "Original array:" );
22 foreach ( var element in employees )
23 Console.WriteLine( element );
24
25 // filter a range of salaries using && in a LINQ query
26 var between4K6K =
27 from e in employees
28 where e.MonthlySalary >= 4000M && e.MonthlySalary <= 6000M
29 select e;
30
31 // display employees making between 4000 and 6000 per month
32 Console.WriteLine( string.Format(
33 "
Employees earning in the range {0:C}-{1:C} per month:",
34 4000, 6000 ) );
35 foreach ( var element in between4K6K )
36 Console.WriteLine( element );
37
38 // order the employees by last name, then first name with LINQ
39 var nameSorted =
40 from e in employees
41 orderby e.LastName, e.FirstName
42 select e;
43
44 // header
45 Console.WriteLine( "
First employee when sorted by name:" );
46
47 // attempt to display the first result of the above LINQ query
48 if ( nameSorted.Any() )
49 Console.WriteLine( nameSorted.First() );
50 else
51 Console.WriteLine( "not found" );
52
53 // use LINQ to select employee last names
54 var lastNames =
55 from e in employees
56 select e.LastName;
57
58 // use method Distinct to select unique last names
59 Console.WriteLine( "
Unique employee last names:" );
60 foreach ( var element in lastNames.Distinct() )
61 Console.WriteLine( element );
62
63 // use LINQ to select first and last names
64 var names =
65 from e in employees
66 select new { e.FirstName, Last = e.LastName };
67
68 // display full names
69 Console.WriteLine( "
Names only:" );
70 foreach ( var element in names )
71 Console.WriteLine( element );
72
73 Console.WriteLine();
74 } // end Main
75 } // end class LINQWithArrayOfObjects
Original array:
Jason Red $5,000.00
Ashley Green $7,600.00
Matthew Indigo $3,587.50
James Indigo $4,700.77
Luke Indigo $6,200.00
Jason Blue $3,200.00
Wendy Brown $4,236.40
Employees earning in the range $4,000.00-$6,000.00 per month:
Jason Red $5,000.00
James Indigo $4,700.77
Wendy Brown $4,236.40
First employee when sorted by name:
Jason Blue $3,200.00
Unique employee last names:
Red
Green
Indigo
Blue
Brown
Names only:
{ FirstName = Jason, Last = Red }
{ FirstName = Ashley, Last = Green }
{ FirstName = Matthew, Last = Indigo }
{ FirstName = James, Last = Indigo }
{ FirstName = Luke, Last = Indigo }
{ FirstName = Jason, Last = Blue }
{ FirstName = Wendy, Last = Brown }
Fig. 18.24. LINQ to Objects using an array of Employee objects.
Accessing the Properties of a LINQ Query’s Range Variable
Line 28 of Fig. 18.24 shows a where clause that accesses the properties of the range variable. In this example, the compiler infers that the range variable is of type Employee based on its knowledge that employees was defined as an array of Employee objects (lines 11–18). Any bool expression can be used in a where clause. Line 28 uses the conditional AND (&&) operator to combine conditions. Here, only employees that have a salary between $4,000 and $6,000 per month, inclusive, are included in the query result, which is displayed in lines 35–36.
Sorting a LINQ Query’s Results By Multiple Properties
Line 41 uses an orderby clause to sort the results according to multiple properties—specified in a comma-separated list. In this query, the employees are sorted alphabetically by last name. Each group of Employees that have the same last name is then sorted within the group by first name.
Any, First and Count Extension Methods
Line 48 introduces the query result’s Any method, which returns true if there’s at least one element, and false if there are no elements. The query result’s First method (line 49) returns the first element in the result. You should check that the query result is not empty (line 48) before calling First.
We’ve not specified the class that defines methods First and Any. Your intuition probably tells you they’re methods declared in the IEnumerable<T> interface, but they aren’t. They’re actually extension methods, but they can be used as if they were methods of IEnumerable<T>.
LINQ defines many more extension methods, such as Count, which returns the number of elements in the results. Rather than using Any, we could have checked that Count was nonzero, but it’s more efficient to determine whether there’s at least one element than to count all the elements. The LINQ query syntax is actually transformed by the compiler into extension method calls, with the results of one method call used in the next. It’s this design that allows queries to be run on the results of previous queries, as it simply involves passing the result of a method call to another method.
Selecting a Portion of an Object
Line 56 uses the select clause to select the range variable’s LastName property rather than the range variable itself. This causes the results of the query to consist of only the last names (as strings), instead of complete Employee objects. Lines 60–61 display the unique last names. The Distinct extension method (line 60) removes duplicate elements, causing all elements in the result to be unique.
Creating New Types in the select Clause of a LINQ Query
The last LINQ query in the example (lines 65–66) selects the properties FirstName and LastName. The syntax
new { e.FirstName, Last = e.LastName }
creates a new object of an anonymous type (a type with no name), which the compiler generates for you based on the properties listed in the curly braces ({}). In this case, the anonymous type consists of properties for the first and last names of the selected Employee. The LastName property is assigned to the property Last in the select clause. This shows how you can specify a new name for the selected property. If you don’t specify a new name, the property’s original name is used—this is the case for FirstName in this example. The preceding query is an example of a projection—it performs a transformation on the data. In this case, the transformation creates new objects containing only the FirstName and Last properties. Transformations can also manipulate the data. For example, you could give all employees a 10% raise by multiplying their MonthlySalary properties by 1.1.
When creating a new anonymous type, you can select any number of properties by specifying them in a comma-separated list within the curly braces ({}) that delineate the anonymous type definition. In this example, the compiler automatically creates a new class having properties FirstName and Last, and the values are copied from the Employee objects. These selected properties can then be accessed when iterating over the results. Implicitly typed local variables allow you to use anonymous types because you do not have to explicitly state the type when declaring such variables.
When the compiler creates an anonymous type, it automatically generates a ToString method that returns a string representation of the object. You can see this in the program’s output—it consists of the property names and their values, enclosed in braces.
18.6.3. Querying a Generic Collection Using LINQ
You can use LINQ to Objects to query Lists just as arrays. In Fig. 18.25, a List of strings is converted to uppercase and searched for those that begin with “R”.
1 // Fig. 18.25: LINQWithListCollection.cs
2 // LINQ to Objects using a List< string >.
3 using System;
4 using System.Linq;
5 using System.Collections.Generic;
6
7 public class LINQWithListCollection
8 {
9 public static void Main( string[] args )
10 {
11 // populate a List of strings
12 List< string > items = new List< string >();
13 items.Add( "aQua" ); // add "aQua" to the end of the List
14 items.Add( "RusT" ); // add "RusT" to the end of the List
15 items.Add( "yElLow" ); // add "yElLow" to the end of the List
16 items.Add( "rEd" ); // add "rEd" to the end of the List
17
18 // convert all strings to uppercase; select those starting with "R"
19 var startsWithR =
20 from item in items
21 let uppercaseString = item.ToUpper()
22 where uppercaseString.StartsWith( "R" )
23 orderby uppercaseString
24 select uppercaseString;
25
26 // display query results
27 foreach ( var item in startsWithR )
28 Console.Write( "{0} ", item );
29
30 Console.WriteLine(); // output end of line
31
32 items.Add( "rUbY" ); // add "rUbY" to the end of the List
33 items.Add( "SaFfRon" ); // add "SaFfRon" to the end of the List
34
35 // display updated query results
36 foreach ( var item in startsWithR )
37 Console.Write( "{0} ", item );
38
39 Console.WriteLine(); // output end of line
40 } // end Main
41 } // end class LINQWithListCollection
RED RUST
RED RUBY RUST
Fig. 18.25. LINQ to Objects using a List<string>.
Line 21 uses LINQ’s let clause to create a new range variable. This is useful if you need to store a temporary result for use later in the LINQ query. Typically, let declares a new range variable to which you assign the result of an expression that operates on the query’s original range variable. In this case, we use string method ToUpper to convert each item to uppercase, then store the result in the new range variable uppercaseString. We then use the new range variable uppercaseString in the where, orderby and select clauses. The where clause (line 22) uses string method StartsWith to determine whether uppercaseString starts with the character "R". Method StartsWith performs a case-sensitive comparison to determine whether a string starts with the string received as an argument. If uppercaseString starts with "R", method StartsWith returns true, and the element is included in the query results. More powerful string matching can be done using .NET’s regular-expression capabilities.
The query is created only once (lines 20–24), yet iterating over the results (lines 27–28 and 36–37) gives two different lists of colors. This demonstrates LINQ’s deferred execution—the query executes only when you access the results—such as iterating over them or using the Count method—not when you define the query. This allows you to create a query once and execute it many times. Any changes to the data source are reflected in the results each time the query executes.
There may be times when you do not want this behavior, and want to retrieve a collection of the results immediately. LINQ provides extension methods ToArray and ToList for this purpose. These methods execute the query on which they’re called and give you the results as an array or List<T>, respectively. These methods can also improve efficiency if you’ll be iterating over the results multiple times, as you execute the query only once.
C# has a feature called collection initializers, which provide a convenient syntax (similar to array initializers) for initializing a collection. For example, lines 12–16 of Fig. 18.25 could be replaced with the following statement:
List< string > items =
new List< string > { "aQua", "RusT", "yElLow", "rEd" };
18.7. (Optional) LINQ to SQL
[Note: This section supports Chapters 20–22.] LINQ to SQL enables you to access data in SQL Server databases using the same LINQ syntax introduced in Section 18.6. You interact with the database via classes that are automatically generated from the database schema by the IDE’s LINQ to SQL Designer. For each table in the database, the IDE creates two classes:
• A class that represents a row of the table: This class contains properties for each column in the table. LINQ to SQL creates objects of this class—called row objects—to store the data from individual rows of the table.
• A class that represents the table: LINQ to SQL creates an object of this class to store a collection of row objects that correspond to all of the rows in the table.
Relationships between tables are also taken into account in the generated classes:
• In a row object’s class, an additional property is created for each foreign key. This property returns the row object of the corresponding primary key in another table. For example, the class that represents the rows of the Books database’s AuthorISBN table also contains an Author property and a Title property—from any AuthorISBN row object, you can access the full author and title information.
• In the class for a row object, an additional property is created for the collection of row objects with foreign-keys that reference the row object’s primary key. For example, the LINQ to SQL class that represents the rows of the Books database’s Authors table contains an AuthorISBNs property that you can use to get all of the books written by that author. The IDE automatically adds the "s" to "AuthorISBN" to indicate that this property represents a collection of AuthorISBN objects. Similarly, the LINQ to SQL class that represents the rows of the Titles table also contains an AuthorISBNs property that you can use to get all of the co-authors of a particular title.
Once generated, the LINQ to SQL classes have full IntelliSense support in the IDE.
IQueryable Interface
LINQ to SQL works through the IQueryable interface, which inherits from the IEnumerable interface introduced in Section 18.6. When a LINQ to SQL query on an IQueryable object executes against the database, the results are loaded into objects of the corresponding LINQ to SQL classes for convenient access in your code.
DataContext Class
All LINQ to SQL queries occur via a DataContext class, which controls the flow of data between the program and the database. A specific DataContext derived class, which inherits from the class System.Data.Linq.DataContext, is created when the LINQ to SQL classes representing each row of the table are generated by the IDE. This derived class has properties for each table in the database, which can be used as data sources in LINQ queries. Any changes made to the DataContext can be saved back to the database using the DataContext’s SubmitChanges method, so with LINQ to SQL you can modify the database’s contents.
18.8. (Optional) Querying a Database with LINQ
[Note: This section supports Chapters 20–22.] In this section, we demonstrate how to connect to a database, query it and display the results of the query. There is little code in this section—the IDE provides visual programming tools and wizards that simplify accessing data in applications. These tools establish database connections and create the objects necessary to view and manipulate the data through Windows Forms GUI controls—a technique known as data binding.
Our first example performs a simple query on the Books database from Section 18.3. We retrieve the entire Authors table and use data binding to display its data in a DataGridView—a control from namespace System.Windows.Forms that can display data from a data source in tabular format. The basic steps we’ll perform are:
• Connect to the Books database.
• Create the LINQ to SQL classes required to use the database.
• Add the Authors table as a data source.
• Drag the Authors table data source onto the Design view to create a GUI for displaying the table’s data.
• Add a few statements to the program to allow it to interact with the database.
The GUI for the program is shown in Fig. 18.26. All of the controls in this GUI are automatically generated when we drag a data source that represents the Authors table onto the Form in Design view. The BindingNavigator at the top of the window is a collection of controls that allow you to navigate through the records in the DataGridView that fills the rest of the window. The BindingNavigator controls also allow you to add records, delete records and save your changes to the database. If you add a new record, note that empty values are not allowed in the Books database, so attempting to save a new record without specifying a value for each field will cause an error.
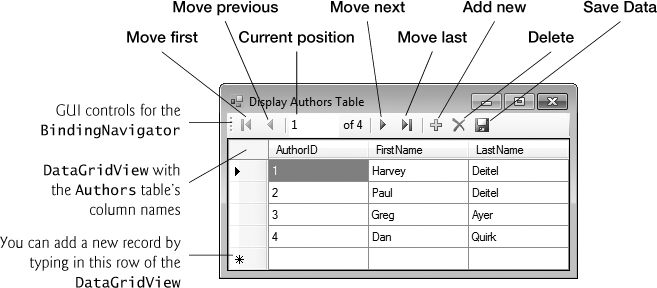
Fig. 18.26. GUI for the Display Authors Table application.
18.8.1. Creating LINQ to SQL Classes
This section presents the steps required to create LINQ to SQL classes for a database.
Step 1: Creating the Project
Create a new Windows Forms Application named DisplayTable. Change the name of the source file to DisplayAuthorsTable.cs. The IDE updates the Form’s class name to match the source file. Set the Form’s Text property to Display Authors Table.
Step 2: Adding a Database to the Project and Connecting to the Database
To interact with a database, you must create a connection to the database. This will also give you the option of copying the database file to your project.
1. In Visual C# 2010 Express, select View > Other Windows > Database Explorer to display the Database Explorer window. By default, it appears on the left side of the IDE. If you’re using a full version of Visual Studio, select View > Server Explorer to display the Server Explorer. From this point forward, we’ll refer to the Database Explorer. If you have a full version of Visual Studio, substitute Server Explorer for Database Explorer in the steps.
2. Click the Connect to Database icon (![]() ) at the top of the Database Explorer. If the Choose Data Source dialog appears (Fig. 18.27), select Microsoft SQL Server Database File from the Data source: list. If you check the Always use this selection
) at the top of the Database Explorer. If the Choose Data Source dialog appears (Fig. 18.27), select Microsoft SQL Server Database File from the Data source: list. If you check the Always use this selection CheckBox, the IDE will use this type of database file by default when you connect to databases in the future. Click Continue to display the Add Connection dialog.
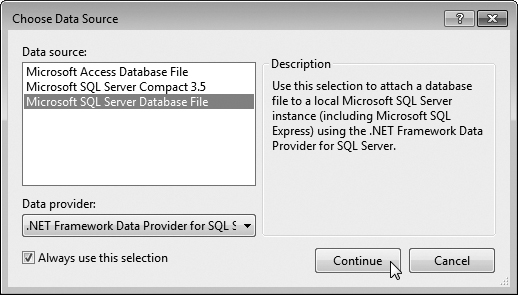
Fig. 18.27. Choose Data Source dialog.
3. In the Add Connection dialog (Fig. 18.28), the Data source: TextBox reflects your selection from the Choose Data Source dialog. You can click the Change... Button to select a different type of database. Next, click Browse... to locate and select the Books.mdf file in the Databases directory included with this chapter’s examples. You can click Test Connection to verify that the IDE can connect to the database through SQL Server Express. Click OK to create the connection.
 Error-Prevention Tip 18.1
Ensure that no other program is using the database file before you attempt to add it to the project. Connecting to the database requires exclusive access.

Fig. 18.28. Add Connection dialog.
Step 3: Generating the LINQ to SQL classes
After adding the database, you must select the database tables from which the LINQ to SQL classes will be created. LINQ to SQL uses the database’s schema to help define the classes.
1. Right click the project name in the Solution Explorer and select Add > New Item... to display the Add New Item dialog. Select the LINQ to SQL Classes template, name the new item Books.dbml and click the Add button. The Object Relational Designer window will appear (Fig. 18.29). You can also double click the Books.dbml file in the Solution Explorer to open the Object Relational Designer.

Fig. 18.29. Object Relational Designer window.
2. Expand the Books.mdf database node in the Database Explorer, then expand the Tables node. Drag the Authors, Titles and AuthorISBN tables onto the Object Relational Designer. The IDE prompts whether you want to copy the database to the project directory. Select Yes. The Object Relational Designer will display the tables that you dragged from the Database Explorer (Fig. 18.30). Notice that the Object Relational Designer named the class that represents items from the Authors table as Author, and named the class that represents the Titles table as Title. This is because one object of the Author class represents one author—a single row from the Authors table. Similarly, one object of the Title class represents one book—a single row from the Titles table. Because the class name Title conflicts with one of the column names in the Titles table, the IDE renames that column’s property in the Title class as Title1.
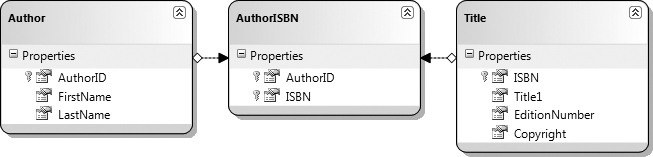
Fig. 18.30. Object Relational Designer window showing the selected tables from the Books database and their relationships.
3. Save the Books.dbml file.
When you save Books.dbml, the IDE generates the LINQ to SQL classes that you can use to interact with the database. These include a class for each table you selected from the database and a derived class of DataContext named BooksDataContext that enables you to programmatically interact with the database.
Be sure to save the file in the Object Relational Designer before trying to use the LINQ to SQL classes in code. The IDE does not generate the classes until you save the file.
18.8.2. Data Bindings Between Controls and the LINQ to SQL Classes
The IDE’s automatic data binding capabilities simplify creating applications that can view and modify the data in a database. You must write a small amount of code to enable the autogenerated data-binding classes to interact with the autogenerated LINQ to SQL classes. You’ll now perform the steps to display the contents of the Authors table in a GUI.
Step 1: Adding the Author LINQ to SQL Class as a Data Source
To use the LINQ to SQL classes for data binding, you must first add them as a data source.
1. Select Data > Add New Data Source... to display the Data Source Configuration Wizard.
2. The LINQ to SQL classes are used to create objects representing the tables in the database, so we’ll use an Object data source. In the dialog, select Object and click Next >. Expand the tree view as shown in Fig. 18.31 and ensure that Author is checked. An object of this class will be used as the data source.
3. Click Finish.
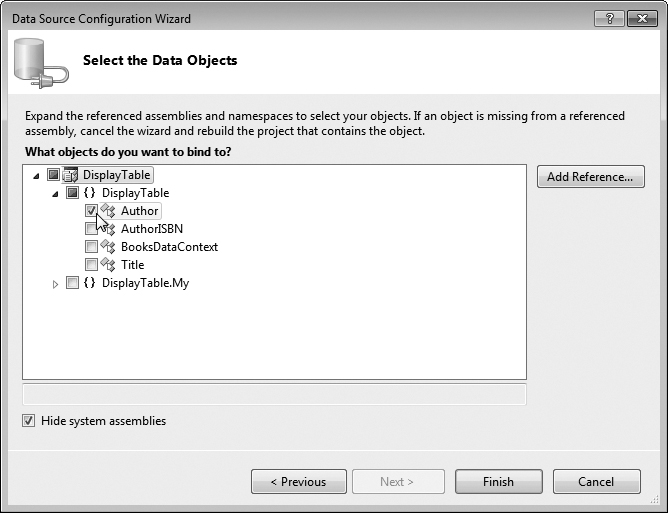
Fig. 18.31. Selecting the Author LINQ to SQL class as the data source.
The Authors table in the database is now a data source that can be used by the bindings. Open the Data Sources window (Fig. 18.32) by selecting Data > Show Data Sources—the window is displayed at the left side of the IDE. You can see the Author class that you added in the previous step. The columns of the database’s Authors table should appear below it, as well as an AuthorISBNs entry representing the relationship between the database’s Authors and AuthorISBN tables.
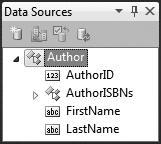
Fig. 18.32. Data Sources window showing the Author class as a data source.
Step 2: Creating GUI Elements
Next, you’ll use the Design view to create a GUI control that can display the Authors table’s data.
1. Switch to Design view for the DisplayAuthorsTable class.
2. Click the Author node in the Data Sources window—it should change to a drop-down list. Open the drop-down by clicking the down arrow and ensure that the DataGridView option is selected—this is the GUI control that will be used to display and interact with the data.
3. Drag the Author node from the Data Sources window onto the Form in Design view.
The IDE creates a DataGridView (Fig. 18.33) with the correct column names and a BindingNavigator (authorBindingNavigator) that contains Buttons for moving between entries, adding entries, deleting entries and saving changes to the database. The IDE also generates a BindingSource (authorBindingSource), which handles the transfer of data between the data source and the data-bound controls on the Form. Nonvisual components such as the BindingSource and the non-visual aspects of the BindingNavigator appear in the component tray—the gray region below the Form in Design view. We use the default names for automatically generated components throughout this chapter to show exactly what the IDE creates. To make the DataGridView occupy the entire window, select the DataGridView, then use the Properties window to set the Dock property to Fill.
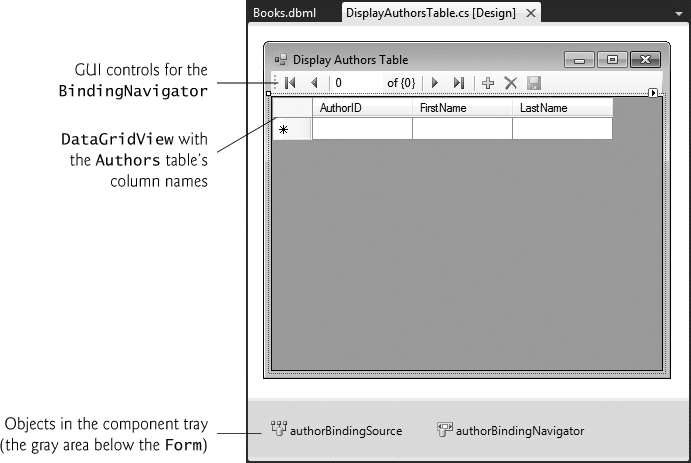
Fig. 18.33. Component tray holds nonvisual components in Design view.
Step 3: Connecting the BooksDataContext to the authorBindingSource
The final step is to connect the BooksDataContext (created with the LINQ to SQL classes in Section 18.8.1) to the authorBindingSource (created earlier in this section), so that the application can interact with the database. Figure 18.34 shows the small amount of code needed to obtain data from the database and to save any changes that the user makes to the data back into the database.
As mentioned in Section 18.7, a DataContext object is used to interact with the database. The BooksDataContext class was automatically generated by the IDE when you created the LINQ to SQL classes to allow access to the Books database. Line 18 creates an object of this class named database.
1 // Fig. 18.34: DisplayAuthorsTable.cs
2 // Displaying data from a database table in a DataGridView.
3 using System;
4 using System.Linq;
5 using System.Windows.Forms;
6
7 namespace DisplayTable
8 {
9 public partial class DisplayAuthorsTable : Form
10 {
11 // constructor
12 public DisplayAuthorsTable()
13 {
14 InitializeComponent();
15 } // end constructor
16
17 // LINQ to SQL data context
18 private BooksDataContext database = new BooksDataContext();
19
20 // load data from database into DataGridView
21 private void DisplayAuthorsTable_Load( object sender, EventArgs e )
22 {
23 // use LINQ to order the data for display
24 authorBindingSource.DataSource =
25 from author in database.Authors
26 orderby author.AuthorID
27 select author;
28 } // end method DisplayAuthorsTable_Load
29
30 // click event handler for the Save Button in the
31 // BindingNavigator saves the changes made to the data
32 private void authorBindingNavigatorSaveItem_Click(
33 object sender, EventArgs e )
34 {
35 Validate(); // validate input fields
36 authorBindingSource.EndEdit(); // indicate edits are complete
37 database.SubmitChanges(); // write changes to database file
38 } // end method authorBindingNavigatorSaveItem_Click
39 } // end class DisplayAuthorsTable
40 } // end namespace DisplayTable

Fig. 18.34. Displaying data from a database table in a DataGridView.
Create the Form’s Load handler by double clicking the Form’s title bar in Design view. We allow data to move between the DataContext and the BindingSource by creating a LINQ query that extracts data from the BooksDataContext’s Authors property (lines 25–27), which corresponds to the Authors table in the database. The authorBindingSource’s DataSource property (line 24) is set to the results of this query. The authorBindingSource uses the DataSource to extract data from the database and to populate the DataGridView.
Step 4: Saving Modifications Back to the Database
If the user modifies the data in the DataGridView, we’d also like to save the modifications in the database. By default, the BindingNavigator’s Save Data Button (![]() ) is disabled. To enable it, right click this
) is disabled. To enable it, right click this Button’s icon and select Enabled. Then, double click the icon to create its Click event handler.
Saving the data entered into the DataGridView back to the database is a three-step process (lines 35–37). First, all controls on the form are validated (line 35)—if any of the controls have event handlers for the Validating event, those execute. You typically handle this event to determine whether a control’s contents are valid. Second, line 36 calls EndEdit on the authorBindingSource, which forces it to save any pending changes in the BooksDataContext. Finally, line 37 calls SubmitChanges on the BooksDataContext to store the changes in the database. For efficiency, LINQ to SQL saves only data that has changed.
Step 5: Configuring the Database File to Persist Changes
When you run the program in debug mode, the database file is overwritten with the original database file each time you execute the program. This allows you to test your program with the original content until it works correctly. When you run the program in release mode (Ctrl + F5), changes you make to the database persist automatically; however, if you change the code, the next time you run the program, the database will be restored to its original version. To persist changes for all executions, select the database in the Solution Explorer and set the Copy to Output Directory property in the Properties window to Copy if newer.
18.9. (Optional) Dynamically Binding LINQ to SQL Query Results
[Note: This section supports Chapters 20–22.] Now that you’ve seen how to display an entire database table in a DataGridView, we show how to perform several different queries and display the results in a DataGridView. The Display Query Results application (Fig. 18.35) allows the user to select a query from the ComboBox at the bottom of the window, then displays the results of the query.
18.9.1. Creating the Display Query Results GUI
Perform the following steps to build the Display Query Results application’s GUI.
Step 1: Creating the Project
First, create a new Windows Forms Application named DisplayQueryResult. Rename the source file to TitleQueries.cs. Set the Form’s Text property to Display Query Results.
Step 2: Creating the LINQ to SQL Classes
Follow the steps in Section 18.8.1 to add the Books database to the project and generate the LINQ to SQL classes.

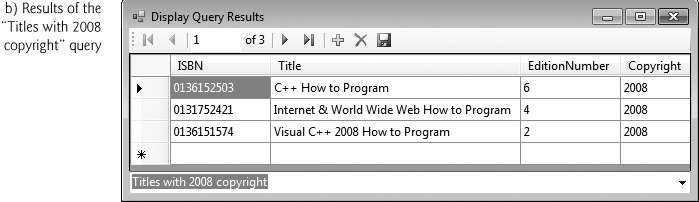

Fig. 18.35. Sample execution of the Display Query Results application.
Step 3: Creating a DataGridView to Display the Titles Table
Follow Steps 1 and 2 in Section 18.8.2 to create the data source and the DataGridView. In this example, select the Title class (rather than the Author class) as the data source, and drag the Title node from the Data Sources window onto the form.
Step 4: Adding a ComboBox to the Form
In Design view, add a ComboBox named queriesComboBox below the DataGridView on the Form. Users will select which query to execute from this control. Set the ComboBox’s Dock property to Bottom and the DataGridView’s Dock property to Fill.
Next, you’ll add the names of the queries to the ComboBox. Open the ComboBox’s String Collection Editor by right clicking the ComboBox and selecting Edit Items. You can also access the String Collection Editor from the ComboBox’s smart tag menu. A smart tag menu provides you with quick access to common properties you might set for a control (such as the Multiline property of a TextBox), so you can set these properties directly in Design view, rather than in the Properties window. You can open a control’s smart tag menu by clicking the small arrowhead (![]() ) that appears in the control’s upper-right corner in Design view when the control is selected. In the String Collection Editor, add the following three items to
) that appears in the control’s upper-right corner in Design view when the control is selected. In the String Collection Editor, add the following three items to queriesComboBox—one for each of the queries we’ll create:
1. All titles
2. Titles with 2008 copyright
3. Titles ending with "How to Program"
18.9.2. Coding the Display Query Results Application
Next you must write code that executes the appropriate query each time the user chooses a different item from queriesComboBox. Double click queriesComboBox in Design view to generate a queriesComboBox_SelectedIndexChanged event handler (Fig. 18.36, lines 44–78) in the TitleQueries.cs file. In the event handler, add a switch statement (lines 48–75) to change the titleBindingSource’s DataSource property to a LINQ query that returns the correct set of data. The data bindings created by the IDE automatically update the titleDataGridView each time we change its DataSource. The MoveFirst method of the BindingSource (line 77) moves to the first row of the result each time a query executes. The results of the queries in lines 53–55, 61–64 and 70–73 are shown in Fig. 18.35(a), (b) and (c), respectively. [Note: As we mentioned previously, in the generated LINQ to SQL classes, the IDE renamed the Title column of the Titles table as Title1 to avoid a naming conflict with the class Title.]
Customizing the Form’s Load Event Handler
Create the TitleQueries_Load event handler (lines 20–28) by double clicking the title bar in Design view. Line 23 sets the Log property of the BooksDataContext to Console.Out. This causes the program to output to the console the SQL query that is sent to the database for each LINQ query. When the Form loads, it should display the complete list of books from the Titles table, sorted by title. Rather than defining the same LINQ query as in lines 53–55, we can programmatically cause the queriesComboBox_SelectedIndexChanged event handler to execute simply by setting the queriesComboBox’s SelectedIndex to 0 (line 27).
1 // Fig. 18.36: TitleQueries.cs
2 // Displaying the result of a user-selected query in a DataGridView.
3 using System;
4 using System.Linq;
5 using System.Windows.Forms;
6
7 namespace DisplayQueryResult
8 {
9 public partial class TitleQueries : Form
10 {
11 public TitleQueries()
12 {
13 InitializeComponent();
14 } // end constructor
15
16 // LINQ to SQL data context
17 private BooksDataContext database = new BooksDataContext();
18
19 // load data from database into DataGridView
20 private void TitleQueries_Load( object sender, EventArgs e )
21 {
22 // write SQL to standard output stream
23 database.Log = Console.Out;
24
25 // set the ComboBox to show the default query that
26 // selects all books from the Titles table
27 queriesComboBox.SelectedIndex = 0;
28 } // end method TitleQueries_Load
29
30 // Click event handler for the Save Button in the
31 // BindingNavigator saves the changes made to the data
32 private void titleBindingNavigatorSaveItem_Click(
33 object sender, EventArgs e )
34 {
35 Validate(); // validate input fields
36 titleBindingSource.EndEdit(); // indicate edits are complete
37 database.SubmitChanges(); // write changes to database file
38
39 // when saving, return to "all titles" query
40 queriesComboBox.SelectedIndex = 0;
41 } // end method titleBindingNavigatorSaveItem_Click
42
43 // loads data into titleBindingSource based on user-selected query
44 private void queriesComboBox_SelectedIndexChanged(
45 object sender, EventArgs e )
46 {
47 // set the data displayed according to what is selected
48 switch ( queriesComboBox.SelectedIndex )
49 {
50 case 0: // all titles
51 // use LINQ to order the books by title
52 titleBindingSource.DataSource =
53 from book in database.Titles
54 orderby book.Title1
55 select book;
56 break;
57 case 1: // titles with 2008 copyright
58 // use LINQ to get titles with 2008
59 // copyright and sort them by title
60 titleBindingSource.DataSource =
61 from book in database.Titles
62 where book.Copyright == "2008"
63 orderby book.Title1
64 select book;
65 break;
66 case 2: // titles ending with "How to Program"
67 // use LINQ to get titles ending with
68 // "How to Program" and sort them by title
69 titleBindingSource.DataSource =
70 from book in database.Titles
71 where book.Title1.EndsWith( "How to Program" )
72 orderby book.Title1
73 select book;
74 break;
75 } // end switch
76
77 titleBindingSource.MoveFirst(); // move to first entry
78 } // end method queriesComboBox_SelectedIndexChanged
79 } // end class TitleQueries
80 } // end namespace DisplayQueryResult
Fig. 18.36. Displaying the result of a user-selected query in a DataGridView.
Saving Changes
Follow the instructions in the previous example to add a handler for the BindingNavigator’s Save Data Button (lines 32–41). Note that, except for changes to the names, the three lines are identical. The last statement (line 40) displays the results of the All titles query in the DataGridView.
18.10. Java DB/Apache Derby
The Java SE 6 and 7 Development Kits (JDKs) come bundled with the open source, pure Java database Java DB (the Oracle branded version of Apache Derby). Chapters 27–28 use Java DB in data-driven web applications. Similar to MySQL, Java DB has both an embedded version and a network (client/server) version. The tools we use in Chapters 27–28 come with Java DB. For those examples, we use Java DB’s network version, and we provide all the information you need to configure each example’s database. You can learn more about Apache Derby at db.apache.org/derby. You can learn more about Java DB at www.oracle.com/technetwork/java/javadb/overview/index.html.
Summary
Section 18.1 Introduction
• A database (p. 618) is an integrated collection of data. A database management system (DBMS; p. 618) provides mechanisms for storing, organizing, retrieving and modifying data.
• Today’s most popular database management systems are relational database (p. 618) systems.
• SQL (p. 618) is the international standard language used to query (p. 618) and manipulate relational data.
Section 18.2 Relational Databases
• A relational database (p. 618) stores data in tables (p. 618). Tables are composed of rows (p. 619), and rows are composed of columns in which values are stored.
• A table’s primary key (p. 619) provides a unique value that cannot be duplicated among rows.
• Each column (p. 619) of a table represents a different attribute.
• The primary key can be composed of more than one column.
• A foreign key (p. 621) is a column in a table that must match the primary-key column in another table. This is known as the Rule of Referential Integrity (p. 621).
• Every column in a primary key must have a value, and the value of the primary key must be unique. This is known as the Rule of Entity Integrity (p. 622).
• A one-to-many relationship (p. 623) between tables indicates that a row in one table can have many related rows in a separate table.
• Foreign keys enable information from multiple tables to be joined together. There’s a one-to-many relationship between a primary key and its corresponding foreign key.
Section 18.4.1 Basic SELECT Query
• The basic form of a query (p. 624) is
SELECT * FROM tableName
where the asterisk (*; p. 624) indicates that all columns from tableName should be selected, and tableName specifies the table in the database from which rows will be retrieved.
• To retrieve specific columns, replace the * with a comma-separated list of column names.
Section 18.4.2 WHERE Clause
• The optional WHERE clause (p. 624) in a query specifies the selection criteria for the query. The basic form of a query with selection criteria (p. 624) is
SELECT columnName1, columnName2, ... FROM tableName WHERE criteria
• The WHERE clause can contain operators <, >, <=, >=, =, <> and LIKE. LIKE (p. 625) is used for string pattern matching (p. 625) with wildcard characters percent (%) and underscore (_).
• A percent character (%; p. 625) in a pattern indicates that a string matching the pattern can have zero or more characters at the percent character’s location in the pattern.
• An underscore ( _ ; p. 625) in the pattern string indicates a single character at that position in the pattern.
Section 18.4.3 ORDER BY Clause
• A query’s result can be sorted with the ORDER BY clause (p. 626). The simplest form of an ORDER BY clause is
SELECT columnName1, columnName2, ... FROM tableName ORDER BY column ASC
SELECT columnName1, columnName2, ... FROM tableName ORDER BY column DESC
where ASC specifies ascending order, DESC specifies descending order and column specifies the column on which the sort is based. The default sorting order is ascending, so ASC is optional.
• Multiple columns can be used for ordering purposes with an ORDER BY clause of the form
ORDER BY column1 sortingOrder, column2 sortingOrder, ...
• The WHERE and ORDER BY clauses can be combined in one query. If used, ORDER BY must be the last clause in the query.
Section 18.4.4 Merging Data from Multiple Tables: INNER JOIN
• An INNER JOIN (p. 628) merges rows from two tables by matching values in columns that are common to the tables. The basic form for the INNER JOIN operator is:
SELECT columnName1, columnName2, ...
FROM table1
INNER JOIN table2
ON table1.columnName = table2.columnName
The ON clause (p. 628) specifies the columns from each table that are compared to determine which rows are joined. If a SQL statement uses columns with the same name from multiple tables, the column names must be fully qualified (p. 629) by prefixing them with their table names and a dot (.).
Section 18.4.5 INSERT Statement
• An INSERT statement (p. 629) inserts a new row into a table. The basic form of this statement is
INSERT INTO tableName ( columnName1, columnName2, ..., columnNameN )
VALUES ( value1, value2, ..., valueN )
where tableName is the table in which to insert the row. The tableName is followed by a comma-separated list of column names in parentheses. The list of column names is followed by the SQL keyword VALUES (p. 630) and a comma-separated list of values in parentheses.
• SQL uses single quotes (') to delimit strings. To specify a string containing a single quote in SQL, escape the single quote with another single quote (i.e., '').
Section 18.4.6 UPDATE Statement
• An UPDATE statement (p. 631) modifies data in a table. The basic form of an UPDATE statement is
UPDATE tableName
SET columnName1 = value1, columnName2 = value2, ..., columnNameN = valueN
WHERE criteria
where tableName is the table to update. Keyword SET (p. 631) is followed by a comma-separated list of columnName = value pairs. The optional WHERE clause determines which rows to update.
Section 18.4.7 DELETE Statement
• A DELETE statement (p. 631) removes rows from a table. The simplest form for a DELETE statement is
DELETE FROM tableName WHERE criteria
where tableName is the table from which to delete a row (or rows). The optional WHERE criteria determines which rows to delete. If this clause is omitted, all the table’s rows are deleted.
Section 18.5 MySQL
• MySQL (pronounced “my sequel”) is a robust and scalable relational database management system (RDBMS) that was created by the Swedish consulting firm TcX in 1994.
• MySQL is a multiuser, multithreaded RDBMS server that uses SQL to interact with and manipulate data.
• Multithreading capabilities enable MySQL database to perform multiple tasks concurrently, allowing the server to process client requests efficiently.
• Implementations of MySQL are available for Windows, Mac OS X, Linux and UNIX.
Section 18.6 (Optional) Microsoft Language Integrate Query (LINQ)
• .NET’s collection classes provide reusable data structures that are reliable, powerful and efficient.
• Lists automatically increase their size to accommodate additional elements.
• Large amounts of data are often stored in a database—an organized collection of data. Today’s most popular database systems are relational databases. SQL is the international standard language used almost universally with relational databases to perform queries (i.e., to request information that satisfies given criteria).
• LINQ allows you to write query expressions (similar to SQL queries) that retrieve information from a wide variety of data sources. You can query arrays and Lists, selecting elements that satisfy a set of conditions—this is known as filtering.
• A LINQ provider is a set of classes that implement LINQ operations and enable programs to interact with data sources to perform tasks such as sorting, grouping and filtering elements.
Section 18.6.1 Querying an Array of int Values Using LINQ
• Repetition statements focus on the process of iterating through elements and checking whether they satisfy the desired criteria. LINQ specifies the conditions that selected elements must satisfy, not the steps necessary to get the results.
• The System.Linq namespace contains the classes for LINQ to Objects.
• A from clause specifies a range variable and the data source to query. The range variable represents each item in the data source (one at a time), much like the control variable in a foreach statement.
• If the condition in the where clause evaluates to true for an element, it’s included in the results.
• The select clause determines what value appears in the results.
• A C# interface describes a set of methods and properties that can be used to interact with an object.
• The IEnumerable<T> interface describes the functionality of any object that’s capable of being iterated over and thus offers methods to access each element in some order.
• A class that implements an interface must define each method in the interface.
• Arrays and collections implement the IEnumerable<T> interface.
• A foreach statement can iterate over any object that implements the IEnumerable<T> interface.
• A LINQ query returns an object that implements the IEnumerable<T> interface.
• The orderby clause sorts query results in ascending order by default. Results can also be sorted in descending order using the descending modifier.
• C# provides implicitly typed local variables, which enable the compiler to infer a local variable’s type based on the variable’s initializer.
• To distinguish such an initialization from a simple assignment statement, the var keyword is used in place of the variable’s type.
• You can use local type inference with control variables in the header of a for or foreach statement.
• Implicitly typed local variables can be used to initialize arrays without explicitly giving their type. To do so, use new[] to specify that the variable is an array.
Section 18.6.2 Querying an Array of Employee Objects Using LINQ
• LINQ can be used with collections of most data types.
• Any boolean expression can be used in a where clause.
• An orderby clause can sort the results according to multiple properties specified in a comma-separated list.
• Method Any returns true if there’s at least one element in the result; otherwise, it returns false.
• The First method returns the first element in the query result. You should check that the query result is not empty before calling First.
• The Count method returns the number of elements in the query result.
• The Distinct method removes duplicate values from query results.
• You can select any number of properties in a select clause by specifying them in a comma-separated list in braces after the new keyword. The compiler automatically creates a new class having these properties—called an anonymous type.
Section 18.6.3 Querying a Generic Collection Using LINQ
• LINQ to Objects can query Lists.
• LINQ’s let clause creates a new range variable. This is useful if you need to store a temporary result for use later in the LINQ query.
• The StartsWith method of the string class determines whether a string starts with the string passed to it as an argument.
• A LINQ query uses deferred execution—it executes only when you access the results, not when you create the query.
Section 18.7 (Optional) LINQ to SQL
• LINQ to SQL enables you to access data in SQL Server databases using LINQ syntax.
• You interact with LINQ to SQL via classes that are automatically generated by the IDE’s LINQ to SQL Designer based on the database schema.
• LINQ to SQL requires every table to have a primary key to support modifying the database data.
• The IDE creates a class for each table. Objects of these classes represent the collections of rows in the corresponding tables.
• The IDE also creates a class for a row of each table with a property for each column in the table. Objects of these classes (row objects) hold the data from individual rows in the database’s tables.
• In the class for a row object, an additional property is created for each foreign key. This property returns the row object of the corresponding primary key in another table.
• In the class for a row object, an additional property is created for the collection of row objects with foreign-keys that reference the row object’s primary key.
• Once generated, the LINQ to SQL classes have full IntelliSense support in the IDE.
Section 18.8 (Optional) Querying a Database with LINQ
• The IDE provides visual programming tools and wizards that simplify accessing data in your projects. These tools establish database connections and create the objects necessary to view and manipulate the data through the GUI—a technique known as data binding.
• A DataGridView (namespace System.Windows.Forms) displays data from a data source in tabular format.
• A BindingNavigator is a collection of controls that allow you to navigate through the records displayed in a GUI. The BindingNavigator controls also allow you to add records, delete records and save your changes to the database.
Section 18.8.1 Creating LINQ to SQL Classes
• To interact with a database, you must create a connection to the database.
• In Visual C# 2010 Express, use the Database Explorer window to connect to the database. In full versions of Visual Studio 2010, use the Server Explorer window.
• After connecting to the database, you can generate the LINQ to SQL classes by adding a new LINQ to SQL Classes item to your project, then dragging the tables you wish to use from the Database Explorer onto the Object Relational Designer. When you save the .dbml file, the IDE generates the LINQ to SQL classes.
Section 18.8.2 Data Bindings Between Controls and the LINQ to SQL Classes
• To use the LINQ to SQL classes for data binding, you must first add them as a data source.
• Select Data > Add New Data Source... to display the Data Source Configuration Wizard. Use an Object data source. Select the LINQ to SQL object to use as a data source. Drag that data source from the Data Sources window onto the Form to create controls that can display the table’s data.
• By default, the IDE creates a DataGridView with the correct column names and a BindingNavigator that contains Buttons for moving between entries, adding entries, deleting entries and saving changes to the database.
• The IDE also generates a BindingSource, which handles the transfer of data between the data source and the data-bound controls on the Form.
• The result of a LINQ query on the DataContext can be assigned to the BindingSource’s DataSource property. The BindingSource uses the DataSource to extract data from the database and to populate the DataGridView.
• To save the user’s changes to the data in the DataGridView, enable the BindingNavigator’s Save Data Button (![]() ). Then, double click the icon to create its
). Then, double click the icon to create its Click event handler. In the event handler, you must validate the data, call EndEdit on the BindingSource to save pending changes in the DataContext, and call SubmitChanges on the DataContext to store the changes in the database. For efficiency, LINQ to SQL saves only data that has changed.
Section 18.9 (Optional) Dynamically Binding LINQ to SQL Query Results
• The IDE displays smart tag menus for many GUI controls to provide you with quick access to common properties you might set for a control, so you can set these properties directly in Design view. You can open a control’s smart tag menu by clicking the small arrowhead (![]() ) that appears in the control’s upper-right corner in Design view.
) that appears in the control’s upper-right corner in Design view.
• The MoveFirst method of the BindingSource moves to the first row of the result.
Section 18.10 Java DB/Apache Derby
• The Java SE 6 and 7 Development Kits (JDKs) come bundled with the open source, pure Java database Java DB (the Oracle branded version of Apache Derby).
Self-Review Exercises
18.1 Fill in the blanks in each of the following statements:
a. The international standard database language is ________.
b. A table in a database consists of ________ and ________.
c. The ________ uniquely identifies each row in a table.
d. SQL keyword ________ is followed by the selection criteria that specify the rows to select in a query.
e. SQL keywords ________ specify the order in which rows are sorted in a query.
f. Merging rows from multiple database tables is called ________ the tables.
g. A(n) ________ is an organized collection of data.
h. A(n) ________ is a set of columns whose values match the primary key values of another table.
i. The LINQ ________ clause is used for filtering.
j. To get only unique results from a LINQ query, use the ________ method.
k. The ________ clause declares a new temporary variable within a LINQ query.
18.2 State whether each of the following is true or false. If false, explain why.
a. The orderby clause in a LINQ query can sort only in ascending order.
b. LINQ queries can be used on both arrays and collections.
c. The Remove method of the List class removes an element at a specific index.
d. A BindingNavigator object can extract data from a database.
e. LINQ to SQL automatically saves changes made back to the database.
Answers to Self-Review Exercises
18.1
a. SQL.
b. rows, columns.
c. primary key.
d. WHERE.
e. ORDER BY.
f. joining.
g. database.
h. foreign key.
i. where.
j. Distinct.
k. let.
18.2
a. False. The descending modifier is used to make orderby sort in descending order.
b. True.
c. False. Remove removes the first element equal to its argument. RemoveAt removes the element at a specific index.
d. False. A BindingNavigator allows users to browse and manipulate data displayed by another GUI control. A DataContext can extract data from a database.
e. False. You must call the SubmitChanges method of the DataContext to save the changes made back to the database.
Exercises
18.3 Define the following terms:
a. Qualified name
b. Rule of Referential Integrity
c. Rule of Entity Integrity
d. selection criteria
18.4 State the purpose of the following SQL keywords:
a. ASC
b. FROM
c. DESC
d. INSERT
e. LIKE
f. UPDATE
g. SET
h. VALUES
i. ON
18.5 Write SQL queries for the books database (discussed in Section 18.3) that perform each of the following tasks:
a. Select all authors from the Authors table with the columns in the order lastName, firstName and authorID.
b. Select a specific author and list all books for that author. Include the title, year and ISBN number. Order the information alphabetically by title.
c. Add a new author to the Authors table.
d. Add a new title for an author (remember that the book must have an entry in the AuthorISBN table).
18.6 Fill in the blanks in each of the following statements:
a. The ________ states that every column in a primary key must have a value, and the value of the primary key must be unique
b. The ________ states that every foreign-key value must appear as another table’s primary-key value.
c. A(n) ________ in a pattern indicates that a string matching the pattern can have zero or more characters at the percent character’s location in the pattern.
d. Java DB is the Oracle branded version of ________.
e. A(n) ________ in a LIKE pattern string indicates a single character at that position in the pattern.
f. There’s a(n) ________ relationship between a primary key and its corresponding foreign key.
g. SQL uses ________ as the delimiter for strings.
18.7 Correct each of the following SQL statements that refer to the books database.
a. SELECT firstName FROM author WHERE authorID = 3
b. SELECT isbn, title FROM Titles ORDER WITH title DESC
c. INSERT INTO Authors ( authorID, firstName, lastName )VALUES ( "2", "Jane", "Doe" )