
24. Web App Development with ASP.NET in VB: A Deeper Look
... the challenges are for the designers of these applications: to forget what we think we know about the limitations of the Web, and begin to imagine a wider, richer range of possibilities. It’s going to be fun.
—Jesse James Garrett
If any man will draw up his case, and put his name at the foot of the first page, I will give him an immediate reply. Where he compels me to turn over the sheet, he must wait my leisure.
—Lord Sandwich
Objectives
In this chapter you’ll learn:
• Web application development using ASP.NET.
• To handle the events from a Web Form’s controls.
• To use validation controls to ensure that data is in the correct format before it’s sent from a client to the server.
• To maintain user-specific information.
• To create a data-driven web application using ASP.NET and LINQ to SQL.
24.2 Case Study: Password-Protected Books Database Application
24.2.1 Examining the ASP.NET Web Site Template
24.2.2 Test-Driving the Completed Application
24.2.3 Configuring the Website
24.2.4 Modifying the Default.aspx and About.aspx Pages
24.2.5 Creating a Content Page That Only Authenticated Users Can Access
24.2.6 Linking from the Default.aspx Page to the Books.aspx Page
24.2.7 Modifying the Master Page (Site.master)
24.2.8 Customizing the Password-Protected Books.aspx Page
24.3.1 Traditional Web Applications
24.3.3 Testing an ASP.NET Ajax Application
24.3.4 The ASP.NET Ajax Control Toolkit
24.3.5 Using Controls from the Ajax Control Toolkit
Summary | Self-Review Exercises | Answers to Self-Review Exercises | Exercises
24.1. Introduction
In Chapter 23, we introduced ASP.NET and web application development with Visual Basic. In this chapter, we introduce several additional ASP.NET web-application development topics, including:
• master pages to maintain a uniform look-and-feel across the Web Forms in a web application
• creating a password-protected website with registration and login capabilities
• using the Web Site Administration Tool to specify which parts of a website are password protected
• using ASP.NET Ajax to quickly and easily improve the user experience for your web applications, giving them responsiveness comparable to that of desktop applications.
24.2. Case Study: Password-Protected Books Database Application
This case study presents a web application in which a user logs into a password-protected website to view a list of publications by a selected author. The application consists of several ASPX files. For this application, we’ll use the ASP.NET Web Site template, which is a starter kit for a small multi-page website. The template uses Microsoft’s recommended practices for organizing a website and separating the website’s style (look-and-feel) from its content. The default site has two primary pages (Home and About) and is pre-configured with login and registration capabilities. The template also specifies a common look-and-feel for all the pages in the website—a concept known as a master page.
We begin by examining the features of the default website that is created with the ASP.NET Web Site template. Next, we test drive the completed application to demonstrate the changes we made to the default website. Then, we provide step-by-step instructions to guide you through building the application.
24.2.1. Examining the ASP.NET Web Site Template
To test the default website, begin by creating the website that you’ll customize in this case study. Perform the following steps:
1. Select File > New Web Site... to display the New Web Site dialog.
2. In the left column of the New Web Site dialog, ensure that Visual Basic is selected, then select ASP.NET Web Site in the middle column.
3. Choose a location for your website, name it Bug2Bug and click OK to create it.
Fig. 24.1 shows the website’s contents in the Solution Explorer.

Fig. 24.1. The default ASP.NET Web Site in the Solution Explorer.
Executing the Website
You can now execute the website. Select the Default.aspx page in the Solution Explorer, then type Ctrl + F5 to display the default page shown in Fig. 24.2.

Fig. 24.2. Default Home page of a website created with the ASP.NET Web Site template.
Navigation and Pages
The default ASP.NET Web Site contains a home page and an about page—so-called content pages—that you’ll customize in subsequent sections. The navigation bar near the top of the page allows you to switch between these pages by clicking the link for the appropriate page. In Section 24.2.3, you’ll add another link to the navigation bar to allow users to browse book information.
As you navigate between the pages, notice that each page has the same look-and-feel. This is typical of professional websites. The site uses a master page and cascading style sheets (CSS) to achieve this. A master page defines common GUI elements that are inherited by each page in a set of content pages. Just as Visual Basic classes can inherit instance variables and methods from existing classes, content pages can inherit elements from master pages—this is a form of visual inheritance.
Login and Registration Support
Websites commonly provide “membership capabilities” that allow users to register at a website and log in. Often this gives users access to website customization capabilities or premium content. The default ASP.NET Web Site is pre-configured to support registration and login capabilities.
In the upper-right corner of each page is a Log In link. Click that link to display the Login page (Fig. 24.3). If you are already registered with the site, you can log in with your username and password. Otherwise, you can click the Register link to display the Register page (Fig. 24.4). For the purpose of this case study, we created an account with the username testuser1 and the password testuser1. You do not need to be registered or logged in to the default website to view the home and about pages.

Fig. 24.3. Login page.
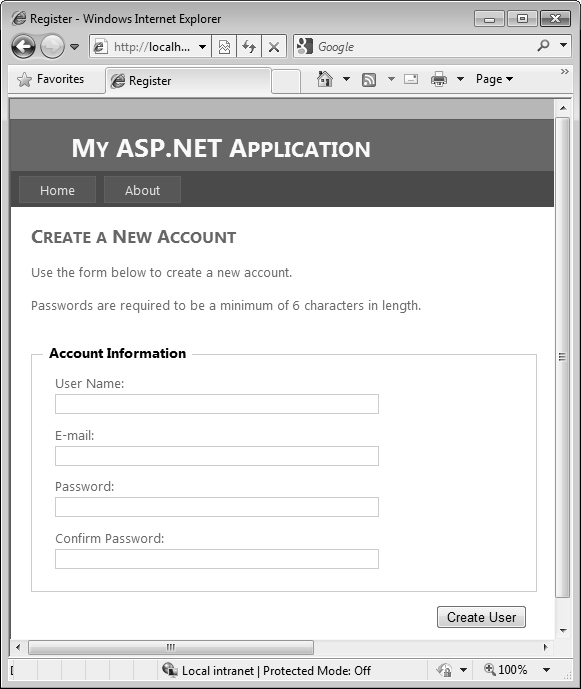
Fig. 24.4. Register page.
24.2.2. Test-Driving the Completed Application
This example uses a technique known as forms authentication to protect a page so that only registered users who are logged in to the website can access the page. Such users are known as the site’s members. Authentication is a crucial tool for sites that allow only members to enter the site or a portion of the site. In this application, website visitors must log in before they’re allowed to view the publications in the Books database.
Let’s open the completed Bug2Bug website and execute it so that you can see the authentication functionality in action. Perform the following steps:
1. Close the application you created in Fig. 24.2.1—you’ll reopen this website so that you can customize it in Section 24.2.3.
2. Select Open Web Site... from the File menu.
3. In the Open Web Site dialog, ensure that File System is selected, then navigate to this chapter’s examples, select the Bug2Bug folder and click the Open Button.
4. Select the Default.aspx page then type Ctrl + F5 to execute the website.
The website appears as shown in Fig. 24.5. Notice that we modified the site’s master page so that the top of the page displays an image, the background color of the top of the page is white and the Log In link is black. Also, the navigation bar contains a link for the Books page that you’ll create later in this case study.
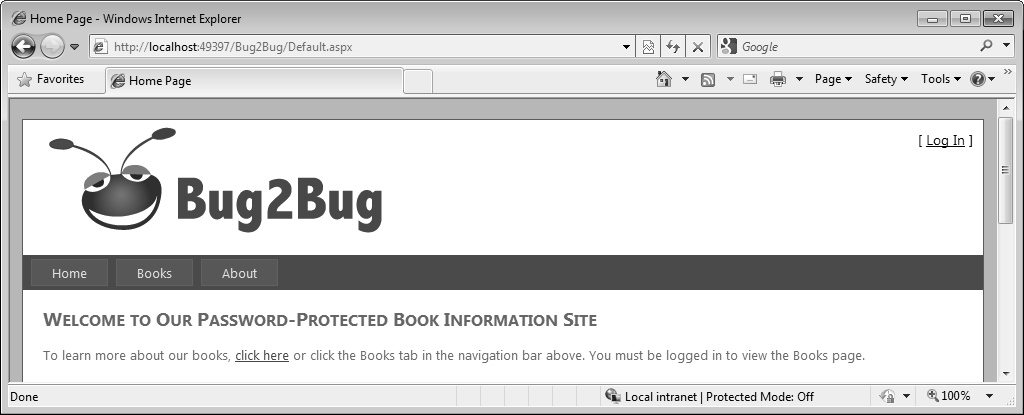
Fig. 24.5. Home page for the completed Bug2Bug website.
Try to visit the Books page by clicking the Books link in the navigation bar. Because this page is password protected in the Bug2Bug website, the website automatically redirects you to the Login page instead—you cannot view the Books page without logging in first. If you’ve not yet registered at the completed Bug2Bug website, click the Register link to create a new account. If you have registered, log in now.
If you are logging in, when you click the Log In Button on the Log In page, the website attempts to validate your username and password by comparing them with the usernames and passwords that are stored in a database on the server—this database is created for you with the ASP.NET Web Site template. If there is a match, you are authenticated (that is, your identity is confirmed) and you’re redirected to the Books page (Fig. 24.6). If you’re registering for the first time, the server ensures that you’ve filled out the registration form properly and that your password is valid (at least 6 characters), then logs you in and redirects you to the Books page.

Fig. 24.6. Books.aspx displaying books by Harvey Deitel (by default).
The Books page provides a drop-down list of authors and a table containing the ISBNs, titles, edition numbers and copyright years of books in the database. By default, the page displays all the books by Harvey Deitel. Links appear at the bottom of the table that allow you to access additional pages of data—we configured the table to display only four rows of data at a time. When the user chooses an author, a postback occurs, and the page is updated to display information about books written by the selected author (Fig. 24.7).
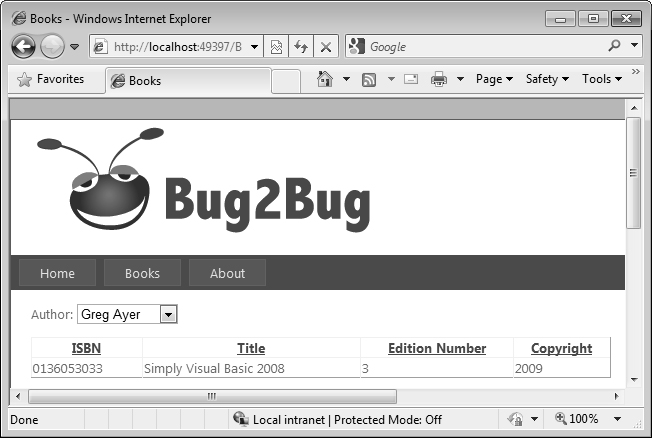
Fig. 24.7. Books.aspx displaying books by Greg Ayer.
Logging Out of the Website
When you’re logged in, the Log In link is replaced in the upper-right corner of each page (not shown in Figs. 24.6–24.7) with the message “Welcome username,” where username is replaced with your log in name, and a Log Out link. When you click Log Out, the website redirects you to the home page (Fig. 24.5).
24.2.3. Configuring the Website
Now that you’re familiar with how this application behaves, you’ll modify the default website you created in Section 24.2.1. Thanks to the rich functionality of the default website, you’ll have to write almost no Visual Basic code to create this application. The ASP.NET Web Site template hides the details of authenticating users against a database of user names and passwords, displaying appropriate success or error messages and redirecting the user to the correct page based on the authentication results. We now discuss the steps you must perform to create the password-protected books database application.
Step 1: Opening the Website
Open the default website that you created in Section 24.2.1.
1. Select Open Web Site... from the File menu.
2. In the Open Web Site dialog, ensure that File System is selected, then navigate to the location where you created your version of the Bug2Bug website and click the Open Button.
Step 2: Setting Up Website Folders
For this website, you’ll create two new folders—one that will contain the image that is used on all the pages and one that will contain the password-protected page. Password-protected parts of your website are typically placed in a separate folder. As you’ll see shortly, you can control access to specific folders in a website.
You can choose any name you like for these folders—we chose Images for the folder that will contain the image and ProtectedContent for the folder that will contain the password-protected Books page. To create the folders, perform the following steps:
1. Create an Images folder by right clicking the location of the website in the Solution Explorer, selecting New Folder and typing the name Images.
2. Create a ProtectedContent folder by right clicking the location of the website in the Solution Explorer, selecting New Folder and typing the name ProtectedContent.
Step 3: Importing the Website Header Image and the Database File
Next, you’ll add an image to the Images folder and the database file to the App_Data folder.
1. In Windows Explorer, locate the folder containing this chapter’s examples.
2. Drag the image bug2bug.png from the images folder in Windows Explorer into the Images folder in the Solution Explorer to copy the image into the website.
3. Drag the Books.mdf database file from the databases folder in Windows Explorer to the project’s App_Data folder. We show how to retrieve data from this database later in the section.
Step 4: Opening the Web Site Administration Tool
In this application, we want to ensure that only authenticated users are allowed to access Books.aspx (created in Section 24.2.5) to view the information in the database. Previously, we created all of our ASPX pages in the web application’s root directory. By default, any website visitor (regardless of whether the visitor is authenticated) can view pages in the root directory. ASP.NET allows you to restrict access to particular folders of a website. We do not want to restrict access to the root of the website, however, because users won’t be able to view any pages of the website. To restrict access to the Books page, it must reside in a directory other than the root directory.
You’ll now configure the website to allow only authenticated users (that is, users who have logged in) to view the pages in the ProtectedContent folder. Perform the following steps:
1. Select Website > ASP.NET Configuration to open the Web Site Administration Tool in a web browser (Fig. 24.8). This tool allows you to configure various options that determine how your application behaves.
2. Click either the Security link or the Security tab to open a web page in which you can set security options (Fig. 24.9), such as the type of authentication the application should use. By default, website users are authenticated by entering username and password information in a web form.
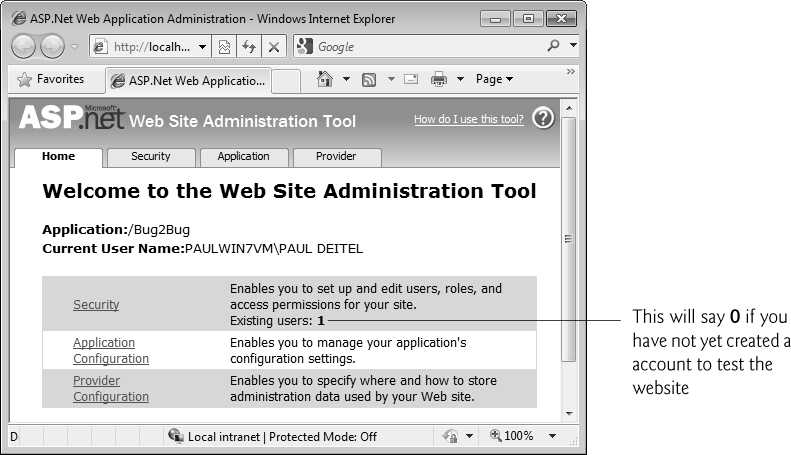
Fig. 24.8. Web Site Administration Tool for configuring a web application.

Fig. 24.9. Security page of the Web Site Administration Tool.
Step 5: Configuring the Website’s Security Settings
Next, you’ll configure the ProtectedContent folder to grant access only to authenticated users—anyone who attempts to access pages in this folder without first logging in will be redirected to the Login page. Perform the following steps:
1. Click the Create access rules link in the Access Rules column of the Web Site Administration Tool (Fig. 24.9) to view the Add New Access Rule page (Fig. 24.10). This page is used to create an access rule—a rule that grants or denies access to a particular directory for a specific user or group of users.
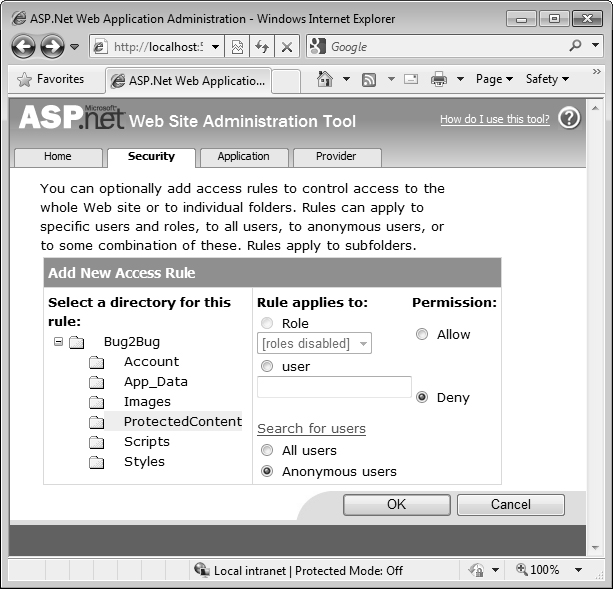
Fig. 24.10. Add New Access Rule page used to configure directory access.
2. Click the ProtectedContent directory in the left column of the page to identify the directory to which our access rule applies.
3. In the middle column, select the radio button marked Anonymous users to specify that the rule applies to users who have not been authenticated.
4. Finally, select Deny in the Permission column to prevent unauthenticated users from accessing pages in the ProtectedContent directory, then click OK.
By default, unauthenticated (anonymous) users who attempt to load a page in the ProtectedContent directory are redirected to the Login.aspx page so that they can identify themselves. Because we did not set up any access rules for the Bug2Bug root directory, anonymous users may still access pages there.
24.2.4. Modifying the Default.aspx and About.aspx Pages
We modified the content of the home (Default.aspx) and about (About.aspx) pages to replace the default content. To do so, perform the following steps:
1. Double click Default.aspx in the Solution Explorer to open it, then switch to Design view (Fig. 24.11). As you move the cursor over the page, you’ll notice that sometimes the cursor displays as to indicate that you cannot edit the part of the page behind the cursor. Any part of a content page that is defined in a master page can be edited only in the master page.

Fig. 24.11. Default.aspx page in Design view.
2. Change the text "Welcome to ASP.NET!" to "Welcome to Our Password-Protected Book Information Site". Note that the text in this heading is actually formatted as small caps text when the page is displayed in a web browser—all of the letters are displayed in uppercase, but the letters that would normally be lowercase are smaller than the first letter in each word.
3. Select the text of the two paragraphs that remain in the page and replace them with "To learn more about our books, click here or click the Books tab in the navigation bar above. You must be logged in to view the Books page." In a later step, you’ll link the words "click here" to the Books page.
4. Save and close the Default.aspx page.
5. Next, open About.aspx and switch to Design view.
6. Change the text "Put content here." to "This is the Bug2Bug password-protected book information database example."
7. Save and close the About.aspx page.
24.2.5. Creating a Content Page That Only Authenticated Users Can Access
We now create the Books.aspx file in the ProtectedContent folder—the folder for which we set an access rule denying access to anonymous users. If an unauthenticated user requests this file, the user will be redirected to Login.aspx. From there, the user can either log in or create a new account, both of which will authenticate the user, then redirect back to Books.aspx. To create the page, perform the following steps:
1. Right click the ProtectedContent folder in the Solution Explorer and select Add New Item.... In the resulting dialog, select Web Form and specify the file name Books.aspx. Ensure that the CheckBox Select master page is checked to indicate that this Web Form should be created as a content page that references a master page, then click Add.
2. In the Select a Master Page dialog, select Site.master and click OK. The IDE creates the file and opens it.
3. Switch to Design view, click in the page to select it, then select DOCUMENT from the ComboBox in the Properties window.
4. Change the Title property of the page to Books, then save and close the page
You’ll customize this page and create its functionality shortly.
24.2.6. Linking from the Default.aspx Page to the Books.aspx Page
Next, you’ll add a hyperlink from the text "click here" in the Default.aspx page to the Books.aspx page. To do so, perform the following steps:
1. Open the Default.aspx page and switch to Design view.
2. Select the text "click here".
3. Click the Convert to Hyperlink (![]() )
) Button on the toolbar at the top of Visual Web Developer to display the Hyperlink dialog. You can enter a URL here, or you can link to another page within the website.
4. Click the Browse... Button to display the Select Project Item dialog, which allows you to select another page in the website.
5. In the left column, select the ProtectedContent directory.
6. In the right column, select Books.aspx, then click OK to dismiss the Select Project Item dialog and click OK again to dismiss the Hyperlink dialog.
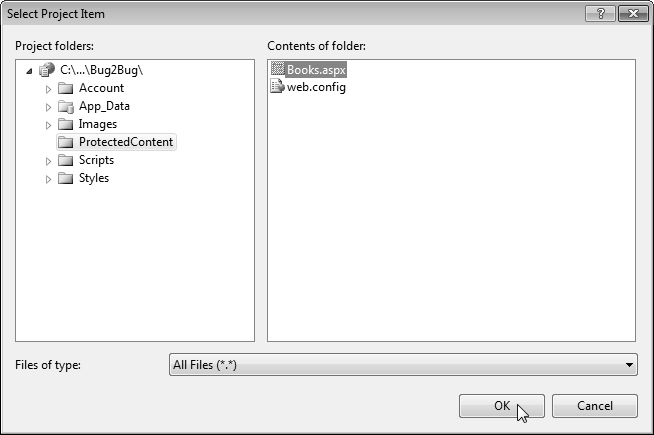
Fig. 24.12. Selecting the Books.aspx page from the Select Project Item dialog.
Users can now click the click here link in the Default.aspx page to browse to the Books.aspx page. If a user is not logged in, clicking this link will redirect the user to the Login page.
24.2.7. Modifying the Master Page (Site.master)
Next, you’ll modify the website’s master page, which defines the common elements we want to appear on each page. A master page is like a base class in a visual inheritance hierarchy, and content pages are like derived classes. The master page contains placeholders for custom content created in each content page. The content pages visually inherit the master page’s content, then add content in the areas designated by the master page’s placeholders.
For example, it’s common to include a navigation bar (that is, a series of buttons or menus for navigating a website) on every page of a site. If a site encompasses a large number of pages, adding markup to create the navigation bar for each page can be time consuming. Moreover, if you subsequently modify the navigation bar, every page on the site that uses it must be updated. By creating a master page, you can specify the navigation-bar in one file and have it appear on all the content pages. If the navigation bar changes, only the master page changes—any content pages that use it are updated the next time the page is requested.
In the final version of this website, we modified the master page to include the Bug2Bug logo in the header at the top of every page. We also changed the colors of some elements in the header to make them work better with the logo. In particular, we changed the background color from a dark blue to white, and we changed the color of the text for the Log In and Log Out links to black. The color changes require you to modify the CSS styles for some of the master page’s elements. These styles are defined in the file Site.css, which is located in the website’s Styles folder. You will not modify the CSS file directly. Instead, you’ll use the tools built into Visual Web Developer to perform these modifications.
Inserting an Image in the Header
To display the logo, we’ll place an Image control in the header of the master page. Each content page based on this master page will include the logo. Perform the following steps to add the Image:
1. Open Site.master and switch to Design view.
2. Delete the text MY ASP.NET APPLICATION at the top of the page.
3. In the Toolbox, double click Image to add an Image control where the text used to be.
4. Edit the Image control’s ImageUrl property to point to the bug2bug.png image in the Images folder.
Customizing the CSS Styles for the Master Page
Our logo image was designed to be displayed against a white background. To change the background color in the header at the top of the page, perform the following steps:
1. Just below the Design view is a list of Buttons that show you where the cursor is currently located in the master page (Fig. 24.13). These Buttons also allow you to select specific elements in the page. Click the <div.header> Button to select the header portion of the page.
Fig. 24.13. Buttons for selecting parts of a page in Design view.
2. Select View > Other Windows > CSS Properties to display the CSS properties (at the left of the IDE) for the currently selected element (the header of the page).
3. At the top of the CSS Properties window, click the Summary Button to show only the CSS properties that are currently set for the selected element.
4. Change the background property from #4b6c9e (the hexadecimal value for the current dark blue background) to white and press Enter.
5. The Log In and Log Out links use white text in the default website. Now that the background of the header is white, we need to change the color of these links so they’ll be visible. In the upper-right corner of the master page click the HeadLoginView control, which is where the Log In and Log Out links get displayed.
6. Below the Design view, click the <div.loginDisplay> Button to display the styles for the HeadLoginView in the CSS Properties window.
7. Change the color property from white to black and press Enter.
8. Click inside the box below HeadLoginView. Then, below the Design view, click the <a#HeadingLoginStatus> Button to display the styles for the Log In/Log Out link in the CSS Properties window
9. Change the color property from white to black and press Enter.
10. Some style changes must be made directly in the Site.css file because the styles are applied only at runtime. On many websites, when you move the mouse over a hyperlink, the color of the link changes. Similarly, once you click a hyperlink, the hyperlink is often displayed in a different color the next time you visit the page to indicate that you’ve already clicked that link during a previous visit. The predefined styles in this website set the color of the Log In link to white for both of these cases. To change these to black, open the Site.css file from the Styles folder in the Solution Explorer, then search for the following two styles:
.loginDisplay a:visited
.loginDisplay a:hover
Change each style’s color property from white to black.
11. Save the Site.master and Site.css files.
Adding a Books Link to the Navigation Bar
Currently the navigation bar has only Home and About links. Next, you’ll add a link to the Books page. Perform the following steps:
1. In the master page, position the mouse over the navigation bar links, then open the smart-tag menu and click Edit Menu Items.
2. In the Menu Item Editor dialog, click the Add a root item (![]() )
) Button.
3. Set the new item’s Text property to Books and use the up arrow Button to move the new item up so that the order of the navigation bar items is Home, Books and About.
4. Set the new item’s NavigateUrl property to the Books.aspx page in the ProtectedContent folder.
5. Click OK, then save the Site.master file to complete the changes to the master page.
24.2.8. Customizing the Password-Protected Books.aspx Page
You are now ready to customize the Books.aspx page to display the book information for a particular author.
Generating LINQ to SQL Classes Based on the Books.mdf Database
The Books.aspx page will provide a DropDownList containing authors’ names and a GridView displaying information about books written by the author selected in the DropDownList. A user will select an author from the DropDownList to cause the GridView to display information about only the books written by the selected author.
To work with the Books database through LINQ, we use the same approach as in the Guestbook case study (Section 23.8). First you need to generate the LINQ to SQL classes based on the Books database, which is provided in the databases directory of this chapter’s examples folder. Name the file Books.dbml. When you drag the tables of the Books database from the Database Explorer onto the Object Relation Designer of Books.dbml, you’ll find that associations (represented by arrows) between the two tables are automatically generated (Fig. 24.14).

Fig. 24.14. Object Relation Designer for the Books database.
To obtain data from this data context, you’ll use two LinqDataSource controls. In both cases, the LinqDataSource control’s built-in data selection functionality won’t be versatile enough, so the implementation will be slightly different than in Section 23.8. So, we’ll use a custom Select LINQ statement as the query of a LinqDataSource.
Adding a DropDownList to Display the Authors’ First and Last Names
Now that we have created a BooksDataContext class (one of the generated LINQ to SQL classes), we add controls to Books.aspx that will display the data on the web page. We first add the DropDownList from which users can select an author.
1. Open Books.aspx in Design mode, then add the text Author: and a DropDownList control named authorsDropDownList in the page’s editable content area (which has a white background). The DropDownList initially displays the text Unbound.
2. Next, we’ll bind the list to a data source, so the list displays the author information in the Authors table of the Books database. Because the Configure Data Source wizard allows us to create LinqDataSources with only simple Select LINQ statements, we cannot use the wizard here. Instead, add a LinqDataSource object below the DropDownList named authorsLinqDataSource.
3. Open the smart-tag menu for the DropDownList and click Choose Data Source... to start the Data Source Configuration Wizard (Fig. 24.15). Select authorsLinqDataSource from the Select a data source drop-down list in the first screen of the wizard. Then, type Name as the data field to display in the DropDownList and AuthorID as the data field that will be submitted to the server when the user makes a selection. [Note: You must manually type these values in because authorsLinqDataSource does not yet have a defined Select query.] When authorsDropDownList is rendered in a web browser, the list items will display the names of the authors, but the underlying values associated with each item will be the AuthorIDs of the authors. Click OK to bind the DropDownList to the specified data.
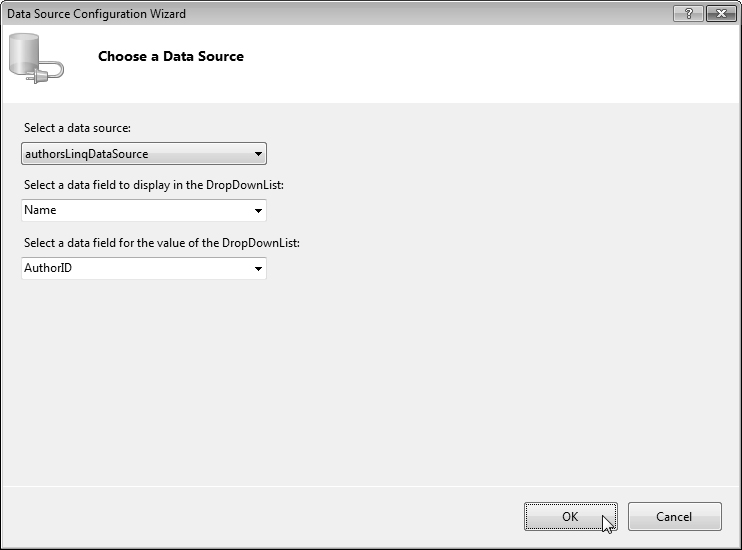
Fig. 24.15. Choosing a data source for a DropDownList.
4. In the Visual Basic code-behind file (Books.aspx.vb), create an instance of BooksDataContext named database as an instance variable.
5. In the Design view of Books.aspx, double click authorsLinqDataSource to create an event handler for its Selecting event. This event occurs every time the LinqDataSource selects data from its data context, and can be used to implement custom Select queries against the data context. To do so, assign the custom LINQ query to the Result property of the event handler’s LinqDataSourceSelectEventArgs argument. The query results become the data source’s data. In this case, we must create a custom anonymous type in the Select clause with properties Name and AuthorID that contain the author’s full name and ID. The LINQ query is
From author In database.Authors
Select Name = author.FirstName & " " & author.LastName,
author.AuthorID
The limitations of the Configure Data Source wizard prevent us from using a custom field such as Name (a combination of first name and last name, separated by a space) that isn’t one of the database table’s existing columns.
6. The last step in configuring the DropDownList on Books.aspx is to set the control’s AutoPostBack property to True. This property indicates that a postback occurs each time the user selects an item in the DropDownList. As you’ll see shortly, this causes the page’s GridView (created in the next step) to display new data.
Creating a GridView to Display the Selected Author’s Books
We now add a GridView to Books.aspx for displaying the book information by the author selected in the authorsDropDownList.
1. Add a GridView named titlesGridView below the other controls in the page’s content area.
2. To bind the GridView to data from the Books database, create a LinqDataSource named titlesLinqDataSource beneath the GridView.
3. Select titlesLinqDataSource from the Choose Data Source drop-down list in the GridView Tasks smart-tag menu. Because titlesLinqDataSource has no defined Select query, the GridView will not automatically be configured.
4. To configure the columns of the GridView to display the appropriate data, select Edit Columns... from the GridView Tasks smart-tag menu to display the Fields dialog (Fig. 24.16).
5. Uncheck the Auto-generate fields box to indicate that you’ll manually define the fields to display.
6. Create four BoundFields with the HeaderText ISBN, Title, Edition Number and Copyright, respectively.
7. For each BoundField except Edition Number, set the SortExpression and DataField properties to match the HeaderText. For Edition Number, set the SortExpression and DataField to EditionNumber—the name of the field in the database. The SortExpression specifies to sort by the associated data field when the user chooses to sort by the column. Shortly, we’ll enable sorting to allow users to sort this GridView. Clock OK to close the Fields dialog.
8. To specify the Select LINQ query for obtaining the data, double click titlesLinqDataSource to create its Selecting event handler. Assign the custom LINQ query to the LinqDataSourceSelectEventArgs argument’s Result property. Use the following LINQ query:
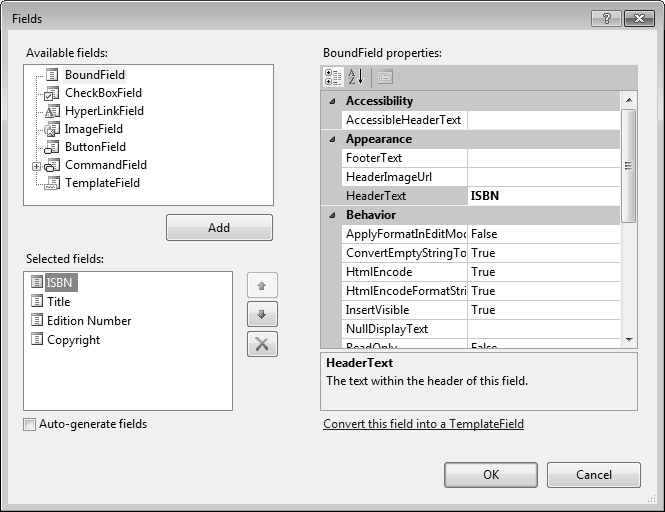
Fig. 24.16. Creating GridView fields in the Fields dialog.
From book In database.AuthorISBNs
Where book.AuthorID = authorsDropDownList.SelectedValue
Select book.Title
9. The GridView needs to update every time the user makes a new author selection. To implement this, double click the DropDownList to create an event handler for its SelectedIndexChanged event. You can make the GridView update by invoking its DataBind method.
Code-Behind File for the Books Page
Figure 24.17 shows the code for the completed code-behind file. Line 7 defines the data context object that is used in the LINQ queries. Lines 10–18 and 21–29 define the two LinqDataSource’s Selecting events. Lines 32–37 define the authorsDropDownList’s SelectedIndexChanged event handler, which updates the GridView.
1 ' Fig. 24.17: ProtectedContent_Books.aspx.vb
2 ' Code-behind file for the password-protected Books page.
3 Partial Class ProtectedContent_Books
4 Inherits System.Web.UI.Page
5
6 ' data context queried by data sources
7 Private database As New BooksDataContext()
8
9 ' specify the Select query that creates a combined first and last name
10 Protected Sub authorsLinqDataSource_Selecting(ByVal sender As Object,
11 ByVal e As System.Web.UI.WebControls.LinqDataSourceSelectEventArgs) _
12 Handles authorsLinqDataSource.Selecting
13
14 e.Result =
15 From author In database.Authors
16 Select Name = author.FirstName & " " & author.LastName,
17 author.AuthorID
18 End Sub ' authorsLinqDataSource_Selecting
19
20 ' specify the Select query that gets the specified author's books
21 Protected Sub titlesLinqDataSource_Selecting(ByVal sender As Object,
22 ByVal e As System.Web.UI.WebControls.LinqDataSourceSelectEventArgs) _
23 Handles titlesLinqDataSource.Selecting
24
25 e.Result =
26 From book In database.AuthorISBNs
27 Where book.AuthorID = authorsDropDownList.SelectedValue
28 Select book.Title
29 End Sub ' titlesLinqDataSource_Selecting
30
31 ' refresh the GridView when a different author is selected
32 Protected Sub authorsDropDownList_SelectedIndexChanged(
33 ByVal sender As Object, ByVal e As System.EventArgs) _
34 Handles authorsDropDownList.SelectedIndexChanged
35
36 titlesGridView.DataBind() ' update the GridView
37 End Sub ' authorsDropDownList_SelectedIndexChanged
38 End Class ' ProtectedContent_Books
Fig. 24.17. Code-behind file for the password-protected Books page.
Configuring the GridView to Enable Sorting and Paging
Now that the GridView is tied to a data source, we modify several of the control’s properties to adjust its appearance and behavior.
1. In Design view, use the GridView’s sizing handles to set the width to 580px.
2. Next, in the GridView Tasks smart-tag menu, check Enable Sorting so that the column headings in the GridView become hyperlinks that allow users to sort the data in the GridView using the sort expressions specified by each column. For example, clicking the Titles heading in the web browser will cause the displayed data to appear sorted in alphabetical order. Clicking this heading a second time will cause the data to be sorted in reverse alphabetical order. ASP.NET hides the details required to achieve this functionality.
3. Finally, in the GridView Tasks smart-tag menu, check Enable Paging. This causes the GridView to split across multiple pages. The user can click the numbered links at the bottom of the GridView control to display a different page of data. GridView’s PageSize property determines the number of entries per page. Set the PageSize property to 4 using the Properties window so that the GridView displays only four books per page. This technique for displaying data makes the site more readable and enables pages to load more quickly (because less data is displayed at one time). As with sorting data in a GridView, you do not need to add any code to achieve paging functionality. Figure 24.18 displays the completed Books.aspx file in Design mode.

Fig. 24.18. Completed Books.aspx page in Design mode.
24.3. ASP.NET Ajax
In this section, you learn the difference between a traditional web application and an Ajax (Asynchronous JavaScript and XML) web application. You also learn how to use ASP.NET Ajax to quickly and easily improve the user experience for your web applications. To demonstrate ASP.NET Ajax capabilities, you enhance the validation example by displaying the submitted form information without reloading the entire page. The only modifications to this web application appear in the Validation.aspx file. You use Ajax-enabled controls to add this feature.
24.3.1. Traditional Web Applications
Figure 24.19 presents the typical interactions between the client and the server in a traditional web application, such as one that uses a user registration form. The user first fills in the form’s fields, then submits the form (Fig. 24.19, Step 1). The browser generates a request to the server, which receives the request and processes it (Step 2). The server generates and sends a response containing the exact page that the browser renders (Step 3), which causes the browser to load the new page (Step 4) and temporarily makes the browser window blank. The client waits for the server to respond and reloads the entire page with the data from the response (Step 4). While such a synchronous request is being processed on the server, the user cannot interact with the web page. Frequent long periods of waiting, due perhaps to Internet congestion, have led some users to refer to the World Wide Web as the “World Wide Wait.” If the user interacts with and submits another form, the process begins again (Steps 5–8).
This model was designed for a web of hypertext documents—what some people call the “brochure web.” As the web evolved into a full-scale applications platform, the model shown in Fig. 24.19 yielded “choppy” user experiences. Every full-page refresh required users to reload the full page. Users began to demand a more responsive model.
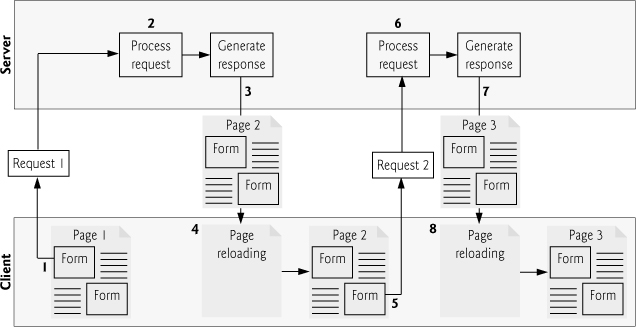
Fig. 24.19. Traditional web application reloading the page for every user interaction.
24.3.2. Ajax Web Applications
Ajax web applications add a layer between the client and the server to manage communication between the two (Fig. 24.20). When the user interacts with the page, the client requests information from the server (Step 1). The request is intercepted by the ASP.NET Ajax controls and sent to the server as an asynchronous request (Step 2)—the user can continue interacting with the application in the client browser while the server processes the request. Other user interactions could result in additional requests to the server (Steps 3 and 4). Once the server responds to the original request (Step 5), the ASP.NET Ajax control that issued the request calls a client-side function to process the data returned by the server. This function—known as a callback function—uses partial-page updates (Step 6) to display the data in the existing web page without reloading the entire page. At the same time, the server may be responding to the second request (Step 7) and the client browser may be starting another partial-page update (Step 8). The callback function updates only a designated part of the page. Such partial-page updates help make web applications more responsive, making them feel more like desktop applications. The web application does not load a new page while the user interacts with it. In the following section, you use ASP.NET Ajax controls to enhance the Validation.aspx page.
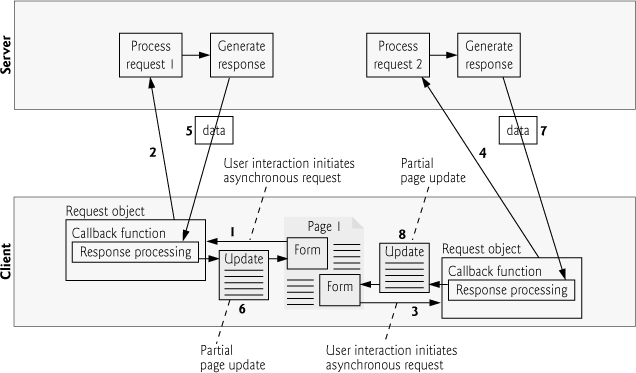
Fig. 24.20. Ajax-enabled web application interacting with the server asynchronously.
24.3.3. Testing an ASP.NET Ajax Application
To demonstrate ASP.NET Ajax capabilities we’ll enhance the Validation application from Section 23.6 by adding ASP.NET Ajax controls. There are no Visual Basic code modifications to this application—all of the changes occur in the .aspx file.
Testing the Application in Your Default Web Browser
To test this application in your default web browser, perform the following steps:
1. Select Open Web Site... from the Visual Web Developer File menu.
2. In the Open Web Site dialog, select File System, then navigate to this chapter’s examples, select the ValidationAjax folder and click the Open Button.
3. Select Validation.aspx in the Solution Explorer, then type Ctrl + F5 to execute the web application in your default web browser.
Figure 24.21 shows a sample execution of the enhanced application. In Fig. 24.21(a), we show the contact form split into two tabs via the TabContainer Ajax control. You can switch between the tabs by clicking the title of each tab. Fig. 24.21(b) shows a ValidatorCalloutExtender control, which displays a validation error message in a callout that points to the control in which the validation error occurred, rather than as text in the page. Fig. 24.21(c) shows the updated page with the data the user submitted to the server.

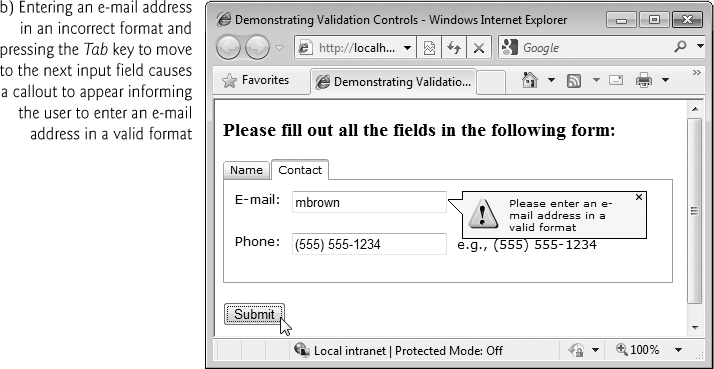

Fig. 24.21. Validation application enhanced by ASP.NET Ajax.
24.3.4. The ASP.NET Ajax Control Toolkit
You’ll notice that there is a tab of basic AJAX Extensions controls in the Toolbox. Microsoft also provides the ASP.NET Ajax Control Toolkit as part of the ASP.NET Ajax Library
ajax.codeplex.com
The toolkit contains many more Ajax-enabled, rich GUI controls. Click the Download Button to begin the download. The toolkit does not come with an installer, so you must extract the contents of the toolkit’s ZIP file to your hard drive. Note the location where you extracted the files as you’ll need this information to add the ASP.NET Ajax Controls to your Toolbox.
Adding the ASP.NET Ajax Controls to the Toolbox
You should add controls from the Ajax Control Toolkit to the Toolbox in Visual Web Developer (or in Visual Studio), so you can drag and drop controls onto your Web Forms. To do so, perform the following steps:
1. Open an existing website project or create a new website project.
2. Open an ASPX page from your project in Design mode.
3. Right click the Toolbox and choose Add Tab, then type ASP.NET Ajax Library in the new tab.
4. Right click under the new ASP.NET Ajax Library tab and select Choose Items... to open the Choose Toolbox Items dialog.
5. Click the Browse Button then locate the folder where you extracted the ASP.NET Ajax Control Toolkit. In the WebFormsRelease folder, select the file AjaxControlToolkit.dll then click Open.
6. Click OK to close dialog. The controls from the Ajax Control Toolkit now appear in the Toolbox’s ASP.NET Ajax Library tab.
7. Initially the control names are not in alphabetical order. To sort them alphabetically, right click in the list of Ajax Control Toolkit controls and select Sort Items Alphabetically.
24.3.5. Using Controls from the Ajax Control Toolkit
In this section, you’ll enhance the application you created in Section 23.6 by adding ASP.NET Ajax controls. The key control in every ASP.NET Ajax-enabled application is the ScriptManager (in the Toolbox’s AJAX Extensions tab), which manages the JavaScript client-side code (called scripts) that enable asynchronous Ajax functionality. A benefit of using ASP.NET Ajax is that you do not need to know JavaScript to be able to use these scripts. The ScriptManager is meant for use with the controls in the Toolbox’s AJAX Extensions tab. There can be only one ScriptManager per page.
ToolkitScriptManager
The Ajax Control Toolkit comes with an enhanced ScriptManager called the ToolkitScriptManager, which manages the scripts for the ASP. NET Ajax Toolkit controls. This one should be used in any page with controls from the ASP. NET Ajax Toolkit.
 Common Programming Error 24.1
Putting more than one ScriptManager and/or ToolkitScriptManager control on a Web Form causes the application to throw an InvalidOperationException when the page is initialized.
Open the Validation website you created in Section 23.6. Then drag a ToolkitScriptManager from the ASP.NET Ajax Library tab in the Toolbox to the top of the page—a script manager must appear before any controls that use the scripts it manages.
Grouping Information in Tabs Using the TabContainer Control
The TabContainer control enables you to group information into tabs that are displayed only if they’re selected. The information in an unselected tab won’t be displayed until the user selects that tab. To demonstrate a TabContainer control, let’s split the form into two tabs—one in which the user can enter the name and one in which the user can enter the e-mail address and phone number. Perform the following steps:
1. Click to the right of the text Please fill out all the fields in the following form: and press Enter to create a new paragraph.
2. Drag a TabContainer control from the ASP.NET Ajax Library tab in the Toolbox into the new paragraph. This creates a container for hosting tabs. Set the TabContainer’s Width property to 450px.
3. To add a tab, open the TabContainer Tasks smart-tag menu and select Add Tab Panel. This adds a TabPanel object—representing a tab—to the TabContainer. Do this again to add a second tab.
4. You must change each TabPanel’s HeaderText property by editing the ASPX page’s markup. To do so, click the TabContainer to ensure that it’s selected, then switch to Split view in the design window. In the highlighted markup that corresponds to the TabContainer, locate HeaderText="TabPanel1" and change "TabPanel1" to "Name", then locate HeaderText="TabPanel2" and change "TabPanel2" to "Contact". Switch back to Design view. In Design view, you can navigate between tabs by clicking the tab headers. You can drag-and-drop elements into the tab as you would anywhere else.
5. Click in the Name tab’s body, then insert a one row and two column table. Take the text and controls that are currently in the Name: row of the original table and move them to the table in the Name tab.
6. Switch to the Contact tab, click in its body, then insert a two row and two column table. Take the text and controls that are currently in the E-mail: and Phone: rows of the original table and move them to the table in the Contact tab.
7. Delete the original table that is currently below the TabContainer.
Partial-Page Updates Using the UpdatePanel Control
The UpdatePanel control eliminates full-page refreshes by isolating a section of a page for a partial-page update. In this example, we’ll use a partial-page update to display the user’s information that is submitted to the server.
To implement a partial-page update, perform the following steps:
1. Click to the left of the Submit Button and press Enter to create a new paragraph above it. Then click in the new paragraph and drag an UpdatePanel control from the AJAX Extensions tab in the Toolbox to your form.
2. Then, drag into the UpdatePanel the control(s) to update and the control that triggers the update. For this example, drag the outputLabel and the submitButton into the UpdatePanel.
3. To specify when an UpdatePanel should update, you need to define an UpdatePanel trigger. Select the UpdatePanel, then click the ellipsis button next to the control’s Triggers property in the Properties window. In the UpdatePanelTrigger Collection dialog that appears (Fig. 24.22), click Add to add an AsyncPostBackTrigger. Set the ControlID property to submitButton and the EventName property to Click. Now, when the user clicks the Submit button, the UpdatePanel intercepts the request and makes an asynchronous request to the server instead. Then the response is inserted in the outputLabel element, and the UpdatePanel reloads the label to display the new text without refreshing the entire page.

Fig. 24.22. Creating a trigger for an UpdatePanel.
Adding Ajax Functionality to ASP.NET Validation Controls Using Ajax Extenders
Several controls in the Ajax Control Toolkit are extenders—components that enhance the functionality of regular ASP.NET controls. In this example, we use ValidatorCalloutExtender controls that enhance the ASP.NET validation controls by displaying error messages in small yellow callouts next to the input fields, rather than as text in the page.
You can create a ValidatorCalloutExtender by opening any validator control’s smart-tag menu and clicking Add Extender... to display the Extender Wizard dialog (Fig. 24.23). Next, choose ValidatorCalloutExtender from the list of available extenders. The extender’s ID is chosen based on the ID of the validation control you’re extending, but you can rename it if you like. Click OK to create the extender. Do this for each of the validation controls in this example.
Changing the Display Property of the Validation Controls
The ValidatorCalloutExtenders display error messages with a nicer look-and-feel, so we no longer need the validator controls to display these messages on their own. For this reason, set each validation control’s Display property to None.
Running the Application
When you run this application, the TabContainer will display whichever tab was last displayed in the ASPX page’s Design view. Ensure that the Name tab is displayed, then select Validation.aspx in the Solution Explorer and type Ctrl + F5 to execute the application.

Fig. 24.23. Creating a control extender using the Extender Wizard.
Additional ASP.NET Information
The Ajax Control Toolkit contains many other extenders and independent controls. You can check them out at www.asp.net/ajax/ajaxcontroltoolkit/samples/. For more information on ASP.NET Ajax, check out our ASP.NET Ajax Resource Center at
www.deitel.com/aspdotnetajax
Summary
Section 24.2 Case Study: Password-Protected Books Database Application
• The ASP.NET Web Site template is a starter kit for a small multi-page website. The template uses Microsoft’s recommended practices for organizing a website and separating the website’s style (look-and-feel) from its content.
Section 24.2.1 Examining the ASP.NET Web Site Template
• The default ASP.NET Web Site contains a home page and an about page—so-called content pages. The navigation bar near the top of the page allows you to switch between these pages by clicking the link for the appropriate page.
• A master page defines common elements that are inherited by each page in a set of content pages.
• Content pages can inherit elements from master pages—this is a form of visual inheritance.
• Websites commonly provide “membership capabilities” that allow users to register and log in. The default ASP.NET Web Site is pre-configured to support registration and login capabilities.
Section 24.2.2 Test-Driving the Completed Application
• Forms authentication enables only registered users who are logged in to the website to access a password-protected page or set of pages. Such users are known as the site’s members.
• If you attempt to access a password-protected page without logging in, you’re automatically redirected to the login page.
• When you successfully log into the website you’re considered to be authenticated.
• When you’re logged in, the Log In link is replaced in the upper-right corner of each page with the message “Welcome username,” where username is replaced with your log in name, and a Log Out link. When you click Log Out, the website redirects you to the home page.
Section 24.2.3 Configuring the Website
• To create a folder in a website, right click the location of the website in the Solution Explorer, select New Folder and type the folder name.
• To restrict access to a page, it must reside in a directory other than the website’s root directory.
• The Web Site Administration Tool allows you to configure various options that determine how your application behaves.
• An access rule grants or denies access to a particular directory for a specific user or group of users.
Section 24.2.4 Modifying the Default.aspx and About.aspx Pages
• As you move the cursor over a content page, you’ll notice that sometimes the cursor displays as ![]() to indicate that you cannot edit the part of the page behind the cursor. Any part of a content page that is defined in a master page can be edited only in the master page.
to indicate that you cannot edit the part of the page behind the cursor. Any part of a content page that is defined in a master page can be edited only in the master page.
Section 24.2.5 Creating a Content Page That Only Authenticated Users Can Access
• When you create a new Web Form that should inherit from a specific master page, ensure that the CheckBox Select master page is checked. Then, in the Select a Master Page dialog, select the appropriate master page and click OK.
Section 24.2.6 Linking from the Default.aspx Page to the Books.aspx Page
• To convert text to a hyperlink, select the text then click the Convert to Hyperlink (![]() )
) Button on the toolbar at the top of Visual Web Developer to display the Hyperlink dialog. You can enter a URL here, or you can link to another page within the website.
Section 24.2.7 Modifying the Master Page (Site.master)
• A master page is like a base class in a visual inheritance hierarchy, and content pages are like derived classes. The master page contains placeholders for custom content created in each content page. The content pages visually inherit the master page’s content, then add content in the areas designated by the master page’s placeholders.
• The website’s styles are defined in the file Site.css, which is located in the site’s Styles folder.
• Select View > Other Windows > CSS Properties to display the CSS properties (at the left of the IDE) for the currently selected element. At the top of the CSS Properties window, click the Summary Button to show only the CSS properties that are currently set for the selected element.
• Some style changes must be made directly in the Site.css file because the styles are applied only at runtime.
• To add a link to the navigation bar in the master page, position the mouse over the navigation bar links then open the smart-tag menu and click Edit Menu Items. In the Menu Item Editor dialog, click the Add a root item (![]() )
) Button. Set the new item’s Text property and use the arrow Buttons to move the new item where it should appear in the navigation bar. Set the new item’s NavigateUrl property to the appropriate page.
Section 24.2.8 Customizing the Password-Protected Books.aspx Page
• The Configure Data Source wizard allows you to create LinqDataSources with only simple Select LINQ statements, so sometimes it is necessary to add a LinqDataSource object with a custom query.
• A LinqDataSource’s Selecting event occurs every time the LinqDataSource selects data from its data context, and can be used to implement custom Select queries against the data context. To do so, assign the custom LINQ query to the Result property of the event handler’s LinqDataSourceSelectEventArgs argument. The query results become the data source’s data.
• Setting a DropDownList’s AutoPostBack property to True indicates that a postback occurs each time the user selects an item in the DropDownList.
• You can configure the columns of a GridView manually by selecting Edit Columns... from the GridView Tasks smart-tag menu.
• Checking Enable Sorting in the GridView Tasks smart-tag menu changes the column headings in the GridView to hyperlinks that allow users to sort the data in the GridView using the sort expressions specified by each column.
• Checking Enable Paging in the GridView Tasks smart-tag menu causes the GridView to split across multiple pages. The user can click the numbered links at the bottom of the GridView control to display a different page of data. GridView’s PageSize property determines the number of entries per page. This technique for displaying data makes the site more readable and enables pages to load more quickly (because less data is displayed at one time).
Section 24.3 ASP.NET Ajax
• A traditional web application must make synchronous requests and must wait for a response, whereas an AJAX (Asynchronous JavaScript and XML) web applications can make asynchronous requests and do not need to wait for a response.
• The ASP.NET Ajax Control Toolkit contains many more Ajax-enabled, rich GUI controls. Click the Download Button to begin the download.
• The key control in every ASP.NET Ajax-enabled application is the ScriptManager (in the Toolbox’s AJAX Extensions tab), which manages the JavaScript client-side code (called scripts) that enable asynchronous Ajax functionality. A benefit of using ASP.NET Ajax is that you do not need to know JavaScript to be able to use these scripts.
• The ScriptManager is meant for use with the controls in the Toolbox’s AJAX Extensions tab. There can be only one ScriptManager per page.
• The Ajax Control Toolkit comes with an enhanced version of the ScriptManager called the ToolkitScriptManager, which manages all the scripts for the ASP. NET Ajax Toolkit controls. This one should be used in any ASPX page that contains controls from the ASP. NET Ajax Toolkit.
• The TabContainer control enables you to group information into tabs that are displayed only if they’re selected. To add a tab, open the TabContainer Tasks smart-tag menu and select Add Tab Panel. This adds a TabPanel object—representing a tab—to the TabContainer.
• The UpdatePanel control eliminates full-page refreshes by isolating a section of a page for a partial-page update.
• To specify when an UpdatePanel should update, you need to define an UpdatePanel trigger. Select the UpdatePanel, then click the ellipsis button next to the control’s Triggers property in the Properties window. In the UpdatePanelTrigger Collection dialog that appears, click Add to add an AsyncPostBackTrigger. Set the ControlID property to the control that triggers the update and the EventName property to the event that is generated when the user interacts with the control.
• Several controls in the Ajax Control Toolkit are extenders—components that enhance the functionality of regular ASP.NET controls.
• ValidatorCalloutExtender controls enhance the ASP.NET validation controls by displaying error messages in small yellow callouts next to the input fields, rather than as text in the page.
• You can create a ValidatorCalloutExtender by opening any validator control’s smart-tag menu and clicking Add Extender... to display the Extender Wizard dialog. Next, choose ValidatorCalloutExtender from the list of available extenders.
Self-Review Exercises
24.1 State whether each of the following is true or false. If false, explain why.
a. An access rule grants or denies access to a particular directory for a specific user or group of users.
b. When using controls from the Ajax Control Toolkit, you must include the ScriptManager control at the top of the ASPX page.
c. A master page is like a base class in a visual inheritance hierarchy, and content pages are like derived classes.
d. A GridView automatically enables sorting and paging of its contents.
e. AJAX web applications make synchronous requests and wait for responses.
24.2 Fill in the blanks in each of the following statements:
a. A(n) ________ defines common GUI elements that are inherited by each page in a set of ________.
b. The main difference between a traditional web application and an Ajax web application is that the latter supports ________ requests.
c. The ________ template is a starter kit for a small multi-page website that uses Microsoft’s recommended practices for organizing a website and separating the website’s style (look-and-feel) from its content.
d. The ________ allows you to configure various options that determine how your application behaves.
e. A LinqDataSource’s ________ event occurs every time the LinqDataSource selects data from its data context, and can be used to implement custom Select queries against the data context.
f. Setting a DropDownList’s ________ property to True indicates that a postback occurs each time the user selects an item in the DropDownList.
g. Several controls in the Ajax Control Toolkit are ________—components that enhance the functionality of regular ASP.NET controls.
Answers to Self-Review Exercises
24.1
a. True.
b. False. The ToolkitScriptManager control must be used for controls from the Ajax Control Toolkit. The ScriptManager control can be used only for the controls in the Toolbox’s AJAX Extensions tab.
c. True.
d. False. Checking Enable Sorting in the GridView Tasks smart-tag menu changes the column headings in the GridView to hyperlinks that allow users to sort the data in the GridView. Checking Enable Paging in the GridView Tasks smart-tag menu causes the GridView to split across multiple pages.
e. False. That is what traditional web applications do. AJAX web applications can make asynchronous requests and do not need to wait for responses.
a. master page, content pages.
b. asynchronous.
c. ASP.NET Web Site.
d. Web Site Administration Tool.
e. Selecting.
f. AutoPostBack.
g. extenders.
Exercises
24.3 (Guestbook Application Modification) Add Ajax functionality to the Guestbook application in Exercise 23.5. Use control extenders to display error callouts when one of the user input fields is invalid.
24.4 (Guestbook Application Modification) Modify the Guestbook application in Exercise 24.3 to use a UpdatePanel so only the GridView updates when the user submits the form. Because only the UpdatePanel will be updated, you cannot clear the user input fields in the Submit button’s Click event, so you can remove this functionality.
24.5 (Session Tracking Modification) Use the ASP.NET Web Site template that you learned about in this chapter to reimplement the session tracking example in Section 23.7.