Lesson 6. Sharing Content on Google+
In this lesson, you learn how to share content on Google+, including photos, videos, and links.
Using the Share Box
The share box displays at the top of your Google+ home page, ready for you to share interesting content with your friends and colleagues—or everyone on the Web. Using the share box, you can share text updates, links, photos, and videos.
To share a post using the share box, follow these steps:
1. Click the Home icon on the Google+ ribbon, if you aren’t already on your home page. Figure 6.1 displays the share box on your Google+ stream, which opens. Your stream enables you to share content as well as view content other people have shared. See Lesson 7, “Viewing Your Google+ Stream,” for more information.

Figure 6.1. Click the Home icon to access the share box on your Google+ stream.
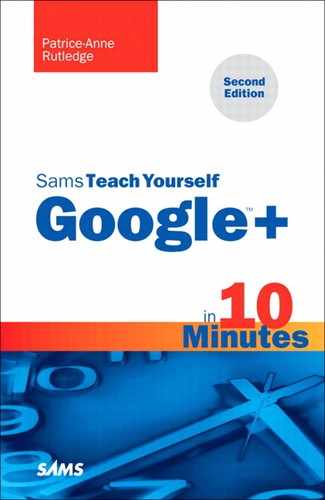
2. Click in the share box to expand it, as shown in Figure 6.2. Alternately, click the Share button that displays in the upper-right corner of any Google+ page to access the share box.
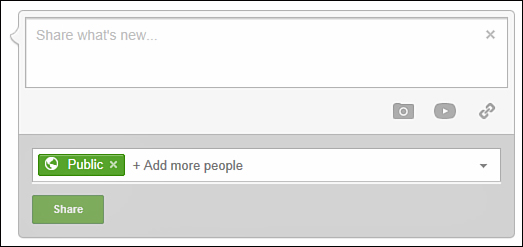
Figure 6.2. Expand the share box to display additional fields.
3. Type your post in the text box.
4. Optionally, you can add other content and apply formatting to your posts. These tasks are covered later in this lesson. For example, you can do the following:
• Format your post using bolding and italics.
• Add a link to the profile of another Google+ user you mention.
• Add a photo.
• Add a video.
• Add a link to an external website.
5. Specify who you want to share this post with. Your options include the following:
• Anyone on the Web. By default, Google+ makes your initial post public, visible to anyone on the Web. Later, Google+ uses the default settings from your most recent post. If you don’t want to share this post publicly, click the Delete icon (x) on the right side of the Public chip.
• People in specific circles. To share this post with specific circles, click the Add More People link. In the menu that opens (see Figure 6.3), select the circles you want to share with. If you want to share with all your circles, select Your Circles. If you want to share with your extended circles (friends of friends), select Extended Circles. When you’re finished selecting circles, click outside the menu to close it.
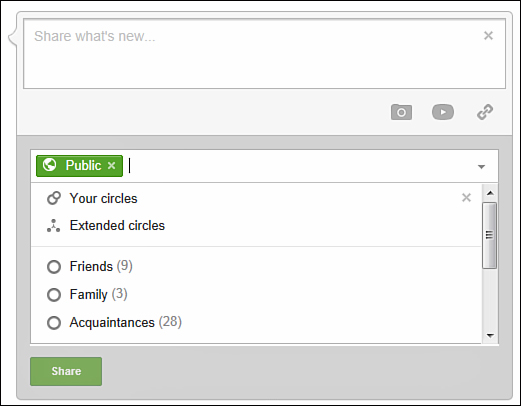
Figure 6.3. You can choose the specific circles you want to share with.
• A specific person. This is the equivalent of sending a private message on Google+. If the person you want to share with uses Google+, type the person’s name in the text box and select from the pop-up menu of potential matches (see Figure 6.4). Optionally, you can enter an email address to share with someone who doesn’t use Google+ yet.

Figure 6.4. You can share a post with just one person.
Note: Understanding Color-Coded Sharing Chips
Google+ uses color-coded chips to differentiate the groups of people you share with. The Public and Extended Circles chips are green, which signifies that you are sharing with people you don’t know. The chips corresponding to your own circles or individual people are blue, which signifies that you are sharing with people you know.
6. If you want to send a notification and email message about this post to the people in a circle, hover the mouse above that circle and select the Notify About This Post check box. In general, you should send notifications and emails only for very urgent or important posts.
7. If any of the people in your selected circles aren’t on Google+ yet, click the following link to send them your post by email instead: Also Email [Number of] People Not Yet Using Google+. For example, if two people you added to circles haven’t signed up for Google+ yet, this link says “2 People.” Again, use caution when emailing people and send emails only for very important content.
Note: Who Will Receive an Email?
To view a list of the people who will receive this email, click the [Number of] People link. A pop-up box displays the people in your circles who aren’t on Google+ yet.
8. Optionally, click the down arrow in the lower-right corner of the share box and choose one or both of the following options:
• Disable Comments. Prevent others from commenting on your post. This is most useful if your posts receive comment spam. Users will still be able to reshare your post and click the +1 button to support it. Click the Okay, Got It button to activate this feature. If you change your mind, click the down arrow again and select Enable Comments from the menu.
• Lock This Post. Prevent others from resharing your post or mentioning people you haven’t shared with. Click the Okay, Lock It button to activate this feature. A lock icon displays in the lower-right corner of the share box. If you change your mind, click the down arrow again and select Unlock This Post from the menu.
9. Click the Share button to share your post with the people you selected.
Figure 6.5 shows a sample post, visible on the streams of the people you shared with as well as on your public profile if you selected to make this post public.

Figure 6.5. A post shared on Google+.
After you share a post:
• You can edit its content, delete it, or prevent others from sharing or commenting on it.
• Your Google+ network can comment on, share, or +1 this post.
See Lesson 7 for more information about these tasks and features.
Formatting Your Posts
Google+ enables you to format your posts using bolding, italics, and strikethroughs. You can do the following:
• Bold text by surrounding it with asterisks.
• Italicize text by surrounding it with underscores.
• Strike through text by surrounding it with hyphens.
Figure 6.6 shows an example of formatting text in the share box.
Figure 6.6. Use these characters to apply text formatting to your posts.
Figure 6.7 shows an example of the results of this formatting.
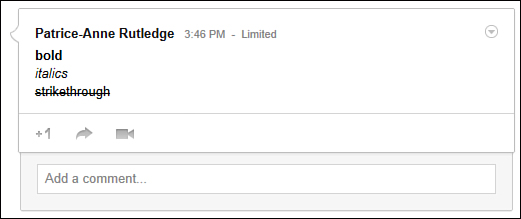
Figure 6.7. Formatting in a live post.
Mentioning Other People in Your Posts
When you mention another Google+ user in a post, you can link to that person’s Google+ profile. Mentioning a person is most useful when you want to give someone public credit or thanks within the Google+ community. Google+ also notifies this person of the mention.
To mention someone in a post, enter the plus sign (+) or at sign (@) in the share box, start typing someone’s name, and select the person you want to mention, as shown in Figure 6.8.
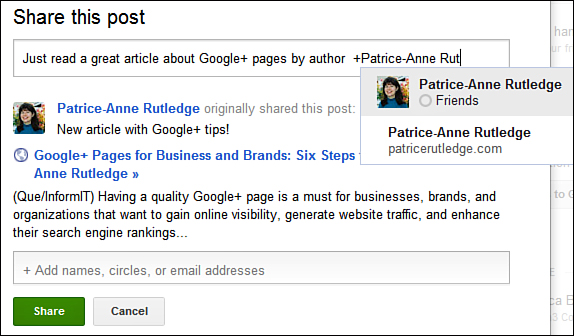
Figure 6.8. Select the person you want to mention from the list of Google+ users.
Figure 6.9 shows a sample mention in a published post. You can pause your mouse over a mention to view a pop-up box with more information or click the mentioned name to view this person’s Google+ profile.
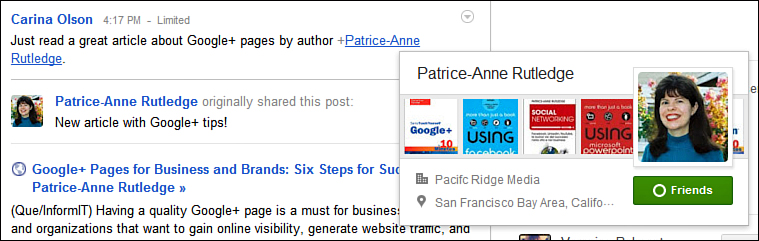
Figure 6.9. Pause your mouse over a mention to view a pop-up box.
Sharing Photos
You can easily share photos on your Google+ posts. For example, you could share vacation photos only with your Friends and Family circles or photos of your company’s products on a public post. Google+ offers unlimited photo uploads. If your photos are larger than 2,048 by 2,048 pixels, however, Google+ resizes them during the upload process.
See Lesson 10, “Working with Photos,” for more information about the many ways you can use photos in Google+.
To share a photo on Google+, follow these steps:
1. Click the Home icon on the Google+ ribbon if you aren’t already on your home page (refer to Figure 6.1).
2. Click in the share box to expand it (refer to Figure 6.2). Alternately, click the Share button that displays in the upper-right corner of any Google+ page to access the share box.
3. Type your post in the text box. For example, you can introduce or comment on the photo you’re sharing.
4. Click the Add Photos button in the lower-right corner of the share box. A pop-up menu opens, offering three ways to add photos (see Figure 6.10).
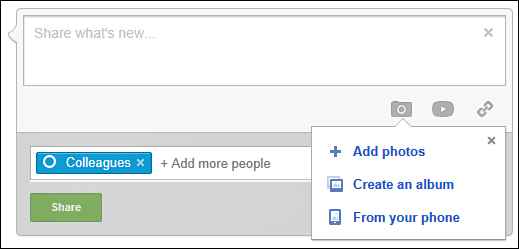
Figure 6.10. Add photos to enliven your posts.
5. Attach your photo to the post by selecting one of the following menu options:
• Add Photos. Search for and upload photos from your computer. After adding photos (see Figure 6.11), you can click the
• Edit Photos link to add captions, rotate your photos, or open Picnick to access advanced photo editing features.
• Tag People link to add tags to photos that include people.
• Add Text link to overlay text on your photos.
• Add More link to upload additional photos.
• Remove All link to remove all formatting.
• Remove button (x) to delete the photos you added.
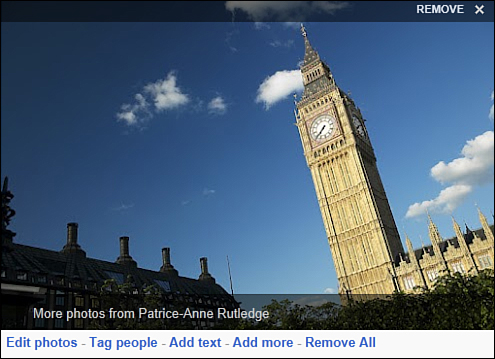
Figure 6.11. You can edit your photo or add more photos to your post.
• Create an Album. Create and upload a photo album by selecting multiple photos from your computer. See Lesson 10 for more information about photo albums.
• From Your Phone. Upload photos from your phone. You must have an iPhone or Android smartphone and download the Google+ app to use this feature. Google+ uploads the photos you take from your phone and places them on the Photos from Your Phone tab on the Photos page. These photos remain private until you choose to share them. See Lesson 10 for more information about uploading photos from your phone.
6. Select the people or circles you want to share this post with or, optionally, make this post public. For a reminder of how to do this, refer to steps 5 through 7 in the section “Using the Share Box” earlier in this lesson.
7. Click the Share button to share your post with the people you selected.
Figure 6.12 shows a sample post with a photo.
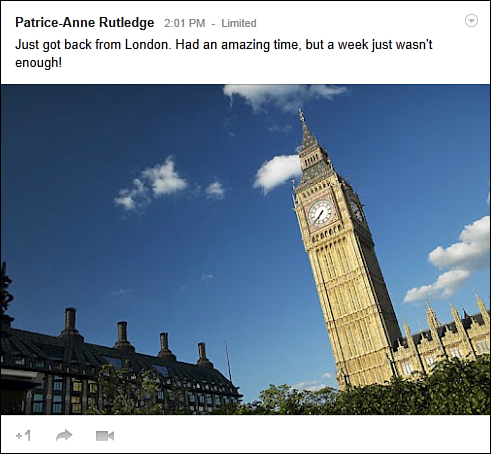
Figure 6.12. A shared post that appears on your stream.
After posting your photo, you can click it to use the lightbox view, where you can edit it, add a caption, add tags, and more. See Lesson 10 for more information about working with photos.
Sharing Videos
Sharing videos is another way to enliven your posts. Google+ gives you three ways to share your videos. You can upload from your phone, share from YouTube, or upload from your Android 2.1+ smartphone. Google+ lets you upload an unlimited number of videos of up to 15 minutes each.
To share a video on Google+, follow these steps:
1. Click the Home icon on the Google+ ribbon if you aren’t already on your home page (refer to Figure 6.1).
2. Click in the share box to expand it (refer to Figure 6.2). Alternately, click the Share button that displays in the upper-right corner of any Google+ page to access the share box.
3. Type your post in the text box. For example, you can introduce or comment on the video you’re sharing.
4. Click the Add Video button in the lower-right corner of the share box. A pop-up menu opens, offering four ways to add videos (see Figure 6.13).
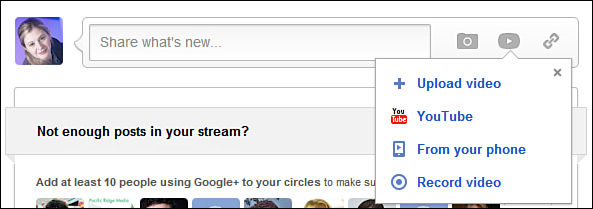
Figure 6.13. Google+ gives you four ways to add videos.
5. Attach your video to the post by selecting one of the following menu options:
• Upload Video. Open the Upload Videos dialog box from which you can upload videos from your computer. Select the videos you want to upload and click the Add Videos button.
• YouTube. Search for YouTube videos by keyword, enter the URL of a specific YouTube video, or select from YouTube videos you’ve shared in the past. Figure 6.14 shows the Choose a YouTube Video dialog box from which you select your video.

Figure 6.14. Embed a YouTube video on a Google+ post.
• From Your Phone. Upload videos from your phone. You must have an iPhone or Android smartphone and download the Google+ app to use this feature.
• Record Video. Record a video from your webcam.
6. Select the people or circles you want to share this post with or, optionally, make this post public. For a reminder of how to do this, refer to steps 5 through 7 in the section “Using the Share Box” earlier in this lesson.
7. Click the Share button to share your post with the people you selected. Users can click the Play button in any embedded video to play it directly on Google+.
Sharing Links
Google+ makes it easy to share links to external websites in your posts. For example, you might want to share your latest blog post or an interesting article you read on the Web.
To share a link on Google+, follow these steps:
1. Click the Home icon the Google+ ribbon if you aren’t already on your home page.
2. Click in the share box to expand it (refer to Figure 6.2). Alternately, click the Share button that displays in the upper-right corner of any Google+ page to access the share box.
3. Type your post in the text box. For example, you can introduce or comment on the link you’re sharing.
4. Click the Add Link button in the lower-right corner of the share box, as shown in Figure 6.15. The share box expands to display new fields.
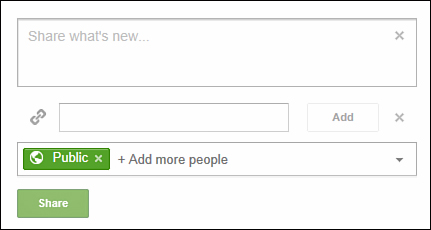
Figure 6.15. Link to an interesting website or blog post.
5. Enter the complete URL of the website page you want to link to, such as www.patricerutledge.com. Optionally, you can copy and paste a longer URL.
6. Click the Add button. The share box displays the link name, its description, and an image (if available), as shown in Figure 6.16.
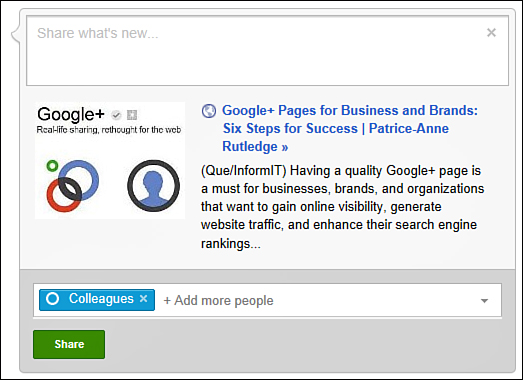
Figure 6.16. Preview your link before posting.
Note: Where Does Google+ Get the Link Data?
Google+ retrieves the link name, description, and image from the metadata and content on the site you’re linking to. Optionally, you can delete the default description by clicking the Remove Description link or delete the default image by clicking the Delete button (small x) in the upper-right corner of the image.
7. Select the people or circles you want to share this post with or, optionally, make this post public. For a reminder of how to do this, refer to steps 5 through 7 in the section “Using the Share Box” earlier in this lesson.
8. Click the Share button to share your post with the people you selected.
Figure 6.17 shows a sample posted link, visible on the streams of the people you shared with as well as on your public profile if you selected to make this post public.
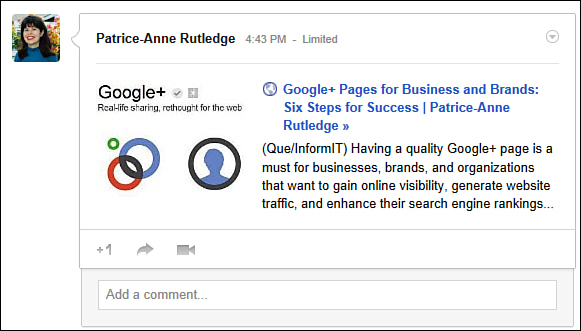
Figure 6.17. Click a link to visit the shared site.
Summary
In this lesson, you learned how to post content on Google+. Next, you learn how to view and manage your Google+ stream.