
Hour 21. Making Games with PyGame
What You’ll Learn in This Hour:
![]() What PyGame gives us
What PyGame gives us
![]() How to install PyGame
How to install PyGame
![]() How to create screens in PyGame
How to create screens in PyGame
![]() How to create shapes
How to create shapes
![]() How to move objects on the screen
How to move objects on the screen
![]() How to get input from the user
How to get input from the user
![]() When to use PyGame in the real world
When to use PyGame in the real world
So far, you’ve learned about how to make applications that run through a terminal window, and about applications that run through a browser. What about an application that looks more like a desktop application? What about a game, for example? In this hour, you’re going to learn about a library called PyGame, which makes creating desktop games easy.
What Is PyGame?
PyGame is an open source library that does the heavy lifting of making desktop applications for us. Dealing with screen resolutions, video, object collision, hardware, and even rendering images is no small task, so we want a library to do all that for us.
PyGame works on every system that supports Python, and has even been adapted for use on Android. PyGame has an enormous amount of functionality, but we’ll only be using a small subset of that functionality in this hour. After all, this is just supposed to be a taste of what you can do with this library. At the end of this hour, though, I list some resources where you can learn more about PyGame.
Installing PyGame
Happily, unlike SQLite and Flask, PyGame does come with installers for Mac and Windows.
Windows
Go to PyGame’s downloads page (http://www.pygame.org/download.shtml) and locate the section for Windows downloads. Look for a file that ends with py2.7.msi. For example, at the time of this writing, the file you would want to download is pygame-1.9.1.win32-py2.7.msi.
Why all the files? There is different installer for each version of Python, going all the way back to Python 2.4. Also, watch out for a file with a version number that has an a in it. This means that the code is in alpha, and may have sections that are considered experimental. The filename should be in the format of pygame-1.X.X.win32-py2.7.msi.
Once you’ve downloaded the installer, click it to begin installation. The wizard should guide you through all of the necessary steps.
Before moving on, you’ll need to make sure that PyGame was installed. Open up your shell and type the following:
>>> import pygame
>>> pygame.ver
1.9.2pre
The actual numbers printed out don’t matter. What does matter is that you don’t get any errors. As long as you don’t get any errors, you’re ready to move on.
Mac
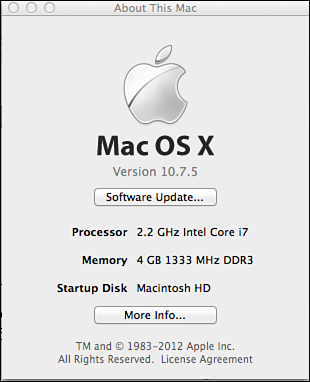
Go to PyGame’s downloads page (http://www.pygame.org/download.shtml) and locate the section for Mac downloads. Each version of OS X has a different installer. You’ll need to figure out what version you have on your Mac before continuing. To find your version number, bring up the About This Mac under the Apple () menu. Your version number should appear immediately under the text “Mac OS X,” as shown in Figure 21.1.
Look for a version that ends with your version plus mpkg.zip. For example, I’m currently on OS X 10.7, so I want pygame-1.9.2pre-py2.7-macosx210.7.mpkg.zip. Click the downloaded Zip file to expand it. This will create a file that starts with pygame and ends with mpkg. Click that file to start the install wizard.
Before moving on, you’ll need to make sure that PyGame was installed. Open up your shell and type the following:
>>> import pygame
>>> pygame.ver
1.9.2pre
The actual numbers printed out don’t matter. What does matter is that you don’t get any errors. As long as you don’t get any errors, you’re ready to move on.
Creating Screens
Now that we have PyGame installed correctly, let’s start playing with some of its capabilities. Let’s begin by creating a new screen.
Create a new file, called one.py, and enter the following text and run it:
import pygame
pygame.init()
screen = pygame.display.set_mode((400,400))
A window will briefly pop up and then close (if your computer is fast, it’s possible you’ll miss it). Let’s go over what this script is doing, line by line, starting with our import statement:
import pygame
Naturally, in order to use PyGame, we have to import all the modules it needs to run. Generally, it’s considered a good idea to import all of PyGame, rather than just a few modules.
In order to use PyGame, we have to initialize it. The following initializes all the imported modules. Without doing this, PyGame isn’t going to work.
pygame.init()
Finally, we create our window:
screen = pygame.display.set_mode((400,400))
This is the code that creates the window that quickly blinked in and out. set_mode() accepts, among other things, a tuple that tells PyGame how big the screen should be. In this case, we want a perfectly square window that is 400 pixels wide by 400 pixels tall.
Now, why did our window open and then close? It closed because our script was done running, so everything that PyGame and Python had created was destroyed. If we want our window to stay open, we need to add a main program loop.
Main Program Loop
Adding a main program loop is easy. After all, we’ve been doing it for most of this book. We just have to enclose the main program in a while loop. With this code, our window will stay open:
import pygame
from pygame.locals import *
def main():
pygame.init()
screen = pygame.display.set_mode((400,300))
while True:
pass
if __name__ == '__main__':
main()
There’s one problem, though. We can’t seem to close the window. If you click the close button, the window stays open. How do we get out of the loop? For this, we’re going to have to tell PyGame what event should allow it to close.
Note: Closing the Window
If you want to close the PyGame window, press Control+C in your terminal window (if you ran the program from your command line) or in the shell (if you ran it through IDLE).
Using User Input (Events)
While PyGame is running and in focus, it’s constantly keeping track of what the player is doing. Where is the mouse? What did the player type? Where did he click? How many times did he click? We do all this with events.
To best use events, we need to import some global variables from PyGame to our script. We need to add the following to our import statements:
from pygame.locals import *
This creates a number of variables that are useful when parsing input from the user. Every key and button on your keyboard and mouse, as well as every button on a window, has an integer associated with it. For example, the “close” button on a window is mapped to the number 12. It’s much simpler, though, to refer to a variable called QUIT than it is to check for '12'.
Now, we have to check for the user trying to click the close button. First, let’s update our imports, so we have the sys library at our disposal:
import pygame, sys
Now, let’s update our main loop:
while True:
for event in pygame.event.get():
if event.type == QUIT:
sys.exit()
Now, when we run our script, if we click the close button, the window closes.
Creating Shapes
Now that we have a screen that will stay open until we close it, let’s add some content. PyGame is capable of drawing a number of shapes. Let’s start with a circle. First, though, we should talk about colors.
Adding Colors
Colors are defined as tuples of three integers. Each number represents how much red, green, and blue is in a shade, and the values can go from zero up to 255. Zero means you should have none of that color, and 255 means you should have as much of that color as your screen can manage.
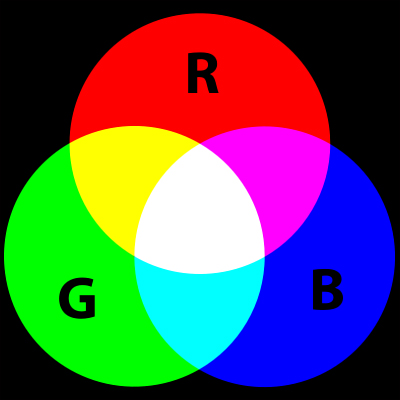
Why red, green, and blue? Why not red, yellow, and blue? Aren’t those the primary colors? They are... in a print medium. Screens, however, work with light, and colors work a bit differently. For example, take a pure green light, a pure red light, and a pure blue light on a wall. They result is a white spot of light. Do that with paint, and you’ll end up with a purplish brown blotch. Figure 21.2 shows how light combines to make new colors.
So, if you want a tuple for white, you’d want to save (255, 255, 255) to a variable (hopefully called white). If you want black, you’d save (0, 0, 0) to a variable. Although you could certainly work with raw tuples as you continue, it won’t be long before you start to get your colors confused.
Let’s go ahead and define red in one.py:
RED = (255, 0, 0)
The first number is 255, because we want all of the red. The other two are zero, because we don’t want any green or blue.
Drawing a Circle
Now that we have our color, let’s draw our circle. Before our main loop, we add the next two lines:
pygame.draw.circle(screen, RED, (20,20), 10)
pygame.display.update()
The first tells PyGame that we want to draw a circle. In order to draw a circle, PyGame needs to know a few things:
![]() On which screen do we want to draw our circle. (In this case, we want PyGame to draw the circle on the screen display.)
On which screen do we want to draw our circle. (In this case, we want PyGame to draw the circle on the screen display.)
![]() What color we want our circle to be.
What color we want our circle to be.
![]() Where its center should be. (This should be a tuple with two values—one for how far right from the far-left side of the display, and one for how far from the top of the display.)
Where its center should be. (This should be a tuple with two values—one for how far right from the far-left side of the display, and one for how far from the top of the display.)
![]() How many pixels long the radius should be. (The radius is the distance from the center to the edge of the circle.)
How many pixels long the radius should be. (The radius is the distance from the center to the edge of the circle.)
The next line tells PyGame that we want to update the display, so our circle will be shown.
Our final code looks something like this:
import pygame, sys
from pygame.locals import *
RED = (255, 0, 0)
def main():
pygame.init()
screen = pygame.display.set_mode((400,300))
pygame.draw.circle(screen, RED, (20,20), 10)
pygame.display.update()
red = 0
while True:
for event in pygame.event.get():
if event.type == QUIT:
sys.exit()
if __name__ == '__main__':
main()
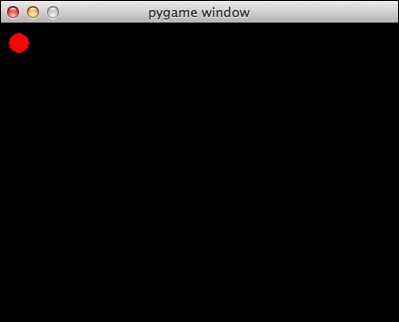
Now, when we run our program, we should see the screen shown in Figure 21.3.
Moving Things Around on the Screen
Just drawing one shape isn’t very interesting. Let’s have our shape move around. This should be easy, right? Just add one to the shape’s position and then update the screen. Let’s try that. We update our code so that the circle will move to the right as the program remains open:
import pygame, sys
from pygame.locals import *
RED = (255, 0, 0)
def main():
pygame.init()
screen = pygame.display.set_mode((400,300))
x = 20
y = 20
pygame.draw.circle(screen, RED, (x, y), 10)
pygame.display.update()
while True:
for event in pygame.event.get():
if event.type == QUIT:
sys.exit()
x += 1
pygame.draw.circle(screen, RED, (x, y), 10)
pygame.display.update()
if __name__ == '__main__':
main()
We run the program... but what we get isn’t quite what we expected. Instead of a moving circle, we get a thick, growing line (see Figure 21.4).
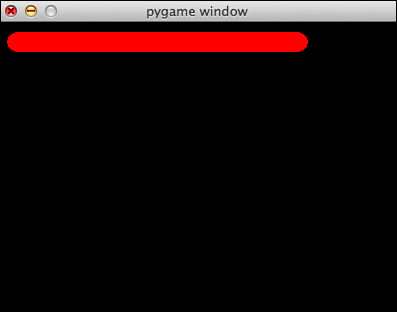
What’s going on here? The answer lies in how the screen is rendered. The screen isn’t completely redrawn every time we tell it to add a new object. It just paints the new object on the screen as it currently is. So, that isn’t a line up there. That’s 30 or 40 circles, each one placed a little further to the right.
What we need to do is draw the background, too. Let’s fill in the background using the fill() function:
screen.fill(BLACK)
This fills the entire screen with black, which gives us a blank slate to draw our circle on. Run the file. The result this time? A circle that moves!
Just in case you need it, here is the full source of our script:
import pygame, sys
from pygame.locals import *
RED = (255, 0, 0)
BLACK = (0,0,0)
def main():
pygame.init()
screen = pygame.display.set_mode((400,300))
x = 20
y = 20
screen.fill(BLACK)
pygame.draw.circle(screen, RED, (x, y), 10)
pygame.display.update()
while True:
for event in pygame.event.get():
if event.type == QUIT:
sys.exit()
x += 1
pygame.draw.rect(screen, BLACK, (0, 0, 400, 300))
pygame.draw.circle(screen, RED, (x, y), 10)
pygame.display.update()
if __name__ == '__main__':
main()
Getting Input from the User
So far the only input we’ve gotten from the user is when she wants to quit the game. That isn’t going to make a very good game. Let’s get some keyboard input from the user, so she can move the circle around on her own. For this, we’re going to have to remove our automatic moving and add in some new code so that when the user uses the arrow keys, we add or subtract numbers from the circle’s position.
Before, we only cared if the event type was equal to QUIT. Now, though, we need to capture exactly what key was pressed. For this, we need to look at the event’s key attribute. Every key on your keyboard has an integer assigned to it, but just like QUIT, importing pygame.globals makes them much easier to read.
First, we need to check to see if the event type is the user pressing the down key. Then, we need to check to see if the user pressed any of the arrow keys. The following is added to our code:
if event.type == KEYDOWN:
if event.key == K_LEFT:
x -= 1
elif event.key == K_RIGHT:
x += 1
elif event.key == K_UP:
y -= 1
elif event.key == K_DOWN:
y += 1
If the user wants to move left or right, we change x. If the user wants to move up or down, we change y.
Here is the complete script:
import pygame, sys
from pygame.locals import *
RED = (255, 0, 0)
BLACK = (0,0,0)
def main():
pygame.init()
screen = pygame.display.set_mode((400,300))
x = 20
y = 20
pygame.draw.rect(screen, BLACK, (0, 0, 400, 300))
pygame.draw.circle(screen, RED, (x, y), 10)
pygame.display.update()
while True:
for event in pygame.event.get():
if event.type == QUIT:
sys.exit()
if event.type == KEYDOWN:
if event.key == K_LEFT:
x -= 1
elif event.key == K_RIGHT:
x += 1
elif event.key == K_UP:
y -= 1
elif event.key == K_DOWN:
y += 1
pygame.draw.rect(screen, BLACK, (0, 0, 400, 300))
pygame.draw.circle(screen, RED, (x, y), 10)
pygame.display.update()
if __name__ == '__main__':
main()
Drawing Text
Even though games are usually pretty graphics heavy, eventually you’ll want to put some text on the screen. This is a three-step process: Create a font, create some text, and then put the text on a screen.
First, you have to declare what font you’ll be using. You can use multiple fonts, but each must be saved to its own variable. You can also, technically, use any font on your system. It’s safest, though, to pick a font that almost everyone has, such as “monospace.”
To get a list of all the fonts on your system, open up your shell and type the following:
import pygame
pygame.font.get_fonts()
A list of all available fonts will print out.
You create a font for your game using this format:
font = pygame.font.SysFont("monospace", 30)
The string is the name of the font, and the integer is the font size. Now, we have to create some text using the render() function. This function takes a string and a color tuple.
label = font.render("Hello, world!", (0 , 255, 0))
Now that we have some text to render, we can add it to our screen. To do this, we tell our screen to add something called a “blit” to itself. This draws another object on top of what has already been drawn.
screen.blit(label, (100, 100))
Let’s play with the fonts that are on your system. We’re going to draw the name of the font, in that font, every time the user presses Enter.
import pygame, sys
from pygame.locals import *
def main():
pygame.init()
screen = pygame.display.set_mode((400,300))
screen.fill((0, 0, 0))
pygame.display.update()
fonts = pygame.font.get_fonts()
font = fonts.pop()
while fonts:
try:
new_font = pygame.font.SysFont(font, 30)
except:
pass
text = new_font.render(font, 1, (255, 255, 255))
screen.fill((0, 0, 0))
screen.blit(text, (40, 40))
pygame.display.update()
for event in pygame.event.get():
if event.type == KEYDOWN:
font = fonts.pop()
if __name__ == '__main__':
main()
Note that there’s a try/escape wrapped around loading the font. Not every font can be displayed by PyGame, so it’s safest not to assume that a fancy font on your computer is going to work without some safeguards. Normally, you’d want to use an extremely common font, or at least have a safe fallback.
Note: Learning More About PyGame
To learn more about what PyGame has to offer, go back to PyGame’s official website. There, you’ll find several tutorials, as well as a collection of games to download and review.
Another resource is Instant PyGame for Python Game Development How-to, by Ivan Idris and published by Packt Publishing. This book covers everything from creating a basic game, to more advanced topics such as using 3D models and networking.
Finally, if you want to learn more about game development, Art of Game Design: A Book of Lenses by Jesse Schnell, published by CRC Press is a code-free exploration of how to plan a game, what makes games engaging, and how people react to games.
Using PyGame in the Real World
The restaurant from our example probably doesn’t have much need for games, so instead, let’s use what you’ve learned to make a hangman game. You could just make a hangman game that runs on the command line, but adding some graphics adds a bit of interest.
What do we need a hangman game to do? It needs to accept input from the user, draw letters on the screen, and draw the hangman figure. It’s a good idea to draw a quick plan for what the screen will look like before you start coding, so I’ve done that in Figure 21.5.
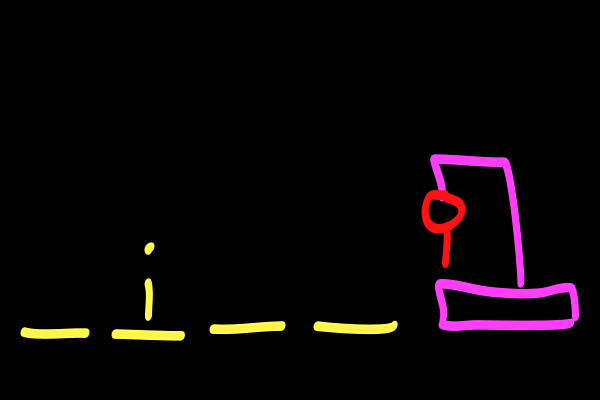
We have four things that need drawing: the gallows, the spaces, any correctly guessed letters, and the figure. Let’s go over the gallows first, because that doesn’t change at all.
def draw_gallows(screen):
pygame.draw.rect(screen, PURPLE, (450, 350, 100, 10)) # bottom
pygame.draw.rect(screen, PURPLE, (495, 250, 10, 100)) # support
pygame.draw.rect(screen, PURPLE, (450, 250, 50, 10)) # crossbar
pygame.draw.rect(screen, PURPLE, (450, 250, 10, 25)) # noose
The gallows is composed of four parts: the bottom, the support bar, the crossbar, and the noose (which I drew another rectangle for). This function will only be called once because it’s never changed.
Next, let’s go over the function that draws the blank spaces. This one changes depending on the length of the word to be guessed:
def draw_word(screen, spaces):
x = 10
for i in range(spaces):
pygame.draw.line(screen, YELLOW, (x, 350), (x+20, 350), 3)
x += 30
For every letter that needs to be guessed, a line is drawn on the screen.
If the user guesses a letter correctly, we need to draw that letter on the screen every time that letter occurs in the word. To do that, we need to iterate through each letter, checking to see if it matches our guess letter. If it does, we print the letter in that blank space.
def draw_letter(screen, font, word, guess):
x = 10
for letter in word:
if letter == guess:
letter = font.render(letter, 3, (255,255,255))
screen.blit(letter, (x, 300))
x += 30
Finally, we need to draw the figure. We’ll only be drawing the figure one part at a time, so we need to accept a body part and then draw just that part.
def draw_man(screen, body_part):
if body_part == "head":
pygame.draw.circle(screen, RED, (455, 270), 10) #head
if body_part == "body":
pygame.draw.line(screen, RED, (455, 280), (455, 320), 3) #body
if body_part == "l_arm":
pygame.draw.line(screen, RED, (455, 300), (445, 285), 3) #arm
if body_part == "r_arm":
pygame.draw.line(screen, RED, (455, 300), (465, 285), 3) #arm
if body_part == "l_leg":
pygame.draw.line(screen, RED, (455, 320), (445, 330), 3) #leg
if body_part == "r_leg":
pygame.draw.line(screen, RED, (455, 320), (465, 330), 3) #leg
Now that we can draw our gallows, our figure, our blank spaces, and our guesses, we can put together our game. We read in a list of random words, pick one, and then let the player enter guesses until the figure is completed.
import pygame
import sys
from random import choice
from pygame.locals import *
RED = (255, 0, 0)
GREEN = (0, 255, 0)
BLUE = (0, 0, 255)
YELLOW = (255, 255, 0)
ORANGE = (255, 100, 0)
PURPLE = (100, 0, 255)
def get_words():
f = open("words.txt")
temp = f.readlines()
words = []
for word in temp:
words.append(word.strip())
return words
def draw_gallows(screen):
pygame.draw.rect(screen, PURPLE, (450, 350, 100, 10)) # bottom
pygame.draw.rect(screen, PURPLE, (495, 250, 10, 100)) # support
pygame.draw.rect(screen, PURPLE, (450, 250, 50, 10)) # crossbar
pygame.draw.rect(screen, PURPLE, (450, 250, 10, 25)) # noose
def draw_man(screen, body_part):
if body_part == "head":
pygame.draw.circle(screen, RED, (455, 270), 10) #head
if body_part == "body":
pygame.draw.line(screen, RED, (455, 280), (455, 320), 3) #body
if body_part == "l_arm":
pygame.draw.line(screen, RED, (455, 300), (445, 285), 3) #arm
if body_part == "r_arm":
pygame.draw.line(screen, RED, (455, 300), (465, 285), 3) #arm
if body_part == "l_leg":
pygame.draw.line(screen, RED, (455, 320), (445, 330), 3) #leg
if body_part == "r_leg":
pygame.draw.line(screen, RED, (455, 320), (465, 330), 3) #leg
def draw_word(screen, spaces):
x = 10
for i in range(spaces):
pygame.draw.line(screen, YELLOW, (x, 350), (x+20, 350), 3)
x += 30
def draw_letter(screen, font, word, guess):
x = 10
for letter in word:
if letter == guess:
letter = font.render(letter, 3, (255,255,255))
screen.blit(letter, (x, 300))
x += 30
def main():
pygame.init()
screen = pygame.display.set_mode((600,400))
font = pygame.font.SysFont("monospace", 30)
draw_gallows(screen)
draw_man(screen, body_part="head")
words = get_words()
word = choice(words)
draw_word(screen, len(word))
pygame.display.update()
body = ['r_leg', 'l_leg', 'r_arm', 'l_arm', 'body', 'head']
while body:
for event in pygame.event.get():
if event.type == QUIT:
sys.exit()
if event.type == KEYDOWN:
if event.unicode.isalpha():
guess = event.unicode
if guess in word:
draw_letter(screen, font, word, guess)
pygame.display.update()
else:
body_part = body.pop()
draw_man(screen, body_part)
pygame.display.update()
if __name__ == '__main__':
main()
Summary
During this hour, you learned how to use PyGame to create desktop applications. You learned how to create shapes and move them on the screen. You also learned how to get input from the user and to put text on the screen.
Q&A
Q. Are there other game libraries out there for Python?
A. There are! Pyglet is gaining popularity, especially where 3D models are involved. You can learn more about Pyglet at http://pyglet.org.
Also, you should remember that you may not need a third-party library to create a game. Is your game mostly text based, like Zork or Adventure? Then you don’t need something to deal with graphics or music.
Q. How do I install my game on other people’s computers, without them having PyGame or Python installed?
A. This is called packaging and, unfortunately, isn’t the easiest thing in the world to do. Happily, some tools out there can make the process easier. PyInstaller (http://www.pyinstaller.org/) is a third-party tool that can help you create executable files for Windows and Mac OS.
Workshop
The Workshop contains quiz questions and exercises to help you solidify your understanding of the material covered. Try to answer all questions before looking at the answers that follow.
Quiz
1. What function must be called so that PyGame will work in your program?
2. What function tells PyGame to reveal what has been drawn?
3. What function is used to get all the input the user has given the program?
Answers
1. If you want PyGame to work properly, you should call pygame.init(). This initializes the libraries included with PyGame.
2. pygame.display.update() tells PyGame to update the display, so anything drawn to it will now be shown.
3. pygame.event.get() returns all the events, or input, the user has given PyGame. This includes mouse clicks, mouse movements, and key presses.
Exercise
Now that you know how colors are created in PyGame, create a display that shows all the colors available to us. It should cycle through all colors automatically. Remember that there are three numbers that create a color, so you’ll need to cycle through them all, in all combinations, to see all the colors. Also, remember to make the game easy to close by listening for user input.