4. Taking Control of Your Diagrams
In This Chapter
• How can Pages keep my large project organized?
• Why would I provide a little Background in my drawing?
• How can I use Themes to give my diagrams pizazz?
• How can I reveal my inner artist using color?
In Chapter 3, “Working with Basic Diagrams,” we discussed making great visuals by using templates. We’ll continue that discussion as we consider ways to keep your drawings organized and avoid cookie-cutter looking diagrams. Visio is one of the best pieces of software ever made in terms of instant gratification. You can make impressive and colorful diagrams in a matter of minutes.
When we say “colorful,” we do not mean throwing color at our diagram until something looks good. Themes and backgrounds can quickly jazz up a diagram, in part because the color combinations are well thought out and locked into tasteful color sets, which is a good thing for us artist-wannabes. Having said that, themes and backgrounds contain enough flexibility that you will not feel limited when it comes time to express yourself.
Working with Pages
As you begin to create awesome diagrams that grow in size, you may quickly feel thwarted by the limits of your workspace. The drawing page itself has many properties that are set by the template you used to open the drawing. Although you may often work with a single page, Visio allows you to spread a diagram over several pages, making things easier to organize and track in a single place rather than having multiple separate diagrams floating around while you try to keep track of them.
Adding Pages
Suppose you are using Visio to create the working plans for the remodel of a kitchen. You may have a drawing with the layout of the cabinets, countertops, and appliances. Instead of starting a new drawing for detailed drawings, you can add pages to the layout and use a different scale on those pages to present more detailed diagrams.
To add a page, click the plus symbol (+) to the right of your current page tab below the drawing. (See Figure 4.1.)
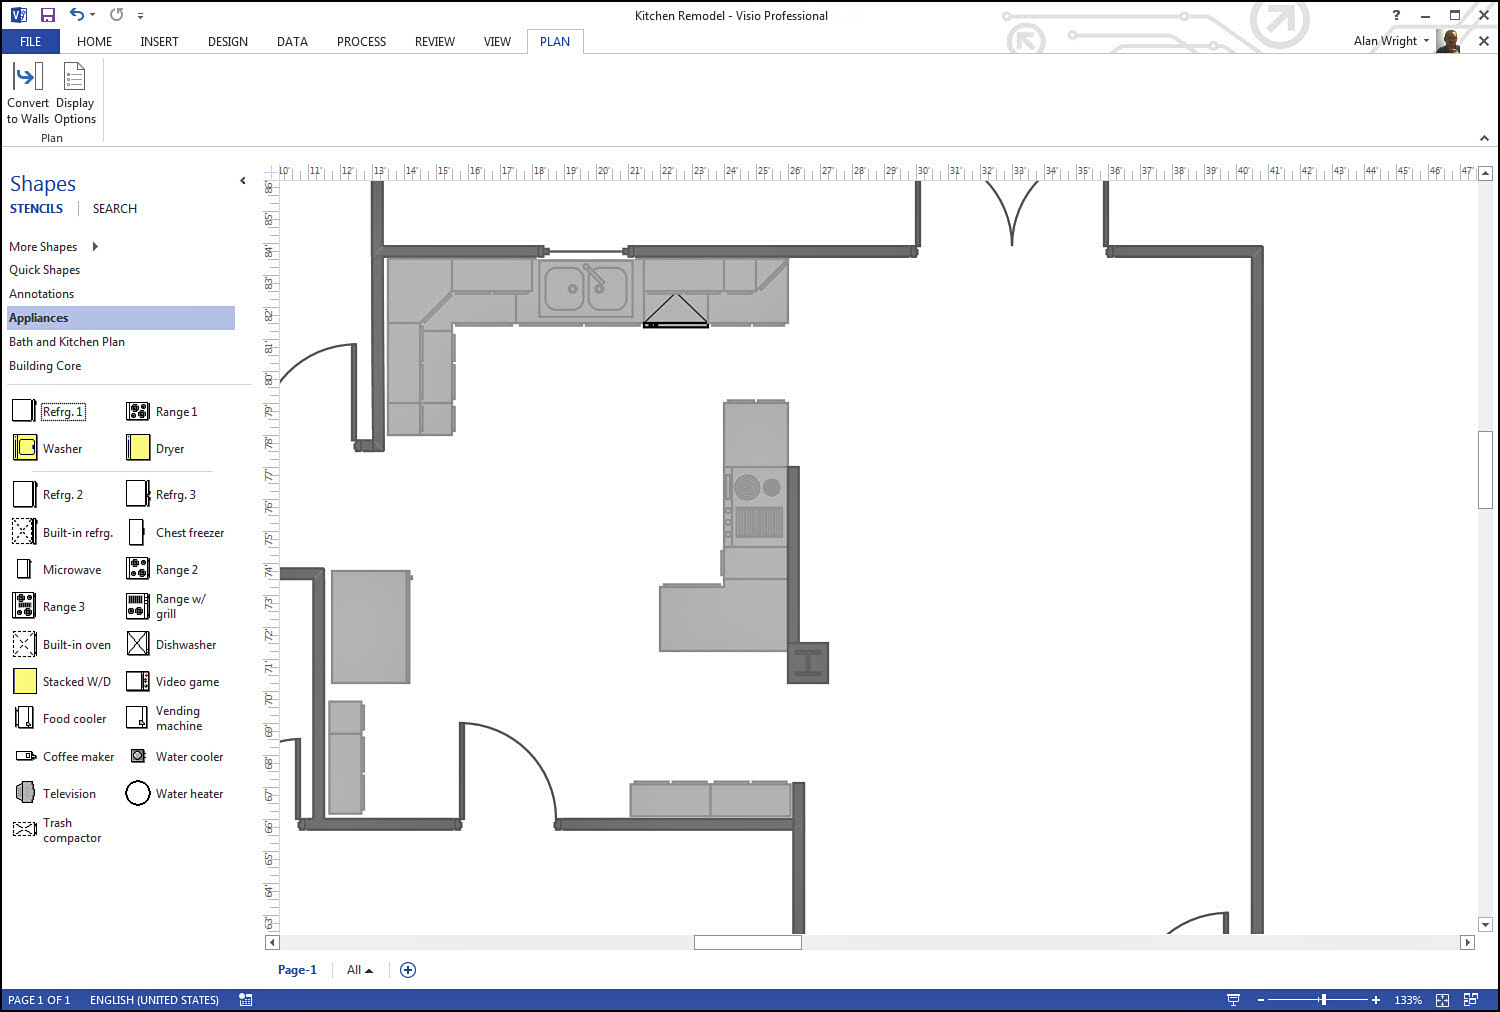
FIGURE 4.1 As your drawing gets more complex, add pages using the pages tools at the bottom of the drawing.
The new blank page has the same page properties as the previous page with the same stencils and shapes. You get the same results if you use the Insert tab, New Page, and Blank Page from the upper ribbon.
 Tip
Tip
You can easily duplicate an entire page. To do so, right-click the lower page tab and click Duplicate. A new page is created with the same content as the source page. Changes made to the duplicate page have no effect on the source page.
Inserting Pages
You can customize the page settings when you add a new page. To do this, follow these steps:
1. Right-click the Page before the point of insertion.
2. Select Insert. A Page Setup window appears.
3. Modify the properties of the new page. For now it may be enough to provide a name for this new page. Click OK to apply.
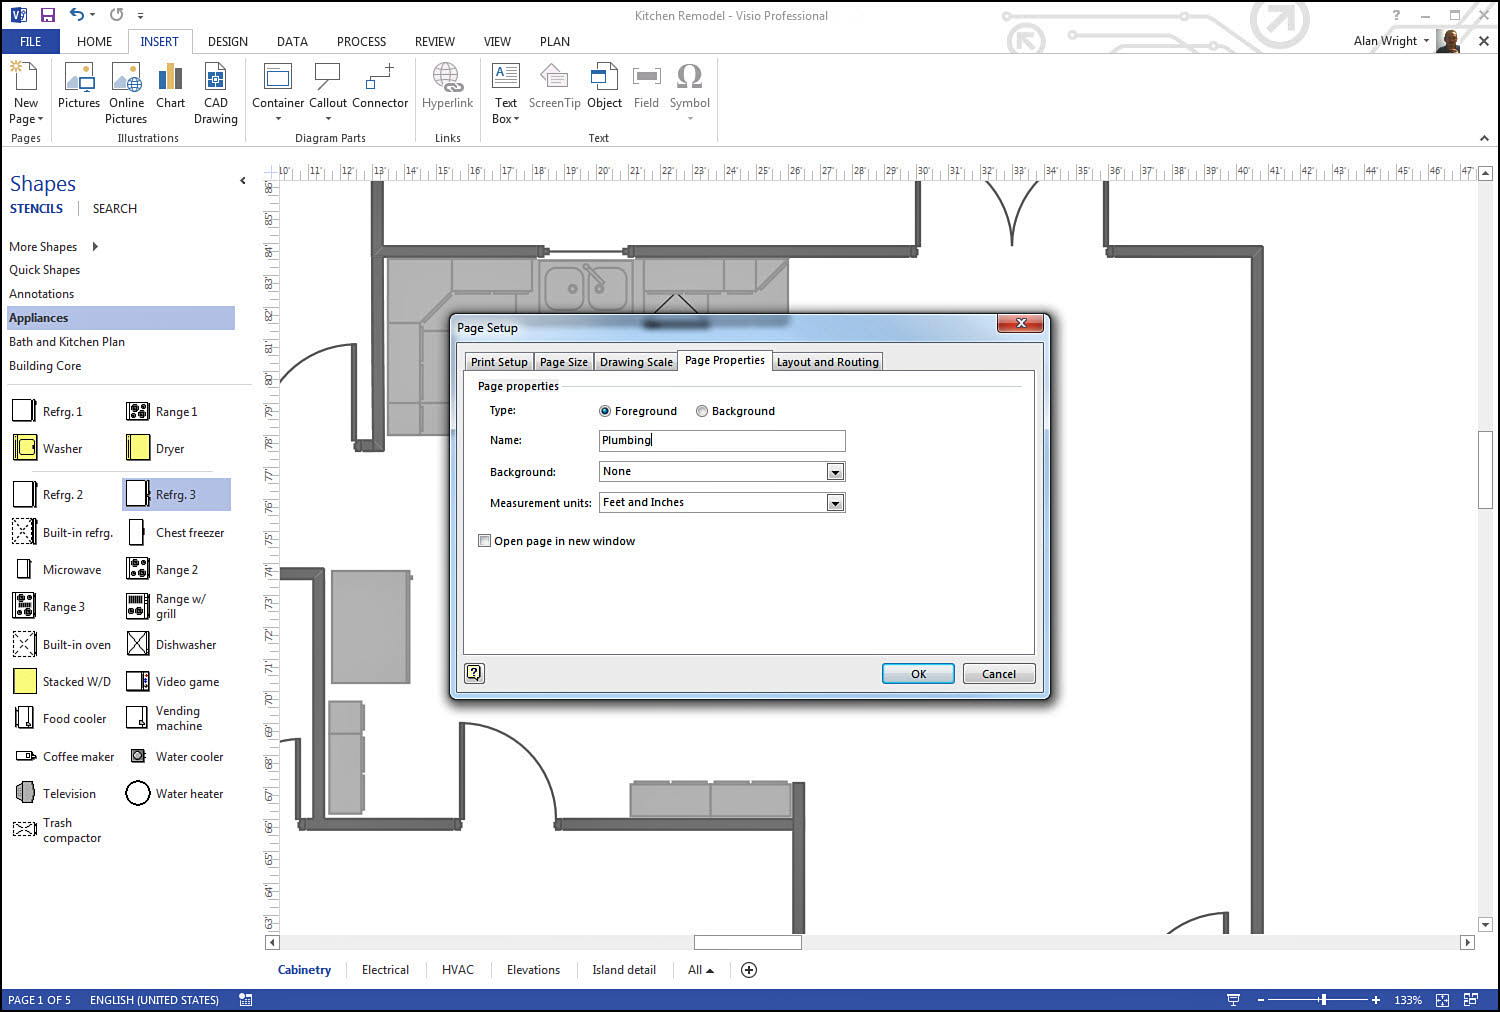
You are presented with the Page Setup dialog box (see Figure 4.2). There are 5 important tabs here:
• Print Setup provides settings specific to printing the page.
• Page Size allows you to change settings related to the drawing window. This is separate from print settings.
• Drawing Scale provides settings to establish or modify a scale for the drawing.
• Page Properties indicate whether this is a normal foreground page or a background page, the page name, and units of measurement used.
• Layout and Routing allow us to tweak basic settings used for laying out the shapes relative to one another and how connectors behave on the page.
These same adjustments can be made to an existing page if you right-click the page and select Page Setup. The different features of the Page Setup dialog box are discussed throughout this book.
Using Background Pages
You may rightly be wondering what background pages are and why you need them. They are intended to save you time by establishing common elements for a multipage drawing in one place. You can set up background graphics, reference text and borders, and then easily apply them to any or all pages in your drawing. The content of the background is protected and cannot be accidently altered as you work on the individual pages of your diagram.
Creating Background Pages
To create a background page, follow these steps:
1. Select File and New. Select the Basic Diagram template. You now have a default page named Page-1.
2. Open the Design tab; from the Backgrounds section on the ribbon, click the Backgrounds button and then select a background image.
3. Click the Borders & Titles button located next to the Background button and choose a combination.
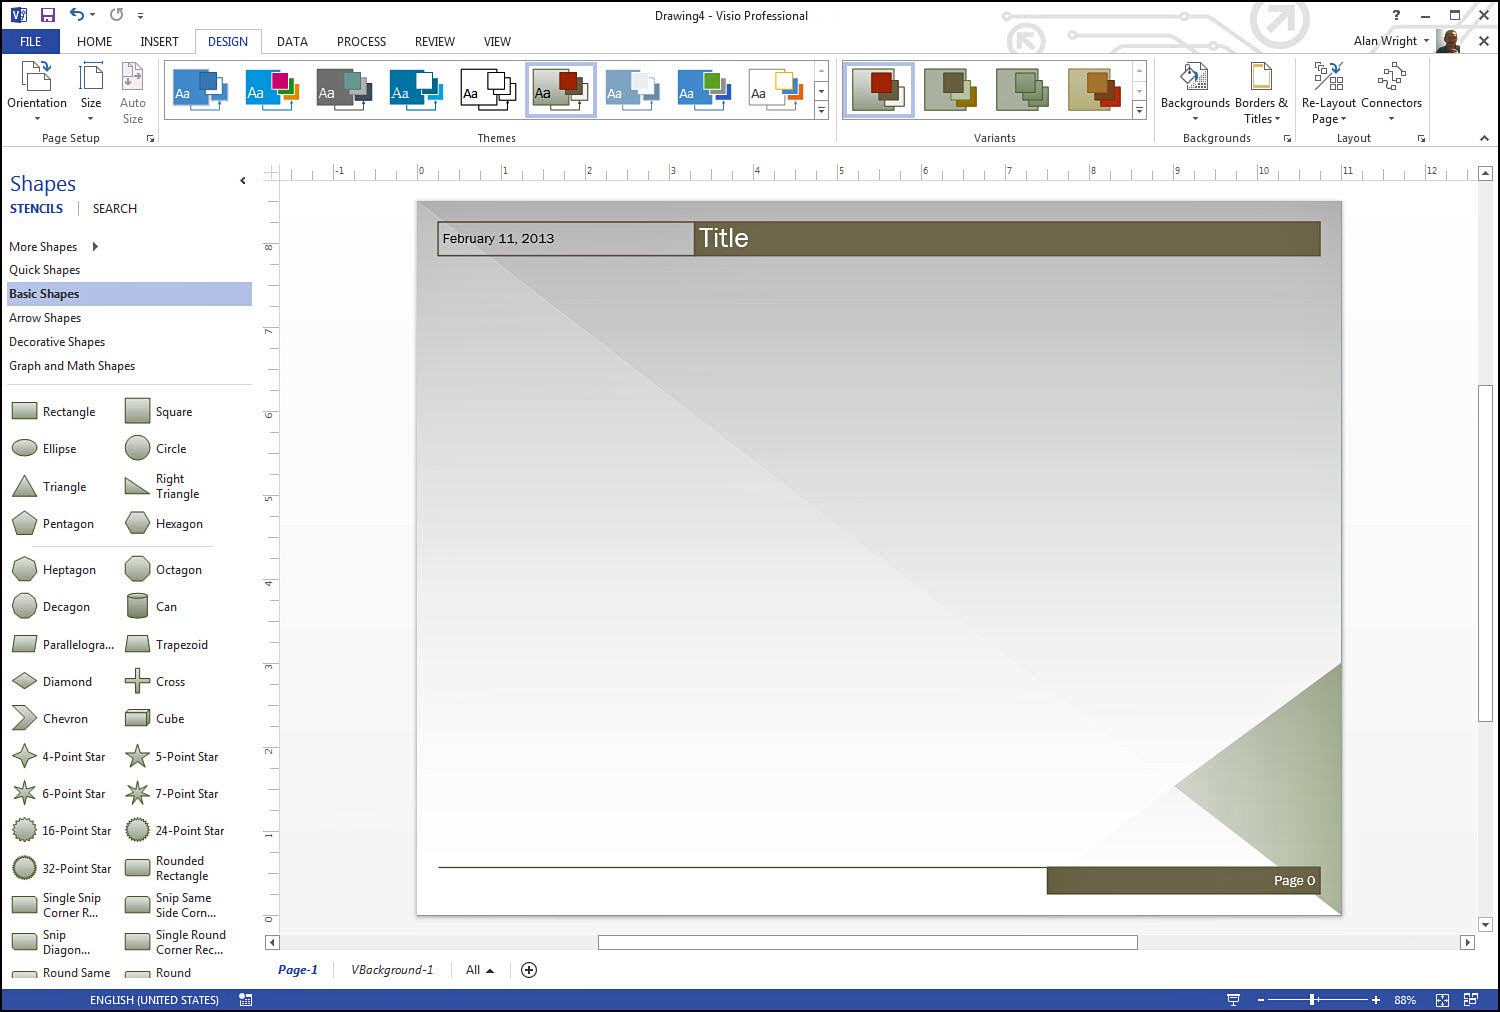
4. From the Design tab, choose a theme from the Theme gallery and apply a theme variation from the Variant gallery. Notice how this modifies both the background graphic and the border title set (see Figure 4.3).
5. Open Page-1 and drag a couple of shapes to the left side of the page. Notice that you can move and resize the shapes.
6. Compare Page-1 with VBackground-1. The shapes do not appear on the VBackground-1, only the background image and Title set.
7. While you have Page-1 open, add a new page by clicking the New Page (+) button below your work area.
8. A new page opens with the background elements but no shapes.
9. Open the VBackground-1 page, and add two shapes to the right side of the page.
10. Return to Page-2 and notice that two shapes now appear on the right. You cannot select or move them.
11. Return to Page-1; you see two shapes to the left and two to the right. Notice you can manipulate only the shapes to the left that were added to Page-1.
12. Right-click the page tab for Page-2 and then select Page Setup. Change the background to None. Click OK.
13. Notice that you now have a blank page with no background effects at all.
14. On Page-2 select the Design tab and choose a different background. Notice that a new VBackground-2 background page was created.
As you can see, background pages allow you to easily maintain a uniform look and add as much or as little to a page before you even start working on the drawing. If you decide later that the theme you chose for the background is too distracting, just modify the background page; the change applies instantly to all the pages using that background. Background pages can be removed from print jobs with a simple click.
→ To learn how to remove Background pages from print jobs, see page 217.
If the border you chose displays a page number, those numbers update automatically as pages are added and moved. The title your border displays is whatever title you create on the VBackground page. To modify the title, simply select and edit the text.
→ To learn more about the use of borders and titles in your Background pages, see page 157.
Rename Pages
As you may have noticed while adding and inserting pages, the default naming is generic and uninformative. Many Visio users rename their pages.
To change a page name, follow these steps:
1. Right-click a page tab.
2. From the right-click menu select Rename. The cuurent name will appear highlighted.
3. Type a new name in and press Enter.
You could also open the Page Setup page we looked at previously and rename the page from the Page Properties tab. The easiest way to change a page name is to double-click the name on the Page tab which selects the text. You can now type the new name. Easy peasy.
Reorganizing Pages
During the creative process you may find that pages are not where you want them to be in the final presentation. Don’t be alarmed. In Visio you can select a page tab and drag and drop to its proper location. This is the same way you move spreadsheets around in Excel, or browser tabs in your web browser. The exception would be your background pages, which are locked into place at the far right of your page tabs and are not meant to be moved.
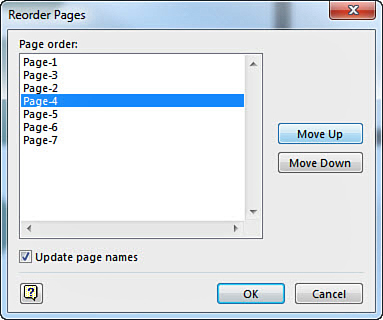
Another way to reorganize your pages is to right-click a page tab and select Reorder Pages. The window shown in Figure 4.4 will open. You can select pages and use the Move Up and Move Down buttons. As a bonus, when using the default page names, you can enable them to rename themselves by selecting the Update Page Names check box.
Customizing Pages
Visio pages may start life with a size and orientation configured into a template, but this setting can be changed to accommodate your needs.
Orientation
You likely know how page orientation works, such as portrait (tall) or landscape (wide). If you are creating a widescreen presentation, naturally you are better served with a landscape-oriented page. A drawing that has a longer vertical axis should use portrait orientation. Both settings can be modified on the Design tab (see Figure 4.5). The first section of this ribbon tab offers you Page Setup tools, and you can quickly toggle orientation here.

Set the Page Size
Also located to the far left of the Design ribbon in the Page Setup section, is the Size tool (see Figure 4.5). This drop-down enables you to quickly select the page size you want. The last entry on this list—More Page Sizes—opens the Page Setup dialog box mentioned earlier in this chapter. The Page Size tab of this dialog box allows you to select additional predefined paper sizes (see Figure 4.6) or manually set the size you want to use without being limited to a standard paper size.
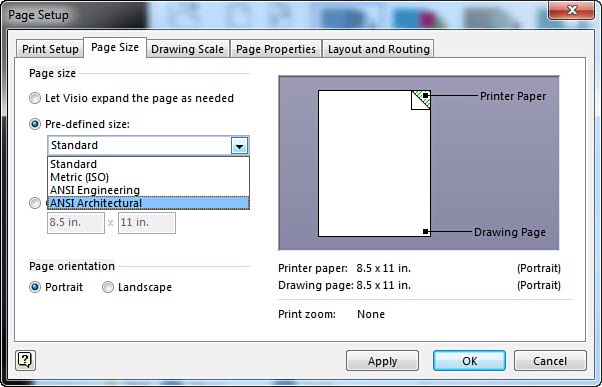
Notice in Figure 4.6 that Drawing Page and Printer Paper are also shown. These two separate settings may not always be the same. The Page Size tab allows you to configure the size of your canvas in the drawing window, whereas the Print Setup tab is limited to the paper size and orientation when printing. The Preview image on both tabs is a nice feature to confirm that the Print Setup and Page Size tabs complement each other. Chapter 11, “Printing Visio Diagrams,” discusses printing process and settings in more detail.
 Caution
When resizing a diagram that may be printed, be aware of the page breaks that indicate the paper size. If a shape or text lands on a page break, this may create quality issues when the diagram is printed and assembled. Printing and dealing with these challenges is discussed in Chapter 11.
The Auto Size Feature
Another tool on the Design tab (see Figure 4.5) is the Auto Size tool. The tool will add page space automatically to include any shapes added, which can be a nice feature since you do not need to pause work to manually increase the page size as a drawing grows. But it can be a problem if you have the habit of dropping shapes off to the side of a page to position later because the drawing page just grows to include them and shrinks when they are moved—quite distracting!
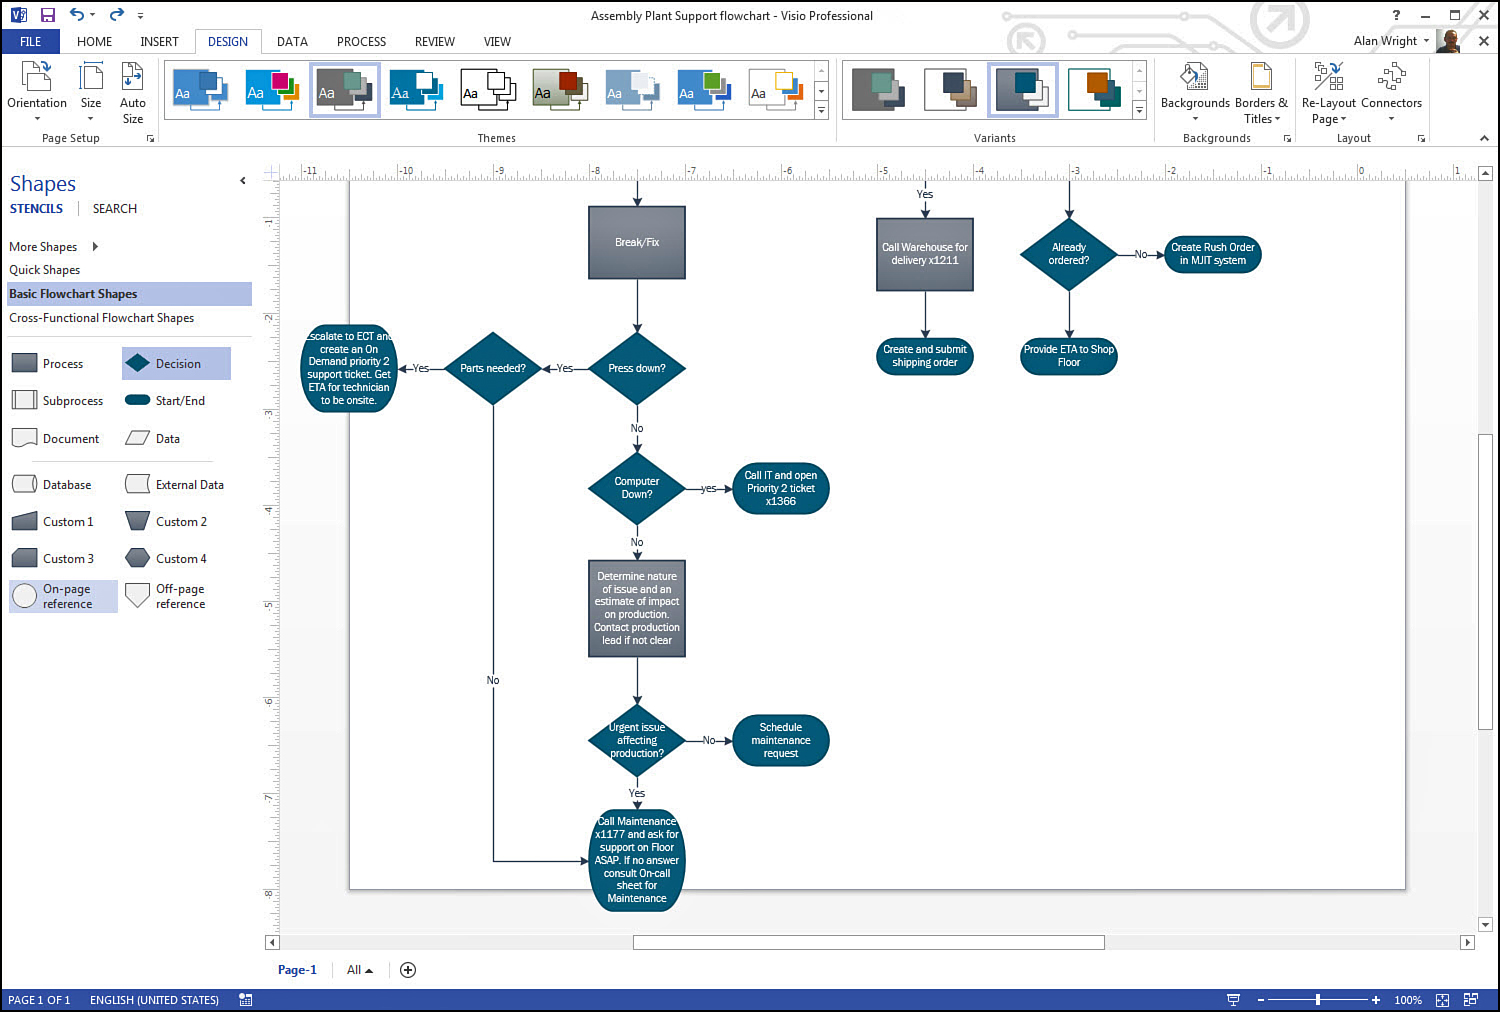
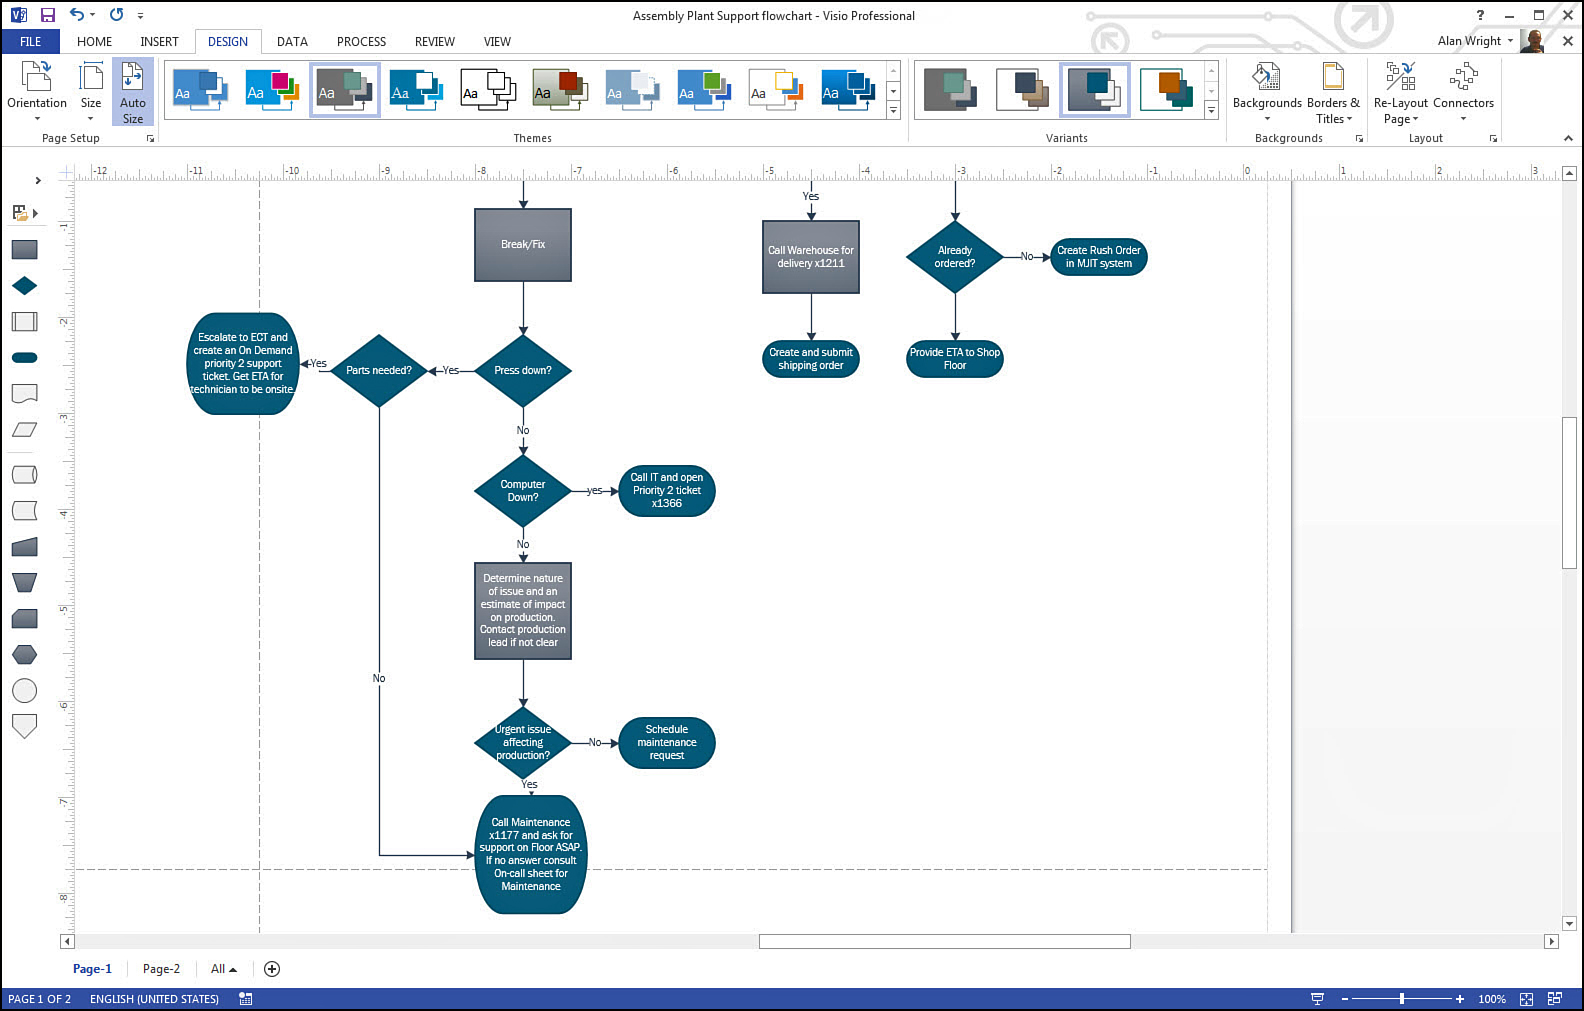
When you create a flow chart, some diagrams can easily outgrow their page as new processes are added. The flow chart in Figure 4.7 has spilled over the edges of the page. One click to Auto Size can create a bigger canvas to accommodate the sprawling flowchart, as seen in Figure 4.8.
The Auto Size button toggles this feature on or off. Rather than a one-time execution, it continues to adjust the size of your drawing page as you work until you toggle it off.
Caution
Auto Size resizes the page anytime an object is dropped into the work area. This includes shapes you meant to leave off the drawing and arrange later. If this is a technique you use when working with diagrams, you may prefer to keep Auto Size disabled and adjust your page size manually.
Some prefer to leave Auto Size disabled and change their page size on-the-fly. If the page size needs to be a bit bigger, either horizontally or vertically, bring the pointer over the edge of the page and hold the Ctrl key down on your keyboard. Your pointer should change and allow you to click and drag the page to the desired position.
Scaling Your Page
Unless you worked with Design products at some point in the past, the idea of scale may be a little foggy. Often, scale refers to the difference or ratio between the life-sized dimensions and those represented by a drawing or model. For example, a Matchbox car is 1/64 the size of a real car. That would be expressed as 1:64 scale. All parts of the model or drawing have to respect this scale to maintain accuracy; otherwise, it can quickly lose value as a representation of the real item. Scale always refers to a constant ratio that helps the viewer calculate the proper proportions.
You don’t need to worry about calculating the correct scale for your drawing because Visio takes care of this for you. Notice the Drawing Scale tab and settings in Figure 4.9. It tells you that every half inch on this page is equal to 12 inches using U.S. measurements. You also can see that the 11×8.5 piece of paper represents 22×17 feet. The furniture on the drawing was rendered to this scale automatically when it was dropped onto the page.
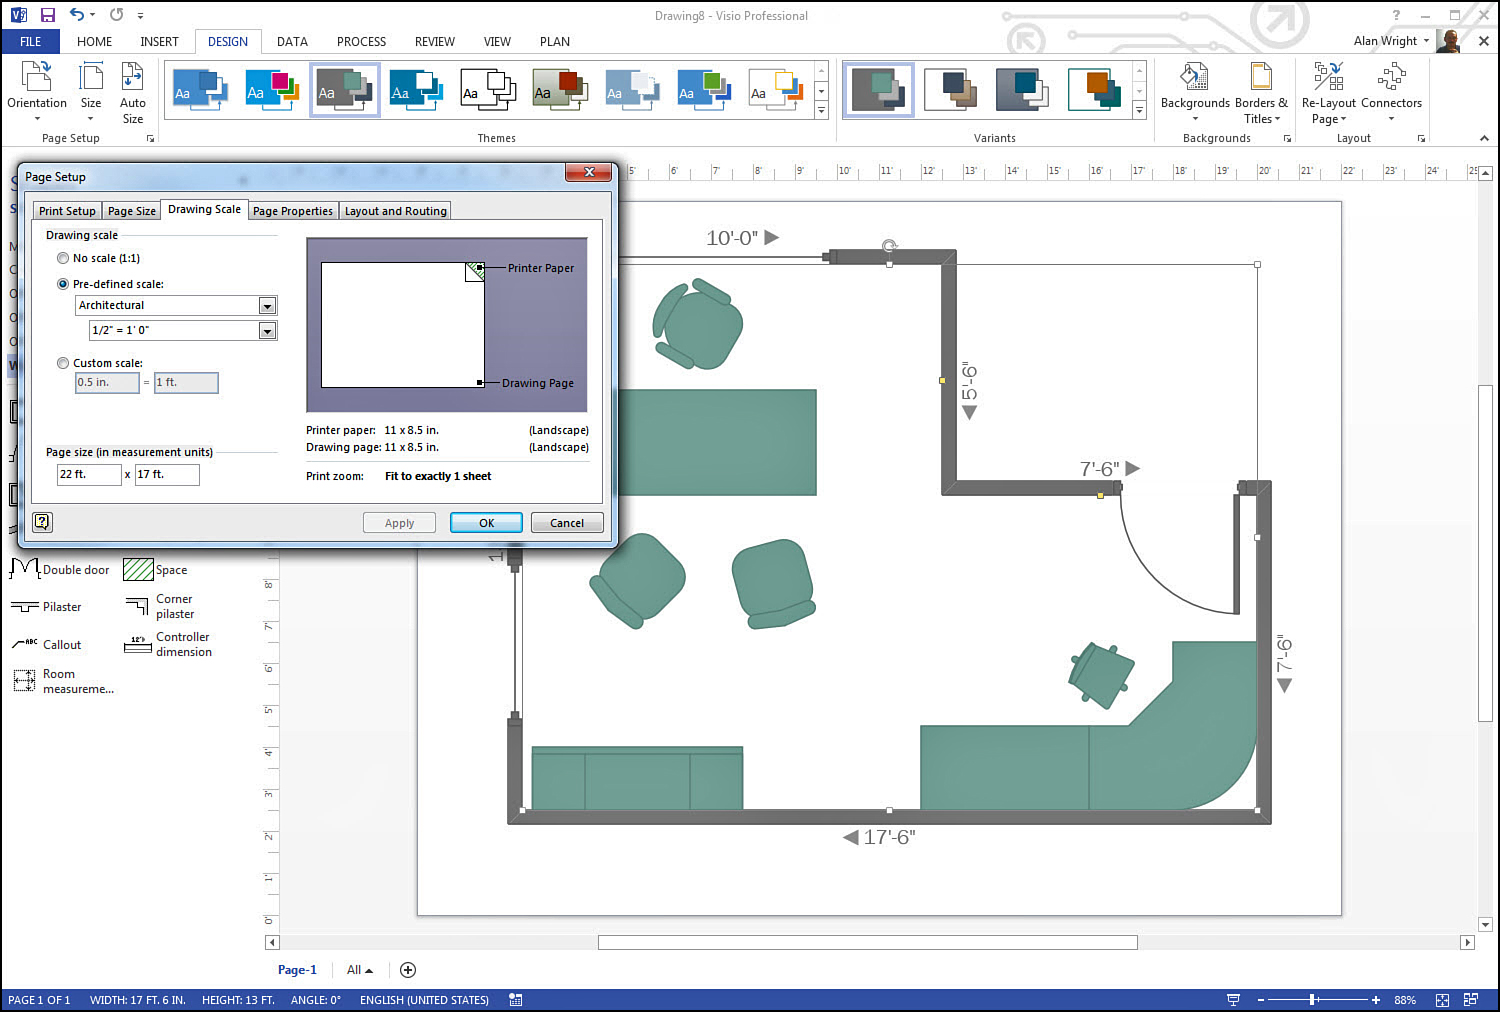
From the drop-down items for predefined scale, you can choose from other standards, including engineering and metric. Also, there are options to use no scale (1:1) or a custom scale that suites your needs.
Changing these scale settings immediately resizes all components in the drawing to conform to the new scale. The drawing maintains its accuracy and usefulness.
Working with Themes
One of the upgrades that makes Visio 2013 especially attractive is the effort that went into updating the Themes and Variants features, which can make ordinary diagrams pop. Themes refer to the combination of colors, effects, and formats that govern the overall appearance of your diagram. And variants refer to variations on the theme currently selected, perhaps just different color combinations while retaining most other settings of the theme. Themes will have 4 pre-defined variants to choose from.
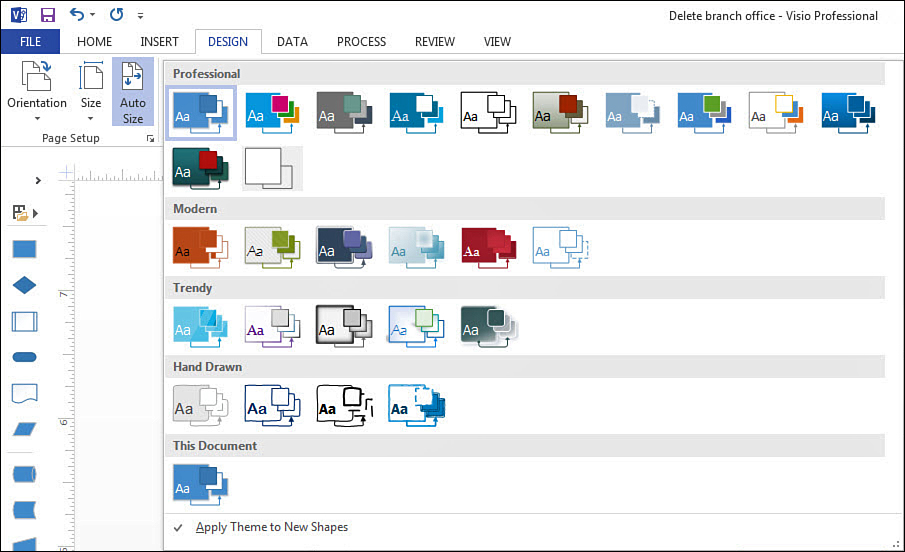
Themes are more than just pretty colors, though; they can influence the effect a diagram has on your audience. In Figure 4.10, notice the categories used: Professional, Trendy, Modern, and so on. These categories help you make intelligent choices to better suit your audience and your message. A rather simplistic diagram that might otherwise appear to have been quickly thrown together can instantly appear polished and well thought out when you apply a tasteful theme.
The Visio developers did an outstanding job of assembling an assortment of themes and variations. It’s easy to express your individual tastes and match established color schemes used by your business.
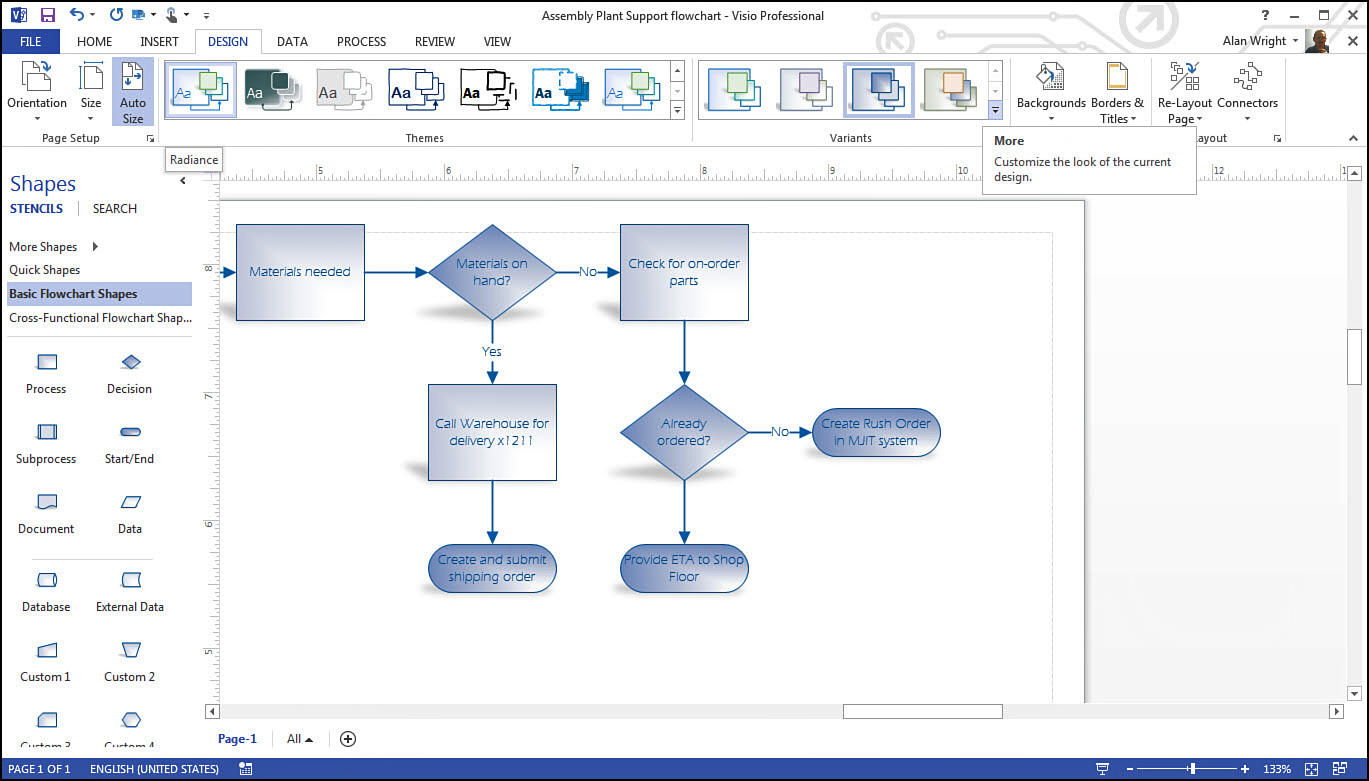
The Theme Gallery
Select the Design tab and you see a section called Themes. To expand the list of Themes, click the unlabeled More button that appears to the right in the Theme section; it’s a minus sign with an arrow pointing down (see Figure 4.10). You can hover over a theme and immediately preview the effects on your drawing. Select the theme to see all the shapes in the Shapes panel displayed with that theme, which is a nice touch. Be sure to browse through the list and check out the themes. Radiance has a cool shadow effect, for example.
Each theme has four variants that enable you to alter the tone or colors a bit. The effect can be subtle or bold. The variants are indicated to the right of the themes on the Design tab. Again, the hover preview works for them as well (see Figure 4.11).
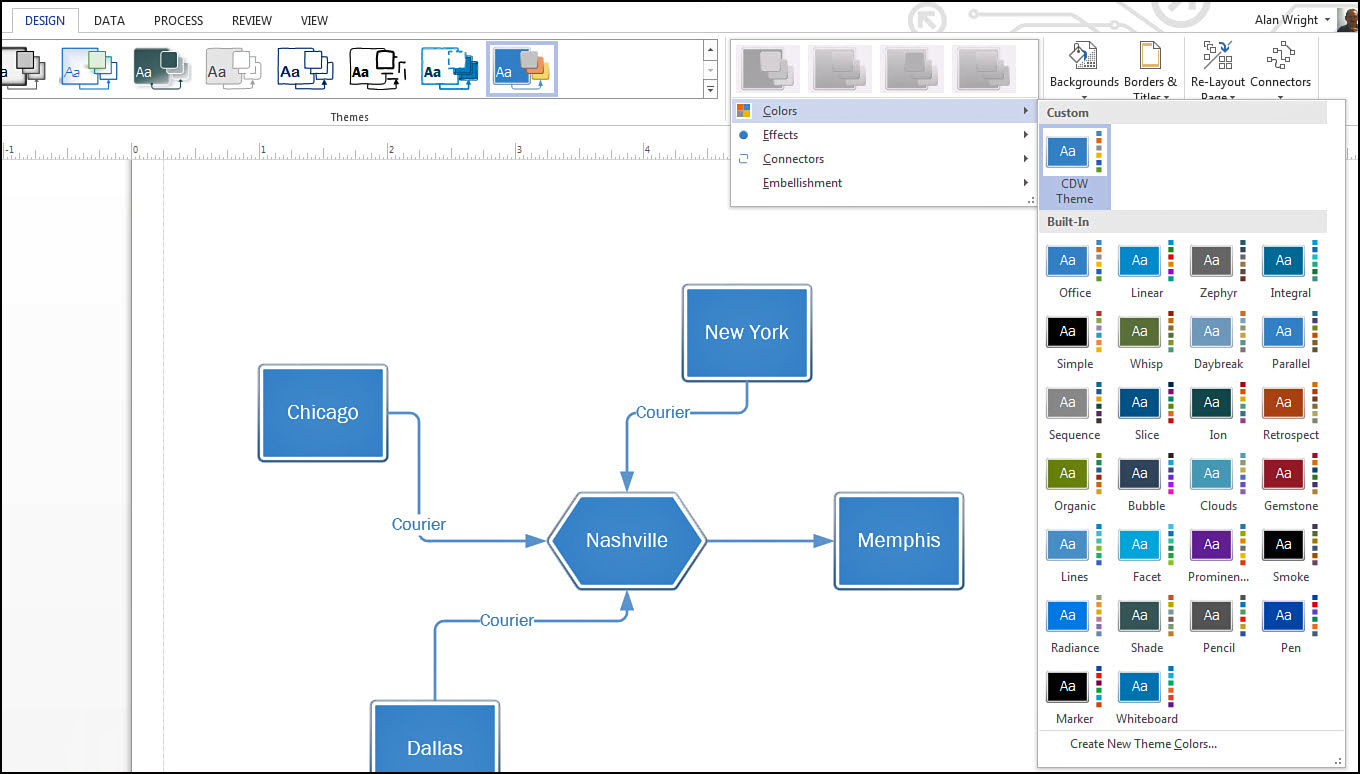
While you are looking at the Variant gallery on the Design tab, click the More button nested under the up/down arrows to the right of the variants. Shown in Figure 4.12, this opens up a few menus that allow you to further customize the major components of the themes. The menu items labeled Colors, Effects, and Connectors are all pretty straightforward.
If you like the way everything appears but wish you could use the colors from a different theme, you can choose just the color scheme from a different theme. To do so, follow these steps:
1. From the Variant gallery on the Design tab, select the More button.
2. Select Colors from the menu.
3. Choose a color set from one of the themes listed (see Figure 4.12). Notice that only the colors are changed, no other modifications to shapes or connectors are applied from the theme.
If you do not see a theme color combination you like, or if you want to create a theme combination to fit the colors you have established in a business logo and artwork, you can choose to create your own custom theme.
1. From the Design tab, click the More button in the Variants section.
2. Click Colors and then choose Create New Theme Colors from the fly-out menu.
3. In the New Theme Colors dialog box (see Figure 4.13), choose from six accent colors and dark, light, and background colors for your theme.
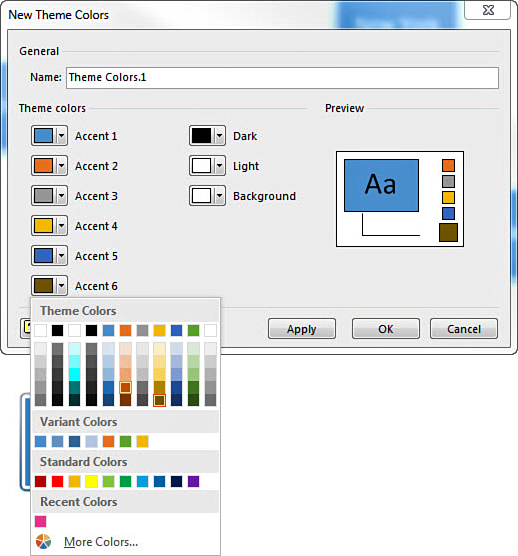
4. Give this color set a name in the Name text box and then click OK.
5. Now when you open the Design tab, and select More from the Variants gallery, then Colors from the menu, you see your new creation in the Custom section above the Built-In themes (refer to Figure 4.12).
You can also choose to change the theme color for a selected shape using styles. Shape Styles can be seen on the Home tab, or you can right-click the shape and select Styles, which provides a plethora of theme styles or variant styles that still complement the theme you are working with (see Figure 4.14).

FIGURE 4.14 Styles allow you to choose from theme colors and variations without changing the entire drawing.
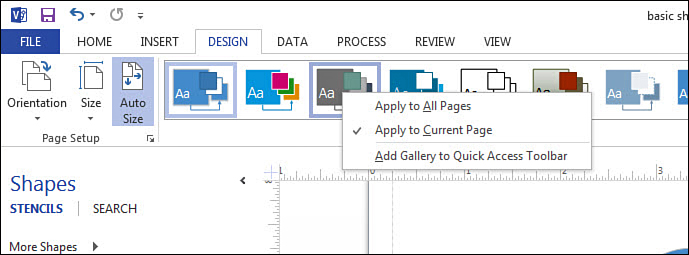
Changing Themes on-the-Fly
As you may have noticed, Visio makes it easy to preview themes and to select and apply them. The theme you choose can apply to the page you are currently working with, or you can apply the theme to all your pages by right-clicking the theme and selecting either Apply to Current Page or Apply to All Pages (see Figure 4.15).
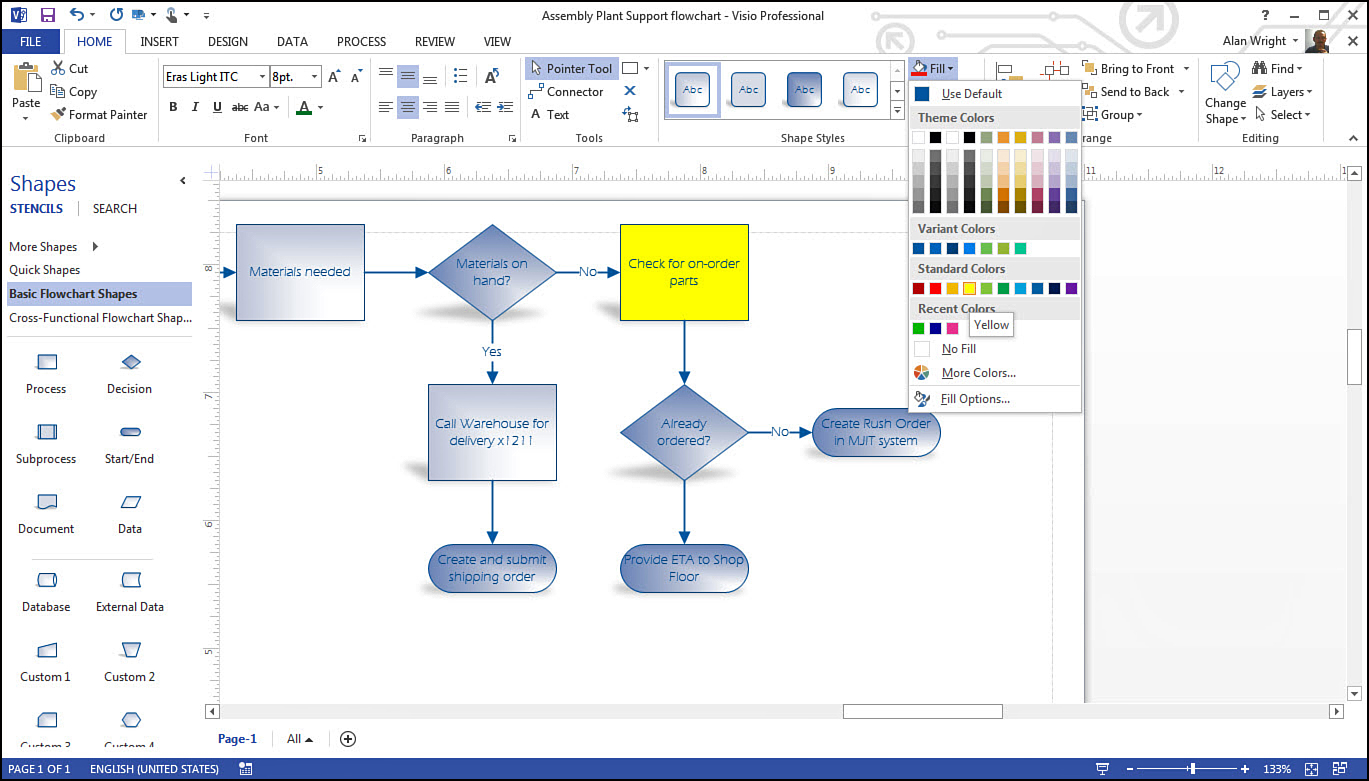
Working with Color
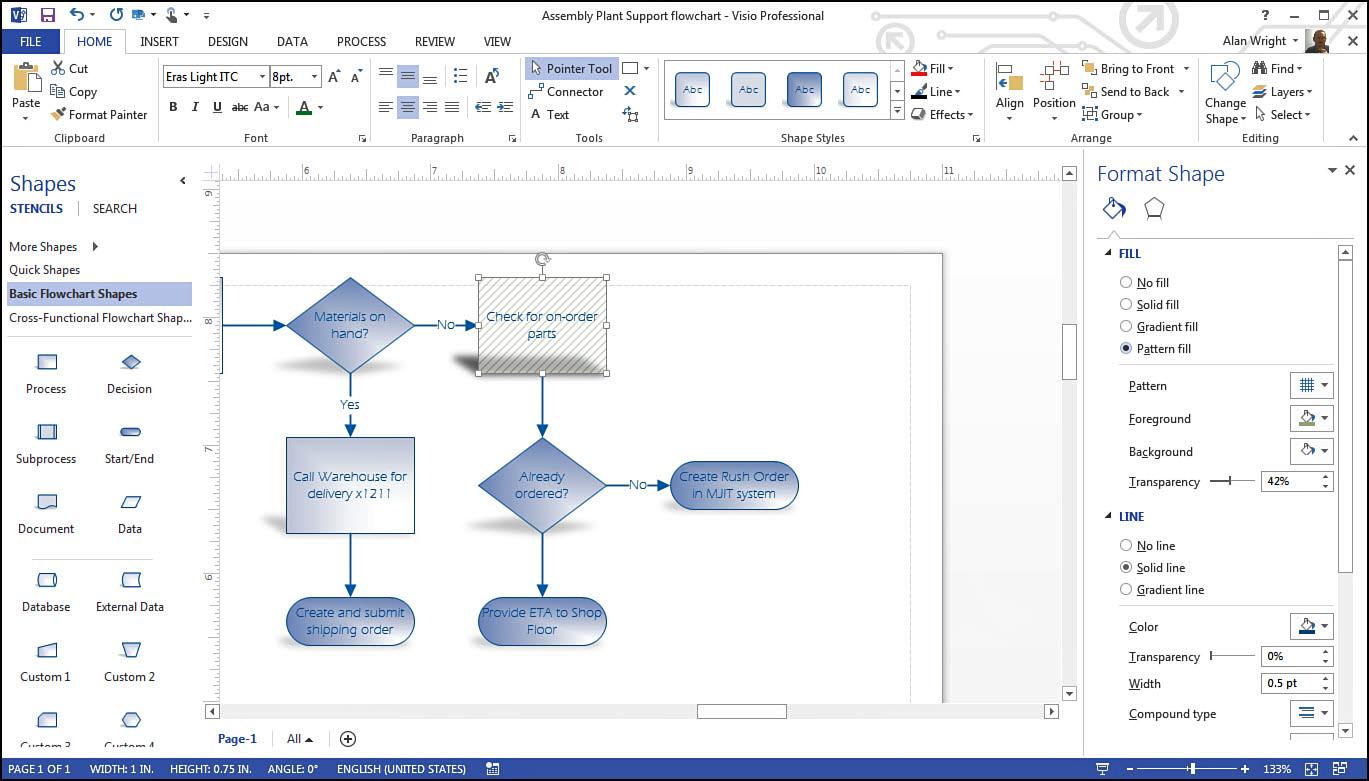
Although themes provide you with a plethora of color choices, you may also need to use specific colors in your drawings from time to time. The easiest way to do this is from the Home tab. After selecting a shape or connector, you can assign colors using the Shape Styles section of the ribbon to make changes using Fill and Line. Notice in Figure 4.16 that there are three types of colors: Theme, Variant, and Standard. If you assign a theme or variant color, it is altered by any later change to the theme or variant used on this page, as discussed earlier in this chapter. To lock in a color and avoid surprises, choose a standard color or choose More Colors and select a color from the Color window that opens. You will be able to select any color using the Standard and Custom tabs by choosing from palettes or even RGB and HSL color models.
You can also change colors by right-clicking the shape or connector and selecting Format Shape. This opens a task pane that gives similar choices, but with even more granular control. For example, you can use a slider to change the Transparency setting or use gradients and patterns, as shown in Figure 4.17.