
6. Working with Links
Links are what make the web, well, webby—the interconnections between pages and sites are a fundamental part of why the web is different from print. Without links coming in to your site, no one will ever find it. And without links going out from your site, it’s a dead end. Dreamweaver makes it easy to add links to your site.
There are a number of different kinds of links: some links are internal to a page, some internal to a site, and some links go to another server altogether. This chapter will cover all of these, along with targets, image links, and email links.
Creating Text Links
If you can drag your mouse from here to there, you can create a link inside Dreamweaver. All you have to do is decide what on the page you want to turn into the link, and where you want that link to point.
Because creating links is such a large part of developing a website, there are multiple ways to create links. You can figure out which method works best for you.
To create a text link
1. Select some text on the page to be the link. ![]() shows that the title “HomeCook.info” has been selected.
shows that the title “HomeCook.info” has been selected.
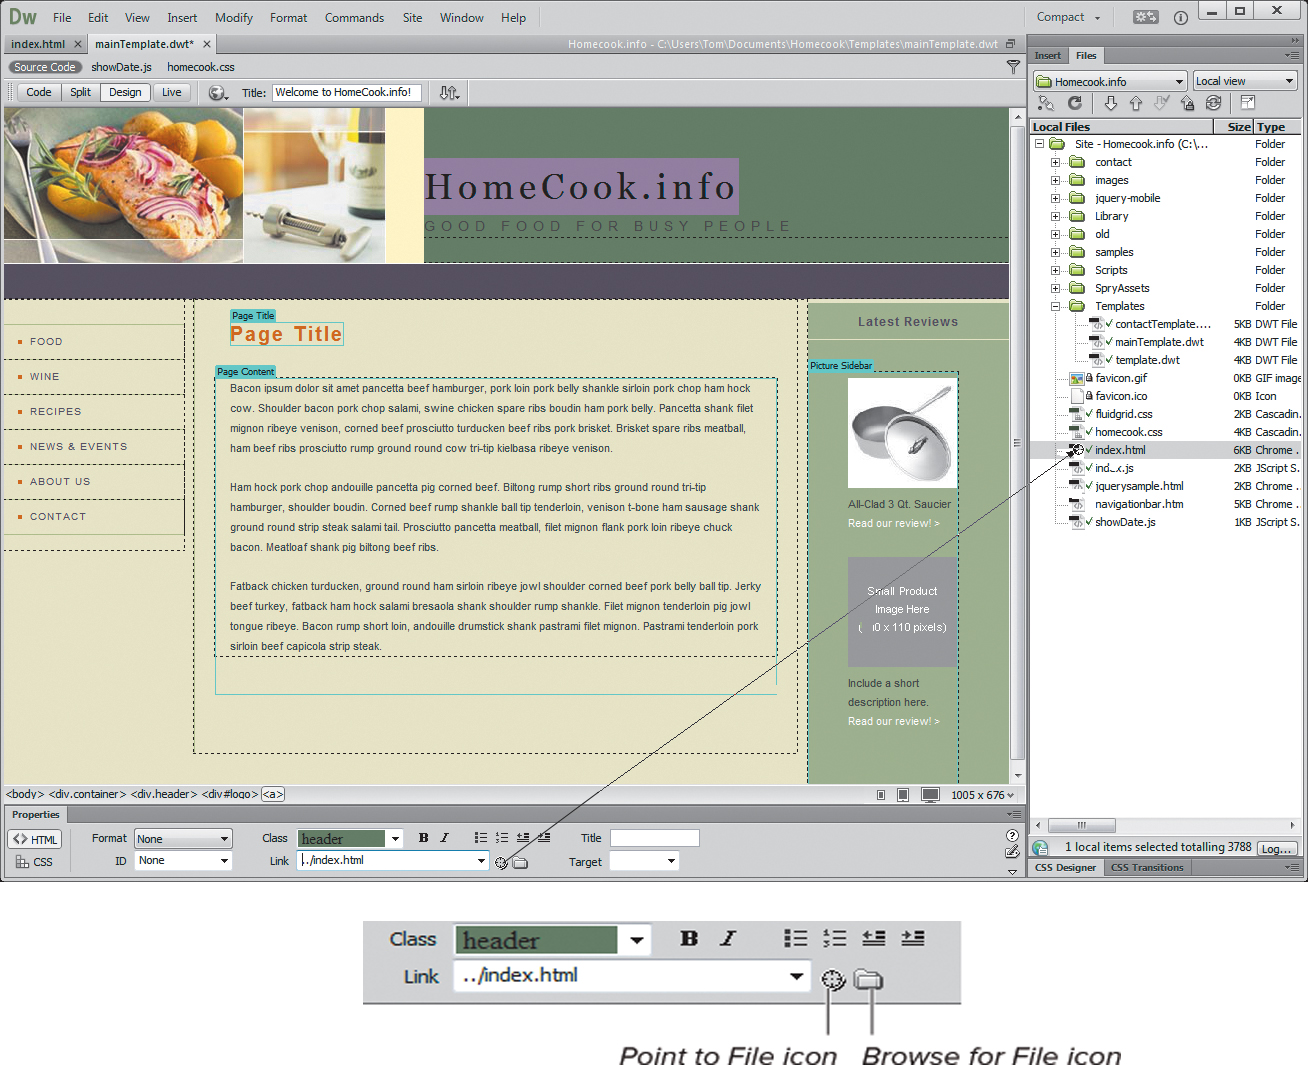
![]() Drag the Point to File icon, and the arrow will follow to the selected link file.
Drag the Point to File icon, and the arrow will follow to the selected link file.
2. In the HTML tab of the Property inspector, click the Point to File icon immediately to the right of the Link field. An arrow appears, and that arrow can be dragged into the Files panel. Drag it to the file you want, and release the mouse.
or
In the Property inspector, click the Browse for File icon, which looks like a folder, to the right of the Link field. The Select File dialog appears ![]() . Choose the file you want and click OK (Choose).
. Choose the file you want and click OK (Choose).
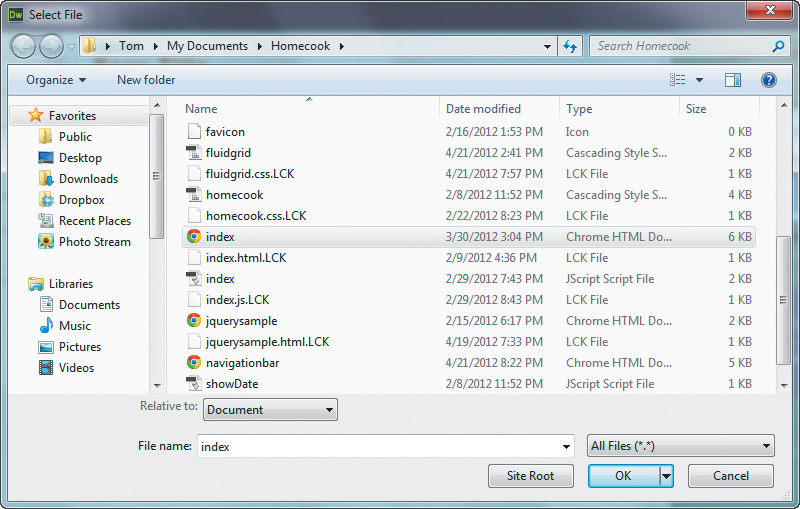
![]() You can also select a link file from the Select File dialog.
You can also select a link file from the Select File dialog.
or
In the Property inspector, click in the Link text field and type the name of the file you want to link to.
or
In the Property inspector, click the pop-up menu to the right of the Link text field, and choose from the list of recently used links ![]() .
.
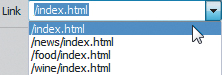
![]() Or use this pop-up menu in the Property inspector.
Or use this pop-up menu in the Property inspector.
or
In the Common category of the Insert panel, click the Hyperlink button. The Hyperlink dialog appears ![]() . Type the name of the file to link to, or click the Browse for File icon to select a file. Click OK when you’re done.
. Type the name of the file to link to, or click the Browse for File icon to select a file. Click OK when you’re done.
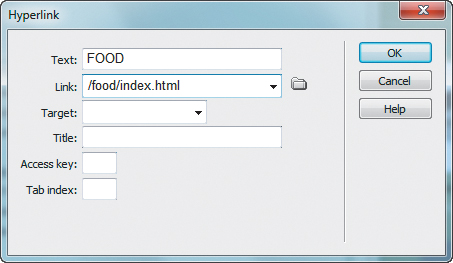
![]() Finally, you can type the link filename in the Hyperlink dialog.
Finally, you can type the link filename in the Hyperlink dialog.
Tip
If you want to remove a link, click inside the text you want to de-link, click the <a> in the tag selector, and then clear the Link text field in the Property inspector.
When you create a link from one webpage to another, there are three possible types of links you can add: absolute, document relative, and site root relative. ![]() shows the file list from www.homecook.info, a fairly typical static site, with a number of files in various folders.
shows the file list from www.homecook.info, a fairly typical static site, with a number of files in various folders. ![]() shows another way of looking at the same information.
shows another way of looking at the same information.
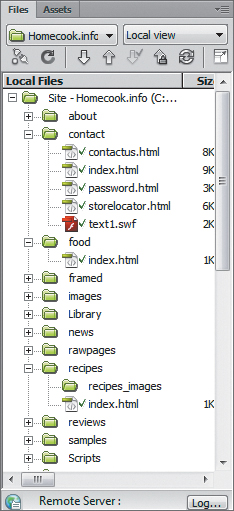
![]() Here’s a list of folders and files (as seen in the Files panel) from a site of medium complexity.
Here’s a list of folders and files (as seen in the Files panel) from a site of medium complexity.
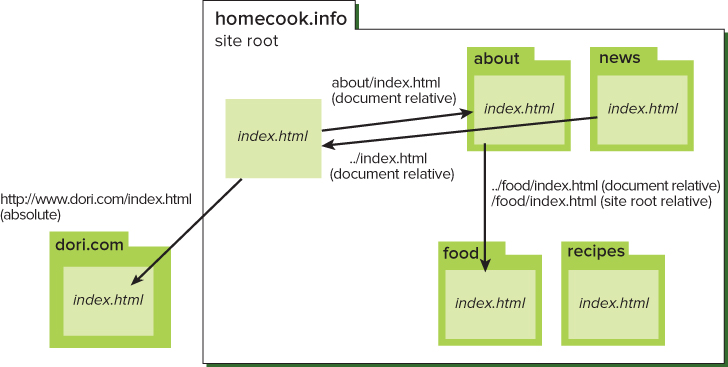
![]() The about, news, food, and recipes folders (or directories) are all contained within the site root folder.
The about, news, food, and recipes folders (or directories) are all contained within the site root folder.
![]() Absolute: The index.html file contains a link to http://www.dori.com/index.html, which is another site altogether. This is an absolute link. The link starts with the explicit name of a server where the file can be found. It’s also correct for the link to just go to either http://www.dori.com/ or http://www.dori.com; in both cases, the link takes you to the default file for that domain (in this case, index.html).
Absolute: The index.html file contains a link to http://www.dori.com/index.html, which is another site altogether. This is an absolute link. The link starts with the explicit name of a server where the file can be found. It’s also correct for the link to just go to either http://www.dori.com/ or http://www.dori.com; in both cases, the link takes you to the default file for that domain (in this case, index.html).
![]() Document relative: The index.html file also contains a link to the index.html file in the about folder. To tell the browser how to navigate from one to the other, the link is about/index.html. That link is relative to the document it’s being called from: the server knows, based on that link, that it needs to find a folder named about at the same level as the index.html file, and within that folder, a file named index.html.
Document relative: The index.html file also contains a link to the index.html file in the about folder. To tell the browser how to navigate from one to the other, the link is about/index.html. That link is relative to the document it’s being called from: the server knows, based on that link, that it needs to find a folder named about at the same level as the index.html file, and within that folder, a file named index.html.
![]() If about/index.html linked back to index.html, it would link to ../index.html. Once again, the server starts looking for the next file at the same level as the current file, and those two periods tell the server to go up a level—back to www.homecook.info. And from there, it’s easy to find the index.html file. A file two levels deep would link to the main index page by linking to ../../index.html. It goes up two levels of folders before looking for a particular file.
If about/index.html linked back to index.html, it would link to ../index.html. Once again, the server starts looking for the next file at the same level as the current file, and those two periods tell the server to go up a level—back to www.homecook.info. And from there, it’s easy to find the index.html file. A file two levels deep would link to the main index page by linking to ../../index.html. It goes up two levels of folders before looking for a particular file.
![]() Document relative links are especially useful when you’re testing on your local machine—the browser can get from one page to another just based on the location of the current document.
Document relative links are especially useful when you’re testing on your local machine—the browser can get from one page to another just based on the location of the current document.
![]() Site root relative: Another way to reference files within the same site is by referencing them by where they are within the site; that is, relative to the root of the site, not the current document. The root of the site is always identified with a forward slash: /. With a site root relative link, the page at /food/index.html would link to /index.html. You no longer need to tell the server to go up a level or two; instead, you just tell it to start at the root and look for that particular file.
Site root relative: Another way to reference files within the same site is by referencing them by where they are within the site; that is, relative to the root of the site, not the current document. The root of the site is always identified with a forward slash: /. With a site root relative link, the page at /food/index.html would link to /index.html. You no longer need to tell the server to go up a level or two; instead, you just tell it to start at the root and look for that particular file.
![]() Site root relative links are useful when you’re creating site-wide library items. For instance, the left navigation menu in the document shown in
Site root relative links are useful when you’re creating site-wide library items. For instance, the left navigation menu in the document shown in ![]() contains links to /recipes/index.html and /food/index.html. With site root relative links, you know that those links work everywhere on the site, no matter what page contains that menu. Library items are covered in Chapter 16.
contains links to /recipes/index.html and /food/index.html. With site root relative links, you know that those links work everywhere on the site, no matter what page contains that menu. Library items are covered in Chapter 16.
Changing Link Relative To
It’s awkwardly named, but it’s useful: you can change the Link Relative To (that is, whether the link is document relative or site root relative) for either a single file or for the site as a whole. As mentioned in the sidebar “The Different Types of Links,” your links can be either document relative or site root relative, or even a mix of the two on each page.
To change the “Link Relative To” for a link
1. In the Property inspector, click the Browse for File icon. The Select File dialog appears ![]() .
.
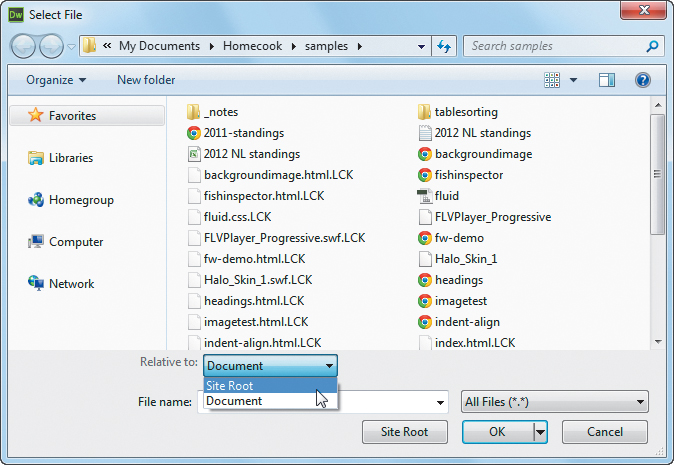
![]() Use the Select File dialog to make your link site root relative or document relative.
Use the Select File dialog to make your link site root relative or document relative.
2. Near the bottom of the dialog is a pop-up menu labeled “Relative to.” From that pop-up, you can switch between Document and Site Root ![]() , and the URL for the link will change.
, and the URL for the link will change.
3. Click OK to save your changes.
2. In the Manage Sites dialog ![]() , find the site you’re working on, click to select it, and then click the Edit button (it looks like a pencil).
, find the site you’re working on, click to select it, and then click the Edit button (it looks like a pencil).
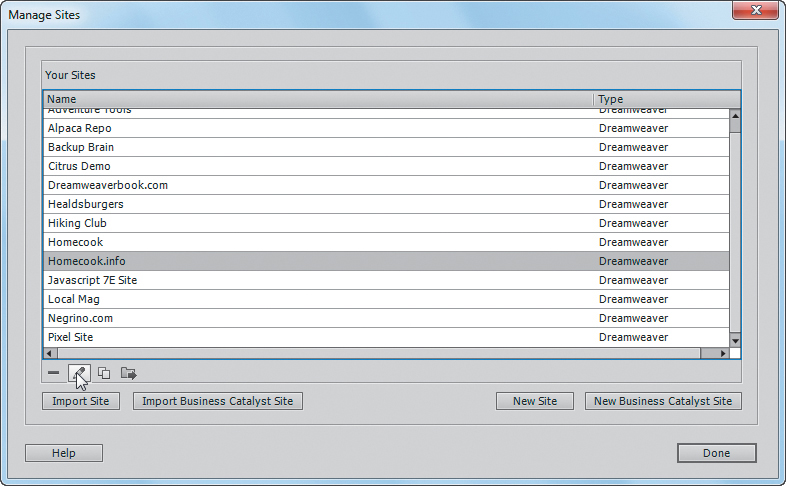
![]() To change the links for the entire site, begin in the Manage Sites dialog.
To change the links for the entire site, begin in the Manage Sites dialog.
The Site Setup dialog for the site appears.
3. Click the Advanced Settings category for the Site Setup for your site, then click the Local Info category ![]() . From here, you can choose either radio button next to “Links relative to,” where the choices are Document or Site Root. This changes the link that you’re currently modifying, as well as the default for future links, but it will not change any other existing links on the page or site.
. From here, you can choose either radio button next to “Links relative to,” where the choices are Document or Site Root. This changes the link that you’re currently modifying, as well as the default for future links, but it will not change any other existing links on the page or site.
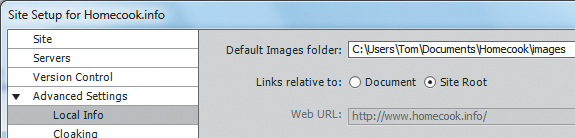
![]() In the Local Info category, set the “Links relative to” for the entire site.
In the Local Info category, set the “Links relative to” for the entire site.
4. Click OK to save your changes.
Tip
You can also follow the directions found in Chapter 2 for editing the site setup. If you click the Advanced Settings category and then choose the Local Info category, you’ll end up in the same place.
Targeting Links
Sometimes you want a link to go to a new window or to an existing window other than the one you’re clicking. That’s done by giving the link a target—the name of the window in which you want the new page to load.
To give a link a target
1. Follow the earlier steps to create a link, and then click the <a> in the tag selector.
2. Directly next to Link in the HTML tab of the Property inspector is a text field named Target where the target is entered. Alternatively, you can click the pop-up menu to the right of the field to choose the target.
3. If you’re working on a site without frames, you have six choices: Default, _blank, _new, _parent, _self, and _top. Choose one from the pop-up menu ![]() , and the Target field will show your choice.
, and the Target field will show your choice.
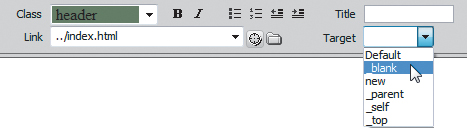
![]() Set a link’s target in the Property inspector with this pop-up menu.
Set a link’s target in the Property inspector with this pop-up menu.
![]() Default: This is equivalent to not using any target at all.
Default: This is equivalent to not using any target at all.
![]() _blank: Open a new, blank window.
_blank: Open a new, blank window.
![]() _new: Acts like _blank the first time it’s used, but after that, each time a link using the _new target is clicked, it will reuse the same “new” window. We think that _new is confusing, and we don’t recommend using it.
_new: Acts like _blank the first time it’s used, but after that, each time a link using the _new target is clicked, it will reuse the same “new” window. We think that _new is confusing, and we don’t recommend using it.
![]() _parent: If the current window was opened by a previous link to a blank target (that is, the current window is a newly opened window), open this link in the previous window. If the current window wasn’t opened that way, what happens depends on the user’s browser—but usually, it just opens in the current window.
_parent: If the current window was opened by a previous link to a blank target (that is, the current window is a newly opened window), open this link in the previous window. If the current window wasn’t opened that way, what happens depends on the user’s browser—but usually, it just opens in the current window.
![]() _self and _top: For non-framed sites, these are both equivalent to not using any target at all.
_self and _top: For non-framed sites, these are both equivalent to not using any target at all.
Tip
To remove a target, just click in the Target text field in the Property inspector and erase its content.
Tip
The underscore before the name of a target tells the browser that this is a special type of target, not just the name of another window.
Linking to Specific Places on a Page
Normally, when a new webpage is displayed, it does so showing the very top of a page. Adding an id to a page element allows you to display the page starting at a given point on a page (this is also called an anchor). The id gets added to the URL of the page. To use an id, you’ll need to add the id to a page element using the HTML tab of the Property inspector or in Code view.
To create an ID
1. Open your document, and click in the spot in the file where you want the link to end up.
2. In the HTML tab of the Property inspector, click in the ID field ![]() .
.

![]() The ID field lets you create a new anchor on your page. This will appear at the end of the page’s URL.
The ID field lets you create a new anchor on your page. This will appear at the end of the page’s URL.
3. Type a name for the id that will be unique for this page. Remember that this id is going to be part of a URL, so it can contain only characters that are valid: no spaces, ampersands, question marks, and so on.
4. Press Enter (Return). The page element you added the id to has an id attribute added to it, which you can see in Code view ![]() . If you click that element, the tag selector will show the element with its id, and the Property inspector will allow you to modify the name
. If you click that element, the tag selector will show the element with its id, and the Property inspector will allow you to modify the name ![]() .
.
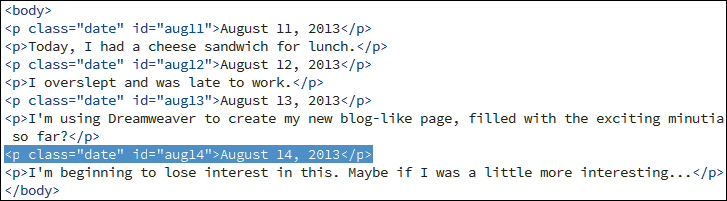
![]() If we look at the page in Code view, we see that the id attribute was added to the paragraph tags, along with the paragraph’s CSS class.
If we look at the page in Code view, we see that the id attribute was added to the paragraph tags, along with the paragraph’s CSS class.
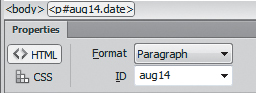
![]() The Property inspector shows the id, and the tag selector shows both the id and the class for the <p> tag.
The Property inspector shows the id, and the tag selector shows both the id and the class for the <p> tag.
Tip
To delete an id, clear the ID field in the Property inspector or choose None from the pop-up menu. Or, of course, you can do it in Code view.
Tip
As you’ll see in later chapters, the concept of the id is an extremely important one, allowing a page element to be manipulated and styled by CSS or with scripting languages such as JavaScript. Using an id for an anchor is one of the simplest ways of using an id.
Tip
Previous versions of HTML (and previous versions of Dreamweaver) used a similar concept, called a named anchor, to accomplish the same goal of targeting a particular point on a page. Because Dreamweaver CC is HTML5-compliant, the named anchor interface was removed.
To link to an ID
Follow the directions from “Creating Text Links” earlier in this chapter, but you’ll have to add the id part of the link manually. Follow the directions from “Creating Text Links” to link to another file, and when that’s complete, click in the Link field in the Property inspector and add a # followed by the anchor name to the end of the existing link. So if you want to link to the chap07 anchor on the dwvqs.html page, your link would be to dwvqs.html#chap07.
Adding Links to Graphics
Making a graphic a link isn’t all that different from creating a text link. The main difference is that the Link and Target fields in the Property inspector are in different areas, so you might not see them at first glance. Additionally, you don’t get the handy pop-up menu on the Link field, so you can’t just reuse one of the links you’ve recently made.
To add a link to a graphic
1. Select the image in the document window.
2. Using the Property inspector ![]() , click the Point to File icon next to the Link field. An arrow appears, and that arrow can be dragged into the Files panel. Drag it to the file you want, and release the mouse.
, click the Point to File icon next to the Link field. An arrow appears, and that arrow can be dragged into the Files panel. Drag it to the file you want, and release the mouse.

![]() For images, the Link and Target fields aren’t where you might expect them to be in the Property inspector.
For images, the Link and Target fields aren’t where you might expect them to be in the Property inspector.
or
Click the Browse for File button next to the Link field; then in the resulting Select File dialog, navigate to and select the file you want as the link’s destination, and click OK (Choose).
Tip
As mentioned in “Creating Text Links,” there are many ways to create links. Over time, you’ll find the one that works best for you.
Tip
It’s very common that images in the upper-left corner of a webpage (usually the site’s logo) link back to a site’s home page; common enough that if you don’t do this, your site’s visitors may be confused. Unless there’s a good reason why you shouldn’t do this for a site, set this up as the default.
Tip
You can make individual parts of an image link to different webpages. That’s done with image maps, and they are covered in the next section.
Creating Image Maps
It’s easy to add a link to an image: just select the image, and use the Link text box in the Property inspector to define the link’s destination. But what if you want different parts of an image to link to different pages? You’ll need an image map. With an image map, you can define areas of the image as hotspots, and each hotspot has its own link.
To create an image map
1. Select the image you want to turn into an image map.
In this example, we’re using a map of Washington, Oregon, California, and Nevada ![]() . We’ll add hotspots to each of the states.
. We’ll add hotspots to each of the states.
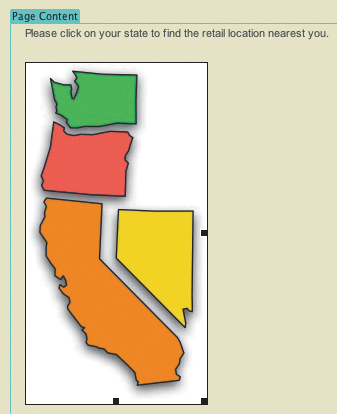
![]() We’ll turn this map of four Western states into an image map.
We’ll turn this map of four Western states into an image map.
2. In the Map text box of the Property inspector, enter a name for the image map ![]() .
.

![]() Both the image and the image map have been named in this figure.
Both the image and the image map have been named in this figure.
The name cannot begin with a number and can contain only letters, numbers, and the underscore character.
3. Use the Rectangle, Circle, or Polygon tool to draw a hotspot over part of your image.
The tool you use depends on the shape of the area that you want to make into a hotspot. For example, we used the Rectangle tool to create the hotspots for Washington and Oregon, and the Polygon tool to create the hotspots for California and Nevada.
Dreamweaver shows the hotspot as a light blue area overlaid on your image ![]() . The blue highlighting won’t show up on your webpages.
. The blue highlighting won’t show up on your webpages.
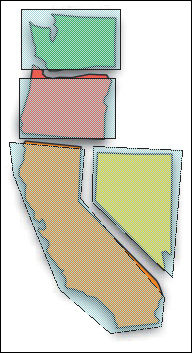
![]() Each of the state images has been overlaid with a hotspot.
Each of the state images has been overlaid with a hotspot.
4. When a hotspot is selected, the Property inspector shows properties for the hotspot ![]() . Use the Link field to attach a link to the hotspot.
. Use the Link field to attach a link to the hotspot.
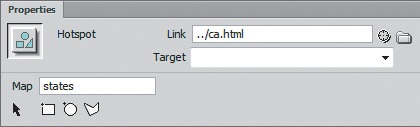
![]() Add the link for a hotspot in the Property inspector.
Add the link for a hotspot in the Property inspector.
5. (Optional) Use the Target pop-up menu to target the destination of the link.
If you need more information about the use of the Target control, see “Targeting Links,” earlier in this chapter.
6. Enter the alternate text for the hotspot in the Alt field.
7. Repeat steps 3–6 for each of the other areas on the image you want to turn into hotspots.
Tip
To change the properties of a hotspot, use the hotspot Selection tool to select the hotspot; then make changes in the Property inspector.
Tip
You can resize and reshape hotspots; just select the hotspot with the hotspot Selection tool, and then drag one of the selection handles that appear at the corners of the hotspot.
Tip
Image maps have somewhat fallen out of favor recently; you see more sites using HTML5 animations or interactive Flash movies to provide users the benefits of clickable images. But they are still perfectly usable and valid ways to make parts of images clickable, and they work on some browsers that don’t support Flash, such as the Safari browser on iOS devices. Even if your sites use Flash, you can use image maps as a fallback plan, serving a version of the page that uses image maps for browsers that aren’t Flash-capable.
Adding Email Links
If you want your site’s visitors to be able to contact you, you’ll need to add a link that allows people to send you email.
To add an email link
1. Click the spot on the page where you want to add an email link.
2. In the Common category of the Insert panel, click the Email Link button, and the Email Link dialog appears ![]() .
.
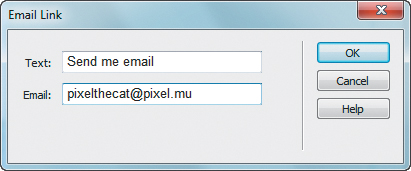
![]() The Email Link dialog lets you set the link (the email address) and the text that will be displayed on the webpage.
The Email Link dialog lets you set the link (the email address) and the text that will be displayed on the webpage.
3. Fill in the Text field with the text you want to display in the web browser, and fill in the Email field with the email address. Click OK when you’re done.
Tip
Dreamweaver doesn’t do any kind of error checking to make sure that the email address is in a valid format, so be careful when you’re entering it.
Tip
Putting an email address on a website can lead to that address getting all kinds of garbage or spam. There are a variety of ways to help protect your email address. The simplest is just to encode—put it into a format that the browser can understand but that a spider sent out by a spammer can’t. To learn more about this, search online for “email obfuscator.” This approach works with some spambots that harvest email links from webpages, but certainly not all.