
Hour 2. Game Objects
What You’ll Learn in This Hour:
• How to work with 2D and 3D coordinates
• How to work with Game Objects
• How to work with Transforms
Game Objects are the foundational components of a Unity game project. Every item that exists in a scene is, or is based on, a game object. This hour you will be learning about Game Objects within Unity. Before you can start working with objects in Unity however, you must first learn about the 2D and 3D coordinate systems. Then you will begin working with the built in Unity game objects and you will wrap up the hour by learning about the various game object transformations. Information gained this hour is foundational to everything else in this book. Be sure to take your time and learn it well.
Dimensions and Coordinate Systems
For all of their glitz and glamor, video games are mathematical constructs. All of the properties, movements, and interactions can be boiled down to numbers. Luckily for you, a lot of the groundwork has already been laid. Mathematicians have been toiling away for centuries to discover, invent, and simplify different processes so that you can more easily build your games with modern software. You may think the objects in a game just exist in space randomly, but really every game space has dimensions and every object is placed in a coordinate system.
Putting the D in 3D
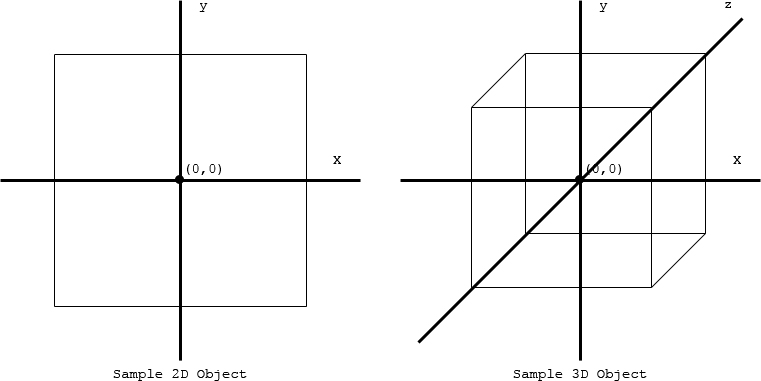
As mentioned above, every game uses some level of dimensions. The most common dimension systems, the ones you are most likely familiar with, are 2D and 3D (short for 2-Dimensions and 3-Dimensions). A 2D system is a flat system. In a 2D system you only deal with vertical and horizontal elements, or to put it another way: up, down, left, and right. Games like Tetris, Pong, and Pac Man are good examples of 2D games. A 3D system is like a 2D system, but it obviously has one more dimension. In a 3D system, you not only have horizontal and vertical (up, down, left, and right), you also have depth (in and out). Figure 2.1 does a good job of illustrating the difference between a 2D square and a 3D square, otherwise known as a cube. Notice how the inclusion of the depth axis in the 3D cube makes it seem to “pop out”.
Figure 2.1. 2D Square Versus 3D Cube.
Note: Learning About 2D and 3D
Unity is a 3D engine. As such, all of the projects made with it will inherently use all 3 dimensions. You may be wondering why then we bother to cover 2D systems at all. The truth is that even in 3D projects, there are still a lot of 2D elements. Textures, screen elements, and mapping techniques all use a 2D system. It is worth learning about 2D systems as they aren’t going away any time soon.
Using Coordinate Systems
The mathematical equivalent of a dimension system is a coordinate system. A coordinate system uses a series of lines, called axes (which is the plural of axis), and locations, called points. These axes correspond directly with the dimensions that they mimic. For instance, a 2D coordinate system has the x axis and y axis which represent the horizontal and vertical directions respectively. If an object is moving horizontally, we say it is moving “along the x axis”. Likewise, the 3D coordinate system uses the x axis, the y axis, and the z axis for horizontal, vertical, and depth respectively.
Note: Common Coordinate Syntax
When referring to an object’s position, you will generally list it coordinates. Saying that an object is 2 on the x axis and 4 on the y axis can be a little cumbersome. Luckily, a short hand way of writing coordinates exists. In a 2D system, you write coordinates like “(x, y)” and in a 3D system, you write them like “(x, y, z)”. Therefore, the above example would instead be written as (3, 4). If that object was also 10 on the z axis, it would be written as (3, 4, 10).
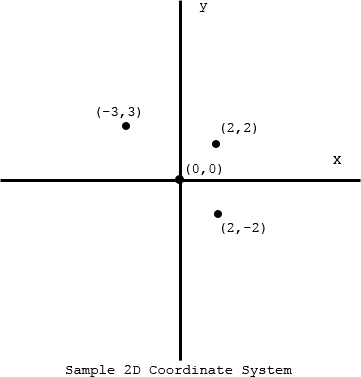
Every coordinate system has a point where all of the axes intersect. This point is called the origin and the coordinates for the origin are always (0, 0) in a 2D system and (0, 0, 0) in a 3D system. This origin point is very important as it is the basis by which all other points are derived. The coordinates for any other point are simply the distance of that point from the origin along each axis. A point’s coordinates will get larger as it moves away from the origin. For example, as a point moves to the right, its x axis value gets larger. When it moves left, the x axis value gets smaller until it passes through the origin. At that time, the x value of the point begins getting larger again, but it also becomes negative. Consider Figure 2.2. This 2D coordinate system has three points defined. The point (2, 2) is 2 “units” away from the origin in both the x and y directions. The point (-3, 3) is 3 “units” to the left of the origin and 3 “units” above the origin. The point (2, -2) is 2 “units” to the right of the origin and 2 “units” below the origin.
Figure 2.2. Points in Relation to the Origin
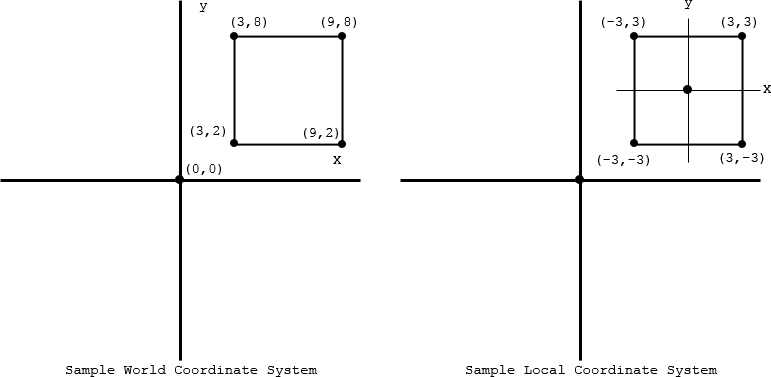
World vs. Local Coordinates
You have now learned about the dimensions of a game world as well as the coordinate systems that compose them. What you have been working with so far is considered the “world” coordinate system. At any given time, there is only a single x, y, and z axis in the world coordinate system. Likewise, there is only one origin that all objects share. What you may not know is that there is also something called the “local” coordinate system. This system is unique to each object and it completely separate from other objects. This local system has its own axes and origin that other objects don’t use. Figure 2.3 illustrates the world versus local coordinate systems by showing the four points that make of a square for each.
Figure 2.3. World Coordinates vs. Local Coordinates
You might be wondering what the local coordinate system is for if the world coordinate system is used for the position of objects. Later in this hour you will look at transforming game objects as well as parenting game objects. Both of these require the local coordinate system.
Game Objects
Every shape, model, light, camera, particle system, etc. in a Unity game all have one thing in common; they are all game objects. The game object is the fundament unit of any scene. Even though they are simple, they are very powerful. At their root, game objects are little more than a transform (this will be talked about in greater detail later in the hour) and a container. This container exists to hold the various components that make objects more dynamic and meaningful. What you add to your game objects is up to you. There are many components and they add a huge amount of variety. Throughout the course of this book you will be learning to use many of these components.
Note: Built-in Objects
Not every game object you use will start as an empty object. Unity has several built-in game objects available to use right out of the box. You can see the large amount of items available by clicking the “GameObject” menu item at the top of the Unity editor and hovering over “Create Other”. A large portion of learning to use Unity is learning to work with built-in and custom game objects.
Transforms
At this point you have learned have explored the different coordinate systems and experimented with some game objects. It is time to put the two together. When dealing with 3D objects, you will often hear the term “transform”. Depending on the context, transform is either a noun or a verb. All objects in 3D space have a position, a rotation, and a scale and if you combine them all together you get an object’s transform (noun). Alternatively, transform can be a verb if it refers to changing an object’s position, rotation, or scale. Unity combines the two meanings of the word with the transform component. You will recall that the transform component is the only component that every game object has to have. Even empty game objects have transforms. Using this component, you can both see the current transform of the object as well as change (or transform) the transform of the object. It may sound confusing now, but it is fairly simple. You will get the hang of it in no time. Since the transform is made up of the position, rotation, and scale it would stand to reason that there are three separate methods (called transformations) of changing the transform: translation, rotation, and scaling (respectively). These transformations can be achieved using either the inspector or the transform tools. Figure 2.4 and 2.5 illustrate which inspector components and tools correlate with which transforms.
Figure 2.4. Transform Options in the Inspector
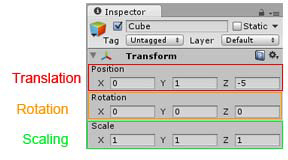
Figure 2.5. The Transform Tools
Translation
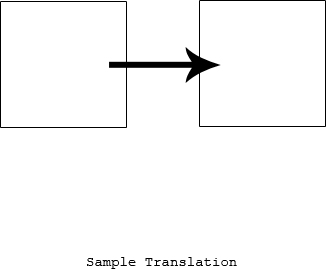
Changing the coordinate position of an object in a 3D system is called translation and it is the simplest transform that can be applied to an object. When you translate an object, it is shifted along an axis. Figure 2.6 demonstrates a square being translated along the x axis.
Figure 2.6. Sample Translation
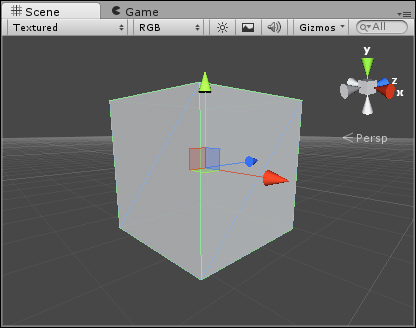
When you select the translate tool (hotkey: W) you will notice that whatever object you have selected will change slightly in the scene view. More specifically, you will see three arrows appear pointing away from the center of the object along the three axes. These are translation gizmos and they help you move your objects around in the scene. Clicking and holding on any of these axis arrows will cause them to turn yellow. Then, if you move your mouse, the object will move along that axis. Figure 2.7 shows you what the translation gizmos look like.
Figure 2.7. Translation Gizmos
Tip: The Transform Component and Transform Tools
Unity provides two ways to manage the transform of your objects. Knowing when to use each is important. You will notice that when you change an object’s transform in the scene view with a transform tool, the transform data also changes in the inspector view. It is often easier to make large changes to an object’s transform using the inspector view as you can just change the values to what they need to be. The transform tools, on the other hand, are more useful for quick, small changes. Learning to use both together will greatly improve your workflow.
Rotation
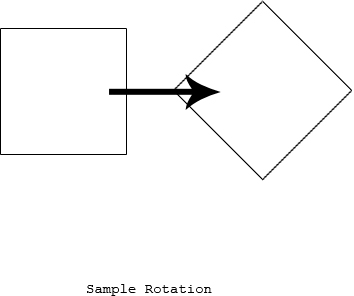
Rotating an object does not move it in space. Instead, it changes the object’s relationship to that space. More simply stated rotation allows you to redefine which direction the x, y, and z axes for a particular object point. When an object rotates around an axis, it is said to be rotating “about” that axis. Figure 2.8 shows a square being rotated about the z axis.
Figure 2.8. Rotation About the Z Axis
Tip: Determining the Axis of Rotation
If you are unsure which axis you need to rotate on object on the get a desired effect, you can use a simple mental method. One axis at a time, pretend the object is stuck in place by a pin that is parallel with that axis. The object can only spin around the pin stuck in it. Now, determine which pin allows the object the spin the way you want. That is the axis you will need to rotate the about around.
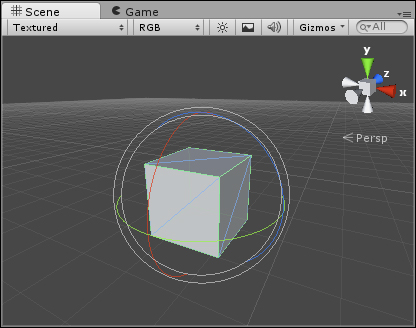
Just as with the translate tool, selecting the rotate tool (Hotkey: E) will cause rotation gizmos to appear around your object. These gizmos are circles representing the object’s rotation path about the axes. Clicking and dragging on any of these circles will turn them yellow and rotate the object about that axis. Figure 2.9 shows you what the rotation gizmos look like.
Figure 2.9. The Rotation Tool Gizmos
Scaling
Scaling causes an object to grow or shrink within a 3D space. This transform is really straightforward and very simple in its use. Scaling an object on any axis causes its size to change on that axis. Figure 2.10 demonstrates a square being scaled down on the x and y axis. Figure 2.11 shows you what the scaling gizmos look like when you select the scaling tool (Hotkey: R).
Figure 2.10. Scaling on the X and Y Axis
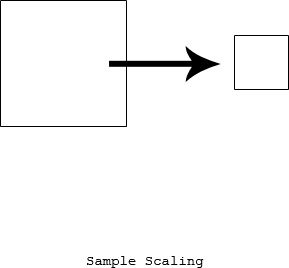
Figure 2.11. The Scaling Gizmos
Hazards of Transformations
As mentioned before, transformations use the local coordinate system. Therefore, the changes that are made can potentially impact future transformations. Consider Figure 2.12. Notice how the same two transformations, when applied in reverse order, has very different effects.
Figure 2.12. Effects of Transformation Order
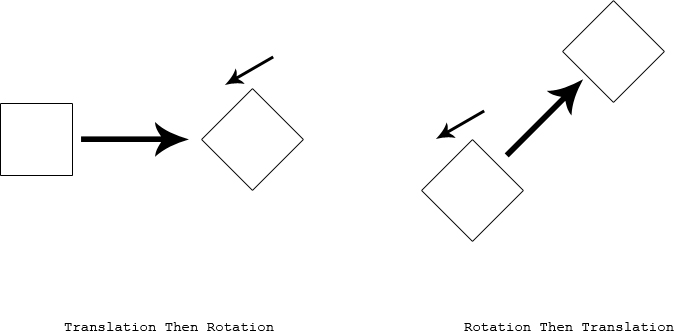
As you can see, not paying attention to transformation order can have unexpected consequences. Luckily, the transformations have consistent effects that can be planned on:
• Translation: Translation is a fairly inert transformation. That means that any changes applied after it generally won’t be affected.
• Rotation: Rotation changes the orientation of the local coordinate system axes. Any translations applied after a rotation would cause the object to move along the new axes. If, for example, you were to rotate an object 180 degrees about the z axis and then move in the positive y direction, the object would appear to be moving down instead of up.
• Scaling: Scaling effectively changes the size of the local coordinate “grid”. Basically, when you scale an object to be larger, you are really scaling the local coordinate system to be larger. This causes the object to seem to grown. This change is multiplicative. For example, if an object is a scaled to 1 (its natural, default size) and then translated 5 units along the x axis, the object would appear to move 5 units to the right. If the same object were to be scaled to 2 however, then translating 5 units on the x axis would result in the object appearing to move 10 units to the right. This is because the local coordinate system is now double the size and 5 times 2 equals 10. Inversely, if the object were scaled to .5 and then moved, it would appear to only move 2.5 units (.5 * 5 = 2.5).
Once you understand these rules, determining how an object will change with a set of transformations becomes easy.
Transforms and Nested Objects
In hour one you learned how to nest game objects in the hierarchy view (drag one object onto another one) and doing so changes the way transformations work slightly. Recall that when you have an object nested inside another one, the top level object is the parent and the other object is the child. Transformations applied to the parent object work as normal. The object can be moved, scaled, and rotated. What’s special is how the child object behaves. Once nested, a child object’s transform is relative to that of the parent object, not the world. Therefore, a child object position is not based on its distance from the origin, but the distance from the parent object. If the parent object is rotated, the child object would move with it. If you looked at the child’s rotation, however, it would not register that it had rotated at all. The same goes for scaling. If you scale the parent object, the child with also change in size. The scale of the child object would remain unchanged. You may be confused by why this is. Remember, when a transformation is applied, it is not applied to the object but the objects coordinate system. An object isn’t rotated, its coordinate system is. The effect is that the object turns. When a child object’s coordinate system is based on the local coordinate system of the parent, any changes to the parent system will directly change the child; without the child knowing about it!
Summary
This hour you learned all about game objects in Unity. You started off by learning all about the differences between 2D and 3D. From there you looked at the coordinate system and how it breaks the “world” concepts down mathematically. Once that was done you were able to begin working with game objects and some of the built in ones. You ended by learning all about transforms and the three transformations. You got to try out the transforms, learn about some of the hazards, and how they affect nested objects.
Q&A
Q. Will it be important to learn both the 2D and 3D concepts?
A. Yes. Even games that are entirely 3D still utilize some of the 2D concepts on a technical level.
Q. Should I learn to use all of the built in game objects right away?
A. Not necessarily. There are many game objects and it can be very overwhelming to attempt to learn them all right away. Take your time and learn about the objects as they are covered here
Q. What is the best way to get familiar with transforms?
A. Practice. Keep working with them and eventually they will become quite natural.
Workshop
Take some time to work through the questions here to ensure you have a firm grasp on the material.
Quiz
1. What does the “D” in 2D and 3D stand for?
2. How many transformations are there?
3. True or False: There are 4 built in game objects
4. If you wanted an object to be “laying on its side” 5 units to the right of its current position, would you rotate the object and then translate it or translate the object and then rotate it?
Answers
1. Dimension
2. Three
3. False
4. Translate and then rotate.
Exercise
Take a moment to experiment with the way transformations work in a parent / child object scenario. You will get a better feel for exactly how the coordinate systems change the way things are oriented.
1. Create a new scene or project.
2. Add a cube to the project and place it at (0, 2, -5). Remember the short hand notation for coordinates. The cube should have a x value of 0, a y value of 2, and a z value of -5. You can set these values easily in the transform component in the inspector view.
3. Add a sphere to your scene. Pay attention to the sphere’s x, y, and z values.
4. Nest the sphere under the cube by dragging the sphere in the hierarchy view onto the cube. Notice how the position values changed. The sphere is now located relative to the cube.
5. Place the sphere at (0, 1, 0). Notice how it doesn’t go to right above the origin and instead sits right above the cube.
6. Now experiment with the various transformations. Be sure to try them on the cube as well as the sphere and see how different they behave for a parent versus a child object.