
1. Getting Started
In this chapter, you learn how to perform specific tasks on your iPad to become familiar with the interface.
→ The iPad Buttons and Switches
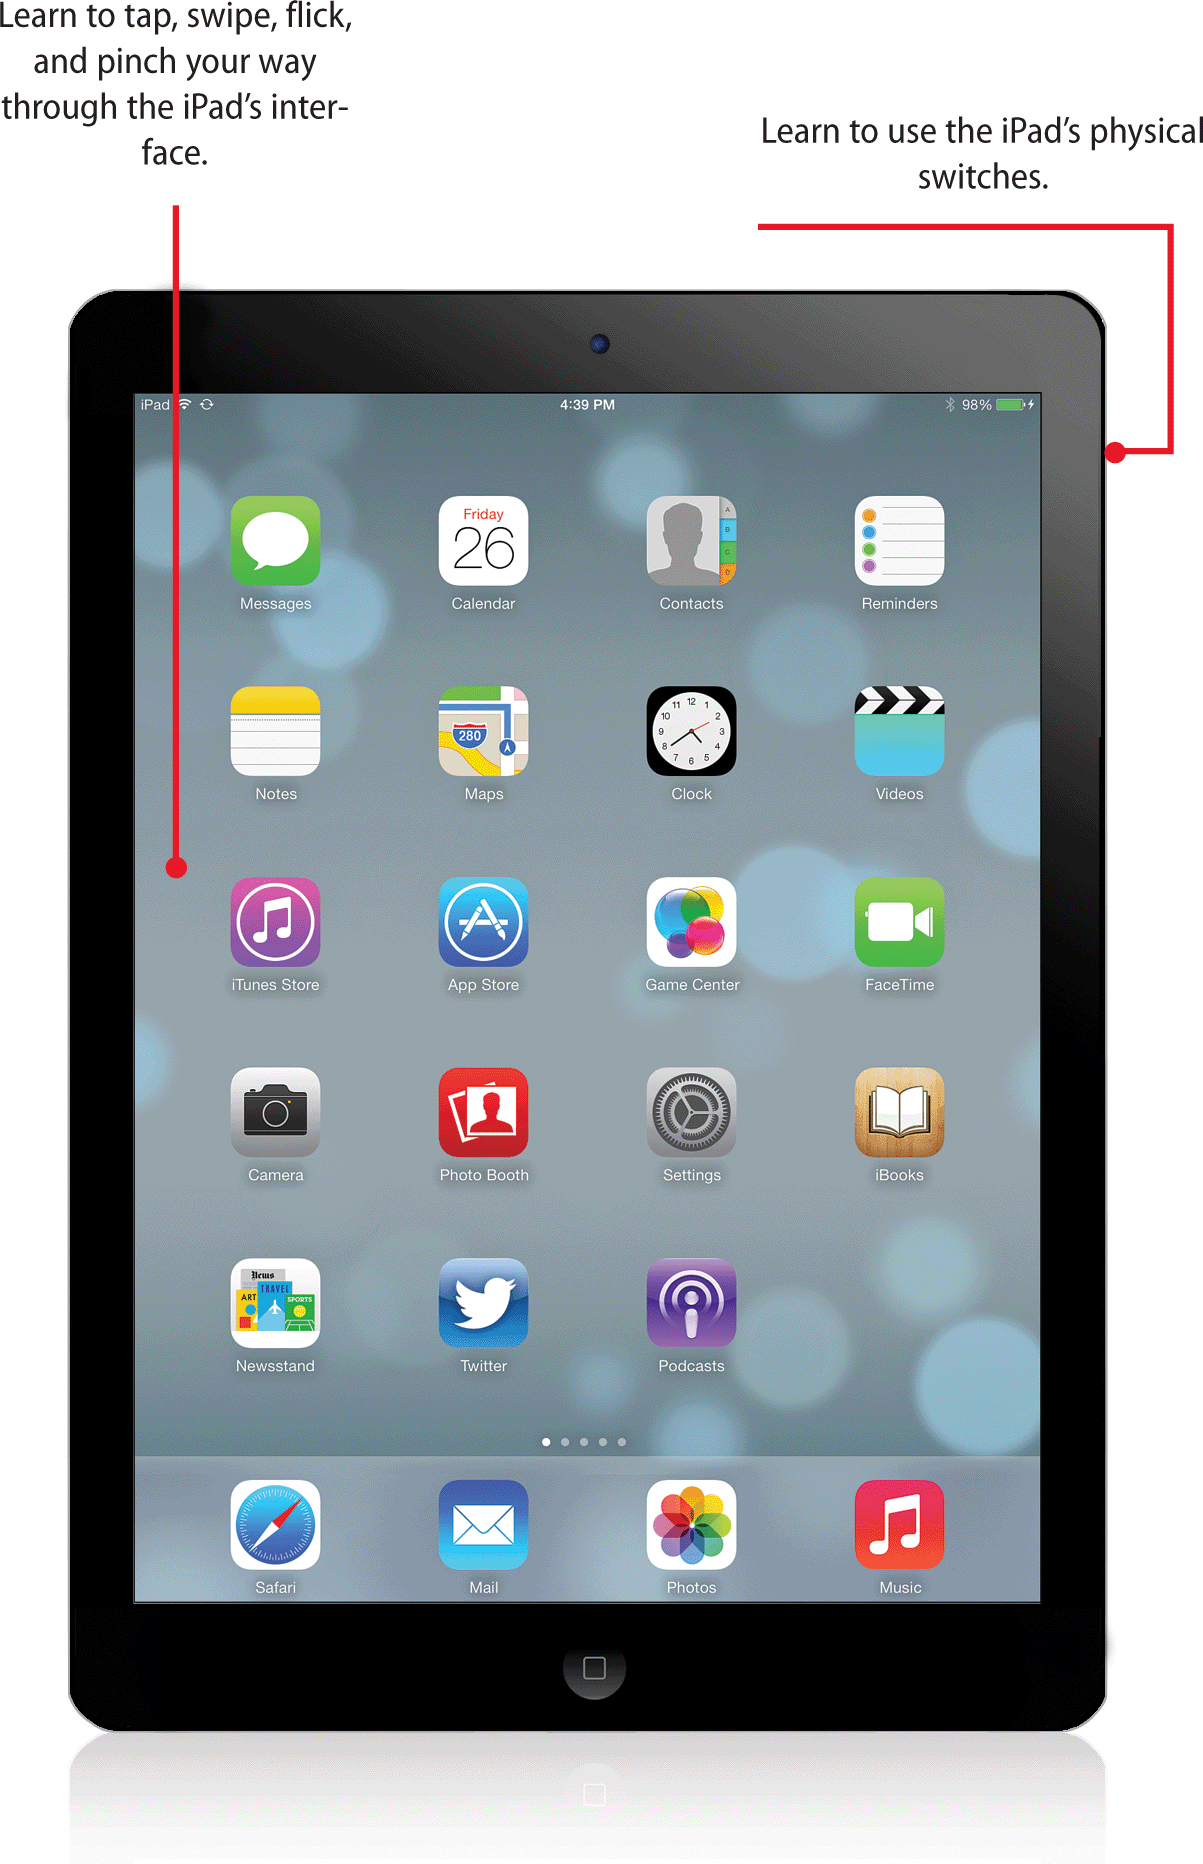
Before you learn how to perform specific tasks on your iPad, you should become familiar with the interface. If you have used an iPhone or iPod touch, you already know the basics. But if the iPad is your first touch-screen device, you need to take time to become accustomed to interacting with it.
Generations of iPads
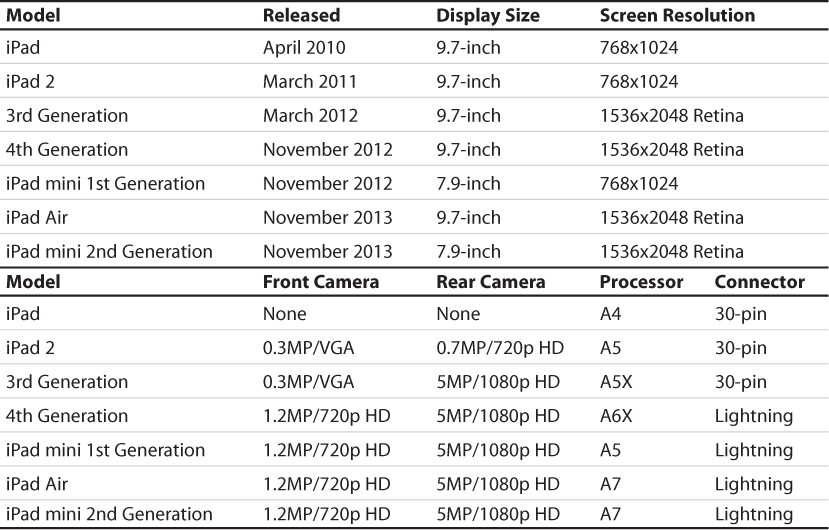
The first thing you may want to do is identify which iPad you have and what features are available to you. There have been many versions of the iPad: the iPad, the iPad 2, the 3rd and 4th generation iPads, the iPad Air (5th generation iPad) and two generations of the iPad mini.
Identifying Your iPad
The following table shows the major differences between these iPads:
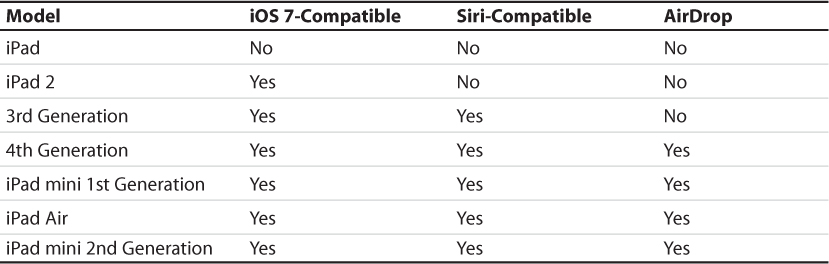
After you know which iPad you are using, you should also know that they differ in what iOS features they can use. The original iPad cannot use iOS 7 at all, or even iOS 6 for that matter. If you have one, the best you can do is iOS 5. Even some of the iPads that can use iOS 7 do not have the ability to access certain features like Siri or AirDrop. We look at Siri at the end of this chapter and AirDrop at the end of Chapter 3.
iPad Capabilities Chart
The 3rd and 4th generation iPads, the iPad Air and the 2nd generation iPad mini use a very different display than the previous versions. They are the same size, but a higher resolution. Instead of 768 pixels across and 1024 vertically, they contain 1536 and 2048, giving you four times as many pixels. This means photographs and text are crisper and clearer. In fact, you can’t even distinguish the individual pixels with your eye unless you hold the iPad very close.
Another difference between iPads is the cameras. The original iPad had no camera at all. The 2nd and 3rd generations had cameras, but the more recent iPads have a rear-facing camera that is capable of much higher resolution for both still photos and video.
Each iPad has also become a little more powerful with a faster processor at its heart. The latest iPad has the 64-bit A7 processor, which gives it the capability to handle voice dictation and render beautiful graphics for games.
iOS 7
The primary piece of software on the iPad is the operating system, known as iOS. This is what you see when you flip through the screens of icons on your iPad and access the various default apps such as Mail, Safari, Photos, and iTunes.
This book covers iOS 7, the version released in September 2013. There have been seven generations of the software that runs iPhones and iPads. The original iPhone OS was developed for the first iPhone. The third version, iOS 3, worked on iPhones and the iPad. This latest version, iOS 7, works on the iPad 2 and newer. If you have an original iPad, you can only use up to iOS 5. Many of the features and tasks in this book work the same in iOS 5 and iOS 6, but you will not be able to use the latest features such as the new Maps app or Siri. To find out which version you are using and to learn how to update, see “Keeping Your iPad Up-To-Date” in Chapter 3.
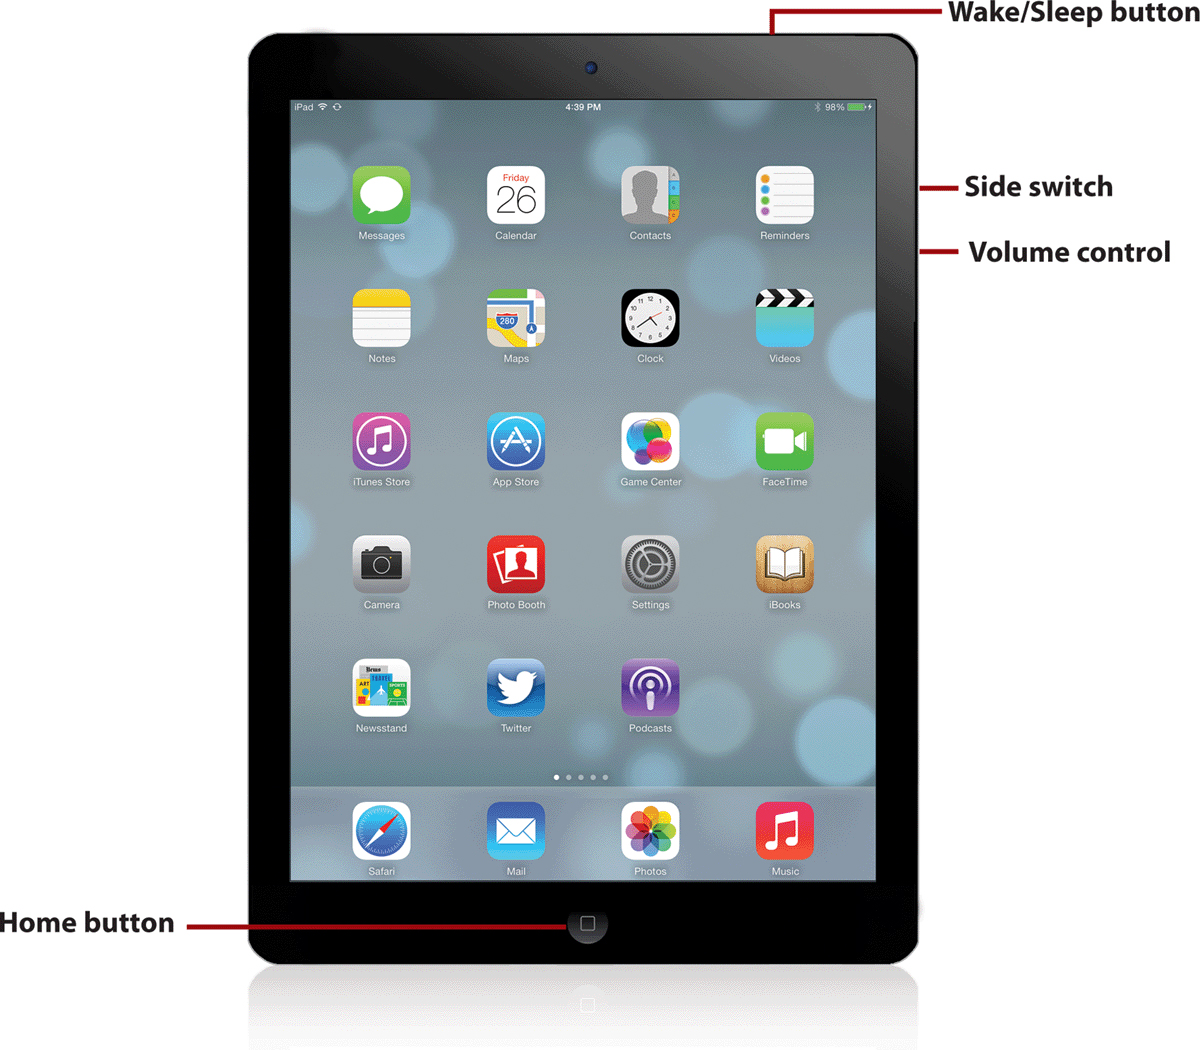
The iPad Buttons and Switches
The iPad features a Home button, a Wake/Sleep button, a volume control, and side switch.
The Home Button
The Home button is probably the most important physical control on the iPad and the one that you will use the most often. Pressing the Home button returns you to the Home screen of the iPad when you are inside an application, such as Safari or Mail, and you want to get back to your Home screen to launch another app. You can also double press the Home button to jump to the app switching screen.
Where’s the Quit Button?
Few, if any, apps on the iPad have a way to quit. Instead, think of the Home button as the Quit button. It hides the current app and returns you to your Home screen. The app is actually still running, but hidden, in the background.
The Wake/Sleep Button
The primary function of the Wake/Sleep button (sometimes called the On/Off button) at the top of your iPad is to quickly put it to sleep. Sleeping is different than shutting down. When your iPad is in sleep mode, you can instantly wake it to use it. You can wake up from sleep by pressing the Wake/Sleep button again or pressing the Home button.
Peek a Boo!
If you are using the Apple iPad Smart Cover, your iPad will go to sleep when you close it and wake up when you open it, as long as you use the default settings.
The Wake/Sleep button can also be used to shut down your iPad, which you might want to do if you leave your iPad for a long time and want to preserve the battery life. Press and hold the Wake/Sleep button for a few seconds, and the iPad begins to shut down and turn off. Confirm your decision to shut down your iPad using the Slide to Power Off button on the screen.
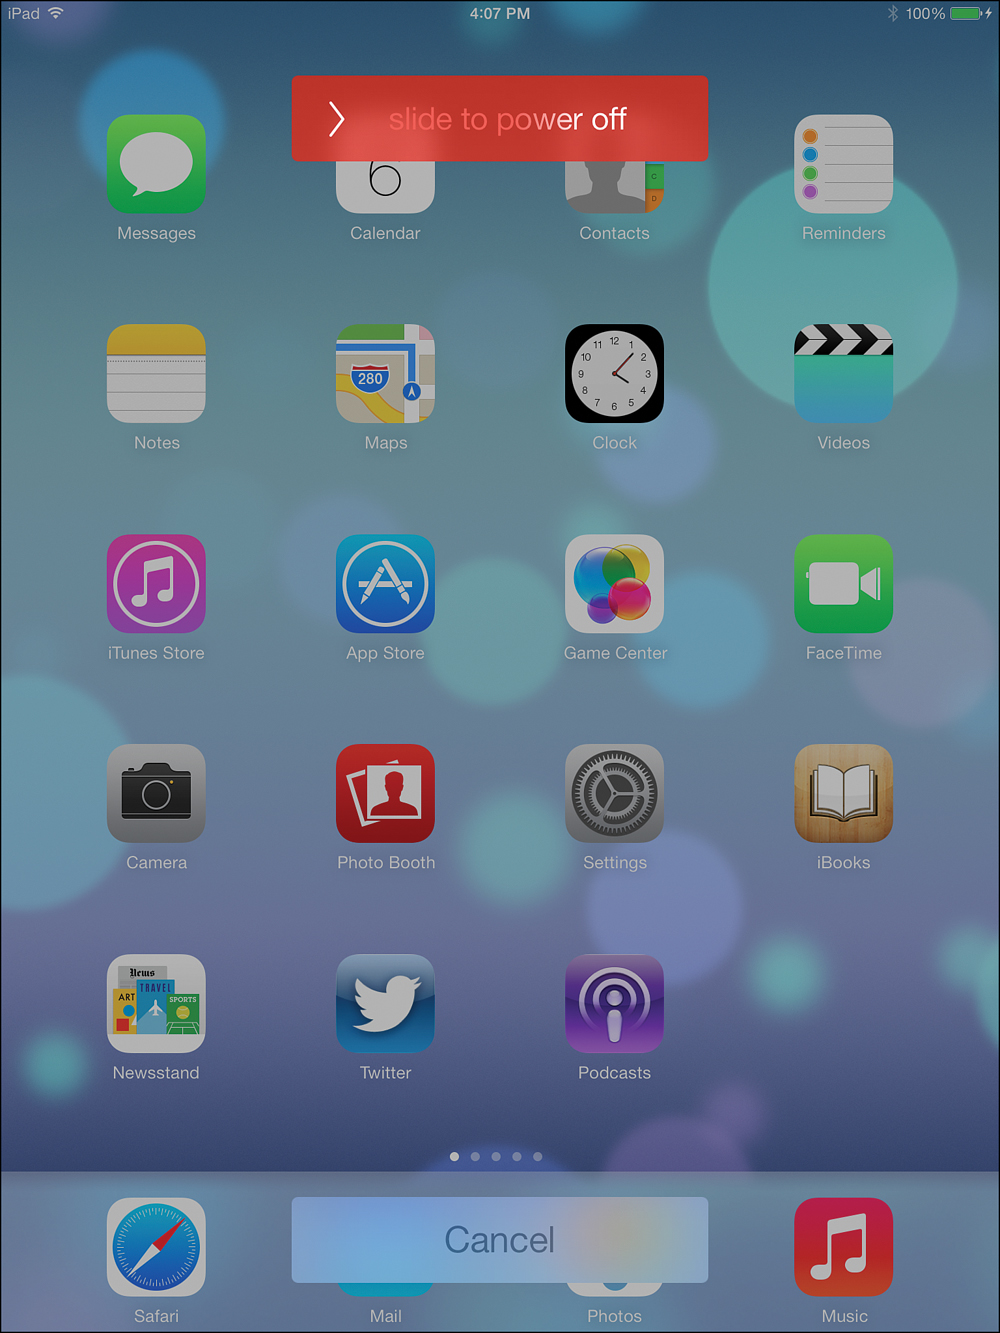
To start up your iPad, press and hold the Wake/Sleep button for a few seconds until you see the Apple logo appear on the screen.
When Should I Turn Off My iPad?
It is normal to never turn off your iPad. In sleep mode, with the screen off, it uses little power. If you plug it in to power at night or during longer periods when you aren’t carrying it with you, you don’t need to ever shut it down.
The Volume Control
The volume control on the side of your iPad is actually two buttons: one to turn the volume up, and the other to turn it down.
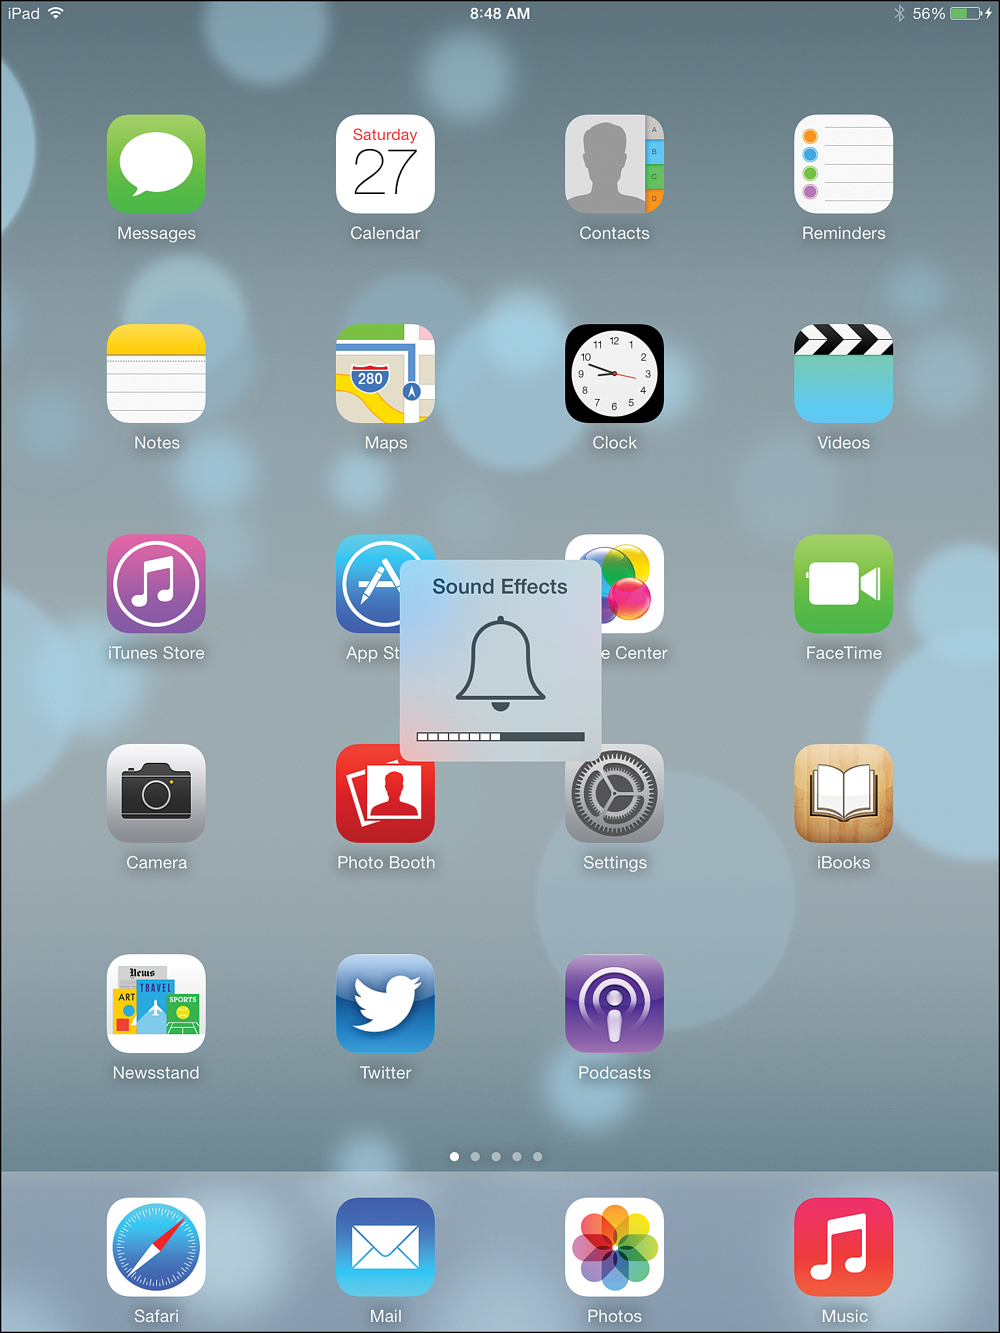
Your iPad keeps two separate volume settings in memory: one for headphones and one for the internal speakers. If you turn down the volume when using headphones and then unplug the headphones, the volume changes to reflect the last settings used when the headphones were not plugged in and vice versa. A bell icon and a series of rectangles display on the screen to indicate the level of volume.
The Side Switch
The switch on the side of your iPad can do one of two things: It can be set as a mute switch or an orientation lock. You can decide which function this button performs in your iPad’s settings. See “Setting Side Switch Functionality” in Chapter 2.
If you choose to use this switch as a mute switch, it will mute all sound if switched to the off position. You will see a speaker icon appear briefly in the middle of the screen when you do this. A line through the icon means you just muted the sound; otherwise, you just unmuted your iPad. By default, the iPad comes with the switch configured to mute.
If you choose to use this switch as an orientation lock, it will do something else entirely. Your iPad has two primary screen modes: vertical and horizontal. You can use almost every default app in either orientation. For example, if you find that a web page is too wide to fit on the screen in vertical orientation, you can turn the iPad sideways and the view changes to a horizontal orientation.
When you don’t want your iPad to react to its orientation, slide the iPad side switch so that you can see the orange dot, which prevents the orientation from changing. When you need to unlock it, just slide the lock off.
This comes in handy in many situations. For instance, if you are reading an ebook in bed or on a sofa while lying on your side, then you may want vertical orientation even though the iPad is lying sideways.
Orientation and Movement
I know I said there were only four physical switches on your iPad, but there is another one: the entire iPad.
Your iPad knows which way it is oriented, and it knows if it is being moved. The simplest indication of this is that it knows whether you hold it vertically with the Home button at the bottom or horizontally with the Home button to one of the sides. Some apps, especially games, use the screen orientation of the iPad to guide screen elements and views.
One interesting physical gesture you might perform is the “shake.” Because your iPad can sense movement, it can sense when you shake it. Many apps take advantage of this feature and use it to set off an action, such as shuffling songs in the Music app, erasing a drawing canvas or as an “undo” function.
Screen Gestures
Who knew just a few years ago that we’d be controlling computing devices with taps, pinches, and flicks rather than drags, key presses, and clicks? Multitouch devices such as the iPhone, iPod Touch, and the iPad have added a new vocabulary to human-computer interaction.
Tapping and Touching
Since there is no mouse, a touch screen has no cursor. When your finger is not on the screen, there is no arrow pointing to anything.
A single, quick touch on the screen is usually called a “tap” or a “touch.” You usually tap an object on the screen to perform an action.
Occasionally you need to double-tap—two quick taps in the same location. For instance, double-tapping an image on a web page zooms in to the image. Another double-tap zooms back out.
Pinching
The screen on the iPad is a multitouch screen, which means it can detect more than one touch at the same time. This capability is used with the pinch gesture.
A pinch (or a pinch in) is when you touch the screen with both your thumb and index finger and move them toward each other in a pinching motion. You can also pinch in reverse, which is sometimes called an “unpinch” or “pinch out.”
An example of when you would use a pinch would be to zoom in and out on a web page or photograph.
Dragging and Flicking
If you touch the screen and hold your finger down, you can drag it in any direction along the screen. This action often has the effect of moving the content on the screen.
For instance, if you are viewing a long web page and drag up or down, the page will scroll. Sometimes an app will let you drag content left and right as well.
What if you have a long web page or a list of items inside an app? Instead of dragging the length of the screen, lifting your finger up, and moving it to the bottom to drag again, you can “flick.” Flicking is like dragging, but you move quickly and lift your finger off the screen at the last moment so that the content continues to scroll after you have lifted your finger. You can wait for it to stop scrolling or touch the screen to make it stop.
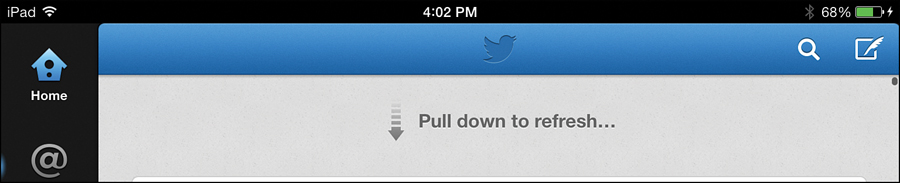
Pull Down and Release to Update
A common gesture is to tap in a list of items, drag down, and release. For instance, you would do this in Mail to get new messages. You would also do this in Twitter to get new tweets. Many Apple and third-party apps use this gesture to let you signal that you want to update the list of items. So if you don’t see an obvious “update now” button, try this gesture.
Four-Finger Gestures
You can perform one of three special functions by using four or five fingers at a time on the screen. If you put four or five fingers on the screen and pinch them all together, you will be taken out of your current app and back to the Home screen, similar to just pressing the Home button.
You can swipe left or right using four or more fingers to quickly page between running apps without going to the Home screen first. Swiping up with four fingers will bring you to the multitask switcher.
iPad Screens
When using a desktop computer, you can usually see multiple windows on the screen that represent different applications, documents, and controls. The iPad doesn’t use a window metaphor like this, but instead usually displays a full screen dedicated to a single purpose.
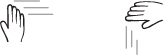
The Lock Screen
The default state of your iPad when you are not using it is the lock screen. This is just your background wallpaper with the time at the top and the words Slide to Unlock at the bottom. You can see the date under the time. The battery status is at the top right, and you can also see it under the time, alternating with the date, if the iPad is currently charging. There is also a small button at the bottom right for quick access to the camera app. The top and bottom of the screen show short bars to allow you to access the Notifications Center at the top and the Control Center at the bottom.
We look at customizing what appears on the lock screen in Chapter 2, as well as the Control Center and the Notifications Center later in this chapter.
By default, you see the lock screen when you wake up your iPad. Sliding your finger from left to right near the words Slide to Unlock takes you to the Home screen or to whichever app you were using when you put the iPad to sleep.
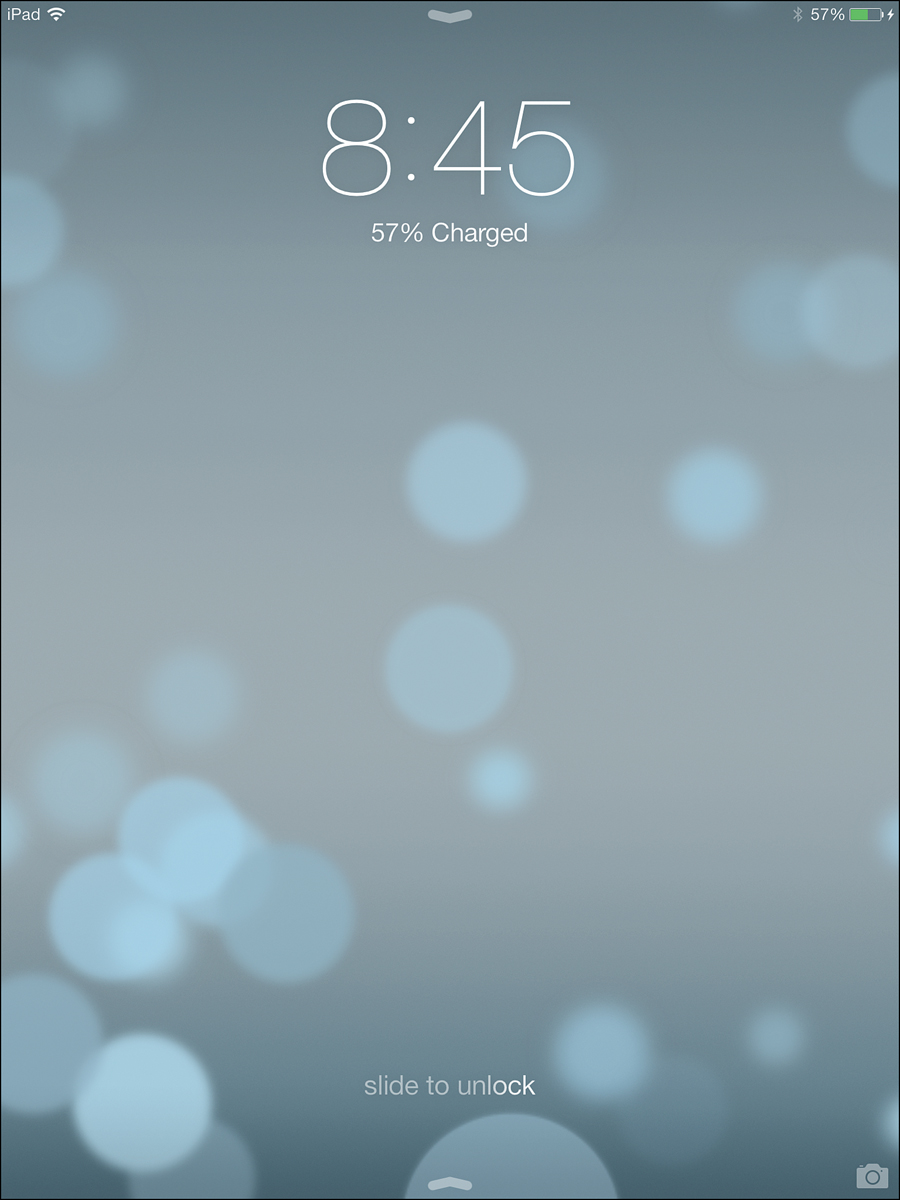
The Home Screen
Think of the Home screen as a single screen but with multiple pages that each features different app icons. At the bottom of the Home screen are app icons that do not change from page to page. The area resembles the Mac OS X Dock.
The number of pages on your Home screen depends on how many apps you have. The number of pages you have is indicated by the white dots near the bottom of the screen, just above the bottom icons. The brightest dot represents the page you are currently viewing. You can move between pages on your Home screen by dragging or flicking left or right.
An App Screen
When you tap on an app icon on the Home screen, you run that app just like you would run an application on your computer. The app takes over the entire screen.
At this point, your screen can look like anything. If you run Safari, for instance, a web page displays. If you run Mail, you see a list of your new email or a single incoming email message.
Home Screen Searching
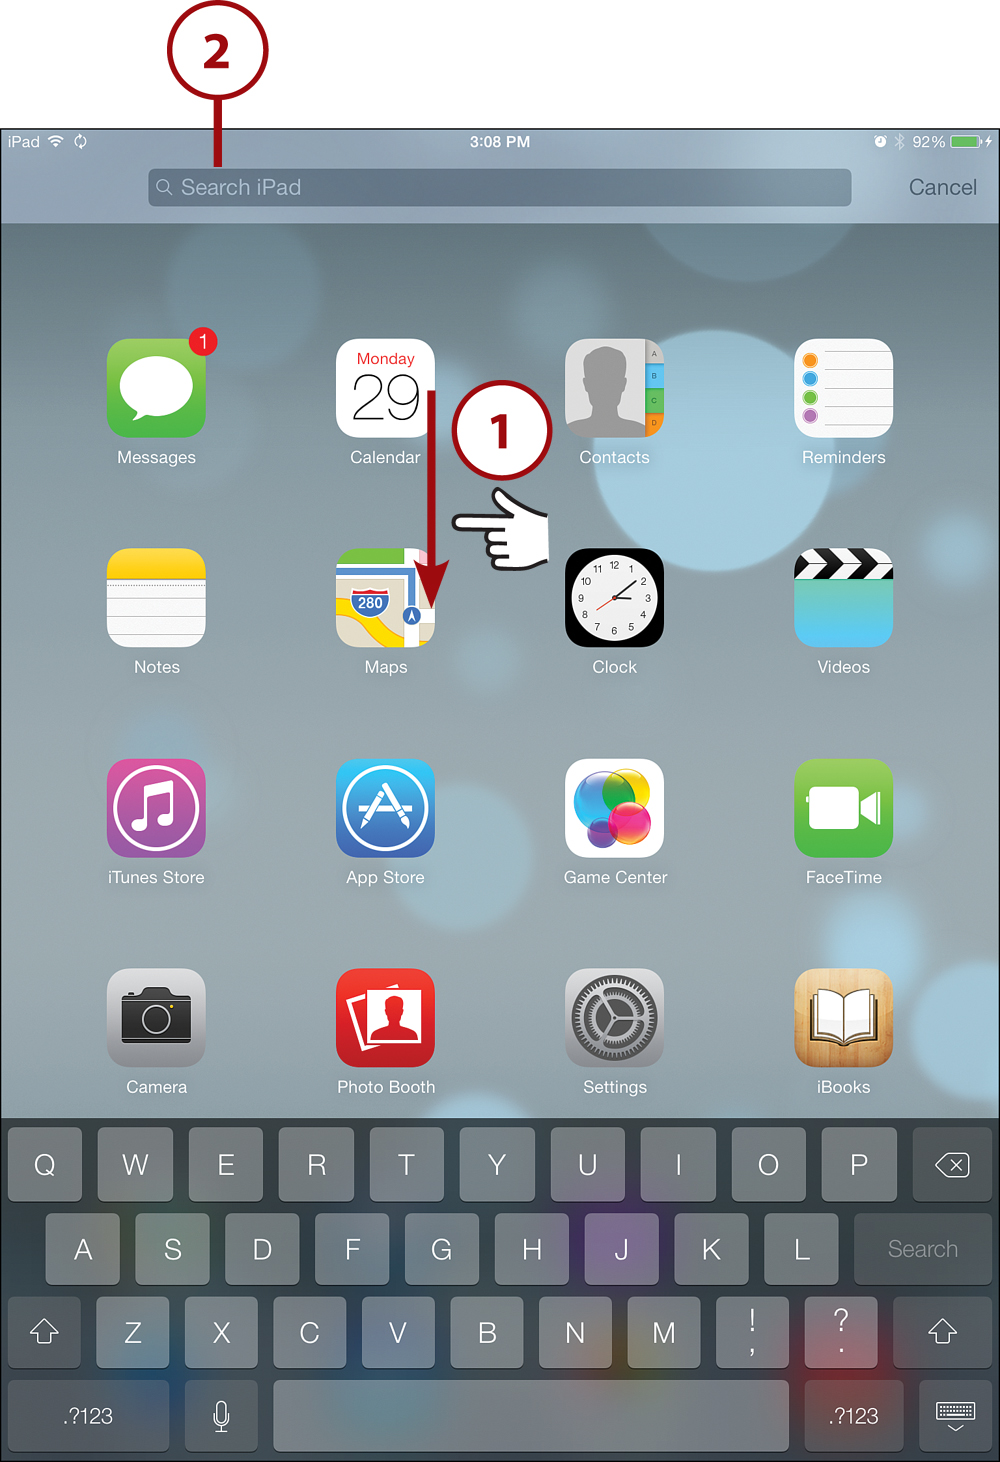
If you are on your Home screen looking at page one of your app icons, you can drag from the center of the screen downward to bring up a Search iPad field at the top and a keyboard at the bottom. This allows you to search your iPad for apps, contacts, events, and other information.
You can type in anything to search for a contact, app, email message, photo, and so on. You don’t have to define what type of thing you want to search for.
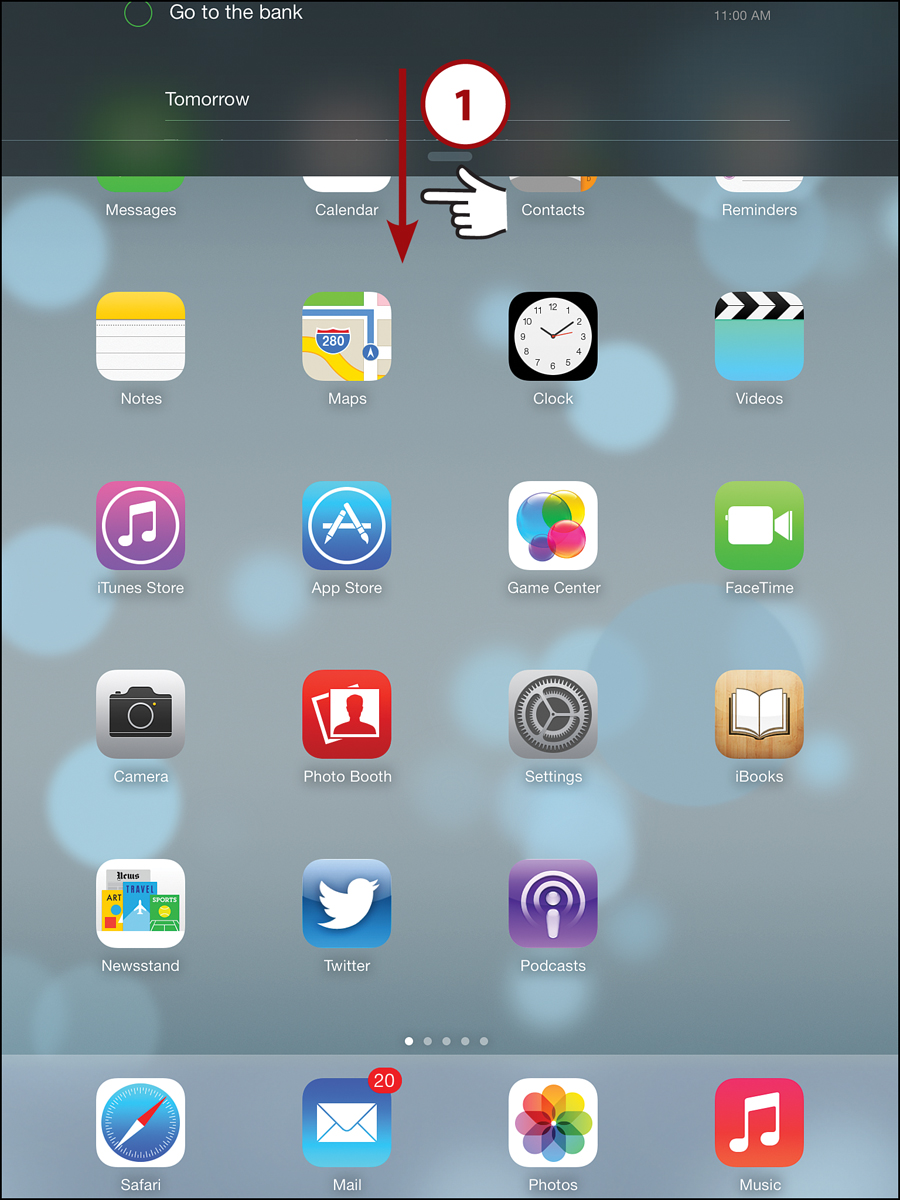
![]() From the Home screen, tap in the center of the screen and drag down. Don’t start at the very top of the screen, as that will bring up Notifications Center instead.
From the Home screen, tap in the center of the screen and drag down. Don’t start at the very top of the screen, as that will bring up Notifications Center instead.
![]() Type a search term using the on-screen keyboard.
Type a search term using the on-screen keyboard.
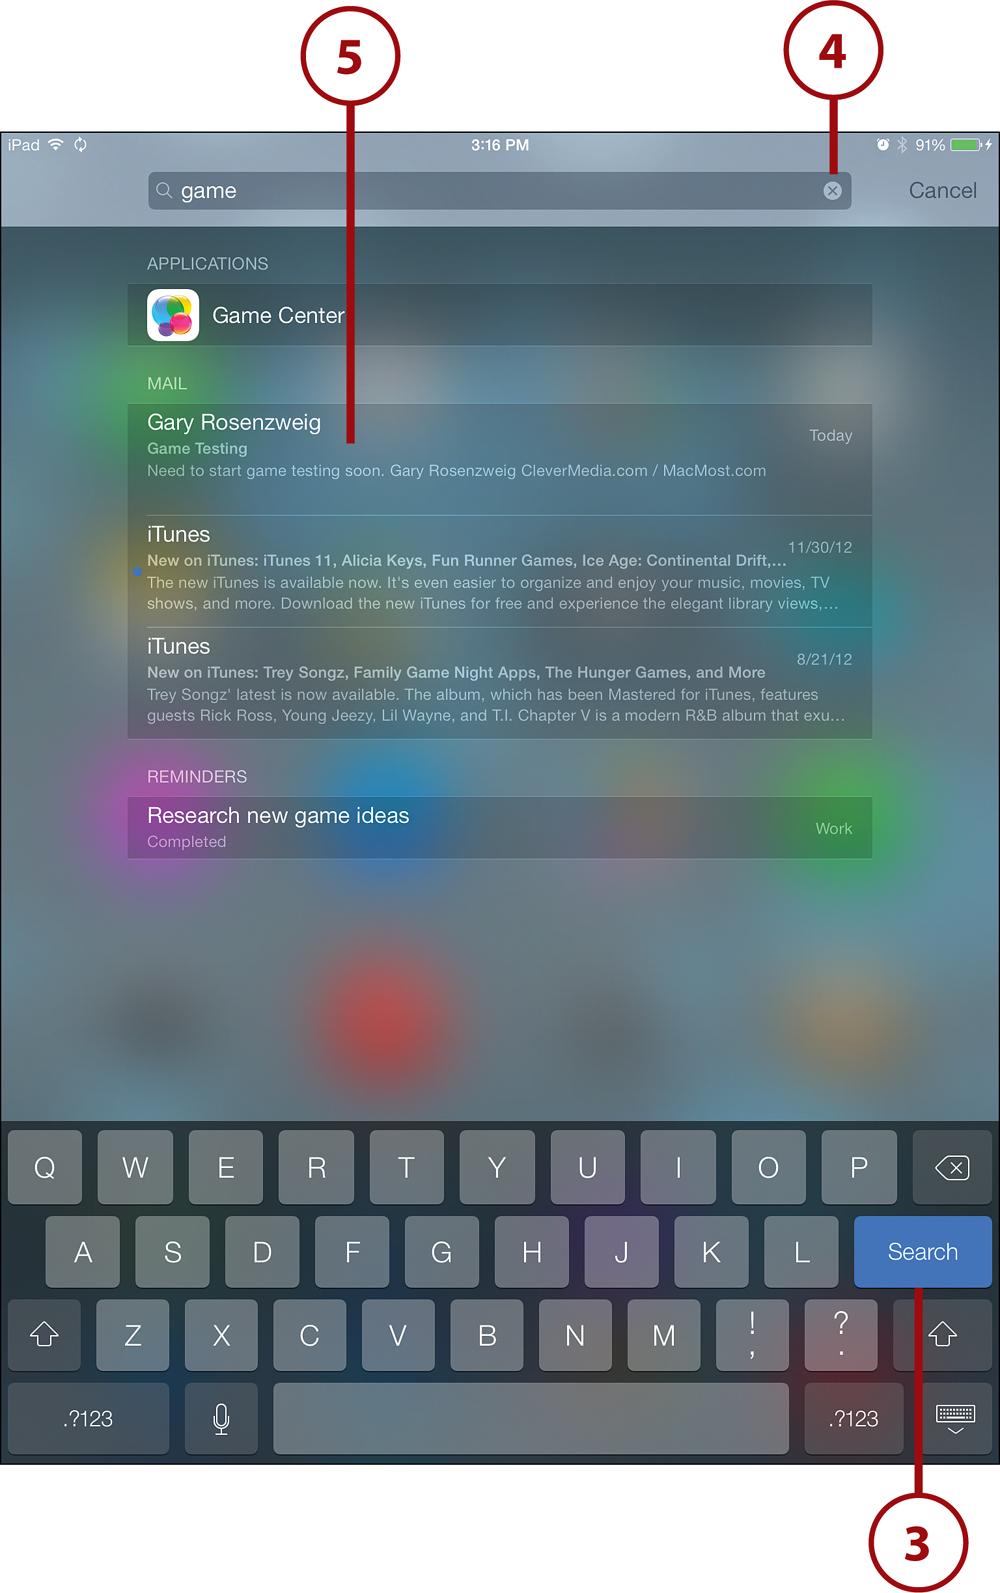
![]() You see a list of items on your iPad that match the search term. Tap the Search button on the keyboard to dismiss the keyboard and complete the search.
You see a list of items on your iPad that match the search term. Tap the Search button on the keyboard to dismiss the keyboard and complete the search.
![]() Tap the X in the search field to clear the search and start again.
Tap the X in the search field to clear the search and start again.
![]() Tap any of the items to go to the appropriate app and view the content.
Tap any of the items to go to the appropriate app and view the content.
The Settings Screen
One of the apps that you have on your iPad by default is the Settings app. With the Settings app, you can control several basic preferences for your iPad. (See Chapter 2 for more on customizing settings.)
This is really just another app screen, but it is worth singling out as you’ll need it to customize most aspects of your iPad.
Interacting with Your iPad
Now let’s examine the different types of on-screen interface elements, the on-screen keyboard and how to use it, and specialized interactions such as text editing and copy and paste.
Common Interface Elements
Several interface elements are more complex than a simple button. In typical Apple style, these elements are often self-explanatory, but if you have never used an iPhone or iPod touch before, you might find some that give you pause.
Switches
A switch is like a simple button, but you need to tap only the switch to activate it. A switch gives you feedback about which state it is in.
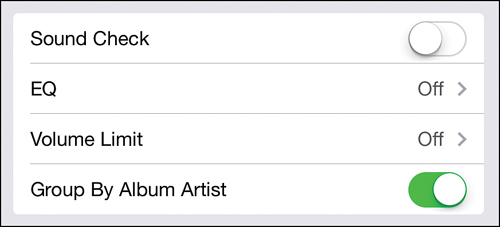
For example, two switches indicate whether the Sound Check and Group By Album Artist features of the Music app are on or off. Tapping on either switch changes the position of the switch.
Toolbars
Some apps have a set of buttons in a toolbar at the top of the screen that are general controls. Each button is nothing more than a word or two that you can tap on to trigger an action. The toolbar might disappear or the buttons might vary depending on the mode of the app. An example of a toolbar is in the Videos app, which lets you switch between Movies, TV Shows, and Music Videos at the top. There is also a button to return to the main Store screen. But this toolbar can change. For instance, if you add some of your own video clips to your iPad, a new Home Movies item will be added to this toolbar.

Menus
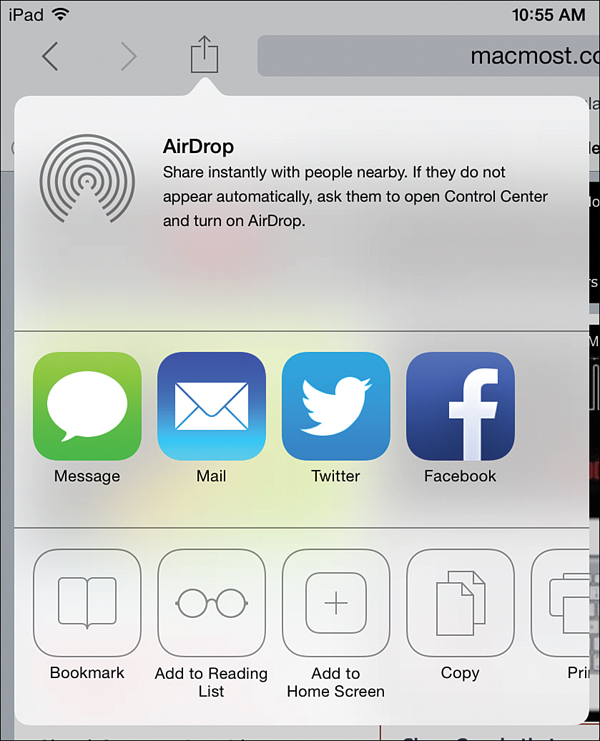
Often tapping a single button in a toolbar brings up more buttons or a list of choices, which are like menus on your Mac or PC. The choices in the list are usually related. For example, a button in Safari gives you many different ways to share a web page.
Tab Bars
Sometimes you see a row of buttons at the bottom of the screen that function similarly to toolbars, but each button represents a different mode for the app. For instance, at the bottom of the App Store app, you see a Tab bar that you use to switch between various lists of apps: Featured, Top Charts, Near Me, Purchased, and Updates.

Using the On-Screen Keyboard
The interface element you might interact with the most is the on-screen keyboard. It pops up from the bottom of the screen automatically whenever you need to enter some text.
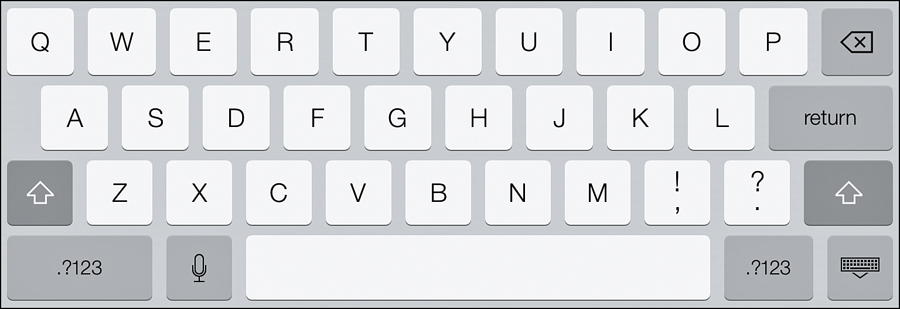
The default keyboard has only letters and the most basic punctuation available. There are two shift keys that enable you to enter uppercase letters. You also have a Backspace key and a Return key.
Is There a Quicker Way to Capitalize?
So to capitalize a word, you tap the Shift key and then type the letter, right? You can. But a faster way is to tap the Shift key; then, without letting your finger off the screen, drag it to the letter and release in a single tap, slide, release action.
You can do the same with numbers and punctuation by tapping the .?123 key and sliding and releasing over the key you want.
To enter numbers and some other punctuation, tap the .?123 key to switch your keyboard into a second mode for numbers and punctuation.
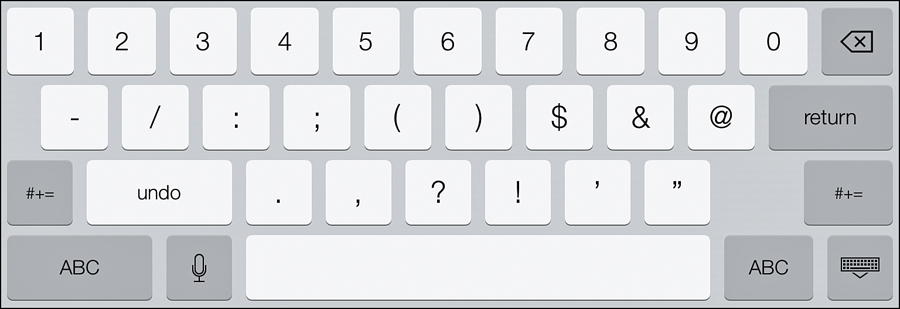
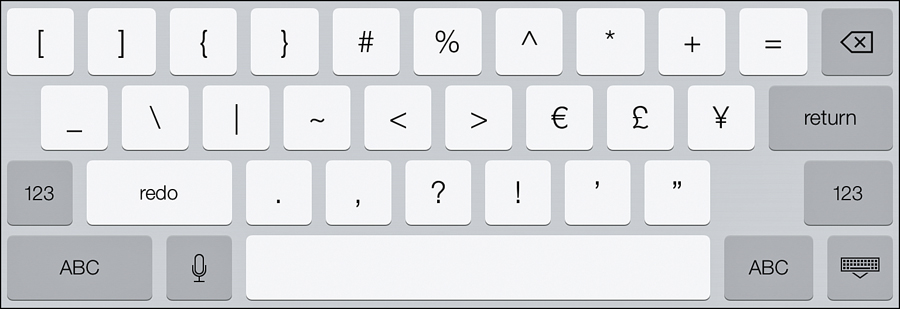
To return to the letters, just tap the ABC key, or tap the #+= key to go to a third keyboard that includes less frequently used punctuation and symbols.
There are other keyboard variations. For instance, if you type in a location that needs a web address, a keyboard that doesn’t have a spacebar appears that instead has commonly used symbols such as colons, slashes, underscores, and even a .com button. Instead of a Return key, you might see an action word like “Search” written on that key—tapping it will perform an action like searching the web. All keyboards include a button at the bottom right that enables you to hide the keyboard if you want to dismiss it.
You can also split the keyboard and/or move it up away from the bottom of the screen. Just tap and hold the keyboard button at the bottom-right corner of the keyboard. It has a little keyboard icon on it. Then select Undock or Split. The first will simply move the keyboard to the middle of the screen. The second will do that as well, but will also split the keyboard into two halves. You can then drag the keyboard up and down by tapping, holding, and dragging on that same keyboard button. Drag it all the way back down to the bottom to dock it to the bottom again. You can also split the keyboard by placing two fingers on the keyboard and dragging them apart, and then rejoin it by dragging the fingers together.
Dictating Text
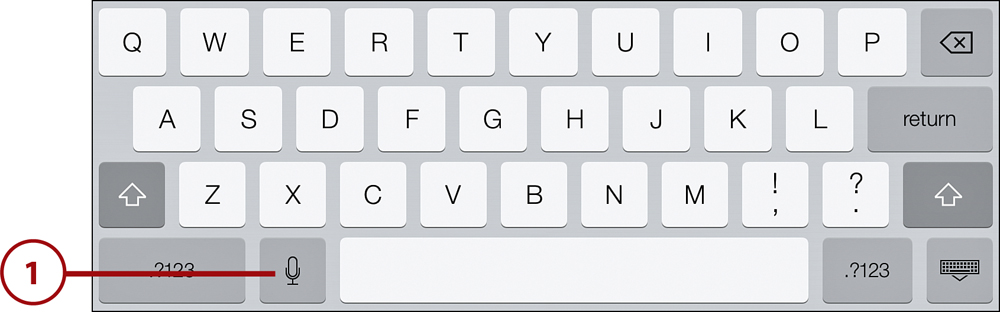
If you have a 3rd generation iPad or newer, or an iPad mini, you can also dictate text using your voice rather than typing on the keyboard. Almost any time you see a keyboard you should also see a small microphone button to the left of the spacebar. Tap that and you will be prompted to speak to your iPad. You will need to be connected to the Internet through a Wi-Fi or cellular connection for this to work.
![]() Any time you see the default keyboard, you will see the microphone button to the left of the spacebar. Tap it to begin dictating.
Any time you see the default keyboard, you will see the microphone button to the left of the spacebar. Tap it to begin dictating.
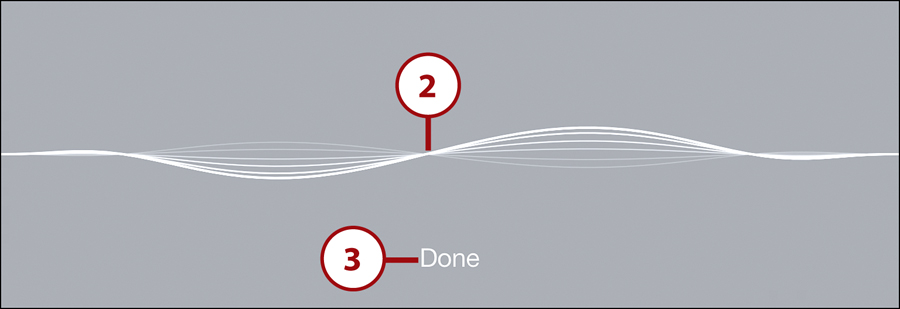
![]() The keyboard is replaced with a waveform line that vibrates as you speak. Speak a few words or a sentence or two.
The keyboard is replaced with a waveform line that vibrates as you speak. Speak a few words or a sentence or two.
![]() Tap Done when you are finished speaking. After a few seconds your spoken words will be translated into text and inserted as if you had typed them.
Tap Done when you are finished speaking. After a few seconds your spoken words will be translated into text and inserted as if you had typed them.
Speak somewhat slowly and clearly, and in segments about the length of a sentence for best results. Of course this feature isn’t perfect. Pay careful attention to what is transcribed and correct any mistakes using the keyboard. Over time you will get better at speaking in a way that minimizes mistakes.
Editing Text
Editing text has its challenges on a touch-screen device. Even though you can just touch any portion of your text on screen, your finger tip is too large for the level of precision you usually get with a computer mouse and cursor. To compensate, Apple developed an editing technique using a magnifying glass area of the screen that you get when you touch and hold over a piece of text.
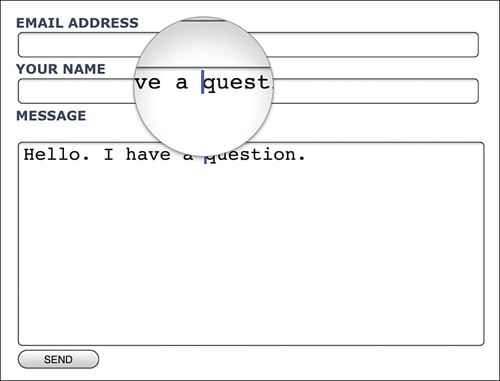
For example, if you want to enter some text into a field in Safari, touch and hold on the field. A circle of magnification appears with a cursor placed at the exact location you selected.
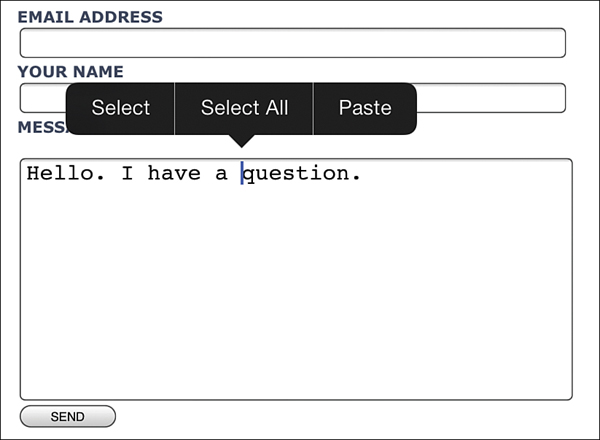
When you find the exact location that you want to indicate, release your finger from the screen. Then a variety of options display, depending on what kind of text you selected, such as Select, Select All, and Paste. You can ignore the options presented and start typing again to insert text at this location.
Copy and Paste
You can copy and paste text inside an app, and between apps, on your iPad. Here’s how you might copy a piece of text from one document to another in the Notes app.
![]() Launch Notes. If you don’t have any notes yet, create one by typing some sample text.
Launch Notes. If you don’t have any notes yet, create one by typing some sample text.
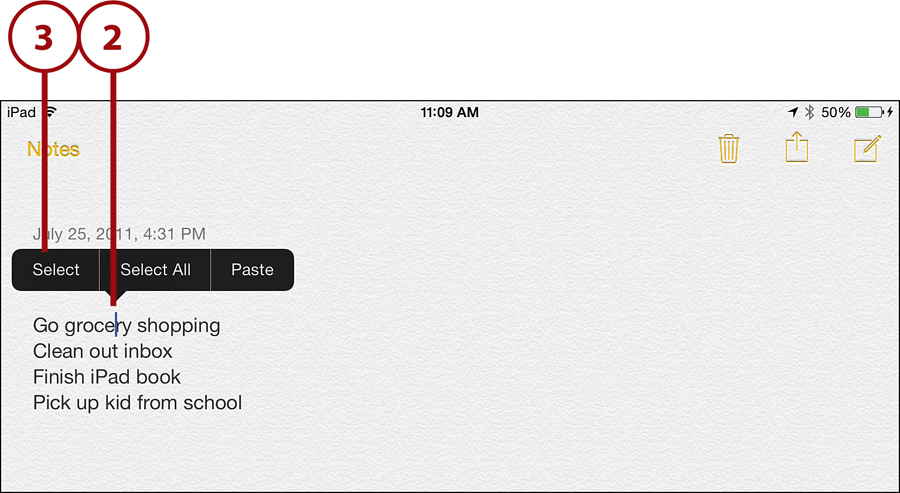
![]() Touch and hold over a word in your note. The Select/Select All pop-up menu appears.
Touch and hold over a word in your note. The Select/Select All pop-up menu appears.
![]() Choose Select.
Choose Select.
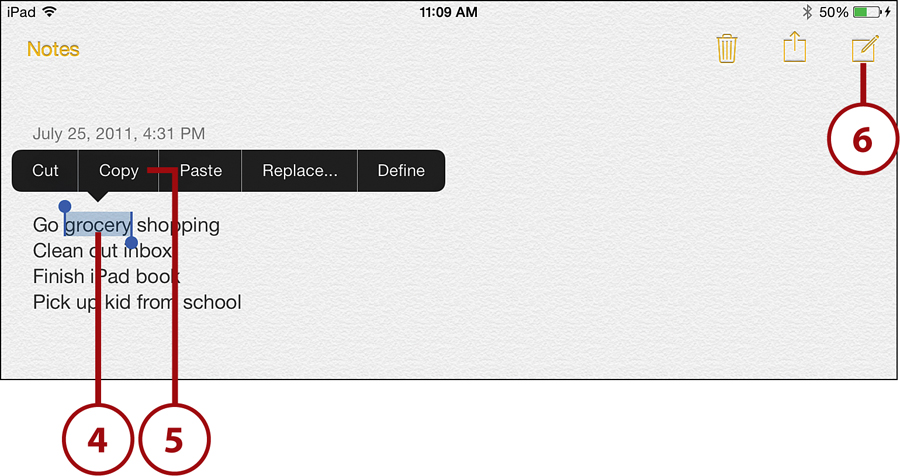
![]() Some text appears highlighted surrounded by dots connected to lines. Tap and drag the dots so the highlighted area is exactly what you want.
Some text appears highlighted surrounded by dots connected to lines. Tap and drag the dots so the highlighted area is exactly what you want.
![]() Tap Copy.
Tap Copy.
![]() Tap the new note button to create a new note.
Tap the new note button to create a new note.
![]() Tap the empty document area once to bring up a pop-up menu with the Paste command.
Tap the empty document area once to bring up a pop-up menu with the Paste command.
![]() Tap Paste to insert the copied text.
Tap Paste to insert the copied text.

Using Siri
Siri is a voice-activated assistant that was first introduced in 2011 on the iPhone 4S. You can use your voice and speak commands to your iPhone and Siri will respond. It will either give you information or take action using one of the apps on the iPhone.
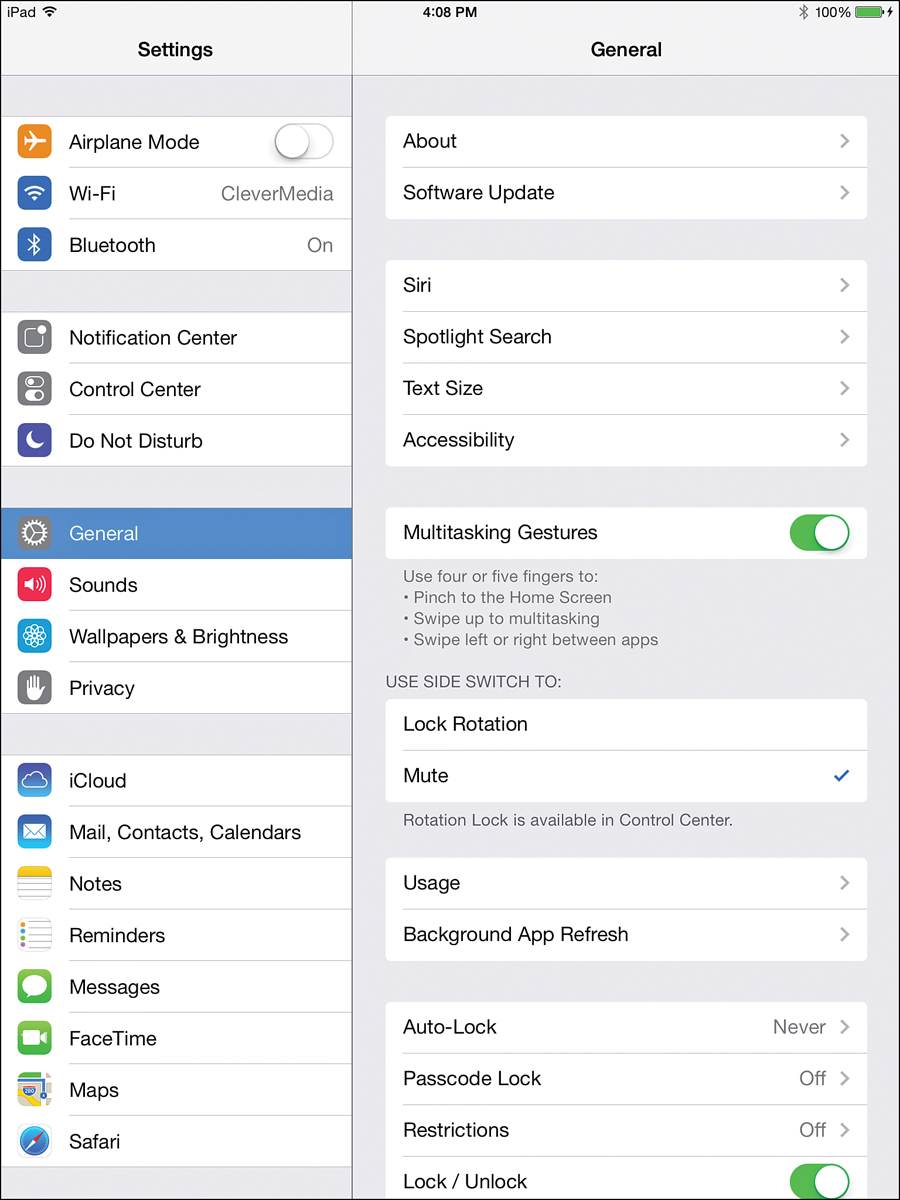
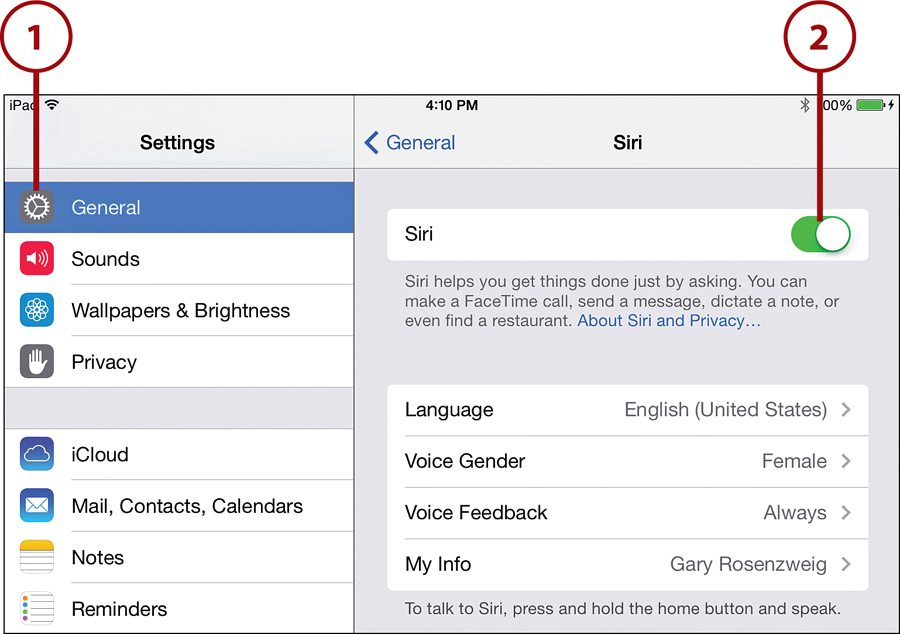
To use Siri on your iPad, you need to make sure you have Siri turned on in the Settings app under General settings. Then, you use the Home button to activate Siri.
![]() In your Settings app, tap the General settings.
In your Settings app, tap the General settings.
![]() Make sure Siri is turned on.
Make sure Siri is turned on.
![]() Press the Home button to exit Settings.
Press the Home button to exit Settings.
![]() Press and hold the Home button for about a second. The Siri interface will pop up, showing a waveform line at the bottom of the screen that reacts to the sound of your voice.
Press and hold the Home button for about a second. The Siri interface will pop up, showing a waveform line at the bottom of the screen that reacts to the sound of your voice.
![]() The help button brings up a list of examples of things you can ask Siri.
The help button brings up a list of examples of things you can ask Siri.
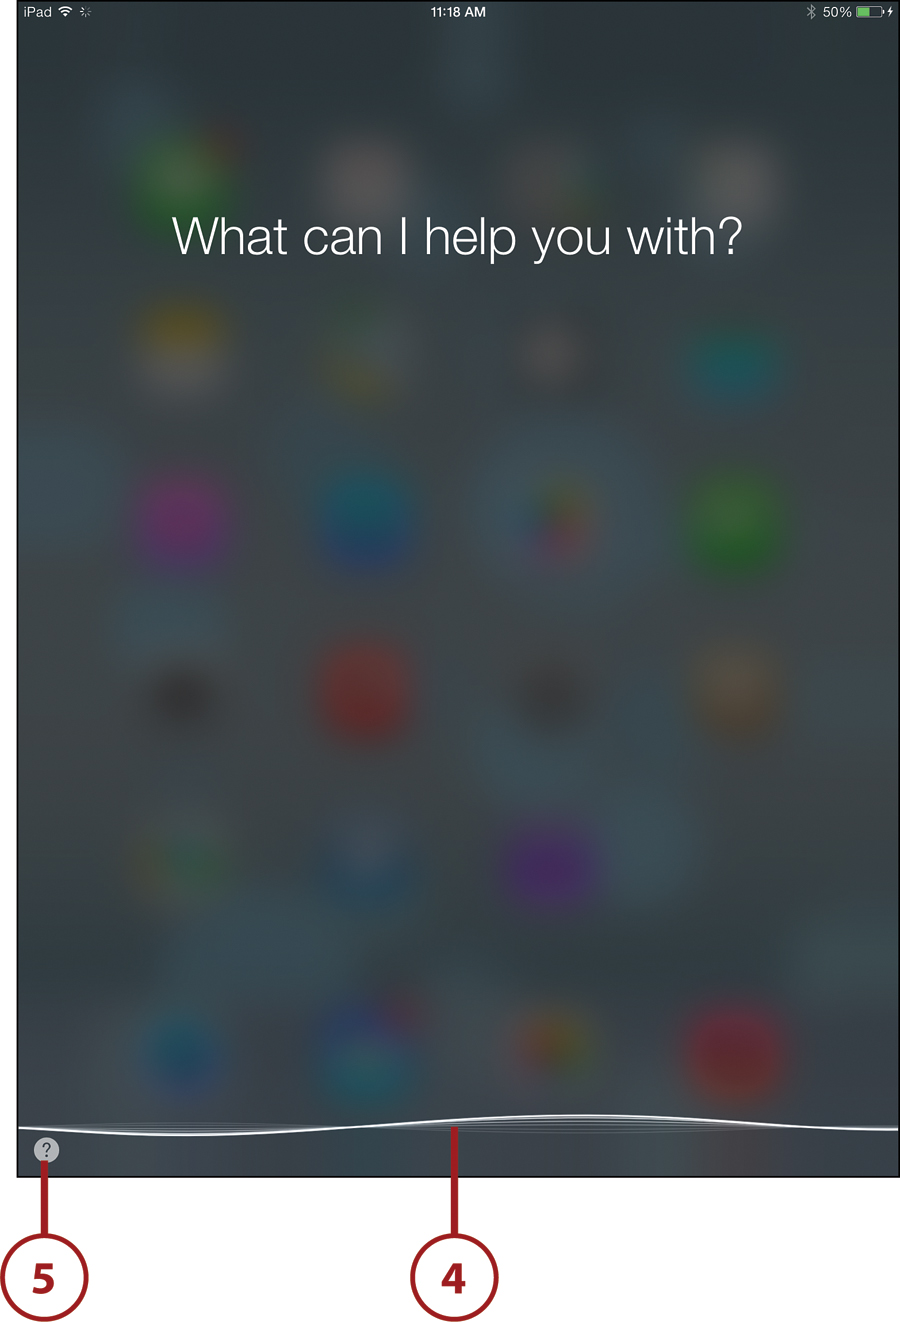
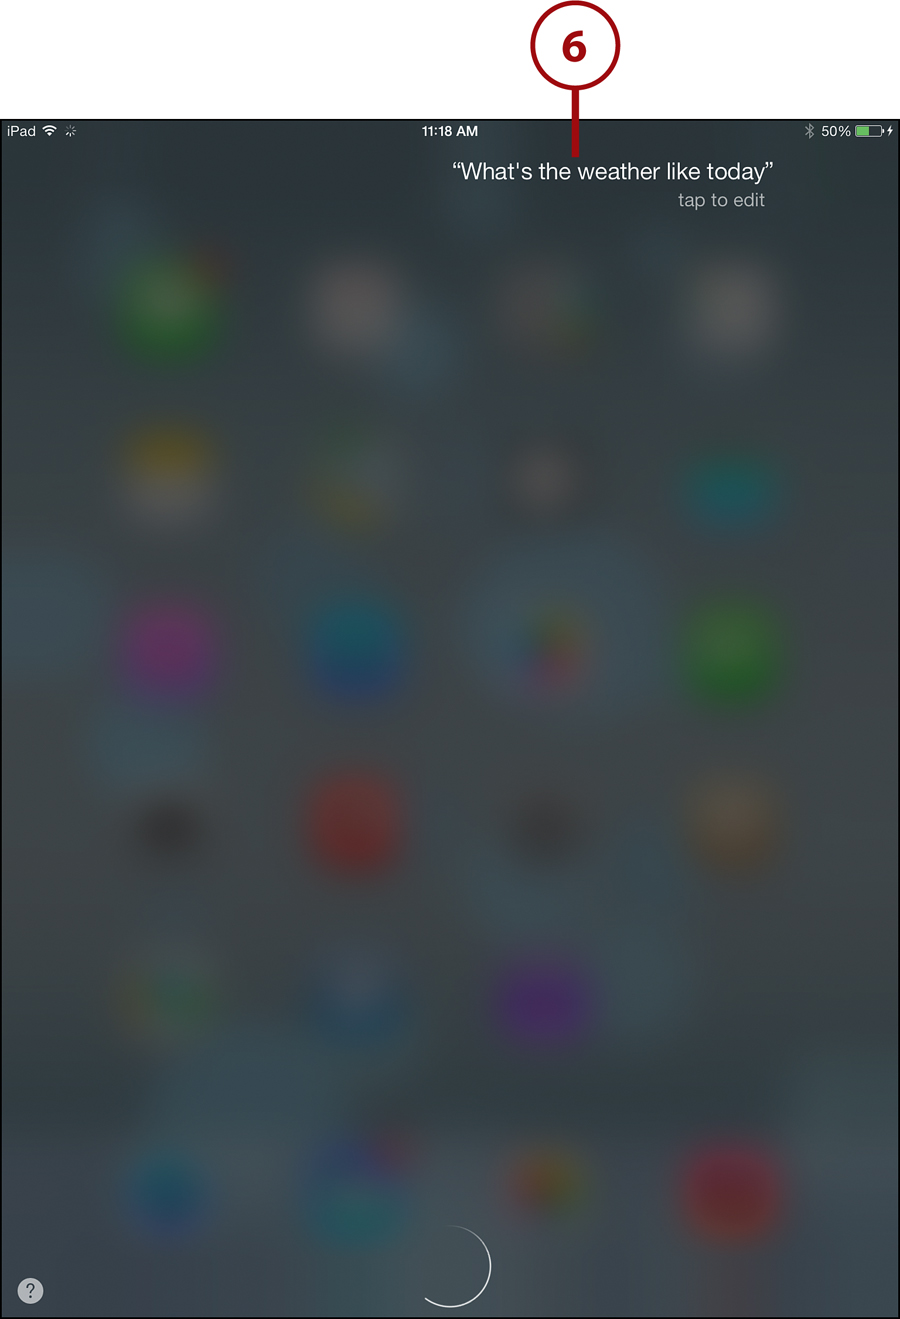
![]() Speak clearly at a normal pace and say “What’s the weather like today?” After a short delay, the words you spoke will appear and Siri will attempt to perform an action based on those words.
Speak clearly at a normal pace and say “What’s the weather like today?” After a short delay, the words you spoke will appear and Siri will attempt to perform an action based on those words.
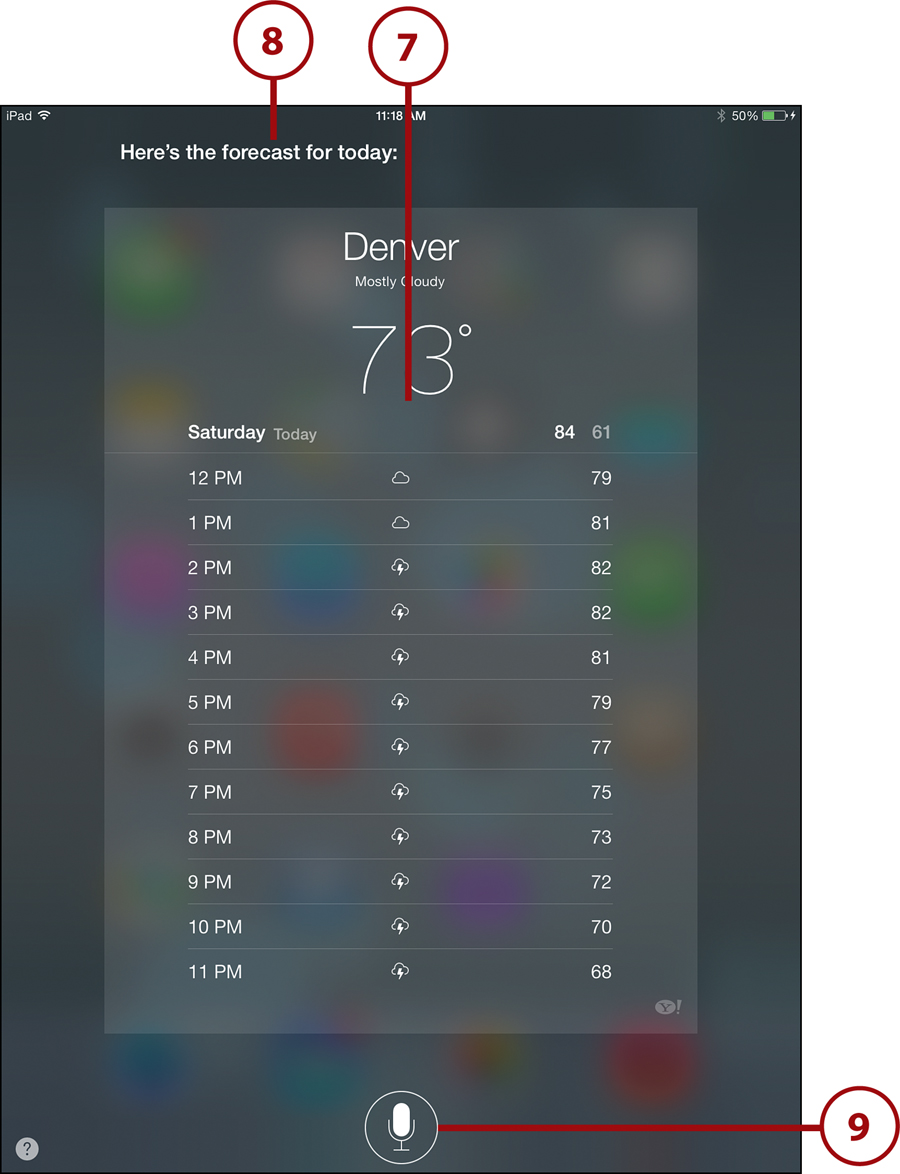
![]() In this case, a short weather forecast will appear.
In this case, a short weather forecast will appear.
![]() Siri also responds with a statement and will speak it audibly. The text of the response will typically appear above the response.
Siri also responds with a statement and will speak it audibly. The text of the response will typically appear above the response.
![]() You can ask Siri another question by tapping the microphone button at the bottom of the screen.
You can ask Siri another question by tapping the microphone button at the bottom of the screen.
To use Siri, you must have a connection to the Internet. It can be a Wi-Fi connection or a mobile connection. When you speak text, the audio is transmitted to Apple’s servers to convert it to text and interpret the command. The results are sent back to your iPad.
It is best to speak clearly and to limit background noise. Using Siri in a quiet room works better than in a crowded outdoor space or in a car with the radio on, for instance.
Because Apple’s servers control Siri, they can update Siri’s capabilities at any time. For example, originally Siri did not understand a request for local sports scores, but after an update this functionality was added.
You can use Siri to perform many tasks on your iPad without typing. For example, you can search the Web, set reminders, send messages, and play music. Throughout the rest of this book, look for the Siri icon for tips on how to use Siri to perform a task related to that section of the book.
Using Notifications Center
To move between pages on your Home screen, you swipe left and right. But you can also pull down and pull up two special screens from any Home screen, or just about any screen at all, even if you are in an app.
Swiping from the very top of your screen downward pulls down the Notifications Center.
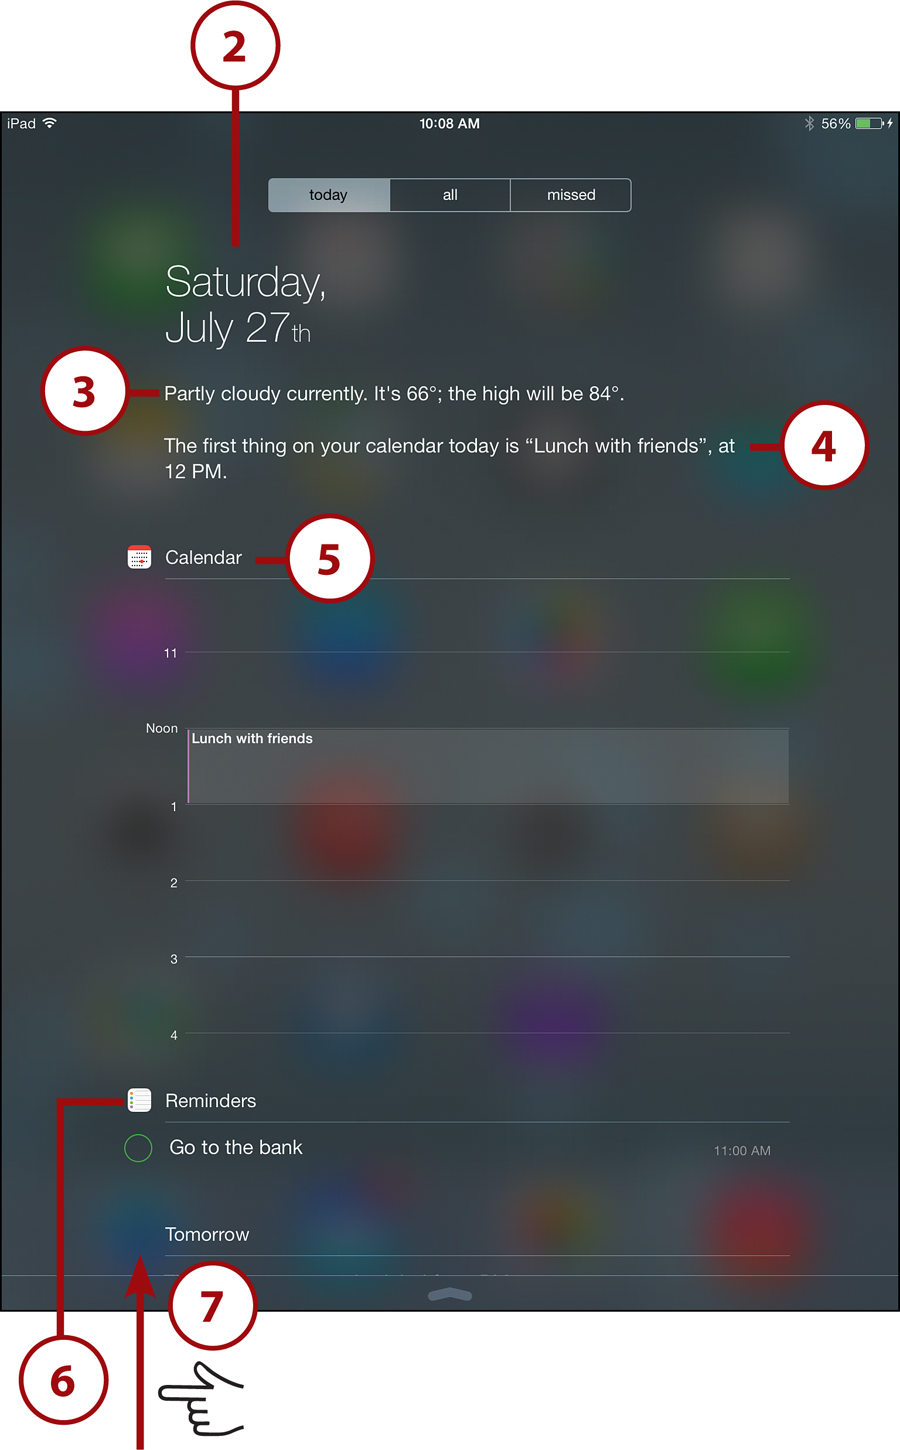
![]() Swipe down from the top of the screen to pull down the Notifications Center. If you are having trouble, try placing your finger above the screen, outside of the actual screen area, and moving your finger down onto the screen, continuing all the way down.
Swipe down from the top of the screen to pull down the Notifications Center. If you are having trouble, try placing your finger above the screen, outside of the actual screen area, and moving your finger down onto the screen, continuing all the way down.
![]() In large type at the top of the screen, you will see today’s date.
In large type at the top of the screen, you will see today’s date.
![]() Under that, you may see a summary of today’s weather, depending on your settings for the Notifications Center.
Under that, you may see a summary of today’s weather, depending on your settings for the Notifications Center.
![]() More information about today are summarized under the weather.
More information about today are summarized under the weather.
![]() A preview of your calendar events for the day are shown. You can tap on an event to open the Calendar app and go right to it.
A preview of your calendar events for the day are shown. You can tap on an event to open the Calendar app and go right to it.
![]() If you have any items set for today in the Reminders app, you will see them here. You can tap them to open the Reminders app.
If you have any items set for today in the Reminders app, you will see them here. You can tap them to open the Reminders app.
![]() If you have more information than can fit on the screen, you can swipe up to see it. This screen shows information about tomorrow as well as today.
If you have more information than can fit on the screen, you can swipe up to see it. This screen shows information about tomorrow as well as today.
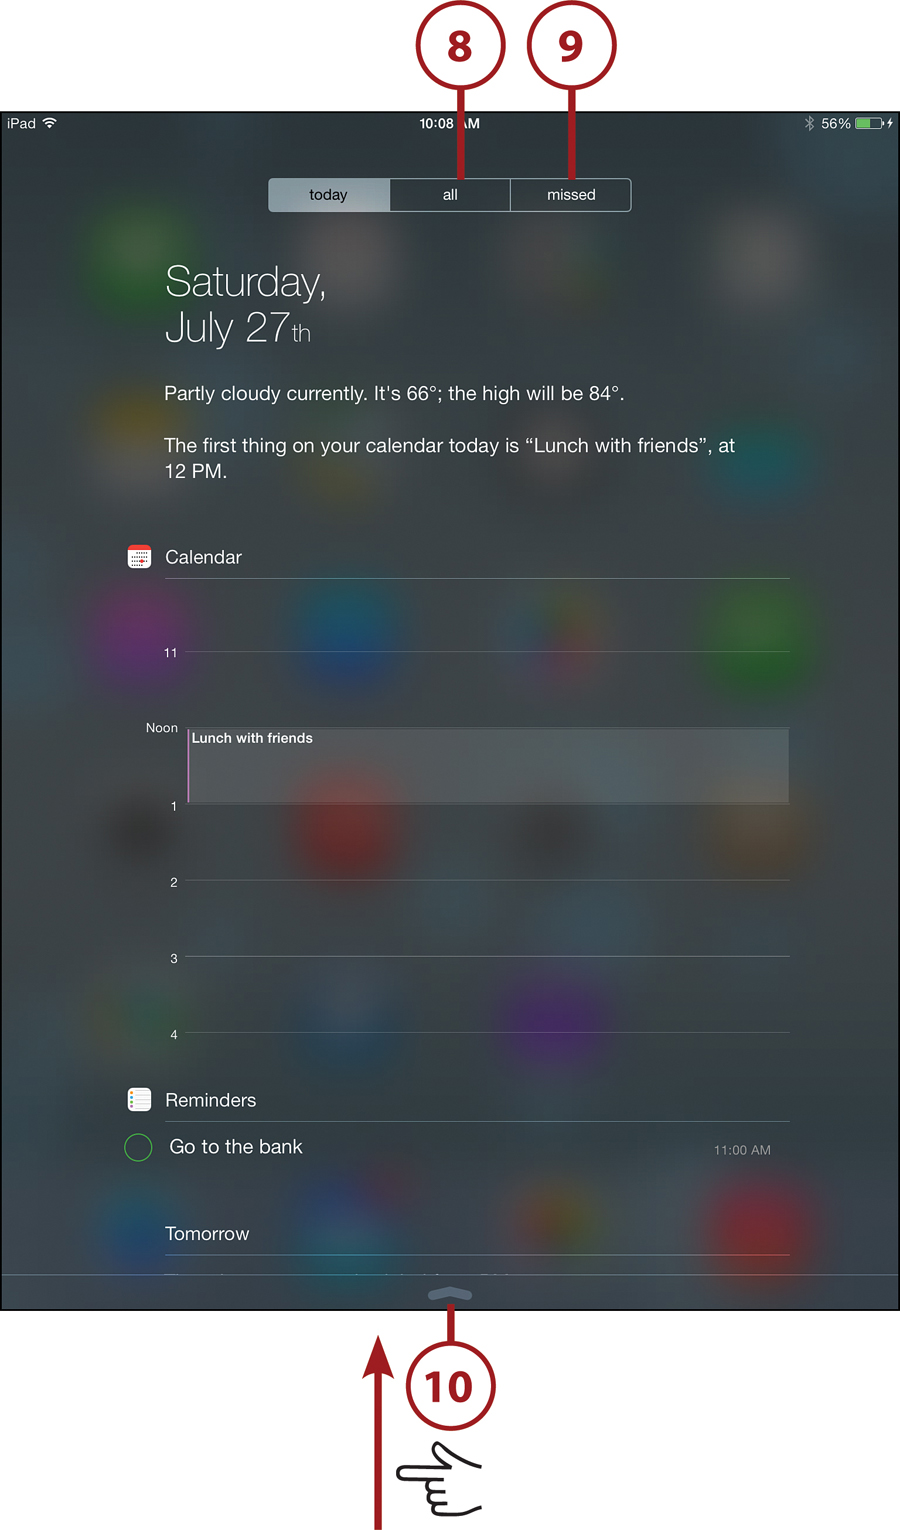
![]() Tap All to see other notifications, such as incoming email, Messages, and App Store updates.
Tap All to see other notifications, such as incoming email, Messages, and App Store updates.
![]() Tap Missed to see events and other information from earlier in the day.
Tap Missed to see events and other information from earlier in the day.
![]() Tap the flat arrow at the bottom of the screen and drag up to the top of the screen to close the Notifications Center. You can also just press the Home button at the bottom of your iPad.
Tap the flat arrow at the bottom of the screen and drag up to the top of the screen to close the Notifications Center. You can also just press the Home button at the bottom of your iPad.
You can customize the Notifications Center in the Settings app, deciding exactly what appears in it. We look at that in Chapter 2.
Using Control Center
The Notifications Center comes down from the top of your iPad’s screen, but the Control Center comes up from the bottom.
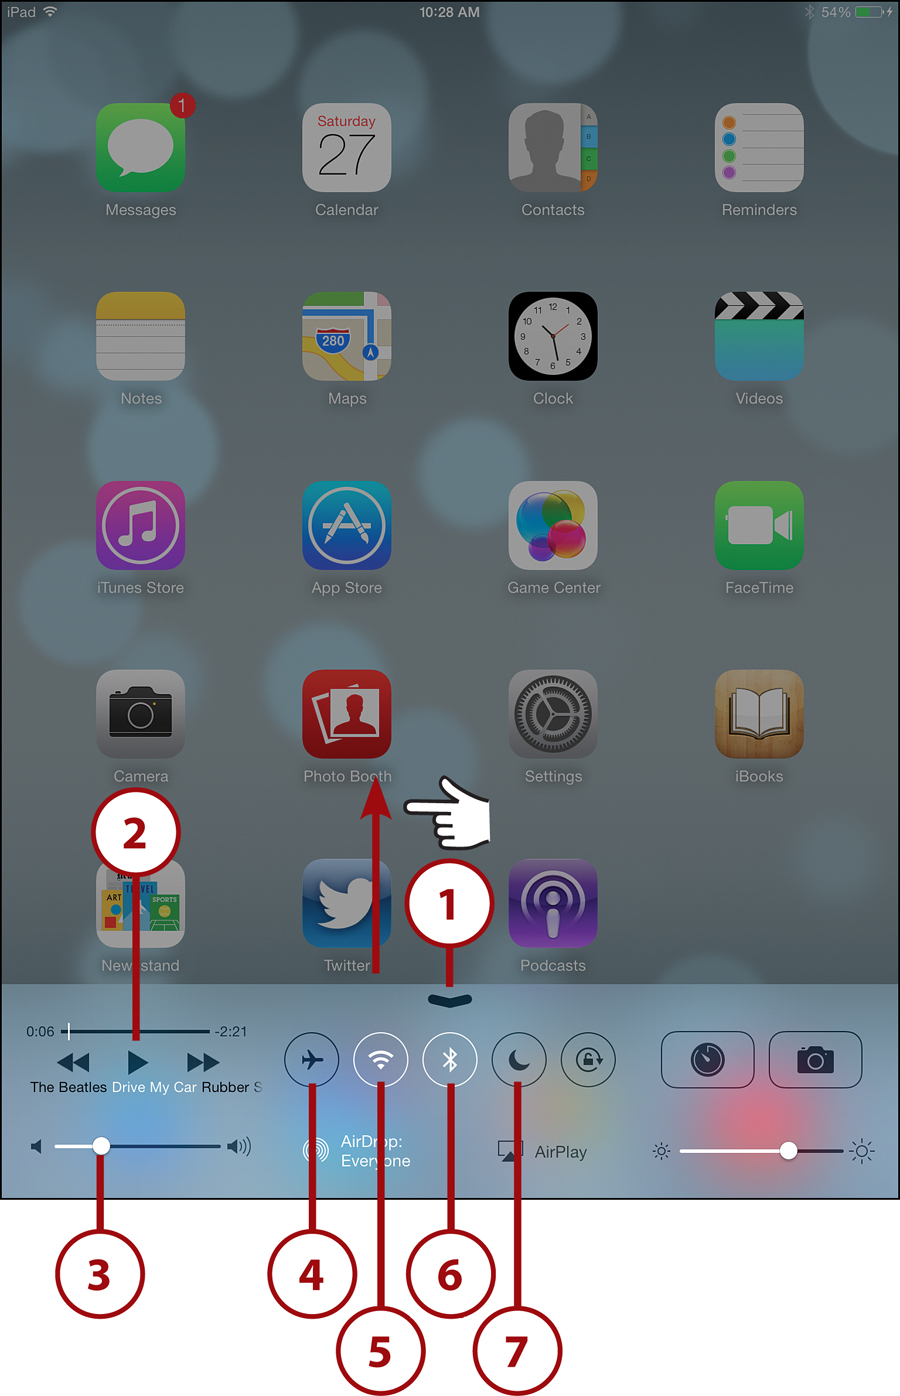
![]() To bring up the Control Center, swipe up from the very bottom of the screen. If you are having trouble, try starting below the screen and swiping up onto the screen area all the way to the top.
To bring up the Control Center, swipe up from the very bottom of the screen. If you are having trouble, try starting below the screen and swiping up onto the screen area all the way to the top.
![]() The upper-left corner of the Control Center is a complete set of music playback controls. You see the name of the song playing and can pause or resume the song, and move the white line to jump around inside the song. You can also skip to the next or go back to the previous song.
The upper-left corner of the Control Center is a complete set of music playback controls. You see the name of the song playing and can pause or resume the song, and move the white line to jump around inside the song. You can also skip to the next or go back to the previous song.
![]() Below the playback controls is a volume slider.
Below the playback controls is a volume slider.
![]() The first in a set of buttons in the middle of the Control Center is a switch that lets you quickly turn on Airplane mode. This shuts off all Wi-Fi, Bluetooth, and cellular data connections.
The first in a set of buttons in the middle of the Control Center is a switch that lets you quickly turn on Airplane mode. This shuts off all Wi-Fi, Bluetooth, and cellular data connections.
![]() The next button lets you toggle on and off the Wi-Fi connection.
The next button lets you toggle on and off the Wi-Fi connection.
![]() Likewise, you can toggle on and off the Bluetooth connection that you may be using with wireless headphones, a keyboard, or to connect to a wireless audio speaker.
Likewise, you can toggle on and off the Bluetooth connection that you may be using with wireless headphones, a keyboard, or to connect to a wireless audio speaker.
![]() You can quickly switch to Do Not Disturb mode, which silences all notifications such as incoming messages.
You can quickly switch to Do Not Disturb mode, which silences all notifications such as incoming messages.
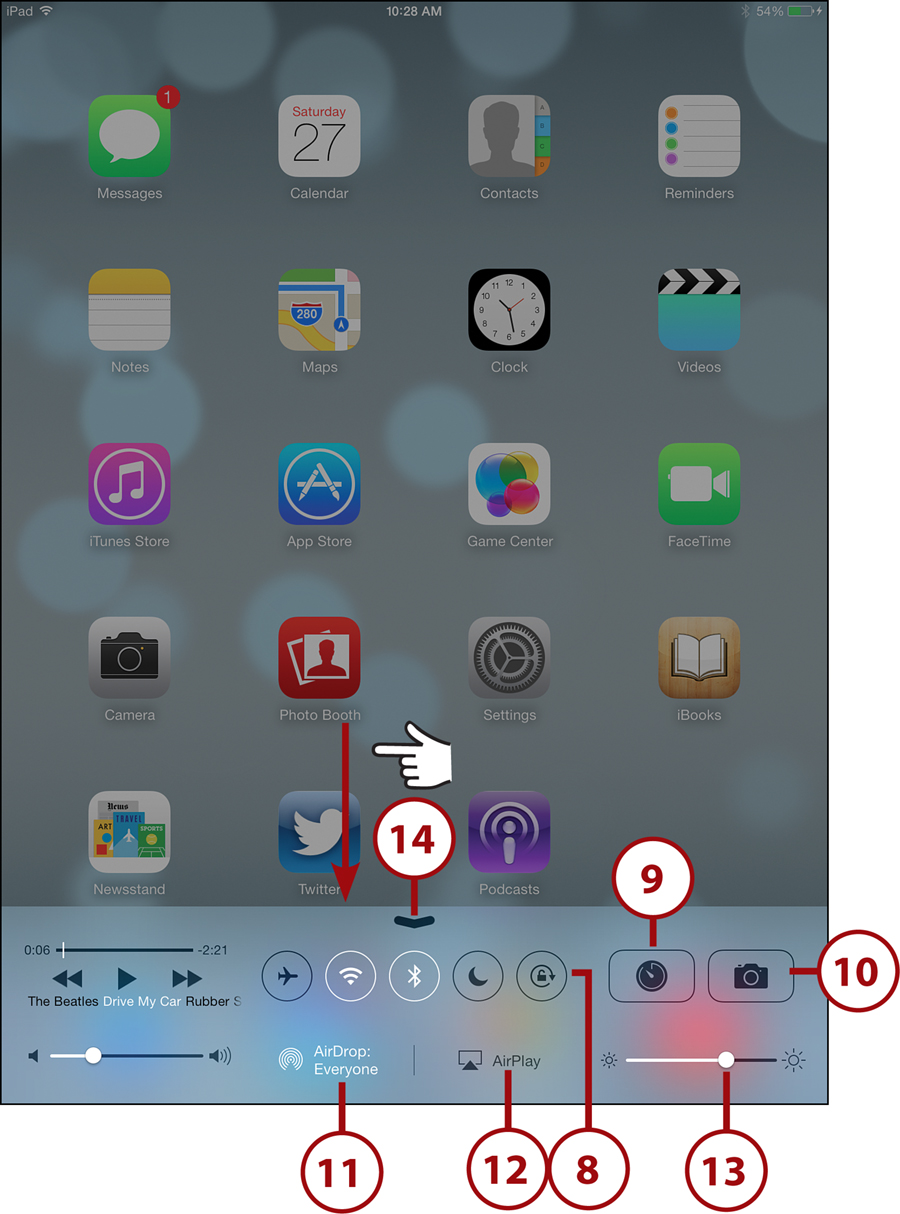
![]() This switch locks the iPad’s orientation to the current state—horizontal or vertical. In Chapter 2, you learn how to use the iPad’s side switch for this, which then changes this Control Center button to a mute switch instead.
This switch locks the iPad’s orientation to the current state—horizontal or vertical. In Chapter 2, you learn how to use the iPad’s side switch for this, which then changes this Control Center button to a mute switch instead.
![]() This button is a shortcut to take you to the Clock app.
This button is a shortcut to take you to the Clock app.
![]() This is a shortcut to take you to the Camera app.
This is a shortcut to take you to the Camera app.
![]() If you have an iPad that supports AirDrop, this button lets you turn AirDrop on or off. We’ll look at AirDrop in Chapter 3.
If you have an iPad that supports AirDrop, this button lets you turn AirDrop on or off. We’ll look at AirDrop in Chapter 3.
![]() The AirPlay button lets you choose a device to stream audio or video to, assuming you have such a device connected to your network.
The AirPlay button lets you choose a device to stream audio or video to, assuming you have such a device connected to your network.
![]() The bottom-right corner of Control Center lets you adjust the brightness of the iPad’s screen.
The bottom-right corner of Control Center lets you adjust the brightness of the iPad’s screen.
![]() To dismiss Control Center, you can tap the flat arrow at the top and drag down. You can also tap the screen above Control Center or simply press the Home button.
To dismiss Control Center, you can tap the flat arrow at the top and drag down. You can also tap the screen above Control Center or simply press the Home button.
There’s not much that Control Center does that cannot be done in the Settings app or the Home screen. Control Center simply provides quick access to a variety of functions.