4. The Professional Modes
ISO 800 • 1/250 sec. • f/2.8 • 23mm lens
Taking your photography to the next level
You can take even more creative control of your camera by using the exposure modes, or “professional modes,” as most photographers call them. Anyone who is familiar with photography will understand the concepts of the professional exposure modes, and by the end of this chapter, so will you.
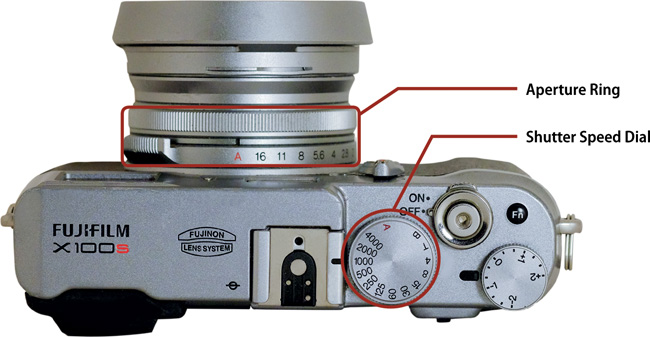
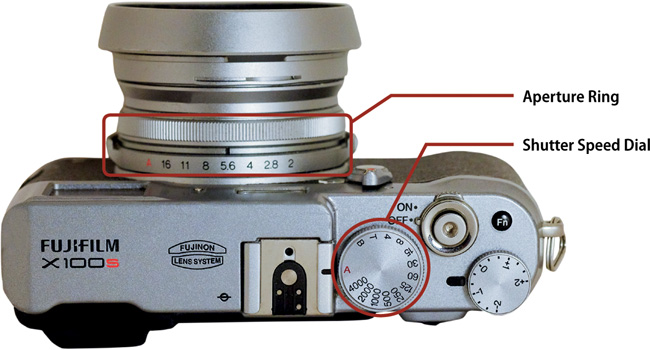
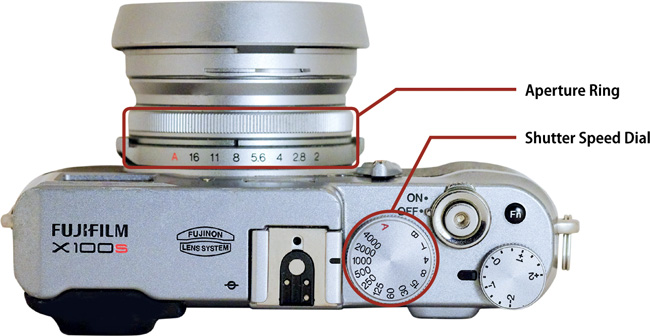
The exposure modes allow you to influence two of the most important factors in taking great photographs: aperture and shutter speed. Accessing these modes on the Fujifilm X100S is relatively simple, and is controlled by the aperture ring and the shutter speed dial. The options are Program (P), Shutter Priority (S), Aperture Priority (A), and Manual (M). Every photograph you take will be in one of these modes. If you really want to take your X100S photography to the next level, it’s important not only to understand what these modes are, but also when and why to use them. Let’s get started!
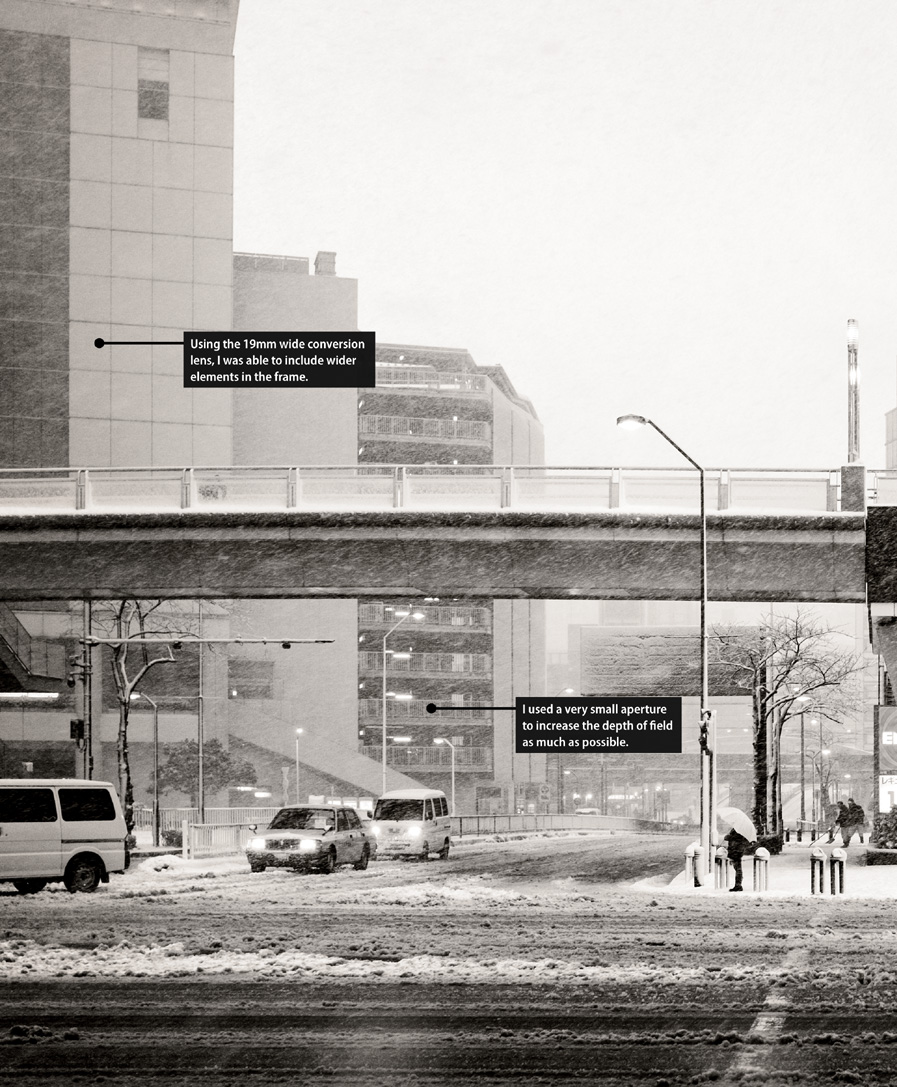
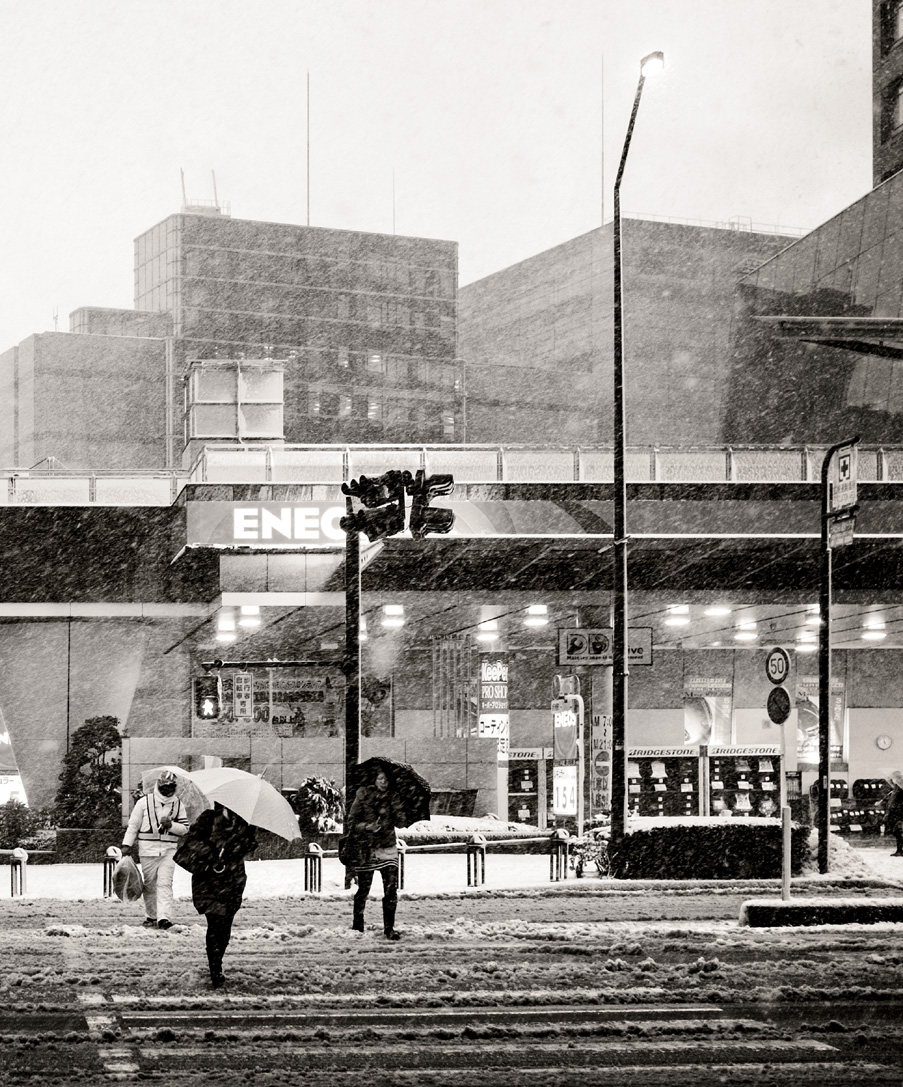
Poring Over the Picture
When traveling to a new city, it’s great to try and discover its people, sights, and events, as well as its compositional features. When I spent time in Yokohama, Japan, the city experienced its largest snowstorm in 45 years, and I managed to capture the beginning of the storm. Using the elevated walkway, an architectural feature of Yokohama, I added a sense of identity to the image.

ISO 1000 • 1/50 sec. • f/12 • 19mm wide conversion lens (WCL)
Program (P) Mode
Program mode is perhaps the shooting mode that most people will start with. It allows the camera to take control of both shutter speed and aperture to produce an optimal exposure for your picture. P mode gives the camera the most control of any of the shooting modes.
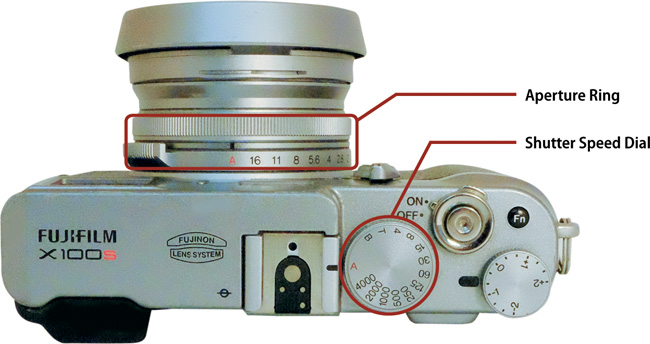
Unlike some other compact and advanced cameras, the X100S doesn’t actually have a mode option in the menu system, or a mode dial. You don’t simply select “P” for Program or “A” for Aperture Priority, for example. You select your exposure mode by using the aperture ring and shutter speed dial. Various combinations of these selections will put the camera into the correct mode.
To put the camera in P mode, set the aperture ring (the ring around the lens, with numbers from 2 to 16, and the letter A) to the letter A, which is bright red. This essentially commands the camera to configure the aperture automatically. You also need to set the shutter speed dial (on the top of the camera) to the bright red A, which tells the camera to look after shutter speed too. When configured this way, the camera is in Program mode, and you will see this indicated in the viewfinder or on the LCD panel with a large P symbol in the bottom left of the screen. If you are using the optical viewfinder, the P will not have the red background and, in some cases, such as when you are using some of the advanced filters or Panoramic mode, for example, it will not appear at all.
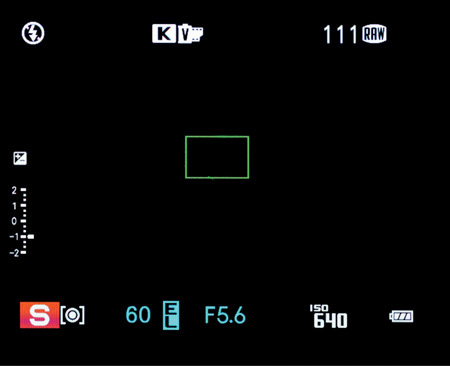
That, believe it or not, is pretty much all there is to configuring your camera to Program mode. You simply compose your image, aim, and shoot; the camera’s built-in metering system will configure the settings and select the shutter speed and aperture to get the best exposure. The exposure will, of course, take into account the ISO setting, the metering mode selected, and other exposure settings to create the best possible exposure. The shutter speed and aperture the camera has selected will appear in the viewfinder (Figure 4.1).
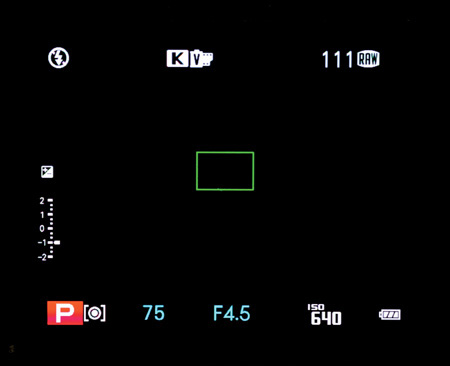
Figure 4.1 The shutter speed appears just to the right of the P icon, which indicates you are shooting in Program mode, and the aperture will be to the right of that.
One thing to be aware of is that if your ISO or dynamic range menu options (both discussed further in this chapter) are set to Auto, then the shutter speed and the aperture the camera has selected will not appear until you press the shutter button halfway (this is because the camera takes into account the ISO and dynamic range settings at that point). If you have those settings set to physical numerical values, then the camera can constantly meter and identify the best aperture and shutter speed, and will display those values continually, even before you press the shutter button.
So, if the camera does most things for us in P mode, why wouldn’t we want to use it? Well, let me first stipulate that I and many other professionals probably use P mode the least. This is because P mode, while allowing you to shoot quickly, gives you less creative control than the other exposure modes. There are occasions, however, when P mode is very useful, like in wildly changing lighting scenarios when I don’t have time to configure the camera to deal with each change (Figure 4.2). Or perhaps I’m just shooting casual shots and I’m not looking for portfolio pictures. Occasionally when I scope out a wedding venue, I will take snaps in P mode as a visual reminder rather than anything of commercial value.
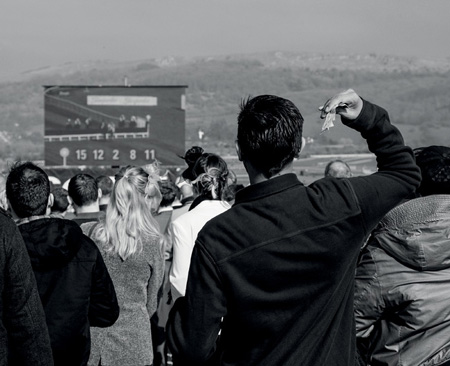
ISO 400 • 1/800 sec. • f/8 • 23mm lens
Figure 4.2 Sometimes Program mode is useful when there is an abundance of wildly changing light. I am confident that the camera will provide a fast enough shutter speed and an aperture suitable for a good exposure.
Although the camera is controlling two of the vital attributes of any exposure in P mode, you do still have a fair amount of control and ability to override the exposure to a certain extent. You can use exposure bracketing (see Chapter 10, “Advanced Features”), exposure compensation (discussed later in this chapter), and program shift (which is applicable only to Program mode).
Program shift is essentially an override for the dual-exposure settings that are automatically controlled by P mode: aperture and shutter speed. The core principle of program shift is to allow the camera to identify a combination of exposures that will actually produce the same exposure, for example, 1/1600 at f/4 or 1/800 at f/5.6. (See Chapter 2, “First Things First,” for more on exposure tables.)
At first glance, you may wonder why program shift is there at all. If the shutter speed and aperture value combinations it chooses always result in the same exposure, then why bother? Well, in some cases it makes perfect sense. Imagine a situation where you are shooting a cycling race. You want to make sure you get a great exposure, so you use Program mode to obtain the best exposure given the current lighting situation. Then you decide that you want to use a slower shutter speed to emphasize the motion of the cyclists as they go past you. Using program shift means you can safely shift the settings to an exposure that uses a slower shutter speed, safe in the knowledge that the photograph will still be well exposed (although it’s worth noting that in Program mode you can go as slow as only 1/4 shutter speed).
It’s also useful to know when program shift won’t be available to you. If the ISO or dynamic range is set to the Auto settings as mentioned above, or if the flash is in any configured state where it may fire, you won’t be able to use the program shift function.
To utilize program shift, simply turn the command dial right or left, or you can use the command control, which I often find easier to reach with my thumb. When the camera has chosen a different exposure for you, the aperture and shutter speed numbers will switch from white (or blue if you are using Auto-ISO or Auto-DR) to yellow (Figure 4.3). To return to the original exposure settings, simply use the control dial or command control to select them.
Let’s set up the camera for Program mode and see how we can make all this come together.
Setting up and shooting in Program mode:
1. Turn on the camera and turn the aperture ring to align with the red A.
2. Turn the shutter speed dial to also align with the red A.
3. Select your ISO as you normally would (using Shooting Menu 1, ISO).
4. Aim the camera at your subject and activate the camera meter by pressing the shutter button halfway.
5. View the exposure information on the LCD panel or in the viewfinder.
6. While the meter is activated (and assuming you have not set Auto ISO or Auto Dynamic Range, or are trying to use the flash), use your thumb to turn the command control to see the different exposure values available.
7. Select the exposure that is correct for you and start shooting.
Shutter Priority (S) Mode
Shutter Priority mode gives us a little more freedom to control certain aspects of our photography—in this case, the shutter speed. The selected shutter speed determines how long you expose your camera’s sensor to light. The basic principle is this: The longer the shutter is open, the more light will hit the sensor; the shorter the time the shutter is open, the less light will hit the sensor. Shutter speed is also very important when trying to achieve sharp images. The main factors that affect sharpness of an image are camera shake and the subject’s movement. If your shutter is open for too long, it means the light from your subject is hitting the sensor for too long a period, and any movement by the subject will appear as blur in your images.
In S mode, you choose the shutter speed and the camera will set the correct aperture in order to achieve a proper exposure of the image. So, to put the camera in S mode, you set the aperture ring to the red letter A, just like in Program mode. Remember, this commands the camera to configure the aperture automatically. You then set the shutter speed dial to the speed for which you want the shutter to be open during the exposure. When the camera is in Shutter Priority mode, you will see that the icon in the lower-left corner of the viewfinder will be—surprise!—an S on a red background in the electronic viewfinder or the LCD panel (or no background if you are using the optical viewfinder). The shutter speed you have selected and aperture the camera has selected will appear in the viewfinder, just like in P mode (Figure 4.4).
So when would you need to use Shutter Priority mode? Some instances might be when you are shooting fast-moving subjects and want to freeze the action (Figure 4.5); when you want to show motion in your subject with motion blur or panning (Figure 4.6); or when you want to use a long exposure to photograph a subject in very low light and emphasize motion at the same time (Figure 4.7; see Chapter 7, “Low Lighting,” for more on this type of shot).
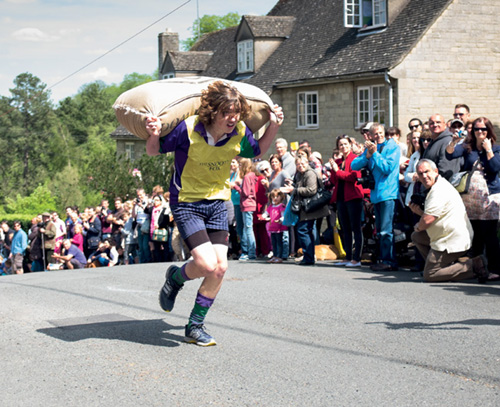
ISO 400 • 1/1000 sec. • f/5.6 • 23mm lens
Figure 4.5 Fast-moving subjects in close proximity to the camera can be frozen with a fast shutter speed.
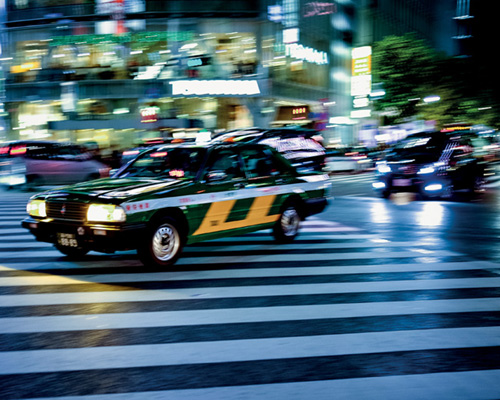
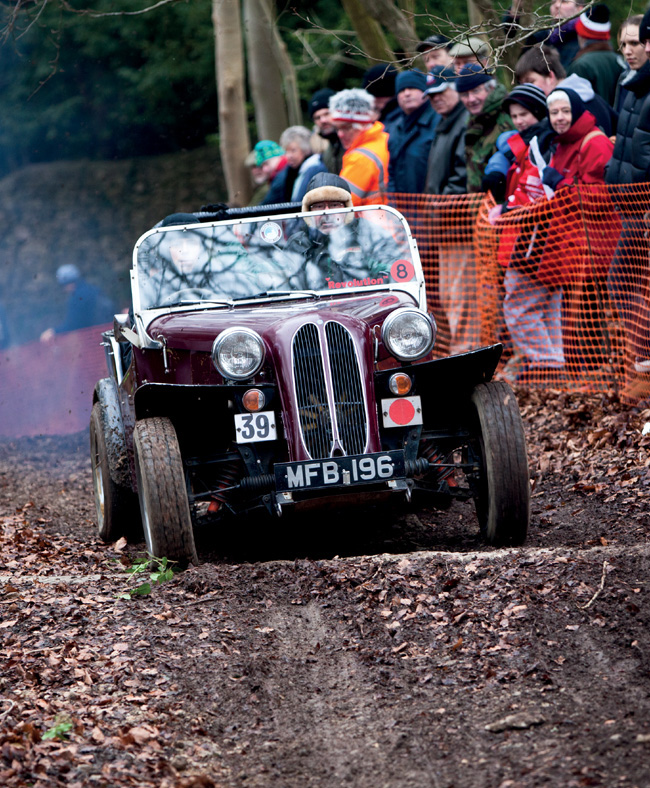
ISO 400 • 1/30 sec. • f/2 • 23mm lens
Figure 4.6 Using a slower shutter speed and panning with the car, I was able to get an image that suggests motion.
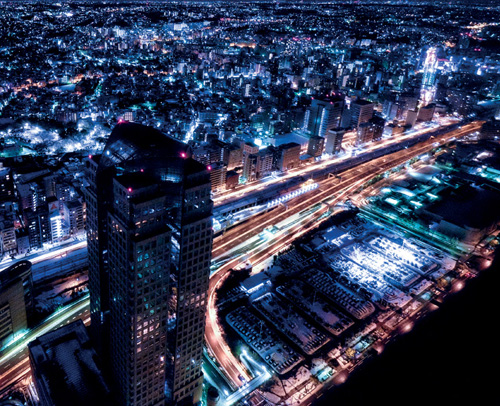
ISO 6400 • 1/8 sec. • f/4 • 19mm wide conversion lens (WCL)
Figure 4.7 A long exposure can capture light over a prolonged period of time, bringing out the detail in the city as well as adding motion trails to the moving cars.
You will notice that when you aim the camera at different light sources, the camera will adjust the aperture in accordance with the shutter speed (and ISO) that you have set in the camera to obtain a good exposure. Now, again, like Program mode, this operation is somewhat dependent on how you have configured the ISO and dynamic range settings. If you have set dedicated values, then the camera will evaluate the exposure continually and display it at the bottom of the frame in the shooting data area. If, however, either the ISO or dynamic range is set to Auto, then the aperture will be established only when you press the shutter button halfway.
Something to note here is that not all shutter speeds are available all the time. Generally, you can shoot from 1/4000 of a second all the way down to 30-second exposures (and even longer in Bulb [B] mode). However, the faster shutter speeds of 1/4000 and 1/3000 are available only for apertures of f/8 and higher; 1/2000, 1/1600, and 1/1500 are available only for apertures of f/4 or higher; and shutter speeds of 1/1000 and slower are available with any aperture.
If your exposure can’t be achieved, then the camera will report that back to you by displaying the aperture value in red (Figure 4.8). It’s important to keep an eye on this; although the camera will still take the shot, it’s always best to try and make sure you are getting a good exposure in the first place.
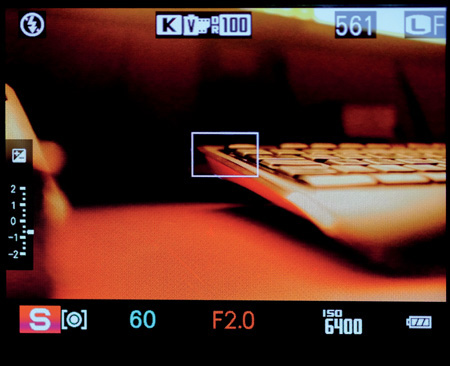
Figure 4.8 If the aperture value appears in red, it means the exposure can’t be achieved and you should try a different exposure.
It’s also worth noting that some shutter speeds are not available on the shutter speed dial. You can fine-tune your shutter speed by rotating the command dial on the back of the camera left or right, and selecting intermediate shutter speeds such as 1/320 and 1/400.
Let’s set up the camera for S mode and see how we can make all this come together.
Setting up and shooting in Shutter Priority mode:
1. Turn on the camera and turn the aperture ring to align with the red A.
2. Turn the shutter speed dial to the shutter speed of your choice.
3. Select your ISO as you normally would (using Shooting Menu 1, ISO).
4. Aim the camera at your subject and activate the camera meter by pressing the shutter button halfway.
5. View the exposure information on the LCD panel or in the viewfinder.
6. While the meter is activated (and assuming you have not set Auto ISO or Auto Dynamic Range), rotate the command dial on the back of the camera to select intermediary shutter speeds.
7. Start shooting.
Aperture Priority (A) Mode
Aperture Priority (A) mode is essentially the opposite of S mode. In S mode, you control the shutter speed and the camera controls the aperture. In A mode, you control the aperture and the camera controls the shutter speed.
Aperture Priority is probably my favorite shooting mode, and that of many professional photographers, because it’s aperture that helps control depth of field. Depth of field, along with composition, is a major factor in how you direct your viewer’s attention to what is important in your image (see Chapter 8, “Creative Compositions,” for more on this). Although the X100S is a crop-sensor camera, meaning it doesn’t have the same depth of field capabilities as a full-frame camera, shooting at wide apertures such as f/2 and f/2.8 can still allow creative use of depth of field.
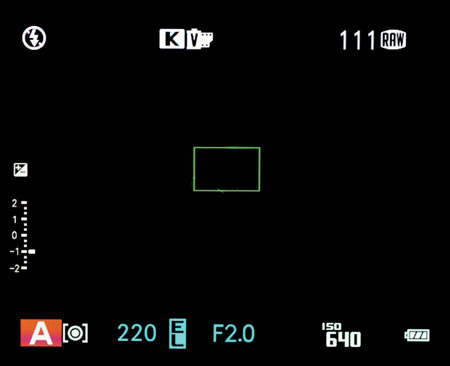
To put the camera in A mode, set the aperture ring to the aperture of your choice and set the shutter speed dial to the red letter A. The indicator in the viewfinder will switch to A with a red background (or no colored background if using the optical viewfinder). The aperture you have selected will appear in the shooting data area, along with the shutter speed that the camera has chosen (Figure 4.9).
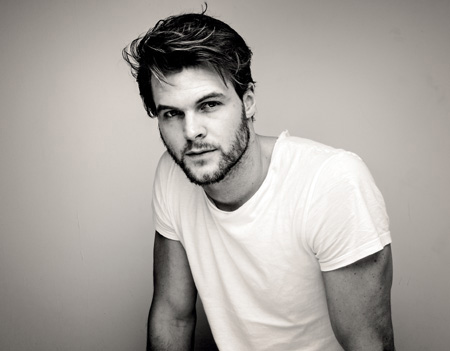
Although Aperture Priority is used primarily to minimize the depth of field and create a blurred background, of course it can be used for the complete opposite effect. Whereas a large aperture of, say, f/2 will cause a blurred background depending on the distance to the subject, a smaller aperture of, say, f/8 will ensure that the subject is crisp and sharp. For this reason, I tend to use A mode when shooting portraits (Figure 4.10). (See more on this in Chapter 5, “Say Cheese!”)
ISO 200 • 1/500 sec. • f/11 • 23mm lens
Figure 4.10 Using Aperture Priority mode and setting the aperture to f/11 ensured that the subject appeared pin-sharp. The camera chose the shutter speed that would make a good exposure.
Aperture Priority is useful in controlling depth of field, but it’s also very important in determining the limits of available light in which you can shoot. The X100S has a maximum aperture of f/2, which is reasonable for low-light shooting. The larger the maximum aperture, the less light you need in order to make a properly exposed picture (Figure 4.11). You may recall when we discussed Shutter Priority how the speed of the shutter can be directly responsible for the presence of blur or camera shake in an image. With a wide aperture of f/2 like the X100S has, you can let in lots of light all at once, which means the camera can use faster shutter speeds. This is why lenses with large apertures such as f/2 or even wider are often referred to as “fast” lenses.

ISO 6400 • 1/60 sec. • f/2 • 23mm lens
Figure 4.11 Using Aperture Priority in an extreme low-light situation meant the camera reduced my shutter speed in accordance with my wide aperture and ISO setting to ensure I got the shot.
Because of the limitations of the leaf shutter and very fast shutter speeds (mentioned later in this chapter), it can be a challenge to shoot wide open with a very fast shutter speed. In these cases, I will often shoot with the Neutral Density (ND) filter in place (Figure 4.12).

ISO 200 • 1/1000 sec. • f/2 • 23mm lens
Figure 4.12 Setting my aperture to f/2 meant I could emphasize the cactus leaf and throw the background out of focus. The camera decided on the shutter speed of 1/1000 as it was a bright day, and shooting at a wide aperture meant it needed to restrict the light hitting the sensor.
On the other hand, bright scenes may require the use of a small aperture, such as f/16 (the X100S’s smallest aperture), especially if you want to use a slower shutter speed. That small opening reduces the amount of incoming light, which requires the shutter to stay open longer (Figure 4.13).

ISO 200 • 1/180 sec. • f/16 • 23mm lens
Figure 4.13 With such perfect light, I used A mode to select a very small aperture of f/16 to get the whole scene in focus. The camera chose the shutter speed accordingly.
Consistent with P mode and S mode, if you have ISO or Dynamic Range set to Auto, the camera will establish the correct shutter speed only when you press the shutter button halfway. Setting the ISO and dynamic range to physical numbers will result in the camera displaying the shutter speed dynamically in the viewfinder’s shooting data area. And once again, if the exposure is not going to be reliable for a good exposure, the shutter speed will appear in red as a warning—remember, the shot can still be taken, though it’s best to get the exposure correct, if possible.
You will remember that with S mode you can make intermediary adjustments to the shutter speed by rotating the command dial on the back of the camera. Similarly, for A mode you can make adjustments to the aperture by using the command control, which is the black rocker switch at the top right of the back of the camera.
As with Shutter Priority, Aperture Priority mode has a few limitations. For example, the camera will not allow a shutter speed of 1/1500 of a second (or faster) unless the aperture is f/4 or smaller, and it won’t allow 1/3000 or faster unless the aperture is at f/8 or even narrower. According to the X100S owner’s manual, the slowest shutter speed allowed in A mode when OVF Power Save Mode is on is 1/4 of a second (see Chapter 1, “The Fujifilm X100S Top Ten List”).
Setting up and shooting in Aperture Priority mode:
1. Turn on the camera and turn the shutter speed dial to align with the red A.
2. Turn the aperture ring on the lens to the aperture of your choice.
3. Select your ISO as you normally would (using Shooting Menu 1, ISO).
4. Aim the camera at your subject and activate the camera meter by pressing the shutter button halfway.
5. View the exposure information on the LCD panel or in the viewfinder.
6. While the meter is activated (and assuming you have not set Auto ISO or Auto Dynamic Range), nudge the command control on the back of the camera to select intermediary apertures.
7. Start shooting.
Manual (M) Mode
As its name suggests, Manual mode gives you manual control over both shutter speed and aperture. This mode is most popular with photographers who want complete control over the exposure. I use M mode quite a lot, especially when shooting weddings, and like any other feature of the X100S, it should be treated as a tool that can be learned and mastered.
When your camera is set to Manual mode, the camera meter will give you a reading of the scene you are photographing. It’s your job, though, to set both the aperture and the shutter speed—no helping hands in M mode. Remember from the exposure triangle discussion in Chapter 2 that if you need a faster shutter speed, you will need to make a reciprocal change to your aperture. Using any other mode, such as Aperture Priority or Shutter Priority, would mean that you have to worry about only one of these changes, but in Manual mode you have to concentrate on doing it all yourself.
This can seem a bit daunting, but spending time getting this right will make you a better photographer, as you will need a complete understanding of how each change affects your exposure. I tend to lean toward starting with the value that is most important to me for that image. If depth of field is going to be primary, then I set the aperture first. If I’m shooting a motion shot or trying to freeze something in the frame, I’ll start with the shutter speed.
To put the camera into Manual, select a physical shutter speed on the shutter speed dial and an aperture on the lens’s aperture ring. When shooting in M mode, the indicator in the viewfinder will switch to M with a red background (or no colored background if using the optical viewfinder). The aperture and shutter speed you have selected will appear in the shooting data area at the bottom of the viewfinder (Figure 4.14).
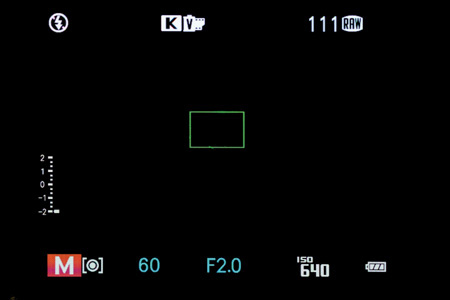
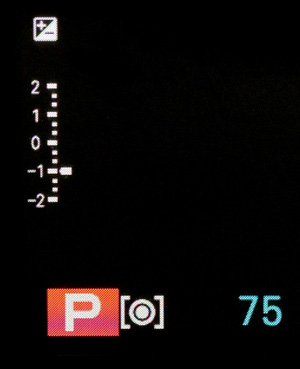
We will discuss exposure compensation in the next section, but I want to mention here that the exposure compensation scale that appears within the viewfinder behaves differently when shooting in Manual mode. At the left of the screen is the scale, with values from +2 to -2 and a status pointer. In the other modes, this indicates exposure compensation; but in Manual mode, the scale gives you a visual indication of how close your settings are to the camera’s metered settings.
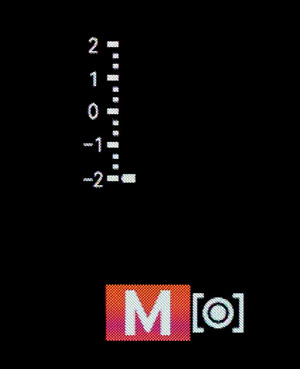
In Figure 4.15, the scale is indicating that my exposure will be very dark. I would need to adjust my shutter speed, aperture, or both to get the pointer to the zero, which would indicate a good exposure. If the pointer goes above the central point, it indicates my image would be overexposed. But keep in mind that this is just a guide. Especially if shooting RAW, I very purposefully aim to have the pointer just under the central mark, which indicates the image would be underexposed. It’s better to have an underexposed image than an overexposed image, because you can recover details in the shadows—but you can’t recover details from totally blown-out areas.
Remember the intermediary adjustment tools we talked about in Aperture Priority and Shutter Priority? Well, those work in Manual, too.
All in all, Manual is a mode I use most when I have more time to consider the light and the shooting environment (Figure 4.16). I don’t use it consistently, but if the lighting is mixed or difficult and I have the time, I will shoot in Manual (Figure 4.17).
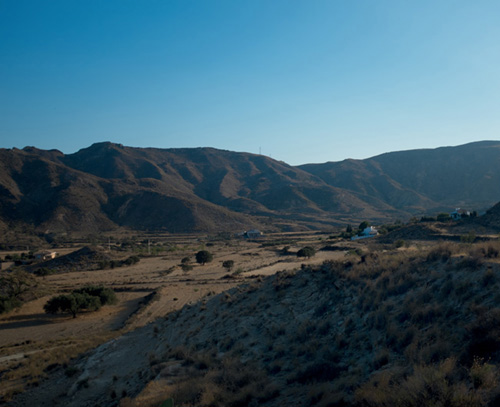
ISO 200 • 1/1000 sec. • f/16 • 23mm lens
Figure 4.16 Exposing this image manually allowed me to take into consideration the foreground hill as well as the background mountain. I managed to get an exposure that kept detail throughout the whole image.
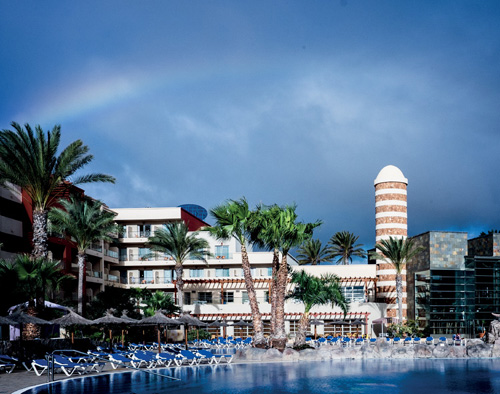
ISO 400 • 1/100 sec. • f/16 • 23mm lens
Figure 4.17 Exposing this image manually ensured I could keep the rainbow in detail as well as the foreground pool and the light on the hotel itself.
Setting up and shooting in Manual mode:
1. Turn on the camera and turn the shutter speed dial to the shutter speed of your choice.
2. Turn the aperture ring on the lens to the aperture of your choice.
3. Select your ISO as you normally would (using Shooting Menu 1, ISO).
4. Aim the camera at your subject and activate the camera meter by pressing the shutter button halfway.
5. View the exposure information on the LCD panel or in the viewfinder.
6. Keep an eye on the exposure gauge in the viewfinder. Try to keep the dial central or a little under the center mark.
7. Start shooting.
Exposure Compensation
The metering modes in the X100S are amazingly accurate, but sometimes they can be fooled by dramatic or wildly changing light, or scenes with a high concentration of dark or light areas. The camera may deliver an exposure that is close, but perhaps not quite what you envisage for the final image. In these situations, you can adjust the exposure when using P, A, or S mode (Figure 4.18). This is known as exposure compensation.
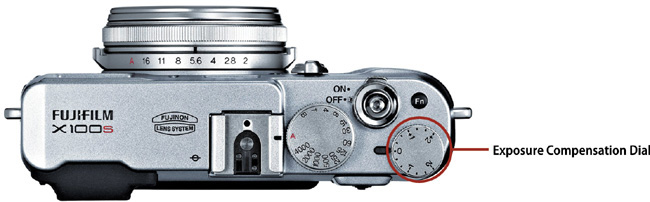
Figure 4.18 You control exposure compensation using the exposure compensation dial on the top of the camera.
Using the exposure compensation dial, you can decrease or increase the exposure in increments of 1/3 of a stop. You can compensate exposure by a maximum of two stops in either direction. Rotating the dial counterclockwise increases the compensation; rotating it clockwise decreases the compensation. Monitor the compensation that is being applied by looking at the compensation dial, or in the viewfinder by looking at the exposure compensation scale (Figure 4.19). The scale in the viewfinder will have a +/- above it. If the dial is below the central marker, that means you are reducing the exposure. If it is above the mark, it means you are increasing the exposure. If the mark is at the central point of the scale, no exposure compensation will be added to the image.
When you are in P mode, the amount of compensation may impact both the shutter speed and the aperture. In A mode, the camera will apply the compensation by changing the shutter speed only (because you are controlling the aperture). In S mode, the camera will apply the exposure compensation by changing the aperture (because you are controlling the shutter speed).
For example, let’s say you are shooting in A mode and the camera is providing an exposure of 1/125 at f/5.6, but when you review the image in the viewfinder or LCD panel, the subject looks too dark (Figure 4.20). In this case, you can increase the exposure by compensating it by +1 stop using the exposure compensation dial. The camera will reduce the shutter speed to 1/60 of a second, which is the equivalent to one full stop of exposure. So now your image will be exposed at 1/60 of a second at f/5.6, which gives a good exposure (Figure 4.21).

ISO 400 • 1/125 sec. • f/5.6 • 23mm lens
Figure 4.20 The subject is underexposed in this image, because the camera’s metering system is taking into account the bright wall and its dominance in the frame.
ISO 400 • 1/60 sec. • f/5.6 • 23mm lens
Figure 4.21 Adjusting the image by one full stop using the exposure compensation dial allowed me to correct the exposure quickly and easily.
Exposure compensation can be used for both increasing and decreasing the exposure when necessary (Figure 4.22).
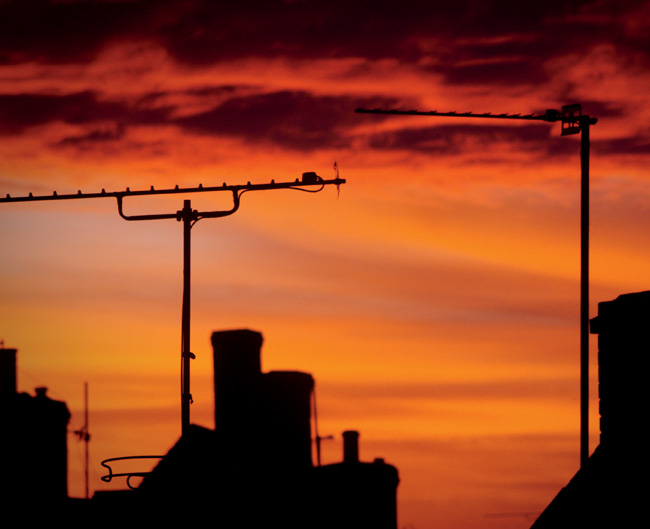
ISO 400 • 1/120 sec. • f/11 • 23mm lens
Figure 4.22 The camera made a good effort of metering this image, but I wanted to have the TV aerials in focus yet silhouetted, so I decreased the exposure using compensation.
Remember, in M mode you have complete autonomy over the shutter speed and aperture, so the exposure compensation dial is, in effect, redundant.
Exposure Lock
The camera is constantly metering the scene in front of it. As you move the camera, the shutter speed and aperture combinations will adjust as the contents of the scene change when you are shooting in P, S, or A modes. In M mode, the metering will change, but the shutter speed and aperture will remain fixed to the values you have selected. Generally, you want the camera to meter the scene continually; however, in some cases you may need to recompose an image without changing the exposure. This is where exposure lock comes into play. Exposure lock is facilitated by the Focus Lock/Exposure (AFL/AEL) button (Figure 4.23).
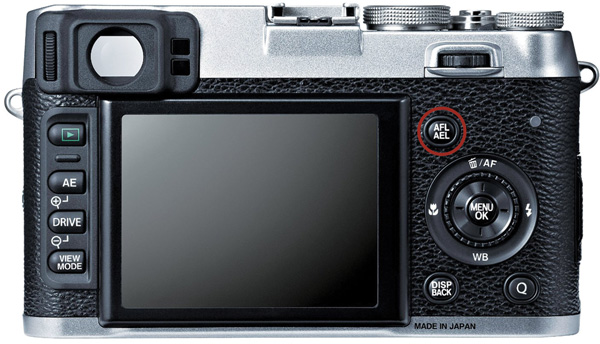
Your configuration setting of the AFL/AEL button in the Shooting Menu 4 (see Chapter 9) determines how the button operates. It can lock either exposure or focus, or lock both. It’s a simple concept, but a very powerful one. Essentially, when you point the camera at an object, it will meter for that object. Perhaps the primary focus of your image is going to be in the bottom left of the frame, but you want the camera to expose for that object, rather than for something else in the frame before you recompose. Simply point your camera at the subject, then press and hold the AFL/AEL button (or press and release it, depending on how you have configured the menu option) (Figure 4.24). The focus and/or exposure information will be locked into the meter and you can recompose your image and shoot. Again, depending on how you configure the menu options, you will need to either hold down the AFL/AEL button to keep the exposure data locked (releasing the button will release the lock), or press the button to lock it and press it again to release it (in the case of toggle mode).
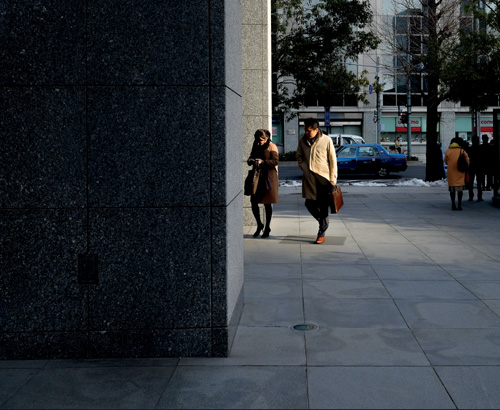
ISO 1000 • 1/125 sec. • f/8 • 23mm lens
Figure 4.24 This office worker would have been overexposed in a composition with so much shadow and dark area. By metering the scene and locking the exposure, I achieved the look I was aiming for.
Notes About Auto ISO
As you know from Chapters 1 and 2, ISO plays a pivotal part in the exposure triangle. The X100S has a very neat feature called Auto ISO, which I use quite extensively. Similar to the exposure modes mentioned throughout this chapter, Auto ISO allows the camera to do some of the work for us. In the case of Auto ISO, it will choose an appropriate ISO level based on other exposure settings and the light, of course.
Setting the Auto ISO level:
1. Press the Menu button on the back of the camera to bring up the menu list.
2. Using the command dial, navigate to Shooting Menu 1.
3. Using the command dial, scroll down and select ISO (A).
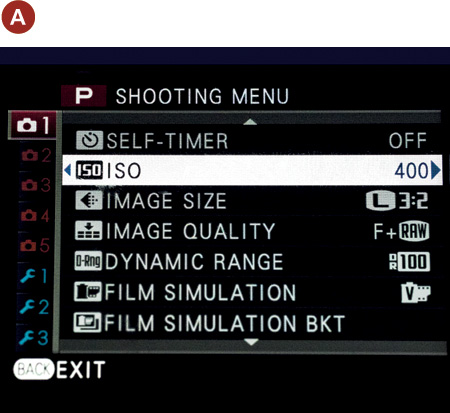
4. Press the command dial to the right to enter the submenu.
5. Select the Auto option at the bottom of the list (B).

6. Press the command dial to the right to enter the Auto ISO configuration.
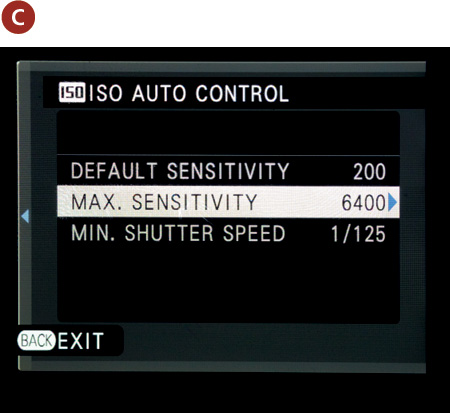
7. Configure your Auto ISO settings accordingly (C).
8. Press the Back button to confirm your settings.
Essentially, by following these steps you are dictating a set of preferred limits to sensitivity and shutter speed. I say “preferred” because actually, if the camera cannot work within these boundaries, it will lower the shutter speed to try and obtain an exposure.
You configure the Auto ISO by first setting the default sensitivity; this can be set anywhere between 200 and 6400. The camera will use the setting you choose here as its base ISO setting (when you are in Auto ISO mode). This means that the camera will avoid raising the ISO above this level if possible to avoid a slower shutter speed. The next configuration to set is Max. Sensitivity—and this is the highest ISO level the camera will achieve under Auto ISO settings. This can be set anywhere between 400 and 6400. The final piece of this jigsaw is Min. Shutter Speed; this, of course, is the minimum shutter speed the camera will shoot at and can range from 1/4 of a second to 1/125 of a second—no faster than 1/125, unfortunately. Note that the minimum shutter speed affects shooting only in A mode and P mode. This is because in S mode and M mode you are controlling the shutter speed manually.
Using Auto ISO can be very beneficial, especially if you are shooting in rapidly changing lighting conditions. Suppose you are out shooting on a day with broken heavy clouds. You may be in A or P mode and shooting good exposures when the sun is covered by clouds and the environment becomes much darker. In this case, the camera will attempt to use the Auto ISO settings to increase the ISO and adjust the shutter speed to compensate for the change in light and achieve a good exposure. In manual mode, as mentioned, the only parameter of the exposure triangle that Auto ISO will adjust is the ISO level itself, and you would need to keep an eye on the exposure gauge in the viewfinder to ensure accurate exposures.
How I Shoot: My Preferred Settings
In this section, I’m going to run through the way I generally shoot in relation to the exposure modes we have just talked about. I will also discuss some of the other features we have referred to throughout the chapter, such as dynamic range.
Primarily I’m a documentary photographer, which means I like to take story-telling images rather than posed studio shots. So, for the majority, I shoot in Aperture Priority and Manual modes. Occasionally, especially if I’m trying to emphasize motion, I will use Shutter Priority mode. I rarely use Program mode, as I find it too restrictive of my creative options. However, Program mode is a great place to start, and I would encourage you to investigate this mode if you are new to shooting with the X100S.
The reason I shoot a lot of my assignments in A mode is that the depth of field is usually a factor in the image I’m making—whether that’s a shallow depth of field for a portrait where I’m trying to emphasize the subject within the frame by shooting at f/2 or f/2.8, or a street scene where I will use a small aperture such as f/8 or f/16 to maximize the detail and sharpness of the subject throughout the frame. When I’m shooting like this, I’m always keeping one eye on the shutter speed. Even though the camera is controlling the shutter speed in Aperture Priority mode, I need to make sure it doesn’t drop too low, especially if I’m shooting handheld, to affect the sharpness of the image.
When I’m facing a challenging lighting situation, or I want to be very creative (for example, to make a silhouette), I will shoot in Manual mode. I’ll also shoot in Manual mode if I want to obtain a constant exposure across a range of images. So, for example, if I’m shooting a wedding ceremony I may meter the scene at the start, lock my exposure in the camera, and shoot the whole ceremony with the same manual exposure settings. This will offer uniformity to the exposures and help me when it comes to postproduction.
If I have time, I’ll usually create a test shot and check it on the LCD panel first. If I notice areas that are overexposed or shadows that are too dark, I can adjust my exposure accordingly. If I’m happy with the results, I’ll keep shooting.
In most cases, the camera will get a very good exposure for me. If I’m in S or A mode and I need to adjust the exposure slightly, I can always resort to exposure compensation to fine-tune the brightness of the photograph.
Dynamic Range
I’ve mentioned dynamic range quite a bit throughout this chapter and, indeed, throughout the book. The dynamic range of an image is the range between the light and dark. The X100S’s Dynamic Range setting, on Shooting Menu 1, in essence allows you to set a level at which the camera will handle shadows and highlights. Cameras have a fairly restricted dynamic range compared to humans, which is why High Dynamic Range (HDR) images need to use multiple exposures (see Chapter 10) to try and composite an image with a higher dynamic range than a single exposure allows.
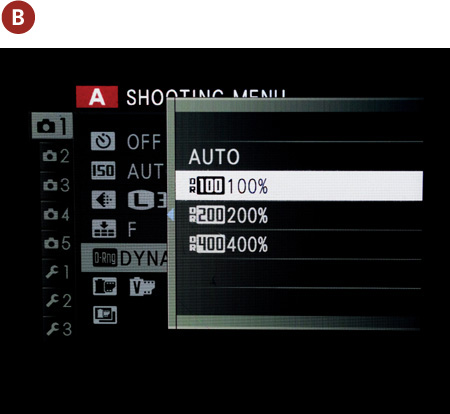
There are four settings in the Dynamic Range menu: Auto, 100%, 200%, and 400%. Auto is the default and can be used only when shooting in P, A, and S modes. In some circumstances, Auto Dynamic Range will be unavailable, such as when shooting multiple exposures.
1. Press the Menu button on the back of the camera to bring up the menu list.
2. Using the command dial, navigate to Shooting Menu 1.
3. Using the command dial, scroll down and select Dynamic Range (A).
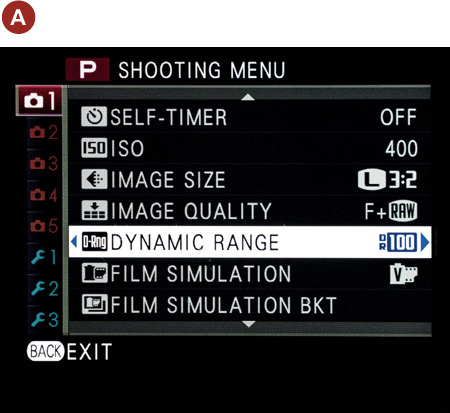
4. Press the command dial to the right to enter the submenu.
5. Select the option you want (B).
6. Press the Menu/OK button to confirm your settings.
Essentially, selecting Auto commands the camera to decide which of the dynamic range options (100%, 200%, or 400%) to use. Of course, you can select Auto or choose the dynamic range yourself. The higher dynamic range options are useful for scenes where there is a clearly defined separation or contrast between the dark areas and light areas. At 400% dynamic range, for example, the camera will increase detail in darker areas and reduce brightness in lighter areas, thus trying to achieve a better tonality across the image. The only time I change dynamic range from Auto is when I have a heavily contrasting image, perhaps one where a subject is half in shade and half in daylight. If you shoot RAW, you can adjust all of this after the fact, of course.
It’s worth noting that the dynamic range setting does affect RAW files. As a broad rule of thumb, if you are shooting at 400% dynamic range, your images will be two stops underexposed. At 200% dynamic range, the images will be one stop underexposed.
Other Shooting Options
Throughout the book I discuss all the options available in the X100S’s menus. A few are very subjective and come down to personal taste, but I thought I’d share my “standard” shooting configuration here (Figure 4.25). Bear in mind these options affect only JPEGs and reflect my personal preferences. I encourage you to try combinations and settle on a system that works for you.
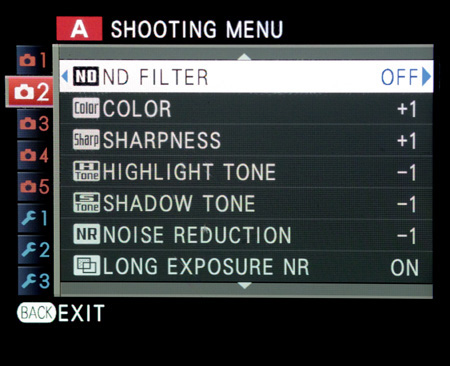
Figure 4.25 I like to adjust the Color, Sharpness, Highlight Tone, Shadow Tone, and Noise Reduction settings.
• Color: I set this to +1 (Medium High). This option simply allows you to adjust the color saturation of the JPEG images. I shoot in black and white a lot, but when I shoot in my preferred color film simulation of Velvia, I like to see the colors a little more vividly than the standard.
• Sharpness: I set this to +1 (Medium High). This option has the same settings as Color (Hard, Medium Hard, Standard, Medium Soft, and Soft). I prefer to see my images with more defined edges and sharp lines, as opposed to slightly softer.
• Highlight Tone: I set this to -1 (Medium Soft). The setting affects the overall contrast in the lighter parts of an image. I prefer to set this to -1, as I want a clear separation between light and dark areas of the image.
• Shadow Tone: I set this to -1 (Medium Soft). The opposite of Highlight Tone, this setting affects the overall contrast in the darker parts of your images. I prefer to set this to -1 for exactly the same reason as I set Highlight Tone to -1; I don’t want the dark areas in the images to be overly emphasized unless I’m looking for a particularly dark and gritty effect.
• Noise Reduction: I generally set this to -1, as I find the standard noise reduction that the camera adds a little harsh. It’s not possible to switch off noise reduction completely, and the camera will always apply some level of noise treatment to the JPEG files.
Chapter 4 Assignments
We have covered a lot in this chapter, and by now you should be getting up to speed with your X100S and the amazing features it has to offer. If you want to grab some quick snaps, Program mode is always an option. But if you want to get more creative and have more control, then the Shutter Priority, Aperture Priority, and Manual exposure modes are worth investigating.
Let’s start with Program mode
Put your camera in Program mode and start shooting! Keep an eye on the ISO, shutter speed, and aperture that the camera decides upon.
Control depth of field with Aperture Priority
Try setting up several similar items in a row, extending away from you—perhaps chess pieces or at least items of similar sizes. Focus on the middle item and set your camera to a medium aperture such as f/5.6. While holding focus on the middle item, start shooting with an ever-smaller aperture until you are at the smallest aperture of f/16. Now, come back down the scale until you reach the largest aperture of f/2. Take a look at the images and get an idea of how the depth of field has affected the overall pictures.
Shooting in Shutter Priority mode
Find some moving objects (kids are always a good bet!) and put your camera into Shutter Priority mode. Start with a slow shutter speed of, say, 1/4 of a second, and then shoot faster and faster until you reach the higher end of 1/2000 and 1/4000 and you can totally freeze the action.
Be Brave—shoot manually
Knowing what you do now about the exposure triangle, go out on a sunny day and set your camera to Manual mode. At all times keep an eye on the exposure dial in the viewfinder or on the LCD panel.
Now head indoors or to a shaded area, and without changing your settings, shoot again. The exposure will be notably different. Using the shutter speed dial and aperture dial, adjust your exposure accordingly to get a reasonable exposure.
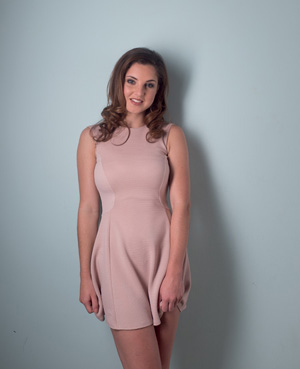
Compensate the exposure
Try to find a light subject that has a light background (a child in a white dress against a white wall, for example). Set your camera to P, S, or A mode. Shoot and, after the first exposure, use the exposure compensation dial to increase the exposure by +1 and +2. Then reduce the exposure by -1 and -2. Compare the images to see how the light areas look, paying particular attention to any overexposed areas.
Share your results with the book’s Flickr group!
Join the group here: flickr.com/groups/fujiX100S_fromsnapshotstogreatshots