
1. The Fujifilm X100S Top Ten List

ISO 500 • 1/3 sec. • f/2 • 23mm lens
Ten tips to get you going right out of the box
So, you have your new Fujifilm X100S. Isn’t it great? If you are anything like me, you will be eager to break into that box and get the camera up and running right away. Nothing is more satisfying than sitting in a brand-new car, cooking in a freshly installed kitchen, or shooting with a brand-new camera.
One of the things that I nearly always put to one side when opening a new camera is the manual. I mean, it’s boring, right? You want to shoot, not read!
Well, boring as it may be, the little manual that accompanies the X100S is going to prove to be an invaluable resource, given time. However, I thought I’d help you out a little with a quick-start guide, so this chapter comprises a Top Ten list of tips to get you familiar with your camera, and up and running almost immediately. All you need, apart from the contents in the box, is a memory card and a power socket.
Poring Over the Camera
Camera Front
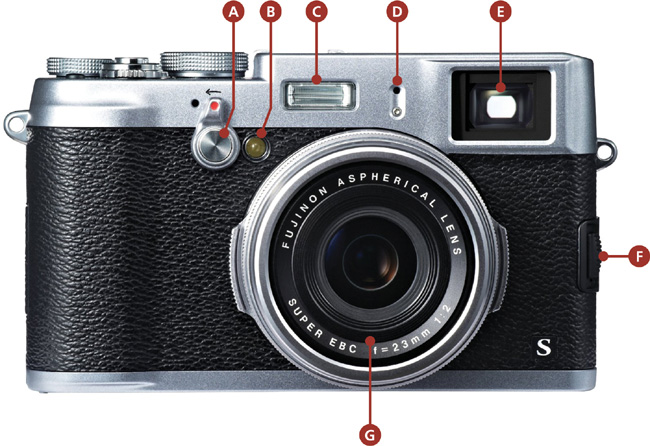
A Viewfinder Selector
B AF-Assist Illuminator/Self-Timer Lamp
C Flash
D Microphone
E Viewfinder Window
F Focus Mode Selector
G Lens
Camera Back
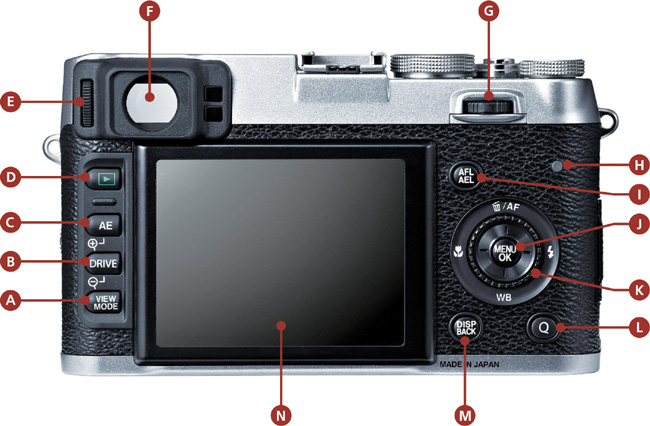
A View Mode Button
B Drive/Zoom Out Button
C AE/Zoom In Button
D Playback Button
E Command Control Lever
F Viewfinder Window
G Diopter Adjuster
H Indicator Lamp
I Exposure/Focus Lock Button
J Menu/OK Button
K Command Dial
L Q Button
M Disp (Display)/Back Button
N LCD Monitor
Poring Over the Camera
Camera Top
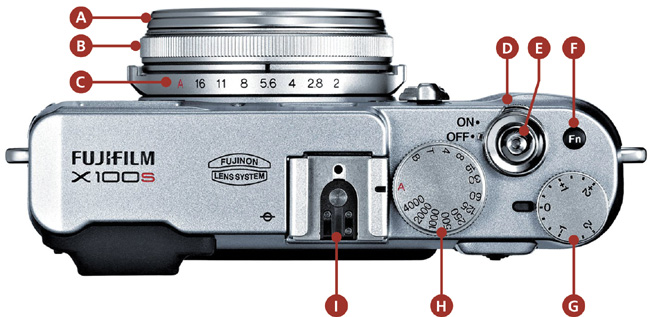
A Front Ring
B Focus Ring
C Aperture Ring
D On/Off Switch
E Shutter Button
F Function Button
G Exposure Compensation Dial
H Shutter Speed Dial
I Hot Shoe
1. Make Sure You Have Everything You Need
Assuming you have purchased the standard retail version of the X100S (rather than a limited edition), then almost everything you need to get started is right there in the box:
• The camera body itself
• An NP-95 rechargeable battery
• A BC-65N battery charger and cord
• Lens cap
• USB cable
• CD-ROM
• Clip attaching tool (don’t lose this!)
• Two metal strap clips
• X100S owner’s manual
• A cool shoulder strap
Note that you’ll use the clip attaching tool and the two metal strap clips for attaching the shoulder strap. Make sure you keep the attaching tool safe in case you need to reset the clips or change them in the future.
The only additional item you will require is a memory card. The Fuji X100S stores images on the SD (Secure Digital), SDHC (Secure Digital High Capacity), and SDXC (Secure Digital Extended Capacity) memory cards. The camera will shoot one image without a card installed, though this image cannot be played back or used in any way after exposure.
SD is a nonvolatile memory-card format used in electronic devices such as cameras, tablets, GPS devices, and some mobile phones. SD cards are relatively small in physical size. This can be a good thing, or potentially a bad thing. It’s good because it helps keep camera systems small and light, though it’s potentially bad, as they are easier to lose and a little less robust if handled incorrectly than the larger CompactFlash (CF) cards. Modern SDXC cards can have a capacity of up to 2 TB, which in theory would hold around 4500 RAW files. (There are many brands of SD cards on the market. However, I typically use SanDisk Extreme Pro cards.)
When you shoot an image, it is buffered to the memory card. The time this takes depends somewhat on the speed of the memory card, which is measured in megabytes per second (MB/s). For wedding photography and time-critical work where the moment is of the essence, (like street or sports photography), I use cards with a minimum speed of 95 MB/s.
2. Charge the Battery
The most onerous task any new camera owner has to go through is charging the battery. A little patience is needed, as the NP-95 battery that ships with the camera is not charged up and ready for use. You may find if you insert the battery into the camera without charging it, there may be some juice. Try to resist shooting straight away, though, and always charge the battery fully first. You’ll get more shooting time after the initial charge, and the manufacturers always stipulate a battery should be fully charged for first use—this will prolong the life of the battery.
When the battery is in the charger, the charging indicator will be in one of three states:
• On: Contrary to many other manufacturers, the Fuji X100S charger’s indicator lamp is constant green when the battery is charging.
• Off: When the battery is fully charged, the lamp goes off completely.
• Blinking: A blinking indicator lamp means there is a fault with the battery. Time for a new one.
Once the battery is fully charged, insert it into the base of the camera. Be careful here, though, as the battery can be inserted in multiple directions and only one way will work. Line up the contacts on the batteries with the contacts at the bottom of the battery chamber.
The battery indicator in the viewfinder or LCD monitor will give you an estimate as to how much battery power you have left. However, I find that the battery indicator is a little misleading when it gets to the lower end of the scale. The battery can go from two bars available to empty very quickly, so be aware of this when shooting. It’s quite easy to be caught off guard with a dead battery!
3. Ensure Optimal Performance
Out of the box, the X100S is a powerful camera, and a full battery will likely see you through 300 to 450 shots before a recharge or a new battery needs to be inserted. To get the most out of the camera, you can tweak a couple of settings and increase the battery life and performance.
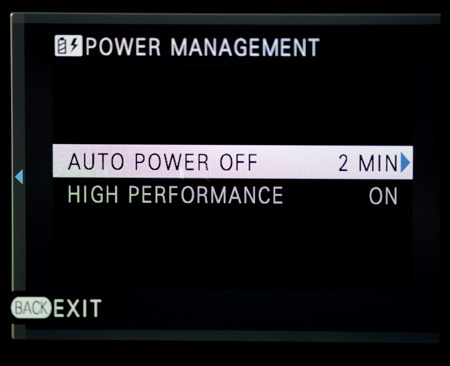
First, setting the Auto Power Off feature to 2 minutes forces the camera to shut down when it hasn’t been used for 2 minutes or more, saving unnecessary battery loss. To re-awaken the camera when it has gone to sleep, simply press the shutter button halfway.
Also, I always turn on the High Performance option as soon as I power up a new X100S. The High Performance option configures the camera to have quicker start-up and focus times. This has a marginal impact on battery life, but the advantages of having the High Performance option set to On outweigh the battery recharge issues.
Setting the optimum performance level:
1. Turn on the camera.
2. Press the Menu button.
3. Using the command dial, navigate to Setup Menu 2.
4. Using the command dial, scroll down and select the Power Management option.
5. Press the command dial right to enter the submenu.
6. Set the Auto Power Off submenu to 2 Min and the High Performance option to On.
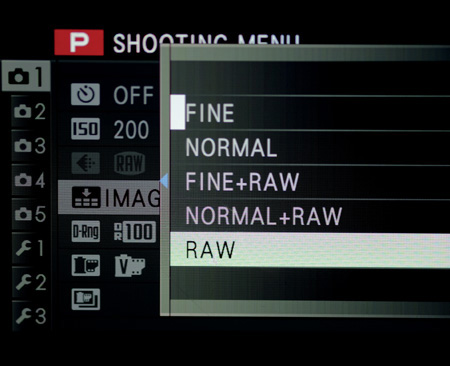
4. Set the Image Quality: JPEG vs. RAW
Your shiny new X100S has a number of image settings to choose from, and you can adjust them according to your needs and post-processing preferences. By default, the camera is set up to create JPEG files, but you can also set it to create RAW files or even JPEGs and RAW files at the same time.
The JPEG format has been around since the mid-1990s and is actually a method of reducing file size while retaining image quality. Technically, JPEG isn’t a file format—it’s an equation. Because of the way JPEG files work, in order to reduce the file size, some of the information is lost via a process called lossy compression. This is a key point to understand because by choosing a lower JPEG setting, you are choosing to create a lower-quality image.
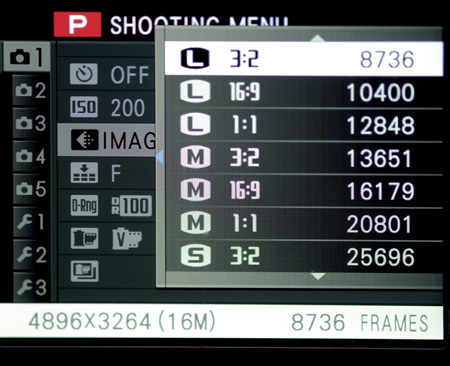
The X100S has two quality settings for the JPEG format: Fine and Normal. It’s useful to understand how JPEG files work before choosing a quality setting. Personally, I use only the Fine option because it offers the most latitude when it comes to editing and printing the files. Additionally, you can choose the image size. There are many image sizes and aspect ratios to choose from. Pictures with an aspect ratio of 3:2 have the same proportions as a 35mm film, so usually I choose the Large (L) 3:2 size.
One key advantage of JPEG files is that generally they are smaller than RAW files, so you can store more on a memory card. Also, when you download the JPEG files, the camera’s built-in image processing is retained, so what you see when reviewing an image on the LCD monitor is what you will see in the image on your computer screen.
When you shoot in JPEG mode, your camera, within the processing of the image itself, makes adjustments for color, sharpness, contrast, and so on, essentially optimizing the image for you. For example, if you shoot using a black-and-white film simulation in JPEG mode, the images you download to your computer will be black and white.
Most people using the X100S will likely shoot JPEG, but you can also choose to shoot in RAW. RAW files are left unprocessed by the camera. They offer greater flexibility when it comes to editing, but straight out of the camera they don’t look so good. If you really want to make your RAW files look great, you will need to “process” them first using image-editing software. Fundamentally, RAW files hold more data and, thus, are larger in file size. RAW files are sometimes called “digital negatives,” as they are similar in role to film negatives in that they need to be processed and converted to a printable format such as TIFF or JPEG.
Whilst many people will shoot JPEG, I tend to change my file-storage type depending on the job. For example, if I’m shooting family snapshots or noncritical street photography, I will shoot in JPEG so I can get more images on the card and have the camera do most of the processing for me. However, if I’m shooting a wedding or commercial work, I’m more likely to choose RAW. This gives me more flexibility, but more work, during post-processing of the images.
There is another option with the Fuji X100S: to shoot RAW+JPEG. This does exactly as the name suggests—records both a JPEG file and a RAW file. The advantage of this is that you have the JPEG for quick editing and printing, assuming the exposure is good, and the RAW file if the exposure is not so great and needs a little tweaking. The disadvantages to shooting RAW+JPEG are that you will use up memory-card space more quickly, and it takes a little longer for two files to be written to the memory card, compared to just one.
Setting the image format:
1. Press the Menu button on the back of the camera to bring up the menu list.
2. Using the command dial, navigate to Shooting Menu 1.
3. Using the command dial, scroll down and select Image Quality.
4. Press the command dial right to enter the submenu.
5. Select the quality setting that you prefer: Fine, Normal, Fine+RAW, Normal+RAW, or just RAW.
6. Press the Menu/OK button to confirm.
If you selected Fine or Normal, then you can adjust the file size and ratio.
Setting the file size and ratio:
1. Press the Menu button on the back of the camera to bring up the menu list.
2. Using the command dial, navigate to Shooting Menu 1.
3. Using the command dial, scroll down and select Image Size.
4. Press the command dial right to enter the submenu.
5. Select the size and ratio you wish to use.
6. Press the Menu/OK button to confirm.
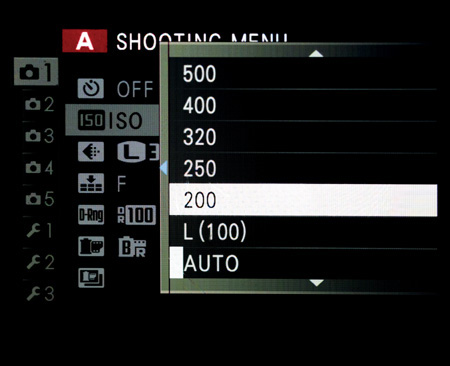
5. Set the ISO Level
Perhaps one of the most important settings on your new camera is the ISO. ISO is the sensitivity of your camera to light. Essentially, the lower the ISO number, the more light is required in order to produce a good exposure. In practice, this means in good light such as a bright summer day, an ISO of 200 would be more than capable of capturing a good image. As light becomes poorer, a higher ISO may be necessary. So, for example, as dusk falls, you may need to increase your ISO setting to 400 or 800. But be aware that higher ISO levels can introduce noise, or more accurately, can increase noise levels in an image. Noise appears as small grain-like speckles, especially in an image’s darker areas.
(Here’s a tip: Always be prepared to increase ISO levels if the light levels are falling, as it will help sustain a constant shutter speed that’s fast enough for a sharp exposure. It’s more appealing to have a sharp image with some noise distortion than an image that is too blurry to see because the ISO level has been kept too low.)
The X100S has a default range of ISO 200 through to 6400 (with expanded options available). When it comes to deciding on the ISO level to use, the rule of thumb is the lighter the scene, the lower the ISO level needed. However, in some cases it may be important to have little or no noise present even in a low-lit environment. In this case, using a lower ISO would have to be offset with a slower shutter speed. In these cases it may be necessary to use a tripod to achieve the desired exposure.
The X100S also has a very useful Auto ISO feature, which allows the camera to change ISO levels dynamically as the light changes around it. I use the Auto ISO feature a lot, and recommend it especially when shooting candid scenes where the light may change regularly. Essentially, the camera makes the decision about which ISO level to set the camera at, based on the chosen aperture (discussed in the next section), shutter speed (also discussed next), exposure compensation, and Dynamic Range setting (discussed further in Chapter 10, “Advanced Features”). You set the minimum and maximum ISO levels between which you are willing to shoot and the minimum shutter speed—for example, an Auto ISO range of 400 and 3200 and a minimum shutter speed of 1/125 of a second. Then the camera will adjust the ISO according to the scene and conform to those settings wherever possible. However, it’s important to be aware that the camera may also override the shutter speed and reduce it beyond the minimum setting if it can’t get an exposure. Sometimes it’s simply too dark and the camera needs to account for that.
Setting the ISO level:
1. Press the Menu button on the back of the camera to bring up the menu list.
2. Using the command dial, navigate to Shooting Menu 1.
3. Using the command dial, scroll down and select ISO.
4. Press the command dial right to enter the submenu.
5. Select the ISO level at which you want to shoot.
6. Press Menu/OK to confirm.
You will notice there are also options here for Auto ISO. I discuss this further in Chapter 4, “The Professional Modes.”
6. Set the Exposure Mode
To get the most out of your X100S and to ensure you can take full creative control of its features, along with ISO you will need to understand shutter speed and aperture.
Shutter speed controls the length of time that the shutter remains open, usually measured in a fraction of a second (1/200 of a second, for example). The aperture is the reference of the opening of the lens blades. It’s usually referred to as an f-stop (f/2.8, for example). The combination of ISO, shutter speed, and aperture is what defines the exposure, and they’re closely connected: Adjust one setting, and it impacts the others.
The X100S offers several exposure modes, each offering various levels of control over the shutter speed and aperture:
• Program (P): Allows the camera to adjust both shutter speed and aperture. Often this gives optimal exposure at the sacrifice of creative control over depth of field or motion blur. To select Program mode, rotate the aperture ring to A and then the shutter speed dial to A.
• Shutter Priority (S): Gives you control over the shutter speed while letting the camera select the optimum aperture. This setting gives you creative control over motion blur, or capturing a very quickly moving subject with a fast shutter speed. To select Shutter Priority mode, rotate the aperture ring to A and then use the shutter speed dial to adjust the shutter speed.
• Aperture Priority (A): Allows you to adjust the aperture manually while letting the camera select the optimal shutter speed. This is useful in situations where the light is low and you want to use a faster f-stop, or where you want to control the depth of field. To select Aperture Priority mode, rotate the shutter speed dial to A and then use the aperture ring to adjust the aperture.
• Manual (M): Gives you full control over the shutter speed, aperture, and ISO. Manual mode is especially useful when you want to keep exposures consistent across a shooting range. To enter Manual mode, ensure that both the shutter speed dial and the aperture ring are set to numeric values, as opposed to A.
• Bulb (B) and Time (T): These modes are for very long exposures. Time mode allows you to stipulate an exposure time, whereas Bulb mode will expose for as long as the shutter is held open (either by the shutter button or shutter release cable). A tripod is recommended for these modes, which are useful for scenes such as fireworks or capturing the motion of running water. To select Bulb or Time mode, rotate the shutter speed dial to B or T, respectively.
7. Set the Autofocus Mode and Focus Point
The Fuji X100S is an advanced camera, and its speed of focusing is a marked improvement over its predecessor, the X100. In the X100S, 49 focus points are available when using the electronic viewfinder, while the optical viewfinder offers 25. (I discuss the X100S’s viewfinders in more detail in Tip #9, below.)
The X100S doesn’t have any “automatic” focusing modes, so you are not at risk of the camera making a false assumption of the subject on which you are trying to focus. So how do you determine which autofocus (AF) mode to use? The X100S offers two autofocus options, which you can select using the focus mode selector, a small switch on the side of the camera body:
• AF-S (single shot): Focus locks when the shutter button is pressed halfway. This setting is used in almost all situations.
• AF-C (continuous): Focus is adjusted continually to reflect changes in distance to the subject (even when the shutter button is not pressed halfway). This setting is used mainly for sports or fast-moving subjects.
There is a third focus option, MF (manual focus). In this mode you control the focus by rotating the focus ring on the lens with your hand. This is most commonly used when you need to shoot very quickly or where autofocus is not a possibility.
Once you have selected your AF mode, it’s time to decide on your focus point, the point on which the camera will attempt to achieve focus. When starting out, you should select the central focus point, as this is generally the most reactive point and eases framing of the subject. Once you become more comfortable with the camera and the focusing system, you can experiment by moving the focus point around.
Setting the focus point:
1. Press the AF Button (command dial up).
2. Use the command dial to position the focus point of choice.
3. Press the Menu/OK button to confirm the focus point.

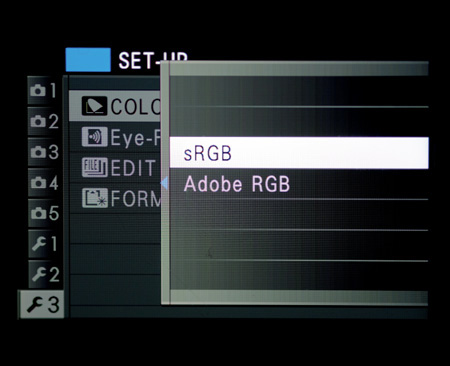
8. Set the Color Space
Color space is an oft-overlooked configuration setting available in most DSLRs. Essentially, the color space is the amount of color that a camera can “see,” capture, and record to card.
The Fuji X100S offers two color spaces:
• sRGB: This is the color space that matches more widely with images displayed on electronic media such as computer screens, tablets, and phones. It’s also the color space that a majority of the print labs use.
• Adobe RGB: This color space has a wider color gamut than sRGB, which means it can produce more vivid and accurate colors on many high-end printers.
If you are not planning on using high-end printing devices, or if your print lab specifically requests Adobe RGB, then sRGB is a good option. Broadly speaking, using sRGB will simplify your workflow and display better on the Web without the need for conversion. Also, it’s invariably an easier one to work with in post-production.
That said, I tend to go against the grain a little, and generally I use Adobe RGB within my cameras. Adobe RGB may require some additional workflow steps, but it captures more color information in your images and potentially gives better results. The main reason I prefer Adobe RGB is that I use a high-end digital recording device that can photograph fast-moving objects, shoot in low light, and even record HD movies. So why would I compromise on the quality of the images I ask it to record for me? Also, I prefer to see my images in print rather than view them online or on devices, so I use Adobe RGB as my color space of choice.
The primary downside of shooting with the Adobe RGB color space is that when processing your images for display on the Web or for certain print labs, you may need to down-sample the color space to sRGB. However, this is easy enough, and all image-editing software can do this (conversely, you can’t up-sample sRGB to Adobe RGB in the same way).
In sum, if you are simply likely just to copy your images from the camera and upload them to the Internet for sharing, or print them on a consumer-level printer at home, then sRGB will be perfectly good to use. Adobe RGB is really an option for those who wish to have more latitude when editing, or will be printing on professional-level printers or using professional labs for their printing.
1. Press the Menu button on the back of the camera to bring up the menu list.
2. Using the command dial, navigate to Setup-Menu 3.
3. Rotate the command dial and select Color Space.
4. Select Adobe RGB or sRGB.
5. Press the Menu/OK button to confirm your choice.
Once you set the color space, you won’t notice any visual change in the image on the LCD monitor—color space is all about behind-the-scenes image processing.
9. Understand the Viewfinders
More than likely, one of the reasons you were attracted to the Fuji X100S is its gorgeous hybrid viewfinder technology. It sounds a little like something out of Star Trek, doesn’t it? Hybrid viewfinder. Well, it’s not that far-fetched and is actually an amazing feature of the X100S—and one of the core features that I use all the time when shooting.
The hybrid viewfinder, which I discuss in Chapter 3, “The Viewfinders,” combines the optical viewfinder (OVF) system found in DSLR cameras with the electronic viewfinder (EVF) system found in mirrorless systems. Simply having a choice of viewfinder will give you creativity and functional benefits. For example, you may use the electronic viewfinder for a critical focusing situation macro shot, or, if you need to reduce shutter lag and shoot quicker, you can change very quickly to the optical viewfinder.
Whether you’re framing your shot through the OVF or EVF, your eye will see not only the subject and scene, but also a range of shooting data projected by an integrated high-definition LCD panel.
Each of the viewfinders has its advantages over the other, and one of the great features of the X100S is the ability to simply switch between the two using the viewfinder selector on the front of the camera.
Optical Viewfinder
The OVF is a sharply defined, bright frame projected by the LCD panel (Figure 1.1). It gives a reasonably accurate view of the image inside the viewfinder. In addition to allowing you to view the wider scene, a number of customized areas on the viewfinder enable you to view key exposure and camera settings such as exposure compensation, ISO, distance indicator, and AF target (amongst others). These settings are discussed in Chapter 3.
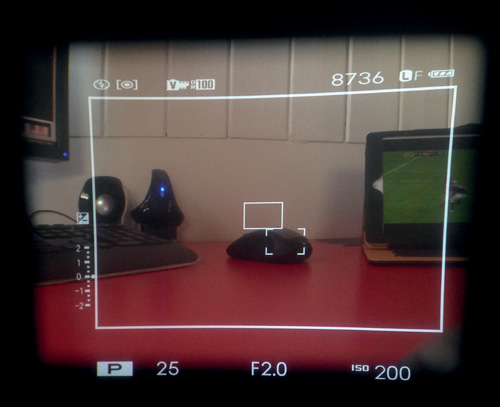
Figure 1.1 The Optical Viewfinder is bright and large and allows you to compose and shoot images quickly, with very little lag.
The OVF is similar to the viewfinder of a traditional rangefinder camera, in that you get to see the wider area around the frame in the viewfinder. This can be extremely useful when lining up shots or simply watching a scene unfold—you can literally watch a subject enter the frame, then shoot it.
I use the optical viewfinder most when I need to work quickly. Because the camera displays less electronic information in the viewfinder, it reacts more quickly, and thus the AF speed and exposure control do as well. This is because when the camera is in OVF mode, it has less processing to do when displaying the information in the viewfinder, as it doesn’t show full exposure simulation.
Electronic Viewfinder
The EVF is a vividly displayed bright frame where you will see 100 percent frame coverage on a sharp image display, thanks to the 0.48-inch, high-definition, 2360K dot-resolution LCD panel (Figure 1.2). From precision framing of macro shots in Live View mode to quick post-shot reviewing of your results, the EVF is ready with its vividly accurate display whenever you need it. Typically, I use the EVF when focusing is critical, or in low-light situations.
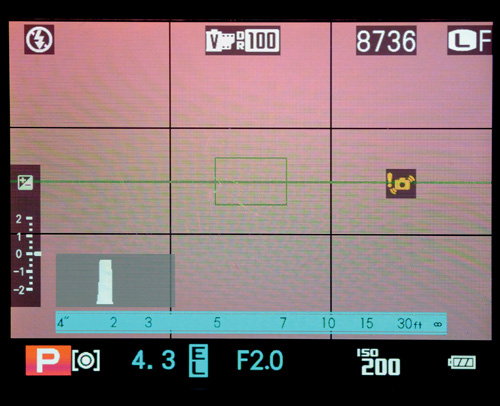
Figure 1.2 The Electronic Viewfinder displays a reasonably accurate view of the image that the camera will take and allows you to make exposure adjustments based on what you see in the viewfinder.
10. Review Your Images
When digital cameras became mainstream, apart from the apparent savings in film and processing fees, the ability to view your image—immediately, on the LCD monitor—was seen by some as a complete revelation. With digital cameras, each time you shoot an image, whether you are in RAW or JPEG mode, the camera records an embedded JPEG image that you can use to review the image. This feedback allows you to check your exposure and composition and retake the shot if necessary.
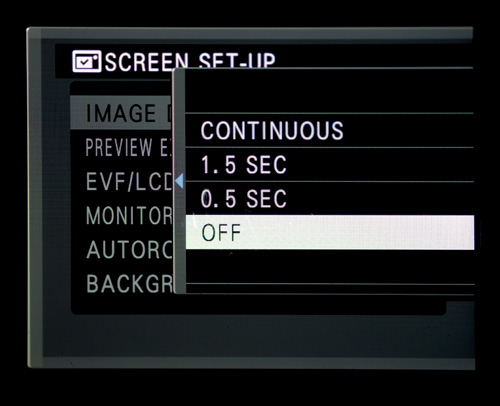
By default, the X100S will show you the image you have just taken in the actual viewfinder, which is a very cool feature if you are not trying to shoot reportage or street photography, in which case you don’t want your view of the scene impaired by the image review. I prefer to switch the viewfinder image review setting to Off, which unshackles me from the demon that is termed “chimping” (constantly checking the image to see if the exposure was nailed).
Changing the image auto-review duration:
1. Press the Menu button on the back of the camera to bring up the menu list.
2. Using the command dial, navigate to Setup Menu 2.
3. Rotate the command dial and select Screen Setup.
4. Set Image Disp. to your preferred setting (I suggest you turn it to Off).
5. Press Menu/OK to confirm your selection.
Once you take a break from shooting, you may want to flick through the shots you have taken and review them in more detail. To do this, simply press the green Playback button, at the top-left of the rear of the camera. This will immediately display your most recent shot on the LCD monitor.
By default, not only can you see the image you shot, but you can also see the exposure date along the bottom of the LCD monitor, as well as useful information such as shutter speed, aperture, and ISO. You can customize the data that the LCD monitor displays to show various other settings, too. However, I encourage you to use the Detail Information view, which gives more detailed exposure information as well as a histogram and any blown highlights (parts of the image where detail has been lost) will be indicated by blinks.
Viewing image-detail information:
1. Press the Playback button on the back of the camera.
2. When the image appears, press the Disp/Back button.
3. Press the Disp/Back button to continue to scroll through the image view options until you select Detail Information.
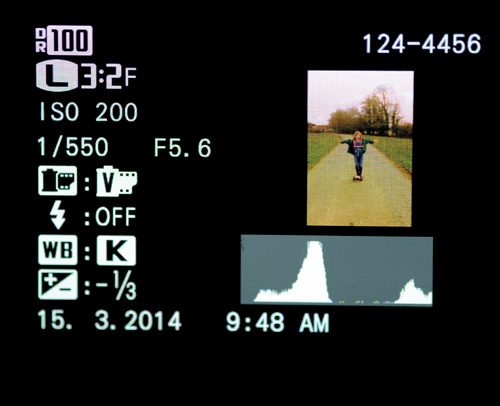
The image-detail information will be displayed as standard hereafter. If you wish to revert to one of the other view options, simply follow the steps again, selecting the view option you want.
Chapter 1 Assignments
Let’s begin our shooting assignments by setting up and using all of the elements of in the Top Ten list. When you have completed the assignments, not only will you have configured your camera correctly, but you will be ready to start shooting!
Set up the basics
Charge the battery until it’s 100 percent juiced up. When it’s charged, insert it into the camera, fix the strap to the camera, insert your memory card, and turn on the camera. Now set the camera to its optimal setting by adjusting the Auto Power Off and High Performance options. Finally, set up your preferred file format and file size.
Think about exposure
Now you need to consider ISO, aperture, and shutter speed. If you are shooting in a well-lit environment, start with ISO 400. Initially, using Program (P) mode for your exposure mode will get you up and running quickest. Next, make sure your focus point is set to the central spot. For the time being, this configuration will get you shooting straight away.
Pick a viewfinder
Viewfinder selection can be totally subjective, so just decide which one you prefer. If you like the uncluttered view and speed of the optical viewfinder, go for that. If you prefer to see an accurate simulation of the exposure in the viewfinder, switch to the electronic viewfinder.
Focus on a subject
Find a family member or friend with your camera configured properly. You are ready to shoot! Focus on the subject, press the shutter button halfway (keep an eye on the focus point in the viewfinder or LCD monitor for confirmation of focus lock), and ... shoot!
Evaluate your pictures with the LCD monitor
Set up your image display properties, and then review some of your images using the different display modes. Review the shooting information for each image, and take a look at the Detail Information, paying close attention to any blinking areas on the image that may represent blown highlights.
Share your results with the book’s Flickr group!
Join the group here: flickr.com/groups/fujiX100S_fromsnapshotstogreatshots