
4. The Professional Modes
Taking Your Photography to the Next Level
Most professional photographers use a few select modes that offer the greatest control over their photography. Anyone who has been involved with photography for any period of time knows that these modes are the backbones of photography. They allow you to influence two of the most important factors in taking great photographs—namely, aperture and shutter speed. To access these modes, you simply hold the Mode button, turn the Main Command dial to one of the letter-designated modes, and begin shooting. But wouldn’t it be nice to know exactly what those modes control and how to make them do our bidding? Well, if you really want to take that next step in controlling your photography, it is essential that you understand not only how to control these modes, but why you are controlling them. So let’s switch over to the first of our professional modes: Program.
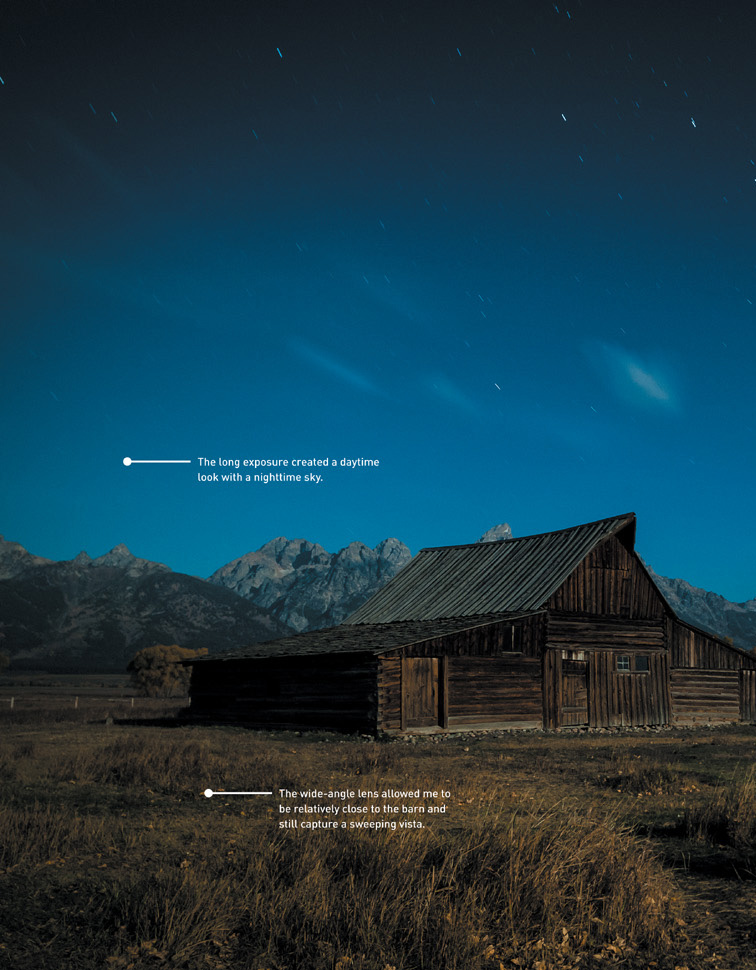
Poring Over the Picture
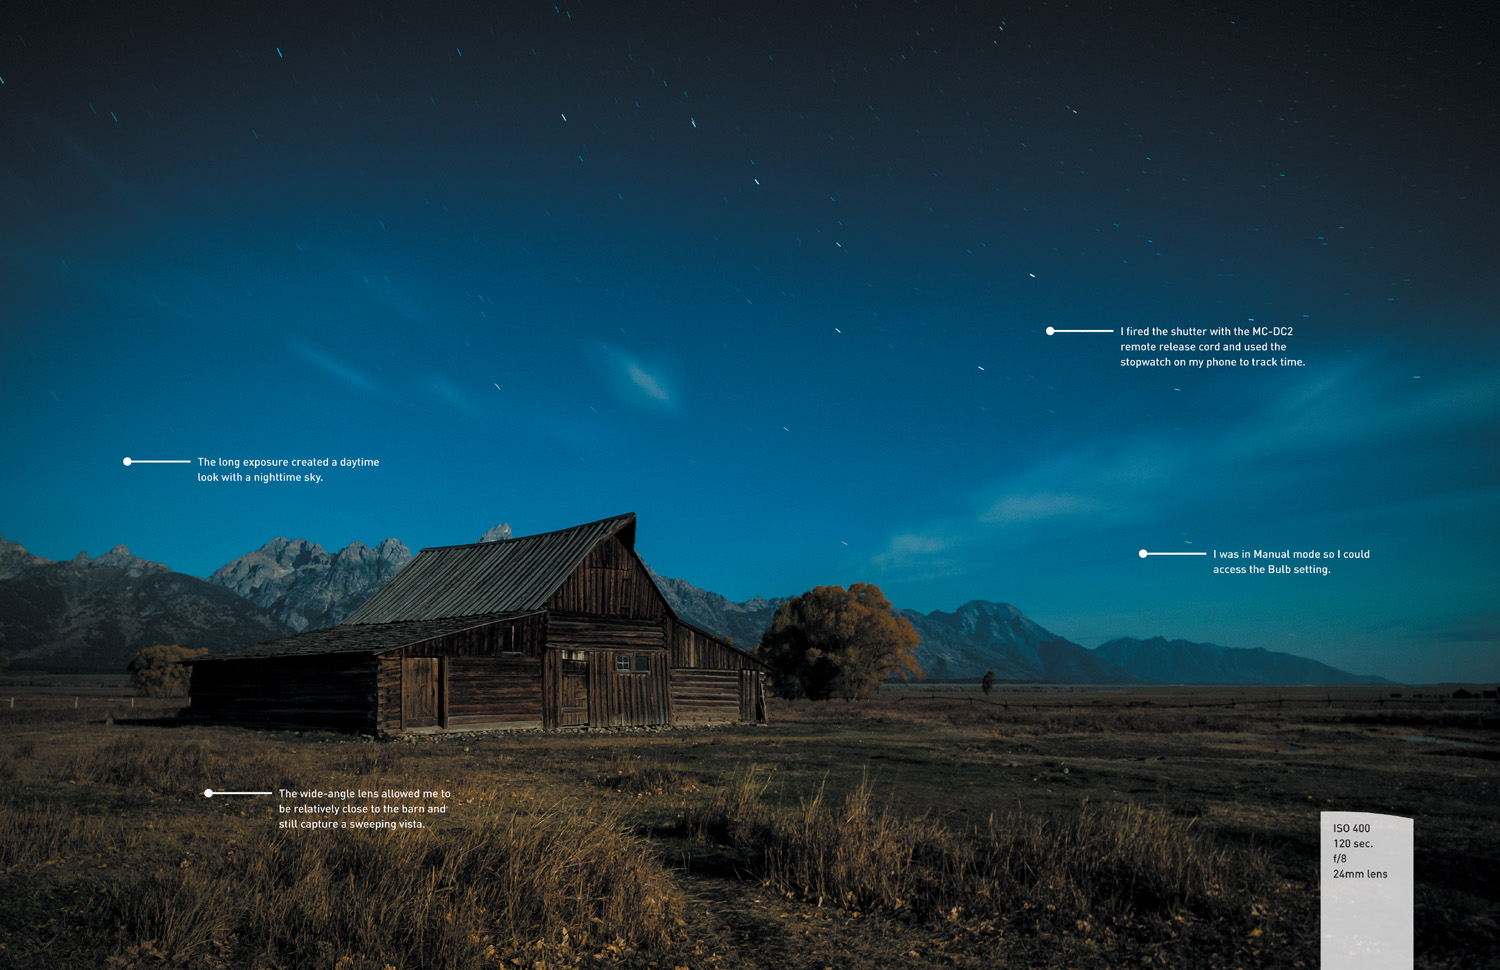
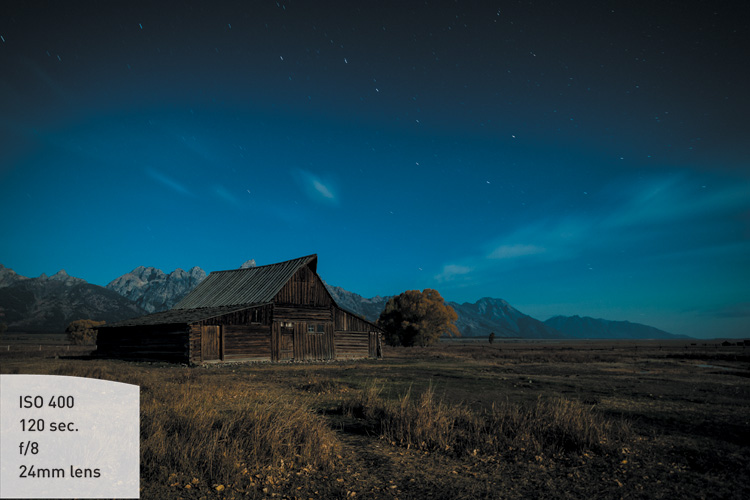
Thisphoto—of one of the barns on Mormon Row in Grand Teton National Park—is the very last photo I took on a recent workshop with the Digital Photo Workshops before packing up the gear and heading home. The sun had set behind the mountains, but the full moon had risen and was shining bright. I used the Bulb setting to make this 2-minute exposure and was pleased to have the Big Dipper moving across the sky as an added bonus.

P: Program Mode

I think of Program mode as a good place to begin for those graduating from the automatic or scene modes. There is a reason that Program mode is only one click away from the automatic modes: With respect to aperture and shutter speed, the camera is doing most of the thinking for you. So if that is the case, why even bother with Program mode?
First, let me say that I rarely use Program mode, because it just doesn’t give as much control over the image-making process as the other professional modes. There are occasions, however, when it comes in handy, like when I am shooting in widely changing lighting conditions and don’t have the time to think through all of my options, or when I’m not very concerned with having ultimate control of the scene. Think of a picnic outdoors in a partial shade/sun environment. I want great-looking pictures, but I’m not looking for anything to hang in a museum. If that’s the scenario, why choose Program over one of the scene modes? Because it gives me choices and control that none of the scene modes can deliver.
When to use Program (P) mode instead of the automatic scene modes
It’s graduation time and you’re ready to move on to a more advanced mode but not quite ready to jump in with both feet. When does Program mode come in handy?
• When shooting in a casual environment where quick adjustments are needed
• When you want more control over the ISO
• If you want to make corrections to the white balance
• When you want to change shutter speeds or the aperture to achieve a specific result
Let’s go back to our picnic scenario. As I said, the light is moving from deep shadow to bright sunlight, which means that the camera is trying to balance our three photo factors (ISO, aperture, and shutter speed) to make a good exposure. From Chapter 1, we know that Auto ISO is generally not what we want except when shooting in Auto mode. Well, in Program mode, you can choose which ISO you would like the camera to base its exposure on. The lower the ISO number, the better the quality of the photograph but the less light sensitive the camera becomes. It’s a balancing act, with the main goal always being to keep the ISO as low as possible—too low an ISO, and we will get camera shake in our images from a long shutter speed; too high an ISO, and we will have an unacceptable amount of digital noise. For now, let’s go ahead and select ISO 400 so that we provide enough sensitivity for those shadows while allowing the camera to use shutter speeds that are fast enough to stop motion.
With the ISO selected, we can now make use of the other controls built into Program mode. By rotating the Main Command dial, we have the ability to shift the program settings. Remember, your camera is using the internal meter to pick what it deems suitable exposure values, but sometimes it doesn’t know what it’s looking at and how you want those values applied (Figures 4.1 and 4.2).


FIGURE 4.2 To get greater depth of field, I decreased the size of the aperture by rotating the Main Command dial to the left, and the shutter speed slowed down to maintain the same exposure value.
With the program shift, you can influence what the shot will look like. Do you need faster shutter speeds in order to stop the action? Just turn the Main Command dial to the right. Do you want a smaller aperture so you get greater depth of field? Turn the dial to the left until you get the desired aperture. The camera shifts the shutter speed or aperture accordingly to get a proper exposure.
When you rotate the Main Command dial, you will notice a small star appear above the letter P in the top control panel and the rear display. This star is an indication that you modified the exposure from the one the camera chose. To go back to the default Program exposure, simply turn the dial until the star goes away or switch to a different mode and then back to Program mode again.
Let’s set up the camera for Program mode and see how we can make all of this come together.
Setting up and shooting in Program mode
1. Turn your camera on, press the Mode dial release lock, and turn the Mode dial to align the P with the indicator line.
2. Select your ISO by pressing and holding the ISO button (on the back left of the camera) while rotating the Main Command dial with your thumb.
3. The ISO will appear on the top display. Choose your desired ISO, and release the ISO button to lock in the change.
4. Point the camera at your subject, and then activate the camera meter by depressing the shutter button halfway.
5. View the exposure information in the bottom of the viewfinder or in the display panel on the back of the camera.
6. While the meter is activated, use your thumb to roll the Command dial left and right to see the changed exposure values.
7. Select the exposure that is right for you and start clicking. (Don’t worry if you aren’t yet sure what the right exposure is. We will work on making the right choices for those great shots beginning with the next chapter.)
S: Shutter Priority Mode

S mode is what photographers commonly refer to as Shutter Priority. Just as its name implies, it is the mode that prioritizes, or places major emphasis on, the shutter speed above all other camera settings.
Like Program mode, Shutter Priority mode gives us more freedom to control certain aspects of our photography. In this case, we are talking about shutter speed. The shutter speed determines how long your camera’s sensor is exposed to light. The longer the shutter remains open, the more time your sensor has to gather light. The shutter speed also, to a large degree, determines how sharp your photographs are. This is different from the image being sharply in focus. One of the major influences on the sharpness of an image is the blurring that is caused by camera shake and the subject’s movement. Because a slower shutter speed means that light from your subject is hitting the sensor for a longer period of time, any movement by you or your subject will show up in your photos as blur.
When to use Shutter Priority mode
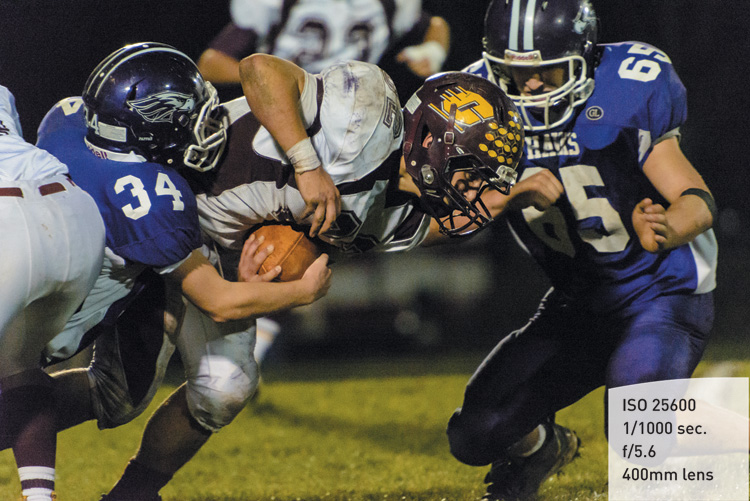
• When working with fast-moving subjects where you want to freeze the action (Figure 4.3); much more on this in Chapter 5
• When you want to emphasize movement in your subject with motion blur (Figure 4.4)
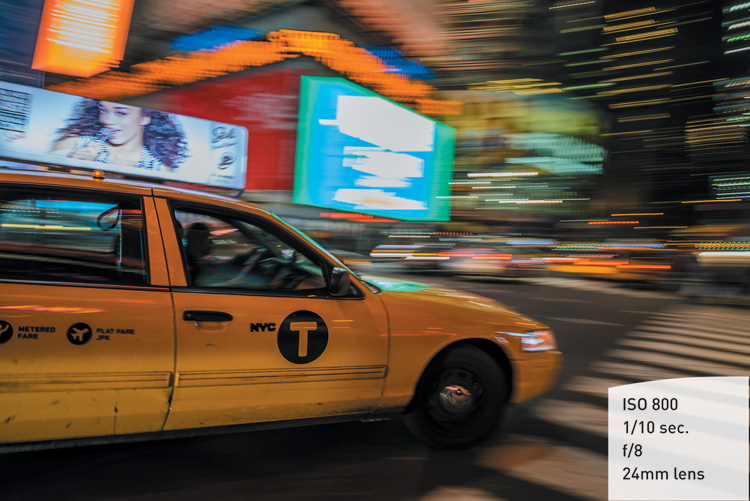
FIGURE 4.4 Slowing down the shutter speed and following the motion conveys a sense of movement in the shot.
• When you want to use a long exposure to gather light over a long period of time (Figure 4.5); more on this in Chapter 8
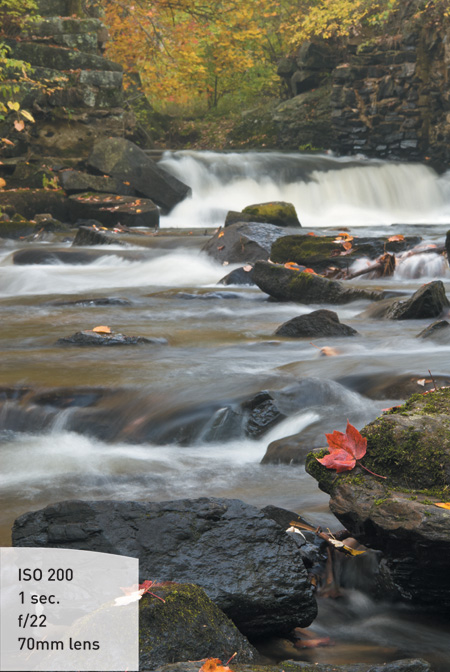
• When you want to create that silky-looking water in a waterfall (Figure 4.6)
As you can see, the subject of your photo usually determines whether or not you will use Shutter Priority mode. It is important that you can visualize the result of using a particular shutter speed. The great thing about shooting with digital cameras is that you get instant feedback by viewing your shot on the rear LCD monitor. But what if your subject won’t give you a do-over? Such is often the case when shooting sporting events. It’s not like you can ask the quarterback to throw that touchdown pass again because your last shot was blurry from a slow shutter speed. This is why it’s important to know what those speeds represent in terms of their ability to stop the action and deliver a blur-free shot.
First, let’s examine just how much control you actually have over the shutter speeds. The D610 has a shutter speed range from 1/4000 of a second all the way down to 30 seconds. With that much latitude, you should have enough control to capture almost any subject. The other thing to think about is that Shutter Priority is considered a “semi-automatic” mode. This means that you are taking control over one aspect of the total exposure while the camera handles the other. In this instance, you are controlling the shutter speed and the camera is controlling the aperture. This is important, because there will be times that you want to use a particular shutter speed but your lens won’t be able to accommodate your request.
For example, you might encounter this problem when shooting in low-light situations. If you are shooting a fast-moving subject that will blur at a shutter speed slower than 1/125 of a second and your lens’s largest aperture is f/3.5, you might find that your aperture display in the viewfinder and the control panel will blink. This is your warning that there won’t be enough light available for the shot—due to the limitations of the lens—so your picture will be underexposed. It does not, however, prevent you from taking the shot, so you need to be aware of the warning and the results.
Another case where you might run into this situation is when you are shooting moving water. To get that look of silky, flowing water, it’s usually necessary to use a shutter speed of at least 1/15 of a second. If your waterfall is in full sunlight, you may see the aperture readout blink because the lens you are using only stops down to f/22 at its smallest opening. In this instance, your camera is warning you that you will be overexposing your image. There are workarounds for these problems, which we will discuss later (see Chapter 7 for all the details), but it is important to know that there can be limitations when using Shutter Priority mode.
Setting up and shooting in Shutter Priority mode
1. Turn your camera on. Press the Mode dial release lock, and turn the Mode dial to align the S with the indicator line.
2. Set your ISO by pressing the ISO button; select the appropriate setting by looking at the ISO readout on the control panel or by pressing the Info button on the back of the camera and looking at the info display on the rear LCD monitor.
3. Once your ISO is set, point the camera at your subject, and then activate the camera meter by depressing the shutter button halfway.
4. View the exposure information in the bottom area of the viewfinder or in the control panel.
5. While the meter is activated, use your thumb to roll the Main Command dial left and right to see the changed exposure values. Roll the dial to the right for faster shutter speeds and to the left for slower speeds.
A: Aperture Priority Mode
You wouldn’t know it from its name, but Aperture Priority mode is one of the most useful and popular modes in DSLR photography. Aperture Priority is one of my favorite modes, and I believe that it will quickly become one of yours as well. Aperture Priority is deemed a semi-automatic mode because it allows you to once again control one factor of exposure while the camera adjusts for another.
Why, you may ask, is this one of my favorite modes? It’s because the aperture of your lens dictates depth of field. Depth of field, along with composition, is a major element in how you direct attention to what is important in your image. It is the controlling factor when determining how much of your image is sharp. If you want to isolate a subject from the background, such as when shooting a portrait, you can use a large aperture to keep the focus on your subject and make both the foreground and background blurry. If your emphasis is on keeping the entire scene sharply focused, such as with a landscape scene, then using a small aperture will render the greatest depth of field possible.
When to use Aperture Priority mode
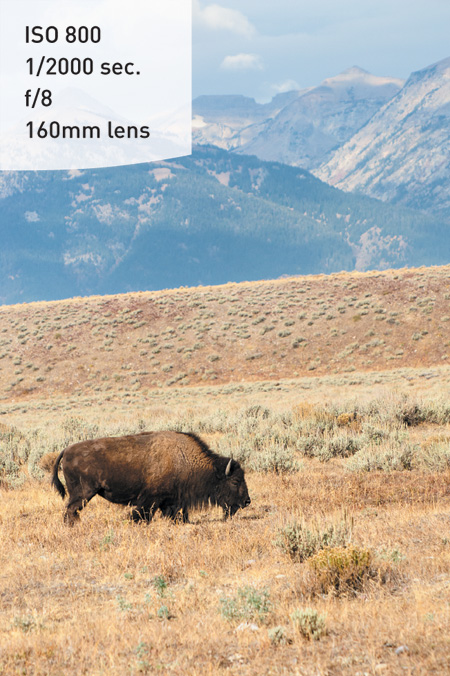
• When shooting portraits or wildlife (Figure 4.7)

FIGURE 4.7 A large aperture created a very blurry background, so all the emphasis is on the subject.
• When shooting most landscape photography (Figure 4.8)
• When shooting macro, or close-up, photography (Figure 4.9)
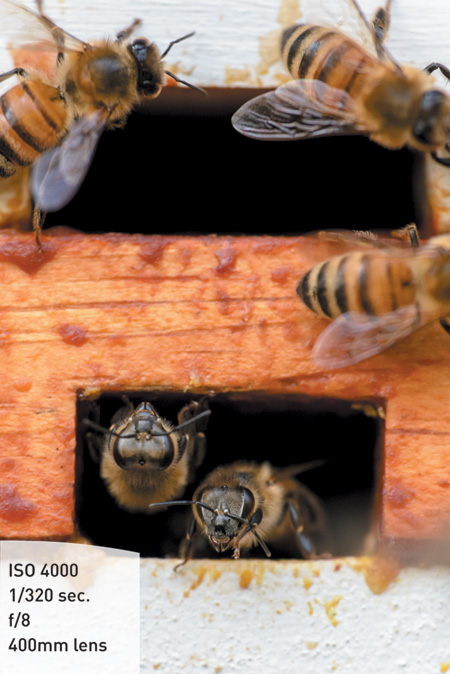
FIGURE 4.9 A small aperture was used to capture the smiling faces of my bees as they emerged from the hive.
• When shooting architectural photography, which often benefits from a large depth of field (Figure 4.10)
So we have established that Aperture Priority (A) mode is highly useful in controlling the depth of field in your image. But it’s also pivotal in determining the limits of available light that you can shoot in. Different lenses have different maximum apertures. The larger the maximum aperture, or f-stop, the less light you need to achieve an acceptably sharp image. You will recall that in Shutter Priority mode, there is a limit at which you can handhold your camera without introducing movement or hand shake, which causes blurriness in the final picture. If your lens has a larger aperture, then you can let in more light all at once, which means that you can use faster shutter speeds. This is why lenses with large maximum apertures, such as f/1.4, are called “fast” lenses.
On the other hand, bright scenes require the use of a small aperture (such as f/16 or f/22), especially if you want to use a slower shutter speed (Figure 4.11). That small opening reduces the amount of incoming light, and this reduction of light requires that the shutter stay open longer.
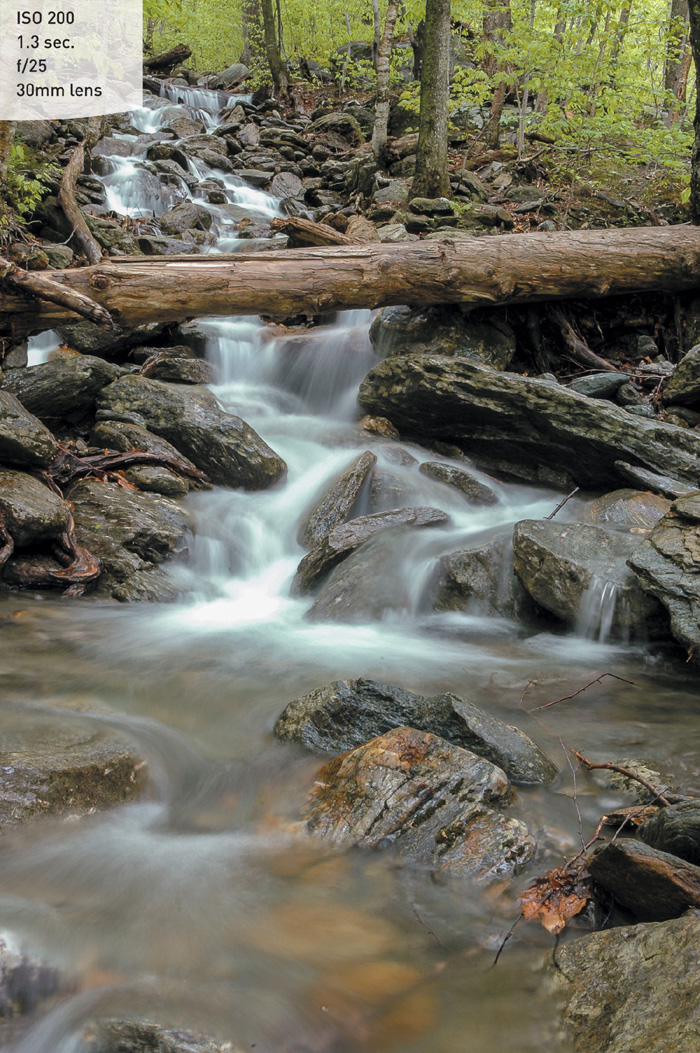
FIGURE 4.11 A wide-angle lens combined with a small aperture added to the depth of field. It also created the need for a long shutter speed, which helped add fluidity to the falling water.
Setting up and shooting in Aperture Priority mode
1. Turn your camera on. Press the Mode dial release lock, and turn the Mode dial to align the A with the indicator line.
2. Set your ISO by pressing the ISO button; select the appropriate setting by looking at the ISO readout on the control panel or by pressing the Info button on the back of the camera and looking at the info display on the rear LCD monitor.
3. Once your ISO is set, point the camera at your subject, and then activate the camera meter by depressing the shutter button halfway.
4. View the exposure information in the bottom area of the viewfinder or in the control panel.
5. While the meter is activated, use your index finger to roll the Sub-command dial left and right to see the changed exposure values. Roll the dial to the right for a smaller aperture (higher f-stop number) and to the left for a larger aperture (smaller f-stop number).
M: Manual Mode
Once upon a time, long before digital cameras and program modes, there was manual mode. Only in those days it wasn’t called “manual mode,” because there were no other modes. It was just photography. In fact, many photographers cut their teeth on completely manual cameras. Let’s face it—if you want to learn the effects of aperture and shutter speed on your photography, there is no better way to learn than by setting these adjustments yourself. But today, with the advancement of camera technology, many new photographers never give this mode a second thought. That’s truly a shame, as it is not only an excellent way to learn your photography basics, it’s also an essential tool to have in your photographic bag of tricks.
When you have your camera set to Manual (M) mode, the camera meter will give you a reading of the scene you are photographing, but it’s your job to actually set both the f-stop (aperture) and the shutter speed to achieve a correct exposure. If you need a faster shutter speed, you will have to make the reciprocal change to your f-stop. Using any other mode, such as Shutter or Aperture Priority, would mean that you just have to worry about one of these changes, but Manual mode requires you to do it all yourself. This can be a little challenging at first, but after a while you will have a complete understanding of how each change affects your exposure, which will in turn improve the way that you use the other modes.
When to use Manual mode
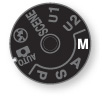
• When learning how each exposure element interacts with the others (Figure 4.12)
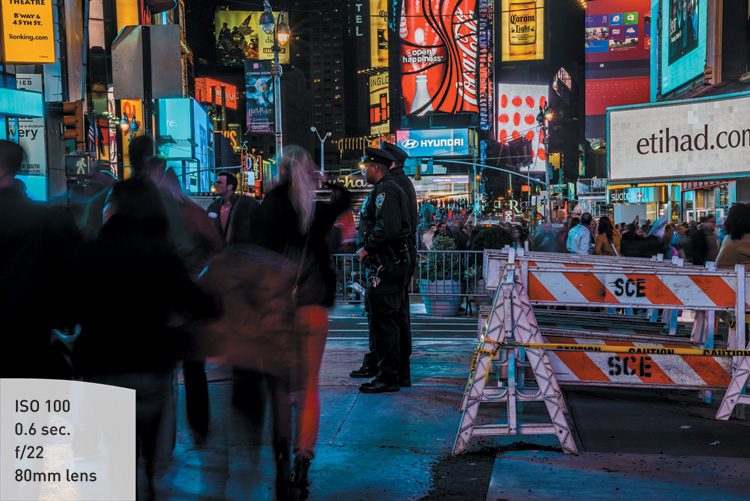
FIGURE 4.12 The camera was set to Manual so I could expose properly for the bright lights while still using a slow-enough shutter to enhance the feeling of motion that exists in Times Square.
• When your environment is fooling your light meter and you need to maintain a certain exposure setting (Figure 4.13)
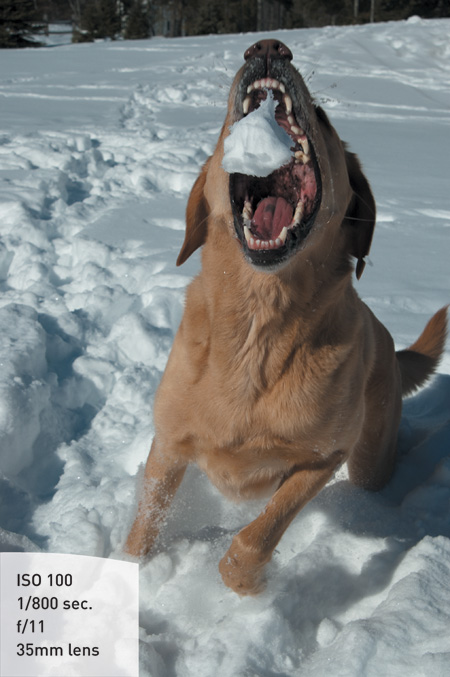
FIGURE 4.13 Beaches and snow are always a challenge for light meters. Add to that the desire to have exact control of depth of field and shutter speed, and you have a perfect scenario for Manual mode.
• When shooting silhouetted subjects, which requires overriding the camera’s meter readings (Figure 4.14)
FIGURE 4.14 Although the meter was doing a pretty good job of exposing for the sky, I used Manual mode to push the foreground elements into complete silhouette and get richer color in the sunset.
Setting up and shooting in Manual mode
1. Turn your camera on. Press the Mode dial release lock, and turn the Mode dial to align the M with the indicator line.
2. Set your ISO by pressing the ISO button; select the appropriate setting by looking at the ISO readout on the control panel or by pressing the Info button on the back of the camera and looking at the info display on the rear LCD monitor.
3. Point the camera at your subject, and then activate the camera meter by depressing the shutter button halfway.
4. View the exposure information in the bottom area of the viewfinder or by pressing the Info button on the back of the camera and looking at the info display on the rear LCD monitor.
5. While the meter is activated, use your index finger to roll the Main Command dial left and right to change your shutter speed value until the exposure mark is lined up with the zero mark. The exposure information is displayed in the viewfinder (and on the rear LCD after pressing the Info button) (Figure 4.15) by a scale with marks that run from –2 to +2 stops. A proper exposure will line up with the taller mark in the middle. As the indicator moves to the left, it is a sign that you will be underexposing (not enough light on the sensor to provide adequate exposure). Move the indicator to the right and you will be providing more exposure than the camera meter calls for; this is overexposure.

6. To set your exposure using the aperture, depress the shutter release button until the meter is activated. Then rotate the Sub-command dial to change the aperture. Rotate right for a smaller aperture (large f-stop number) and left for a larger aperture (small f-stop number).
User Settings Mode—Saving Your Favorite Settings to the Mode Dial
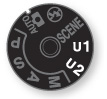
User Settings mode is a great feature if you’d like to access your favorite settings with the touch of a dial. These settings appear on the Mode dial as U1 and U2. If you have a favorite group of settings that you find you are using often and want to have them close at hand, then these modes are for you.
1. Under any of the semi-automatic modes or Manual mode, set the camera to your favorite settings, adjusting any or all of the following: aperture, shutter speed, ISO, flash, focus point, metering, and bracketing.
2. Go to the Setup menu, and select Save user settings (A).
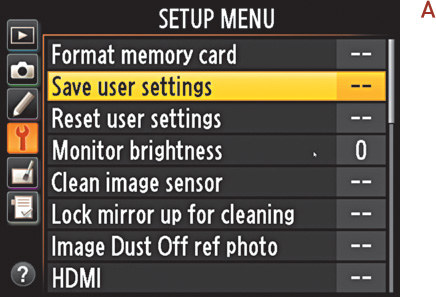
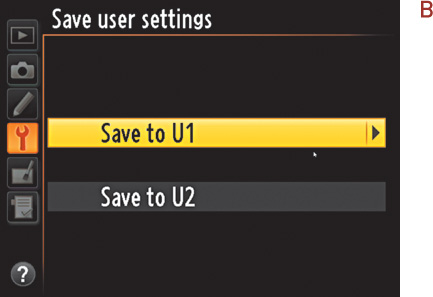
3. Highlight Save to U1 or U2, then click OK to save your settings (B), (C).
4. When you want to use those settings again, just rotate the Mode dial to U1 or U2, and the camera will choose your saved settings so that you’re ready to go.
I find it useful to set up one user setting for Aperture Priority with bracketing turned on and ISO set to 100 for times when I want shoot that way (I find it too easy to forget that I have bracketing enabled). I have the other user setting configured for Shutter Priority with Auto ISO sensitivity enabled for times when freezing fast action is more important than ISO setting (and I also find it easy to forget that I have Auto ISO sensitivity enabled). This makes it simple for me to jump right to those settings, but also to jump out again.
How I Shoot: A Closer Look at the Camera Settings I Use
The great thing about working with a DSLR camera is that I can always feel confident that some things will remain unchanged from camera to camera. For me, these are the Aperture Priority (A) and Shutter Priority (S) shooting modes. Regardless of the subject I am shooting––from landscape to portrait to macro––I am almost always going to be concerned with my depth of field. Whether it’s isolating my subject with a large aperture or trying to maximize the overall sharpness of a sweeping landscape, I always keep an eye on my aperture setting. If I do need to control the action (Figure 4.16), I use Shutter Priority. If I am trying to create a silky waterfall effect, I can depend on Shutter Priority mode to provide a long shutter speed and get the desired result. Or perhaps I am shooting a sporting event—I definitely need fast shutter speeds that will freeze the fast-moving action.
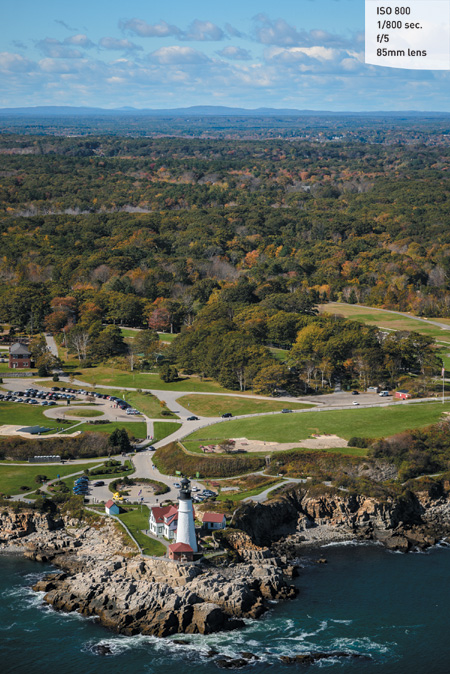
FIGURE 4.16 I got to join my aerial photographer buddy Dave Cleaveland on a helicopter flight over Maine during one of his recent jobs. A fast shutter speed was the most important factor in overcoming the vibration of the helicopter and keeping subjects sharp.
While the other camera modes have their place, I think you will find that, like myself and most other working pros, you will use the Aperture Priority and Shutter Priority modes for 90 percent of your shooting.
The other concern that I have when setting up my camera is just how low I can keep my ISO. This is always a priority for me, because a low ISO will always give the cleanest image. I raise the ISO only as a last resort, because each increase in sensitivity is an opportunity for more digital noise to enter my image. To that end, I always have the High ISO Noise Reduction feature turned on when shooting in JPEG mode (I use Adobe Photoshop Lightroom to deal with high ISO noise in the RAW format).
To make quick changes while I shoot, I often use exposure compensation so that I can make small over- and underexposure changes. This is different than changing the aperture or shutter because it is more like fooling the camera meter into thinking the scene is brighter or darker than it actually is. To get to this function quickly, I simply press the Exposure Compensation button and then dial in the desired amount of compensation. Truth be told, I usually have this set to –1/3 so that there is just a tiny bit of underexposure in my image. This usually leads to better color saturation.
One of the reasons I change my exposure is to make corrections when I see the blinkies in my rear LCD monitor. (“Blinkies” is not the real name for the highlight clipping warning, just the one that most photographers use.) Blinkies are the warning signal that part of my image has been overexposed to the point that I no longer have any detail in the highlights. When the Highlights feature is turned on, the display will flash between black and white whenever there is a potential of overexposing in the image. The black and white flashing will only appear in areas of the picture that are in danger of overexposure. To turn on this feature, go to the Playback menu and enable the feature as follows.
1. To set up the highlight warning for your camera, press the Menu button and then use the Multi-selector to access the Playback menu.
2. Once in the Playback menu, use the Multi-selector to choose Playback display options, and press OK (A).
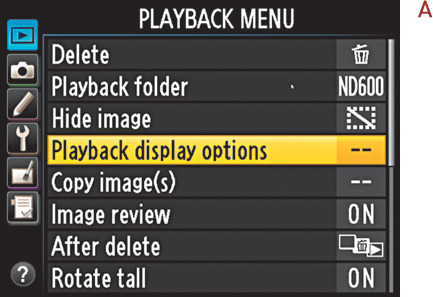
3. Use the Multi-selector to move down to the Highlights option, and then press the OK button to add a checkmark (B).
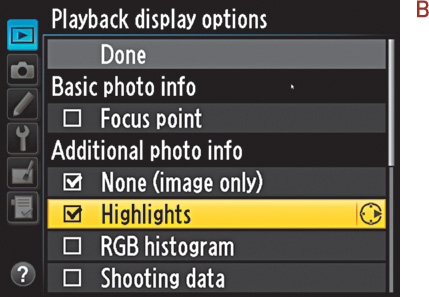
4. Now move back up to the Done heading, and press the OK button again to lock in your change.
Once the highlight warning is turned on, I use it to check my images on the back of the LCD after taking a shot. If I see an area that is blinking (Figure 4.17), I will usually set the exposure compensation feature to an underexposed setting like –1/3 or –2/3 stops and take another photo, checking the result on the screen. I repeat this process until the warning is gone.
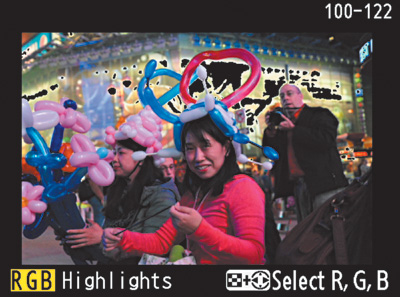
FIGURE 4.17 The blinking black and white areas (shown in this image as black) are a warning that part of the image is overexposed at the current camera settings.
Sometimes, such as when shooting into the sun, the warning will blink no matter how much you adjust the exposure, because there is just no detail in the highlights. Use your best judgment to determine if the warning is alerting you to an area where you want to retain highlight detail.
To see the highlight, or “blinkie,” warning, you will need to change your display mode. To do this, press the Image Review button on the back of the camera and then press up or down on the Multi-selector until you see the word “Highlights” at the bottom of the display screen. This will now be your default display mode unless you change it or turn off the highlight warning.
As you work your way through the coming chapters, you will see other tips and tricks I use in my daily photography, but the most important tip I can give is that you should understand the features of your camera so you can leverage the technology in a knowledgeable way. This will result in better photographs.
Chapter 4 Assignments
This will be more of a mental challenge than anything else, but you should put a lot of work into these lesson assignments because the information covered in this chapter will define how you work with your camera from this point on. Granted, there may be times that you just want to grab some quick pictures and will resort to Program mode, but to get serious with your photography, you will want to learn the professional modes inside and out.
Learning to control time with Shutter Priority mode
Find some moving subjects and then set your camera to S mode. Have someone ride a bike back and forth, or even just photograph cars as they go by. Start with a slow shutter speed of around 1/30 of a second, and then start shooting with faster and faster shutter speeds. Keep shooting until you can freeze the action. Now find something that isn’t moving, like a flower, and work your way down from a fast shutter speed like 1/500 of a second. Don’t brace the camera on a steady surface. Just try to shoot as slowly as possible, down to about 1/4 of a second. The point is to see how well you can handhold your camera before you start introducing hand-shake into the image, making it appear soft and somewhat unfocused.
Controlling depth of field with Aperture Priority mode
The name of the game with A mode is depth of field. Set up three items at varying distances from you. I would use chess pieces or something similar. Now focus on the middle item and set your camera to the largest aperture that your lens allows (remember, large aperture means a small number, like f/3.5). Now, while still focusing on the middle subject, start shooting with ever-smaller apertures until you are at the smallest f-stop for your lens. If you have a zoom lens, try doing this exercise with the lens at the widest and then the most telephoto settings. Now move up to subjects that are farther away, like telephone poles, and shoot them in the same way. The idea is to get a feel for how each aperture setting affects your depth of field.
Giving and taking with Manual mode
Manual mode is not going to require a lot of work, but you should pay close attention to your results. Go outside on a sunny day, and using the camera in Manual mode, set your ISO to 100, your shutter speed to 1/125 of a second, and your aperture to f/16. Now press your shutter release button to get a meter reading. You should be pretty close to that zero mark. If not, make small adjustments to one of your settings until it hits that mark. Now the fun begins. Start moving your shutter speed slower, to 1/60, and then set your aperture to f/22. Now go the other way. Set your aperture on f/8 and your shutter speed to 1/500. Now review your images. If all went well, all the exposures should look the same. This is because you balanced the light with reciprocal changes to the aperture and shutter speed. Now go back to our original setting of 1/125 at f/16, and try just moving the shutter speed without changing the aperture. Just make 1/3-stop changes (1/125 to 1/100 to 1/80 to 1/60), and then review your images to see what 1/3 stop of overexposure looks like. Then do the same thing going in the opposite way. It’s hard to know if you want to over- or underexpose a scene until you have actually done it and seen the results.
With each of the assignments, make sure that you keep track of your modes and exposures so that you can compare them with the image. If you are using software to review your images, you should also be able to check the camera settings that are embedded within the image’s metadata.
Share your results with the book’s Flickr group!
www.flickr.com/groups/d610fromsnapshotstogreatshots