
10. The Moving Picture

Getting the Most Out of the D610’s Video Capabilities
Probably one of the reasons you purchased the D610 over competing cameras is its ability to capture video—and not just regular video, but high-definition video. As I discussed in the book’s introduction, the focus of this book is on the photography aspects of the camera, but that doesn’t mean I am going to skip the video functions. The fact is that the line between photography and video is getting blurrier each day, especially since the inclusion of video capture in DSLR cameras. In this chapter, we will address some of the basics of video capture with the D610 and also take a look at some of the creative things you can do with your video. First, though, let’s take a look at why the video capture feature is such a big deal in a DSLR.
It’s All About the Lenses
Video cameras have been around for a long time, so why is it such a big deal that you can now use your DSLR camera to record video? The answer is simple: it’s all about the lenses. If you have any experience using a video camcorder, you know that it always seems like everything is in focus. While this isn’t always a bad thing, it can also be pretty boring. Using DSLR video allows you to use faster lenses (larger apertures), which can give you more shallow depth of field in your videos. This shallow depth of field can add a sense of dimension and depth that is normally lacking in most standard video cameras. The truth is that many videographers are turning their attention from video cameras costing tens of thousands of dollars to the much more affordable DSLR video cameras to produce similar professional, high-definition results.
The D610 will not only allow you to capture video with a more shallow depth of field, it will also allow you the flexibility of using different lenses for different effects. While you may own only one lens right now, you have the ability to buy specialty lenses to enhance your video as well as your still capture. Any lens that you can use for still photography on your D610 can also be used for video, including an ultra-wide lens such as the AF Fisheye-Nikkor 16mm f/2.8 ED, the AF-S VR Zoom-Nikkor 70-300mm f/4.5-5.6G IF-ED, or even the AF Micro-Nikkor 105mm f/2.8D for getting extreme close-up videos.
Recording with Live View
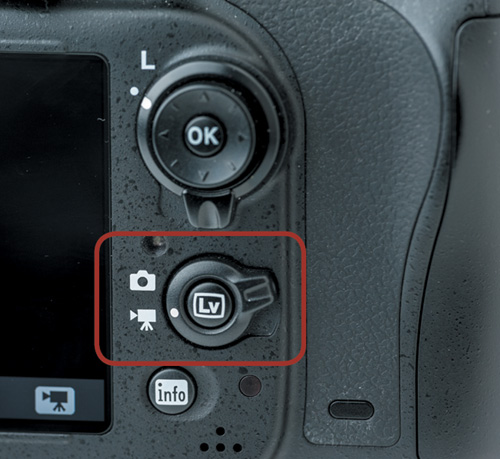
Video recording is a feature of the Live View capabilities of the camera, so you’ll have to put it into active Live View mode to begin capturing video. This is done by rotating the Live View selector to the movie camera icon and then pressing the Lv button, which will activate Live View on the rear display (Figure 10.1).
Next, focus the camera by placing the red focus box on the subject and holding down the shutter button halfway until the focusing box turns green, indicating that your subject is in focus.
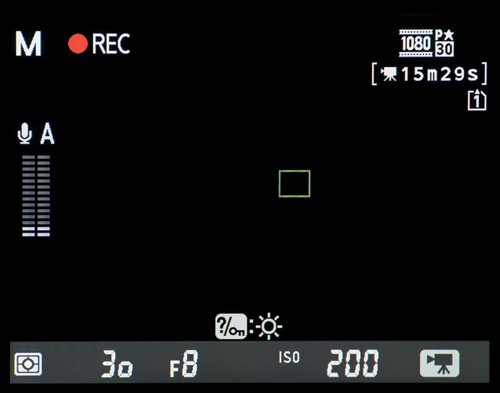
Once your subject is in focus, push the red Movie-record button, located on top of the camera near the shutter release button, to begin recording. As the camera begins to record, you will notice a few new icons on the LCD (Figure 10.2). At the upper left is a blinking red Record icon to let you know that the camera is in active recording mode. At the upper right, a timer counts down your remaining recording time. The recording time is directly related to the quality of video you have selected as well as to the capacity of your memory card. Lower-quality video and larger memory cards equal more recording time. To stop recording, simply press the Movie-record button a second time, which takes you back to Live View mode. To turn off Live View, press the Lv button or simply turn off the camera.

FIGURE 10.2 When recording is active, you will see a blinking red icon in the upper-left corner of the screen.
Video Quality
Now that we know the mechanics of recording a video, let’s spend a little time looking at the settings you will use to dictate the quality of your video. First, we need to determine the size of the video that will be recorded. The best quality your D610 is capable of is high-definition video with a resolution of 1920×1080, aka 1080p. The 1080 represents the height of the video image in pixels, and the p stands for progressive, which is the method the camera uses to draw the video on the screen (more on this later).
The D610’s other video resolution is 1280×720. For high-definition television and computer/media station viewing, you will be best served by using 1920×1080. If you plan on recording for the Internet or for portable media devices, first check the appropriate upload to that medium or device. Many social media sites, such as YouTube and Facebook, support HD video, as do the iPad, the iPod touch, and competing devices. But before you decide to render HD video, you should know the key benefit of using the lower resolutions: lower-resolution video requires less physical storage, because of its smaller pixel count. This means that more video will fit on your storage card, and it will take less time to upload the video to the Internet.
Along with selecting a size for your video, you will also need to pick a frame rate. Video is, after all, a series of still image frames that are displayed in rapid fashion to make what looks like a moving picture. The standard for most video is 30 frames per second. The European standard is 25 frames per second. There is also a setting of 24 frames per second, which is the frame rate used for movies shot on film. There are also additional choices for the 1280×720 sizes, which include 60 (U.S.A.) and 50 (Europe) frames per second. These faster frame rates are great if you intend to do some slow-motion edits of your videos since they contain twice as many frames per second. This means they can be played at half-speed and still look nice and smooth.
1. Press the Menu button, and use the Multi-selector to navigate to the shooting menu.
2. Using the Multi-selector, highlight Movie settings and press OK (A).
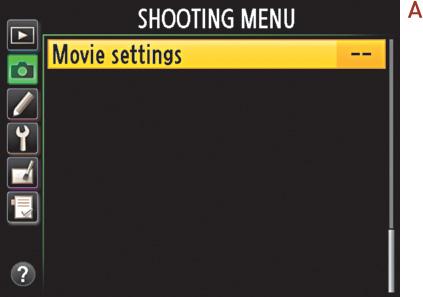
3. Highlight Frame size/frame rate and press OK, then choose your desired frame size/frame rate and press OK (B).

4. Select a movie quality and press OK (C).
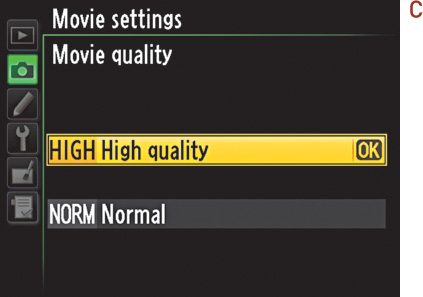
5. Press the Menu button twice to exit Menu mode and return to shooting.
Sound
The D610 can record audio to go along with your video, but there are a couple of things to keep in mind while using the built-in microphone (the two small holes right above the D610 nameplate). The first is to make sure you don’t block the microphone with your finger and muffle any sounds you are trying to capture. The next thing you need to know about the sound is that it is mono, not stereo. This is lower-quality sound than you are used to hearing in movies and music.
To get stereo audio, you will need to use an external microphone, which can be connected via the port on the side (Figure 10.3). A nice step up from the built-in mic is the Nikon ME-1 external microphone, which records in stereo and, because it mounts atop the hot shoe, it picks up less noise from the AF motor. You can watch and listen to a thorough review of the ME-1, along with some comparisons to other external mic choices, at http://bit.ly/d5100Mic (it is used on a D5100 in the review, but the mic is the same).
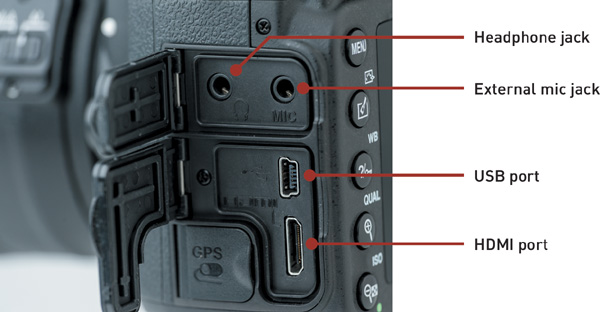
A welcome feature on the D610 is the addition of a headphone jack, which gives you the ability to monitor the sound being recorded by the mic. Using headphones that reduce or cancel ambient sound will improve your ability to monitor what is coming in through the mic.
Turning off the sound
Sometimes you may wish to turn the sound off altogether—maybe sound would be distracting or you plan to add your own soundtrack later.
Changing the audio settings
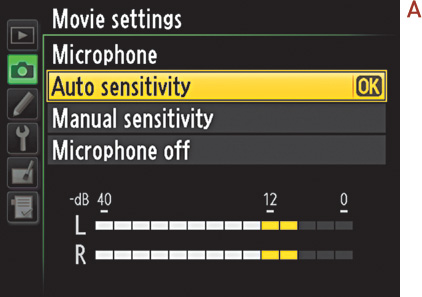
1. To make adjustments to the audio settings, go back into the Movie Settings menu, select Microphone, and press OK.
2. To enable the camera to automatically adjust the audio levels, select Auto sensitivity and press OK (A). If you want to adjust them yourself, highlight Manual sensitivity and press OK.
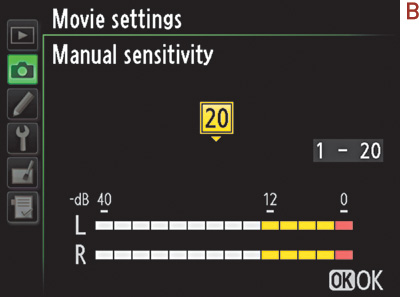
3. You can select an audio level from 1 to 20 by using the Multi-selector (B). Just be careful to watch your audiometers to make sure the audio level reaches zero only during the loudest moments.
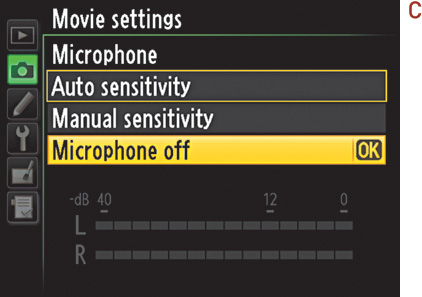
4. To turn off the microphone, highlight the Microphone off option in the menu and press OK (C).
Dedicating a Second Card to Video
This is a nice option if you have a good reason for keeping your photos separated from your video files. For some people, it is just easier for importing purposes to have one card dedicated to photos and the other to video. Plus, it allows you to dedicate your fastest or highest-capacity SD card to video.
To dedicate a video card
1. Press the Menu button, use the Multi-selector to highlight Movie settings in the shooting menu, and click OK (A).

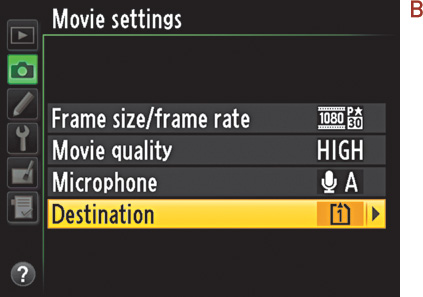
2. Use the Multi-selector to highlight Destination, and click OK (B).
3. Select your desired SD card slot, and press OK (C).
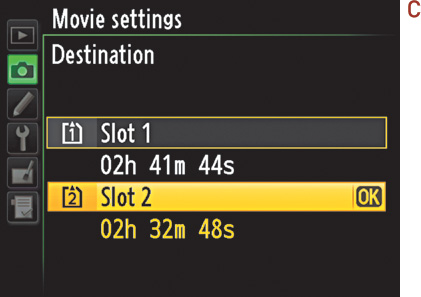
4. Click the Menu button twice to return to shooting.
Focusing
Your D610 has several focusing options for Live View/Movie mode: Face Priority AF, Wide Area AF, Normal Area AF, and Subject Tracking AF. There are benefits to each focus-point option, and you will want to choose your focus mode depending on the subject of your video. See page 52 in your manual for more on the AF-area modes.
Changing the AF-area mode
Normal Area AF uses the small rectangular focus point to lock focus on a subject. The focus point can be manually moved around the frame by using the Multi-selector. You can also quickly bring the focus point back to the center of the frame by pressing the center button on the Multi-selector.
If you are going to be shooting landscapes or other scenes without people, you might want to consider using the Wide Area AF mode. This provides a larger focus area and makes it a little easier to get a quick focus lock on general subjects.
If you are going to be recording people, you can use the Face Priority mode. It automatically detects and focuses on your subject’s face. If there is more than one person, the camera will focus on the closest one, but you can change from one face to another by using the Multi-selector.
For tracking a moving subject, use Subject Tracking AF. Place the focus point over your subject, and press the center button on the Multi-selector. The focus point will continue to track your subject until it leaves the frame or until you turn it off by pressing the center button again.
1. To change the AF-area, activate Live View mode by pressing the Lv button.
2. Press and hold the AF-mode button on the front of the camera.
3. Rotate the Sub-command dial until you see the icon for the desired AF-area mode in the top of the Live View display.
Changing the focus mode
Of course, these modes will focus only if you are pressing the shutter release button (and that includes Subject Tracking AF). If you want your camera to actively focus while you are recording, you will need to change the mode from AF-S to AF-F (Full-time servo AF). When you activate AF-F, the camera will continuously focus using the focus mode you have selected.
1. To change the focus mode, activate Live View mode by pressing the Lv button.
2. Press and hold the AF-mode button on the front of the camera.
3. Rotate the Main Command dial until you see the icon for the desired focus mode in the top of the Live View display.
View Modes
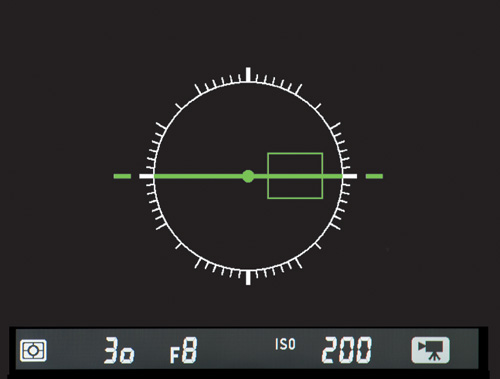
The Information On mode of Live View offers a lot of information for setting up your camera and lets you see things like the focus mode, the white balance, the frame size and rate, the selected picture control, and even the audiometer (Figure 10.4).
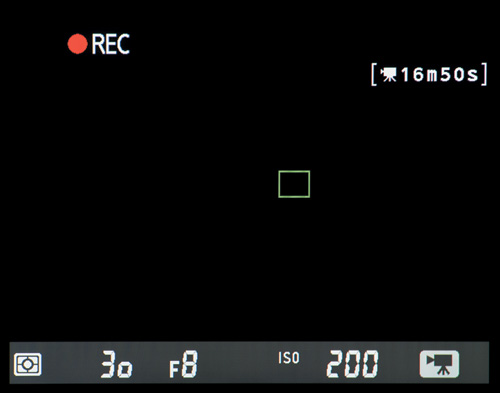
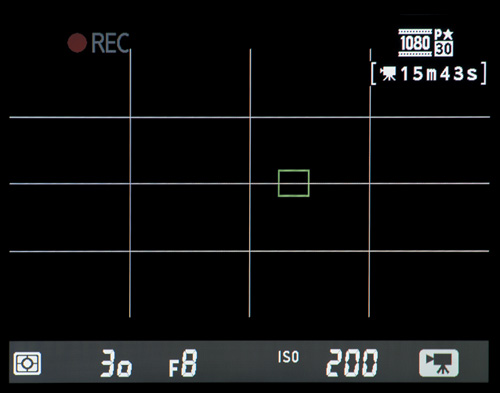
All of this is great stuff, but sometimes it can get in the way, which is why you have three other options available. For an uncluttered view, you can choose to turn off all information (Figure 10.5). The other two options are really helpful in composing your scene. The Framing Guides mode overlays a grid on the preview to help keep things squared up (Figure 10.6). The Virtual Horizon mode puts an active level indicator right on your screen; this lets you know whether you are holding the camera straight and whether the lens is tipped forward or backward (Figure 10.7).
Accessories for Video
I’ve dedicated an entire chapter to accessories that will expand your photographic options, and many of those same accessories can also be used for motion capture, but there are a few video-specific accessories I want to mention here.
Tripods
The use of a tripod for video is not quite the same as for still-image applications. When you are shooting video, you want to present a nice, smooth video scene that is free of camera shake. One particular case for this is the pan shot. When you are following a subject from side to side, you want the viewer’s attention to be focused on the subject, not on the shaky look of the video. To help in this effort, your preferred weapon of choice should be a tripod with a fluid head. A fluid head looks a little different than a standard tripod head, in that it usually has one long handle for controlled panning. To really make things smooth, the head uses a system of small fluid cartridges within the panning mechanisms so that your panning movements are nice and smooth. For around $130, you can get a fluid pan head that will mount on your existing tripod legs (if your existing tripod has a removable head). Another option to consider is a dedicated video monopod such as the Manfrotto Fluid Video Monopod (you can even get it with a panning head), which gives you the stability of a tripod but with a much smaller footprint.
Camera stabilizers
Aside from using a boom arm, there’s really only one way to get jitter-free video on your camera while moving around: use a steady device. You have probably heard of SteadiCam rigs, but they can be cumbersome, expensive, and frankly a little bit of overkill for the normal video experience. But there are smaller, handheld rigs that provide the same benefit without the cost and bulk, like the ModoSteady from Manfrotto. One of the big advantages of this rig is that it has three different setups to choose from. The steady mode hangs a counterbalance under the camera to allow you to capture fluid-looking video movement. You can also move the balance arm to a different position and use it as a shoulder rig, much like the stock of a rifle. Finally, you can open the handle and turn it into a small tabletop tripod. That’s a lot of functionality for under $100.
Easier LCD vision
I have one problem with shooting video on the D610 or any DSLR camera, and that is that I can’t use the viewfinder as I record. Instead, I am forced to use the rear LCD screen, and while it is very large and sharp, my old eyes tend to make me hold the camera fairly far away from my body to see the screen. But there is another way, and it is perfect for old eyes like mine.
To really get a good look at what is happening in your LCD monitor, you should use a loupe like the Zacuto Z-Finder Pro 3X, which is made for 3.2” screens and attaches to the camera for hands-free operation. If you are going to be doing a lot of video recording, you will most certainly want to look into a device like this. Not only is it great for getting a better look at the LCD screen while recording, it also helps avoid glare on the screen while working outdoors.
Get yourself a mini-HDMI cable
When you are ready to play back your video, you can run the video directly from your camera to your TV. You’ll need to use a TV capable of displaying high-definition video, which also means that you will want to use an HDMI cable to connect the camera to the TV. HDMI (High-Definition Multimedia Interface) cables will carry your uncompressed video to your HDTV in all its glory. The only problem is that your camera didn’t include an HDMI cable in the box when you bought it. This means that you will have to purchase one to take advantage of HD playback. If you are thinking that you already own an HDMI cable for connecting your other media components to your TV, you might want to take another look. Your camera uses a mini-HDMI connection, so most standard cables designed for video components won’t work. If you do decide to purchase one, make sure you get a mini-HDMI-to-HDMI cable. You can find them at most electronics stores where HD cameras and TVs are sold. (Here’s a little hint for purchasing a mini-HDMI cable: search the Internet for the best prices. Most electronics stores have huge mark-ups on cables, and you can usually find a suitable one online for about a third of the price.)
Getting a Shallow Depth of Field
As I said earlier, getting the look of a production cinema camera means working with a shallow depth of field. The problem you might encounter when trying to get a large aperture in your video will be that the camera wants to use an auto-exposure mode to establish the correct camera settings for recording video. To get the benefit of a large aperture, you will need to work in either Aperture Priority or Manual mode.
If you are shooting in Aperture Priority mode, the camera will automatically adjust the shutter speed and ISO so that you can use your desired aperture setting. As the shutter slows to 1/30 of a second, the ISO will begin to rise to maintain an acceptable shutter speed. If you want to adjust the brightness or darkness of the scene, you can use the Exposure Compensation setting, which will fool the meter.
To really get control of your exposure, you will want to use the Manual mode setting. Manual will let you make the scene darker or lighter than will the other modes, which are striving for a perfectly metered scene. The problem is that sometimes you might want the scene to appear darker or lighter than it is, which is a great time to flip into Manual. There is no auto function in Manual, so you will need to adjust the aperture, ISO (try to keep it under 1600 for noise reasons), and shutter speed. Just as in Aperture Priority, you won’t be able to set a shutter speed below 1/30 of a second. But since Manual mode has no auto adjustments, the Exposure Compensation feature will not render any difference in the exposure.
Note that you’ll need to set your aperture before you engage Live View. Once you are in Live View (in either Aperture Priority or Manual mode), you will not be able to change the aperture. (See page 58 of the manual for a chart that shows what settings are adjustable in Live View movie mode.) So if you want a shallow depth of field in your video (Figure 10.8), choose a large aperture and then push the Lv button; if you want a wider depth of field (Figure 10.9), choose a smaller aperture first. You generally don’t want to change exposure while recording video, so get your settings figured out before you start.


FIGURE 10.9 This cedar waxwing was kind enough to wait while I jumped out of Live View and changed the aperture to f/18 to increase the depth of field.
• Video at f/5.6: vimeo.com/53270933
• Video at f/18: vimeo.com/53270934
Giving a Different Look to Your Videos
Using picture controls
Something that a lot of people don’t realize is that you can use the picture controls to give your video a completely different look. Sure, you can use the Standard control for everyday video, but why not add some punch by using the Vivid setting? Nothing says HD like bright, vivid colors. Or maybe you want to shoot a landscape scene. Go ahead and set the picture control to the Landscape setting to improve the look of skies and vegetation. If you really want to get creative, try using the Monochrome setting and shoot in black and white. The great thing about using the picture controls is that you will see the effect right on your LCD monitor as you record so you will know exactly what your video is going to look like. Want to take things up a notch? Try customizing the picture controls and do things like shoot sepia-colored video. Check out the “Classic Black and White Portraits” section of Chapter 6 to see how to customize the look of the Monochrome picture control.
White balance
Another great way to change the look of your video is to select a white balance that matches your scene for accurate color rendition—or better yet, choose one that doesn’t match to give a different feel to your video. You can completely change the mood of the video by selecting a white balance setting that is different from the actual light source that you are working in. Don’t be afraid to be creative and try out different looks for you video.
Tips for Better Video
Shoot short sequences
Even though your camera can record fairly long video sequences, you should probably limit your shooting time to short clips and then edit them together. Here’s the deal: most professional videos shot today are actually made up of very short video sequences that are edited together. If you don’t believe me, watch any TV show and see how long you actually see a continuous sequence. I am guessing that you won’t see any clip that is longer than about 10 seconds. You can thank music videos for helping to shorten our attention spans, but the reality is that your videos will look much more professional if you shoot in shorter clips and then edit them together.
Turn off the sound
Earlier I told you how to turn off the audio option while recording your video. The truth is that the mono microphone does not produce audio that is up to the quality of the video. To make your videos stand out, try turning it off and then adding a music soundtrack. You will be amazed at how the right music can enhance a video. Of course you will need to do this on your computer, which will require special video-editing software (see the section “Editing Video,” later in this chapter).
Stage your shots
If you are trying to produce a good-looking video, take some time before you begin shooting to determine what you want to shoot and where you want to shoot it from. You can mark the floor with tape to give your “actors” a mark to hit. You can also use staging to figure out where your lens needs to be set for correct focus on these different scenes.
Avoid the quick pan
While recording video, your camera uses something called a rolling shutter, which, as the name implies, rolls from the top to the bottom of the frame. If you are panning quickly from one side to another, you will see your video start to jiggle like it is being shot through Jell-O. This is something that can’t be overcome except by using a slower panning motion. If you are going to be shooting a fast subject, consider using a camera setting that utilizes a fast shutter speed. It won’t eliminate the problem completely, but it should improve it a little.
Use a fast memory card
Your video will be recording at up to 60 frames per second, and as it is recording it’s placing the video into a buffer, or temporary holding spot, while the camera writes the frames to your memory card. If you are using a slower memory card, it might not be able to keep up with the flow of video—with the result being dropped frames. The camera will actually not record some frames because the buffer will fill up before the images have time to be written. This will be seen as small skips in the video when you watch it later. You can prevent this from happening by using an SD card that has a speed rating of class 6 or higher. These cards have faster writing speeds and will keep the video moving smoothly from the camera to the card.
Watching and Editing Your Video
Watching video
There are a couple of different ways for you to review your video once you have finished recording. The first is probably the easiest: press the Playback button to bring up the recorded image on the rear LCD screen, and then use the OK button to start playing the video. The Multi-selector acts as the video controller and allows you to rewind and fast-forward as well as stop the video altogether.
If you would like to get a larger look at things, you will need to either watch the video on your TV or move the video files to your computer. To watch video on your TV, you will need to purchase an HDMI cable (as discussed previously) and your TV needs to support at least 720p and have an HDMI port. Once you have the cable hooked up to your TV (tune your TV to the channel used for HDMI input), simply use the same camera controls that you used for watching the video on the LCD screen. See page 204 of the manual for more information on using the HDMI connection.
If you would like to watch your video on your computer, you will first need to download the files or access them using an SD card reader. For Apple owners, you can use Apple’s QuickTime Player to watch the video. If it is too large for your screen, press Command-0 (zero) to make the video half-size, or Command-3 to fit the video to your screen. For Microsoft Windows users, it is possible to use the Windows Media Player, but you may need to download a special codec. Instead, try downloading the Apple QuickTime Player (www.apple.com/quicktime). The basic player is free and will allow you to view your movie files without any problems.
Editing video
If you are a Mac owner, you can edit your HD video using the iMovie application. The latest version is chock-full of new video-editing features, including the ability to work with audio.
Windows XP users will have to purchase an editing program for editing HD video, since the Windows Movie Maker application doesn’t do a very good job of handling HD video resolutions. If you are using Windows 7, Windows Live Movie Maker is a good basic video-editing application. There are also many other applications for Windows editing, such as Adobe Premiere Elements. You can find more information and download a trial version at www.adobe.com/products/premiereel. If you have Adobe Photoshop CS6 or later, then you should definitely take advantage of the improved video-editing features that are now included; this is currently my favorite option.
Expanding Your Knowledge
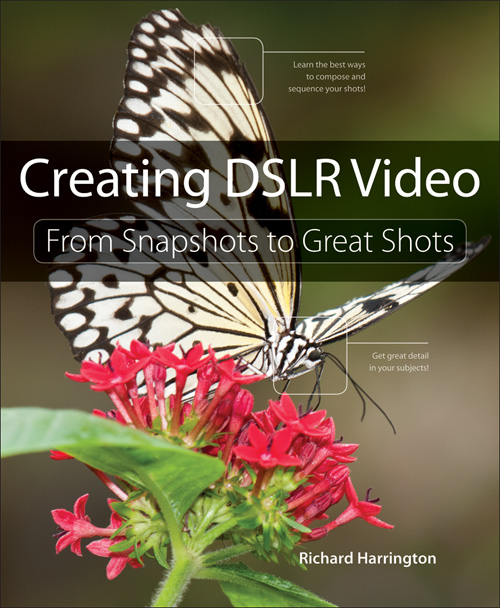
I have given you a couple of quick tips and suggestions in this chapter to get you started with your moviemaking, but if you really want to get serious there is a lot more you need to know. Videography can be a complex endeavor, and there is much to learn if you want to move beyond the simple video capture of the kids in the backyard or the trip to the amusement park. If you really want to explore all your camera has to offer in the way of video moviemaking, then I suggest you check out Creating DSLR Video: From Snapshots to Great Shots (Figure 10.10). It is packed solid with everything you need to know about taking your DSLR video making to the next level and beyond. Check out this sample chapter, “Exposure and Focus,” and I think you’ll agree: bit.ly/DSLRsnapshots4.
Chapter 10 Assignments
Even if you don’t think you will be shooting much video, it pays to know how to use it, because you just never know when it will come in handy. The truth is that I used to turn up my nose at the video functions in DSLR cameras, but over time I have come to appreciate the ability to create multimedia projects that offer expanded expression. Who knows, you just might be the next big indie director on the block.
Change your focus
There are several focus modes available for the Live View/Movie mode, and you should give all of them a try before deciding which method works best for you. Try setting AF-S mode and focusing prior to shooting, and then shoot a sequence with AF-F mode to see if you prefer to have the camera autofocus continuously while you shoot.
Abandon AF
Once you are comfortable with the autofocus methods, go ahead and turn it off and go manual. The hardest part is getting used to which way the focus ring needs to turn for closer and farther focus points. Try this: put a piece of tape on the lens barrel and write N and F (for near and far) on it so you know which way to go. Now try to capture a moving subject while adjusting focus.
Go shallow
Remember that one of the big deals in using your D610 for video is the shallow depth of field you can achieve. If you don’t have a lens with a particularly large aperture, try using it wide open and getting close to your subject. The closer you are, the narrower the depth of field will look.
Change the look of your video
The picture controls are a great creative tool for making movies. Check out all the options to see if you can add some pizzazz to your video. Want to preview a picture control’s effect? Activate Live View, press the Picture Control/Lock button, and then use the Multi-selector to preview the different picture controls.
Share your results with the book’s Flickr group!
www.flickr.com/groups/d610fromsnapshotstogreatshots