Getting Started
Adobe® Photoshop® Lightroom® delivers a complete workflow solution for the digital photographer—from importing, reviewing, organizing, and enhancing images to publishing photos, producing client presentations, creating photo books and web galleries, and outputting high-quality prints.
The user interface is highly intuitive and easy to learn, yet Lightroom has all the power and versatility you’d expect from an Adobe application, using state-of-the-art technologies to manage large volumes of digital photographs and to perform sophisticated image processing tasks.
Whether you’re a home user, a professional photographer, a hobbyist, or a business user, Lightroom enables you to stay in control of your growing photo library and to easily produce good-looking pictures and polished presentations for both web and print.
About Classroom in a Book
Adobe Photoshop Lightroom CC (2015 release) / Lightroom 6 Classroom in a Book is part of the official training series for Adobe graphics and publishing software developed with the support of Adobe product experts.
Each lesson in this book consists of a series of self-paced projects that give you hands-on experience using Adobe Photoshop Lightroom CC / Lightroom 6.
If you’re new to Lightroom, you’ll learn the fundamental concepts and skills that will help you master the application; if you’ve used earlier versions of Lightroom, you’ll find that this Classroom in a Book® teaches advanced tips and techniques, and covers the many innovative features that Adobe Systems has introduced in the latest version.
What’s new in this edition
This edition covers many new features in Adobe Photoshop Lightroom CC / Lightroom 6, such as panoramic and HDR (High Dynamic Range) merging, face tagging, and pan and zoom effects to add motion to your Lightroom slideshows.
You’ll also discover enhancements to many of your favorite tools, including automatic straightening, a new Pet Eye mode for the Red Eye Correction tool, a freehand brush for adding to and subtracting from gradient and radial filters, and many exciting new, up-to-date template designs for your web galleries.
You’ll learn new techniques for removing unwanted objects with the enhanced Spot Removal tool, how to attach multiple sound files to a slideshow and synch the timing to the music, and how you can take advantage of Lightroom mobile to edit, share, and collaborate on your photos, wherever you go.
This edition also includes inspirational showcases of seven guest photographers.
Prerequisites
Before starting on the lessons in this book, make sure that you and your computer are ready by following the tips and instructions on the next few pages.
Requirements on your computer
You’ll need about 500 MB of free space on your hard disk for the downloaded lesson files (see Accessing the Classroom in a Book files on the facing page) and the work files that you’ll create as you work through the exercises.
Required skills
The lessons in this book assume that you have a working knowledge of your computer and its operating system.
Make sure that you know how to use the mouse and the standard menus and commands, and also how to open, save, and close files. Can you scroll (vertically and horizontally) within a window to see content that may not be visible in the displayed area? Do you know how to use context menus, which open when you right-click (Windows) / Control-click (Mac OS) items?
If you need to review these basic and generic computer skills, see the documentation included with your Microsoft® Windows® or Apple® Mac® OS X software.
Installing Adobe Photoshop Lightroom
Before you begin the lessons in Adobe Photoshop Lightroom CC / Lightroom 6 Classroom in a Book, make sure that your system is set up correctly and that you’ve installed the required software and hardware.
You must purchase the Adobe Photoshop Lightroom CC / Lightroom 6 software separately. For system requirements and detailed instructions for downloading, installing, and setting up, see the topics listed on the System Requirements and Release Notes links under Get Support at https://helpx.adobe.com/lightroom.html.
Accessing the Classroom in a Book files
In order to work through the exercises in this book, you’ll need to download the sample image files and other resources from your Account page at peachpit.com. You can either download the entire Lessons folder before you begin, or download the files for individual lessons as you need them.
Your Account page is also where you’ll find any updates to the lessons or work files. Check on the Lesson & Update Files tab for the most current content.
Downloading the Lesson files
1. Go to www.peachpit.com/redeem, and enter the code found at the back of this book. If you don’t yet have a Peachpit.com account, follow the prompts to create one.
2. Click the Lesson & Update Files tab on your Account page to see a list of downloadable files. Click the links to download either the entire Lessons folder or the work folders for individual lessons to your computer; then, unzip the downloaded files.
3. Create a new folder named LRCIB inside the username/My Documents (Windows) or username/Documents (Mac OS) folder on your computer.
![]() Note
Note
The downloadable sample images are practice files, provided for your personal use in these lessons. You are not authorized to use these files commercially, or to publish or distribute them in any form without written permission from Adobe Systems, Inc. and the individual photographers who took the pictures, or other copyright holders.
4. If you downloaded the entire Lessons folder, drag the downloaded folder into the LRCIB folder on your hard disk. If you downloaded the work folder for an individual lesson, first create a Lessons folder inside the LRCIB folder; then, drag the downloaded folder to your LRCIB/Lessons folder.
The lesson images you’ve downloaded won’t appear in Lightroom until you’ve imported them into the library catalog file.
In the following pages, you’ll set up a dedicated catalog for working with this book; then, you’ll import the first set of lesson files into your work catalog in the section “Importing photos,” after the introductory overview in Lesson 1. Until then, your work library will remain empty.
Understanding Lightroom catalog files
The catalog file stores information about all the photos in your library. It includes the location of the master files, any metadata you’ve added in the process of organizing your images, and a record of every adjustment or edit you’ve made. Most users will keep all their photos in a single catalog, which can easily manage thousands of files. Some might want to create separate catalogs for different purposes, such as home photos and business photos. Although you can create multiple catalogs, you can only have one catalog open in Lightroom at a time.
For the purposes of working with this book, you’ll create a new catalog to manage the image files that you’ll use in the lessons. This will allow you to leave the default catalog untouched while working through the lessons, and to keep your lesson files together in one easy-to-remember location.
Creating a catalog file for working with this book
When you first launch Lightroom, a catalog file named Lightroom Catalog.lrcat is automatically created on your hard disk. This default catalog file is created inside the folder username/My Documents/My Pictures/Lightroom (on Windows) or username/Pictures/Lightroom (on Mac OS).
You’ll create your new work catalog file inside your LRCIB folder, right beside the Lessons folder containing your downloaded work files.
1. Launch Lightroom.
![]() Note
Note
In this book, the forward arrow character (>) is used to denote submenus and commands found in the menu bar at the top of the workspace or in context menus; for example, Menu > Submenu > Command.
2. From the Lightroom menu bar, choose File > New Catalog.
3. In the Create Folder With New Catalog dialog box, navigate to the LRCIB folder you created on your hard disk.
4. Type LRCIB Catalog in the File Name text box on Windows, or the Save As text box on Mac OS; then, click Save (Windows) or Create (Mac OS).

5. If you see a notification about backing up the current catalog before loading your new catalog, choose your preferred option to dismiss the message.
In order to be sure that you’re always aware of which catalog you’re working with as you progress through the exercises in this book, you will now set the preferences so that you’ll be prompted to specify the LRCIB catalog each time you launch Lightroom. It is recommended that you keep this preference set as long as you’re working through the lessons in this book.
![]() Note
Note
In the remainder of this book, instructions that differ for Macintosh users and those working on Windows systems are given in a compact format as follows; the forward slash character ( / ) is used to separate equivalent terms and commands for Windows / Mac OS, in the order shown here.
6. Choose Edit > Preferences (Windows) / Lightroom > Preferences (Mac OS).
7. In the Preferences dialog box, click the General tab. From the Default Catalog menu, choose Prompt Me When Starting Lightroom.
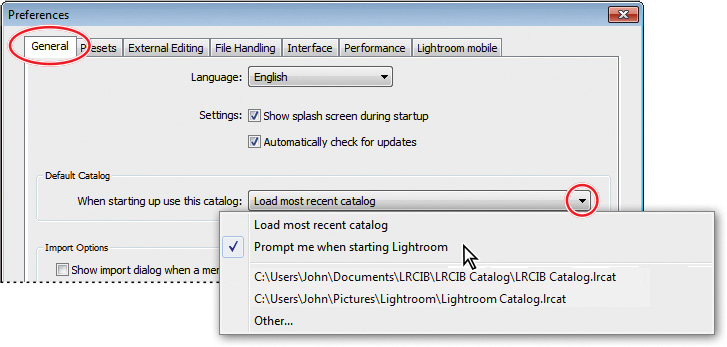
8. Click OK (Windows) / the Close button (![]() ) (Mac OS) to close the Preferences dialog box.
) (Mac OS) to close the Preferences dialog box.
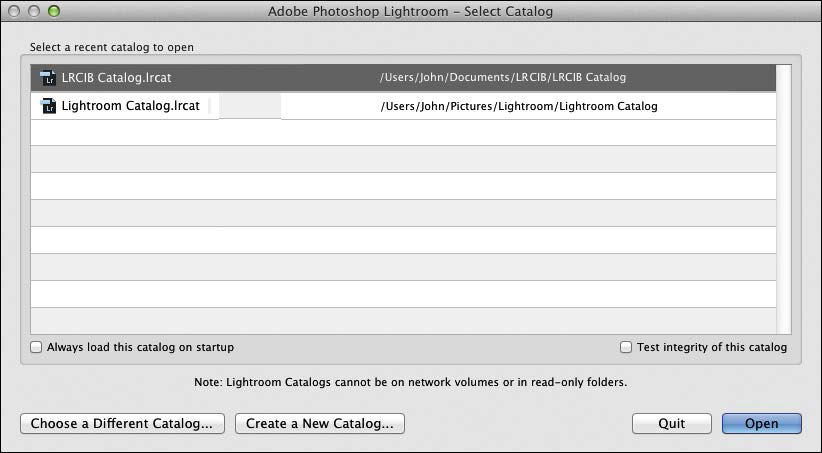
Next time you start Lightroom the Select Catalog dialog box will appear, giving you the opportunity to make sure that your LRCIB Catalog is selected before Lightroom launches.
![]() Tip
Tip
Even if you’ve set Lightroom to load the most recent catalog by default, you can open the Select Catalog dialog box by holding down the Clrl+Alt / Control+Option keys immediately after you launch Lightroom.
Getting ready to go mobile
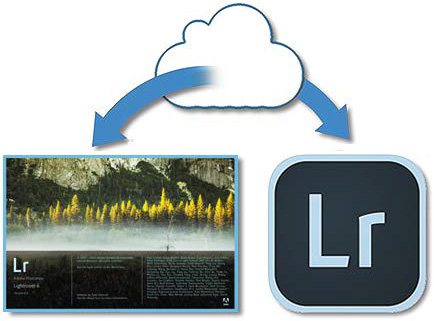
Adobe Photoshop Lightroom CC / Lightroom 6 is fully integrated with Lightroom mobile, a cloud-based subscription service that enables you to sync photo collections between your desktop computer and a companion app on your mobile device, so you can review, organize, share, and even edit your photos anywhere, anytime.
Whether you’re working in Lightroom on your desktop or on your handheld device, any modifications made to a synced collection or the photos it contains will be updated on the other device. Lightroom mobile syncs high resolution Smart Previews to your mobile device, rather than your original photos. At a small fraction of the original file size, these Smart Previews won’t take long to sync, or use up all your storage space, which means that you can even work with raw images while you’re away from your desktop computer.
Edits you make on the mobile device are synced back to the full-size originals in your Lightroom catalog as needed. Photos captured on your handheld device and added to a synced Collection are downloaded to your desktop at their full file size. You can share your photos from Lightroom mobile via Lightroom web.
1. The first step is to download and install Lightroom on your mobile device. You can download the app free from iTunes or the Apple App Store (for iPad and iPhone), or from Google play (for Android), on a 30 day trial basis; then, choose a subscription plan later.
2. Once you’ve installed Lightroom on your handheld device, see the section “Taking your collections on the road” in Lesson 4, “Managing Your Photo Library” for details on getting started with Lightroom mobile.
Editing photos in Lightroom mobile is covered in Lesson 5, “Developing Basics.”
Sharing collections from Lightroom mobile via Lightroom web is explained in Lesson 10, “Publishing Your Photos.”
When your 30-day free trial ends, subscription to Lightroom mobile is free with either a full Creative Cloud subscription, or the Photography Bundle. For subscription details, go to https://creative.adobe.com/plans.
Getting help
Help is available from several sources, each one useful to you in different circumstances:
Module-specific tips
The first time you enter any of the Lightroom modules, you’ll see module-specific tips that will help you get started by identifying the components of the Lightroom workspace and stepping you through the workflow.
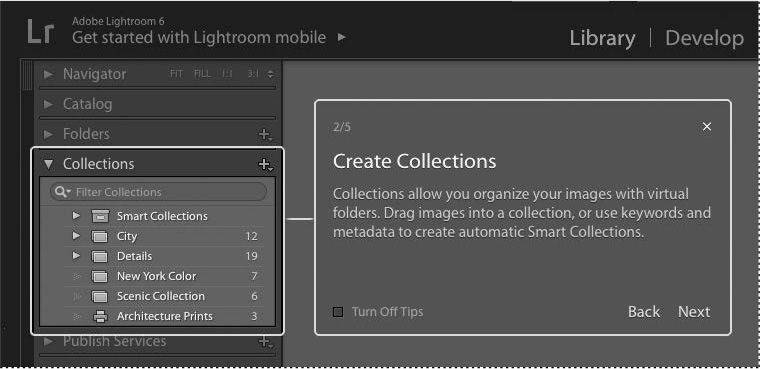
You can dismiss the tips if you wish, by clicking the Close button (x) in the upper right corner of the floating tips window. Click the Turn Off Tips checkbox at the lower left to disable the tips for all of the Lightroom modules. You can call up the module tips at any time by choosing Help > [Module name] Tips.
In the Help menu you can also access a list of keyboard shortcuts applicable to the current module.
Navigating Help in the application
The complete user documentation for Adobe Photoshop Lightroom is available from the Help menu.
1. Choose Help > Lightroom Help, or press the F1 key on your keyboard. Lightroom takes you to the online Help landing page. To search for a particular topic in the online Help, use the search bar in the left pane. Enter a search term and press Enter/Return.
![]() Note
Note
You need to be connected to the Internet to view Help in Lightroom.
2. For quick access to Help documentation specific to the module in which you are working, press Ctrl+Alt+/ on Windows, or Command+Option+/ on Mac OS.
3. Press Ctrl+/ on Windows, or Command+/ on Mac OS to see a list of keyboard shortcuts for the current module.
Accessing Help and Support on the web
You can access Lightroom Help, tutorials, support, and other useful resources on the web, even if Lightroom is not currently running.
• If Lightroom is currently running, choose Help > Lightroom Online.
• If Lightroom is not currently running, point your default web browser to https://helpx.adobe.com/lightroom.html where you can find and browse Lightroom content on adobe.com.
Downloading the Lightroom Help PDF
Help is also available as a PDF document, optimized for printing, which is helpful for those times when you’re not connected to the internet. You can download the Help PDF at: https://helpx.adobe.com/pdf/lightroom_reference.pdf.
Additional resources
Adobe Photoshop Lightroom CC / Lightroom 6 Classroom in a Book is not intended to replace the documentation that comes with the application, or to be a comprehensive reference for every feature. Only the commands and options used in the lessons are explained in this book. For comprehensive information about program features and tutorials, please refer to these resources:
Adobe Photoshop Lightroom CC / Lightroom 6 Help and Support
You can search and browse Help and Support content from Adobe at https://helpx.adobe.com/lightroom/topics.html.
Adobe Forums
Tap into peer-to-peer discussions, advice, and questions and answers on Adobe products at https://forums.adobe.com/welcome
Adobe Creative Cloud Learn
For inspiration, key techniques, cross-product workflows, and updates on new features, go to https://helpx.adobe.com/lightroom/tutorials.html
Resources for educators
You’ll find three free curriculums that use an integrated approach to teaching Adobe software, as well as associated study guides that can be used to prepare for the Adobe Certified Associate exams at www.adobe.com/education/certification-programs.edu.html
Adobe Photoshop Lightroom CC / Lightroom 6 product home page
www.adobe.com/products/photoshop-lightroom.html
Adobe Inspire
http://inspire.adobe.com offers articles on design and design issues, a gallery showcasing the work of top-notch designers, tutorials, and more.