
Objective 1.3: Apply styling to HTML elements programmatically
The section covers applying styles to the HTML elements on the page dynamically, using JavaScript. When you retrieve element references by using methods such as getElementById, you can then manipulate those elements, including their styles.
This objective covers how to:
![]() Change the location of an element
Change the location of an element
![]() Apply a transform
Apply a transform
![]() Show and hide elements
Show and hide elements
Changing the location of an element
By using the methods to retrieve an element from the DOM in JavaScript, you can apply styles dynamically through code that can change the element’s position on the page. How elements are laid out on the page can affect how elements behave when they are repositioned.
A few options determine how HTML elements are positioned on a webpage. By default, all HTML elements flow statically from left to right in the same order that they are declared in the HTML page. However, CSS provides a mechanism to specify some advanced options in element position. You can position elements by using absolute positioning or relative positioning. With absolute positioning, the element is placed in the exact location specified, relative to its container’s borders. However, with relative positioning, the element is positioned relative to its immediate left sibling’s coordinates. You can apply four properties individually or in combination to control the position of an element: Top, Left, Right, and Bottom. Each property takes a distance parameter that specifies the relative distance of the object from a reference point based on the positioning attribute specified. When using absolute or relative positioning, the default border or margin settings are ignored because the object is positioned where the positioning attributes direct the element to be.
The code in Listing 1-3 demonstrates this.
LISTING 1-3 HTML and JavaScript to illustrate positioning
<!DOCTYPE html>
<html lang="en" xmlns="http://www.w3.org/1999/xhtml">
<head>
<meta charset="utf-8"/>
<title></title>
<style>
html, body {
height: 100%;
width: 100%;
}
img {
height: 150px;
width: 225px;
}
</style>
<script>
window.onload = function () {
var top = document.getElementById("topText");
var left = document.getElementById("leftText");
var pos = document.getElementById("positioning");
document.getElementById("btnPosition").onclick = function () {
var img = document.getElementById("orange2");
img.style.position = pos.value;
img.style.left = left.value + "px";
img.style.top = top.value + "px";
}
}
</script>
</head>
<body>
<table style="width: 100%; height: 100%; border: 1px solid black;">
<tr>
<td style="vertical-align: top; width: 80%">
<img id="orange1" src="orange.jpg"/>
<img id="orange2" src="orange.jpg"/>
</td>
<td style="vertical-align: top;">Left:
<input type="text" id="leftText"/><br/>
Top:
<input type="text" id="topText"/><br/>
Position:
<select id="positioning">
<option>relative</option>
<option>absolute</option>
</select><br/>
<input type="button" id="btnPosition" value="Update"/>
</td>
</tr>
</table>
</body>
</html>
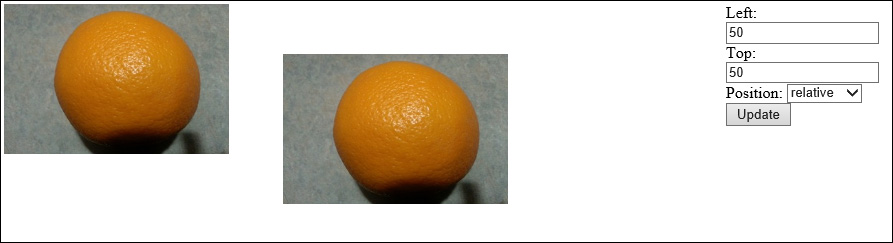
When the code is rendered in the browser, the default position is in effect, as shown in Figure 1-44.

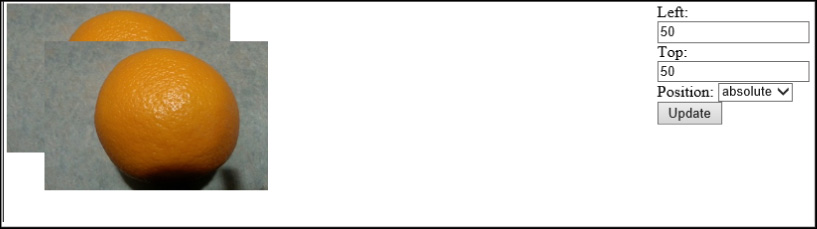
All positioning attributes that have been discussed are available declaratively in the style attribute of the HTML element but can also be accessed programmatically and manipulated via JavaScript. The webpage is enhanced to provide some end-user functionality to control the positioning of the two images. The code in Listing 1-3 provides an HTML page with the two images and some input controls to control the positioning of the second image. You can enter the top and left positions as well as whether to position relative to the first orange picture or to position as absolute to the parent table element.
When top and left are set to 50px and positioning is relative, you’ll see the result shown in Figure 1-45.
Keeping the values the same but changing the positioning to absolute changes the positioning of the elements, as shown in Figure 1-46.
You can employ yet another mechanism to change the appearance of an HTML element: transforms, which you examine next.
Applying a transform
Applying transforms is a way to change an object on the webpage. Transforms enable you to change an element’s appearance. You can make an element larger or smaller, rotate it, and so on. Quite a few transform methods are available. To add a transform to an element, you declare it in the CSS for the element by adding the transform property as follows:
.rota {transform: rotate(90deg);}
This code applies the rotate method to an object when you add the .rota CSS class to the object’s styles collection. As mentioned, various transform methods are available, and you’ll examine each in turn. Use the following code for all the examples in this section:
<!DOCTYPE html>
<html lang="en" xmlns="http://www.w3.org/1999/xhtml">
<head>
<meta charset="utf-8"/>
<title></title>
<style>
#orange1 {
height: 150px;
width: 225px;
}
.trans {
transform: scale(1) ;
}
</style>
<script>
window.onload = function () {
document.getElementById("orange1").onclick = function () {
this.classList.add("trans");
}
}
</script>
</head>
<body>
<img id="orange1" src="orange.jpg" style="position:relative"/>
</body>
</html>
This code creates a single image object to which you’ll apply the transformations; however, the transformations can work successfully against any HTML element. The image also is assigned an event handler for the click event. This suffices for demonstration purposes. You can use any supported event to trigger a transformation. In the examples that follow, you’ll need to replace the .trans CSS class in the preceding code with the appropriate transform methods to demonstrate them. You’ll be prompted to replace the code when needed.
Using the rotate method
The rotate transform method enables you to rotate an object by a specified number of degrees. The method accepts a single parameter that specifies the number of degrees. In the previous code used for the scale transformation, replace the transform method with the following:
transform: rotate(90deg);
Now, run the webpage in the browser. Click the image to see the transform take effect. In this case, the image is rotated clockwise by 90 degrees (see Figure 1-47). If you instead want to rotate the image counterclockwise, you can specify a negative number of degrees.

The transform also supports the rotateX and rotateY methods, which accept a single parameter in degrees to specify an angle around the x-axis or y-axis in which to rotate. You can, for example, use these methods to flip an element vertically or horizontally by specifying 180deg as the parameter. In this case, the element rotates 180 degrees along the specified axis—which essentially results in the image being flipped or mirrored along that axis.
Using the translate method
The translate method lets you move an HTML element by changing its relative X and Y position on the page. You implement the translate method by specifying the translate method on the transform property. In the example listing, replace the transform method with the following:
transform: translate(50px,0px);
The translate method moves the HTML element to which it’s applied by 50 pixels in the X direction and 0 pixels in the Y direction relative to where it now resides (see Figure 1-48). Again, translateX and translateY methods are available if the desired effect is to move the object around the x-axis or y-axis.

Using the skew method
You can skew an HTML element using the skew method of the transform property. Skewing slants the object so that it’s not parallel to the vertical or horizontal axis. In the example code, replace the transform property with the following code line. Figure 1-49 shows the effect
transform: skew(10deg, 10deg);

Using the scale method
The scale method enables you to resize elements by a specified ratio. The scale method takes one parameter: a decimal value that represents the percentage to scale. Specifying a value greater than 1 makes the object larger; specifying a value less than 1 but greater than 0 makes the object smaller. Specifying a value of –1 flips the object over its horizontal axis. In the sample code, replace the transform property with the following:
transform: scale(1.5);
This scale transform increases the size of the element by 50 percent, essentially multiplying the existing height and width values by 1.5. The object scales out from its absolute center so that it expands in all directions; it doesn’t just extend down and to the right. Figure 1-50 shows the result of a scale transform.

Combining transformations
Transformations individually lend great flexibility to what you can accomplish by changing the appearance of HTML elements, but the transform style isn’t limited to specifying a single transformation method. You can combine the methods to apply multiple effects to the element. In the sample code, change the transform property to the following code:
transform: translate(50px,0px) scale(1.5) skew(10deg, 10deg);
In this code, three effects are applied. Order matters. The effects are applied in the order that they are specified in the transform property. In this case, the translate property is applied first, and then the translated object is scaled. Finally, the resulting object is skewed. The effect on the HTML element is that it is moved 50 pixels along the x-axis, scaled by 50 percent, and then skewed 10 degrees.
Showing and hiding elements
You can show and hide elements declaratively in the HTML markup or programmatically by modifying the object’s CSS properties through JavaScript. You can create the CSS properties that show or hide an element directly in an object’s style property or in a CSS style, and it is added to the element’s style collection. This section’s examples use the code from Listing 1-2, updated as follows:
<html lang="en" xmlns="http://www.w3.org/1999/xhtml">
<head>
...
<script>
window.onload = function () {
document.getElementById("btnHideAnElement").onclick = function () {
if (document.getElementById("innerDiv").style.display == 'inline') {
document.getElementById("innerDiv").style.display = 'none';
}
else {
document.getElementById("innerDiv").style.display = 'inline';
}
}
}
</script>
...
<button type="button" id="btnHideAnElement" >Show/Hide Element</button>
</form>
</body>
</html>
This code modifies the script block and adds a new button to the bottom of the page. The button is connected to an onclick event after the window finishes loading. In this event, you modify programmatically the visibility of the HTML elements.
The innerDiv element defaults to hidden when the page is loaded. When the button is clicked, the code evaluates the state of the display CSS property to determine whether the element is now visible or hidden. Depending on the result, the property is toggled. The display property accepts two possible values. A value of inline tells the browser to show the item, while a value of none means the browser should hide the item.
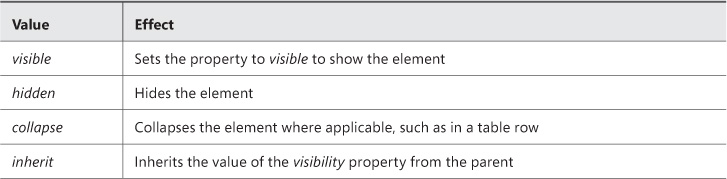
The second property available for controlling element visibility is called visibility. This property accepts four possible values, as outlined in Table 1-12.
Some of these values have interesting behaviors. When you use the display CSS property and set it to the value of none, the HTML element is hidden. But hiding the element in this way also removes it from the layout. All the surrounding elements realign themselves as though the element was not there at all. When display is set to inline, the element is shown again and all the surrounding elements move out of the way, back to where they were originally.
The visibility CSS property behaves slightly differently. Setting the visibility property to hidden hides an element, but the hidden element’s surrounding elements act as though it’s still there. The space that the element occupied is maintained intact, but the element’s content is hidden. When the property is set back to visible, the element reappears exactly where it was, without affecting any surrounding elements. The collapse value, on the other hand, acts more like the display property. If you specify collapse on something such as a table row, the table rows above and below collapse and take over the space that the collapsed row was occupying. When you set the visibility property back to visible, the surrounding elements move out of the way to show the element. This is useful for situations where you want to have content that can be collapsed or displayed one item at a time to preserve space, such as on an FAQ, where the answer to a question is shown when a user clicks the question but then collapsed when the user clicks a different question.
 Exam Tip
If you need to preserve the page layout when altering visibility, use the visibility property with the hidden value. If you don’t need to preserve the layout, you can either set the display property to none or set visibility to collapse.
![]() Thought experiment: Creating a dynamic survey
Thought experiment: Creating a dynamic survey

<html>
<head>
<meta charset="utf-8"/>
<title></title>
</head>
<script>
...
</script>
<body>
<header>
A dynamic Questionnaire.
</header>
<section>
<article>
<hgroup>
<h1>Questionnaire</h1>
<h2>Answer the questions in order as they
appear.</h2>
</hgroup>
<div id="Question1">
1. ....
</div>
<div id="Question2">
2. ....
</div>
<div id="Question3">
3. ....
</div>
<div id="Question4">
4. ....
</div>
<div id="Question5">
5. ....
</div>
<div id="Question6">
6. ....
</div>
<div id="Question7">
7. ....
</div>
<div id="Question8">
8. ....
</div>
<div id="Question9">
9. ....
</div>
<div id="Question10">
10. ....
</div>
</article>
</section>
</body>
</html>
Objective summary
![]() You can use CSS to define transformation effects.
You can use CSS to define transformation effects.
![]() You can apply transformations via JavaScript to manipulate the DOM with effects such as rotate, skew, scale, and translate.
You can apply transformations via JavaScript to manipulate the DOM with effects such as rotate, skew, scale, and translate.
![]() The visibility property provides options to control an element’s visibility within the page.
The visibility property provides options to control an element’s visibility within the page.
Objective review
Answer the following questions to test your knowledge of the information in this objective. You can find the answers to these questions and explanations of why each answer choice is correct or incorrect in the “Answers” section at the end of this chapter.
1. Absolute positioning positions an object relative to what?
A. The top-left corner of the browser window.
B. The top-left corner of its parent element.
C. Centered inside the window.
D. Centered inside its parent element.
2. Which transformation enables you to change the size of an element?
A. rotate
B. skew
C. translate
D. scale
3. Which syntax preserves the layout of the page when hiding an element in the DOM?
A. display=’hidden’
B. display=’inline’
C. visibility=’none’
D. visibility=’hidden’
Objective 1.4: Implement HTML5 APIs
JavaScript APIs have provided some new powerful functionality, such as the ability to store more data locally and make that data available to the webpage through the Web Storage API. The AppCache API allows you to take web applications offline. The Geolocation API provides methods to work with global positioning within the application.
This objective covers how to:
![]() Use the storage API
Use the storage API
![]() Use the AppCache API
Use the AppCache API
![]() Use the Geolocation API
Use the Geolocation API
Using the storage API
WebA Storage is a new API for storing webpage data locally. Web Storage, described in this section, replaces the concept of cookies.
Note: Browser Support
Of course, you must consider your audience’s browser support for HTML5 and Web Storage before you choose to use it exclusively.
Two forms of Web Storage exist: local and session storage. Local storage is persistent; data stored in local storage is available to the webpage even if the user closes the browser completely and then reopens it to your site. Session storage is available only for the duration of the current session, so if the user closes the browser, session storage is automatically cleaned up and is no longer available. The Web Storage API is available as a global object. To access local storage, use the localStorage object; to access session storage, use the sessionStorage object.
Exam Tip
The localStorage and sessionStorage objects provide exactly the same API. All the examples shown in this section work exactly the same with either object. The only difference is the lifetime of the storage. Remember that sessionStorage is cleared when the session is closed, whereas localStorage is still be accessible after a session closes and a new session opens.
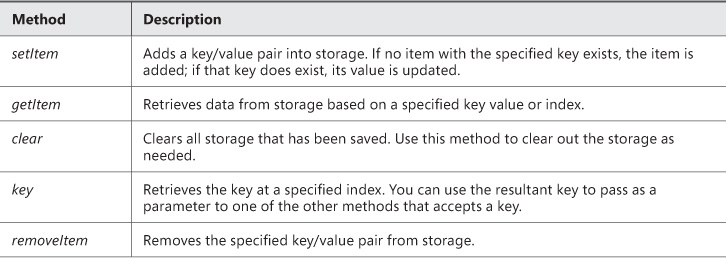
Table 1-13 lists the API methods and their usage. Web Storage is implemented as name value pairs and stored as strings. Any data that you can put into a string format can be stored in Web Storage. This isn’t as limiting as it sounds. You’ll see some examples of storing complex objects.
In addition to the methods described in Table 1-13, the storage objects expose a length property which returns the number of key/value pairs in storage. Use the sample code in Listing 1-4 to explore the Web Storage API.
LISTING 1-4 Exploring the Web Storage API
<html lang="en" xmlns="http://www.w3.org/1999/xhtml">
<head>
<meta charset="utf-8"/>
<title></title>
<style>
section {
margin-top: 15px;
}
</style>
<script>
window.onload = function () {
document.getElementById("btnAdd").onclick = function () {
}
document.getElementById("btnRemove").onclick = function () {
}
document.getElementById("btnClear").onclick = function () {
}
function LoadFromStorage() {
}
}
</script>
</head>
<body>
<section>
Key:
<input type="text" id="toStorageKey"/>
Value:
<input type="text" id="toStorageValue"/><br/>
</section>
<section>
<button type="button" id="btnAdd">Add To Storage</button>
<button type="button" id="btnRemove">Remove from Storage</button>
<button type="button" id="btnClear">Clear Storage</button>
</section>
<div id="storage">
<p>Current Storage Contents</p>
</div>
</body>
</html>
The code in Listing 1-4 creates text boxes to accept a key and a value, respectively. Buttons let you add items to storage, remove an item, or completely clear the storage. Each capability is implemented in turn. To display the contents of the storage, the page contains a div that shows the contents of the storage appended to it. The LoadFromStorage method is called for each operation to refresh the page with the data available in the storage. All the following examples use local storage, but again, they would work the same way with session storage. If you want to test these examples using session storage, simply replace the localStorage reference with a reference to sessionStorage.
You first need to implement the LoadFromStorage method so that when the page loads, you can see any items that have already been placed into storage. Enter the following code into the LoadFromStorage function in the script block:
window.onload = function () {
LoadFromStorage();
document.getElementById("btnAdd").onclick = function () {
...
function LoadFromStorage() {
var storageDiv = document.getElementById("storage");
var tbl = document.createElement("table");
tbl.id = "storageTable";
if (localStorage.length > 0) {
for (var i = 0; i < localStorage.length; i++) {
var row = document.createElement("tr");
var key = document.createElement("td");
var val = document.createElement("td");
key.innerText = localStorage.key(i);
val.innerText = localStorage.getItem(key.innerText);
row.appendChild(key);
row.appendChild(val);
tbl.appendChild(row);
}
}
else {
var row = document.createElement("tr");
var col = document.createElement("td");
col.innerText = "No data in local storage.";
row.appendChild(col);
tbl.appendChild(row);
}
if (document.getElementById("storageTable")) {
document.getElementById("storageTable").replaceNode(tbl);
}
else {
storageDiv.appendChild(tbl);
}
}
Notice that this code added a call to the LoadFromStorage method to the top of the window.onload event, so that localStorage is checked after the page loads. The LoadFromStorage method takes any available elements in local storage and displays them in an HTML table. This code takes advantage of the length property to determine whether any local storage values need to be displayed. If not, the page displays a message about no data in local storage. Add the following code to the button onclick events to start manipulating localStorage:
document.getElementById("btnAdd").onclick = function () {
localStorage.setItem(document.getElementById("toStorageKey").value,
document.getElementById("toStorageValue").value);
LoadFromStorage();
}
document.getElementById("btnRemove").onclick = function () {
localStorage.removeItem(document.getElementById("toStorageKey").value);
LoadFromStorage();
}
document.getElementById("btnClear").onclick = function () {
localStorage.clear();
LoadFromStorage();
}
The preceding code implements each button’s onclick event. A user can now add items to local storage and see what’s in storage. The user can continue adding to local storage in this application until the storage is full. Availability of local storage is limited, and the storage available isn’t consistent across browsers. As of this writing, the documentation states that Microsoft Internet Explorer 10 supports up to about 10 MB of storage. However, that could change and may not be the same in other browsers; some now support only 5 MB of storage. Keep this in mind when designing web applications that take advantage of the Web Storage API.
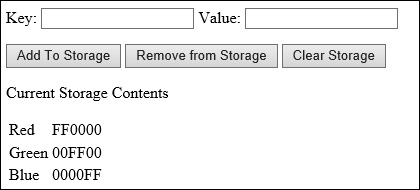
Run the preceding example and add the following items to localStorage:
("Red","FF0000"), ("Green","00FF00"), ("Blue","0000FF").
Figure 1-51 shows the output on the screen after adding these items to the local storage.
Now, if you close the browser and then reopen your page, the items are still available in local storage. Try replacing all uses of localStorage with sessionStorage. This time notice that closing the browser automatically clears out any data in the storage.
The benefit to using the Web Storage API instead of cookies is that the data resides locally and stays local. The data doesn’t get sent back and forth to and from the server, as is the case with cookies. Data stored in web storage is organized by root domain. The space allotment is available on a per–root domain basis. For example, domains such as localhost or microsoft.com each get their own secure web storage space.
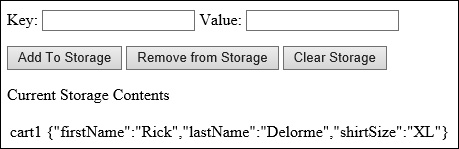
As defined by the API, web storage allows storage only of key/value pairs where the key and the value component are stored as a string. If you need to store more complex objects in web storage, you can use a few techniques. For example, add the following code right before the first call to LoadFromStorage in the onload event:
var customer = new Object();
customer.firstName = "Rick";
customer.lastName= "Delorme";
customer.shirtSize = "XL";
localStorage.setItem("cart1", JSON.stringify(customer));
LoadFromStorage();
This code creates a custom object to represent a customer browsing the site and sets that customer’s shirt size. This information is to be kept and used locally, so it doesn’t need to be posted to the server. Local storage is a great solution for this. However, to store the custom object in local data, you need a method to convert the custom object to a string that matches the local storage model. This is where JavaScript Object Notification (JSON) can come in handy. You can serialize the object into a JSON string, give it a key, and then store it in web storage. When you run this application now, it shows the customer object represented as a JSON string in Figure 1-52.
The availability of local web storage can improve both end-user experience and performance of your web applications by saving round trips to the server to retrieve or store temporary data. You must consider the local web storage as temporary. Even when you’re using localStorage as opposed to sessionStorage, you should think of the storage as temporary and design your applications so that they can fall back on default values and behavior if the user purges the web storage. Web storage provides a way to make data available locally and even persist across browser sessions. These techniques work with a live connected website. If you want to make an application available offline, in a disconnected way, you can use the AppCache API, which is covered next.
Using the AppCache API
The ability to continue to work with web applications when disconnected from an Internet source has become particularly important in today’s mobile world. This section talks about how to create an application that works when disconnected by using the Application Cache API, also commonly called the AppCache API.
The AppCache API makes content and webpages available even when a web application is in offline mode. AppCache stores files in the application cache in the browser. Just as with Web Storage, the amount of data the browser can store locally is limited for offline use. Two components make up the AppCache API: the manifest file and a JavaScript API to support it.
Using AppCache manifest
Specifying that a page should be available for offline use is as easy as adding an attribute to the HTML element in the page. Here’s an example:
<html manifest="webApp.appcache">
...
</html>
The manifest attribute on the html element tells the browser that this webpage needs to be available offline. The value of the manifest attribute points to a manifest file. The name of the file is a convention more than a requirement; you can name the file anything, but the file extension is usually .appcache.
If you really want to change the file extension, you need to configure the web server so that your chosen file extension is returned with a MIME type of text/cache-manifest.
The application cache manifest file must list each and every file and resource required to be stored for offline use. When the browser parses the manifest attribute of the html element, it downloads the manifest and stores it locally. It also ensures that it downloads all the files listed in the manifest so that they are available offline. The manifest file contains three sections: CACHE, NETWORK, and FALLBACK. Each section might appear just once, multiple times in the file, or not at all. Each serves a specific purpose in how application caching functions when dealing with the resources in specific scenarios. A typical manifest file looks like this:
CACHE MANIFEST
# My Web Application Cache Manifest
# v.1.0.0.25
#
#Cache Section. All Cached items.
CACHE
/pages/page1.html
/pages/page2.html
#Required Network resources
NETWORK:
login.html
#Fallback items.
FALLBACK:
login.html fallback-login.html
The first line in a manifest file must be CACHE MANIFEST. The manifest file, as with any code file, can have comment lines added to it for additional explanations, as denoted by the # symbol. The CACHE section lists all the resources that must be cached offline. This must include all CSS files, JPG files, video and audio files, and any other resource required for the page to function correctly. If you omit an item from the manifest file, it won’t be cached, which can result in unexpected behavior when the application is run offline.
The NETWORK section declares any resources that must be available from the Internet. These items can’t be cached. Anything that the page requires from the Internet, such as embedded third-party elements, must be listed here. If such a resource isn’t listed here, the browser won’t know to check on the Internet for it when in offline mode. When the browser is in offline mode, it doesn’t attempt to go to the Internet for anything unless it’s listed in the NETWORK section.
The FALLBACK section enables you to provide fallback instructions to the browser in the event that an item isn’t available in the cache and the browser is in offline mode. In the example file, if login.html isn’t available in the cache, render fallback-login.html. You can use shortcuts in the FALLBACK section to provide more general redirects, such as the following:
/resources /resource.jpg
This tells the browser that if the browser is offline and can’t access anything in the resources folder, it should replace any references to items in the resources folder with resource.jpg. Note that resource.jpg is cached because it’s specified in the FALLBACK section. You don’t need to also specify resource.jpg in the CACHE section.
Using the AppCache API
As with Web Storage, the application cache is available in JavaScript as a global object. The following code gets a reference to the AppCache global object:
var appCache = window.applicationCache;
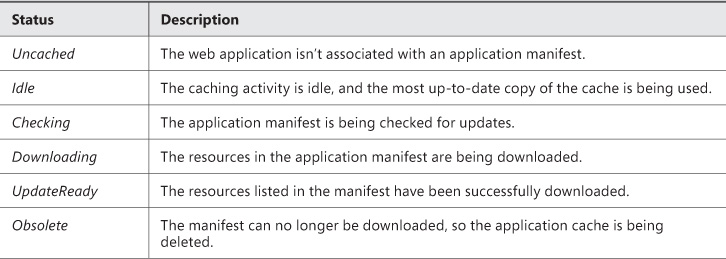
When you’re using the application cache to make pages available offline, one of the more useful things you can do when the page is loaded is verify its status. You achieve this by evaluating the status property of the AppCache object. The status property could be one of the values listed in Table 1-14.
After you know the cache status, two methods on the AppCache object can be useful. Table 1-15 lists these.

When the update method is called, an update to the cache is prepared. When that’s ready to download, the status of the application cache changes to UpdateReady. When this is set, a call to the swapCache method tells the application to switch to the most recent cache.
Exam Tip
The call to the update method is asynchronous. Therefore, you must handle the onupdateready event to determine when the update has completed the download process.
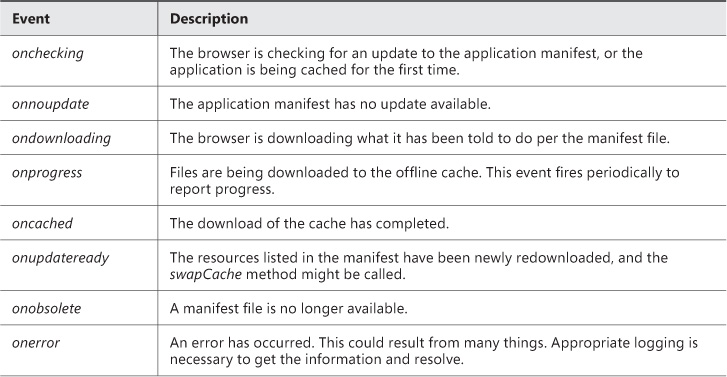
In addition to the properties and methods, the AppCache object can raise a series of events that you can handle. The application cache typically operates in the background, and you won’t need these events. However, in some cases handling some of the events and forcing an update can be useful. Table 1-16 lists the available events.
Most of these events might not be used often, if at all. The most common scenario is to handle the onupdateready method and then make a call to the swapCache method, as in this example:
window.onload = function () {
var appCache = window.applicationCache;
appCache.oncached = function (e) { alert("cache successfully downloaded."); };
appCache.onupdateready = function (e) { appCache.swapCache(); };
}
Using the application cache is more about configuration than about coding. However, it’s important that you’re aware the API is available for advanced scenarios where you need more control over the process, or when you need to receive timely information about the process, such as by handling the onprogress event.
Using the Geolocation API
Location services have become a large part of most people’s lives. From routing and navigation to just finding nearby points of interest or checking into their favorite social community sites, more and more people are using some form of location services. Location services depend on the Global Positioning System (GPS), IP addresses, and other device characteristics. You can take advantage of geolocation in web applications by leveraging browsers that support the Geolocation API.
You can get a reference to the Geolocation API from the window.navigator property, as follows:
var geoLocator = window.navigator.geolocation;
This code saves a reference to the Geolocation API in a variable to provide shorthand access to the API during future use. A good practice is to ensure that the client’s browser supports the Geolocation API by making sure that the reference is actually present.
The Geolocation API supports three key methods that you use to interact with it: getCurrentPosition, watchPosition, and clearWatch.
Using the getCurrentPosition method
Here’s an example of using the getCurrentPosition method:
getCurrentPosition(positionCallback, [positionErrorCallback], [positionOptions])
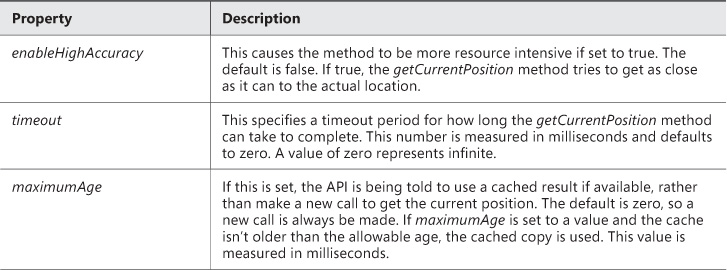
You use getCurrentPosition to get exactly what its name indicates—the current position of the user or the device in which the application is running. This method takes one required parameter and two optional parameters. The first parameter is a callback method that the API calls after the current position is determined. The second parameter is optional, but it’s also a callback function called when an error occurs. The callback method you specify here should handle any errors that can occur when trying to get the current position. The last optional parameter is a special object called PositionOptions, which lets you set some special options that control how the getCurrentPosition method behaves. Table 1-17 lists the possible values.
Listing 1-5 shows the getCurrentPosition method in use, with all parameters specified.
LISTING 1-5 Using the getCurrentPosition method
<html lang="en" xmlns="http://www.w3.org/1999/xhtml">
<head>
<meta charset="utf-8"/>
<title></title>
<script>
window.onload = function () {
var geoLocator = window.navigator.geolocation;
var posOptions = {enableHighAccuracy: true,timeout: 45000};
geoLocator.getCurrentPosition(successPosition, errorPosition,
posOptions);
}
function successPosition(pos) {
alert(pos);
}
function errorPosition(err) {
alert(err);
}
</script>
</head>
<body>
<div id="geoResults">
<p>Current Location is:</p>
</div>
</body>
</html>
When the code runs in the browser, some interesting things can happen. First, browser security starts; users are asked whether they want to allow this application to determine their location. In Internet Explorer, the message looks like the image in Figure 1-53.

If the user chooses to allow the application to proceed, everything is great. Otherwise, the method throws an exception.
For purposes of demonstrating the code, select Allow For This Site from the drop-down list so that the page can proceed. It might take a few seconds, but the call returns and shows a message box that a position object exists as passed to the success callback method.
Both the success and error callback methods receive one parameter from the Geolocation API. The success method receives a position object, whereas the error method receives an error object. The position object exposes two properties: coords and timestamp. The timestamp property indicates the time at which the coords were received. The coords property is itself a coordinates object that contains the latitude, longitude, altitude, heading, and speed of the device’s current position and/or relative to the last position acquired. The positionError object contains two properties: one for the code and one for the message. You can use these objects in Listing 1-5 by adding the following fragments:
<script>
function successPosition(pos) {
var sp = document.createElement("p");
sp.innerText = "Latitude: " + pos.coords.latitude +
" Longitude: " + pos.coords.longitude;
document.getElementById("geoResults").appendChild(sp);
}
function errorPosition(err) {
var sp = document.createElement("p");
sp.innerText = "error: " + err.message; + " code: " + err.code;
document.getElementById("geoResults").appendChild(sp);
}
</script>
Figure 1-54 shows the output from running this code successfully.

Using the watchPosition method
The second method available on the geolocation object is the watchPosition method, which provides a built-in mechanism that continuously polls for the current position. Here’s an example of using the method:
geoLocator.watchPosition(successCallBack,errorCallback,positionOptions)
The watchPosition method takes the same set of parameters as the getCurrentPosition method but returns a watchPosition object:
var watcher = geoLocator.watchPosition...
After running this code, the watcher variable holds a reference to the watchPosition instance being invoked, which can be useful later. The method calls the success callback method every time the Geolocation API detects a new location. The polling continues forever unless it you stop it. This is where the watcher object comes in handy; you can cancel polling by calling the clearWatch method. You could call this method in either the success or the error callback—for example, to cancel polling when you have captured enough position information or when you want to pause polling for a period of time:
geoLocator.clearWatch(watcher);
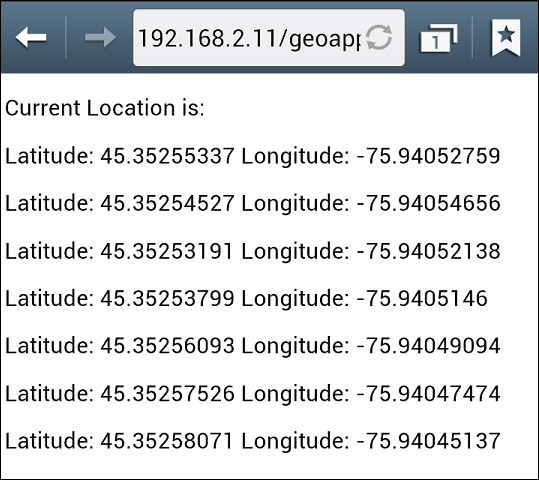
Listing 1-6 shows the full solution code for the watchPosition example.
LISTING 1-6 Using the Geolocation API to monitor position
var watcher;
var geoLocator;
window.onload = function () {
geoLocator = window.navigator.geolocation;
var posOptions = {enableHighAccuracy: true,timeout: 45000};
watcher = geoLocator.watchPosition(successPosition, errorPosition, posOptions);
}
function successPosition(pos) {
var sp = document.createElement("p");
sp.innerText = "Latitude: " + pos.coords.latitude + " Longitude: "
+ pos.coords.longitude;
document.getElementById("geoResults").appendChild(sp);
geoLocator.clearWatch(watcher);
}
function errorPosition(err) {
var sp = document.createElement("p");
sp.innerText = "error: " + err.message; + " code: " + err.code;
document.getElementById("geoResults").appendChild(sp);
}
Figure 1-55 shows the output of this code on a mobile device.
Objective summary
![]() The new Web Storage API enables you to store data locally on the client computer.
The new Web Storage API enables you to store data locally on the client computer.
![]() Web Storage supports both localStorage and sessionStoroage.
Web Storage supports both localStorage and sessionStoroage.
![]() Data in Web Storage is stored as name and value pairs.
Data in Web Storage is stored as name and value pairs.
![]() The AppCache API provides a way to make webpages available when users are offline.
The AppCache API provides a way to make webpages available when users are offline.
![]() The AppCache manifest defines what’s available offline.
The AppCache manifest defines what’s available offline.
![]() The Geolocation API provides a way to integrate location services into a webpage.
The Geolocation API provides a way to integrate location services into a webpage.
![]() The Geolocation API provides two methods: getPosition and watchPosition.
The Geolocation API provides two methods: getPosition and watchPosition.
Objective review
Answer the following questions to test your knowledge of the information in this objective. You can find the answers to these questions and explanations of why each answer choice is correct or incorrect in the “Answers” section at the end of this chapter.
1. When using the Web Storage API, where should you store data to ensure that it’s cleared when the user closes the browser?
A. localStorage
B. cookieStorage
C. sessionStorage
D. A hidden input element
2. What do you need to do to designate a page as available offline?
A. Specify in JavaScript as document.offLine=true.
B. Specify the manifest attribute on the form element.
C. Specify the manifest attribute on the HTML element.
D. Tell users to switch to offline mode using their browser. No code is required.
3. Which of the following aren’t valid sections of the AppCache manifest?
A. Cache manifest
B. Session manifest
C. Network manifest
D. Fallback manifest
4. Which event is fired by the AppCache object when the cache download is complete?
A. oncached
B. onupdateready
C. ondownloading
D. onchecking
5. When using the Geolocation API, how do you configure the ability to use cached data?
A. Set the enableCache property to true on the PositionOptions object.
B. Set the maximumAge property to a non-zero value on the PositionOptions object.
C. Set the timeout property of the PositionOptions object.
D. Using the cache is always on to save bandwidth, so no configuration is required.
Objective 1.5: Establish the scope of objects and variables
A key component of any programming language is how it uses variables, and JavaScript is no exception. To use variables effectively, you must understand their scope and lifetime. Declaring variables and instantiating objects consumes resources. The primary system resource used for variables is memory. The more memory an application uses, the greater the potential that usage of other resources will increase also—such as battery power to support the additional memory use. When applications drain the battery, users are less likely to use those applications.
![]() Establish the lifetime of variables and variable scope
Establish the lifetime of variables and variable scope
![]() Avoid using the global namespace
Avoid using the global namespace
![]() Leverage the this keyword
Leverage the this keyword
Establishing the lifetime of variables and variable scope
Variables begin their life with a declaration. The remainder of their life within the application depends on where the variables are declared.
To declare a variable in JavaScript, you use the var keyword.
var myVariable;
You can declare many variables concurrently. For example, the following code declares three variables:
var x, y, z;
You can also initialize your variables inline with the declaration, giving them immediate nondefault values:
var x =0.0, y=0.0, z=0.0
Until a variable is initialized, it’s not really “alive”—it has a value of undefined. After a variable is available for use, it’s considered to be “in scope.” The duration over which the variable remains in scope depends on where the variable is declared. A variable that has global scope is available throughout the webpage. A variable with local scope is available only within a specified context, as Listing 1-7 shows.
LISTING 1-7 An example to demonstrate variable scope
<html lang="en" xmlns="http://www.w3.org/1999/xhtml">
<head>
<meta charset="utf-8"/>
<style>
div {
width: 100px;
height: 100px;
border: 1px solid black;
}
</style>
<script>
var globalVar = "global";
window.onload = function () {
var localVar = "local";
document.getElementById("Div1").onclick = function () {
var insideDiv1Click;
//Do some logic here...
};
document.getElementById("Div2").onclick = function () {
};
document.getElementById("Div3").onclick = function () {
};
function AFunction() {
var x;
}
function BFunctionWithParam(p) {
}
}
</script>
</head>
<body>
<div id="Div1"></div>
<div id="Div2"></div>
<div id="Div3"></div>
</body>
</html>
In Listing 1-7, notice that the <script> block creates a section of script available to the entire page. The first line in the script section is the variable globalVar, which is considered global to the entire page. Any JavaScript anywhere on this page could access this variable. At the next level, the code implements a window.onload event handler. Inside this event handler, the first line declares a variable called localVar, which is local to the onload event handler. Inside the onload event handler, the code has access to the globalVar variable.
Now things start to get interesting.
The onload event handler accesses the DOM to wire up some other event handlers. Inside these event handlers, the code has access to both localVar and globalVar variables. The localVar variable is local to the onload event, but because the other event handlers are declared within the onload event handler, they also have access to local variables declared in the onload event handler. Update the Div1 onclick handler to this code:
document.getElementById("Div1").onclick = function () {
var insideDiv1Click = "insideDiv1";
alert(globalvar);
alert(localVar);
alert(insideDiv1Click);
};
When this code runs and a user clicks the Div1 element, all three alerts successfully display the value of each variable, which means they are all in scope.
Now, update the Div2 onclick handler with this code, the same as was placed into Div1:
document.getElementById("Div2").onclick = function () {
alert(globalVar);
alert(localVar);
alert(insideDiv1Click);
};
When you run this code and click Div2, the globalVar variable is in scope, the localVar variable is in scope, but the insideDiv1Click variable isn’t in scope. That variable lives only within the Div1 onclick handler, so it’s in scope only while that function runs. This example raises an undefined exception when it tries to access the insideDiv1Click variable.
As a final example, update the code for Div3 and other functions as follows:
document.getElementById("Div3").onclick = function () {
var insideDiv3 = "Div3";
AFunction();
BFunctionWithParam(insideDiv3);
};
function AFunction() {
var x;
alert(insideDiv3);
}
function BFunctionWithParam(p) {
alert(p);
alert(localVar);
}
In this code, the variable insideDiv3 is local to the onclick event handler for Div3. The onclick event handler has access to the globalVar and localVar variables just like the other event handlers did. The event handler for Div3 also calls the AFunction and BFunctionWithParam methods. The AFunction method attempts to access the insideDiv3 variable. Unfortunately, that variable lives only within the scope of the Div3 onclick handler. The functions called from the Div3 click event function don’t inherit or have access to the local variables of the Div3 method. To access the local variables declared in the Div3 event handler from another function, you need to pass them as parameters to those functions.
You can also see an illustration of passing a local variable as a parameter to another function in the code. After the call to the AFunction method, the event handler calls the BFunctionWithParam method. This function expects a single parameter named p. The onclick event handler passes the value of the insideDiv3 variable to the method. Now, the p variable is a local variable to the BFunctionWithParam method, so it can show the value of the insideDiv3 variable. This is the only way to make a local variable from one function accessible to another function—by passing a parameter.
Next, the BFunctionWithParam method attempts to access the localVar variable. It assumes it would have access, but it doesn’t for the same reason the AFunction method doesn’t have access to the insideDiv3 variable. The localVar variable is accessible only to code within the onload event handler in which it’s declared. For functions outside that scope to have access to it, you need to pass it as a parameter. One more thing to consider with respect to the lifetime and scope of variables is hierarchy.
If you plan to use the values of globalVar or localVar variables in the onclick event handlers for the various div elements, you must not declare any variables at the local level with the same name. Locally scoped variables override higher-level scoped variables of the same name. Note that they don’t overwrite them, they override them—meaning that you can’t access the overridden values. The following code demonstrates this point:
window.onload
...
var scaleX = 0.0;
...
document.getElementById("Div4").onclick = function () {
var scaleX = -3;
alert(scaleX);
}
function scaleDiv() {
//code to scale the Div by a factor of scaleX
}
In this code, if your intention is to use the scaleX variable declared globally within the scaleDiv function, the results should be unexpected. That’s because the function assigned to the onclick event handler also declares a variable named scaleX. The value in the alert window within the onClick function is –3, not 0.0, and when the scaleDiv function accesses the scaleX variable, the value is 0.0. Scoping problems such as these highlight why you must always provide meaningful names to variables. Meaningful names can help prevent accidentally naming variables the same thing.
Avoiding using the global namespace
The global namespace is where all the native JavaScript libraries live. In Internet Explorer, the window object references the global namespace. Everything this object exposes is global. The global namespace has far more functionality than this book can cover; however, you’ve already seen some examples of the objects in the global namespace used in this chapter, including the Web Storage API and the Geolocation API. The global namespace includes other nested namespaces, such as Math, WebSocket, and JSON.
The global namespace is available to all code within an application session. With the increasing number of third-party libraries in use, and as applications become more complex and require the use of such libraries, the potential for naming conflicts increases. Names of classes within a namespace must be unique. If multiple developers define a namespace with the same name, the JavaScript runtime can’t identify which namespace they intended to use. This is why keeping your objects out of the global namespace is important.
One strategy to avoid name collisions is to create your own namespaces for your JavaScript libraries. One pattern to consider using to create unique namespace names is the name of the domain in reverse, such as com.microsoft. Because domain names are unique, this pattern helps reduce the possibility of naming collisions. The following code demonstrates this strategy to create a namespace for a library developed for a bookstore:
var com = {};
com.Bookstore = {};
com.Bookstore.Book = {
title: 'my book',
genre: 'fiction'
};
com.Bookstore.Author = {
firstName: 'R',
lastName: 'D'
}
By creating the objects in this way, you can be reasonably certain that if another developer creates a useful library to manage books that you want to include in your site, you won’t have to worry about a naming collision between your Book and Author objects and those provided by the other library. When developing reusable JavaScript libraries, never implement your objects in the global namespace.
Leveraging the this keyword
The keyword this is a special term that allows JavaScript developers to reference the containing object directly. The following code snippet demonstrates the context of the this keyword:
<script>
//Here, "this" references the global namespace
this.navigator.geolocation
window.onload = function () {
//Here, "this" references the window object
this...
document.getElementById("aDiv").onclick = function()
{
//Here, "this" references the DIV element
this...
}
}
</script>
In this code snippet, the first this reference is in the global namespace—so it provides a direct reference to the global namespace. As you move down through the code, the context of the this keyword changes. In the onload event for the window, this refers to the window object (yes, that’s in the global namespace, but keep reading). Within the onclick function, the this keyword refers to the div element returned from the getElementById method. The this keyword always refers to the object that contains the currently running code. That is its context.
Objective summary
![]() Variables are undefined until they are initialized.
Variables are undefined until they are initialized.
![]() Variables are scoped and accessible depending on where they are declared. If they are inside a function, for example, they are local to the function.
Variables are scoped and accessible depending on where they are declared. If they are inside a function, for example, they are local to the function.
![]() Passing parameters is the only way to make a local variable available in another function.
Passing parameters is the only way to make a local variable available in another function.
![]() The global namespace shouldn’t be used because it’s shared by all.
The global namespace shouldn’t be used because it’s shared by all.
![]() You should apply a namespace to custom objects to prevent conflicts in the global namespace.
You should apply a namespace to custom objects to prevent conflicts in the global namespace.
![]() The this keyword provides direct access to the object that raised the event.
The this keyword provides direct access to the object that raised the event.
Objective review
Answer the following questions to test your knowledge of the information in this objective. You can find the answers to these questions and explanations of why each answer choice is correct or incorrect in the “Answers” section at the end of this chapter.
1. In JavaScript, how do you determine the scope of a variable?
A. The scope of a variable is global within the context of the page.
B. The scope of a variable depends on where inside the script it’s declared.
C. The scope of a variable changes depending on the type it represents.
2. Why is it important to avoid creating custom JavaScript objects in the global namespace?
A. The global namespace is reserved for the browser.
B. The global namespace is available to all applications in the session, and using it could result in a naming conflict.
C. The global namespace creates a security risk to users’ systems.
3. What JavaScript keyword in an event handler can be easily used to reference the object that raised the event?
A. The it keyword provides a reference to the object.
B. The document.current property provides a reference to the object.
C. The this keyword provides a reference to the object.
D. No way is available other than to use a selector query to retrieve the object from the DOM.
Objective 1.6: Create and implement objects and methods
JavaScript is an object-oriented programming language, which means that to develop applications in JavaScript effectively, you must understand how to work with objects. Essentially, two types of objects exist in JavaScript:
![]() Native JavaScript objects, which are provided with JavaScript itself
Native JavaScript objects, which are provided with JavaScript itself
![]() Custom objects, which developers create to represent their own data constructs and behaviors
Custom objects, which developers create to represent their own data constructs and behaviors
In some cases, creating an entirely new object isn’t necessary. You can base objects on other objects (if they are a subtype of that object) by using object inheritance, in which one object inherits all the attributes and behaviors of another object but can also implement additional aspects that are unique to it.
Objects encapsulate functionality and state information that is relevant for them. The functionality is provided in the form of methods, whereas state information is provided in the form of properties. This objective examines working with objects in JavaScript.
This objective covers how to:
![]() Implement native objects
Implement native objects
![]() Create custom objects and custom properties for native projects using prototypes and functions
Create custom objects and custom properties for native projects using prototypes and functions
![]() Implement inheritance
Implement inheritance
![]() Implement native methods and create custom methods
Implement native methods and create custom methods
Implementing native objects
Native objects are available to developers directly through JavaScript. JavaScript provides a large number of objects that provide functionality to make developers’ lives easier. Although covering every native object in JavaScript is out of scope for this book and this exam, you will be expected to be able to create and work with native JavaScript objects.
Some native objects are available statically, which means you don’t need to create an instance of them. Others require you to create an instance. You can find both types among objects in the global namespace. One example of a static object is Math, which is available in the global namespace and provides a great deal of functionality without you having to create an instance:
var squareValue = Math.sqrt(144);
Other objects, such as Array shown in the following code, require you to create an instance to work with them:
var listofPrimeNumbers = new Array(1, 2, 3, 5, 7, 11, 13, 17, 19, 23);
This code introduces the new keyword, which you use to instantiate an object. This tells the runtime to allocate a new object of the type specified. In this case, a new Array object is being requested. The list after the Array object type is called the object’s constructor. This information can be passed into the object as parameters to construct the initial state of the object. Some objects have many constructors to choose from, with differing sets of parameters. The addition of multiple constructors is called an overloaded constructor.
JavaScript also provides wrapper objects. These wrap up native types, for example. Native types are defined as integer, string, char, and so on. When a variable is declared like this,
var txt = "my long string";
var num = 5;
you can access method on the variable like this:
var index = txt.indexOf("long",0);
var exp = num.toExponential(5);
The underlying types for string and integer don’t natively have methods or functionality; however, the JavaScript runtime creates a wrapper object for them dynamically so that some useful methods are available. For example, you could create the following string and number variables with the new keyword, but that’s not very common.
var txt = new String("my long string");
var num = new Number(5);
The syntax reviewed thus far applies to both native objects and custom objects. Custom objects are created by the developer, whereas native objects are provided by core JavaScript.
Creating custom objects
Creating custom objects is standard practice when working with information in custom applications. Because JavaScript is an object-oriented language, you should apply proper object-oriented practices when developing JavaScript applications. In almost all cases, this involves creating custom objects to encapsulate functionality within logical entities.
For example, the following code creates a book object. This is a dynamic object, meaning that it’s created inline with a variable declaration.
var book = {
ISBN: "55555555",
Length: 560,
genre: "programming",
covering: "soft",
author: "John Doe",
currentPage: 5
}
The object created represents a book. It provides a way to encapsulate into a single object the properties that apply to a book—in this case, a book entity. The code specifies five properties. When using the book variable, you can access all the properties just as with any other property; if desired, you could output to the screen by placing the values into the DOM. The properties of an object represent its state, whereas the methods of an object provide its behavior. At this point, the book object has only properties. To give the book object some behavior, you can add the following code:
var book = {
ISBN: "55555555",
Length: 560,
genre: "programming",
covering: "soft",
author: "John Doe",
currentPage: 5,
title: "My Big Book of Wonderful Things",
flipTo: function flipToAPage(pNum) {
this.currentPage = pNum;
},
turnPageForward: function turnForward() {
this.flipTo(this.currentPage++);
},
turnPageBackward: function turnBackward() {
this.flipTo(this.currentPage--);
}
}
In the book object, three methods have been added: turnPageForward, turnPageBackward, and flipTo. Each method provides some functionality to the book object, letting a reader move through the pages. The interesting parts of this code are the function declarations themselves. For example, when you look at the code for the flipTo function, you might think that the function is called FlipToAPage because that’s what was declared. However, this isn’t the case. The methods are called using the alias property that assigned the function. When using the code, the runtime knows that it’s a method, not a property, and it expects the method to be called with parentheses:
//This line throws an exception because the object does not support this method
book.FlipToAPage(15);
//This line works because this is what the method has been named.
book.flipTo(15);
Creating objects inline as the book object is in the previous code sample is useful only when it is used in the page where it’s defined, and perhaps only a few times. However, if you plan to use an object often, consider creating a prototype for it so that you can construct one whenever you need it. A prototype provides a definition of the object so that you can construct the object using the new keyword. When an object can be constructed, such as with the new keyword, the constructor can take parameters to initialize the state of the object, and the object itself can internally take extra steps as needed to initialize itself. The following code creates a prototype for the book object:
function Book() {
this.ISBN = "55555555";
this.Length = 560;
this.genre= "programming";
this.covering = "soft";
this.author = "John Doe";
this.currentPage = 5,
this.flipTo = function FlipToAPage(pNum) {
this.currentPage = pNum;
},
this.turnPageForward = function turnForward() {
this.flipTo(this.currentPage++);
},
this.turnPageBackward = function turnBackward() {
this.flipTo(this.currentPage--);
}
}
var books = new Array(new Book(), new Book(), new Book());
books[0].Length
...
Exam Tip
JavaScript consists of objects. Everything in JavaScript is an object. Each object is based on a prototype. Whenever you create a new instance of an object, that instance is based on the object’s prototype.
In the preceding code, the Book object is constructed so that you can create one with default properties set. Then, the code creates an Array containing a list of books. You can access each element of the array to initialize each Book object as it’s needed.
Accessing each Book element to provide initialization values isn’t terribly efficient. It would be more convenient if the Book object supported more than one constructor. That way, you could create a blank book or create one with specific unique properties. This is where prototyping comes in handy. The following code creates a prototype containing two constructors that support the needs of any users of the Book object:
function Book()
{
//just creates an empty book.
}
function Book(title, length, author) {
this.title = title;
this.Length = length;
this.author = author;
}
Book.prototype = {
ISBN: "",
Length: -1,
genre: "",
covering: "",
author: "",
currentPage: 0,
title: "",
flipTo: function FlipToAPage(pNum) {
this.currentPage = pNum;
},
turnPageForward: function turnForward() {
this.flipTo(this.currentPage++);
},
turnPageBackward: function turnBackward() {
this.flipTo(this.currentPage--);
}
};
var books = new Array(new Book(), new Book("First Edition",350,"Random"));
With this new code, you can create an empty Book object by using the constructor with no parameters, or you can create a Book object by using specific parameters to initialize some fields.
Objects can contain other objects as needed. In this example, the Author property could easily be factored into a new prototype, making it more extensible and encapsulating the information related to an author. Add the following code to the Book prototype:
Book.prototype = {
ISBN: "",
Length: -1,
genre: "",
covering: "",
author: new Author(),
currentPage: 0,
title: "",
...
}
function Author(){
}
function Author(firstName, lastName, gender)
{
this.firstName = firstName;
this.lastName = lastName;
this.gender = gender;
}
Author.prototype = {
firstName:"",
lastName:"",
gender:"",
BookCount: 0
}
var books = new Array(new Book(),
new Book("First Edition",350, new Author("Random","Author","M"))
);
Now, the book’s Author is a custom object instead of just a string. This provides for more extensibility in the design. If you later decide that you need to add information about the author, you can simply add the property or properties to the Author prototype.
Exam Tip
You can add properties to a prototype dynamically rather than use the preceding method. The following code achieves the same outcome. Using such code is just a matter of preference.
Book.prototype.ISBN = "";
Book.prototype.Length = 350;
Book.prototype.genre = "";
Book.prototype.covering = "";
Book.prototype.author = new Author();
Book.prototype.currentPage = 0;
Book.prototype.title = "";
Implementing inheritance
In object-oriented programming, inheritance is a fundamental concept. In standard object-oriented programming, classes are created in a relational hierarchy, so that the attributes and functionality of one entity can be reused within another entity without having to re-create all the code. In object-oriented parlance, if an entity satisfies the “is-a” relationship question, it’s a candidate for inheritance. For example, an organization is made up of employees, in which an employee entity has certain attributes (properties) and behaviors (methods). Management, executives, and staffers are all types of employees. A staffer “is-a” employee. So in an object-oriented design, a staffer object would inherit from an employee. This type of inheritance is quite easy to build in full-fledged object-oriented languages. However, JavaScript is a special situation because it doesn’t use classes. As you saw in the previous sections, everything is an object; a custom object is made up of properties where some properties are native types and some properties are assigned to functions to implement methods. This section examines object inheritance as it works in JavaScript.
Building on the code used in the previous section, this section explains object inheritance. In the preceding code sample, you created an object called Book. But many types of books exist. To extend the definition of Book, you must separate the differences in functionality between, for example, pop-up books and other books. Pop-up books have some extra functionality, such as displaying the pop-up on the current page and perhaps playing a sound. In other words, while a pop-up book “is-a” type of book, it also has this extra functionality that doesn’t apply to all books. In this case, it would be useful to inherit from Book so that all the basic attributes and behaviors of a book are available without you having to re-create them. Then you could add the specific functionality for pop-up books.
You can extend the Book object in a couple of ways. (Extending is another way of thinking about inheritance—an object is extended into another object.) Here’s the first way to extend an object:
var popupBook = Object.create(Book.protoType,{ hasSound: {value:true},
showPopUp:{ value: function showPop() {
//do logic to show a popup
}
}
});
Object.create is a method available from the Object class in the global namespace. The create method takes two parameters: the object you want to create and a list of property descriptors.
The first parameter expects to receive the prototype of the object to create or null. If null is specified, the object uses only those functions or properties specified in the second parameter. If an object prototype is specified, as in the case Book.prototype, the object is created with all the properties and functions declared on that object prototype. This is another reason designing code in a proper object-oriented way is important—so that you can leverage this type of functionality to keep code more readable and maintainable.
The second parameter enables you to add properties or behaviors to the object being created. Essentially, you define this additional prototype information inline with the object creation. This example adds the property hasSound, which has a default value specified as false. You could also specify additional information here, such as whether the property is read-only and whether it’s enumerable. Creating objects this way is similar to the inline example in the beginning of the earlier section on custom objects. Again, such an approach isn’t very modular or reusable. For every instance of a pop-up book, you’d need to declare the additional property and method. So again, for objects that you might want to reuse often, extending the Book prototype is better.
Extending the Book prototype is much the same as creating a new prototype. You need only one line of code to tell JavaScript to inherit the functionality and attributes of another object. You do this by initializing the prototype to the parent object:
function PopUpBook() {
Book.call(this);
}
PopUpBook.prototype = Book.prototype;
PopUpBook.prototype.hasSound = false;
PopUpBook.prototype.showPopUp = function ShowPop() { };
In this way, PopUpBook now extends the implementation of the Book object and adds its own functionality for reuse. The function PopUpBook makes a method call to Book.call(..). This is a call to the constructor of the super class (the class being inherited from). If the super class has a constructor that takes parameters, this method would enable you to pass the parameter values to the super-class constructors for object initialization.
![]() Thought experiment: Creating synergy between custom objects and native objects
Thought experiment: Creating synergy between custom objects and native objects
![]() JavaScript supports native objects and custom objects.
JavaScript supports native objects and custom objects.
![]() Objects are created with the new keyword.
Objects are created with the new keyword.
![]() Access methods and properties on objects with the dot notation: object.method or object.property.
Access methods and properties on objects with the dot notation: object.method or object.property.
![]() You can create custom objects dynamically or by using prototypes.
You can create custom objects dynamically or by using prototypes.
![]() Prototypes provide for object definition reuse, whereas dynamic objects require attributes and methods defined for each use.
Prototypes provide for object definition reuse, whereas dynamic objects require attributes and methods defined for each use.
![]() Inheritance is achieved in JavaScript through the extension of prototypes.
Inheritance is achieved in JavaScript through the extension of prototypes.
Objective review
Answer the following questions to test your knowledge of the information in this objective. You can find the answers to these questions and explanations of why each answer choice is correct or incorrect in the “Answers” section at the end of this chapter.
1. In JavaScript, which of the following isn’t a native object?
A. Function
B. Array
C. Integer
D. Person
2. Which of the following snippets shows the correct way to create a custom book object?
A. var book = “Title: ‘My book about things’” + “Author: ‘Jane Doe’” + “Pages: 400”;
B. var book = {Title: “My book about things”, Author: “Jane Doe”, Pages: 400};
C. var book = (Title= “My book about things”, Author= “Jane Doe”= Pages: 400);
D. var book = new {Title: “My book about things”, Author: “Jane Doe”, Pages: 400};
3. Inheritance is accomplished in JavaScript through the use of which construct?
A. inherits keyword
B. implements keyword
C. this keyword
D. Prototypes
Answers
This section contains the solutions to the thought experiments and answers to the objective review questions in this chapter.
Objective 1.1: Thought experiment
The following HTML shows the conversion of the page to HTML5:
<html>
<head>
<title></title>
</head>
<body>
<table>
<tr>
<td colspan="3">
<header>
<h1>A Thoughtful Experiment</h1>
</header>
</td>
</tr>
<tr>
<td>
<nav>
<a href="">Home</a>
<a href="">Page 1</a>
<a href="">Page 2</a>
<a href="">Page 3</a>
</nav>
</td>
<td>
<section>
<article>
<hgroup>
<h1>An Article regarding thought is presented here.</h1>
<h2>Thought as a provoking element.</h2>
</hgroup>
.....................
<aside>Here are some reference materials.</aside>
</article>
</section>
</td>
<td>
<section id="profile">
.....
</section>
</td>
</tr>
<tr>
<td>
<footer>
This page is copyright protected.
</footer>
</td>
</tr>
</table>
</body>
</html>
Objective 1.1: Review
1. Correct answer: D
A. Incorrect: The <article> element is a new HTML5 semantic element.
B. Incorrect: The <footer> element is a new HTML5 semantic element.
C. Incorrect: The <hgroup> element is a new HTML5 semantic element.
D. Correct: The <input> element isn’t new in HTML5. However, new input types have been introduced to the specification.
2. Correct answer: A
A. Correct: The <hgroup> element is expected to contain any or all of the <h1> to <h6> elements.
B. Incorrect: The <header> element is used separately to define the header section of an <article> element or a <section> element.
C. Incorrect: The <nav> element is used to define a menu structure. It wouldn’t be included inside an <hgroup> element.
D. Incorrect: The <hgroup> element is expected to contain only the <h1> to <h6> elements.
3. Correct answer: C
A. Incorrect: The <div> element doesn’t provide any additional context to a search engine.
B. Incorrect: The <header> element is contained inside an <article> element and will help but isn’t the main element to provide search engine optimization.
C. Correct: The <article> element tells the search engine that specific content in this area is relevant to what users are searching for. This element provides for the best search engine optimization.
D. Incorrect: The <article> element is specifically used for SEO.
4. Correct answer: C
A. Incorrect: <div> elements flow left to right and top to bottom and don’t provide any structure.
B. Incorrect: The <p> element denotes a paragraph. This element doesn’t provide any layout structure to the page.
C. Correct: You use the <table> element to provide a structured layout, using its rows and columns elements as needed to create the desired layout.
D. Incorrect: The <form> element is used to denote an area where the user can submit data. The <form> element doesn’t provide any mechanism to control layout.
Objective 1.2: Thought experiment
This thought experiment speaks directly to performance. As the number of balls increases, the demand on the graphics engine and local resources such as CPU and memory becomes more intense. The <canvas> element is better designed to perform this duty. From a coding perspective, this experiment provides insight into capturing events from the canvas, calculating the location of the click in relation to the balls on the screen, and creating new balls dynamically as they get clicked. These computations need to occur quickly as the graphics are redrawn. The implementation of such a game would be too involved for the scope of this book. However, the notion of performance is an important concept to be clear on with respect to graphics rendering.
Objective 1.2: Review
1. Correct answer: D
A. Incorrect: The getElementById method retrieves an element by its unique id.
B. Incorrect: The querySelector method retrieves a single element that matches the specified selector.
C. Incorrect: The getElementsByClassName method retrieves all the elements that have the specified CSS class assigned to them.
D. Correct: The queryAll method isn’t available to search the DOM.
2. Correct answer: A
A. Correct: document.getElementbyId(“myDog”); retrieves only the single image with the ID myDog.
B. Incorrect: <p>.getChildNode(“img”); isn’t a valid syntax.
C. Incorrect: document.getElementbyId(“dogs).querySelector (“thumb”); fails because the page has no element named “dogs”.
D. Incorrect: document.querySelector.querySelectorAll(“thumb”); is incorrect because it returns all the elements on the page with the specified class name.
3. Correct answer: B
A. Incorrect: The DOM is dynamic and changes physically when items are removed from it.
B. Correct: When an element is removed and needed again, a reference to the removed node must be kept to be able to add it back.
C. Incorrect: No such method exists.
D. Incorrect: A node can be added back to the DOM if a reference was kept. This is accomplished by using the various methods available to insert nodes in the DOM.
4. Correct answer: C
A. Incorrect: Different browsers support different media formats. Use the <source> element to provide the media in the various formats.
B. Incorrect: The src attribute allows you to specify only one source video. This doesn’t work across multiple browsers unless the video format is supported across the browsers.
C. Correct: The <source> elements specify multiple video formats so that the browser can choose the correct one.
D. Incorrect: The <object> element is supported to provide a fallback mechanism in the event that the browser doesn’t support the HTML5 <video> element.
5. Correct answer: C
A. Incorrect: The moveTo method moves the current context to a new point but doesn’t begin a drawing.
B. Incorrect: The lineAt method draws a line within the current positional context.
C. Correct: The beginPath method tells the context to start a new drawing from its current point.
D. Incorrect: The stroke method tells the context to draw the graphics that are applied to the context.
6. Correct answer: C
A. Incorrect: The <canvas> element doesn’t support any declarative elements.
B. Incorrect: The <svg> element has poorer performance than the <canvas> element when a lot of graphic refresh is required.
C. Correct: The <canvas> element provides superior performance compared to the <svg> element.
D. Incorrect: The <canvas> and <svg> elements combined don’t provide better performance. The <canvas> element provides superior performance when the graphics require a lot of refreshing.
Objective 1.3: Thought experiment
To complete this thought experiment, you must get a reference to the DOM via JavaScript and set up events for the click to each radio button. When an event is created for notification of the selection of each radio button, the questions can be shown/hidden as needed. Setting the display CSS attribute of the elements so that the questions present in flow is key. The desired effect is for the surrounding elements to behave as though the element is no longer part of the DOM. Setting display=none achieves this effect.
Objective 1.3: Review
1. Correct answer: B
A. Incorrect: The element isn’t positioned relative to the browser window.
B. Correct: Absolute positioning positions the element relative to its parent element.
C. Incorrect: The element doesn’t center within the window.
D. Incorrect: Absolute positioning doesn’t center an element.
2. Correct answer: D
A. Incorrect: The rotate transform spins an object clockwise or counterclockwise.
B. Incorrect: The skew transform slants an object.
C. Incorrect: The translate transform moves an object.
D. Correct: The scale transform changes the size of an object.
3. Correct answer: D
A. Incorrect: Display=’hidden’ isn’t a valid option.
B. Incorrect: Display=’inline’ shows an object that previously wasn’t showing.
C. Incorrect: Visibility=’none’ isn’t a valid option.
D. Correct: Visibility=’hidden’ hides an element, and its surrounding elements remain in place as though the element was still there.
Objective 1.4: Thought experiment
This is a simple example of the power available when combining the HTML5 APIs. You can use the Web Storage API to store the location points as they occur from the Geolocation API by using the watchPosition method. The following code demonstrates the storage of the data:
<script>
var watcher;
var geoLocator;
var positions = 0;
window.onload = function () {
geoLocator = window.navigator.geolocation;
var posOptions = { enableHighAccuracy: true, timeout: 45000 };
watcher = geoLocator.watchPosition(successPosition, errorPosition,
posOptions);
}
function successPosition(pos) {
//on each position, store it into local storage sequentially.
//Then it can be retrieved sequentially
//in order to redraw the route on a map.
var p = "Lat: " + pos.coords.latitude + " Long: " + pos.coords.longitude;
localStorage.setItem(position, p);
}
function errorPosition(err) {
var sp = document.createElement("p");
sp.innerText = "error: " + err.message; + " code: " + err.code;
document.getElementById("geoResults").appendChild(sp);
}
</script>
Objective 1.4: Review
1. Correct answer: C
A. Incorrect: localStorage is persistent even after the session closes.
B. Incorrect: cookieStorage doesn’t exist in the Web Storage API.
C. Correct: sessionStorage clears when the session closes.
D. Incorrect: A hidden input element isn’t a valid solution to meet the requirement.
2. Correct answer: C
A. Incorrect: The offLine property isn’t a valid JavaScript option.
B. Incorrect: You wouldn’t specify the manifest on the <form> element.
C. Correct: Specifying the manifest attribute on the HTML element is the correct action.
D. Incorrect: The browser’s offline option doesn’t invoke the AppCache API.
3. Correct answer: B
A. Incorrect: Cache manifest lists all resources that must be cached offline.
B. Correct: Session manifest isn’t a valid option.
C. Incorrect: Network manifest specifies any resources that must be available from the Internet.
D. Incorrect: Fallback manifest enables you to tell the browser what to do when resources aren’t available offline.
4. Correct answer: A
A. Correct: The oncached event is fired when the download completes.
B. Incorrect: The onupdateready event is fired when items in the manifest are newly downloaded and the swapCache method can be called.
C. Incorrect: The ondownloading event is fired when the browser is downloading.
D. Incorrect: The onchecking event is fired when the browser is checking for updates.
5. Correct answer: B
A. Incorrect: The enableCache property doesn’t exist.
B. Correct: Set the maximumAge property to a non-zero value on the PositionOptions object.
C. Incorrect: The timeout property specifies how long to wait for a response before firing the timeout event.
D. Incorrect: The cache maximumAge defaults to 0, so caching is off by default.
Objective 1.5: Thought experiment
In this experiment, you took a look at a real-world scenario where the addition of JavaScript libraries could potentially conflict with other libraries already in use. This is a case for using namespaces to scope the library with a unique fully qualified name to ensure that it’s distinct from any other. Review the objective on the use of the global namespace to ensure that you understand this concept for the exam.
Objective 1.5: Review
1. Correct answer: B
A. Incorrect: Variables are global only if declared in the global space.
B. Correct: The scope of a variable depends on where inside the script it’s declared.
C. Incorrect: A variable’s type doesn’t affect its scope.
2. Correct answer: B
A. Incorrect: The global namespace isn’t reserved for the browser.
B. Correct: Because the global namespace is available to all applications in the session, using it could result in a naming conflict.
C. Incorrect: The global namespace doesn’t create a security risk to the user’s system.
3. Correct answer: C
A. Incorrect: The it keyword doesn’t exist.
B. Incorrect: The document.current keyword doesn’t provide the reference.
C. Correct: The this keyword provides a reference to the object.
D. Incorrect: The this keyword provides a direct shortcut to the element that raised the event.
Objective 1.6: Thought experiment
To extend a native object, you must add functionality to its prototype. This isn’t ideal object orientation in all cases; however, it does provide another avenue to achieve the desired results. JavaScript objects are dynamic, meaning that the prototype can be modified to add functionality to them. In this example, you extend the Array object to provide a sum method that returns the sum of all the elements in the array.
For this type of example, type safety is a concern. Arrays can hold any type of data. True inheritance would allow you to create a special type of array to hold only numbers. In this code, you can add validation to ensure that the values in the array are numeric or add only the numeric values. However, for the sake of demonstrating the extension of the object, this sample omits that validation. The following code shows how you can extend the Array object to support a sum method by adding a new method to its prototype:
Array.prototype.sum = function () {
var res = 0;
for (var i = 0; i < this.length; i++)
res += this[i];
return res;
};
var x = new Array(2);
x[0] = 5;
x[1] = 6;
document.write(x.sum());
Objective 1.6: Review
1. Correct answer: D
A. Incorrect: Functions are objects in JavaScript.
B. Incorrect: Arrays are objects in JavaScript.
C. Incorrect: Integers are objects in JavaScript.
D. Correct: People aren’t native JavaScript objects.
2. Correct answer: B
A. Incorrect: This code segment produces a string.
B. Correct: This code segment creates a dynamic object.
C. Incorrect: This segment is incorrect because (..) was used instead of {}, along with = instead of :.
D. Incorrect: The new keyword isn’t used when creating a dynamic object.
3. Correct answer: D
A. Incorrect: The inherits keyword isn’t a JavaScript construct.
B. Incorrect: The implements keyword isn’t a JavaScript construct.
C. Incorrect: The this keyword doesn’t provide inheritance.
D. Correct: Prototypes are used to create inheritance trees in JavaScript.