21. Vector Drawing

In This Chapter
Creating shape layers with a shape tool
Changing the attributes of a shape layer
Drawing with the Freeform Pen tool
Saving, displaying, selecting, and repositioning paths
More ways to create paths and shapes
The shape and path tools in Photoshop produce vector objects, which have crisp and precise edges, like objects in a vector drawing program. You can use these tools to add a precisely drawn element to a photo (such as a filled rectangle or ellipse), to produce a precisely-shaped selection, or to create a sharp-edged mask that hides areas of a layer. Unlike pixel layers, vector objects are resolution independent, meaning they print at the resolution of the output device (not at the resolution of the file) and keep their original crispness when transformed or exported.
Before you create a vector object, you must decide whether it will be stored as a colored shape on its own layer on the Layers panel (with a built-in Shape Path that is listed on the Paths panel when the shape layer is selected), or as a path on the Paths panel (a wireframe object not associated with any layer, from which you can produce a vector mask, a selection, or a filled pixel area). You can create a vector object by using one of the shape or pen tools or by converting an existing selection. An existing vector object can be reshaped via the usual transform controls or, as we show you on page 424, by manipulating its segments or anchor points.
Aligning vector objects for Web output
![]() To minimize anti-aliasing along horizontal and vertical edges of objects for sharper rendering onscreen, before you create, transform, or edit any vector objects, go to Edit/Photoshop > Preferences > General and verify that Snap Vector Tools and Transforms to Pixel Grid is checked. Photoshop will snap the bounding box of a shape, or anchor points that are created with the Pen tool, to the pixel grid. (To view the grid, choose View > Show > Pixel Grid and zoom in to 600% or greater.)
To minimize anti-aliasing along horizontal and vertical edges of objects for sharper rendering onscreen, before you create, transform, or edit any vector objects, go to Edit/Photoshop > Preferences > General and verify that Snap Vector Tools and Transforms to Pixel Grid is checked. Photoshop will snap the bounding box of a shape, or anchor points that are created with the Pen tool, to the pixel grid. (To view the grid, choose View > Show > Pixel Grid and zoom in to 600% or greater.)
![]() To have Photoshop minimize or remove anti-aliasing from the edges of a selected shape that was created with the “Snap Vector Tools” preference off, check Align Edges on the Options bar. Horizontal and vertical edges of the shape that touch the edges of its bounding box will be aligned to the pixel grid. Note: This feature may offset the stroke on an object from its path.
To have Photoshop minimize or remove anti-aliasing from the edges of a selected shape that was created with the “Snap Vector Tools” preference off, check Align Edges on the Options bar. Horizontal and vertical edges of the shape that touch the edges of its bounding box will be aligned to the pixel grid. Note: This feature may offset the stroke on an object from its path.
Creating shape layers with a shape tool
The easiest way to create a shape layer is by using one of the ready-made presets, as in the steps here. Later in this chapter, you’ll learn how to draw custom shapes.
Note: If you want to use a shape tool to produce a path instead of a shape, follow steps 1–3 in the task on page 415.
To create a vector shape:
1. On the Layers panel, click the layer (not a shape layer) above which you want a new shape layer to appear.
2. On the Tools panel, choose one of the shape tools (U or Shift-U).A

A We chose the Custom Shape tool on the Tools panel.
3. On the Options bar, do the following:
From the Tool Mode menu, choose Shape.
You can choose fill and stroke settings from the Options bar now, or change the shape properties after finishing this task (see the next two pages).
Open the tool options menu.![]() If it lists an Unconstrained option, make sure it’s selected.
If it lists an Unconstrained option, make sure it’s selected.
If you’re using the Custom Shape tool,![]() click a shape on the Custom Shape picker (or right-click in the image and choose from the preset picker on the context menu).B
click a shape on the Custom Shape picker (or right-click in the image and choose from the preset picker on the context menu).B

B On the Options bar, we chose the Shape option from the Tool Mode menu and a preset from the Custom Shape picker.
4. To produce the shape, do either of the following:
Drag in the document. To constrain the proportions of the shape, hold down Shift while dragging.C-D

C Next, we Shift-dragged to produce this shape.

D The last-used fill and stroke attributes appeared in the shape layer. (To reveal the underlying wood texture within it, we chose Color Burn as the layer blending mode.)
Click in the document. A dialog opens. Enter values and choose settings, then click OK.
A new vector shape layer appears on the Layers panel. All the Layers panel settings are available for it (e.g., blending mode, opacity, layer effects).
![]() To load more libraries onto the Custom Shape picker, see page 131 or 133.
To load more libraries onto the Custom Shape picker, see page 131 or 133.
![]() To reposition a shape layer, see page 157.
To reposition a shape layer, see page 157.
![]() To draw a straight, solid line, we use the Pen tool:
To draw a straight, solid line, we use the Pen tool: ![]() One click to start the line, a second click to finish it, then Ctrl-click/Cmd-click to deselect it. We prefer this method to using the Line (shape) tool, which produces a very thin, hollow rectangle.
One click to start the line, a second click to finish it, then Ctrl-click/Cmd-click to deselect it. We prefer this method to using the Line (shape) tool, which produces a very thin, hollow rectangle.
Changing the attributes of a shape layer
You can change many attributes of a shape layer. For example, you can change the interior (fill) color or the edge (stroke) color, or for either component, you can apply a color of None. You can change the details of a stroke, such as the width, style (solid, dotted, or dashed), alignment, cap style, and corner style. And you can change unique properties for specific kinds of shapes, such as the radius of one or more corners of a Rounded Rectangle.
To change the properties of a shape layer:
1. To access the properties controls, do as follows:
If you just created a new Rectangle, Rounded Rectangle, or Ellipse shape layer, and if Show on Shape Creation is checked on the Properties panel menu, that panel will open automatically.![]()
On the Layers panel, ![]() click one or more existing Rectangle, Rounded Rectangle, or Ellipse shape layers. Choose the Path Selection tool
click one or more existing Rectangle, Rounded Rectangle, or Ellipse shape layers. Choose the Path Selection tool ![]() (A or Shift-A), click the shape(s) in the document, show the Properties panel,
(A or Shift-A), click the shape(s) in the document, show the Properties panel, ![]() then click the Live Shape Properties button.
then click the Live Shape Properties button. ![]()
For other kinds of shapes, click one or more layers, then use the Options bar.
2. To recolor the shape(s), click the Fill Color or Stroke Color swatch to open the picker, then do any of the following (when you’re done using a picker, click outside it to close it):
Click the No Color button ![]() to apply a fill or stroke color of None.
to apply a fill or stroke color of None.
Click the Solid Color button, then click a color swatch; A or click the Color Picker button, ![]() choose a color, then click OK. Colors that you try out are added as temporary swatches below Recently Used Colors.
choose a color, then click OK. Colors that you try out are added as temporary swatches below Recently Used Colors.
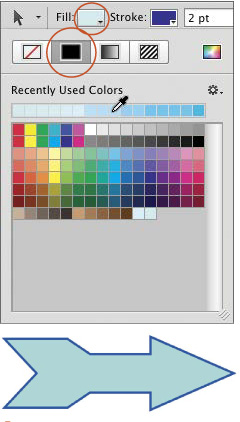
A We clicked the Fill Color swatch to open the picker, clicked the Solid Color button, clicked a few colors, then clicked our favorite swatch under Recently Used Colors.
Click the Gradient button to display a gradient editor, then click a gradient swatch. B To add another color stop, click below the bar. To recolor a stop, double-click the stop to open the Color Picker, choose a color, then click OK. To use the other controls on the picker (e.g., add opacity stops, change the gradient style or angle), see pages 214–215.

B We clicked the Gradient button, then clicked a gradient swatch.
Click the Pattern button, click a pattern swatch, and adjust the Scale percentage, if desired. C
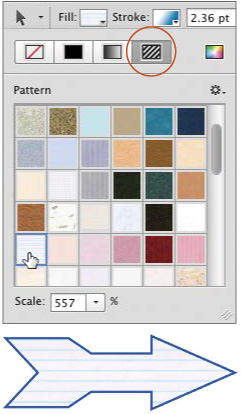
C We clicked the Pattern button, then clicked a pattern swatch (we also applied a color to the object’s stroke).
![]() To load other libraries onto the Solid Color, Gradient, or Pattern preset picker, see page 131.
To load other libraries onto the Solid Color, Gradient, or Pattern preset picker, see page 131.
3. To change the stroke details of a Rectangle, Rounded Rectangle, or Ellipse, you can use the Properties panel or Options bar; for other kinds of shapes, you must use the Options bar or the Stroke Options picker on the Options bar:
Change the Stroke Width value.A

A This is the original shape layer.
Click the Stroke Options picker, then click a stroke preset in the scrolling window.B

B We chose a dotted preset from the Stroke Options picker on the Properties panel.
From the Align menu, choose an option for the position of the stroke on the path.C

C We changed the Align setting to Outside. The screen capture at right shows the selected path.
From the Caps menu, choose an option for the shape of the stroke at the endpoints — if the path is open — or for the shape of dots or dashes.
From the Corners menu (Stroke Options picker) or Join menu (Properties panel), choose an option to make angles in the path (if any) mitered, round, or beveled.
To create and save a custom dashed or dotted stroke, see Photoshop Help.
4. Optional: To save customized stroke details as a preset, choose Save Stroke from the picker menu.
5. To change other properties of the shape, do any of the following, if available:
To resize the shape, change the W and/or H values.
To move the shape to an exact location, change the X and/or Y values.
To adjust the radius of any individual corner in a Rectangle or Rounded Rectangle, make sure the Link icon is deactivated, ![]() and use a corner icon
and use a corner icon![]() as a scrubby slider or enter a value in the field. Or to adjust the value of all four corners simultaneously, activate the Link icon, then change any one value (A–C).
as a scrubby slider or enter a value in the field. Or to adjust the value of all four corners simultaneously, activate the Link icon, then change any one value (A–C).

A This document contains a Rectangle shape layer above an image layer. (The blending mode of the shape layer is set to Multiply, and the Opacity of the layer is 50%.)

B Via the Properties panel, we changed the stroke width and color and chose a different radius value for two of the corners.

C The results of our Properties panel edits are shown here.
To copy properties from one shape layer to another:
Do one of the following:
To copy a fill or stroke color, gradient, or pattern between shapes, click a shape layer, and choose the Path Selection tool ![]() (A or Shift-A). From the menu on the Fill Color or Stroke Color picker on the Options bar or Properties panel, choose Copy [Fill or Stroke]. Click another shape layer, then choose Paste [Fill or Stroke] from the same menu.
(A or Shift-A). From the menu on the Fill Color or Stroke Color picker on the Options bar or Properties panel, choose Copy [Fill or Stroke]. Click another shape layer, then choose Paste [Fill or Stroke] from the same menu.
To copy stroke details (not colors) between shapes, click a shape layer. From the menu on the Stroke Options picker on the Options bar or Properties panel, choose Copy Stroke Details. Click another shape layer, then choose Paste Stroke Details from the same menu. Note: If the new details don’t appear, make sure the target shape has a Stroke color (not a setting of None).
To copy all the stroke and fill settings from one shape to another, including the colors and stroke details, right-click a shape layer and choose Copy Shape Attributes from the context menu. Click another shape layer, then choose Paste Shape Attributes from the context menu.
![]() Only one set of fill and stroke settings (e.g., one fill color, stroke color, and stroke option preset) can be applied to a given shape layer. You can’t apply unique settings to a subshape within a multishape layer.
Only one set of fill and stroke settings (e.g., one fill color, stroke color, and stroke option preset) can be applied to a given shape layer. You can’t apply unique settings to a subshape within a multishape layer.
To load a shape layer as a selection:
Hold down Ctrl/Cmd and click the shape layer thumbnail on the Layers panel.
![]() To convert a shape layer to a standard pixel layer, right-click the shape layer and choose Rasterize Layer from the context menu. If you want to restrict future image edits to the newly rasterized shape areas, activate the Lock Transparent Pixels button
To convert a shape layer to a standard pixel layer, right-click the shape layer and choose Rasterize Layer from the context menu. If you want to restrict future image edits to the newly rasterized shape areas, activate the Lock Transparent Pixels button ![]() on the Layers panel.
on the Layers panel.
Creating Buttons for a Web Page
Selecting shape layer paths
To select whole shape layer paths:
1. Choose the Path Selection tool ![]() (A or Shift-A).
(A or Shift-A).
2. Do either of the following:
From the Select menu on the Options bar, choose All Layers to allow the tool to select any shapes that you drag across, regardless of which listings are selected on the Layers panel.A
A We chose the Path Selection tool, then chose All Layers from the Select menu on the Options bar.
On the Layers panel, hold down Ctrl/Cmd and click all the layers that you want to potentially include in a selection. From the Select menu on the Options bar, choose Active Layers.![]()
3. Drag across the shapes that you want to select. Note that if you drag across part of a shape, the entire shape will become selected.B–E (and A–D).

B Although only one layer happens to be selected on our Layers panel ...

C ... when we dragged across an area in our document, we were able to select shapes from multiple layers.

D Anchor points on the shape paths became selected and visible ...

E ... and the respective layer listings for the three shapes we dragged across became selected.
A We chose the Path Selection tool, then chose Active Layers from the Select menu on the Options bar.
B Next, we held down Ctrl/Cmd and clicked two shape layer listings on the Layers panel.
C We dragged across three shapes.
D Because the tool was set to Select: Active Layers, of the shape layers that we dragged across, only those that we had activated on the Layers panel became selected.
Selecting Anchor Points on a Shape ![]()

To select a single anchor point on a shape layer path, with the Direct Selection tool and Select: All Layers chosen on the Options bar, click inside a shape (you don’t have to click the edge of the path). The anchor points will become hollow.

Next, click the anchor point that you want to edit. The point will become filled. (To select multiple points, drag across them.)

With the Direct Selection tool, if you drag across a selected or unselected shape ...

... only the anchor points within your marquee will become selected.
Isolating a shape layer
When you isolate a shape layer, editing is temporarily limited to just that shape, and no other layers can be edited (note that the entire document remains visible).
To isolate a shape layer: ![]()
Method 1
1. Choose the Path Selection ![]() or Direct Selection
or Direct Selection ![]() tool (A or Shift-A selects whichever of the two tools was used last).
tool (A or Shift-A selects whichever of the two tools was used last).
2. On the Option bar, choose Select: All Layers.
3. In the document, double-click a shape.A
A If you isolate a shape layer by double-clicking it in the document, that layer (temporarily) becomes the solo listing on the Layers panel.
Method 2
1. Choose the Path Selection or Direct Selection tool.
2. On the Option bar, choose Select: Active Layers.
3. On the Layers panel, click the listing for the shape layer that you want to edit.B

B If you isolate a shape by choosing Select: Active Layers, then click its layer listing, all the layer listings will remain visible on the panel.
To de-isolate a shape layer and redisplay all layer listings on the Layers panel:
1. On the Options bar, make sure Select: All Layers is chosen.
2. Choose the Path Selection or Direct Selection tool.
3. Double-click on or outside the isolated shape.
![]() To filter layer listings on the Layers panel of a specific category, such as all shape or type layers, see pages 160–161.
To filter layer listings on the Layers panel of a specific category, such as all shape or type layers, see pages 160–161.
![]() To clear all filtering from the Layers panel (even if the Layer Filtering On/Off button is activated), choose the Move, Path Selection, Direct Selection tool, or a pen tool, then right-click in the document and uncheck Isolate Layers on the context menu.
To clear all filtering from the Layers panel (even if the Layer Filtering On/Off button is activated), choose the Move, Path Selection, Direct Selection tool, or a pen tool, then right-click in the document and uncheck Isolate Layers on the context menu.![]() You can also clear filtering by unchecking Select > Isolate Layers.
You can also clear filtering by unchecking Select > Isolate Layers.
Working with multiple shapes
To reposition or copy a shape:
1. On the Layers panel, ![]() click a shape layer.
click a shape layer.
2. Choose the Path Selection tool ![]() (A or Shift-A).
(A or Shift-A).
3. Drag a shape to a new location; or to copy the shape, hold down Alt/Option before and while dragging (the copy will appear in the same layer).
![]() To delete one shape in a multishape layer, with the Path Selection tool, click the shape you want to discard, then press Backspace/Delete.
To delete one shape in a multishape layer, with the Path Selection tool, click the shape you want to discard, then press Backspace/Delete.
To combine multiple shape layers into one layer:
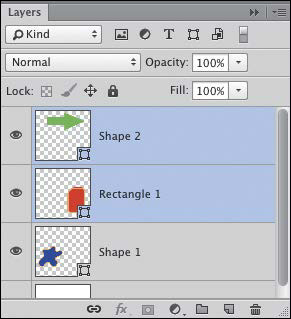
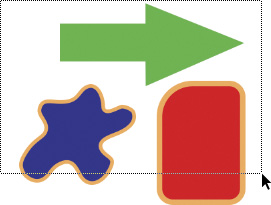
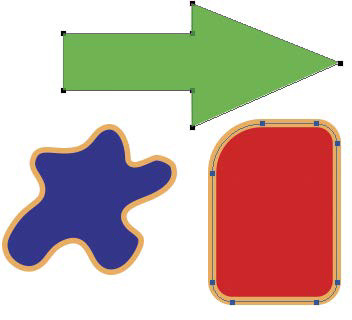
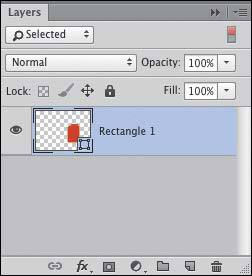
1. On the Layers panel, select two or more shape layers.A The layers don’t have to be consecutive.
A This document contains three shape layers.
2. Choose the Path Selection tool ![]() (A or Shift-A).
(A or Shift-A).
3. Right-click in the document and choose Unite Shapes.B Or to unite only the intersection of two overlapping shapes, choose Unite Shapes at Overlap.C–D All the shapes will adopt the fill and stroke settings of the uppermost of the selected layers; the other selected layers will be discarded. (For a different result, you could choose Subtract Front Shape or Subtract Shapes at Overlap.)

B The Unite Shapes command combined all the shapes into one.
C We started with these two shape layers.
D We chose the Unite Shapes at Overlap command.
To align shapes within the same layer:
1. Choose the Path Selection tool ![]() (A or Shift-A).
(A or Shift-A).
2. In the document, Shift-click two or more shapes that reside on the same layer.
3. From the Path Alignment menu ![]() on the Options bar, choose one or more options (e.g., Top Edges).
on the Options bar, choose one or more options (e.g., Top Edges).
![]() To align multiple shape layers, see page 281.
To align multiple shape layers, see page 281.
To unite, subtract, intersect, or exclude shapes within the same layer:
1. On the Layers panel, click a layer that contains multiple shapes.
2. Choose the Path Selection tool ![]() (A or Shift-A).
(A or Shift-A).
3. To see the effect of the button you will click in the next step, make sure that at least some area of two or more shapes overlap one another.
4. If you selected Rectangle, Rounded Rectangle, or Ellipse shapes, on the Properties panel, ![]() make sure the Live Shape Properties
make sure the Live Shape Properties ![]() are displaying; for other kinds of shapes, use the Path Operations menu on the Options bar. Click the Combine,
are displaying; for other kinds of shapes, use the Path Operations menu on the Options bar. Click the Combine, ![]() Subtract,
Subtract, ![]() Intersect,
Intersect, ![]() or Exclude
or Exclude ![]() button.
button.
Creating vector masks
Like a pixel mask, the function of a vector mask is to hide areas of a layer. We’ll show you how to create a vector mask from a shape layer or path, from a new path that you draw, and from a type layer.
To create a vector mask from a shape layer:
1. Arrange a shape layer so it overlaps the content of the layer to be masked (if needed, restack it via the Layers panel and/or reposition it).A
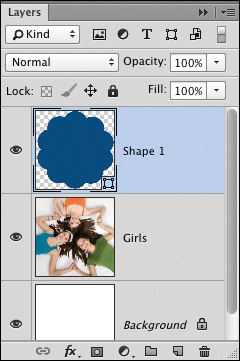
A We created a shape layer with the Custom Shape tool (Flower 1 preset, Shapes library).
2. Hold down Ctrl-Alt/Cmd-Option and drag the shape layer listing over an image, type, adjustment layer, or layer group listing (not the Background). Release when a rectangular border appears around the target layer.
3. Hide the shape layer.B–C

B We dragged from the shape layer to the image layer; the shape appeared within a new vector mask. Finally, we hid the shape layer.

C The mask is hiding parts of the image layer.
To create a vector mask from an existing path:
1. On the Layers panel, ![]() click the image, type, or adjustment layer or layer group to which you want to add a vector mask (not the Background).
click the image, type, or adjustment layer or layer group to which you want to add a vector mask (not the Background).
2. On the Paths panel, ![]() click a path listing.
click a path listing.
3. Choose the Path Selection tool ![]() (A or Shift-A), then position the path over the layer content to be masked.
(A or Shift-A), then position the path over the layer content to be masked.
4. Right-click inside the document and choose Create Vector Mask from the context menu (A–B).

A We created a path with the Custom Shape tool (Talk 4 preset, Talk Bubbles library), clicked an image layer, selected the path, then chose the Create Vector Mask command.

B The vector mask appeared on the image layer.
To create a vector mask by drawing a path:
1. Choose a shape tool (U or Shift-U), the Pen tool, ![]() or the Freeform Pen tool
or the Freeform Pen tool ![]() (P or Shift-P).
(P or Shift-P).
2. From the Tool Mode menu on the Options bar, choose Path. If you’re using the Custom Shape tool, also click a shape on the Custom Shape picker.
3. If you chose a shape tool, drag in the document, or Shift-drag to constrain the proportions of the object.C (If you want to reposition the path while it’s being drawn, also hold down the Spacebar.) Optional: After drawing a path with the Rectangle, Rounded Rectangle, or Ellipse tool, you can change some of its properties via the Properties panel.![]()

C We dragged to produce a path with the Custom Shape tool (Diamond Card preset, Shapes library).
If you chose the Pen or Freeform Pen tool, draw a path. To learn how to use the Pen tool, see pages 420–422, or for the Freeform Pen tool, see page 418.
4. On the Layers panel, ![]() click the image, type, adjustment layer, or layer group to which you want to add a vector mask (not the Background).
click the image, type, adjustment layer, or layer group to which you want to add a vector mask (not the Background).
5. On the Options bar, click the Mask button.D
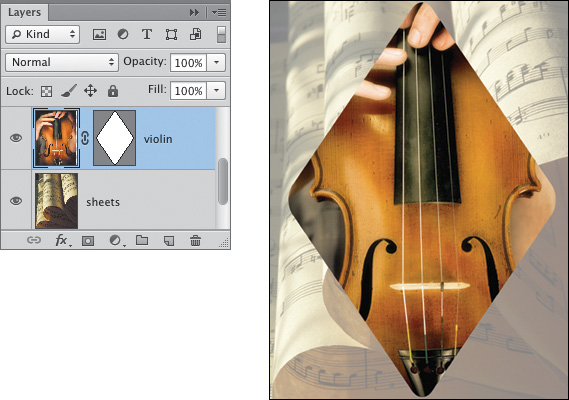
D We clicked the violin layer, then clicked the Mask button on the Options bar, which converted the path to a vector mask on the current image layer. The mask is hiding parts of the violin layer.
To create a vector mask from type:
1. Create an editable type layer.A

A This is an editable type layer.
2. Right-click the type layer listing and choose Create Work Path. Hide the type layer.
3. On the Layers panel, ![]() click an image layer or adjustment layer or a layer group, then Ctrl-click/Cmd-click the Add Vector Mask button.
click an image layer or adjustment layer or a layer group, then Ctrl-click/Cmd-click the Add Vector Mask button. ![]() B (If the layer has a layer mask, you can click the button without holding down Ctrl/Cmd.)
B (If the layer has a layer mask, you can click the button without holding down Ctrl/Cmd.)

B We created a work path from the type layer, then used the path to create a vector mask on an image layer.
More Essential Vector Mask Topics
![]() To move or copy a vector mask to another layer, see page 194.
To move or copy a vector mask to another layer, see page 194.
![]() To disable or delete a vector mask, see page 194.
To disable or delete a vector mask, see page 194.
![]() To lower the density of a vector mask, or to feather its edges, see page 192.
To lower the density of a vector mask, or to feather its edges, see page 192.
![]() To reshape a vector mask, click the mask thumbnail on the Layers panel, then either use Edit > Free Transform Path (see pages 348–349) or manipulate the points or direction lines on its path (see page 424).
To reshape a vector mask, click the mask thumbnail on the Layers panel, then either use Edit > Free Transform Path (see pages 348–349) or manipulate the points or direction lines on its path (see page 424).
Working with vector masks
By moving a vector mask separately from the layer content, you can hide a different area of the layer.
To reposition a vector mask:
1. On the Layers panel, ![]() click a vector mask thumbnail.
click a vector mask thumbnail.
2. Choose the Path Selection tool ![]() (A or Shift-A).
(A or Shift-A).
3. If the mask contains multiple subpaths (such as type shapes), Shift-click the ones you want to reposition.
4. Drag in the document.A–B
A We’re repositioning a mask ...

B ... to reveal a different part of the image within the mask shape.
![]() To move the layer content instead of the mask, on the Layers panel, click the Link icon
To move the layer content instead of the mask, on the Layers panel, click the Link icon ![]() between the layer and vector mask thumbnails (the icon disappears). Click the layer thumbnail, drag in the document with the Move tool,
between the layer and vector mask thumbnails (the icon disappears). Click the layer thumbnail, drag in the document with the Move tool, ![]() then click between the thumbnails to restore the Link icon.
then click between the thumbnails to restore the Link icon.
You can switch the hide and reveal functions of a vector mask.
To switch the function of a vector mask:
1. Choose the Path Selection tool ![]() (A or Shift-A).
(A or Shift-A).
2. On the Layers panel, ![]() click a vector mask thumbnail.C
click a vector mask thumbnail.C

C We selected the leaf-shaped vector mask ...
3. If the path segments and anchor points aren’t selected, click the path or drag a marquee around it.
4. From the Path Operations menu on the Options bar, choose Subtract Front Shape, ![]() or press – (minus key).D
or press – (minus key).D

D ... then switched the function of the mask by pressing – (minus key).
![]() To restore the default reveal and hide functions to a vector mask, choose Combine Shapes
To restore the default reveal and hide functions to a vector mask, choose Combine Shapes ![]() from the Path Operations menu on the Options bar, or press + (plus key).
from the Path Operations menu on the Options bar, or press + (plus key).
If a layer contains both a layer (pixel) mask and a vector mask, the layer mask thumbnail will be adjacent to the layer thumbnail (on the left), followed by the vector mask thumbnail (on the right).
To convert a vector mask to a layer mask:
1. Optional: To preserve a copy of the vector mask, on the Layers panel, duplicate its whole layer.
2. Right-click the vector mask thumbnail and choose Rasterize Vector Mask from the context menu.
Drawing with the Freeform Pen tool
The simplest way to draw a custom object is with the Freeform Pen tool. It produces bumpier and less precise curves than the Pen tool, but if you’re new to vector drawing, it’s a good tool to start with. If you have a stylus and tablet, use them.
To use the Freeform Pen tool:
1. Choose the Freeform Pen tool (P or Shift-P). ![]()
2. From the Tool Mode menu on the Options bar, choose Path or Shape.
3. If you’re going to draw a path, display the Paths panel, ![]() then click the New Path button.
then click the New Path button. ![]()
4. Drag to draw a shape or path, then release the mouse. If you want to close the shape, drag the pointer over the starting point (a little circle displays in the pointer); otherwise, just release.A–C

A A path is being drawn with the Freeform Pen tool (a mouse is drawing a cat!).
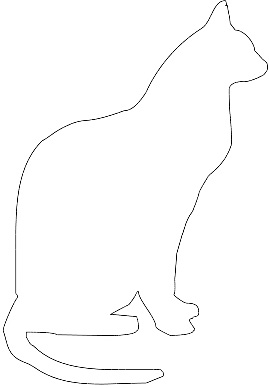
B The path is completed.
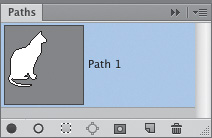
C The new path displays in the thumbnail on the Paths panel.
Note: When you use the Freeform Pen tool, Photoshop creates the anchor points needed for the path. The higher the Curve Fit value you chose for the tool (options menu ![]() on the Options bar), the smoother the path and the fewer anchor points are created, but the less precisely the path follows the movement of your mouse.
on the Options bar), the smoother the path and the fewer anchor points are created, but the less precisely the path follows the movement of your mouse.
Saving, displaying, selecting, and repositioning paths
Note: The features discussed in this section apply only to path listings on the Paths panel (not to shape layers or their respective mask listings on the Paths panel).
If you draw a path without clicking the New Path button (or an existing path listing) on the Paths panel first, the path will be listed on the panel as a temporary Work Path. If you deselect the Work Path listing and then proceed to draw another path, the current Work Path will be replaced by a new Work Path. Due to the fleeting nature of the Work Path listing, we recommend always clicking the New Path button before drawing a path (we’ll remind you to do this in our instructions). If you forget to create a new path listing before you start to draw, don’t worry — you can still save the current Work Path as a permanent path, as described in the first task on the next page.
Note: If you click a Work Path or other listing on the Paths panel and then draw a new path, the new path will appear as a subpath within the same listing. To learn about combining paths, see page 425.
To save a Work Path as a permanent path:
On the Paths panel, ![]() do either of the following:
do either of the following:
Double-click the Work Path listing. The Save Path dialog opens. Change the name, if desired, then click OK.
To save the path under a default name, drag the Work Path listing to the New Path button. ![]()
![]() To rename a saved path, double-click the existing name, type a new name, then press Enter/Return.
To rename a saved path, double-click the existing name, type a new name, then press Enter/Return.
![]() If you want to name a permanent path as you create it, Alt/Option click the New Path button, enter a name in the New Path dialog, then click OK.
If you want to name a permanent path as you create it, Alt/Option click the New Path button, enter a name in the New Path dialog, then click OK.
1. On the Paths panel, ![]() click a path listing. The path displays in the document window (or multiple paths display, if the listing contains subpaths).A–B
click a path listing. The path displays in the document window (or multiple paths display, if the listing contains subpaths).A–B
A We held down Ctrl/Cmd and clicked two path listings.

B The paths displayed in the document.
2. Optional: Hold down Ctrl/Cmd and click one or more additional path listings.
To hide one or more paths:
Do either of the following:
To hide all currently displayed paths, either hold down the A key and press Esc, or on the Paths panel, ![]() click the blank area below all the listings.
click the blank area below all the listings.
To hide just one of several visible paths, hold down Ctrl/Cmd and click a path listing on the Paths panel.
![]() To open a dialog in which you can change the size of the thumbnails on the Paths panel, choose Panel Options from the panel menu.
To open a dialog in which you can change the size of the thumbnails on the Paths panel, choose Panel Options from the panel menu.
When you select a path, its anchor points become visible and accessible, ready for editing.
1. Show one or more paths, as described in “To display one or more paths,” above.
2. Choose the Path Selection tool ![]() (A or Shift-A).
(A or Shift-A).
3. Do either of the following:
Click the edge of a path.C If desired, Shift-click additional paths or subpaths.
C With the Path Selection tool, we clicked one of the paths.
Drag a marquee across multiple paths. (Note that if you use this method, any shape layers that you drag across will also become selected.)
When you deselect a path, its anchor points become hidden, but its listing on the Paths panel stays selected.
To deselect one or more paths:
Do either of the following:
To deselect all paths, choose a path selection or pen tool, then hold down Ctrl/Cmd and click a blank area of the artboard.
To deselect one path in a multiple selection, choose the Path Selection tool, ![]() then Shift-click one of the selected paths.
then Shift-click one of the selected paths.
To reposition one or more paths:
1. Follow steps 1–3 in “To select one or more paths,” on this page.
2. Drag the edge of one of the paths.
Drawing with the Pen tool
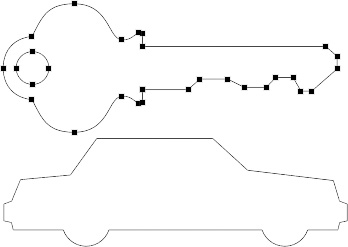
With the Pen tool, you can create shapes or paths. Shapes are listed on the Layers panel (and when a shape layer is selected, its path is also listed on the Paths panel); paths are listed only on the Paths panel. Depending on how you use the Pen, you can draw straight sides, smooth curves, nonsmooth curves — or a combination thereof (see the sidebar on page 423).
To draw a straight-sided path or shape with the Pen tool:
1. Choose the Pen tool ![]() (P or Shift-P).
(P or Shift-P).
2. On the Options bar, do the following:
From the Tool Mode menu, choose Path or Shape.
On the tool options menu, ![]() check Rubber Band.
check Rubber Band.
3. If you chose the Path option, on the Paths panel, ![]() click the New Path button.
click the New Path button. ![]()
If you chose the Shape option, choose Select > Deselect Layers, then choose fill and stroke attributes via the Options bar. These attributes can easily be changed later.
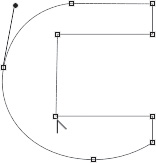
4. Click to create the first anchor point, then click to create a second one; a straight segment will connect them automatically.A The last-created point will be solid (selected), then will become deselected (hollow) when you create the next point.
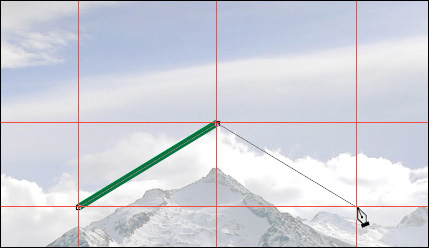
A We created a few ruler guides in our document, then with the Pen tool, we clicked to create two points. Photoshop connected them with a straight segment. Here we’re about to click to produce another segment; the segment previews because the Rubber Band option is on.
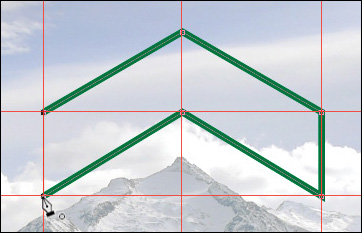
5. Click to create additional anchor points.B To constrain a straight segment to an increment of 45°, hold down Shift while clicking.

B We clicked to create more points.
6. To complete the object, do one of the following:
To close the object and keep it selected, position the pointer over the starting point (a tiny circle appears next to the pointer),C then click.
C The tool is positioned over the starting point (note the circle next to the pointer). When we click that point, Photoshop will close and complete the shape.
To keep the object open and deselect it, Ctrl-click/Cmd-click anywhere on the artboard.
To keep the object open and selected, press A or Shift-A for the Path Selection tool.
7. Optional: To change the fill color, stroke color, or stroke details of a shape, see pages 407–408.
![]() To draw paths that are aligned to the pixel grid, for better Web output, see page 407.
To draw paths that are aligned to the pixel grid, for better Web output, see page 407.
![]() To help you align the points that you produce while drawing a path (as shown in A–C), on the View menu, check Show > Guides, Rulers, Snap, and Snap To > Guides. Drag guides into the document from the rulers. See also pages 287–288.
To help you align the points that you produce while drawing a path (as shown in A–C), on the View menu, check Show > Guides, Rulers, Snap, and Snap To > Guides. Drag guides into the document from the rulers. See also pages 287–288.
To draw a curved path or shape with the Pen tool:
1. Choose the Pen tool ![]() (P or Shift-P).
(P or Shift-P).
2. On the Options bar, do the following:
From the Tool Mode menu, choose Path or Shape.
On the tool options menu, ![]() check Rubber Band.
check Rubber Band.
3. If you chose the Path option, on the Paths panel, click the New Path button. ![]()
If you chose the Shape option, choose a nonshape layer, then choose fill and stroke attributes via the Options bar (see page 407).
4. Drag (don’t click) to create the first anchor point. The direction you drag will determine the angle of the direction handles that appear on the point; the distance you drag will control the length of the handles. The handles, in turn, control the shape of the curve. Release the mouse.
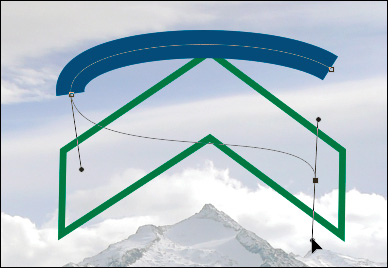
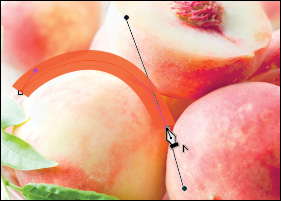
5. Position the mouse where you want the first curve to change direction, then drag to define the next curve. A curved segment will connect the two anchor points, and the next pair of direction handles will appear.A

A To draw a curved shape with the Pen tool, we dragged to create the first anchor point, moved the mouse, then dragged to create the second point (note the direction handles). Photoshop connected the two points with a curved segment.
6. Drag to create more anchor points with direction handles.B–C
B We dragged to create a third point. (Note: The stroke on this path has the Align setting of Center; see page 408.)

C We dragged to create the final point and third curve (we’ll end this shape as an open object).
7. To complete the object, do one of the following:
To close the object and keep it selected, position the pointer over the starting point (a little circle appears next to the pointer), then drag to produce the last pair of direction handles.
To keep the object open and deselect it, Ctrl-click/Cmd-click anywhere on the artboard.
To keep the object open and selected, press A or Shift-A for the Path Selection tool.
8. Optional: To change the fill color, stroke color, or stroke details of a shape, see pages 407–408.
![]() For smoother curves, draw the minimum number of points needed to define the object. Remember, you can always reshape the curves later by adjusting the length and angle of the handles (see page 424).
For smoother curves, draw the minimum number of points needed to define the object. Remember, you can always reshape the curves later by adjusting the length and angle of the handles (see page 424).
The anchor point on a nonsmooth curve can have either just one direction handle or two handles that can be rotated in different directions. In contrast, the pair of handles on a smooth curve always remain in a straight line.
To draw a nonsmooth curve:
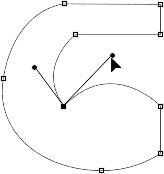
1. While using the Pen tool ![]() to draw a path or shape (see the preceding page), hold down Alt/Option, position the pointer over the last point you created, then do either of the following: A
to draw a path or shape (see the preceding page), hold down Alt/Option, position the pointer over the last point you created, then do either of the following: A
A After dragging to produce a smooth curve, we’re holding down Alt/Option and positioning the Pen tool over the last point.
Drag the end of one of the direction handles (the handles will form a “V” shape).B–C

B We’re dragging the end of one of the direction handles. Now the handles are in a “V” shape.

C We released, then repositioned the mouse, and will proceed to create more points.
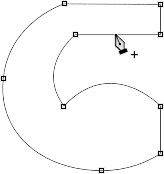
Click the point to remove one of the handles.
2. Continue to draw nonsmooth curves, or click to create straight sides, or drag to create smooth curves.D

D For all of the paths in this image, from the menus on the Stroke Options picker, we chose the settings of Align: Center, Caps: Round, and Corners: Round (see page 408).
More ways to create paths and shapes
You can create a path from a selection, such as an area of an image layer that you have selected with the Quick Selection tool. (If you prefer to create a path directly with a shape or pen tool, follow steps 1–3 in the task on page 415 instead of doing the task below.)
To produce a path from a selection or an existing shape layer:
1. Do either of the following:
Create a selection with any selection tool (e.g., Quick Selection or a lasso tool).
Hold down Cmd/Ctrl and click a shape layer thumbnail.
2. Display the Paths panel. ![]() If the panel contains a Work Path and you don’t want it to be discarded, double-click it to save it as a permanent path.
If the panel contains a Work Path and you don’t want it to be discarded, double-click it to save it as a permanent path.
3. Click the Make Work Path from Selection button, ![]() then double-click the resulting Work Path to save it as a permanent path.
then double-click the resulting Work Path to save it as a permanent path.
You can paste a path from Illustrator into a Photoshop document, and have it appear as either a path or a shape layer.
To create a path or shape from Illustrator artwork:
1. In an Illustrator document, select one or more vector objects, then copy the artwork via Edit > Copy.
2. Open a Photoshop document. If you’re going to create a path, make sure no paths are selected on the Paths panel and no layers are selected on the Layers panel.
3. Choose Edit > Paste.
4. In the Paste dialog, do either of the following:
Click Paste As: Path, then click OK. A Work Path will appear on the Paths panel; double-click it to save it as a permanent path.
Click Paste As: Shape Layer. The shape(s) will be given the current fill color and a stroke color of None.
To produce a shape from a path:
1. On the Paths panel, ![]() click a path listing.
click a path listing.
2. Choose the Pen tool (P or Shift-P). ![]()
3. On the Options bar, make sure Path is chosen on the Tool Mode menu, then click the Shape button.
You can save any shape or path to the Custom Shape picker, for use in any document.
To save a vector object as a custom shape:
1. Do either of the following:
On the Layers panel, ![]() click a shape layer; also choose the Path Selection tool
click a shape layer; also choose the Path Selection tool ![]() (A or Shift-A).
(A or Shift-A).
On the Paths panel, ![]() click a path listing.
click a path listing.
2. Choose Edit > Define Custom Shape.
3. In the Shape Name dialog, enter a name, then click OK. The new shape appears as the last thumbnail on the Custom Shape picker. The picker displays on the Options bar when you use the Custom Shape tool (see page 406).
Note: To save all the shapes currently on the Custom Shape picker as a permanent library, so they’re not replaced if you load a new library, see page 131.
Combining Your Pen Skills in One Object

Reshaping vector objects
There are several ways to reshape a vector object: You can convert a corner to a smooth curve, or vice versa; rotate one handle independently of the other; drag an anchor point or segment; or add or delete points.
To convert points on a vector object:
1. Do either of the following:
On the Paths panel, ![]() click a path listing.
click a path listing.
On the Layers panel, ![]() click a shape layer listing or a vector mask thumbnail.
click a shape layer listing or a vector mask thumbnail.
2. Choose the Direct Selection tool ![]() (A or Shift-A).
(A or Shift-A).
3. Click the edge of a path, then click a point on the path; or click inside a shape.![]()
4. To use a temporary Convert Point tool, hold down Ctrl-Alt/Cmd-Option and do any of the following:
To convert a corner point to a smooth point (add direction handles), drag away from the point.A–B
A We’re using the Convert Point tool to convert a corner ...

B ... to a curve.
To convert a smooth point to a corner point (remove both direction handles), click the point.
To rotate one direction handle on a point independently of the other handle, drag the handle.C
C We rotated one of the new handles independently.
![]() In step 4 above, you can choose the Convert Point tool
In step 4 above, you can choose the Convert Point tool ![]() directly from the Pen tool menu; or if you’re using the Pen tool, hold down Alt/Option.
directly from the Pen tool menu; or if you’re using the Pen tool, hold down Alt/Option.
To reshape a segment on a vector object:
1. Choose the Direct Selection tool ![]() (A or Shift-A).
(A or Shift-A).
2. Do either of the following:
On the Layers panel, click a shape layer listing, then in the document, click inside the shape.![]()
Click a path listing on the Paths panel or a vector mask thumbnail on the Layers panel, then click the edge of the path in the document.
3. Do any of the following:
Drag an anchor point.
Drag a segment. (If you want to prevent adjacent segments from reshaping, check Constrain Path Dragging on the Options bar.)
Click a point on a curve segment, then drag the end of a direction handle toward or away from the anchor point, or rotate it around the point.D
![]() If you click a selected anchor point on a path, all other selected anchor points become deselected automatically.
If you click a selected anchor point on a path, all other selected anchor points become deselected automatically.![]()

D We’re dragging a direction handle on a smooth curve.
To add or delete anchor points from a vector object:
1. Follow step 1 in the first task on this page.
2. Choose the Pen tool ![]() (P or Shift-P).
(P or Shift-P).
3. Choose Path from the Tool Mode menu on the Options bar, then check Auto Add/Delete.
4. Hold down Ctrl/Cmd (for a temporary Path Selection tool) and click the path in the document.
5. Do any of the following:
To add a point, click a segment (note the plus sign in the tool pointer).E–F Optional: If you want to remove both direction handles from the new point (convert it to a corner point), hold down Alt/Option and click the point; or to rotate one handle separately, drag it with Alt/Option held down.
E We’re adding point to a segment.

F With Ctrl/Cmd held down, we’re dragging the new point downward.
To delete a point, click it (note the minus sign in the tool pointer).
To add a segment to an open path, click to select the endpoint, reposition the mouse, then click or drag to create one or more points.
Working with paths
To copy a path listing:
On the Paths panel, ![]() Alt-drag/Option-drag a path listing upward or downward.
Alt-drag/Option-drag a path listing upward or downward.
![]() To restack a path listing on the Paths panel (not a Work Path or Shape Path), drag it upward or downward; release when the double line appears in the desired position.
To restack a path listing on the Paths panel (not a Work Path or Shape Path), drag it upward or downward; release when the double line appears in the desired position.
To transform one or more paths:
1. On the Paths panel, select one or more path listings.
2. Do either of the following:
Choose Edit > Free Transform Path (Ctrl-T/Cmd-T).
Choose an option from the Edit > Transform Path submenu (if you choose a rotate or flip option, skip the next step).
3. A transform box displays around the paths. Follow steps 5–6 on pages 348–349.
To delete one or more saved paths:
1. On the Paths panel, click the listing for the path to be deleted, or Ctrl/Cmd click multiple listings.
2. Click the Delete Path button, ![]() then click Yes in the alert dialog (or to bypass the alert, hold down Alt/Option as you click the button).
then click Yes in the alert dialog (or to bypass the alert, hold down Alt/Option as you click the button).
Subpaths within a path listing can be edited individually or as a bloc.
To combine multiple paths into one listing:
Method 1 (Clipboard)
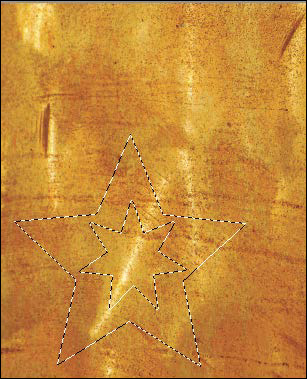
1. On the Paths panel, select one or more path listings, then press Ctrl-C/Cmd-C to copy them.A
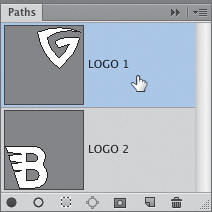
A On the Paths panel, we clicked our “LOGO1” listing, then used the Copy command.
2. Click the listing in which you want the copied paths to appear, then press Ctrl-V/Cmd-V.B
Method 2 (loading a path as a selection)

B We clicked the “LOGO 2” listing, then used the Paste command. Now two subpaths display in the same thumbnail.
1. On the Paths panel, Ctrl-click/Cmd-click to select two or more path listings.
2. Click the Load Path as Selection button ![]() at the bottom of the panel, then click the Make Work Path from Selection button.
at the bottom of the panel, then click the Make Work Path from Selection button. ![]()
3. A new Work Path appears on the panel. Double-click it to save it as a permanent path.
Method 3 (drawing)
1. On the Paths panel, click a path listing.
2. With the Pen, ![]() or Freeform Pen,
or Freeform Pen, ![]() or a shape tool, draw a path.
or a shape tool, draw a path.
![]() To add a Shape Path as a subpath, click the shape layer on the Layers panel, then follow one of the methods above.
To add a Shape Path as a subpath, click the shape layer on the Layers panel, then follow one of the methods above.
When you recolor a path, the color appears as an area of pixels on the current image layer.
To apply a fill and/or stroke color to one or more paths:
1. On the Layers panel, click an image layer or create a new blank layer.
2. Choose a Foreground color.
3. If you’re going to apply a brush to the path stroke (next step), choose a tool that uses brushes, then right-click in the image and choose from the preset picker on the context menu.
4. On the Paths panel, ![]() select one or more path listings, then click the Fill Path with Foreground Color
select one or more path listings, then click the Fill Path with Foreground Color ![]() or Stroke Path with Brush
or Stroke Path with Brush ![]() button.A–B
button.A–B

A We created a blank layer on the Layers panel. Next, on the Paths panel, we clicked a path listing, then clicked the Fill Path with Foreground Color button.

B The area defined by the path filled with pixels.
5. Deselect the path listing(s).
![]() Instead of applying a fill or stroke color, after clicking a path listing in step 4, apply a style via the Styles panel.C
Instead of applying a fill or stroke color, after clicking a path listing in step 4, apply a style via the Styles panel.C

C We applied a style to the new layer (Purple Gel with Drop Shadow style in the Web Styles library).
![]() You can also apply a stroke to a path using any painting or editing tool. Choose a tool and Options bar settings, then Alt-click/Option-click the Stroke Path button on the Paths panel. From the tools menu in the dialog, choose the tool for which you just chose settings, then click OK.
You can also apply a stroke to a path using any painting or editing tool. Choose a tool and Options bar settings, then Alt-click/Option-click the Stroke Path button on the Paths panel. From the tools menu in the dialog, choose the tool for which you just chose settings, then click OK.
To load a path as a selection:
On the Paths panel, do either of the following:
Hold down Ctrl/Cmd and click a path thumbnail.D
Click a path listing, then click the Load Path as Selection button. ![]()
D We loaded a path as a selection.