23. Presentation
In This Chapter
Creating a PDF presentation of images
Creating and using layer comps
Creating a PDF presentation of layer comps
Importing video clips into Photoshop
Adding video tracks to a timeline
Changing the length, order, or speed of a clip
Adding transitions to video clips
Adding still images to a video
Applying adjustment layers and filters to a video
In this chapter, you’ll learn various ways to showcase your images for clients. You will spotlight your subject matter as a vignette; add an artistic border; create a PDF presentation of multiple images; create and present layer comps (layer variations within a single document); and create and edit a video.
Creating a vignette
We’ll show you several ways to create a vignette (lighten or darken the outer part of an image).
To create a white-bordered vignette:
1. Duplicate the Background in an image (Ctrl-J/Cmd-J).
2. Click the Background, then press Shift-Backspace/Shift-Delete. In the Fill dialog, choose Use: White, Mode: Normal, and Opacity: 100%, then click OK.
3. Click the image layer. Choose the Elliptical Marquee tool ![]() (M or Shift-M). To select the area of the image you want to keep visible, drag with Alt/Option held down (to draw the selection from the center).
(M or Shift-M). To select the area of the image you want to keep visible, drag with Alt/Option held down (to draw the selection from the center).
4. On the Layers panel, click the Add Layer Mask button. ![]()
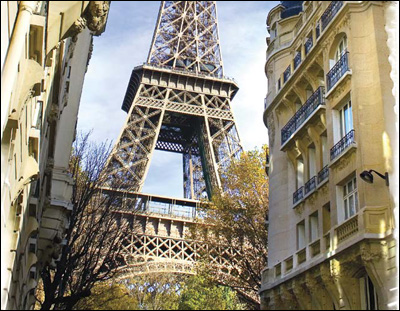
5. On the Properties panel, adjust the Feather value to soften the edge of the mask.A
A An oval, feathered mask gives this garden photo a vintage look.
6. Optional: To reposition the mask to reveal a different part of the image, on the Layers panel, click between the layer and mask thumbnails (the link icon disappears), click the mask thumbnail, then hold down V (temporary Move tool) and drag in the document. Click between the thumbnails to restore the link.
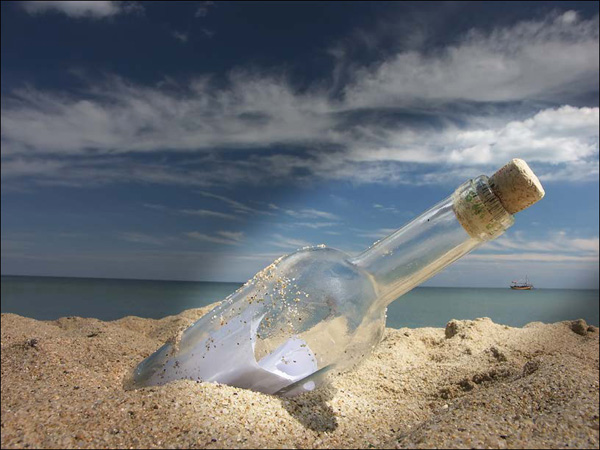
Another way to create a vignette is by manipulating light and dark values. Here you will use the layer mask on a Brightness/Contrast adjustment layer to control where a bright area is located in an image. The effect is like shining a spotlight.
To create a vignette via a tonal adjustment and mask:
1. Choose the Elliptical Marquee tool ![]() (M or Shift-M), then drag with Alt/Option held down to select the area of the image you want to feature (Alt/Option draws the selection from the center).
(M or Shift-M), then drag with Alt/Option held down to select the area of the image you want to feature (Alt/Option draws the selection from the center).
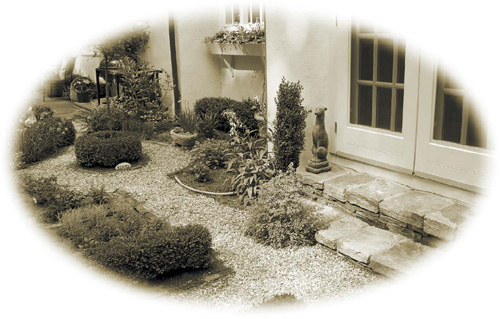
2. Optional: To transform the selection (e.g., rotate it), choose Select > Transform Selection, and follow steps 5–6 on pages 348–349.A
A We created an elliptical selection, then rotated it via the Select > Transform Selection command.
3. On the Adjustments panel, ![]() click the Brightness/Contrast button.
click the Brightness/Contrast button. ![]() Press Ctrl-I/Cmd-I to invert the adjustment layer mask, then on the Properties panel, lower the Brightness value to darken the unmasked areas.
Press Ctrl-I/Cmd-I to invert the adjustment layer mask, then on the Properties panel, lower the Brightness value to darken the unmasked areas.
4. To soften the edge of the mask, click the Masks icon ![]() on the Properties panel, then increase the Feather value.B
on the Properties panel, then increase the Feather value.B
B Next, we applied a Brightness/Contrast adjustment, inverted the mask, then softened the edge of the mask via the Feather slider.
5. To reposition the mask to spotlight a different part of the image, on the Layers panel, click between the layer and mask thumbnails (the link icon disappears), click the mask thumbnail, then hold down V (temporary Move tool) and drag in the document. Click to restore the link.C–D
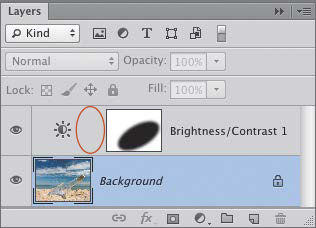
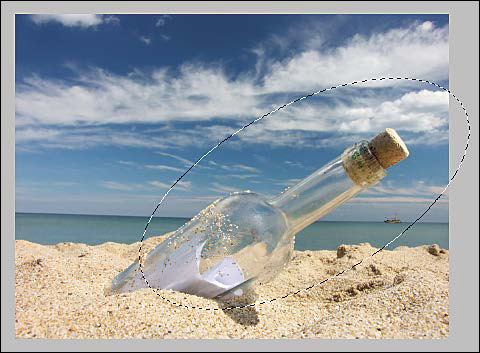
C We clicked between the adjustment layer and mask thumbnails to remove the Link icon, then with the Move tool, we dragged the layer mask slightly to the left.
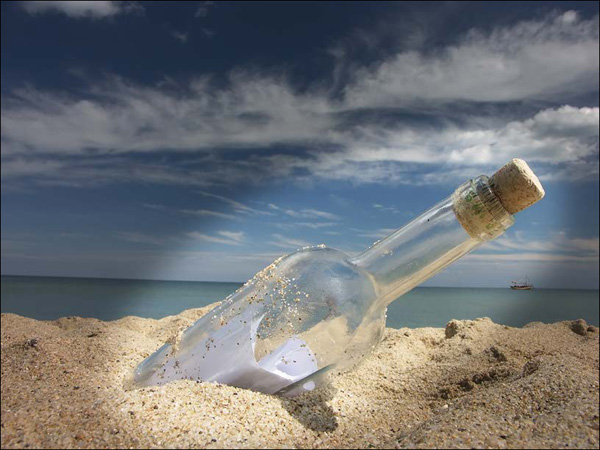
D Now the mask is positioned better on the bottle.
![]() For other ways to create a vignette, choose Filter > Camera Raw Filter, then use either the Radial Filter tool (see pages 88–89) or the Post Crop Vignetting controls in the Effects tab (see page 85).
For other ways to create a vignette, choose Filter > Camera Raw Filter, then use either the Radial Filter tool (see pages 88–89) or the Post Crop Vignetting controls in the Effects tab (see page 85).
A third way to create a vignette is by using the Vignette controls in the Lens Correction filter dialog. With this method, you can’t control where the vignette is positioned, but it’s quick and easy, and if you apply it to a Smart Object, you can edit the settings at any time.
To create a vignette via the Lens Correction filter:
1. Duplicate the Background in an RGB image.A
A This is the original image.
2. Right-click the duplicate layer and choose Convert to Smart Object.
3. Choose Filter > Lens Correction (Ctrl-Shift-R/Cmd-Shift-R). At the bottom of the dialog, check Preview and uncheck Show Grid.
4. Click the Custom tab, then under Vignette, do the following: B
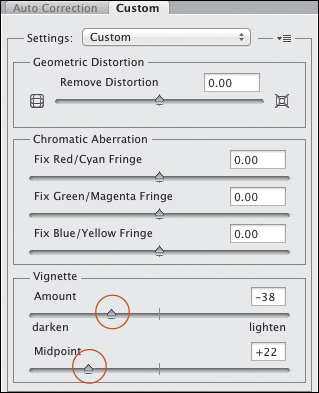
B We chose these values in the Custom tab of the Lens Correction dialog.
Choose a negative Amount to darken the outer part of the layer.
Adjust the Midpoint value to control where the darkening effect begins in the image (you may need to readjust the Amount value afterward).
5. Click OK.C To edit the Lens Corrections settings at any time, double-click the Lens Correction listing on the Layers panel.
C This is the result.
Adding an artistic border
Using controls in the Refine Edge dialog, it’s super easy to add an artistic border to an image.
To add an artistic border to an image:
1. Click the Background on the Layers panel.
2. Choose the Rectangular Marquee tool ![]() (M or Shift-M), then draw a selection within the image where you want the inner part of the border to begin.A You can reposition the selection border with the same tool.
(M or Shift-M), then draw a selection within the image where you want the inner part of the border to begin.A You can reposition the selection border with the same tool.
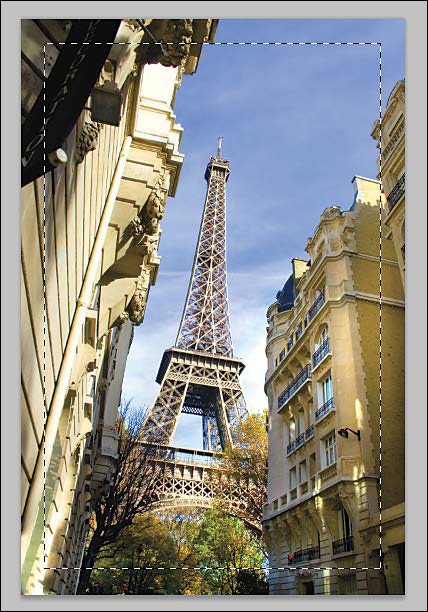
A We created a rectangular selection.
3. On the Options bar, click Refine Edge.
4. In the dialog, choose View: On White (W), then adjust the Radius, Smooth, Contrast, and Shift Edge values to create rough edges that you like.B
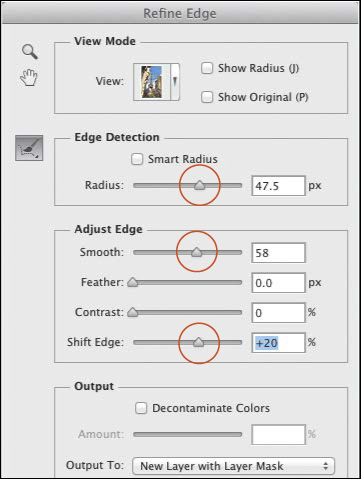
B We chose these settings in the Refine Edge dialog.
5. From the Output To menu, choose New Layer with Layer Mask, then click OK.C
C So easy!
6. Click the Background, make it visible, then press Shift-Backspace/Shift-Delete. In the Fill dialog, choose Use: White, Mode: Normal, and Opacity: 100%, then click OK.
![]() The actions in the Frames library apply various kinds of frames. Apply to a one-layer document.
The actions in the Frames library apply various kinds of frames. Apply to a one-layer document.
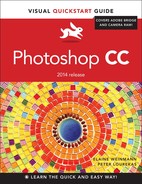
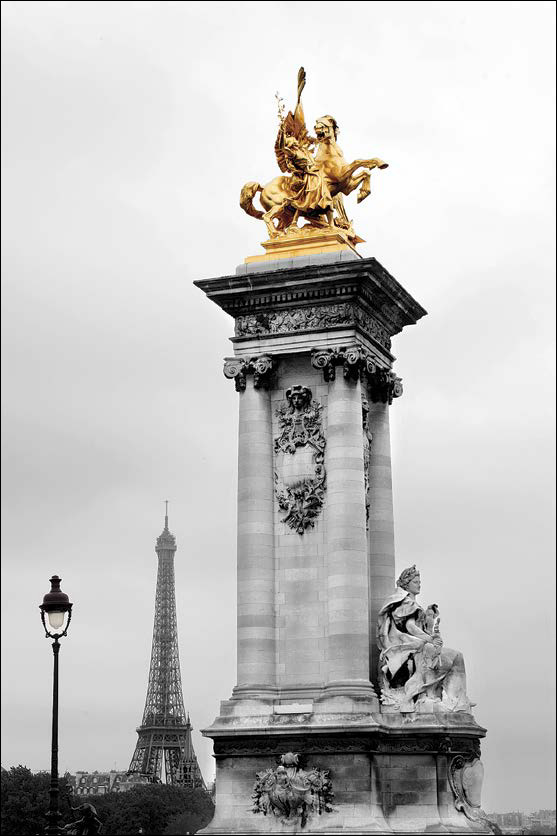
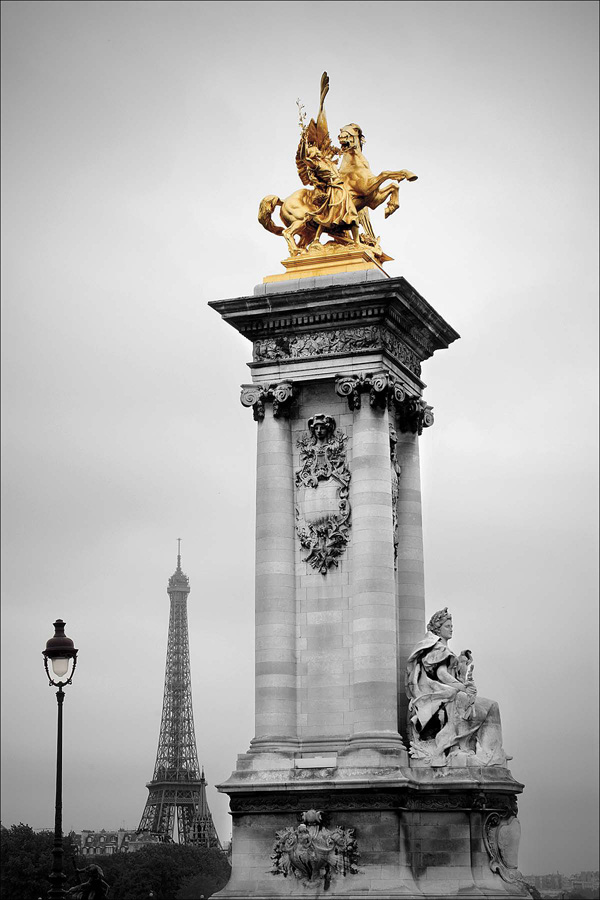
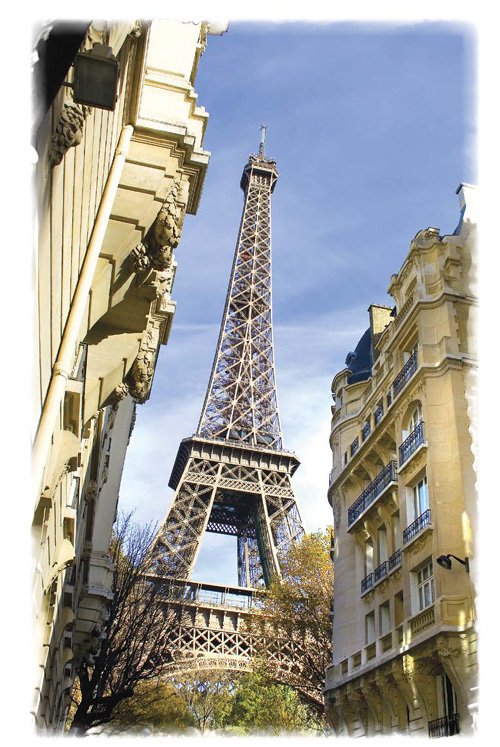
Using Artistic Borders in a Montage
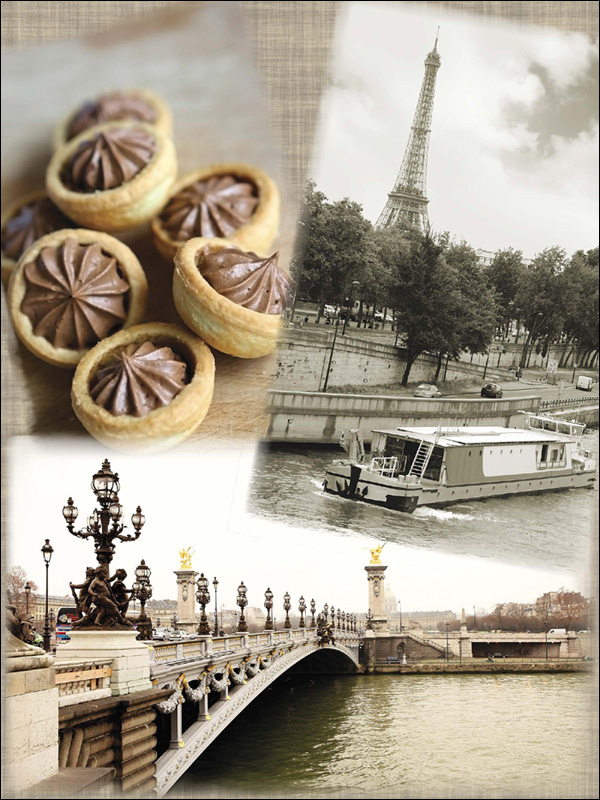
To create this Paris montage, we created a border in each image separately in its own file, using the technique described on the preceding page. We dragged each image layer into a larger document, which contains a photo of burlap as the Background image. To complete the composition, we scaled and repositioned the layers, then rotated two of them.
Creating a PDF presentation of images
An easy way to package and send files to a client or friend is via a PDF presentation, in which images play sequentially onscreen. To view the presentation in Adobe Reader or one of the Adobe Acrobat programs, all the viewer has to do is double-click the PDF file icon.
To create a PDF presentation of images:
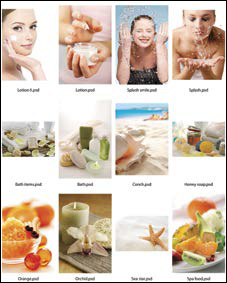
1. In Bridge, put all the image files for the presentation in the same folder.
2. In Photoshop, choose File > Automate > PDF Presentation. The PDF Presentation dialog opens.
3. Click Browse, navigate to the folder you set up in step 1, Ctrl-click/Cmd-click some or all of the file names, then click Open.
4. Optional: Drag a file name up or down on the list to change the order in which the files display in the presentation. (To remove a file from the list, click the file name, then click Remove.)
5. Under Output Options, do the following:
Click Save As: Multi-Page Document to place each source image as a page in the PDF file, or click Presentation to create both a multipage PDF document and a slideshow. A
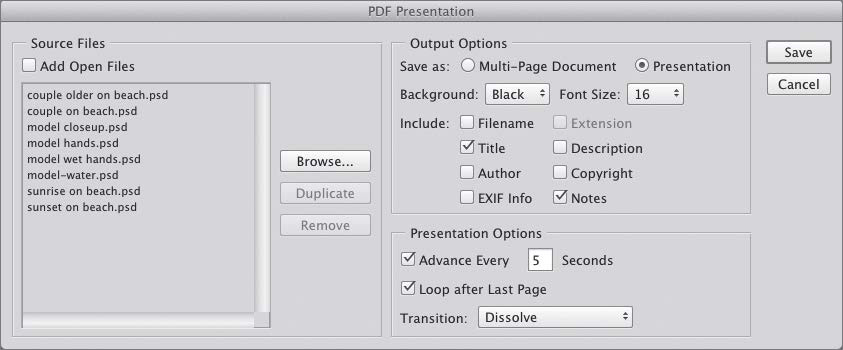
A In the PDF Presentation dialog, we clicked Presentation to have Photoshop produce both a multipage PDF document and a slideshow from the images in the selected folder.
Choose Background: White, Gray, or Black for the color to be displayed behind the images.
Under Include, check the categories of text that you want to appear below each image (to be taken from the metadata in the file), and choose a Font Size for the text.
6. If you clicked the Presentation option, you can choose these options:
To have frames advance automatically, check Advance Every, then enter the duration (in Seconds) that you want each frame to display.
To have the slideshow loop continuously, check Loop After Last Page (after the last frame displays, the show replays from the first frame).
Optional: To display a transition effect between frames, choose a Transition option (e.g., Dissolve or Wipe Right).
7. Click Save. In the Save dialog, enter a file name, choose a location, then click Save.
8. The Save Adobe PDF dialog opens. Check View PDF After Saving to have Adobe Reader or an Acrobat program launch automatically when you exit the dialog. Click Save PDF.
Depending on which Save As option you clicked in step 5, Photoshop will take a few moments to produce just a multipage document, or a multipage document plus a presentation (slideshow). If you chose the latter option, an alert pertaining to full-screen mode may appear; click Yes. The slideshow will play onscreen. A To end the show at any time, press Esc. For both Save As options, the new multipage document will open onscreen in Adobe Reader or in one of the Acrobat programs. B
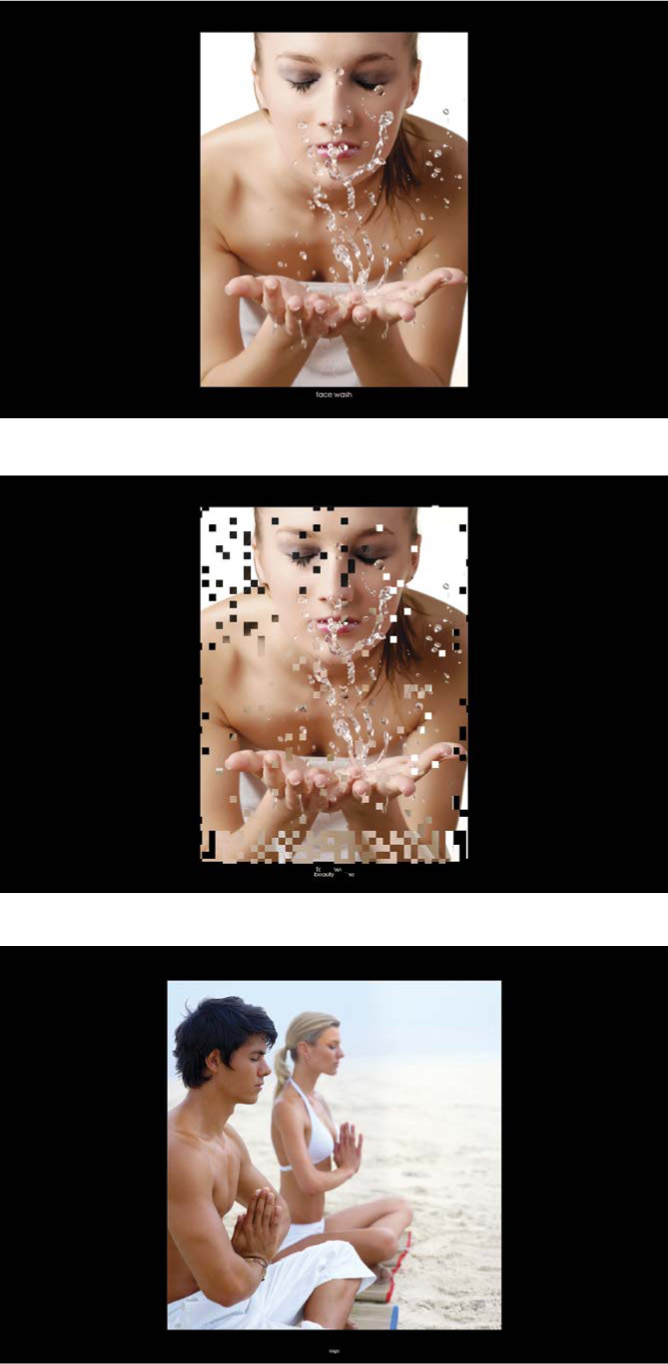
A The Presentation option produced this full-screen slideshow (we chose the Transition option of Glitter Down).
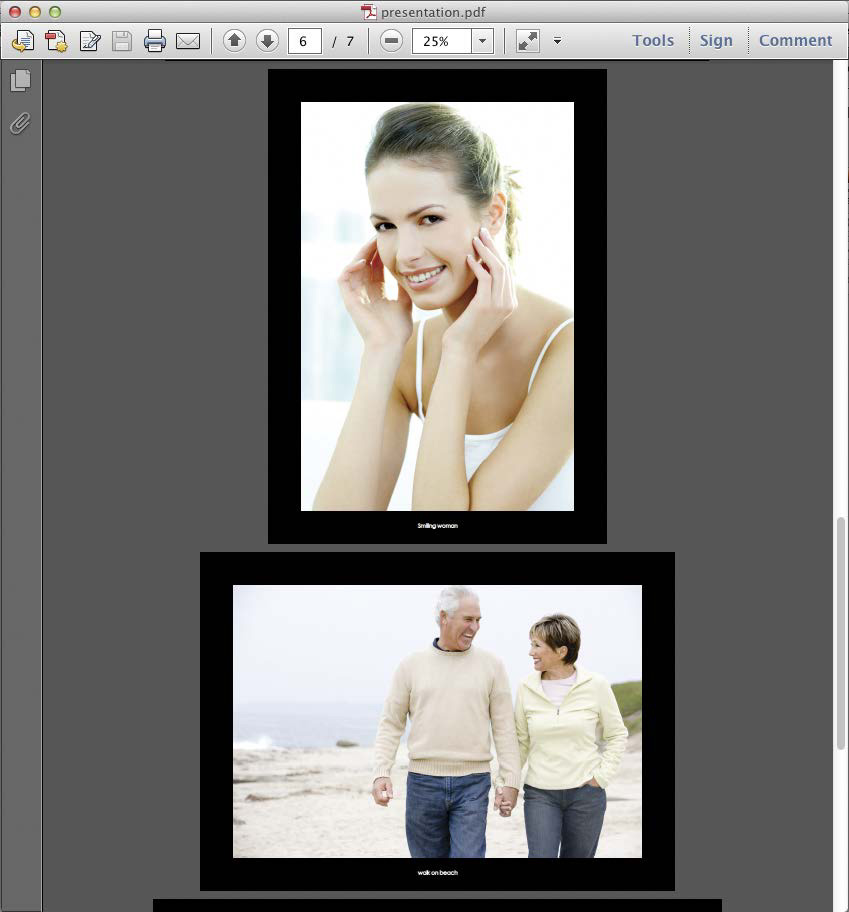
B Both the Multi-Page Document and Presentation options produce a multipage document. This document is being displayed in Adobe Reader.
Creating A contact Sheet
Creating and using layer comps
A layer comp, short for “composition,” is a record of a state of the layers in a document. Categories of settings that can be saved in a comp include layer visibility, position, and styles. Using layer comps, you can quickly display different design variations within one file, say, as a way to compare them, or as a way to present them to colleagues or clients. Layer comps are saved to, and displayed via, the Layer Comps panel.
To create a layer comp:
1. Create design variations within your document using multiple image, type, shape, fill, or adjustment layers, or Smart Objects. The layers can have the usual characteristics, such as masks, Smart Filters, blending modes, and effects.
2. To create a comp, for each layer in the document, do any of the following: Choose a visibility setting, a position (location), and layer style settings (blending mode, Opacity setting, etc.).
3. Show the Layer Comps panel, ![]() A then click the New Layer Comp button
A then click the New Layer Comp button ![]() at the bottom of the panel. The New Layer Comp dialog opens.B
at the bottom of the panel. The New Layer Comp dialog opens.B
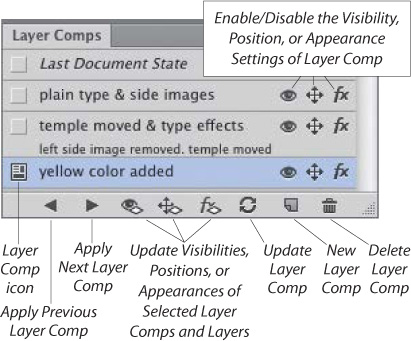
A Use the Layer Comps panel to create, store, show, edit, update, and delete layer comps.
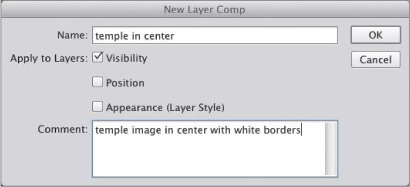
B In the New Layer Comp dialog, we typed a Name, checked Visibility to save just that layer characteristic in the comp, and entered a comment for the viewer to read on the panel.
4. Enter a Name, then check the categories of layer settings that you want saved in the comp: Visibility, Position, and/or Appearance (Layer Style).
5. Optional: Enter text in the Comment field, such as an explanatory note, to appear only on the panel.
6. Click OK.C To create more comps from different design variations, repeat steps 2–6 (e.g., hide or show different layers, move the content of a layer, or change the layer style settings).
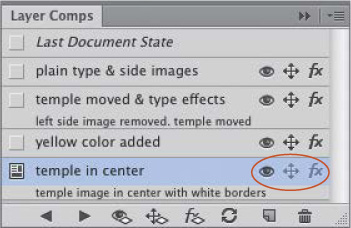
C Our new comp appeared on the panel. Note that only its Visibility button is enabled.
![]() To change which categories of layer settings are stored (and therefore displayed) in a comp, or to add or edit the Comment data, double-click to the right of the comp name; the Layer Comp Options dialog opens. To enable or disable a category for a comp without opening the dialog, click the Layer Comp Visibility,
To change which categories of layer settings are stored (and therefore displayed) in a comp, or to add or edit the Comment data, double-click to the right of the comp name; the Layer Comp Options dialog opens. To enable or disable a category for a comp without opening the dialog, click the Layer Comp Visibility, ![]() Layer Comp Position,
Layer Comp Position, ![]() or Layer Comp Appearance
or Layer Comp Appearance ![]() button within the comp listing.
button within the comp listing. ![]()
To display a layer comp:
Do either of the following:
On the Layer Comps panel, click a blank square in the left column. The Layer Comp icon ![]() moves to that slot.
moves to that slot.
To cycle through the comps on the panel, click the Apply Next Selected Layer Comp button ![]() or Apply Previous Selected Layer Comp
or Apply Previous Selected Layer Comp ![]() button.A
button.A

A The variations shown above are layer comps (document variations) within a single image.
Let’s say that after creating some layer comps in a document, you edit your document further, then display a comp. If you want to restore the document to its state before you displayed the comp, do the following.
To restore the last document state:
On the Layer Comps panel, ![]() do either of the following:
do either of the following:
Click in the left column next to the Last Document State listing.
Right-click a layer comp and choose Restore Last Document State.
You can update one or more layer comps to include edits that you have made to layers in your document.
To apply layer edits to one or more layer comps: ![]()
1. On the Layer Comps panel, ![]() make sure the layer comp to be edited has the Layer Comp icon
make sure the layer comp to be edited has the Layer Comp icon ![]() (click in the leftmost column).
(click in the leftmost column).
2. Change the visibility setting, position, or layer style settings of one or more layers. You can also edit exisiting layers, or add and edit new layers.
3. Do either of the following:
To update just the layer comp you edited, click that comp listing. Optionally, if you want to prevent Photoshop from updating any category of settings for a layer comp, deactivate its Layer Comp Visibility, ![]() Layer Comp Position,
Layer Comp Position, ![]() or Layer Comp Appearance
or Layer Comp Appearance ![]() button. Finally, click the Update Layer Comp button
button. Finally, click the Update Layer Comp button ![]() at the bottom of the panel, or right-click the layer comp and choose Update Layer Comp from the context menu.
at the bottom of the panel, or right-click the layer comp and choose Update Layer Comp from the context menu.
To sync (apply) your edits to multiple layer comps, select all the layers you edited. Next, hold down Ctrl/Cmd and click the comps to which you want to sync your edits. Finally, click one or more of these buttons at the bottom of the panel: Update Visibilities of Selected Layer Comps and Layers, ![]() Update Positions of Selected Layer Comps and Layers,
Update Positions of Selected Layer Comps and Layers, ![]() or Update Appearances of Selected Layer Comps and Layers.
or Update Appearances of Selected Layer Comps and Layers. ![]() Alternatively, to access the update commands via a context menu, right-click one of the selected layer comps.
Alternatively, to access the update commands via a context menu, right-click one of the selected layer comps.
![]() If you add new layers to a document and you want to apply that addition to the currently selected layer comp, click the Update Layer Comp button.
If you add new layers to a document and you want to apply that addition to the currently selected layer comp, click the Update Layer Comp button. ![]() Or to sync the addition of layers to multiple comps, select the new layers on the Layers panel; next, on the Layer Comps panel, select multiple comps, then click the Update Visibilities of Selected Layer Comps and Layers button.
Or to sync the addition of layers to multiple comps, select the new layers on the Layers panel; next, on the Layer Comps panel, select multiple comps, then click the Update Visibilities of Selected Layer Comps and Layers button. ![]()
![]() When you place an image that contains layer comps into a Photoshop document as a Smart Object, you can specify which comp will display in the document. See step 4 on page 272.
When you place an image that contains layer comps into a Photoshop document as a Smart Object, you can specify which comp will display in the document. See step 4 on page 272.
![]() To rename a comp, double-click its name.
To rename a comp, double-click its name.
If you change the layer count in an image (e.g., delete or merge layers or convert a layer to a Smart Object), and the image contains layer comps, an alert icon, ![]() indicating that the “Layer Comp Cannot Be Fully Restored,” will appear next to the names of any comps that are missing data. Follow either option below to remove the alert icon(s) and sync the comp(s) with the layers’ current status. Deleted layers won’t be retrieved.
indicating that the “Layer Comp Cannot Be Fully Restored,” will appear next to the names of any comps that are missing data. Follow either option below to remove the alert icon(s) and sync the comp(s) with the layers’ current status. Deleted layers won’t be retrieved.
To clear an alert icon from a layer comp:
Do either of the following:
Click a layer comp that has an alert icon, then click the icon. If an alert dialog appears, click Clear.
Right-click the alert icon and choose Clear Layer Comp Warning (or to clear all the alert icons, choose Clear All Layer Comp Warnings instead).
When you delete a layer comp, no layers are deleted, and the appearance of the document is preserved.
To delete a layer comp:
1. On the Layer Comps panel, ![]() click the listing for the layer comp to be deleted.
click the listing for the layer comp to be deleted.
2. Click the Delete Layer Comp button ![]() on the panel, or right-click the comp listing and choose Delete Layer Comp from the context menu.
on the panel, or right-click the comp listing and choose Delete Layer Comp from the context menu.
Creating a PDF presentation of layer comps
Via the Layer Comps to PDF script, you can produce a PDF presentation of the layer comps in your document, which any viewer can watch as a slideshow in an Acrobat program, such as Adobe Reader.
To create a PDF presentation of layer comps:
1. Open a Photoshop file that contains layer comps.
![]() To create the PDF presentation from select layer comps in your document (instead of all of them), Ctrl-click/Cmd-click those listings.
To create the PDF presentation from select layer comps in your document (instead of all of them), Ctrl-click/Cmd-click those listings.
2. Choose File > Scripts > Layer Comps to PDF. The Layer Comps to PDF dialog opens.A
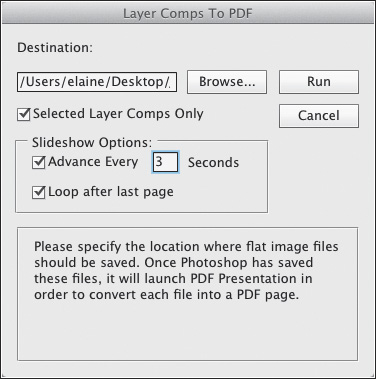
A In the Layer Comps to PDF dialog, choose a destination folder and options for the PDF slideshow.
3. Click Browse. In the Save As dialog, enter a file name and choose a location for the PDF file, then click Save.
4. If you selected some layer comps in step 1, check Selected Layer Comps Only.
5. Under Slideshow Options, check Advance Every [ ] Seconds to let the comps advance automatically, and enter a time value.
Optional: Check Loop After Last Page to allow the slideshow to replay continuously (after the last frame displays, the show will replay from the first frame).
6. Click Run. Pause while the script produces a PDF file from your document. When it’s done processing, an alert dialog will appear, indicating that the script was successful. Click OK.
7. In Bridge or your Desktop, locate and double-click the PDF file. One of the Acrobat programs will launch, such as Adobe Reader, Acrobat XI Standard, or Acrobat XI Pro. If an alert pertaining to Acrobat appears, click Yes.
8. The PDF file will open onscreen, then the slideshow will play. (To halt the show, press Esc.)
Importing video clips into Photoshop
Using the Timeline panel in Photoshop,A you can edit video that is shot with a digital camera or other input device. Although the controls in Photoshop won’t replace stand-alone video applications, they do provide basic editing features. As an added bonus, many of the Photoshop features that you have learned to apply to still photos can also be applied to video, such as filters and adjustments. The first step is to set up your Photoshop workspace for video editing.
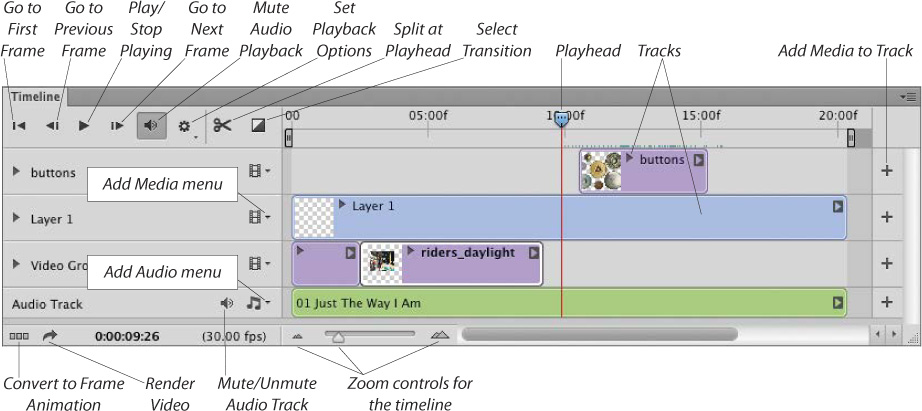
A The Timeline panel is used for video editing in Photoshop.
To set up the Photoshop workspace for video editing:
1. Choose Window > Workspace > Motion. By default, the Timeline panel is docked at the bottom of the Application frame. You can leave it there or drag it out of the frame.
2. On the Timeline panel menu, check Enable Timeline Shortcut Keys.
3. From the Timeline panel menu, choose Panel Options. In the Animation Panel Options dialog, click Timeline Units: Timecode, then click OK.
![]() To reopen the Timeline panel if it’s not showing, choose Window > Timeline.
To reopen the Timeline panel if it’s not showing, choose Window > Timeline.
![]() To enlarge the Timeline panel if it’s docked, drag the top of the panel (the dark line) upward. If the panel isn’t docked, drag a side, bottom, or corner.
To enlarge the Timeline panel if it’s docked, drag the top of the panel (the dark line) upward. If the panel isn’t docked, drag a side, bottom, or corner.
Learning the Video Lingo
![]() The work area in which you edit a video project in Photoshop is called the timeline.
The work area in which you edit a video project in Photoshop is called the timeline.
![]() Each video file that you open into Photoshop is called a video clip. Each video clip displays as a blue bar on the Timeline panel.
Each video file that you open into Photoshop is called a video clip. Each video clip displays as a blue bar on the Timeline panel.
![]() Each horizontal row (labeled Video Group) on the timeline is called a track. A track can contain one or more video clips and/or title clips (type). Audio clips are on separate tracks, and display as green bars.
Each horizontal row (labeled Video Group) on the timeline is called a track. A track can contain one or more video clips and/or title clips (type). Audio clips are on separate tracks, and display as green bars.
![]() Each split-second image within a video clip is called a frame. The first frame of each clip is shown in a thumbnail on the Timeline panel.
Each split-second image within a video clip is called a frame. The first frame of each clip is shown in a thumbnail on the Timeline panel.
![]() The Playhead (blue marker atop the red vertical line) designates the frame at which a video will begin to play.
The Playhead (blue marker atop the red vertical line) designates the frame at which a video will begin to play.
![]() Effects that are used to blend the end of one clip to the beginning of the next are called transitions.
Effects that are used to blend the end of one clip to the beginning of the next are called transitions.
![]() The markers that designate where changes in a frame sequence begin and end are called keyframes.
The markers that designate where changes in a frame sequence begin and end are called keyframes.
![]() The process by which all the clips in the timeline are combined into a movie is called rendering.
The process by which all the clips in the timeline are combined into a movie is called rendering.
Photoshop can import standard and high-definition video files in many popular formats. When you edit a video, your edits are stored in a Photoshop document; the original video file isn’t altered. As a last step before playing your final video, you will need to render it (see page 456).
To import a video file into a new Photoshop document:
1. Close all open Photoshop documents, then do either of the following:
From Bridge, drag a video file thumbnail into the Application frame in Photoshop.
On the Timeline panel in Photoshop, ![]() choose Add Media from the Add Media menu
choose Add Media from the Add Media menu ![]() or, at the right end of the timeline, click the Add Media to Track button.
or, at the right end of the timeline, click the Add Media to Track button. ![]() In the Add Clips dialog, select one or more clip files, then click Open.
In the Add Clips dialog, select one or more clip files, then click Open.
2. If an alert regarding the pixel aspect ratio appears, click OK. On the View menu, uncheck View > Pixel Aspect Ratio Correction. A new document appears in Photoshop. The video clip appears on the Layers panel within a Video Group listing,A and on the Timeline panel as a blue bar.B The first frame of the clip displays as a thumbnail within the bar.
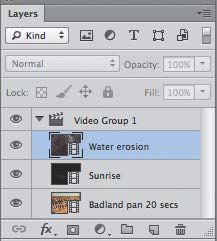
A The three clips that we added to a Video Group are listed on the Layers panel.

B This Timeline panel is showing the same Video Group as on the Layers panel. The three layers display as clips in one track.
3. Optional: Add more clips via the Add Media menu (not via dragging). They will appear from left to right on the timeline in the sequence in which you import them.
Note: Once you have imported a video into a Photoshop file, don’t move the original video file, or the link to that file will be broken.
4. Save your file in the Photoshop format — and remember to save it periodically while editing it.
![]() As your video becomes more complex, you will need to drag the scroll bar horizontally on the panel in order to view the clips.
As your video becomes more complex, you will need to drag the scroll bar horizontally on the panel in order to view the clips.
Adding video tracks to a timeline
By default, clips that you add to a timeline appear within the currently selected Video Group (track), and are also listed on the Layers panel. The first clip in a track corresponds to the bottommost layer on the Layers panel, and plays back first. If you want clips to play simultaneously, such as a title clip on top of video footage, you need to put them on separate tracks.
To add a track to the timeline:
1. From the Add Media menu ![]() on the Timeline panel, choose New Video Group. A new Video Group appears on both the Timeline and Layers panels.
on the Timeline panel, choose New Video Group. A new Video Group appears on both the Timeline and Layers panels.
2. Drag a video clip from another track (Video Group) into the new track, or import it via the Add Media menu ![]() or the Add Media to Track button.
or the Add Media to Track button. ![]()
Changing the length, order, or speed of a clip
One of the first edits you should make to a video is to trim off any excess footage.
To trim a clip by dragging:
Position the pointer over either end of a clip (the Trim cursor appears ![]() ), then drag inward to shorten the clip.A
), then drag inward to shorten the clip.A
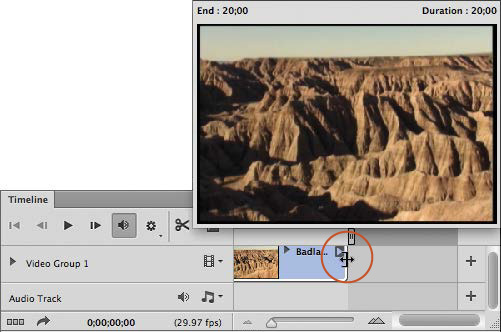
A As we dragged the end of a clip to shorten it, the frame at which the clip would end displayed temporarily in a trim window.
As you trim the clip, the frame at which the clip will begin or end displays temporarily in what is called a trim window. The current Start or End position of the Trim cursor on the timeline is also listed in the window, as well as the Duration (length) of the clip.
![]() Trimmed frames aren’t deleted. To retrieve trimmed frames at any time, drag the start or end of the clip outward.
Trimmed frames aren’t deleted. To retrieve trimmed frames at any time, drag the start or end of the clip outward.
To specify the length or speed of a clip via a panel:
1. To display the temporary Video panel, right-click a clip or click the arrowhead at the end of the clip.B
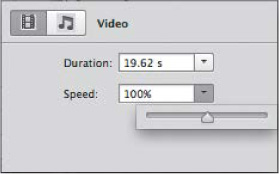
B We right-clicked a clip to display this Video panel, then chose new Duration and Speed settings.
2. Do either or both of the following:
To adjust the length of the clip, click the Duration arrowhead, then adjust the slider; or enter a value in the field.
To adjust the speed at which the clip plays, click the Speed arrowhead, then adjust the slider; or enter a value in the field. Any audio in the clip will be muted, as the change in speed will cause audio distortion. A high Speed value will shorten the Duration.
To change the order of clips in a track:
Do either of the following:
On the Timeline panel, ![]() drag a clip to the left or right, either between two other clips or to the beginning or end of its track, and release when the vertical black bar or rectangle displays.
drag a clip to the left or right, either between two other clips or to the beginning or end of its track, and release when the vertical black bar or rectangle displays.
On the Layers panel, ![]() drag a clip layer upward or downward. The clip that is listed at the bottom of a Video Group plays first.
drag a clip layer upward or downward. The clip that is listed at the bottom of a Video Group plays first.
To delete a clip or track:
Do either of the following:
On the Timeline panel, click a Video Group listing or a clip (colored bar), then press Backspace/Delete.
On the Layers panel, expand a Video Group listing, click a clip layer, then press Backspace/Delete.
Playing or reviewing a video
Any time you edit a timeline, you can preview the results by doing either of the following:
To play your video at normal playback speed, press the Play button on the Timeline panel. ![]() Had enough? To stop the playback, press the button again
Had enough? To stop the playback, press the button again ![]() (same button, different icon).
(same button, different icon).
If you want to review just a section of your video (a process called scrubbing), simply drag the Playhead along that section of the timeline.
![]() From the Set Playback Options menu,
From the Set Playback Options menu, ![]() you can choose a resolution for the playback quality.
you can choose a resolution for the playback quality.
![]() To mute the audio in all video clips, click the Mute Audio Playback button at the top of the Timeline panel.
To mute the audio in all video clips, click the Mute Audio Playback button at the top of the Timeline panel. ![]() To mute the audio in just one video clip, right-click the clip, click the Audio icon,
To mute the audio in just one video clip, right-click the clip, click the Audio icon, ![]() then check Mute Audio on the temporary panel.
then check Mute Audio on the temporary panel.
Splitting a clip
When you split a clip into sections, an insertion point is created between them, into which you can add other clips. Optionally, you can move or delete any of the sections that result from the split.
To split a clip:
1. On the Timeline panel, click a clip.
2. Drag the Playhead (the blue marker at the top of the red line) over the frame at which you want to split the clip.
3. Click the Split at Playhead button. ![]() A
A
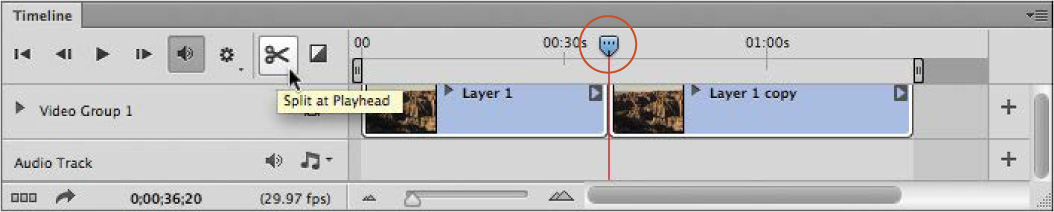
A To split a selected clip, we moved the Playhead to the desired position, then clicked the Split at Playhead button.
4. Optional: To split the clip further, repeat steps 2–3.B
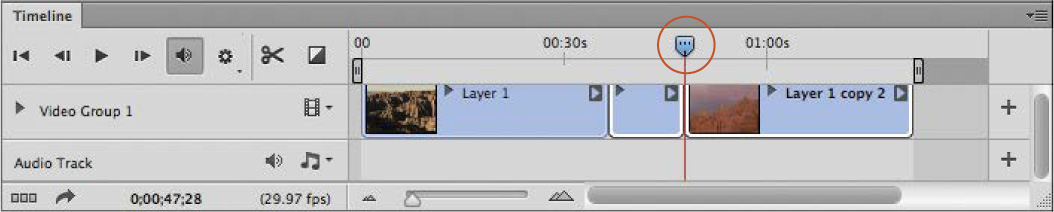
B To split the clip once more, we moved the blue Playhead further along the timeline. Because we split the clip, we now have the option to delete any unwanted sections or move a section to a different track.
You can click any section that results from a split, then drag it to a new location within the same track or into another track, or press Backspace/Delete to remove it. Any resulting gap in the track will close automatically.
![]() When you split a clip, although each new section looks shorter (and plays for less time), it still contains all the original video footage. If you decide you want to include more frames in one of the clips, position the pointer over either end of it (the Trim cursor appears), then drag to lengthen it.
When you split a clip, although each new section looks shorter (and plays for less time), it still contains all the original video footage. If you decide you want to include more frames in one of the clips, position the pointer over either end of it (the Trim cursor appears), then drag to lengthen it.
Adding transitions to video clips
Although video editors sometimes use a “jump cut” (abrupt transition) between scenes to convey a sense of action and energy, a smoother transition, such as a fade, creates a more gentle segue between clips, and can be used to convey the passage of time.
To add a transition to a clip:
1. On the Timeline panel, click the Transition button, ![]() then drag a transition from the temporary panel to the start or end of any clip (A), or between two clips to have the transition apply to the end of the first clip and the beginning of the second one.
then drag a transition from the temporary panel to the start or end of any clip (A), or between two clips to have the transition apply to the end of the first clip and the beginning of the second one.
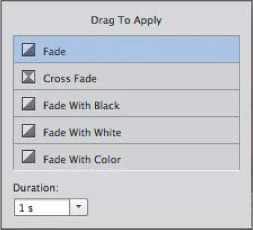
A We clicked the Transition button on the Timeline panel to open this temporary panel. Our next step will be to drag an option from the panel to a clip on our timeline.
2. To change the transition style, right-click the transition ramp ![]() in the lower-left or lower-right corner of the clip and choose a different option from the menu on the temporary Transition panel.
in the lower-left or lower-right corner of the clip and choose a different option from the menu on the temporary Transition panel.
To adjust the duration of a transition:
Do either of the following:
Position the cursor over the transition ramp ![]() on the clip, then drag inward to shorten the effect or back outward to lengthen it (you’ll see the Trim cursor) (B).
on the clip, then drag inward to shorten the effect or back outward to lengthen it (you’ll see the Trim cursor) (B).
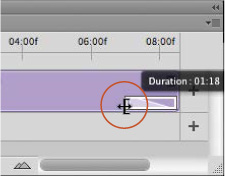
B We’re dragging a transition ramp to change its duration.
Right-click the transition ramp on the clip to display a temporary Transition panel, then change the Duration value via the slider or field.
Adding still images to a video
You can also add still images to a timeline, then have them “come to life,” making them pan, zoom, or rotate. You can play a still image on top of a video track, or import a series of still image clips into one track to be played in succession, like a slideshow.
To add a still image to a video:
1. Save a copy of a photo, then use the Image Size dialog to change its resolution to 72 ppi.
2. On the Timeline panel, click a Video Group, then from the Add Media menu, ![]() choose Add Media.
choose Add Media.
3. The Add Clips dialog opens. Click a still image, then click Open. The still image will appear as a new purple bar on the timeline.
4. Optional: Drag the Playhead over the image clip, then press Ctrl-T/Cmd-T (if you don’t see all the transform handles, press Ctrl-0/Ctrl-0). Shift-drag a corner handle to scale the image to the desired size, then double-click in the transform box.
5. Optional: Each still image is assigned a default play interval of 5 seconds. You can adjust that interval by dragging its edge.
![]() For the most flexibility in trimming and positioning a still image clip, create a new track (see page 450), then drag the clip to that track.
For the most flexibility in trimming and positioning a still image clip, create a new track (see page 450), then drag the clip to that track.
To apply a motion effect to a still image:
To open a temporary Motion panel, right-click a still image clip or click its arrowhead. Choose an option from the first menu,C then choose other applicable settings, such as the angle for a pan or the origin for a zoom.
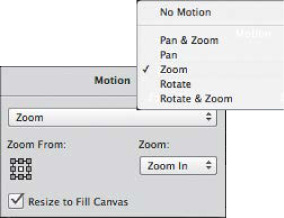
C We’re choosing Zoom as the motion option from the top menu on the Motion panel.
Adding title clips to a video
The addition of titles to a video adds a professional touch, and sometimes essential information. Just make sure your titles are concise, carefully kerned, and easy to read. Avoid using serif fonts, which can become fuzzy on a low-resolution monitor, and the color red, which can smear or bleed onscreen.
To add a title clip to a video:
1. On the Timeline panel, position the Playhead where you want the title to appear.
2. With the Horizontal Type tool, create an editable type layer. The type layer will appear within the currently selected Video Group on the Layers panel and as a purple clip on the Timeline panel.
To have a title clip play on top of a video clip:
1. Do either of the following:
Create a new track above all the other tracks (see page 450), then drag the title clip into that group.
On the Layers panel, drag the type layer to the top of the layer stack.
2. Optional: To extend the duration that the title clip plays, drag its right edge. (The maximum duration is the current length of the timeline.)
You can apply a motion effect to a title clip to make it less static, just as you can to a still image.
To apply motion to a title clip:
Follow the second task at left. If you want the title to fill the entire screen when the video plays, check Resize to Fill Canvas on the Motion panel.
Applying adjustment layers and filters to a video
You can apply any Photoshop adjustment command to a clip or track, or to the whole timeline. By default, each adjustment layer is clipped to, and only affects, the clip directly below it. If desired, you can expand the adjustment to affect all the clips in the Video Group or to all the tracks on the timeline. The adjustment layer settings can be edited at any time.
To apply an adjustment layer to one clip:
1. On the Layers panel or the Timeline panel, click the clip to be adjusted, then on the Timeline panel, drag the Playhead over that clip.
2. Create an adjustment layer (via the Adjustments or Layers panel) and choose settings in the Properties panel. Try applying a Color Lookup adjustment, ![]() which adds Hollywood movie-like effects.
which adds Hollywood movie-like effects.
To apply an adjustment layer to all the clips in a Video Group:
1. On the Layers panel or Timeline panel, click a Video Group.
2. Create an adjustment layer.
3. To unclip the adjustment layer, on the Layers panel, Alt-click/Option-click the line between the clip layer and the adjustment layer. If the adjustment layer isn’t at the top of its Video Group, drag it upward to that stacking position.
Note: The adjustment clip won’t display as a clip on the timeline (unless you follow the steps in the next task).
To apply an adjustment layer to all the tracks in a timeline:
1. On the Layers panel, do the following:
Click the topmost Video Group.
If you haven’t already done so, create an adjustment layer.
Drag the adjustment layer above (and outside of) its original Video Group.A
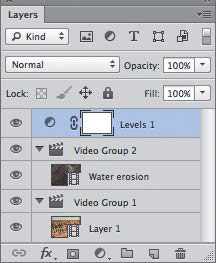
A On the Layers panel, we dragged an adjustment layer out of a Video Group.
2. On the Timeline panel, the adjustment clip will appear in a new track. To adjust its duration, drag its right edge to the right.B
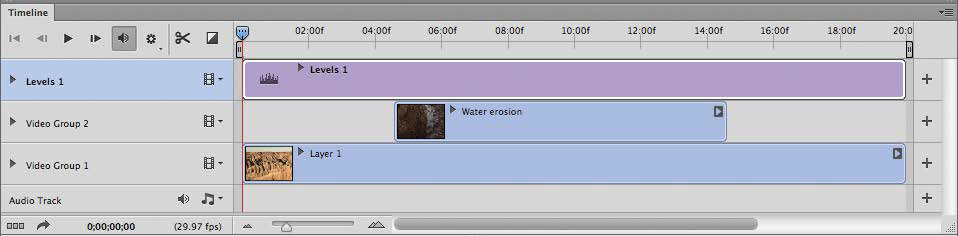
B Because we dragged the Levels adjustment layer clip to its own track, the adjustment will apply to all the tracks below it on the timeline. We also lengthened the adjustment clip to have it apply to the entire duration of the video.
![]() When an adjustment layer is in its own track, you can apply keyframing edits (such as opacity changes) to make the effect appear gradually over time (see the next page).
When an adjustment layer is in its own track, you can apply keyframing edits (such as opacity changes) to make the effect appear gradually over time (see the next page).
You can apply any Photoshop filter to a clip. By default, the filter will affect only the frame where the Playhead is located. To have a filter affect an entire clip, you must convert the clip to a Smart Object before you apply it.
To apply a filter to a clip:
1. On the Timeline panel, click a clip.
2. Choose Filter > Convert for Smart Filters (click OK if an alert dialog appears). The clip color changes to purple. Apply one or more filters (Filter menu). A Smart Filters listing appears on the Layers panel. To edit the filter at any time, double-click the listing.
![]() You can apply a filter in the Blur Gallery to a clip (Filter > Blur > Field Blur, Iris Blur, or Tilt-Shift Blur). For a “miniaturized” effect, try Blur > Tilt-Shift.
You can apply a filter in the Blur Gallery to a clip (Filter > Blur > Field Blur, Iris Blur, or Tilt-Shift Blur). For a “miniaturized” effect, try Blur > Tilt-Shift.
![]() To apply a filter to just a section of a clip, split the clip, click a section, then follow step 2 above.
To apply a filter to just a section of a clip, split the clip, click a section, then follow step 2 above.
![]() To make a filter effect fade in and out over time, on the Layers panel, duplicate the clip layer. Add a new track (see page 450), drag the duplicate clip into the new track, and position it directly above the original one. Apply the filter to the duplicate, then follow the steps in the last task on this page.
To make a filter effect fade in and out over time, on the Layers panel, duplicate the clip layer. Add a new track (see page 450), drag the duplicate clip into the new track, and position it directly above the original one. Apply the filter to the duplicate, then follow the steps in the last task on this page.
Keyframing
By using keyframe markers, you can apply an edit to a video that plays over a specified span, such as a transformation (e.g., scale change), opacity change, or layer style change (blending mode or layer effect).
To create a picture-in-a-picture:
1. Make sure your timeline contains at least two video clips that are on separate tracks. Drag the upper clip to the right (so the video begins with the lower clip).
2. Click the clip on the upper track, then to enable it to be transformed, if it’s not already a Smart Object, right-click its layer on the Layers panel and choose Convert to Smart Object.
3. Move the Playhead to the right, to the location in the clip where you want the clip to begin to scale.
4. Expand that Video Group listing, then click the Enable Keyframe Animation button ![]() for Transform. A yellow diamond-shaped marker appears on the timeline.
for Transform. A yellow diamond-shaped marker appears on the timeline.
5. Move the Playhead to the point in the clip where you want the scaling to end.
6. Press Ctrl-T/Cmd-T for the Transform command, Shift-drag a corner handle in the document window to shrink the clip proportionally, drag the scaled clip to the desired location, then press Enter/Return to accept the transformation. A second keyframe marker appears on the timeline.
7. As you play the video, the still image will shrink and move between the keyframes.A
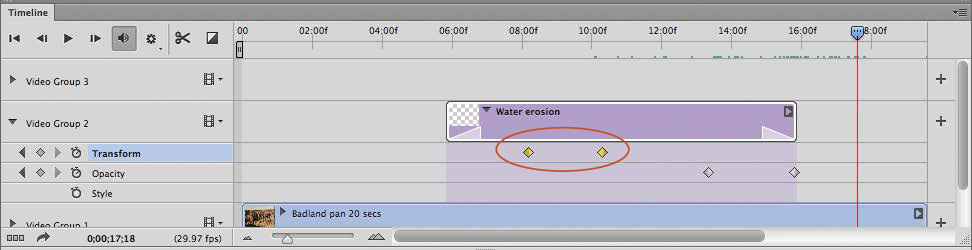
A We added keyframes to a video clip to designate where we wanted Transform and Opacity changes to occur. The section between each pair of diamonds within the row marks the area of transition.
![]() If you need to change the Speed setting for the clip, double-click its Smart Object thumbnail on the Layers panel.
If you need to change the Speed setting for the clip, double-click its Smart Object thumbnail on the Layers panel.
To create a manual fade:
1. On the timeline, click a clip (not one in the bottommost Video Group), then position the Playhead several seconds inward from the end of the clip.
2. Expand the Video Group and click the Enable Keyframe button ![]() for Opacity.
for Opacity.
3. Move the Playhead to the end of the clip.
4. On the Layers panel, lower the Opacity value to 0%. A second keyframe marker appears on the timeline.
Adding audio clips
By default, one audio track (for narration or music) is included in each timeline. You can add more audio clips or tracks as needed, plus you can fade, mute, or adjust the volume for any existing audio clip.
To adjust the settings of an audio clip:
1. To display the temporary Audio panel, right-click a video clip, then click the Audio icon ![]() A; or right-click an audio clip.B
A; or right-click an audio clip.B
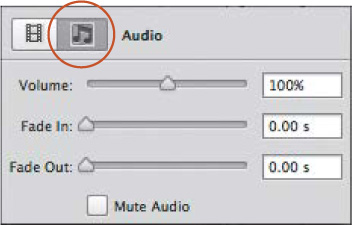
A To access the audio settings for a video clip, we clicked the Audio icon.
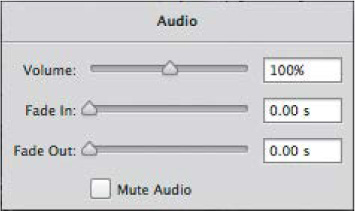
B We right-clicked an audio clip to display these Audio panel settings.
2. Adjust the Volume, Fade In, and Fade Out sliders (or if you want to mute the clip, check Mute Audio).
![]() If the audio doesn’t play as you play the video, click the Enable Audio Playback button.
If the audio doesn’t play as you play the video, click the Enable Audio Playback button. ![]()
To add an audio clip or track to a timeline:
1. Optional: To add an audio clip to a new track, from the Add Audio menu ![]() on an audio track, choose New Audio Track.
on an audio track, choose New Audio Track.
2. From the Add Audio menu ![]() on an audio track, choose Add Audio; or click the Add Audio to Track button
on an audio track, choose Add Audio; or click the Add Audio to Track button ![]() at the right end of the timeline.
at the right end of the timeline.
3. The Add Audio Clips dialog opens. Locate an audio file, then click Open.
Rendering clips into a movie
Rendering is the essential final step of combining edited clips into a playable movie file.
To render a timeline into a final video:
1. Save your file. On the Timeline panel, click the Render Video button. ![]()
2. The Render Video dialog opens.C Do all of the following:
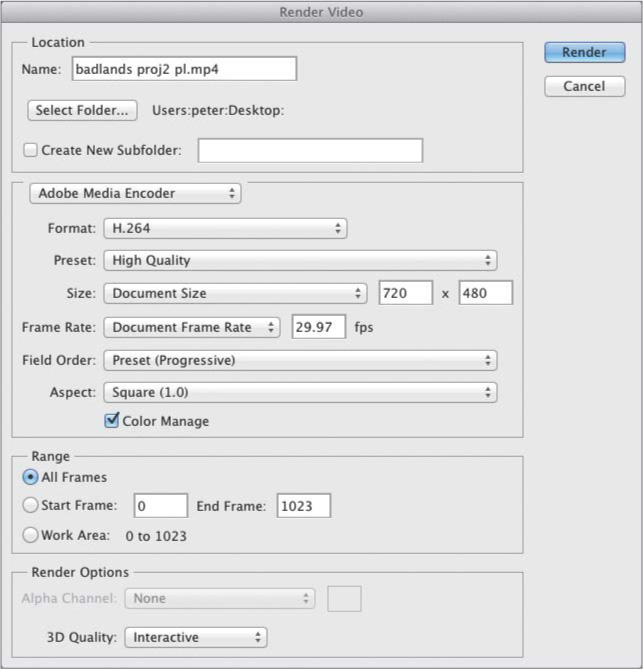
C The Render Video dialog provides a lot of output options.
Enter a Name for your video file (keep the default extension).
Click Select Folder, choose a location for the file, then click OK/Choose.
Choose a Format and Size for the video. (The Preset menu for the H.264 format offers presets for many popular tablets, devices, and video services.) Leave the other menus alone.
Under Range, click All Frames (or click Start Frame and enter a specific range of frames).
Click Render. The rendering process may take a while, depending on the speed of your computer and the length of the video.
![]() To enable your Photoshop video to be played on a home DVD player, use Windows Live Movie or Apple iMovie to convert it to the proprietary file format for DVD players.
To enable your Photoshop video to be played on a home DVD player, use Windows Live Movie or Apple iMovie to convert it to the proprietary file format for DVD players.