2. Meeting the Galaxy Tab 4
In this chapter, you discover the different hardware and the common screens on the Galaxy Tab 4. Topics covered in this chapter include:
![]() Features on the front, back, and sides of the unit
Features on the front, back, and sides of the unit
![]() Galaxy Tab 4 icons for manipulating the screen
Galaxy Tab 4 icons for manipulating the screen
![]() Three important screens you need to know
Three important screens you need to know
![]() Gestures for manipulating the Galaxy Tab 4 screen
Gestures for manipulating the Galaxy Tab 4 screen
![]() Configuring email settings
Configuring email settings
![]() Screen elements for interacting with Android
Screen elements for interacting with Android
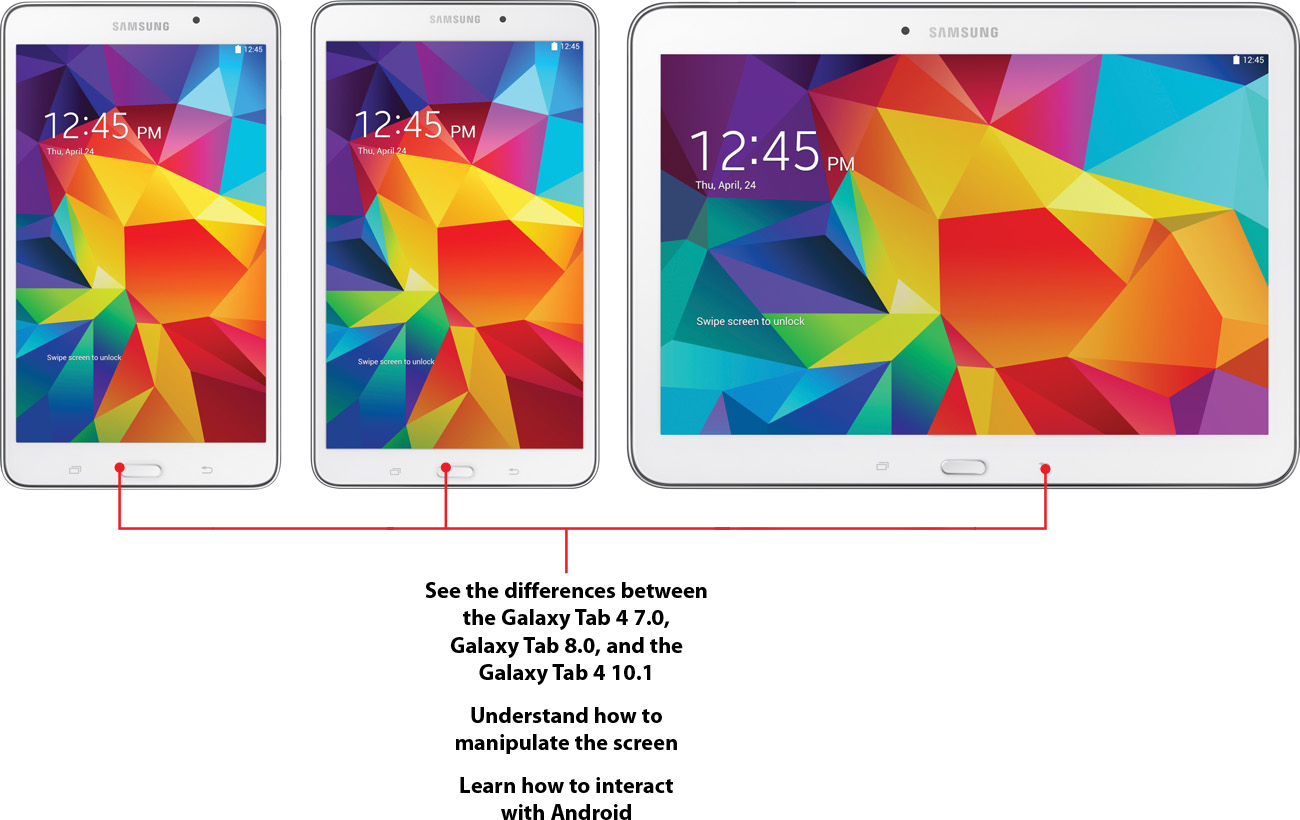
This book covers two models of the Galaxy Tab 4: the 8" Tab and the larger 10" version.
The 8" unit, called the Galaxy Tab 4 8.0, runs version 4.4.2 of Google’s Android operating system, also called KitKat.
The 10" unit, called the Galaxy Tab 4 10.1, also runs KitKat. Both models connect to the Internet and/or a network using a Wi-Fi connection. (As of this writing no cell phone carrier has offered the Galaxy Tab 4 with its data network plans.)
Many tasks throughout the book include information for one model or the other, and if there are any differences between the models then there are separate tasks for each. The headers for each section (or subsection) indicate in parentheses the model name, such as (Galaxy Tab 4 10"). If you don’t see an area in parentheses in the section (or subsection) name, the information applies to both models.
Investigating the Galaxy Tab 4 Unit
Before you work with your Galaxy Tab 4, it’s important to take it out of the box and examine it so you can learn where all the controls and features are on the unit. If you’ve used (or tried) another tablet computer in the past, you might already be familiar with some of the features. If this is your first time using a tablet computer or the Galaxy Tab 4, though, take time to read this chapter and enjoy learning about it.
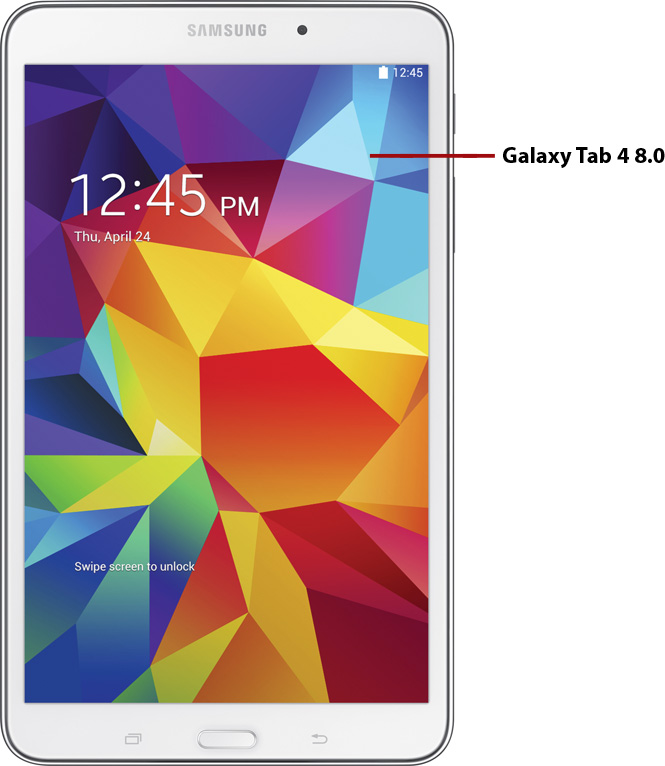
Physical Features of the Galaxy Tab 4 8"
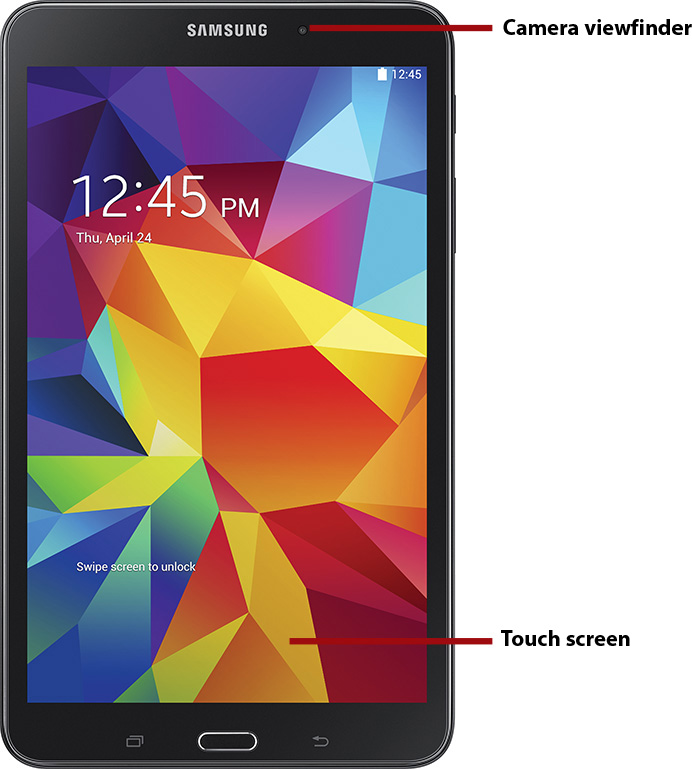
The front of the Galaxy Tab 4 8" includes the LCD touch screen for viewing information as well as a camera so you can take photos and/or record video of yourself.
You learn more about using the cameras to take photos in Chapter 11, “Capturing and Managing Photos,” and to record video in Chapter 12, “Playing Music and Video.”
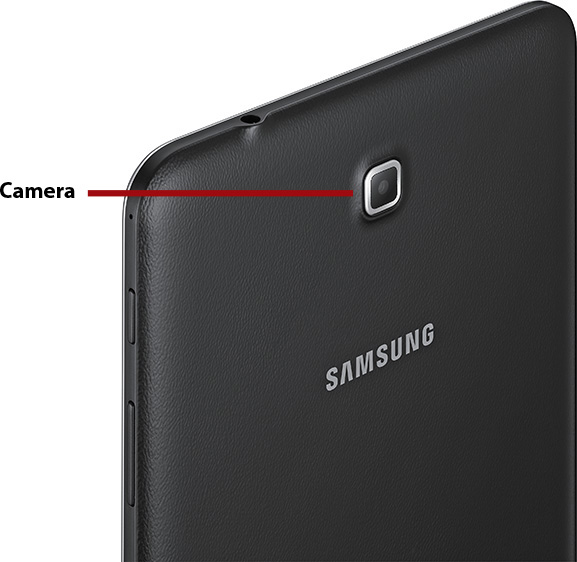
The back of the unit has only one feature: a second camera that includes a flash so you can take photos and record video using your Galaxy Tab 4. (Otherwise, the function of the back is to rest in your hand, of course.)
There are four buttons included on both the Galaxy Tab 4 8" and the Galaxy Tab 4 10". Those buttons are covered later in this chapter’s “The Galaxy Tab 4 Buttons and Switches” section. Aside from those four, the Galaxy Tab 4 8" contains a number of features on the sides of the unit:
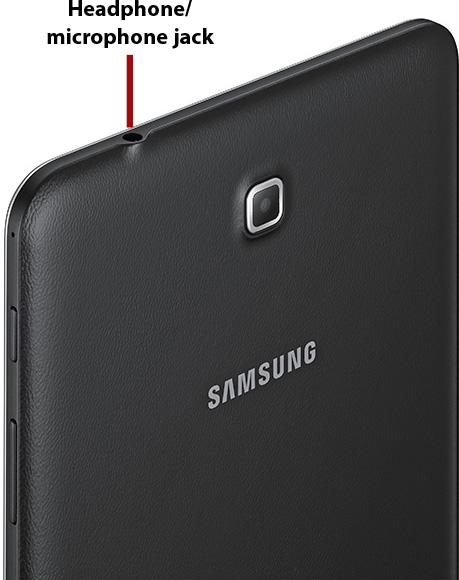
• A headphone and microphone jack on the top side of the unit so you can either listen to audio privately or record audio into a microphone.
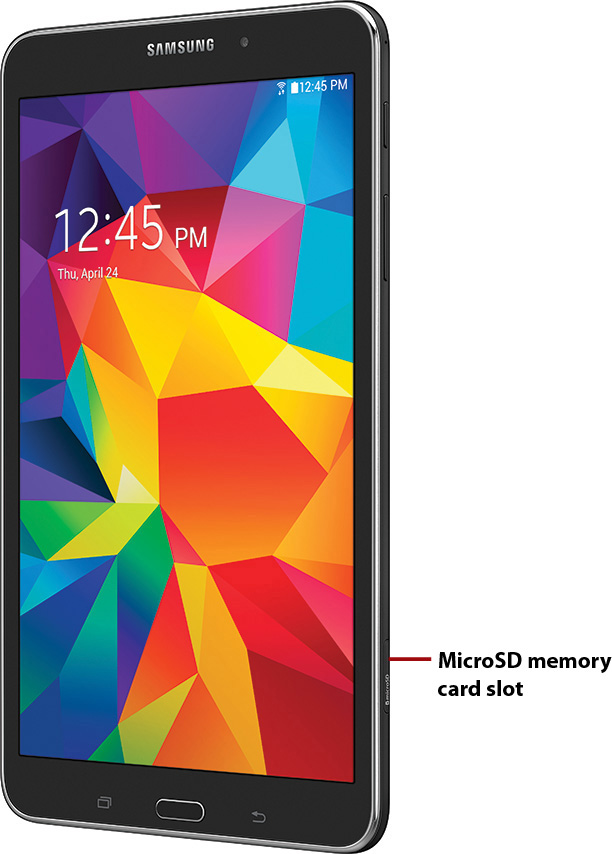
• A MicroSD memory card slot on the right side of the unit.
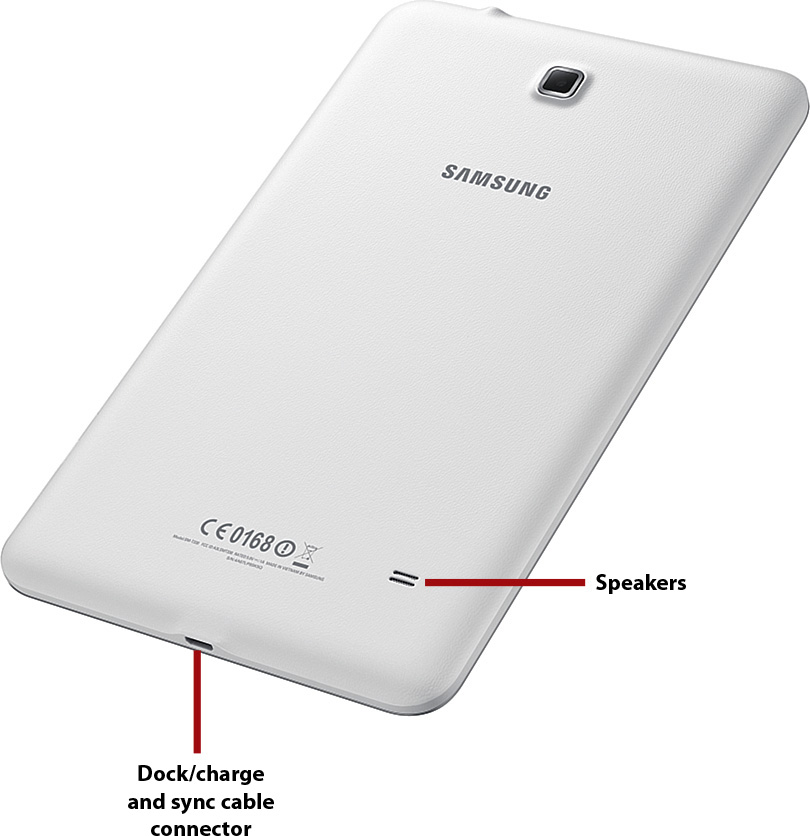
• The audio speakers on the bottom side of the unit.
• A dock/charge and sync cable connector that is also on the bottom side of the unit. You learn more about docking, charging, and syncing your Galaxy Tab 4 in Chapter 3, “Setting Up the Galaxy Tab 4.”
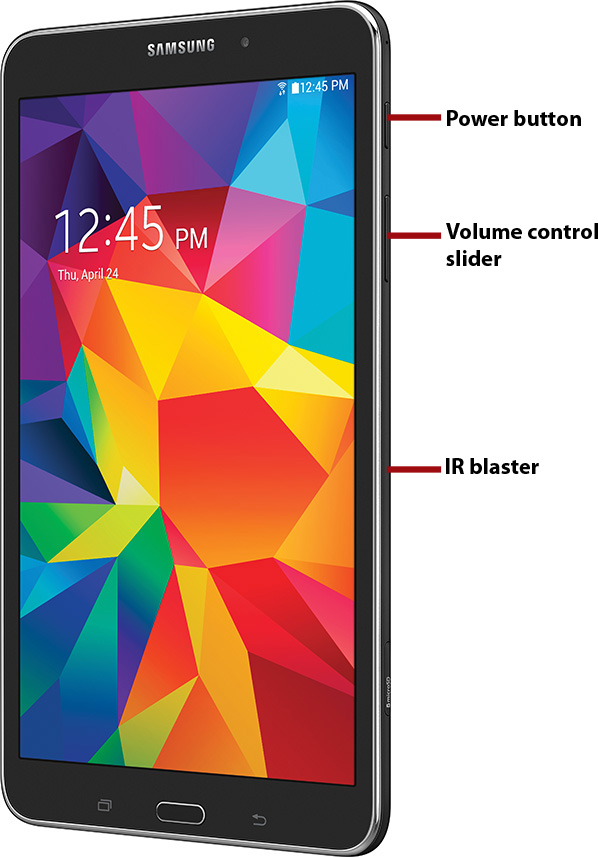
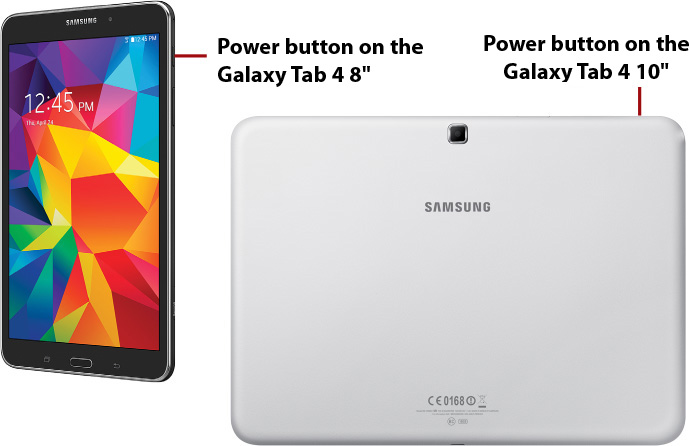
• The Power button on the right side of the unit.
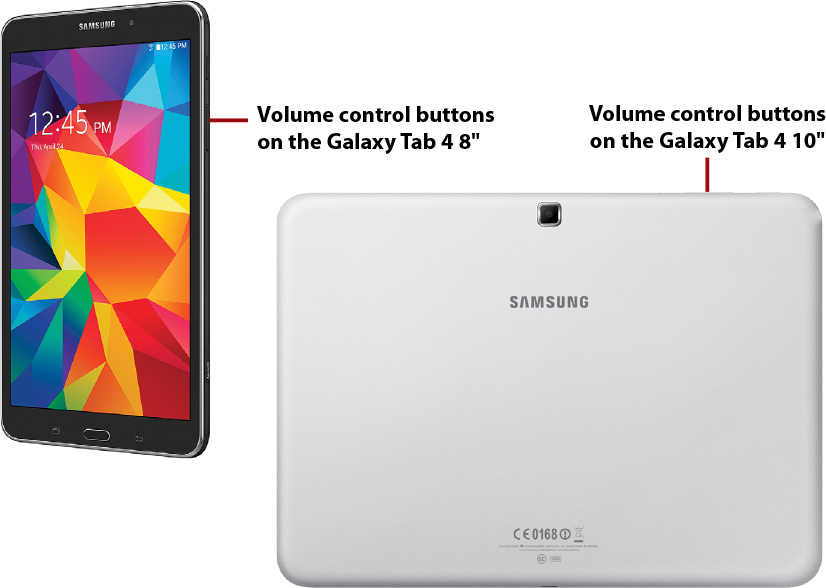
• The volume control slider also on the right side of the unit.
• An infrared (IR) blaster also on the right side of the unit. The IR blaster controls a device that accepts infrared commands from a remote device such as your television and your cable box.
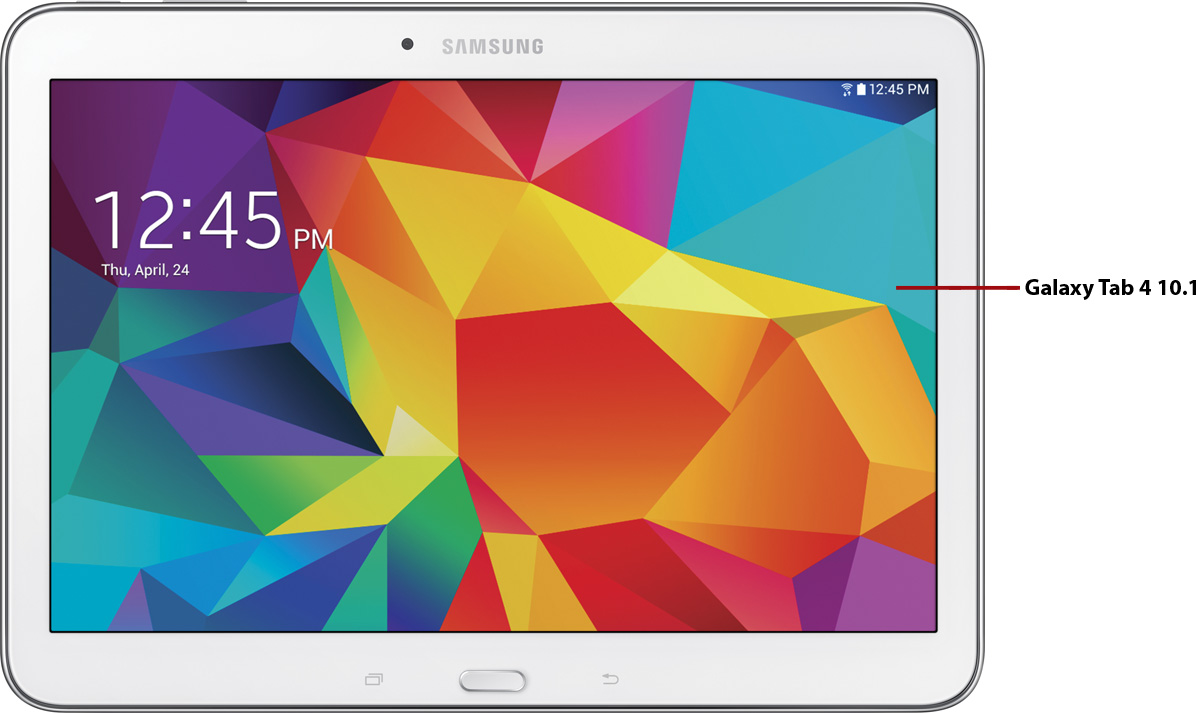
Physical Features of the Galaxy Tab 4 10"
The front of the Galaxy Tab 4 10" includes the LCD touchscreen for viewing information and a camera so you can take photos or record video of yourself.
You learn more about using the cameras to take photos in Chapter 11 and to record video in Chapter 12.

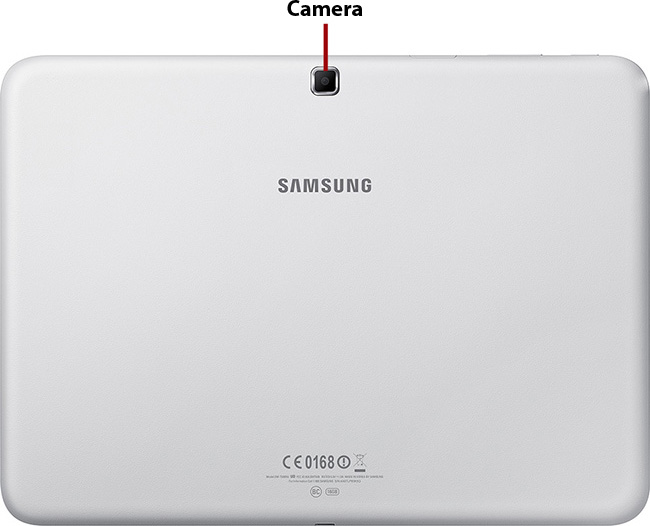
The back of the unit has only one feature: a second camera that includes a flash so you can take photos and record video using your Galaxy Tab 4.
There are three buttons included on both the Galaxy Tab 4 8" and the Galaxy Tab 4 10". Those buttons are covered later in this chapter’s “The Galaxy Tab 4 Buttons and Switches” section. Aside from those three, the Galaxy Tab 4 10" contains a number of features on the sides of the unit:
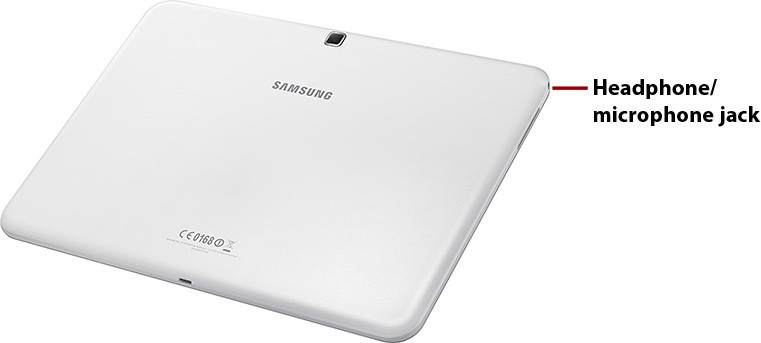
• A headphone and microphone jack on the left side of the unit so you can either listen to audio privately or record audio into a microphone.
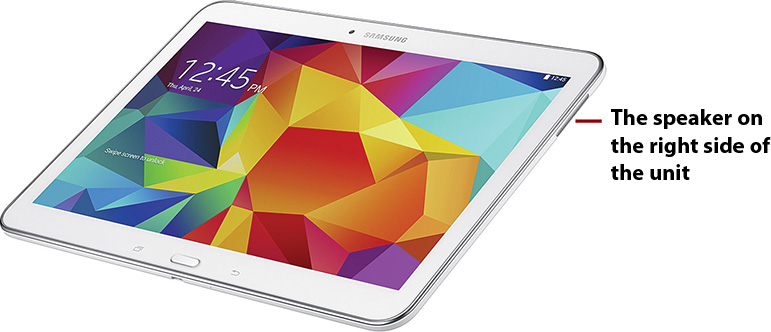
• The audio speakers on the left and right sides of the unit. The speaker on the left side of the unit appears below the headphone and microphone jack.
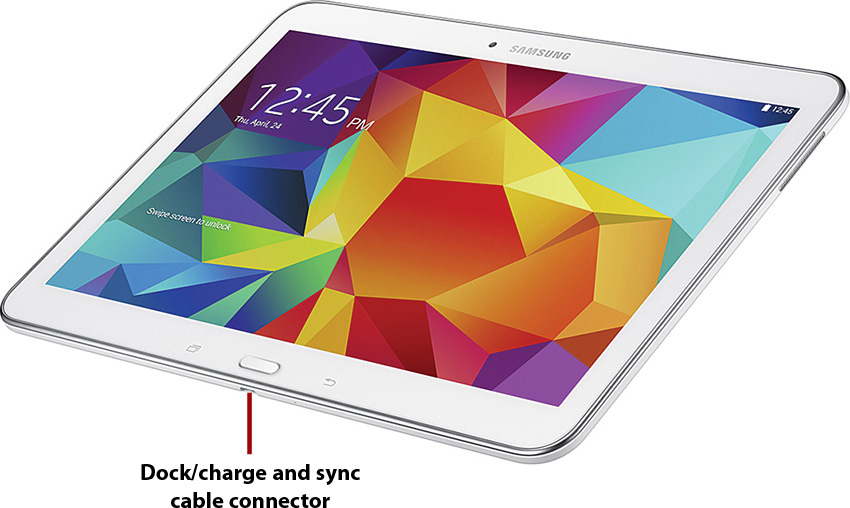
• A dock/charge and sync cable connector that is on the bottom side of the unit. You learn more about docking, charging, and syncing your Galaxy Tab 4 in Chapter 3.
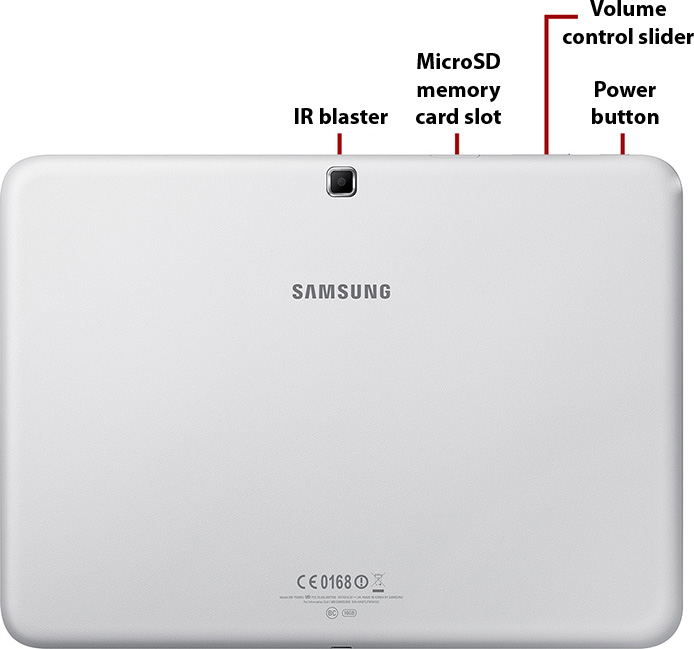
• The Power button on the top of the unit.
• The volume control slider on the top of the unit.
• A MicroSD memory card slot on the top of the unit.
• An IR blaster at the top of the unit. The IR blaster controls a device that accepts infrared commands from a remote device such as your television and your cable box.
The Galaxy Tab 4 Buttons and Switches
Both models of the Galaxy Tab 4 feature two touch buttons on either side of a physical Home button. All three are below the touch screen. The Power button and volume slider are on one side of the unit.
The Three Galaxy Tab 4 Buttons
There are three buttons below the touch screen that you use frequently to manage the device and applications on it. They are (from left to right) Recent, Home, and Back.
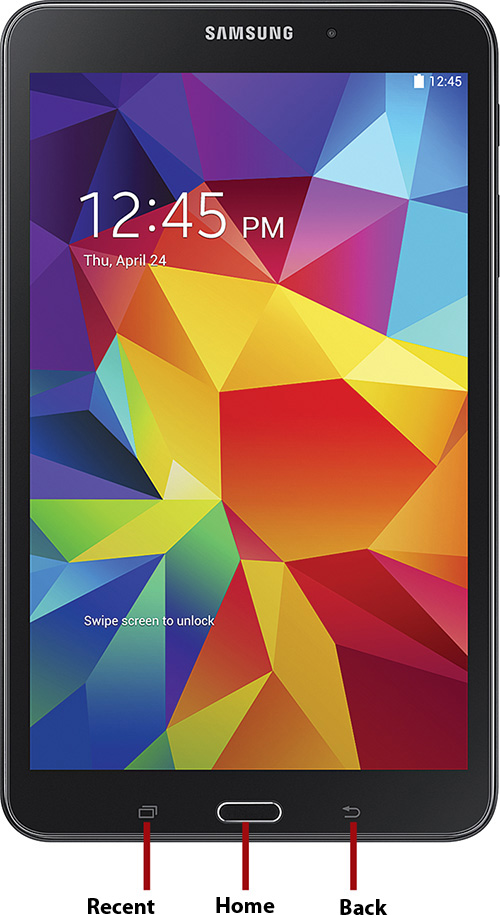
• Recent—The Recent touch button opens the Recent Apps window at the bottom of the screen and displays a list of apps that are open currently. Show an open app on the entire screen by tapping the app’s thumbnail image in the list. Close the menu by tapping the Recent touch button again.
• Home—The fact that the Home button is a physical button signifies its place of importance with regard to how the Tab 4 functions. It’s probably the button you will use most often because it’s the one you press to get out of a specific application, such as the Galaxy Tab 4 web browser, and move back to the Home screen so you can open another application.
If you want to hide an application and go back to the Home screen, pressing the Home button is the way to go. Pressing the Home button hides the application you currently have open.
• Back—The Back touch button moves you back to the previous screen. For example, if you’re on the Home screen and touch the Apps icon at the bottom right of the screen to bring up the Apps screen, you might decide that you don’t want to open an app. Close the Apps screen by tapping the Back touch button.
• Turns on the unit when you press the button. The Power button is on the right side of the Galaxy Tab 4 8" unit and on the top of the Galaxy Tab 4 10" unit. The Galaxy Tab 4 boots up and is ready for you to use in about 20 seconds.
• Turns off the unit when you press the button for about two seconds.
• If you press and hold the button for a few seconds while the unit is on, the Galaxy Tab 4 automatically restarts.
• If you press the button and immediately release your finger, the screen turns off and the Galaxy Tab 4 enters sleep mode.
Volume Control Buttons
There are two volume control buttons on the left side of the device—one that turns up the volume and one that turns down the volume. What device the buttons control depends on what you have connected to the Galaxy Tab 4.
If you’re listening to audio through the Galaxy Tab 4 speakers, the unit remembers the volume settings for the external speakers and sets the volume accordingly. If you decide to connect headphones to the unit, the Galaxy Tab 4 adjusts to the headphone volume the unit has in memory. When you remove the headphones, the unit readjusts the volume to the speaker volume.
You might want to check your volume settings for your headphones and external speakers so you don’t get any nasty surprises. You learn more about setting the volume in Chapter 3.
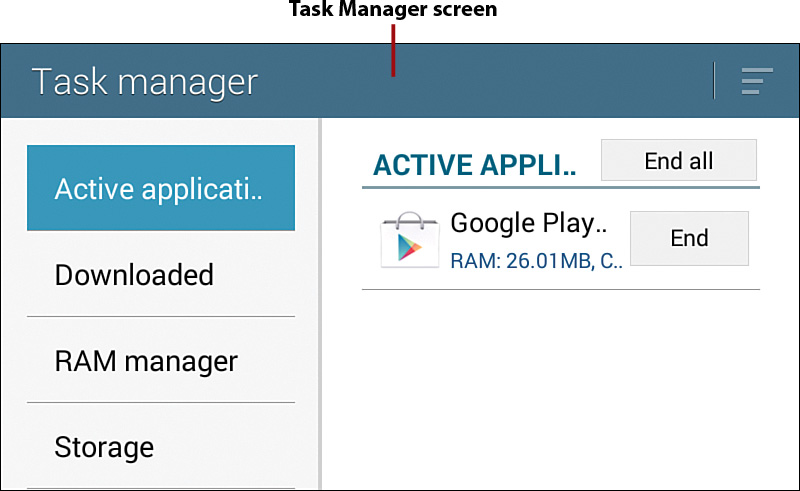
Galaxy Tab 4 Screens
There are three important screens that are mainstays of your Galaxy Tab 4 experience no matter which Galaxy Tab 4 model you use.
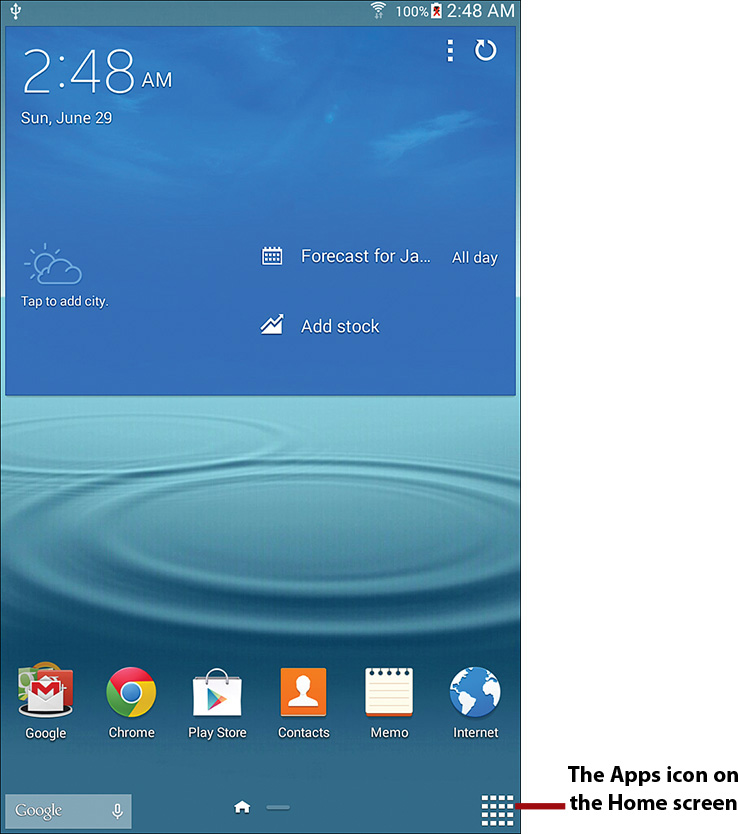
The Lock Screen (Galaxy Tab 4 8")
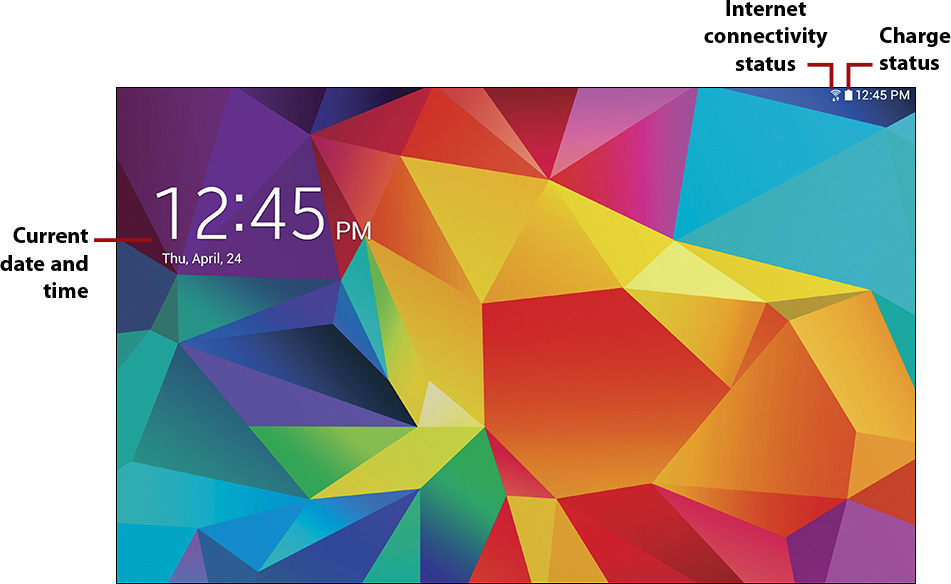
The lock screen is the default state of the Galaxy Tab 4 when it first boots.
The lock screen shows the current date and time as well as the Wi-Fi connectivity status and battery charge status in the upper-right corner of the screen. It also includes the Smart Stay feature icon (it looks like an eye), which indicates that this feature is on. Smart Stay detects whether you’re looking at the screen. When the Tab 4 detects that you are looking at it, the device won’t go to sleep.

All you have to do to unlock your Tab 4 is to hold your finger anywhere on the screen and then swipe your finger in any direction. If your Tab 4 is password-protected then you need to type your password in the password box. You learn more about password-protecting your Galaxy Tab 4 in Chapter 3.
The Lock Screen (Galaxy Tab 4 10")
The lock screen is the default state of the Galaxy Tab 4 when it first boots.
The lock screen shows the current date and time, the current status of your Bluetooth and Internet connections, and the amount of charge you have in your battery. It might also include the Smart Stay feature icon (it looks like an eye), which indicates that this feature is on.
All you have to do to unlock your Tab 4 is to hold your finger anywhere on the screen and then swipe your finger in any direction. If your Galaxy Tab 4 is password-protected, the password box appears on the screen. You must tap the password box, type your password, and then tap the OK button to open the Home screen or the application you were working on before the unit went to sleep. You learn more about password protecting your Galaxy Tab in Chapter 3.
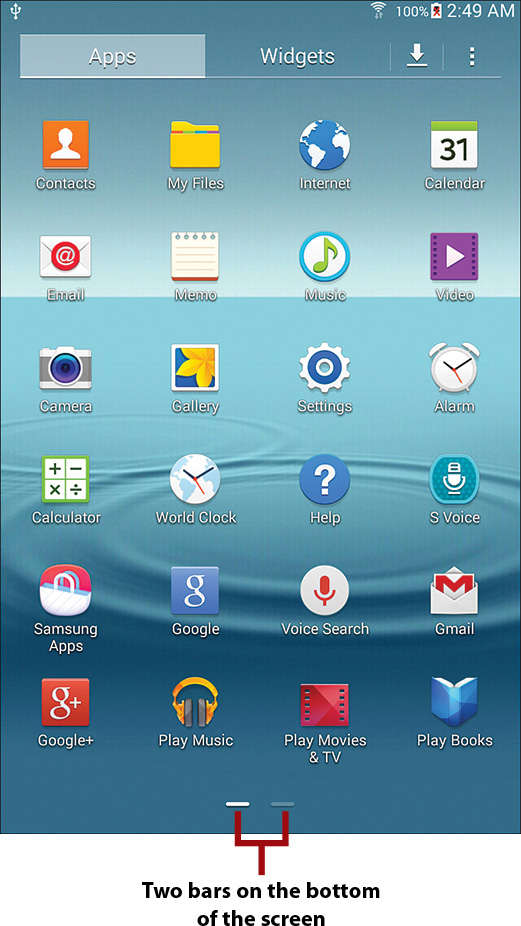
The Apps Screen (Galaxy Tab 4 8")
The applications screen is your command center where you can access all the applications available on the Galaxy Tab 4. Tap the Apps icon to view the applications screen.
When you tap an application icon, the application launches. If you have more than one page of application icons on the applications screen, bars appear at the bottom of the screen. You can scroll between pages by tapping one of the buttons or dragging or flicking left and right. You learn more about dragging and flicking later in this chapter.
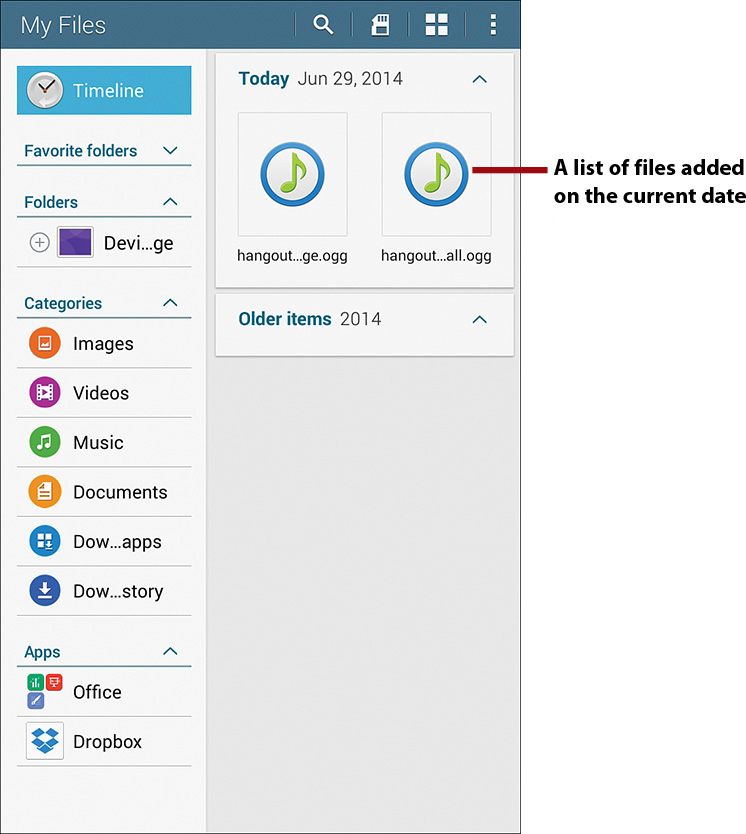
The Application Screen (Galaxy Tab 4 8")
After you press an application button on the applications screen, the application launches and takes up the entire screen. For example, if you open the My Files application, a list of files and folders on your Tab 4 appears on the screen.
Manipulating the Screen
Like many tablets these days, the Galaxy Tab 4 doesn’t come with a stylus (essentially a stick) for manipulating elements on the screen. Instead, you use your fingers and change the orientation of the Galaxy Tab 4 itself to make it do what you want. Although the examples in this section are for the Galaxy Tab 4 8", you manipulate elements on the Galaxy Tab 4 10" screen in the same way. If there are different instructions for manipulating the screen for the Tab 4 10" model, they are noted in a different subsection.
Tapping an Element
Unlike a desktop or laptop computer, you don’t have a mouse installed on your Galaxy Tab 4, so there is no cursor that you can see. However, when you quickly tap an element with your finger, the Galaxy Tab 4 performs an action. For example, when you tap an application icon, the Galaxy Tab 4 launches the application.
You can also double-tap, which is two quick taps in the same location, to perform a specific function. For example, you can double-tap an image to zoom in and double-tap again to zoom out.
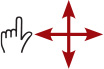
Pinching
Apple set the standard for multitouch screen gesture requirements with its iPad, and the Galaxy Tab 4 follows the same standard. A multitouch screen can recognize different gestures that use multiple finger touches. One such gesture is the pinching gesture.
You pinch when you touch the screen with both your thumb and forefinger and bring them together in a pinching motion. This is also called pinching in, and it has the same effect as zooming in. For example, you can get a closer view of a web page in the browser by pinching. You can also pinch outward, which has the same effect as zooming out, by touching the screen with your thumb and forefinger together and moving them apart.
Dragging and Flicking
You can drag up and down the screen (or even left to right if an app allows it) by touching the top of the screen and moving your finger to drag content the length of the screen. If you want to move more content down the screen, remove your finger, touch the top of the screen, and drag your finger down the length of the screen again. You can drag a page of content up by touching the bottom of the screen and dragging your finger upward.
Dragging can become cumbersome, though, if you have to drag through a long document such as a web page or spreadsheet. The Galaxy Tab 4 makes it easy for you to drag through large chunks of content by flicking. That is, after you touch the top (or bottom) of the screen, move your finger quickly down (or up) and then lift your finger at the last moment so the content scrolls after you lift your finger. You can wait for the content to stop scrolling when you reach the beginning or end of the content, or you can touch anywhere on the screen to stop scrolling.
Screen Rotation and Orientation
Your Galaxy Tab 4 has two screen orientation modes—vertical and horizontal—and it knows which way it’s oriented. By default, the Galaxy Tab 4 screen orientation changes when you rotate the unit 90 degrees so the screen is horizontal, or you can rotate it another 90 degrees so the screen is vertical again. Nearly all default apps, such as the Browser, use both orientations. However, there might be times when you don’t want the Galaxy Tab 4 to automatically change its screen orientation when you move the unit. For example, you might want to view a web page only in vertical orientation.
You can set the autorotation setting on or off as you see fit.
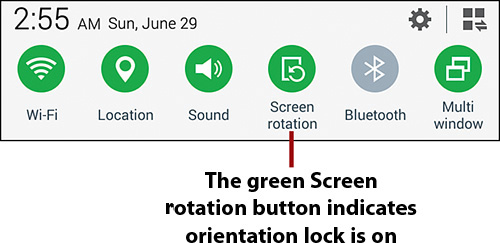
1. Open the Quick Settings and Notifications screen by holding your finger at the top edge of the screen and then swiping downward.
2. Tap the Screen rotation button. The button turns green to signify that orientation lock is on or gray when orientation lock is off.
3. Tap the Screen rotation button again to turn off orientation lock. The next time you rotate the unit 90 degrees, the screen rotates automatically.

Interacting with Android
Android is a fun operating system to use; it includes a number of common elements, including sliders and switches, as well as the keyboard that you can use to enter and edit text in your Galaxy Tab 4.
Sliders
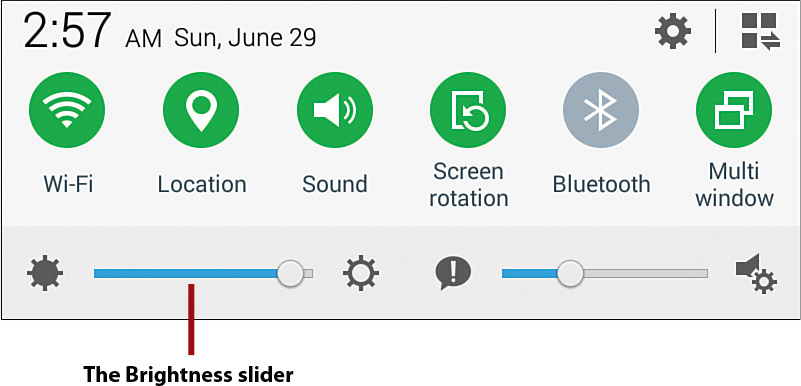
A slider is a button that requires a bit of effort for you to activate. Android uses sliders to prevent you from doing something that can lead to unintended consequences. For example, if you open the Quick Settings and Notifications screen, you see the Brightness slider so you can adjust the brightness of the screen.
Button Bar
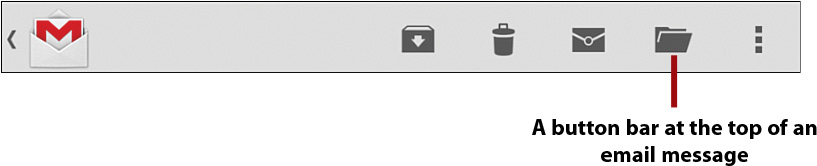
You might see a button bar in different locations on the screen depending on the app you’re using. For example, if you read a message in the Gmail app, you see some icon buttons in the bar at the top of the screen that enable you to perform certain tasks, such as putting the message in the trash.
Tab Areas
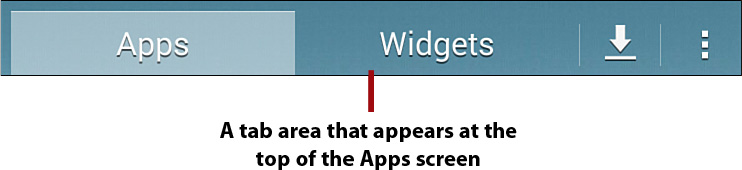
Some apps have a Tab area that contains a set of buttons that control the app. The area location and buttons vary depending on the app; if the app doesn’t have a Tab area, you won’t see one. For example, if you tap the Downloads app you see a Tab area in the center of the screen that enables you to view Internet downloads or any other type of download.
Using the Keyboard
The Galaxy Tab 4 doesn’t come with a physical keyboard like you find on many smartphones. Instead, you type in the text with something that looks similar to a computer keyboard. The keyboard appears at the bottom of the screen automatically when you want to enter text.
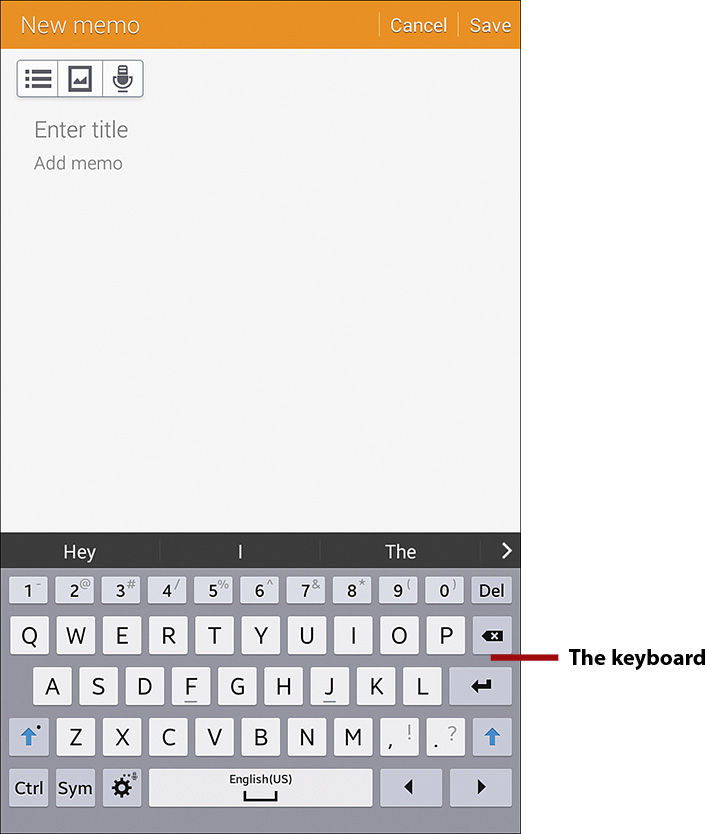
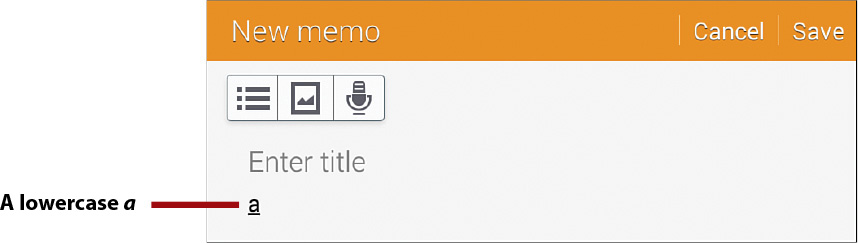
You can type a letter by tapping the letter’s key. For example, if you tap the letter a on the keyboard, the lowercase letter a appears on the screen.
>>>Go Further: How Do I Capitalize a Letter?
• Tap one of the two Shift keys and then tap the letter you want to capitalize. Notice that after you tap the Shift key that all the keys on the keyboard become capitalized.
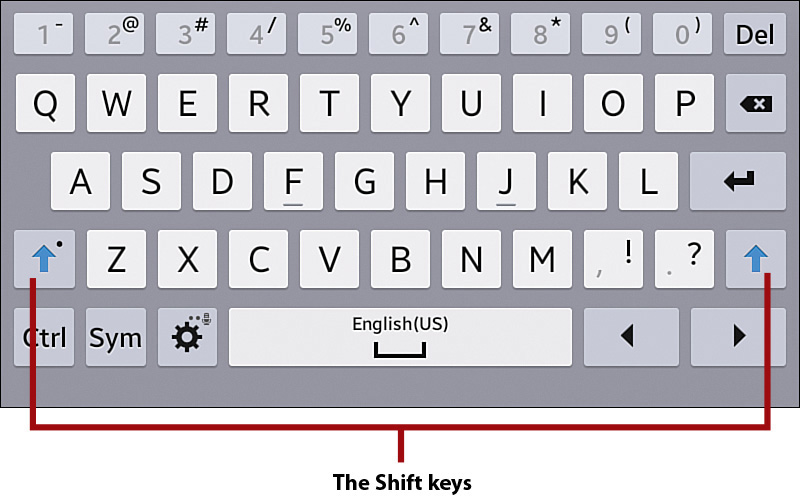
• You can capitalize more than one letter by tapping the Shift key twice. The arrow on the Shift key turns blue; this denotes that the Shift key is locked. You can unlock the Shift key by tapping the key again. You know the Shift key is unlocked not only because the blue arrow on the Shift key is off, but also because all the letter keys on the keyboard are back to lowercase.
Using Special Keyboards and Characters
It’s not easy typing on a screen that’s only 8" wide (or even 10"), especially with an onscreen keyboard, but Android has a trick to make it a bit easier to add information.
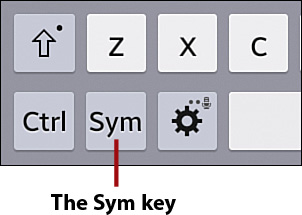
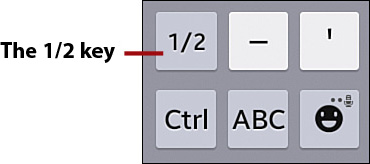
You can’t access special characters from the standard Tab keyboard, but you can access those special character keys by tapping the Sym key to see a variety of symbols.
If the symbol you need isn’t on the keyboard that displays then you can access an extended symbols keyboard by tapping the 1/2 key on the numbers and symbols keyboard. After you tap this key, the key label changes to 2/2, which signifies that you are on the second of two extended keyboards. When you’re on the second extended keyboard, you can return to the numbers and symbols keyboard by tapping the 2/2 key.
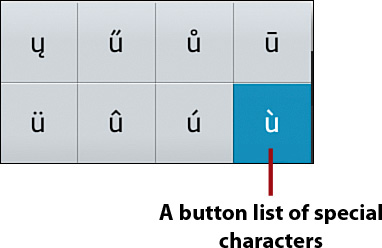
If you hold down a key on the keyboard, the letter appears, and if there are any related characters, such as a letter with an umlaut (such as ü), you see a character window above the letter key. Hold and drag your finger to the character you want to insert and then release your finger.
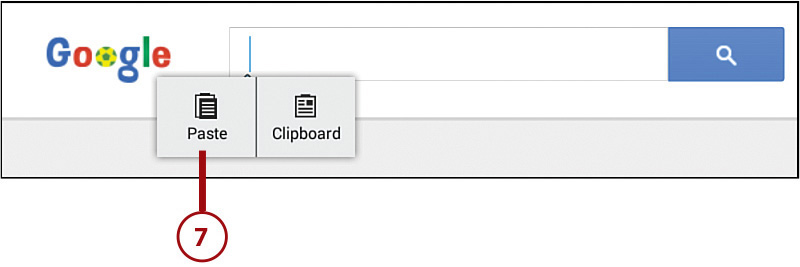
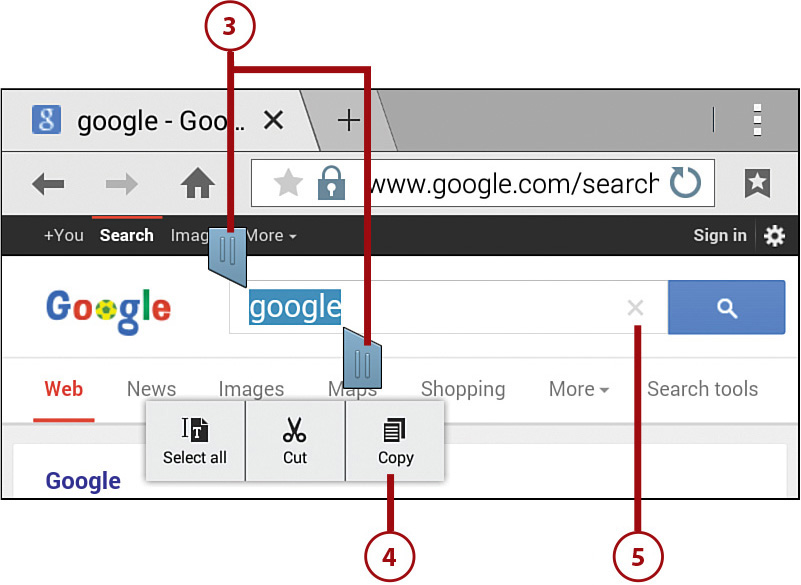
Copy and Paste Data
Android makes it pretty easy to copy and paste text from one app to another. In this example, you learn to copy a term from the Browser app and paste it into the Search app so you can search for the term not only on the Web but also throughout the Galaxy Tab 4.
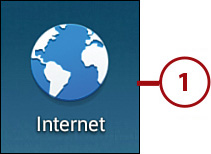
1. Tap Internet on the Home screen.
2. This example starts on the Google website. Type a search term into the Google search box.
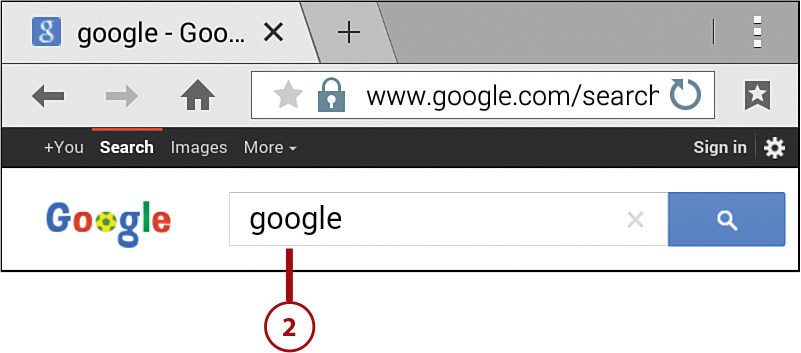
3. Hold down your finger on the search box for a couple of seconds and then release your finger. The search term is highlighted and bracket bars appear below and on each side of the term.
4. Tap Copy in the Edit Text pop-up menu that appears below the selected text.
5. Tap the X at the right side of the Search box to clear the contents of the box.
6. Hold down your finger on the Google box until the Edit Text pop-up menu appears below the Search box and then release your finger.
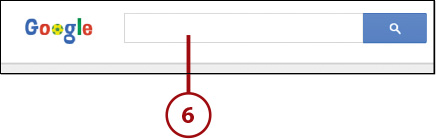
7. Tap Paste in the Edit Text pop-up menu to insert the copied text.