10. Using Maps
In this chapter, you find out how to use the Maps app to find locations, get directions, and connect with friends. Topics include:
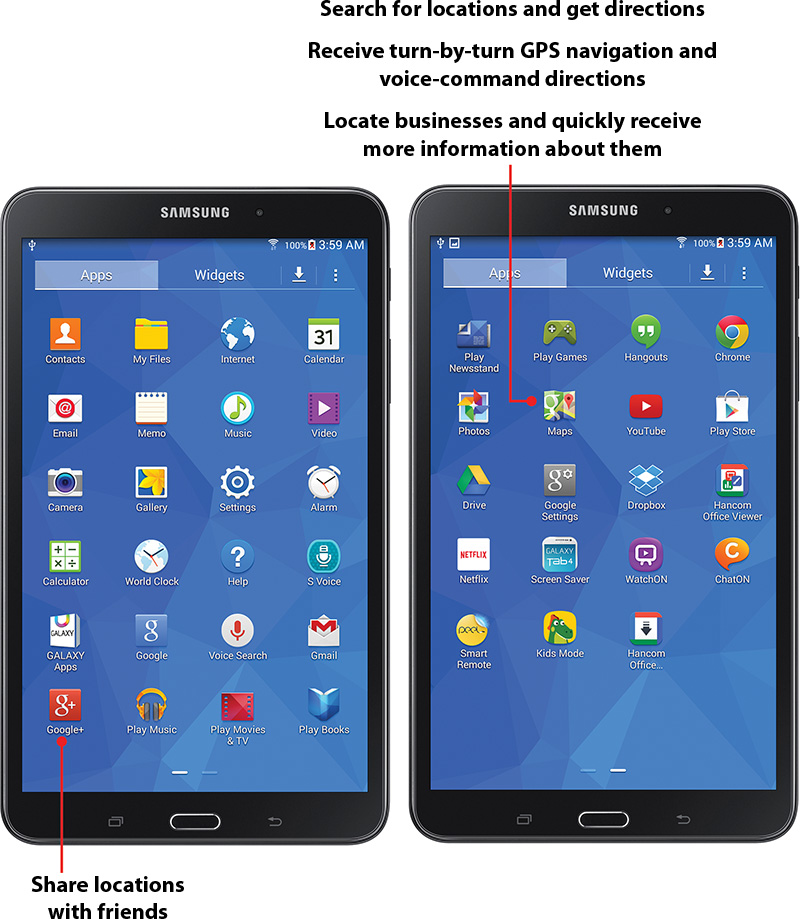
![]() Getting voice-command directions
Getting voice-command directions
![]() Enabling wireless networks
Enabling wireless networks
![]() Sharing locations with Google+ friends
Sharing locations with Google+ friends
Your Galaxy Tab 4 is equipped with the Maps app that can help you get where you need to go. In Android 4.4 (or KitKat, if you prefer), the Maps app is one comprehensive app that combines several apps that were previously separate in earlier versions of Android:
• The app can supply detailed destination directions for a specific address.
• The app can provide voice-guided turn-by-turn directions to a location.
• You can also use Maps to quickly locate local businesses and access contact information, coupons, and customer reviews.
What’s more, the Google+ app enables you to share your location with Google+ friends and view their locations on a map.
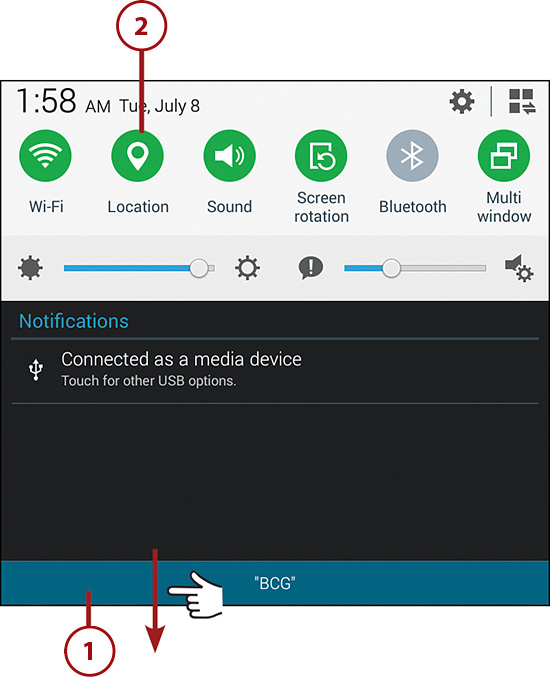
Enabling GPS
Before you can begin to use the many features of your Galaxy Tab 4 that utilize GPS, you must first enable your Tab’s GPS capabilities.
1. Open the Quick Settings and Notifications page by tapping and holding on the Status Bar at the top of the page and then swiping down the screen.
2. Tap Location into the on position if it isn’t on already. The icon turns green and a green bar appears beneath the setting to indicate that GPS is on.
Getting Around with Maps
Maps is great when you’re planning a trip across town or the nation. You can change your map view by adding layers that include traffic, terrain, satellite imagery, transit lines, and more. You do not even have to have an address for Maps to help you get where you need to go. Just specify the general area on a map and let the Maps app generate directions.
Find a Location with Maps
The Maps app on your Galaxy Tab 4 gives you the capability to find locations, get directions, and pinpoint locations. It also gives you access to features in other apps, such as Navigation, Local, and Location Sharing. The Maps app can help you pinpoint your exact location if you ever find yourself in an unfamiliar place. As soon as you launch Maps, your Tab uses GPS to pinpoint your current location.
1. Tap the Apps icon on the Home screen.

2. Swipe to the second page in the Apps screen and then tap Maps.
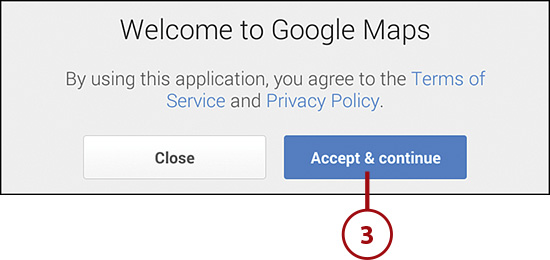
3. Tap the Accept & Continue button.
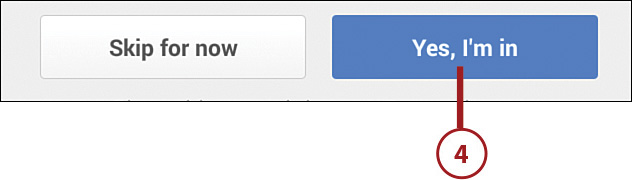
4. Tap Yes, I’m In if you want Google to improve your search suggestions. A map displaying your current location opens.
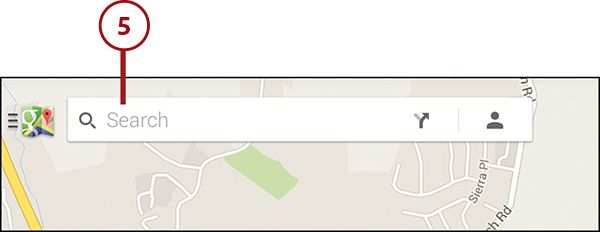
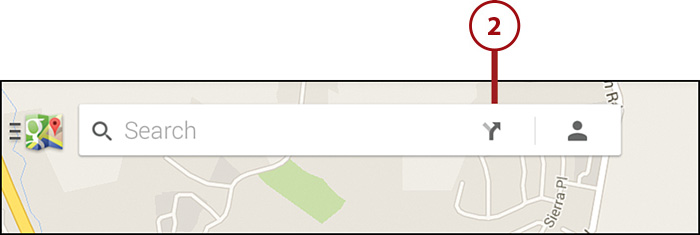
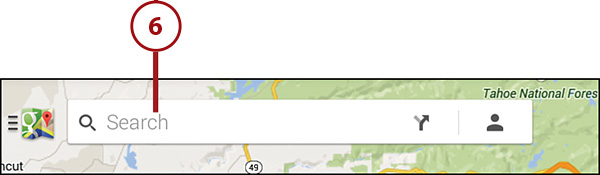
5. Tap the Search field at the top of the screen to find a location. If you see a message asking you to store your personal data on the Tab 4, tap OK.
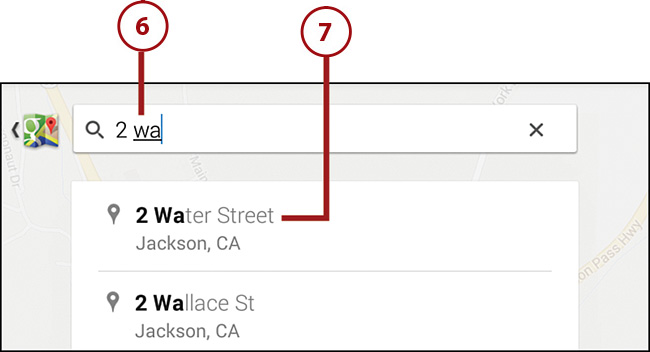
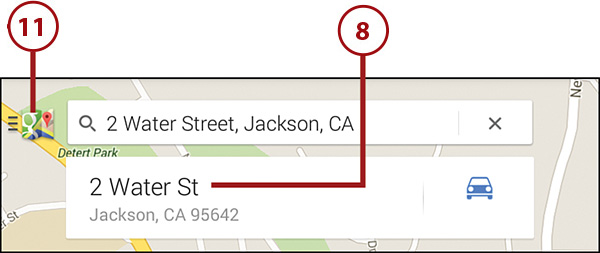
6. Type the address of the location you want to find. As you type, a list of possible locations displays.
7. Tap the correct address in the list. Your Tab 4 displays the location on the map. If you cannot find the address you need in the list, Maps might not have complete data for that area or the information Google Maps has might be outdated.
8. Tap the location overlay.
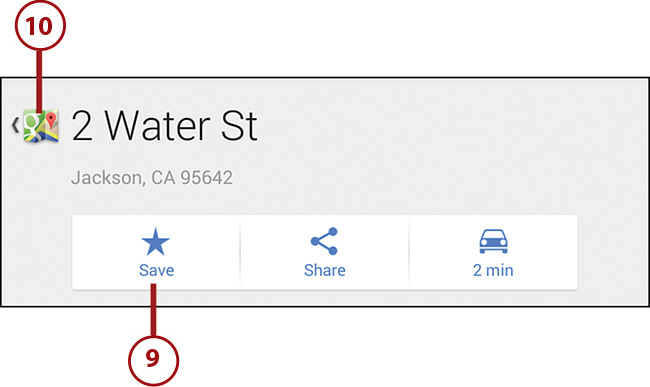
9. Tap Save to save this location for future searches. There are many options you can access from this window including Share, Directions, and Street View.
10. Tap the Google Maps icon to close the window.
11. Tap the Google Maps icon to add additional layers of information to the current map.
12. Tap the layer of information that you want to add to the map in the menu. The information is added to the map, changing the map view.
13. Pinch outward to enlarge the map. You can also double-tap your finger in a specific location on the map to enlarge the area. As you move in closer on the map, you start to notice that new information appears in the map, such as the names of banks and restaurants.
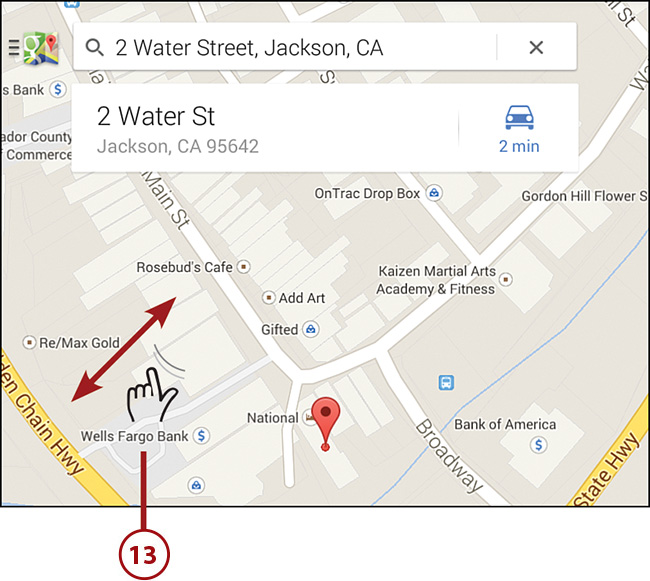
14. Use your finger to physically move the map and pinpoint locations.
Get Directions with Maps
Maps can help you get from point A to point B by providing detailed directions. You can get step-by-step driving, public transportation, biking, and walking directions to a specified destination by designating addresses for a starting location and a desired destination.
1. Tap the Apps icon on the Home screen, swipe to the second page on the Apps screen, and then tap the Maps icon. A street map opens and displays your current location as a blue dot.
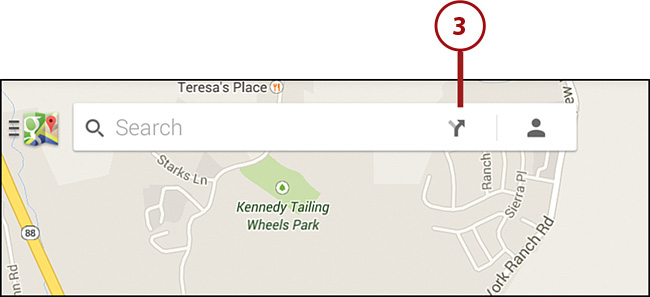
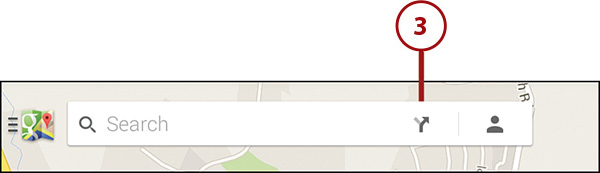
2. Tap the Directions icon.
3. By default, your Tab 4 is able to pinpoint your current location, which appears as My Location in the top field. You can also type a different starting address in the top field. As you type, suggested addresses appear in a list below the box; you can tap an address in the list to place that address in the box.
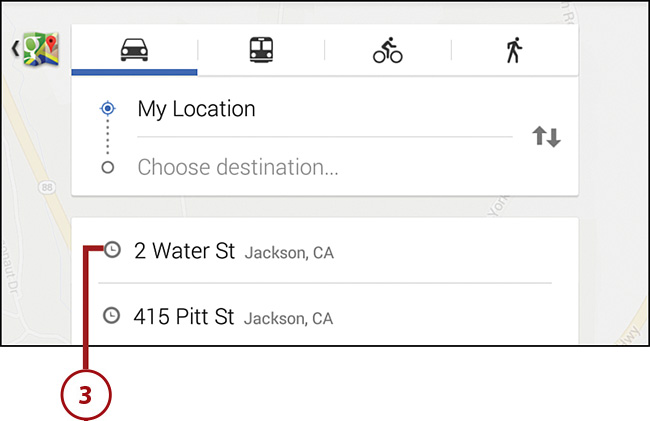
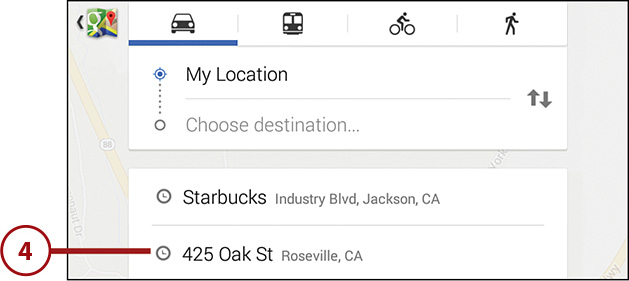
4. By default, the address you searched for appears in the End Point box. You can change the address by tapping in the box and typing a new address. As you type, suggested addresses appear in a list below the box; tap an address in the list to place that address in the box.
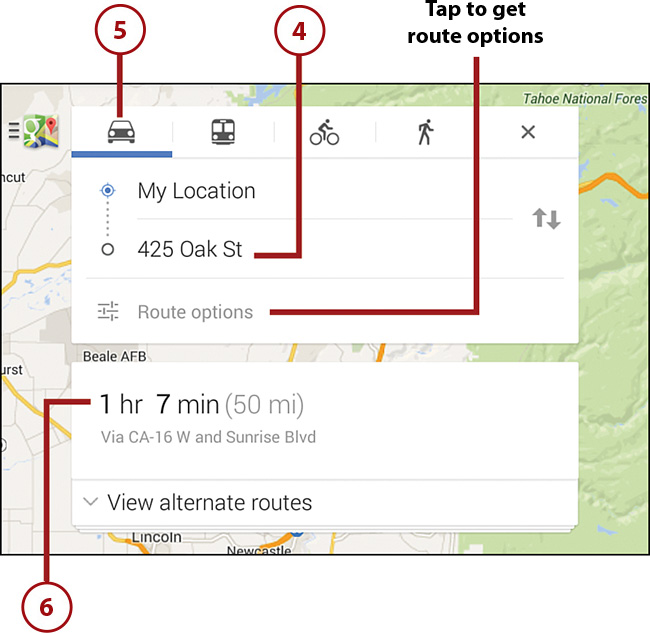
5. By default, the car button is selected so you can determine how long your trip will take by car. You can also select how long the trip will take by bus, bicycle, or walking.
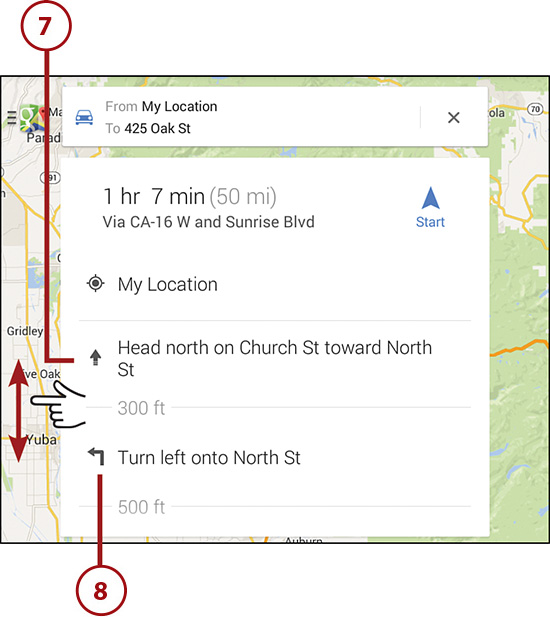
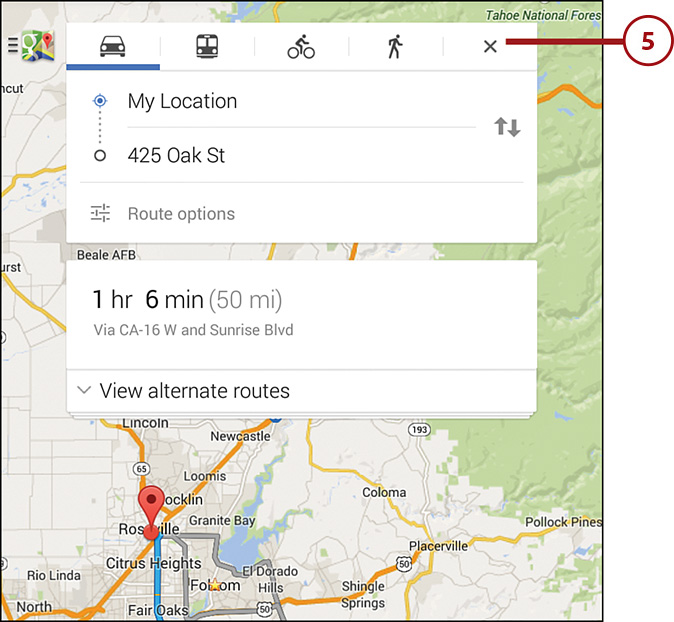
6. Tap the estimated travel time to receive directions. A screen of detailed directions appears as a list. The estimated travel time appears above the list.
7. Swipe up and down the Directions list to move through each step in the directions.
8. Tap any step in the directions to review it on the map.
Specify Locations with Maps
Maps can help you find locations for which you do not have an address. For example, you might know that a café that you would like to visit is located downtown, but you do not know how to get downtown from your hotel. Maps enables you to specify a vicinity on a map where you want to go and generates directions from your current location.
1. Tap the Apps icon on the Home screen, swipe to the second page in the Apps screen, and then tap the Maps icon.
2. Use your finger to move the map to your desired location and then tap and hold on the location until the pin appears on the location.
3. Tap the location address.
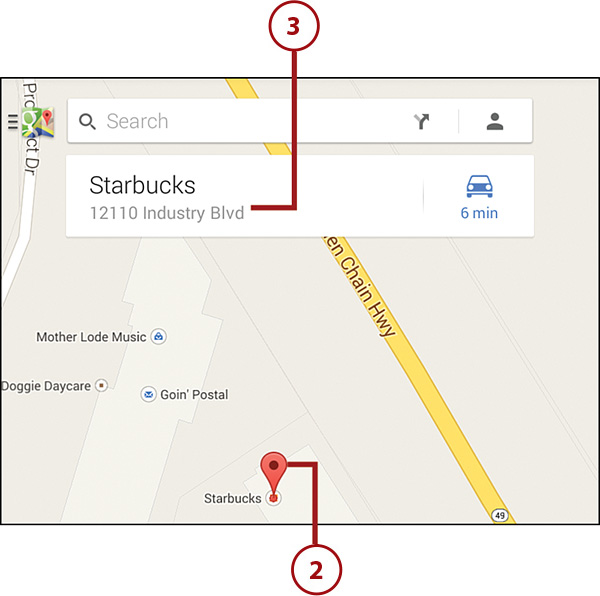
4. The location appears on the map so you can save the location, share it with someone else, or get driving directions. Tap the car icon to get driving directions.
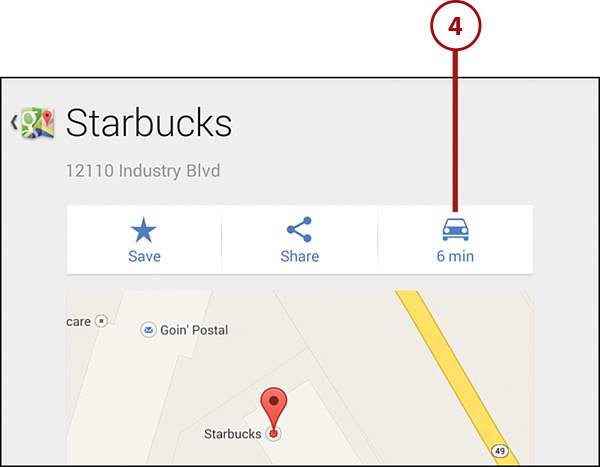
5. Get driving directions by tapping the estimated travel time.
6. Swipe up and down the Directions list to move through each step in the directions.
7. Tap any step in the directions to review it on the map.
Getting Voice-Command Directions
After you get driving directions, you can turn your Galaxy Tab into a turn-by-turn voice-command GPS device using the Maps app.
1. Tap the Apps icon on the Home screen.

2. Swipe to the second page in the Apps screen and then tap Maps.
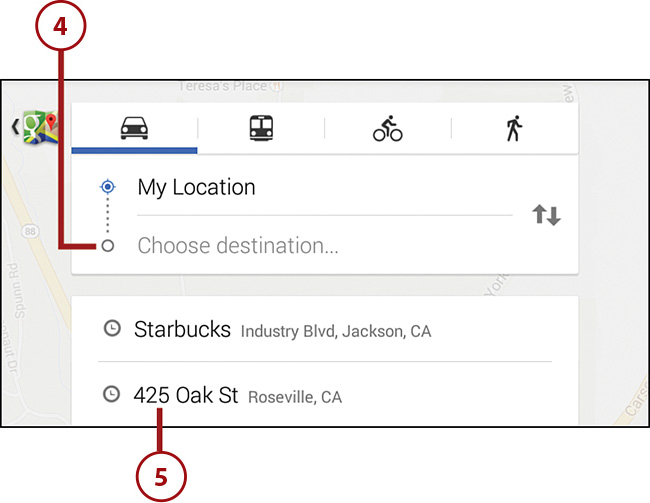
3. Tap the Directions icon.
4. Type the name of the destination for which you need directions in the Choose Destination field or select your destination from the list below the field.
5. If you type the destination, a list of possible destinations appears in the list; tap the correct destination.
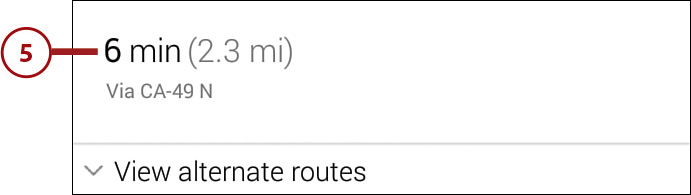
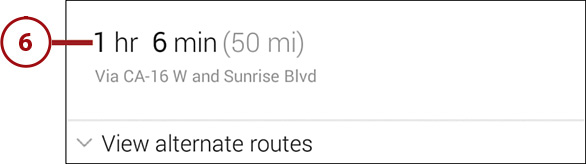
6. A street map appears with a highlighted route; tap the estimated travel time to your destination.
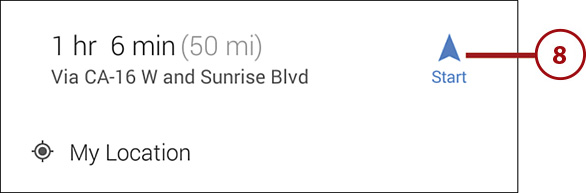
7. If you have a vehicle mount in your car, attach the Tab 4 to the vehicle mount. Appendix A, “Finding Galaxy Tab 4 Accessories,” has more information about vehicle mounts.
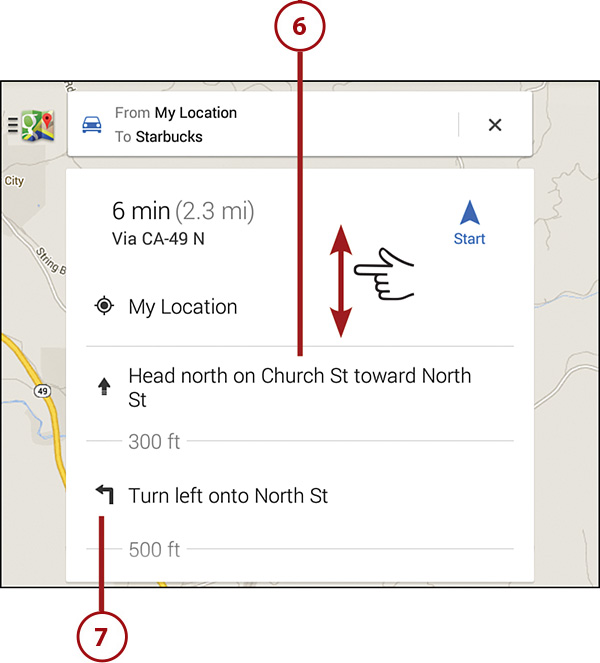
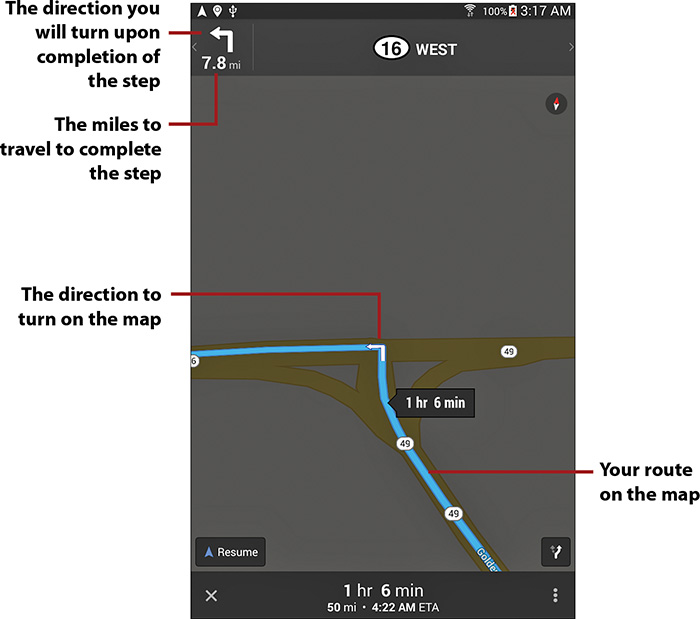
8. Tap Start in the directions list.
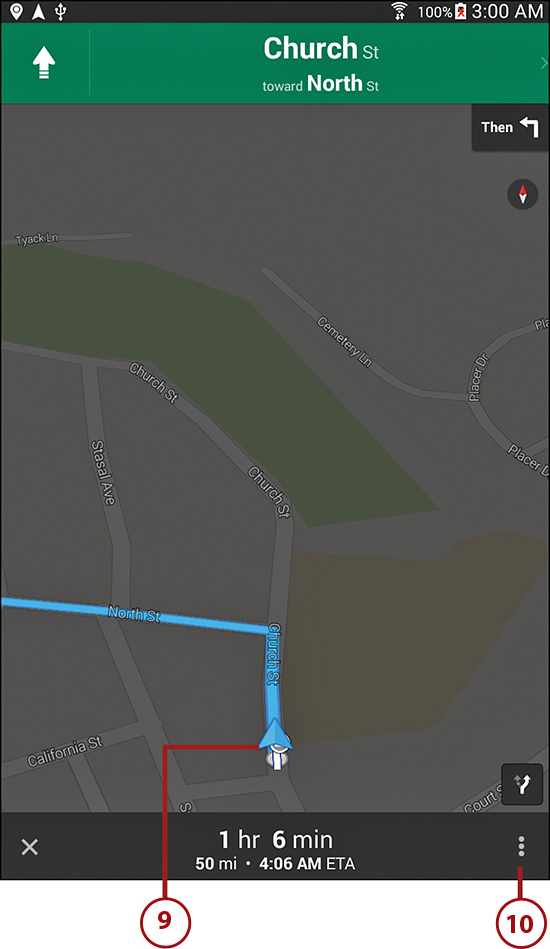
9. Drive the route. Much like a dedicated GPS, your Tab senses where you are on the route and proceeds to give you instructions, verbally and graphically.
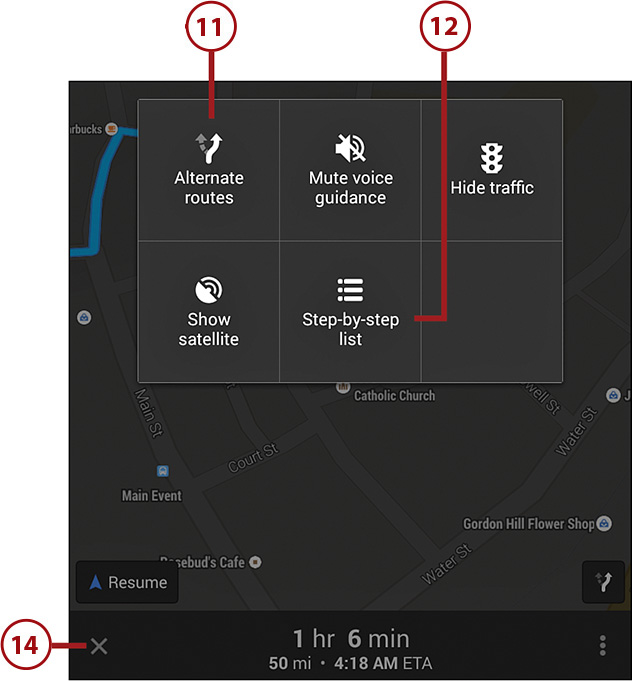
10. Tap the Menu button to view more options.
11. Tap Alternate Routes to view information about the route and alternative routes, respectively.
12. Tap Step-by-Step List to view directions as a step-by-step list.
13. Return to the map by tapping the Back touch button.
14. Return to the step-by-step directions list and map by tapping the Close button in the menu bar.
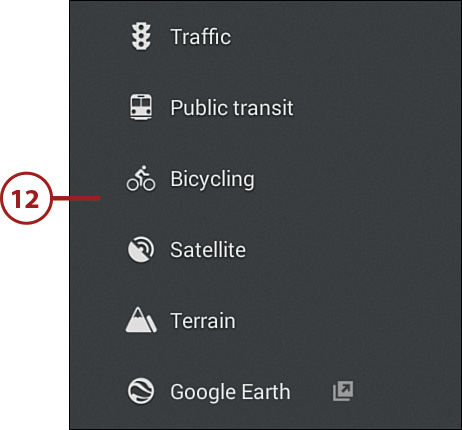
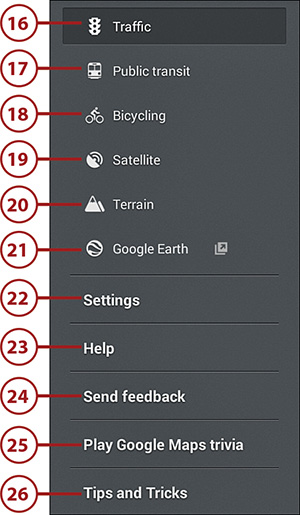
15. Tap to view the options menu list.
16. Tap to overlay a traffic status layer on the map.
17. Tap to overlay a public transit route layer on the map.
18. Tap to overlay a bicycling route layer on the map.
19. Tap to view a location map as a satellite image.
20. Tap to overlay a 3D geographic terrain and altitude information layer on the map.
21. Tap to download the Google Earth app and then view your map within the app.
22. Tap Settings to view your account information; edit your home or work address; change location information; view your maps history; change distance units; send feedback; get tutorials and help; and to read the terms, privacy policy, and notice information.
23. Tap to launch tutorials and help for the app.
24. Tap to send feedback about the app to Google.
25. Tap to play a map trivia game on the Google Maps Smarty Pins website within the Internet or Chrome browser.
26. Tap to get quick tips and tricks about using the Maps app.
Finding Local Information
The Maps app enables you to locate places of interest and retrieve information, such as addresses, hours of operation, and phone numbers for those places. You can use Local to pinpoint the exact locations of restaurants, bars, ATMs, gas stations, and more, or you can create a new location, such as a pharmacy or hospital. The Maps app offers a great way to explore nearby areas with which you might not be familiar.
1. Tap the Apps icon on the Home screen.

2. Swipe to the second page in the Apps screen and then tap Maps.
3. Tap the Directions icon.
4. Type the name of the destination for which you need directions in the Choose Destination field or select your destination from the list below the field.
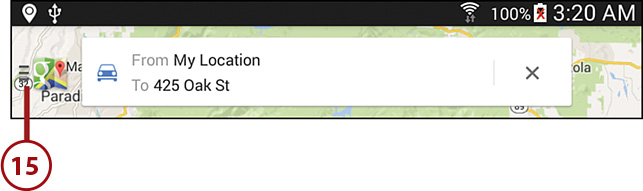
5. A street map appears with a highlighted route; close the route information by tapping the Close icon.
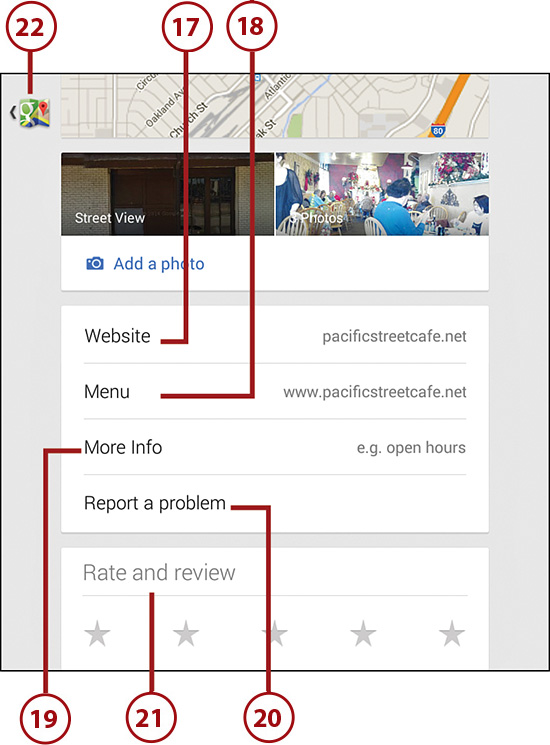
7. The most recent place you searched appears at the top of the list underneath the Search field. You can display a list of related establishments in and around that place by tapping the category name in the Explore Nearby window. For this example I tapped Eat to find restaurants.

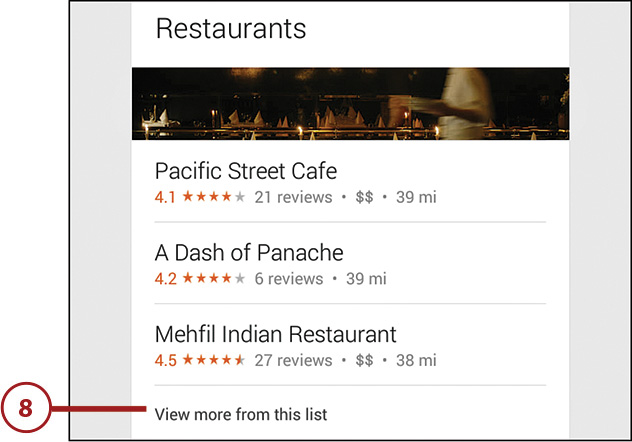
8. Swipe up and down to view all the results in various categories. At the bottom of each category tile, view all the results in the category by tapping View More from This List.
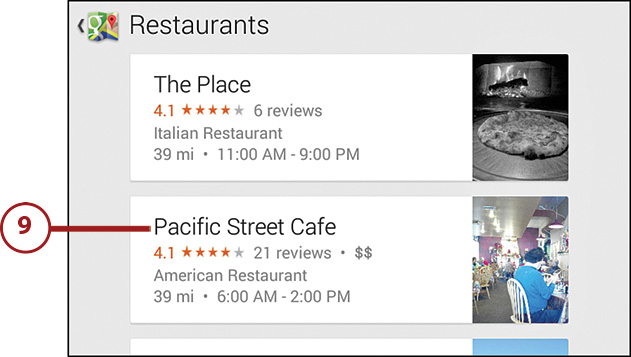
9. Swipe up and down the list to view all the results. When you want to find more information about an establishment, tap the appropriate tile.
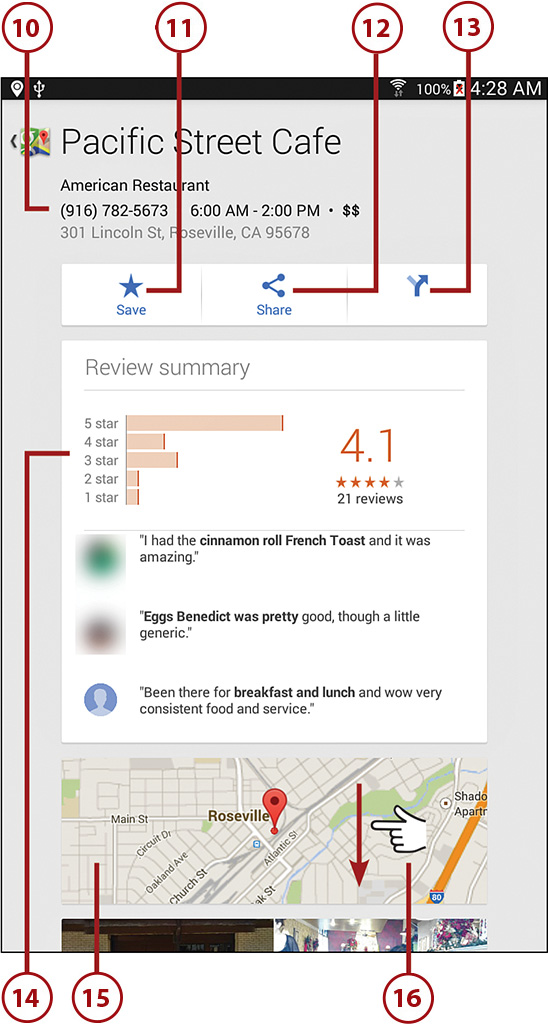
10. The business type, address, and hours of operation appear underneath the business name.
11. Tap Save to save this location for future searches.
12. Tap Share to share information about this business to other users on Dropbox, ChatON, email or Gmail, via a Bluetooth or Wi-Fi Direct connection, Flipboard, Google+, Google Hangout, to your Google Drive account, to the clipboard, or in a memo.
13. Tap to get driving directions to the business location.
14. The aggregated review ranking based on the number of written reviews appears in the Review Summary tile. Ratings vary from 1 star (bad) to 5 stars (great).
15. Tap to view a map of the location on the entire screen.
16. Swipe down the screen to view more options.
17. Tap to open the business website in the Internet or Chrome browser app.
18. If you’re viewing a restaurant and a menu is available, tap to view the menu in the Internet or Chrome browser app.
19. Tap to get more information about the business.
20. Tap to report a problem with the business so Google can update the business entry in Google Maps. For example, if the business listing has the wrong contact details you can send the correct details to Google. You can also ask Google to notify you when the problem has been resolved so you can check the revised listing for accuracy.
21. Tap to rate and review the business. Your review will be read by other Google Maps users who are interested in visiting the business. Swipe down the screen to read other user reviews.
22. Return to the map by tapping the Google Maps icon.
Sharing Locations with Friends
The Google Maps app enables you to see the location of your Google+ friends on a map or as a list. You can set up Google+ to share your location with individual friends or circles of friends.
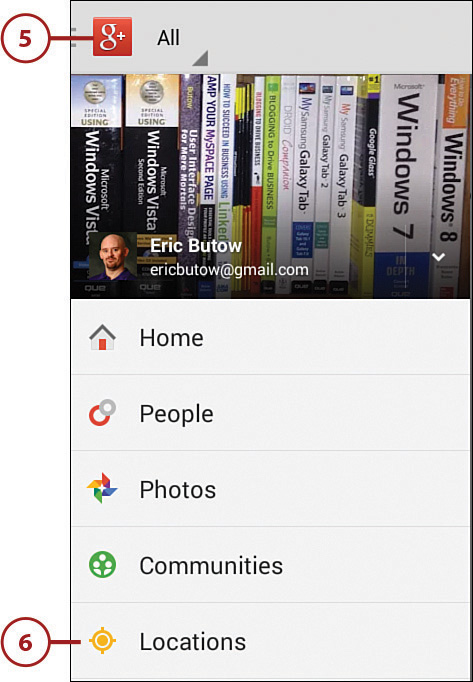
1. Tap the Apps icon on the Home screen.

2. Tap Google+.
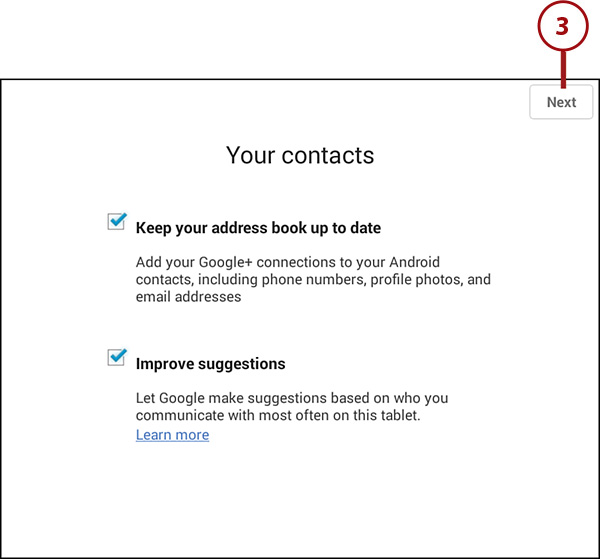
3. By default the Google+ app adds your Google+ contacts to your Contacts database on the Tab 4, and the app also makes suggestions about using Google+ more effectively based on who you communicate with using the Tab 4. Tap Next.
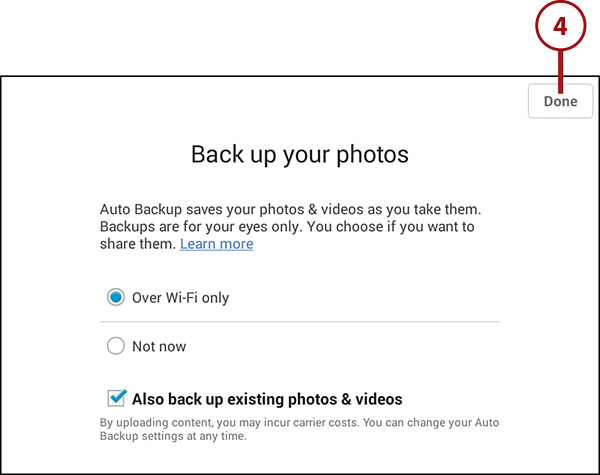
4. Tap Done to back up the photos stored on your Galaxy Tab 4 onto Google+.
6. Tap Locations.
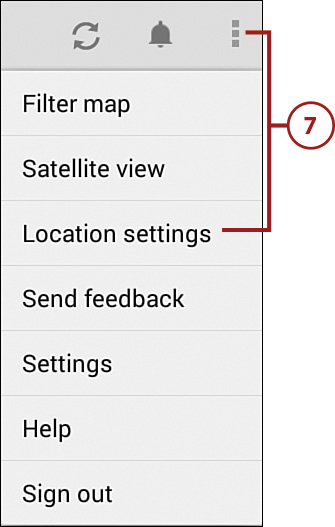
7. Tap the Menu button in the menu bar and then tap Location Settings.
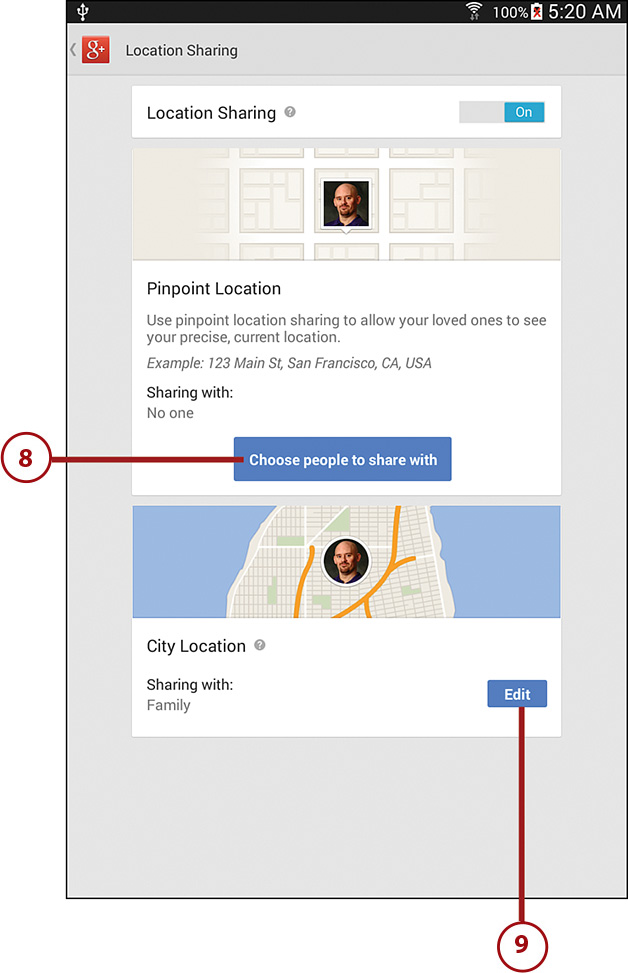
8. Tap Choose People to Share With in the Pinpoint Location tile if you want to share your exact location with others.
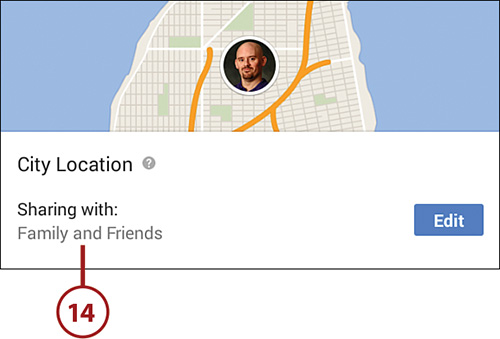
9. Alternatively, tap Edit in the City Location tile if you only want to share your city. This example uses the city location.
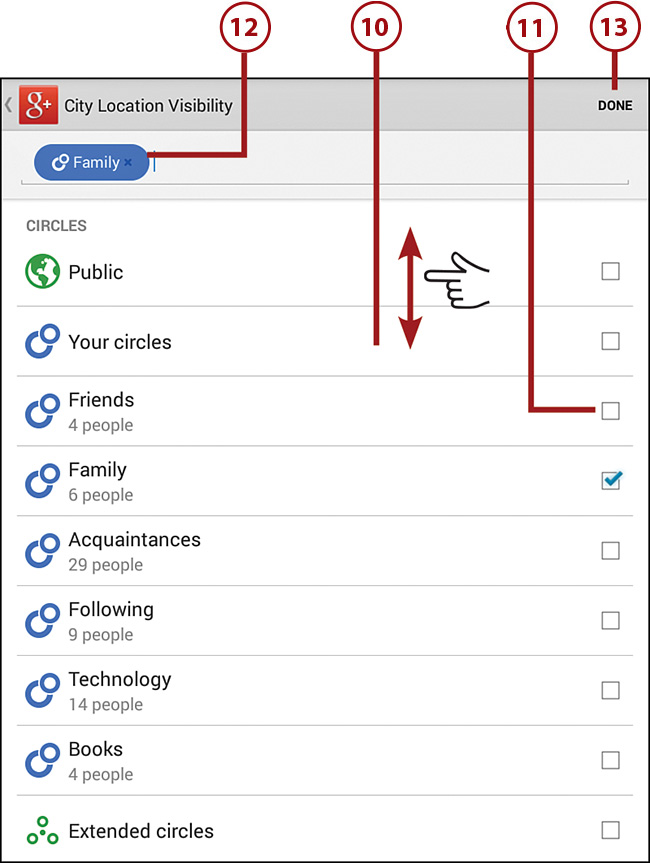
10. Swipe up and down in the screen to view the circles and individual friends with whom you want to share your location information.
11. Select a circle or friend by tapping the check box to the right of the circle or friend name.
12. The circles and friends you added appear above the circles list.
13. Tap Done when you’ve made all your selections.
14. The City Location tile reflects the sharing changes you made.
15. Return to the map page in Google+ by tapping the Google+ icon in the menu bar.

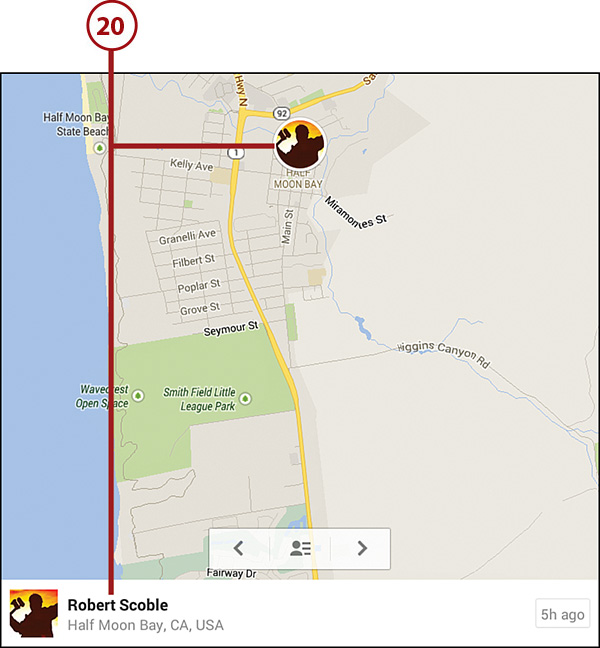
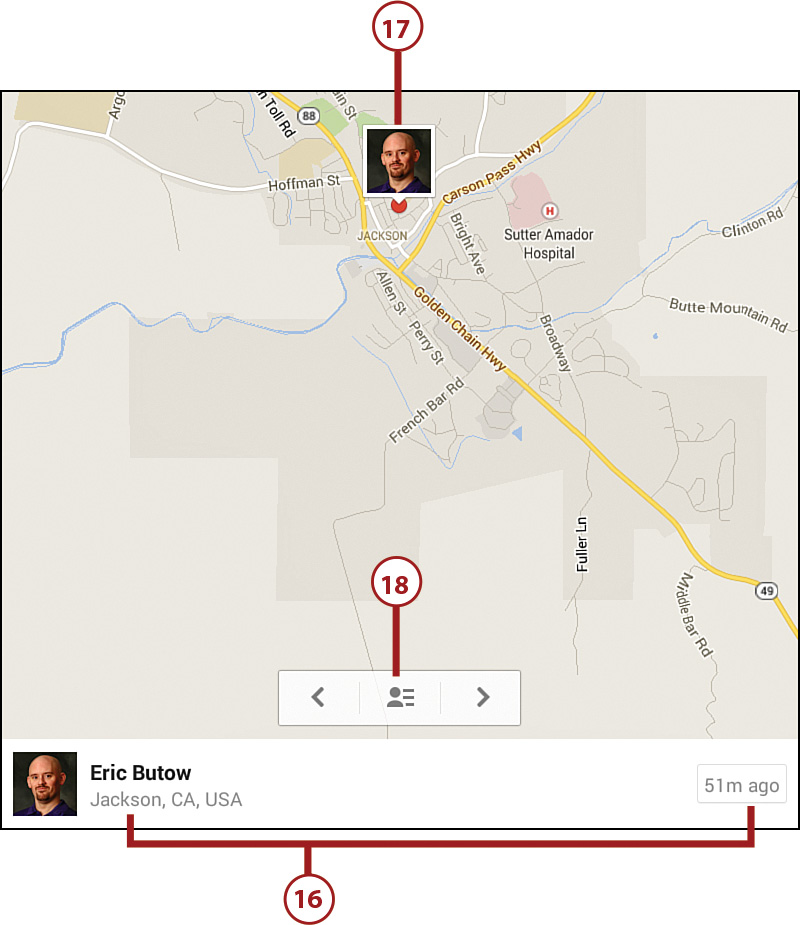
16. The name and photo of the person who appears nearest you and is sharing his contact information appears at the bottom of the screen. The information includes the person’s current location and how long ago the person checked in at that location.
17. The person’s photo appears above the person’s current location in the map.
18. See a list of more contacts who are sharing their locations by tapping the Contact icon.
19. Tap the name of a person in the list.

20. The person’s current location appears on the map and more information about the person appears at the bottom of the screen.