
2. Importing Your Photos
Adding pictures to your Photos Library is called importing. With Photos there are several ways you can import your photographs. This chapter explains the ways you can import your pictures from various devices, including your digital camera; an iPhone, iPod touch, and iPad; and folders on your computer.
![]() Migrating photos from an iPhoto or Aperture library
Migrating photos from an iPhoto or Aperture library
![]() Creating a library
Creating a library
![]() Importing photos from a device, folder, or Mail
Importing photos from a device, folder, or Mail
![]() Turning off automatic imports
Turning off automatic imports
![]() Finding your Photos Library
Finding your Photos Library
It used to be that importing photos into a photo application was a big pain. Every different source of the photographs—hard drives, digital cameras, mobile phones—seemed to have a different, complex import process. With the latest version of Photos, Apple has simplified importing and, at least as far as devices go, after you know how to import from one source, you know how to import from the others.
Migrating an iPhoto or Aperture Library to Photos for Mac
If you have previously used iPhoto or Aperture and are switching to Photos, you need to know how to migrate your photo library into Photos.
Migrate a Library to Photos
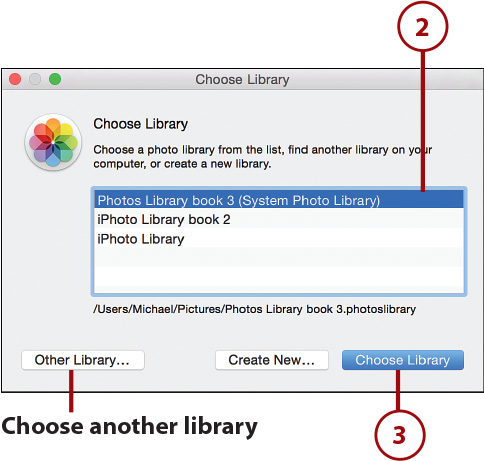
1. After launching Photos for the first time, click the Get Started button to open the Choose Library screen.
Migrate Now
If you’re totally new to the Mac and don’t have an iPhoto or Aperture library you can skip this task and continue to the “Creating and Working with Libraries” section later in this chapter. But if you have photos in iPhoto or Aperture, you’re going to want to move those over to the new Photos for Mac because Apple is discontinuing both iPhoto and Aperture. At some point, the programs will no longer run on a future version of OS X, and you’ll be locked out of your pictures forever.
My Library Isn’t Listed
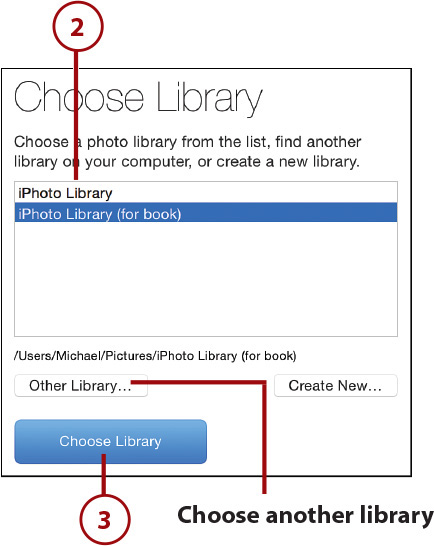
If you have saved your iPhoto or Aperture library on an external hard drive or in a unique place on your Mac, and Photos doesn’t find it and display it in the existing libraries list, click the Other Library button and navigate to the library in the Finder window that appears.
2. From the list of iPhoto and Aperture libraries, select the one you want to migrate into Photos.
3. Click the blue Choose Library button to open the Preparing Library screen that lets you know how much more of your old library needs to be migrated. This could take as little as a few minutes to over an hour depending on the size of your library. When it’s complete you’ll be taken right to the new Photos app.
Your Old iPhoto and Aperture Library Remain Intact
Importing an iPhoto or Aperture library to Photos doesn’t alter or delete the old library. You can still open those libraries in iPhoto or Aperture by launching their respective app. Migrating an iPhoto or Aperture library over simply creates a new Photos library from the pictures in the iPhoto or Aperture libraries.
Creating and Working with Libraries
If you have no iPhoto or Aperture libraries to migrate and want to start using Photos for OS X from scratch, you need to create a new Photos library. Initially it’ll just be a blank library—that digital shoebox; eventually the library will contain all the pictures you ever import into Photos.
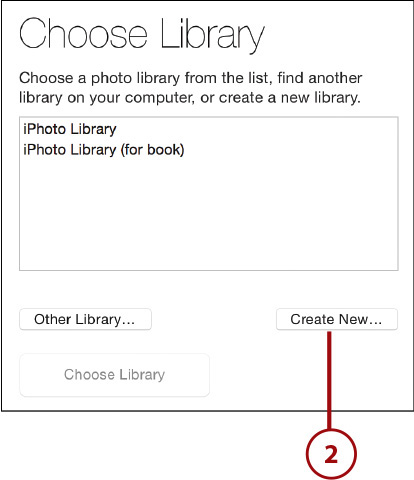
Create a Library
1. After launching Photos for the first time, click the Get Started button to open the Choose Library screen.
2. Click the Create New button.
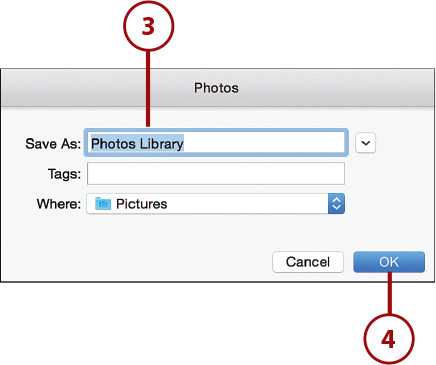
3. Enter a name for your new library. The default name is Photos Library, which is fine to keep if you only have one Photos library.
4. Click OK. The Photos app launches with an empty library ready for you to start importing photos.
Create Additional Photos Libraries
You aren’t limited to only having one Photos library. You can create as many as you like so you can choose which one to launch each time you open Photos. Creating multiple Photo libraries is helpful if multiple people use the Photos app under the same user account on OS X or if you want to differentiate your Photo libraries by criteria such as personal collections and work collections.
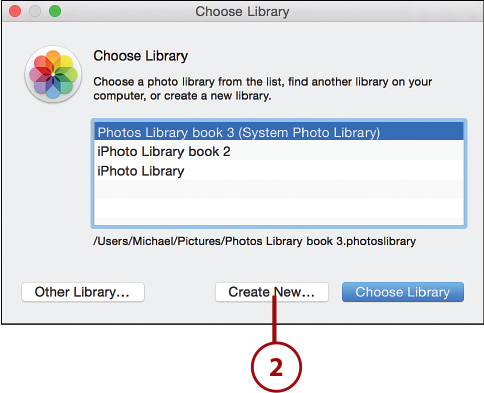
1. Find the Photos icon in the Applications folder. Hold down the Option key on your keyboard while you double-click the icon to open the Choose Library window.

2. Click the Create New button.
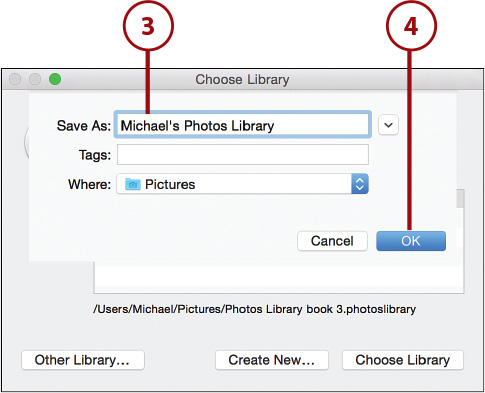
3. Enter a name for your new library. The default name is Photos Library, but be sure to change this name to something else if you already have a Photos library called that.
4. Click OK. The Photos app launches with a new empty library ready for you to start importing photos.
Switch Between Photos Libraries
When you have multiple libraries, make sure you’re opening the right one each time you launch Photos. By default Photos opens the last-opened Photos library.
1. Find the Photos icon in the Applications folder and hold down the Option key on your keyboard while you double-click the icon to open the Choose Library window.

2. Select the library you want to open.
Where’s My Library
If your library isn’t listed in the Choose Library window (for example, if you have it on an external hard drive) then click the Other Library button and navigate to the library in the Finder window that appears.
3. Click the Choose Library button. Photos opens the library you’ve selected.
Importing Photos to Libraries
Photos supports importing your pictures from a range of devices, including card readers, iPhones, digital cameras, or even your Mac’s hard drive. For many of the import sources there are even multiple ways you can import your images. But know there is no one “right way.” Rather, choose the way that works best for you.
Import from iOS Devices, Digital Cameras, or Card Readers
Photos works with virtually any card reader or digital camera on the market, including all of Apple’s iOS devices that offer camera functionality.
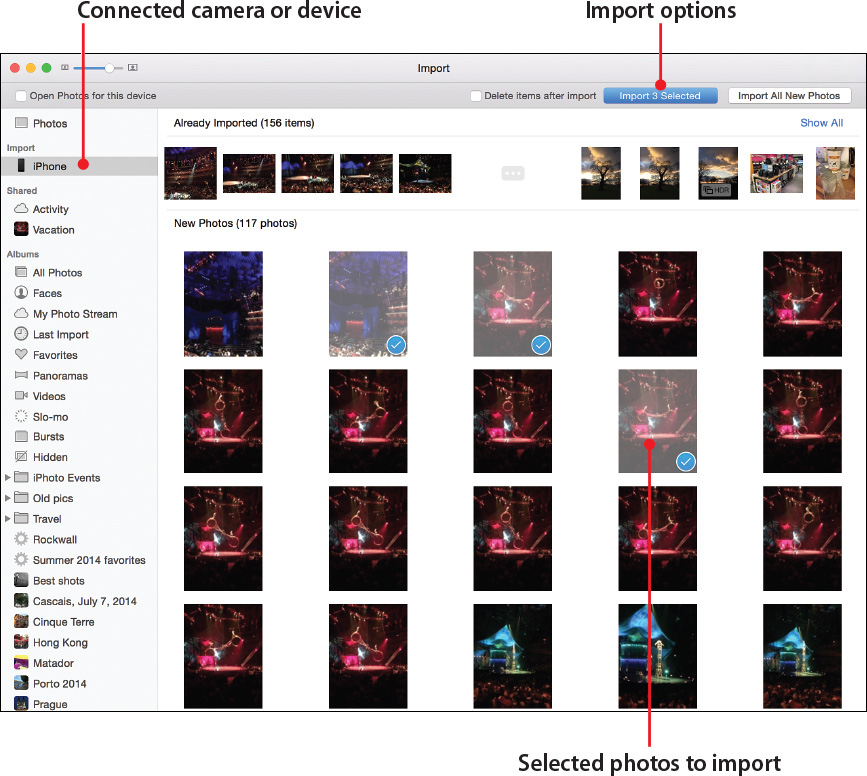
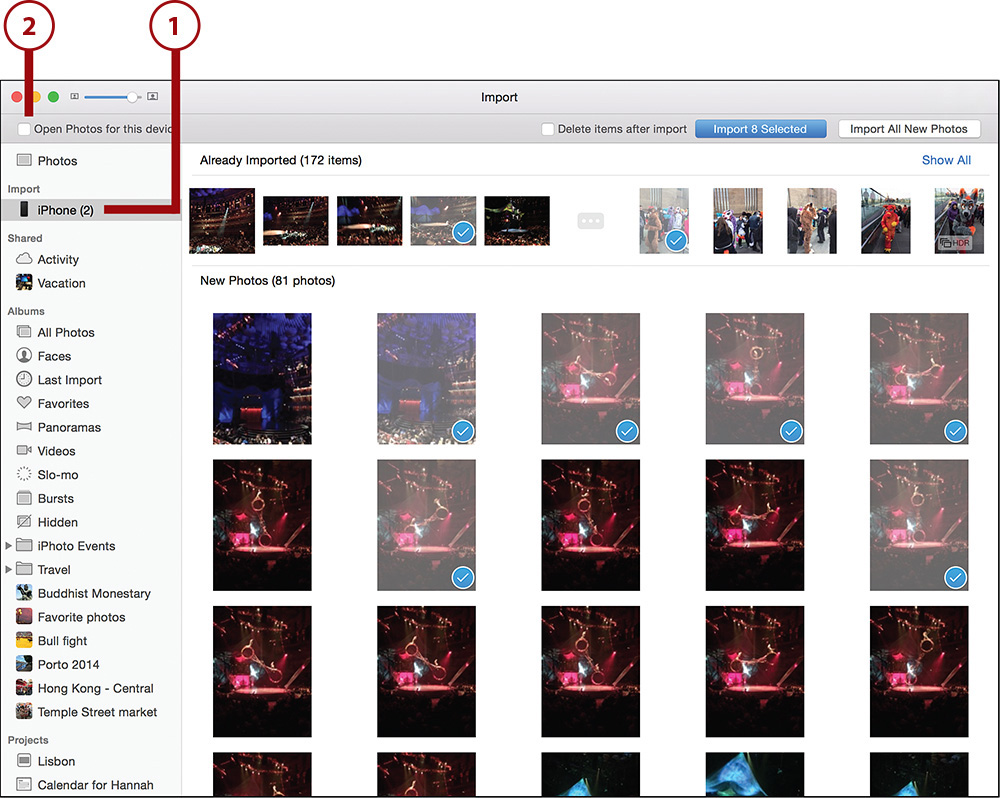
1. Plug in your digital camera, mobile device, or card reader to your Mac’s USB port, or put the digital camera’s SD card into the Mac’s SD card reader. The device you have plugged in will then appear in the Devices list in Photos’ Source List under a new Import header.
2. (optional) Click the Show All button to expand the Already Imported list to see all the photos you’ve already imported that are still on the device.
3. (optional) Mark photos to be deleted from your device after you import them (thus freeing up space on your device) by checking the Delete Items After Import checkbox.
4. Import only specific photos from your device (rather than importing all of them) by clicking each photo you want to import (a blue check mark appears on selected photos). You can select photos from both the Already Imported and New Photos sections.
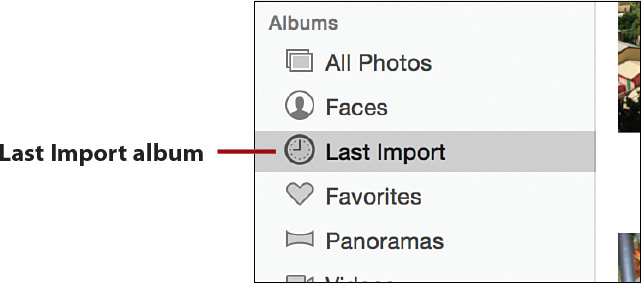
5. Click the Import Selected button. The Last Import album opens so you can see the newly imported photos.
6. Alternatively, import all of the photos on your device by clicking the Import All New Photos button. The Last Import album opens so you can see the newly imported photos.
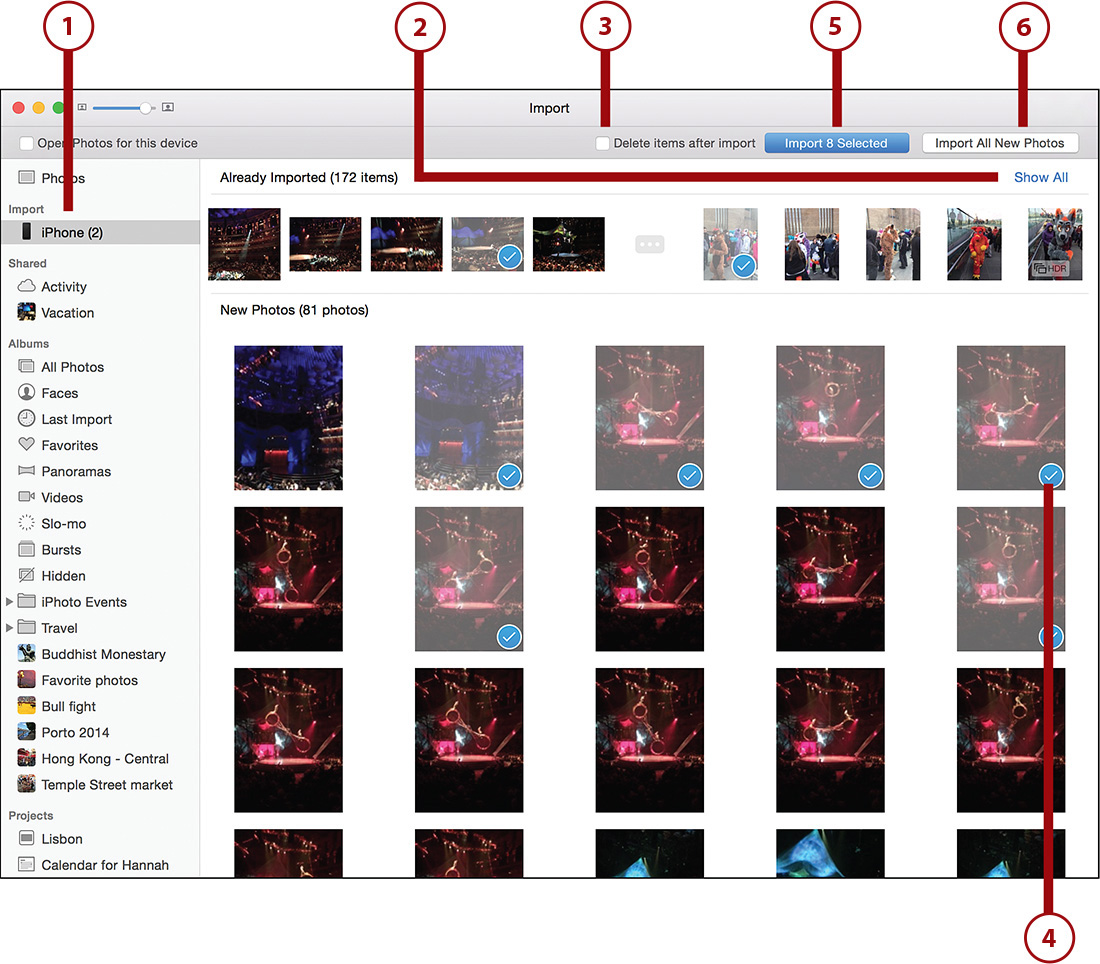
If you have the Source List hidden, a new Import button displays in the toolbar at the top of the screen.
Turn Your Camera On!
If you have your camera plugged into your Mac and Photos does not recognize it, make sure your camera is turned on and that it has battery power. A camera must be powered on and usually be in “view images” mode for Photos to recognize it.
Import from a Folder on Your Mac or from an External Device
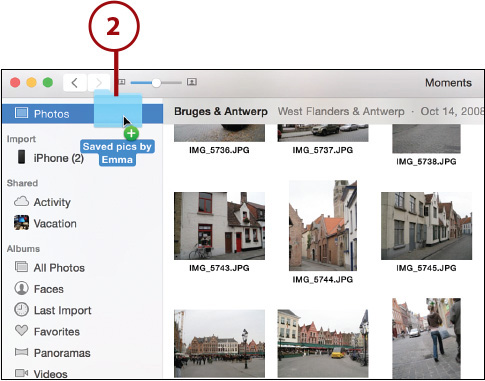
Another way you can import photos to Photos is directly from your Mac or an external device such as an external hard drive. There are two ways to import photos that are already on your Mac and on external drives: dragging and dropping files or using the File menu.
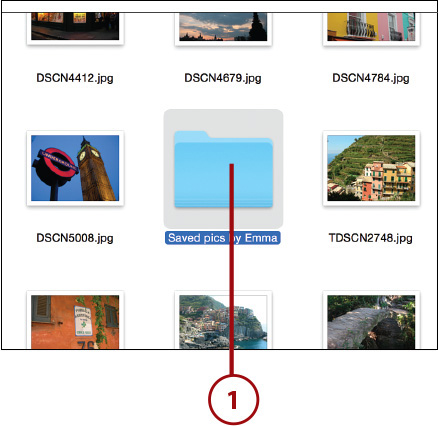
2. Drag the selected item into the body of the Photos window or onto the Photos header in the Source List. The pictures are automatically imported and are added to your Photos Library.
Copied, Not Moved
Keep in mind that when you drag and drop files or folders, you are copying the photos to your Photos Library. A copy of the photograph still remains in the original location on your Mac or external device. You can delete either the original copies or the ones you put into Photos without affecting the others.
Use the File Menu
1. With Photos open, select File, Import.
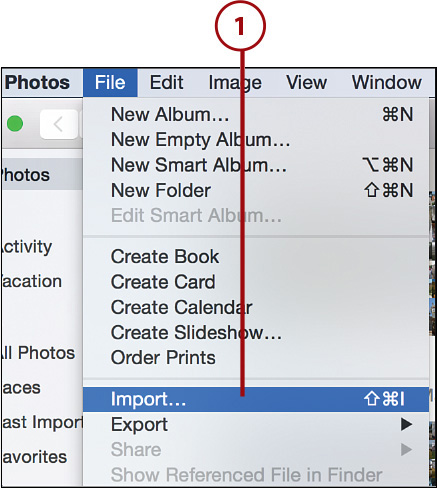
2. Navigate to the photograph or folder of photos you want to import.
3. Select the photos you want to import, and click the Review for Import button.
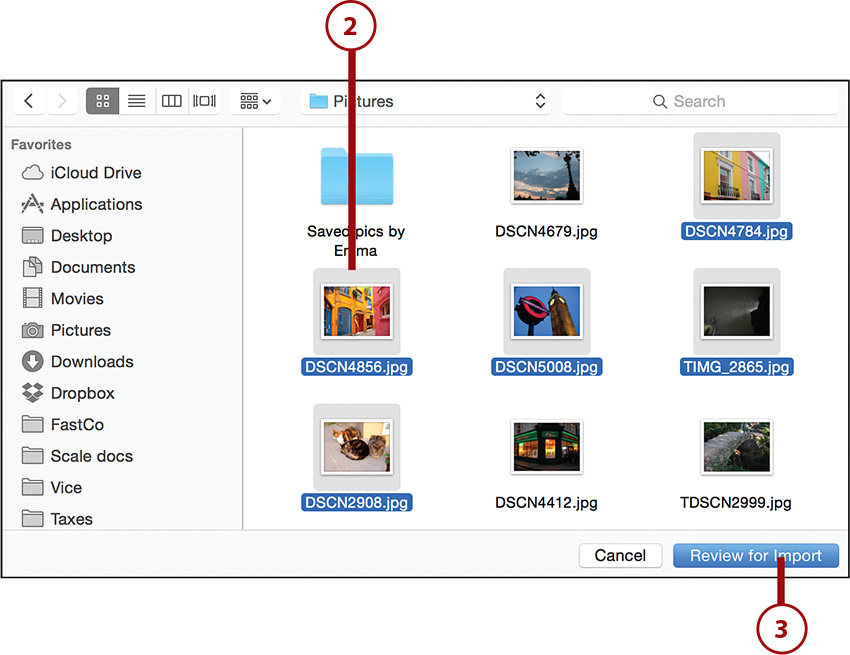
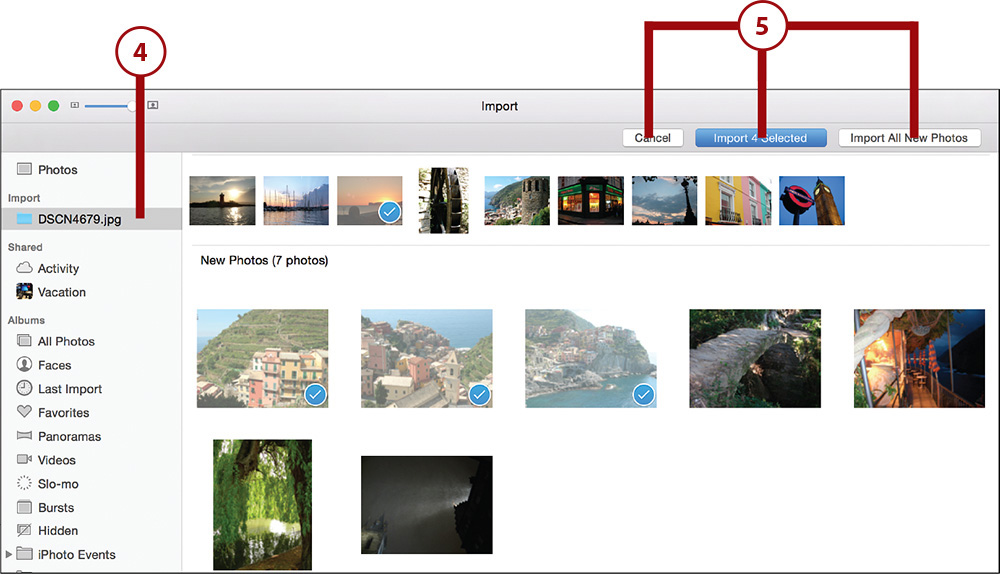
4. The folder or pictures you selected show up in the Source List under the Import header. Here you see if any of the photos have already been imported and which ones haven’t been.
Importing Only One Photo
If you select just a single image to import, Photos does not ask you to review the image for import; it assumes you’ve already reviewed it because you’ve selected only one image. The lone image is immediately imported into the library and displayed in the Last Import album.
5. Just as with importing from a device, you can choose to import only selected items or import everything by clicking the respective buttons. When importing from the File menu you also have the option to cancel the import by clicking the Cancel button.
Enabling Automatic Device Imports
By default, when you plug in a camera via the USB port to your Mac or insert a camera card into a card reader that is connected via USB to your Mac, Photos does not automatically open. However, for convenience you may prefer that Photos open automatically every time you plug in a device that has photos on it.
Enable Automatic Import
1. With your device plugged in, open Photos and select the device from the Source List under the Import header.
2. Check the Open Photos for This Device box to enable automatic imports.
If you later decide that you don’t want Photos to automatically open when you connect a device, just uncheck the Open Photos for This Device box.
Dealing with Duplicates
When importing images from a CD or a folder on your computer, or even from a camera where you left the original images on the card after a prior import, you run the risk of importing photographs you’ve already imported. Luckily, Photos has a built-in duplicate detector. If you try importing a photograph that you have imported before, the Duplicate Photo warning appears.
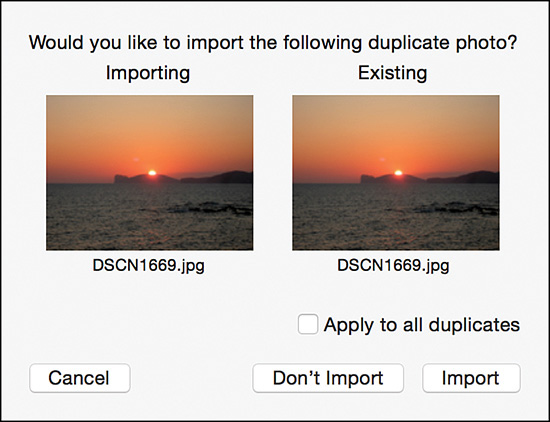
The Duplicate Photo warning gives you the option of reimporting the photograph, which adds another copy of it to your library, or not importing it, which causes Photos to skip that single photo and move on to the next. If you check the Apply to All Duplicates check box, Photos either imports all duplicates or doesn’t import all duplicates in the current import session, depending on whether you click Import or Don’t Import.
>>>Go Further: Finding Where Your Photos Are Stored
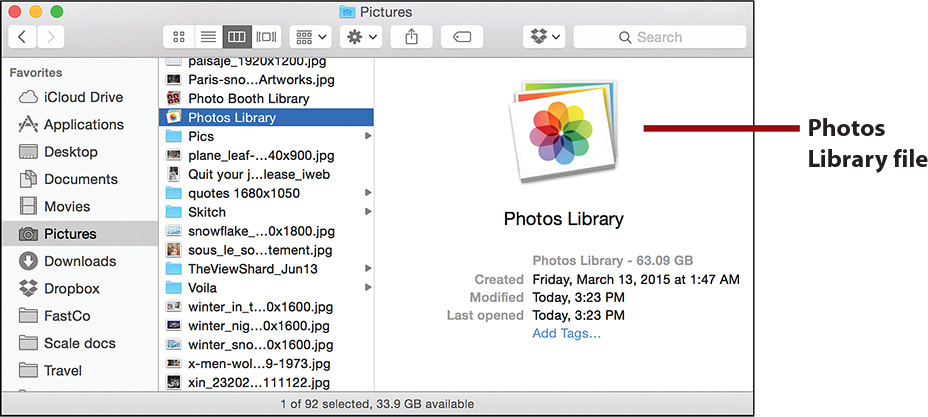
• It allows you to easily back up your entire photo library by simply copying the Photos Library file to an external hard drive.
• It ensures that all the photos on your computer are in one easy-to-find place and eliminates clusters of folders of pictures from being scattered around your Mac.
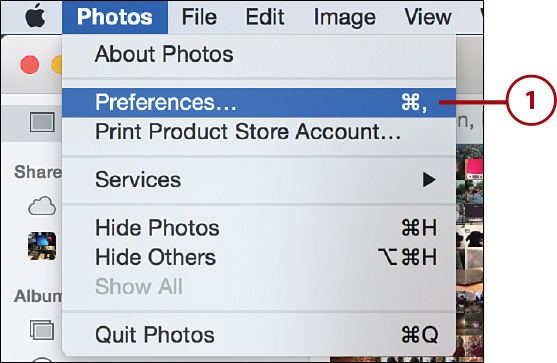
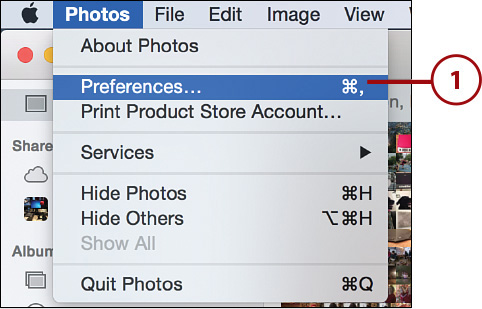
1. Select Photos, Preferences.

2. On the General tab of the Preferences, click the Show in Finder button. A Finder window opens with your Photos Library file selected.
Disabling Copy Imported Photos
As mentioned, Photos copies a photo by default when you add it to your Photos Library. This means that when you drag a photo from the Finder into Photos, the original photo remains in the Finder. The photo that shows up in Photos is a separate copy of that original file. In other words, you have two copies of that same photo.
Photos gives you the option of turning off the Copy Imported Photos feature in the Photos preferences. By turning it off, any photo you import into Photos will automatically be removed from its original location after import.
Disable Copy Imported Photos
1. Select Photos, Preferences from the menu bar at the top of your screen.
2. On the General tab, uncheck the Copy Items to the Photos Library box.
