4. Working with Metadata and Searches
This chapter covers how you can easily view all the extra information, such as shutter speed and aperture, you recorded when taking your photos. It also shows you how to mark your photos by favoriting and adding keywords to them. Finally the chapter explores how the metadata on photos helps when you’re searching for them.
![]() Learning about Photos’ Information window
Learning about Photos’ Information window
![]() Changing a photo’s date, and time
Changing a photo’s date, and time
![]() Using titles and descriptions
Using titles and descriptions
![]() Marking favorite photos
Marking favorite photos
![]() Hiding and deleting photos
Hiding and deleting photos
When you take a photograph on a digital camera, you’re recording more than an image. You’re also recording dozens of bits of information about that photo, such as the lens size used, the photo resolution, the name of the camera the photo was taken with, the aperture and shutter speed, GPS location coordinates, and more. When you are viewing your photos, this information is of little use. However, when you are organizing, navigating, and searching your photos, this information can be invaluable—and you find it all in Photos’ Information window.
Working with the Information Window
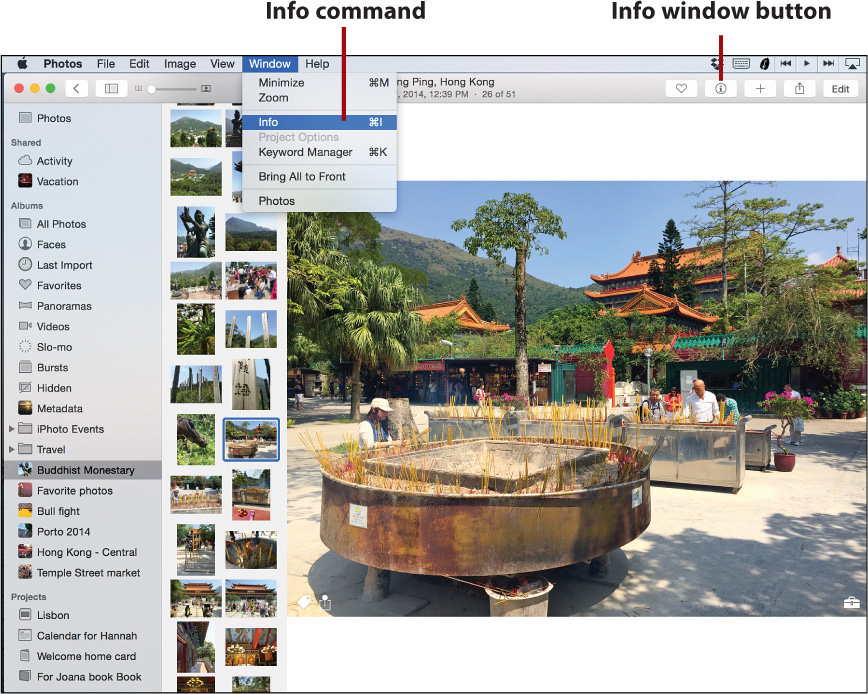
The Information window (or Info window for short) is a wonderful little tool to quickly get all kinds of information about a single photo, a group of photos, or your entire Photos library. There are three ways you can access this window:
• Click the Info window button in the toolbar when you are viewing an individual photo.
• Select Window, Info from the menu bar.
• Press Command+I to show or hide the Info window at any time.
The Info window is responsive, meaning the information it displays changes depending on what you have selected. When you have your entire Photos library selected the Info window shows different information than when you have an album selected. And when you have selected an individual photo from an album the Info window changes again.
For example, when I have my Photos library selected in Photos’ Source List, the Info window shows me the filename of my Photos library, the date range of every photo in it from the first to the last, the number of photos and videos, the size of the Library, a selection of Faces in the library, and a map showing the location of some of the photos in the library.
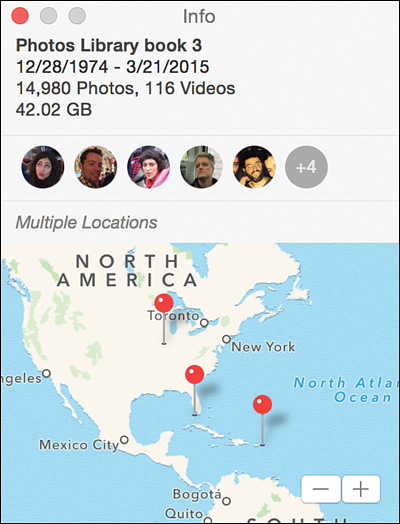
Info window for entire library
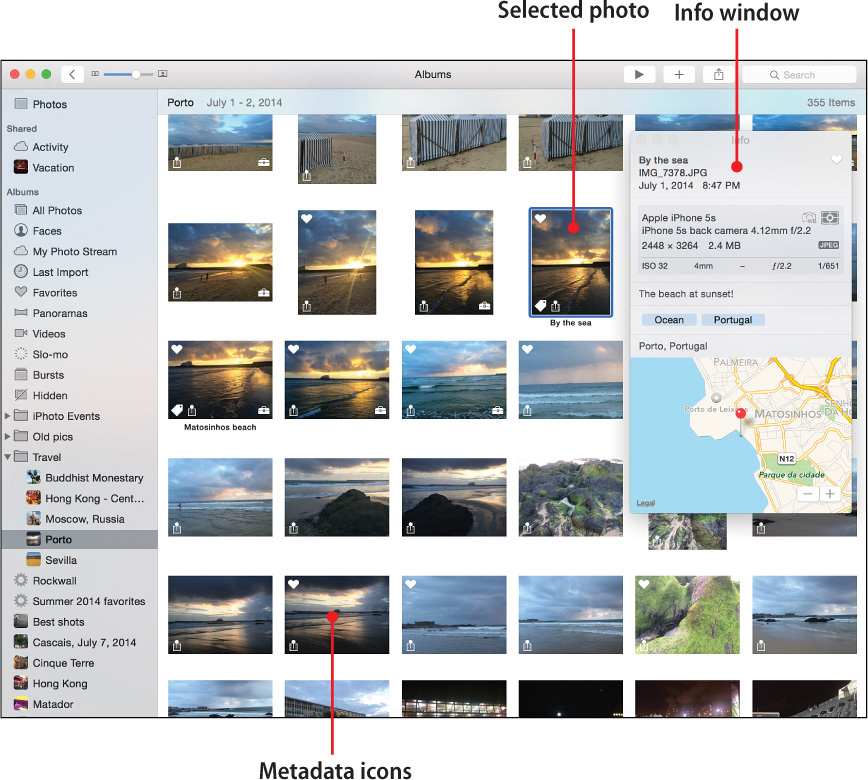
But if I go one level deeper in my Photos library and select an album, the Info window dynamically changes to give me only information about that album. In this case the Info window is showing me the name of the album, the date and time range when the photos in the album were taken, the total size of the photos in that album, and a more detailed map showing where photos in that album were taken.

The real power of the Information window is evident when you are viewing a single photo. That’s because it shows you more information, or metadata, about your photos than you probably knew existed. It’s this Info window for the individual photo that’s really worth exploring.
• General information: This top part of the Info window includes the sequence number of the photo in a particular album or Moment, the photo’s title, the filename, and the date and time the photo was taken.
• Favorite button: Click this button to mark it as a favorite or unmark it as a favorite. You can read more about marking favorite photos later in this chapter.
• EXIF info: Examine the EXIF information (metadata) for your photo. You can read about what everything in this section means in the “What Is EXIF?” sidebar.
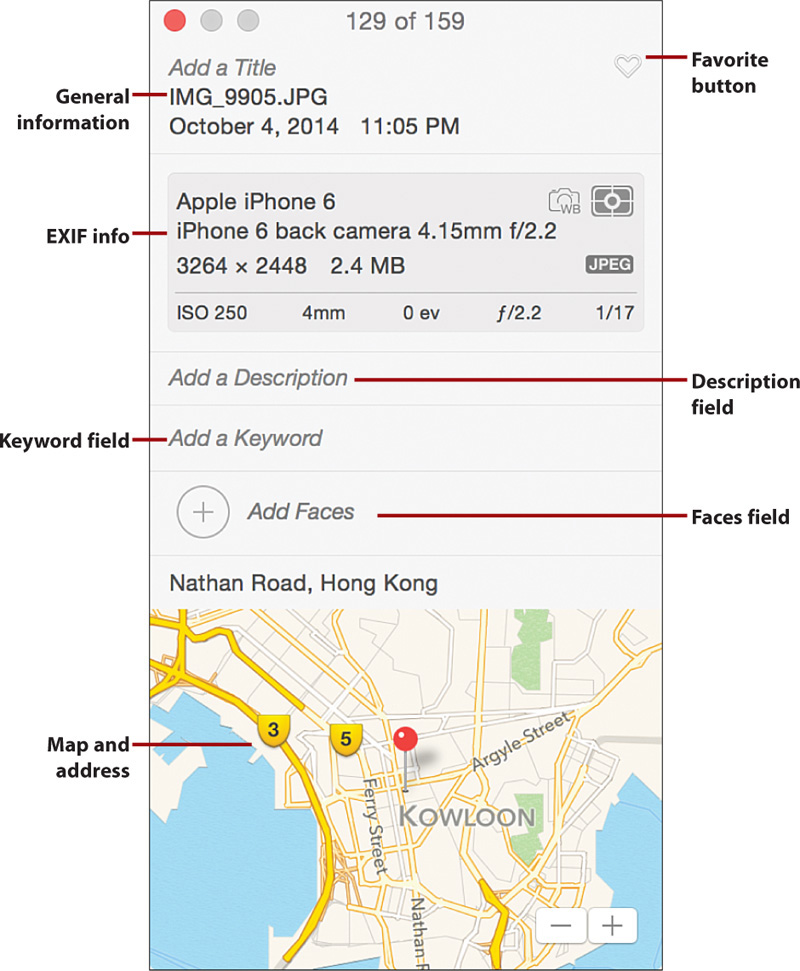
• Description field: Use this field to make notes about the photo.
• Keyword field: View and add keywords to your photos.
• Faces field: Read a list of names of any faces in your photo and add more faces to the list.
• Map and address: View a map with a pin representing the specific location in the world you took your photograph. You can zoom in and out on the map.
It’s Not Mission Critical
If you feel freaked out by all the numbers in the EXIF information, don’t worry! You don’t need to know what any of the EXIF information means to be a good photographer or to enjoy editing and organizing your pictures in Photos. Apple just added this EXIF information to Photos’ Information Window for easy reference for those of us who do like to see our pic’s EXIF information.
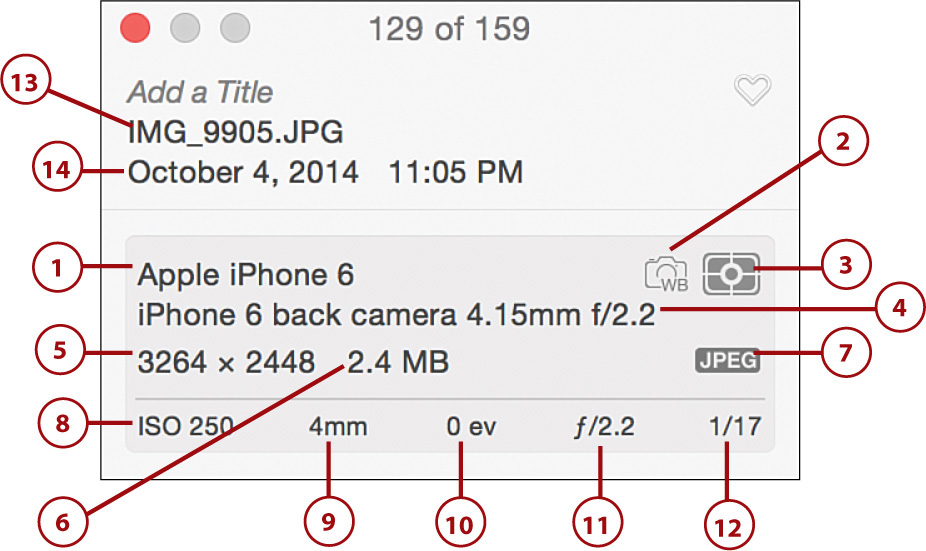
1. Camera name: This is the name of the camera you took the selected photo with. In this case, it was an Apple iPhone 6.
2. White balance: The letters WB signify that the photo was taken using the camera’s automatic white balance. White balancing is a technique that ensures what’s white in real life shows up as white when you take a picture of it.
3. Metering mode: This appears as the crosshairs in a rectangular box in the EXIF window. The metering mode tells you the way your camera determined the photo’s exposure.
4. Lens information: This displays the length of the camera’s optical lens. In this case, the camera had a 4.15mm f/2.2 lens and was the iPhone 6’s back camera.
5. Resolution: This shows you the resolution of the photo in pixels. The selected photo is 3264 pixels wide by 2448 pixels high.
6. File size: The size of the photo. It’s 2.4MB in this case.
7. File type: The file type of the photo. It’s JPEG in this case. Other common formats are TIFF, RAW, and PNG.
8. ISO: ISO is a measure of how sensitive the image sensor in the camera is to the amount of light present. The higher the ISO, the more sensitive the image sensor is, which increases the ability to take pictures in low-light situations.
9. Focal length: The focal length determines how much your camera can see. It’s the distance between the center of the lens and its focus. In this case, the focal length of the photo is 4mm.
10. Exposure compensation: Basically, exposure compensation allows your camera to automatically brighten or darken images so you can get the best picture possible. A number followed by the letters ev designates exposure compensation. In this case, the photo’s exposure compensation was 0.
11. Aperture: The aperture is the size of the opening in the camera lens while taking a photograph. This limits the amount of light entering the lens. It is designated by f/ followed by a number. The higher the number, the smaller the aperture. Higher numbers mean less light. The aperture in the example is f/2.2.
12. Shutter speed: This is the length of time the camera’s shutter is open. Shutter speed is generally longer in night shots because the length of time the shutter is open must be longer in order to take in the appropriate amount of light. The shutter speed of the photo in the example is 1/17—that means the shutter was open for 1/17th of a second.
13. Filename: Technically a few bits of EXIF information reside outside the shaded box, including the filename. Camera manufacturers use conventional standards when naming photos you have taken. These names often begin with DSC_ or IMG_; in this example the name the camera assigned to the photograph is IMG_9905.JPG.
14. Date and time: The date and time you took your photograph is also outside the shaded box. This is the only EXIF information Photos allows you to alter. You find out how to change this later in this chapter in the section “Changing the Date and Time.”
Viewing Metadata on Thumbnails
Photos actually gives you a second place to view your picture’s metadata: It’s right on the picture’s thumbnail. You can enable a simple View command to display on the thumbnail small white icons that give you a quick glance at various types of metadata for the picture. While these icons are nowhere near as detailed as the metadata information in the Info window, they can help you quickly ascertain just by looking at them whether a picture has metadata that might interest you.
Use the following steps to view metadata icons on your photos’ thumbnails:
1. Select View, Metadata.
2. Click each type of metadata you’d like to be able to view on your photos. A check mark next to the type of metadata confirms that it’s selected.
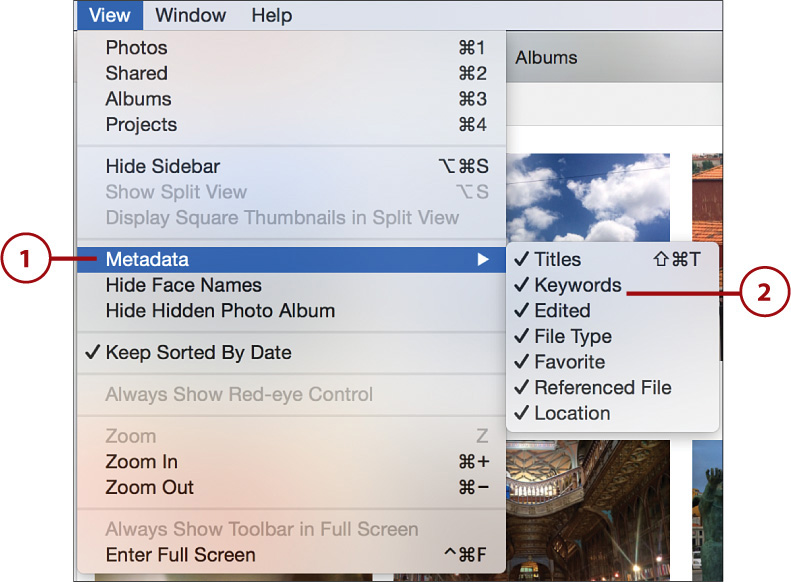
White icons display around the borders of your photos. Note that only photos that contain the metadata you’ve selected show icons.
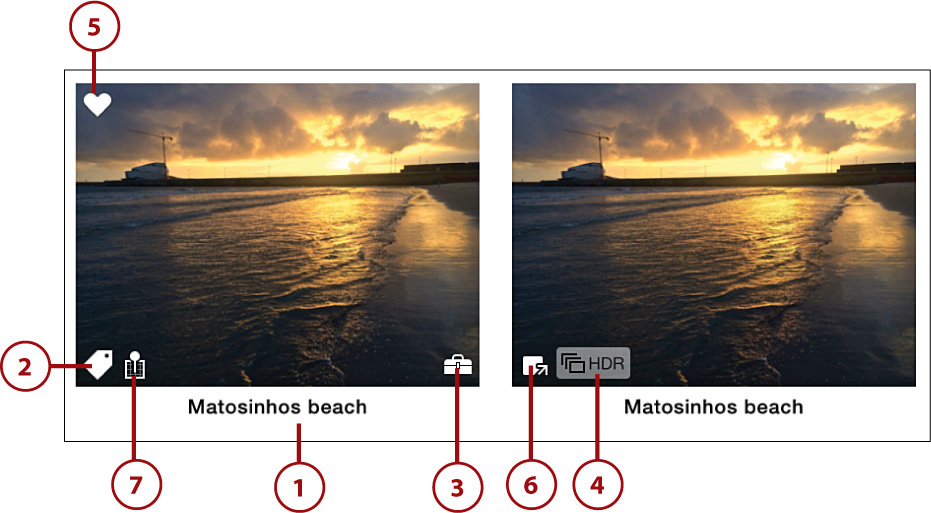
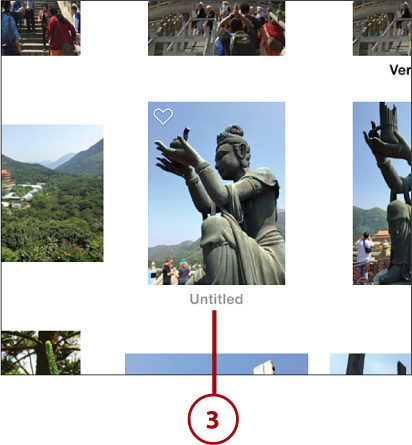
1. Titles: If you’ve given a title or name to your photo, the title displays below the thumbnail.
2. Keywords: A tag icon indicated the photo has one or more keywords attached to it.
3. Edited: The toolbox icon signifies that the photo has been edited. Edits you’ve made become part of a photo’s metadata.
4. File Type: If you’ve taken a regular video, slow-motion video, or HDR photograph you see various File Type icons. For a regular video you see a video camera icon. A slow-motion video is indicated by a circular icon made of dashes, and HDR images are designated by the letters HDR.
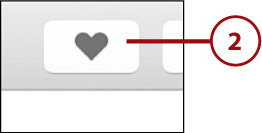
5. Favorite: A heart icon signifies you’ve marked the photo as a favorite. This is the only thumbnail metadata icon you can interact with. Click it to unfavorite the photo. Click it again to favorite it.
6. Referenced File: A referenced file is one that shows up in Photos’ library but isn’t actually stored in the library file. Instead it’s saved by someone else on your Mac or on an external hard drive. A referenced file’s icon looks like a white square with an arrow pointing out of its lower-right corner.
7. Location: This icon looks like a pin in a hollow square, and it means your photo has location data associated with it.
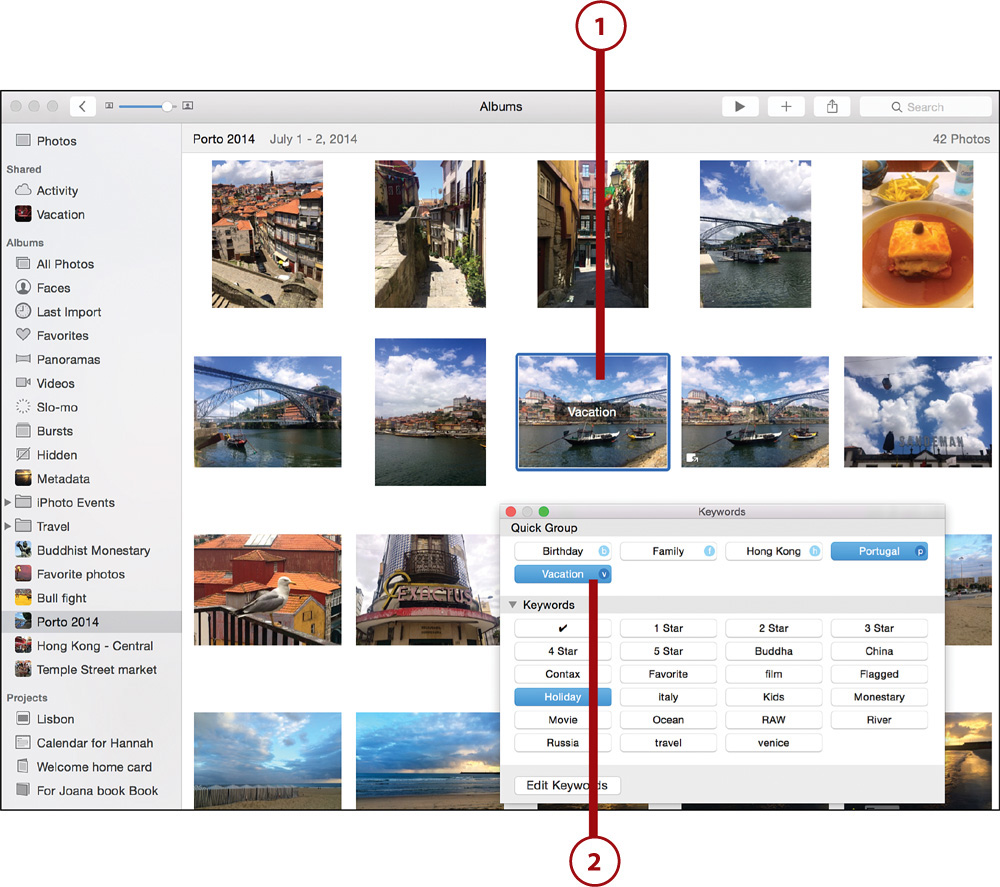
You can also view and interact with some of the metadata icons when you view an image in Photos’ viewer.
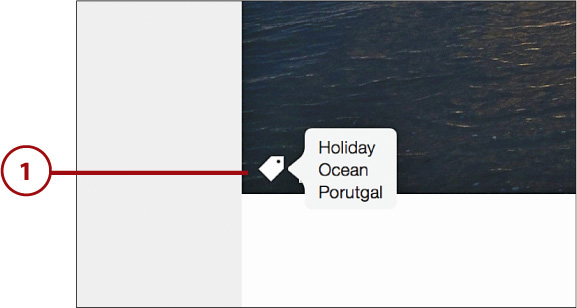
1. Click on the Keywords icon to view a pop-up window that lists the picture’s keywords.
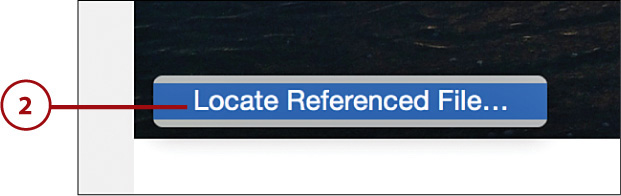
2. Click the Referenced File icon so a window saying Locate Referenced File appears. Click it to go to the location on your Mac or external hard drive where the actual file resides.
3. Click the Location icon to open the Info window and see a mini map of where the photo was taken.

Changing the Date and Time
Photos main purpose is to help you organize and categorize your photographs. A big way Photos helps you do this is by its Years, Collections, and Moments grouping. For those groupings to work properly, however, your camera must have the correct time and date metadata. If it doesn’t, when you search through your Years, Collections, or Moments, you may see that photos that you took last week are showing up chronologically in the past—way behind photos you took years ago.
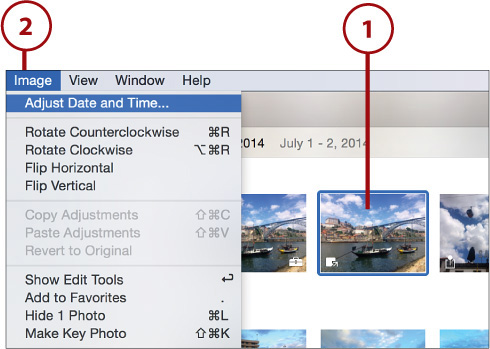
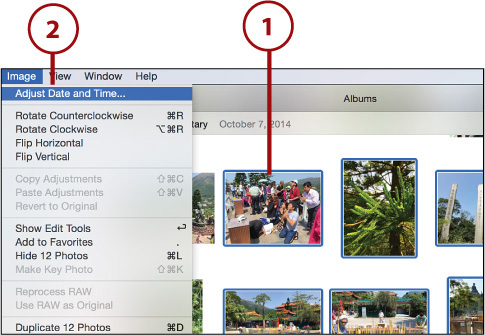
2. Select Image, Adjust Date and Time. In the dialog box that opens, you see the photo you have selected as well as the original date and time.
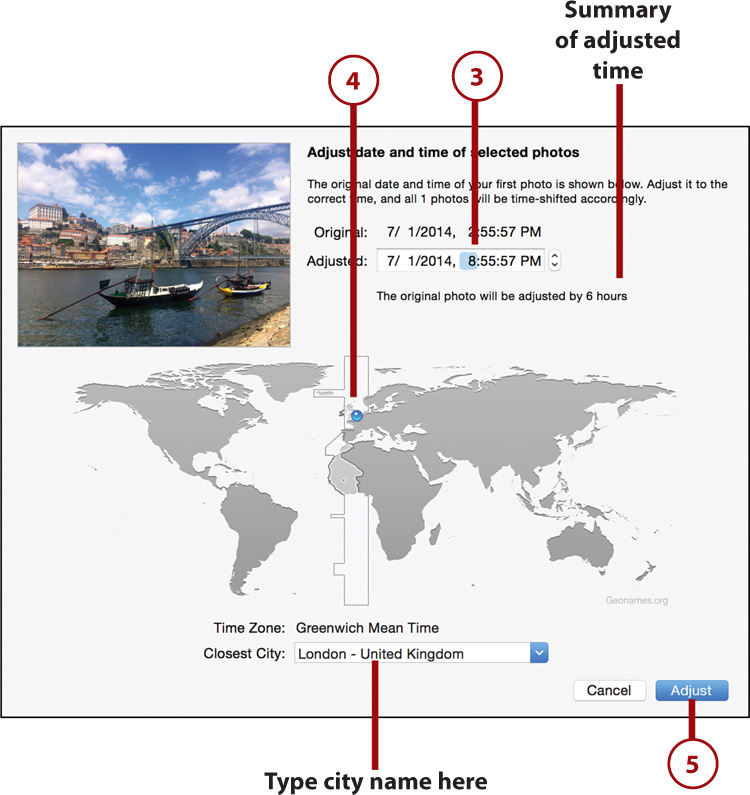
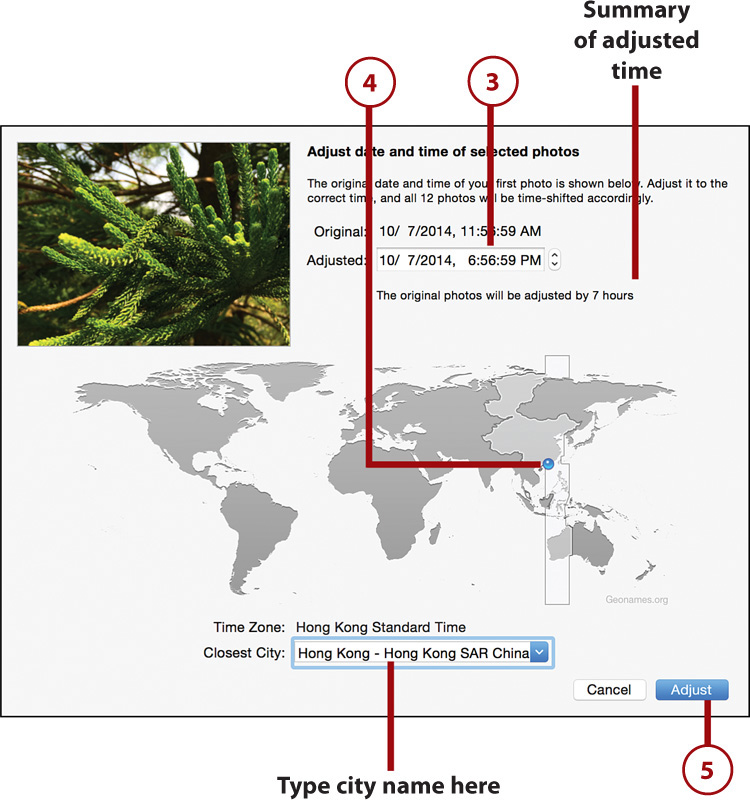
3. Enter the new date and time in the Adjusted field. The dialog box shows by how much the original date and time will be changed.
4. If the date was correct, but the time is wrong because you were traveling and forgot to set the new time on your camera, you can simply drag the blue dot on the map to the correct time zone. The time automatically adjusts. You can also type in the name of the city to adjust the time to that city’s time zone.
5. Click the Adjust button to finalize the change. The new date and time are reflected in the photo’s Information Window.
Change Multiple Photos’ Dates and Times
You aren’t limited to changing the date and time of one photo at a time. You can change the date and time for an entire group of photos.
1. Select the photos you want to change. Either click and drag the cursor to select a group of photos or hold down the Command key and click photos individually. Selected photos are outlined with blue boxes.
2. Select Images, Adjust Date and Time. In the dialog box, you see the first photo of the group of photos you have selected as well as the first photo’s original date and time.
3. Enter the new date and time for the first photo. Photos uses this date and time to adjust all the other photos accordingly. So, if you change the first photo’s time by adding 37 minutes to it, all the photos that you have selected will have 37 minutes added to their times. The dialog box shows by how much the original date and time will be changed.
4. If the date of the photos were correct, but the time was wrong because you were traveling and forgot to set the new time on your camera, you can simply drag the blue dot on the map to the correct time zone to automatically adjust the time. You can also type in the name of the city to adjust the time to that city’s time zone.
5. Click the Adjust button to finalize the change. The new dates and times will be reflected in the photos’ Information Window.
Working with Titles and Descriptions
Photos gives you the ability to usurp the boring filenames your camera gives your photographs (such as IMG_1842.JPG) by giving it a title. You can think of this title as an alternate filename, though it’s important to note that though you can give a photograph a title, Photos doesn’t actually let you change the filename of the picture that is stored in the photo’s EXIF data. That data is unchangeable.
Titles can be anything you want. You might name a picture of your spouse “My love” while naming a picture of the used car you bought “The trusty junker.” If you have tens of thousands of photographs, renaming each one might get tedious, but being able to name individual photos can be very helpful for your favorites, especially when it comes to searching through your library, as you’ll see later in this chapter.
Add a Title
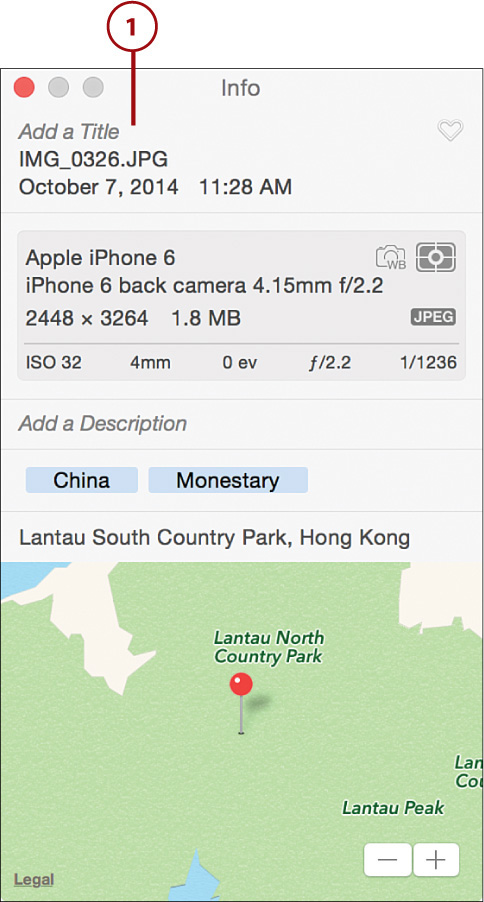
1. With a thumbnail selected or a picture already enlarged in the viewer, bring up the Info window by pressing Command+I on your keyboard. Click the Add a Title field.
2. Type any name you want, and press the Return key on your keyboard to finalize it.
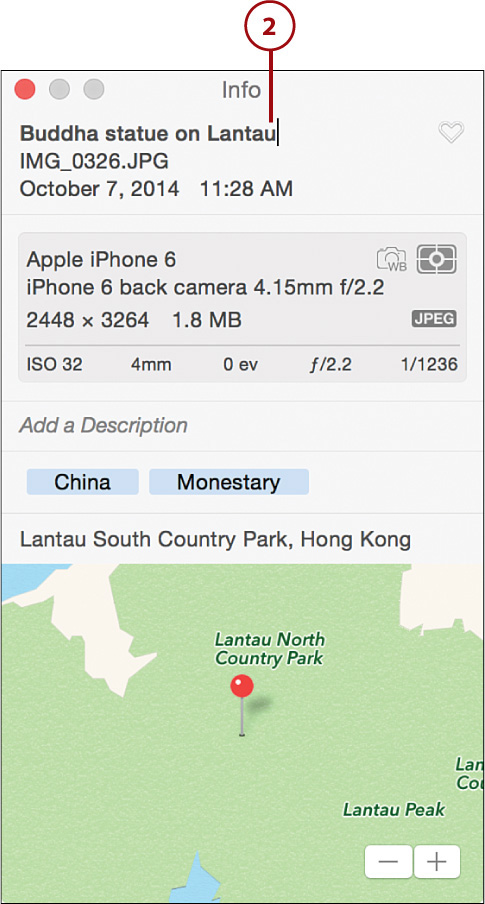
3. Alternatively, if you have title metadata showing in thumbnail view, move your mouse below the bottom of any thumbnail until you see Untitled in gray letters. Click the word and type any name you want. Press the Return key to finalize it.
Add a Description
Photos also lets you add a description to your individual pictures. Descriptions are cool because you can record a little blurb about each photo—something to help you remember it by. Descriptions are also helpful when you are searching your Photos Library, as you’ll find out later in this chapter.
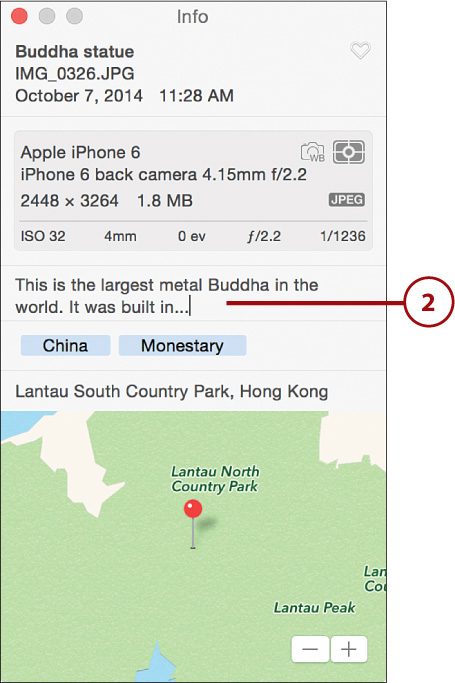
1. With a thumbnail selected or a picture already enlarged in the viewer, bring up the Info window by pressing Command+I on your keyboard. Click the Add a Description field.

2. Type any description you want, and press the Return key to finalize it.
Working with Keywords
Remember how you used to flip a photo over to write on its backside—things like who was in it or where it was taken or what the event was? A digital photo doesn’t have a backside, but Apple still lets you amend labels to it in the form of keywords. A keyword is a tag or label that you apply to your photographs. These tags come in handy when you are searching for specific photos.
Add a Keyword
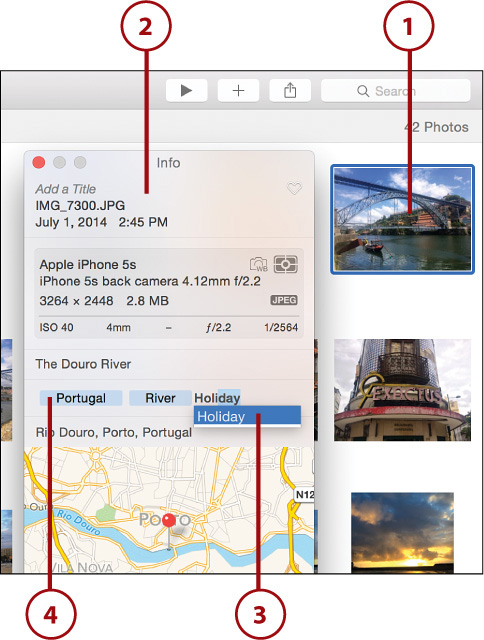
1. Select the photos or group of photos to which you want to add a keyword.
2. Bring up the Info window by pressing Command+I on your keyboard.
3. Click inside the Add a Keyword field and then type your keywords. As you start typing, the Info window suggests previously entered keywords. Click a previously entered keyword to add it or simply press Return on your keyboard to select the previously entered suggested keyword.
4. If you’re entering more than one keyword, press Return after each one. This separates one keyword from the next. A completed keyword is enclosed in a blue rectangle with rounded corners.
The Keyword Limit
You can add as many keywords to a photo as you like. To delete a keyword from a photo, simply select the keyword in the Keywords field and press the Delete key.
Work with the Keyword Manager
If you ever want to see all the keywords you’ve created and have the option of editing them, you can find them all in the Keyword Manager. From the Keyword Manager you can create, edit, and delete keywords.
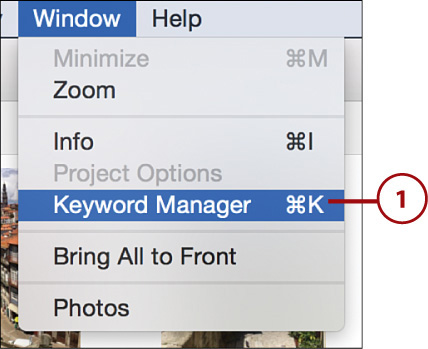
1. Select Window, Keyword Manager. Alternatively, press Command+K.
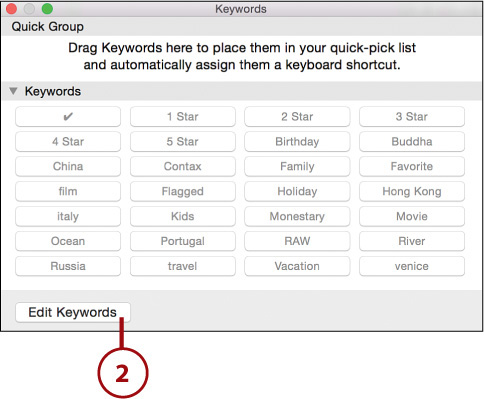
2. Click the Edit Keywords button.
3. Add a keyword by clicking the + button and entering the new keyword in the field that appears.
4. Delete a keyword by selecting the keyword from the list, and clicking the – button. You see a confirmation window that tells you how many photos will be affected if you remove the keyword. Click OK to delete the keyword or Cancel if you’ve changed your mind.
5. Rename a keyword by selecting that keyword and then clicking the Rename button. Enter your edit in the text field of the window that opens.
6. Click OK when you are done editing keywords.

Add Keyboard Shortcuts to Keywords
Keywords are terrific tools; however, adding them to many, many photographs can get rather tedious if you have to repeatedly go through the steps outlined previously. An easier way to quickly add keywords to your photographs is to assign keyboard shortcuts to your keywords.
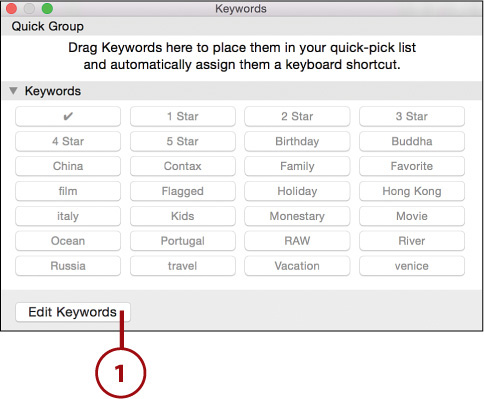
1. Select Window, Keyword Manager and then click the Edit Keywords button.
Legal Keys
You can use any letter, number, or punctuation key on the keyboard as a keyword shortcut. You cannot, however, use symbols or punctuation that use a modifier key. For example, you cannot use the dollar sign because typing it requires you to press Shift+4.
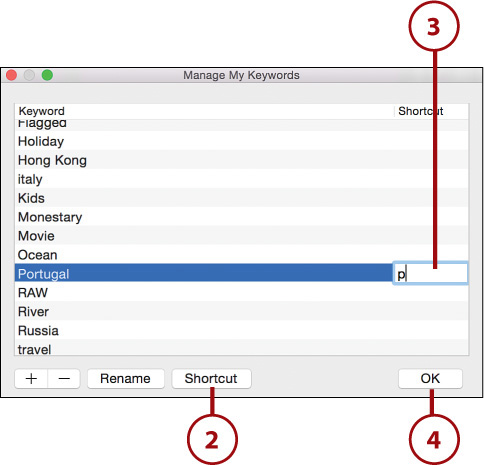
2. Select a keyword you want to create a shortcut for, and click the Shortcut button. You can also just click in the field below the Shortcut column header for the keyword you want to add a shortcut for.
3. Enter a letter representing that keyword in the shortcut field. Usually it’s a good idea to use the first letter of the keyword. If a letter is already taken by another keyword, you have the option of choosing which keyword you want to use the letter with.
4. Click OK when you are done adding shortcuts.
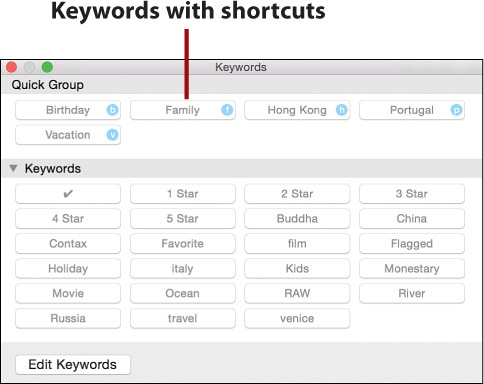
The Quick Group
When you click OK and return to the Keyword Manager, any keywords that have shortcut keys applied to them show up under the Quick Group heading. Next to the keyword you see its shortcut key in a blue circle.
Apply Keywords Using Shortcut Keys
After you have your keyboard shortcuts assigned to keywords, you can quickly assign keywords to your photos.
1. Move the Keyword Manager window aside so you can see your photograph in Photos.
2. Select a photograph and press the appropriate shortcut key to assign that assigned keyword to the photo. You can also select a group of photos and then press the shortcut key.
Marking Your Favorite Photos
Marking a photo as a favorite is a great way to automatically group all your best shots in one place. Every time you mark a photo as a favorite that photo is added to the dedicated Favorites album in Photos. This is a one-stop album to view all your best pics.
Mark a Photo as a Favorite
There are several ways to mark your photos as favorites.
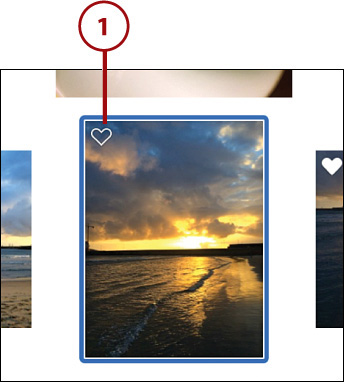
1. In thumbnail view, move your cursor to the top-left corner of the thumbnail. Click the heart outline; the heart becomes solid to signify the photo is a Favorite.
2. When viewing a single image enlarged in the Viewer window, click the Favorite button in the toolbar.
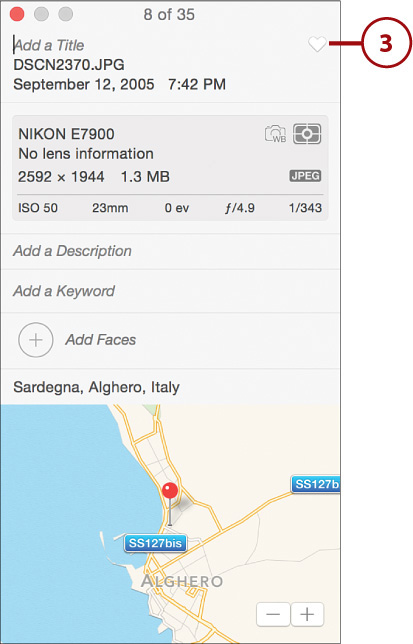
3. When the Info window is displayed, click the Favorite button in the upper-right corner.
Other Ways To Favorite
You can also mark multiple photos as favorites by selecting their thumbnails and selecting Image, Add to Favorites (or just press the period key on your keyboard).
4. When viewing a single image enlarged in the Viewer window or selecting a thumbnail, select Image, Add to Favorites.

5. Select a photo thumbnail and then press the period (.) key on your keyboard. This method also works when you’re viewing a photo in the Viewer window.
Searching Your Photos
Photos offers you powerful search capabilities. It enables you to search your photos based on many of the parameters you’ve described in this chapter, including photo titles and filenames; text in descriptions; dates (month and year); locations, including countries, cities, and addresses; people and faces; keywords; and album names.
If you are just starting out with Photos or digital photography, your Photos library may be quite small, meaning you hardly need to use search. However, as your Photos library grows, search will become an important tool you’ll use more and more to help you find that specific photo quickly.
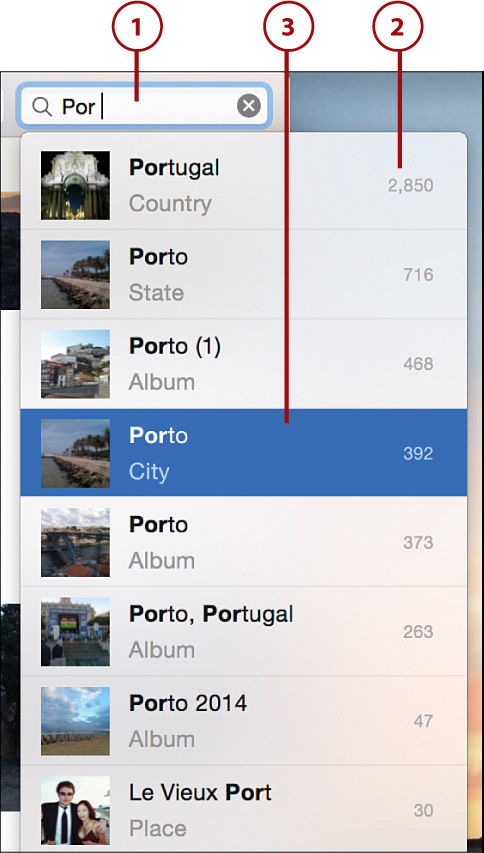
2. As you type a dropdown list will appear with all the possible results. Next to each result is the number of photos that matches that search query.
Dynamic Searching
Search is dynamic. That means if you start typing in HOLIDAY one letter at a time, photos with the letters HO, such as Holland, are shown alongside photos with the words holiday associated with them. When you type in HOLI, those photos labeled Holland disappear, and those labeled holiday remain.
3. Click a result in the drop-down list to select it.
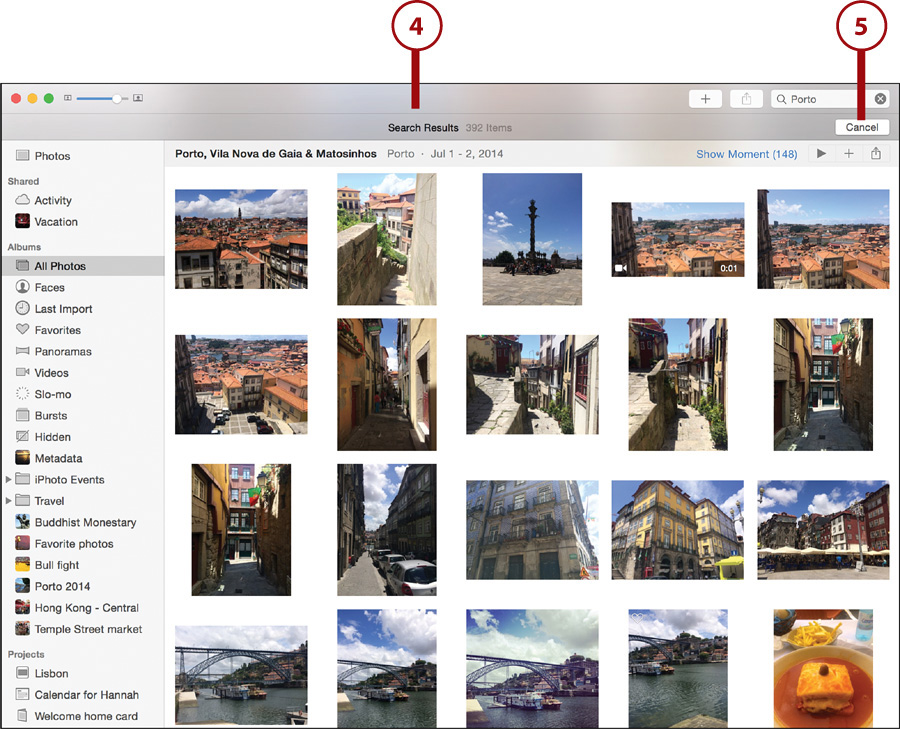
4. The Search Results screen opens. This screen shows you thumbnails of all the photos that match your query. You can work with these photos as you normally would any photo in your library.
5. To exit the search results screen click the Cancel button.
Hiding Your Photos
Photos gives you the ability to hide photos. For example, when you are thinking about deleting photos but aren’t quite sure if you want to do that, you can hide the photos so you no longer see them in your Photos Library.
Hide a Photo
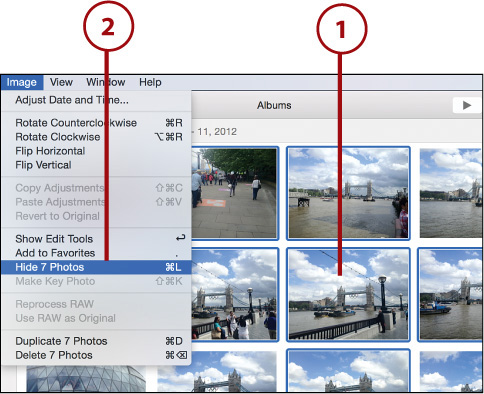
1. Select the photo or photos you want to hide.
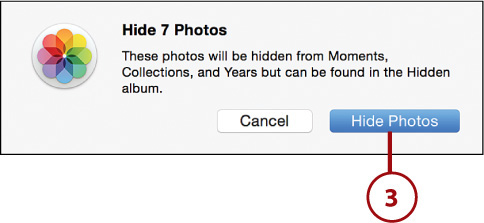
2. From the menu bar select Image, Hide Photo. Alternatively you can press Command+L. You see a dialog box that tells you how many photos will be hidden.
3. Click Hide Photos or click Cancel if you’ve changed your mind.
Temporarily View Hidden Photos
When you hide a photo, Photos automatically places it in a special photo album called Hidden. By default this album is itself hidden from view, but you can navigate to it and see all your hidden pictures.
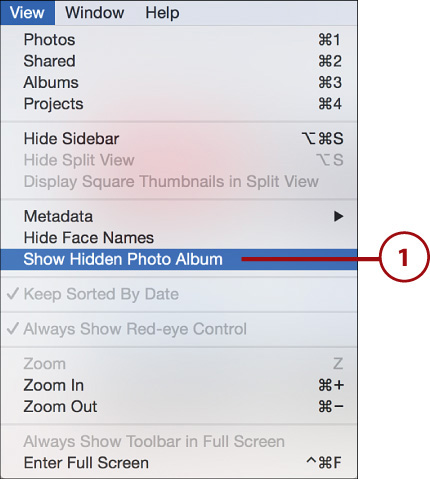
1. Select View, Show Hidden Photo Album to reveal an album called Hidden in the Source List.
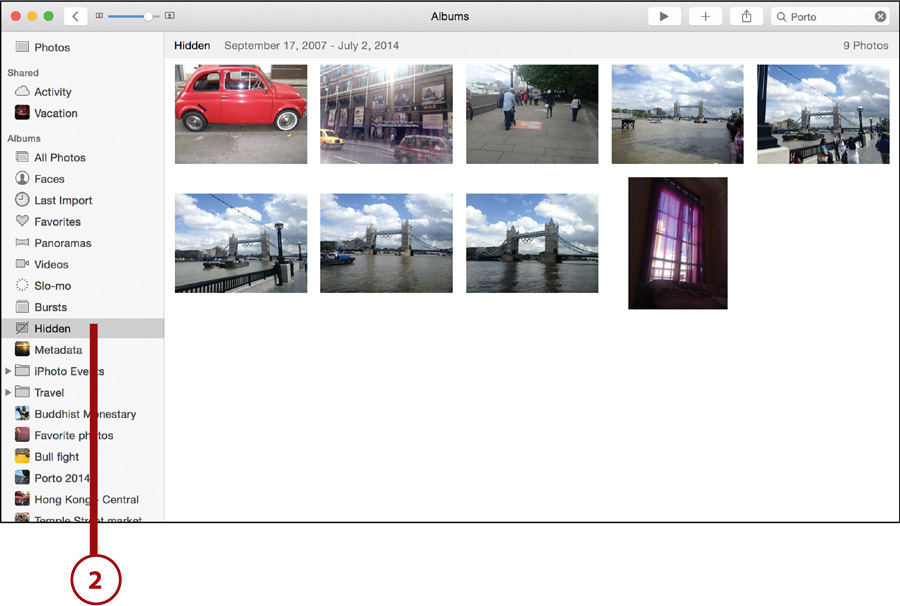
2. Click the Hidden album to see the photos you’ve put in that album.
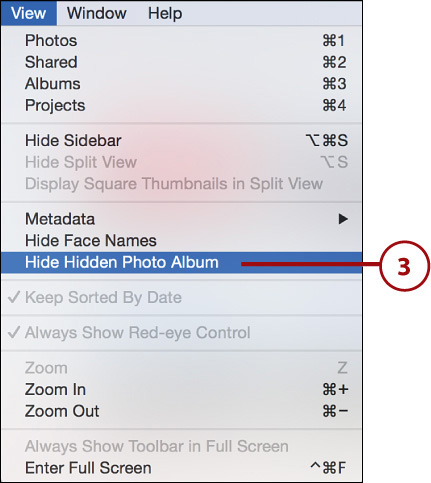
3. Select View, Hide Hidden Photo Album to hide the album from view.
Unhide a Photo
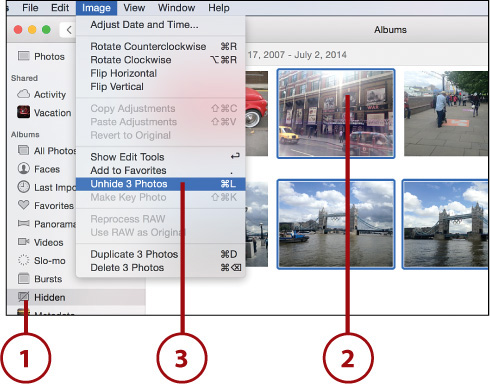
1. Navigate to your Hidden album using the steps from the preceding task.
2. Select the hidden photo or photos in the album you want to unhide.
3. Select Image, Unhide Photo from the menu bar. Alternatively you can press Command+L on your keyboard. The hidden photo disappears from the Hidden album and is viewable in all other locavtions in your Photos library.
Deleting Your Photos
At some point you are going to decide to delete some of your photographs. Perhaps you want to get rid of a shot that is blurry. Maybe the photo is similar to dozens of others. Fortunately, Photos enables you to get rid of pictures you no longer need.
Delete Your Photos
1. Select the photo or photos you want to delete.
2. If you are in the main Photo Library press the Delete key on your keyboard, or select Image, Delete Photo. If you are in a photo album and you want to delete the selected photos, press Command+Delete.
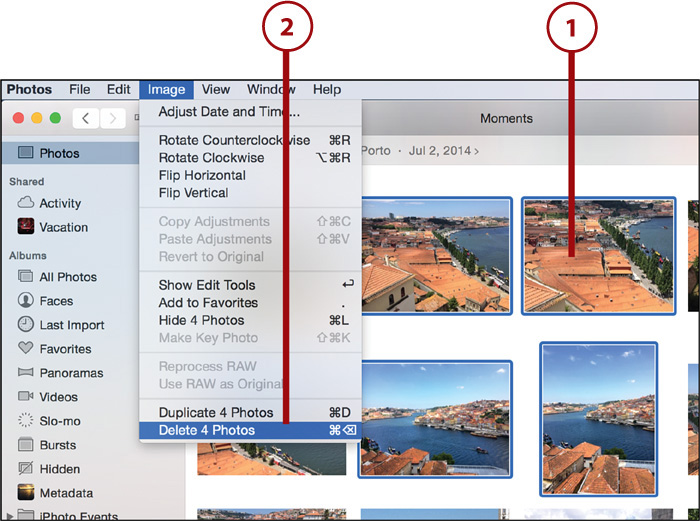
Using the Delete Key in Albums
If you just press the Delete key while in an album the photo will only be removed from that album and not your Photos library.
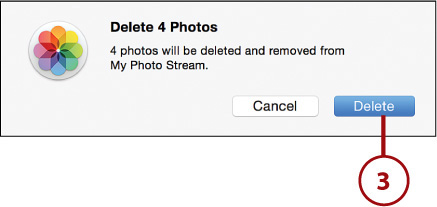
3. Click the Delete button to confirm you want to delete the photo. The photo is moved to the Recently Deleted album.
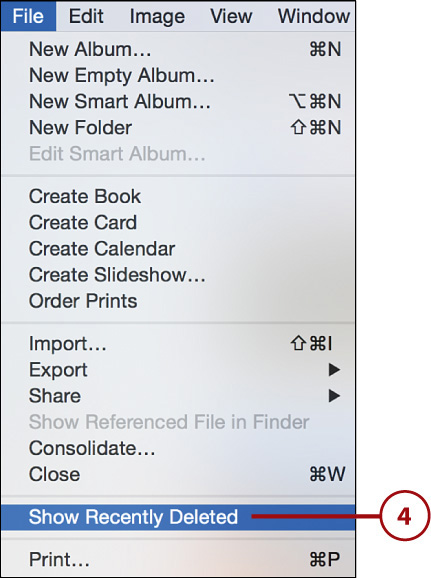
4. Select File, Show Recently Deleted.
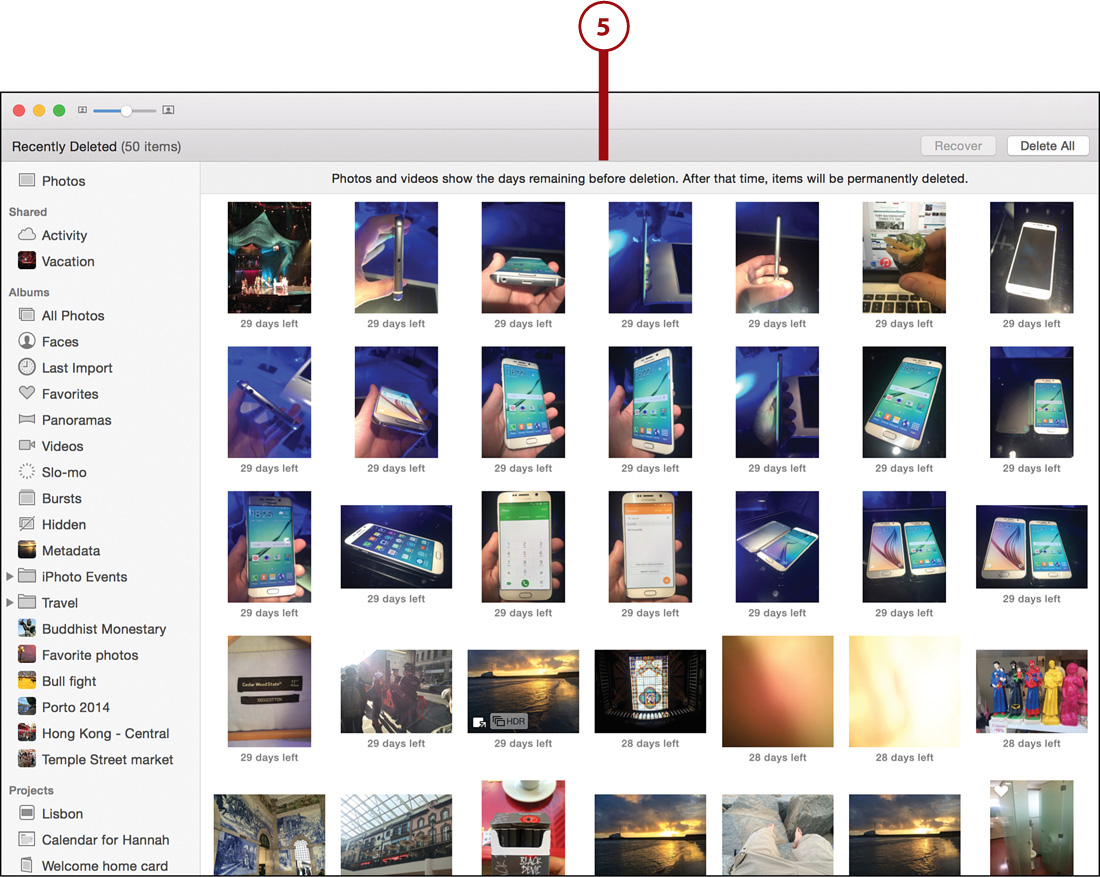
5. Photos stay in the Recently Deleted album for 30 days before they’re expunged for good. Below each photo’s thumbnail you’ll see how many days are left before the photo is deleted.
About Trashing Photos
Moving a picture to Photos’ Recently Deleted album removes that photo from all albums and projects that photo appeared in, including any books, cards, or calendars you have created. If you used Photos to share the image online via services like Flickr, Twitter, or Facebook, the photo remains posted on those services until you manually remove it.
Recover Deleted Photos
If you’ve changed your mind and don’t want to delete photos you’ve moved to the Recently Deleted album, you can choose to recover them to your Photos Library.
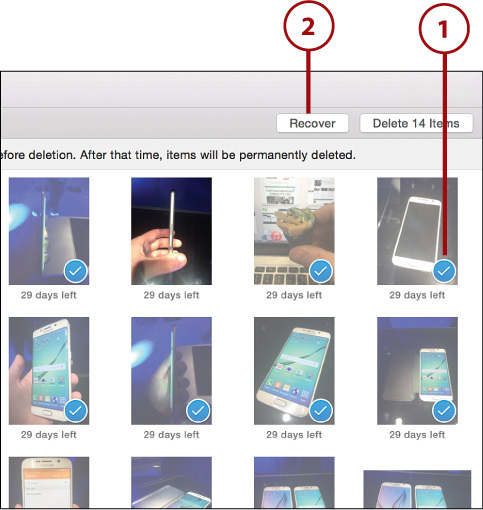
1. Select the photos you want to recover in the Recently Deleted album. As you select them a blue check mark appears on the photo’s lower-right hand corner.
2. Click the Recover button to restore your photos to the albums and projects in which they were located before you moved them to the trash.
Permanently Delete Your Photos
Photos permanently deletes all recently deleted photos after they’ve been in the Recently Deleted album for 30 days. You can also force photos to be permanently deleted.
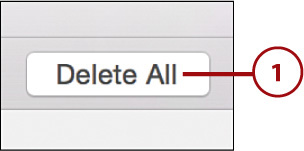
1. Click the Delete All button in the Recently Deleted album to immediately delete all the photos.
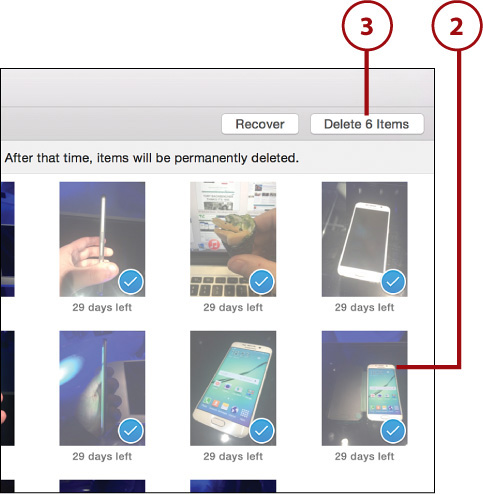
2. Alternatively, delete only selected photos by clicking each photo you want to delete. A blue check mark appears on the selected photos.
3. Click the Delete Items button to immediately delete the selected photos.
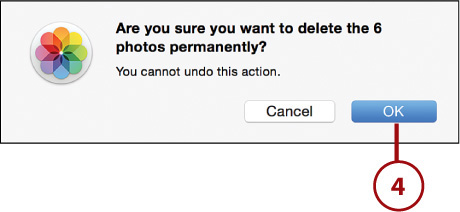
4. Click OK in the confirmation dialog box.
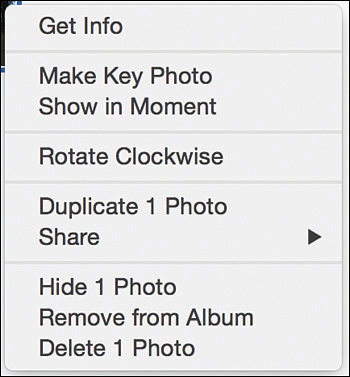
Using the Contextual Menu
You can complete many of the operations reviewed in this chapter using a contextual menu. You access this contextual menu by moving your mouse over a photograph and right-clicking it. (Optionally, you can click the tiny downward-facing arrowhead that appears in the lower-right corner of a photo.)
From this contextual menu, you can do the following:
• Get Info: Use this command to open the Information window.
• Make Key Photo: Designate the selected photo an album’s key photo. You can read more about key photos in Chapter 5. Note that this option only appears when you right-click a photo in an album.
• Show in Moment: Go to the Moment the photo is located in (if the photo is in an album).
• Rotate Clockwise: Rotate the selected photo clockwise 90 degrees at a time. Hold down the option key to change this command to Rotate Counterclockwise.
• Duplicate Photo: Make a copy of the selected photo. The duplicate photo will have the name “Version 2” and appear next to the original.
• Share: Share the photo using one of the sharing options, which are discussed in detail in Chapter 13, “Creating Projects: Books, Cards, Calendars, and Slideshows.”
• Hide Photo: Hide a photo.
• Remove from Album: Removes the photo from the selected album.
• Delete Photo: Moves the photo to the Recently Deleted album, where it will be permanently deleted after 30 days.