13. Creating Projects: Books, Cards, Calendars, and Slideshows
This chapter explains the ways you can share your photos by creating photo keepsakes such as books, calendars, and cards. It also explores slideshows, the digital keepsake you can share, and having your photos professionally printed via Photos.
![]() Understanding the basics of managing projects
Understanding the basics of managing projects
![]() Creating professional-quality photo books
Creating professional-quality photo books
![]() Sending greetings with personalized cards
Sending greetings with personalized cards
![]() Keeping a beautiful annual outlook with calendars
Keeping a beautiful annual outlook with calendars
![]() Ordering prints of photos
Ordering prints of photos
![]() Creating stunning slideshows
Creating stunning slideshows
When you have all your photos organized and edited, you’ll most likely want to share them with people and not keep them all to yourself. You can use the electronic share methods described in Chapter 12, “Sharing Your Photos and Videos,” or you can use the methods described in this chapter to take advantage of Photos’ ability to create beautiful projects, including printed keepsakes such as books, cards, and calendars and stunning slideshows.
Creating and Managing Projects
Before you can start sending beautiful books, cards, and calendars to your friends and family you need to understand how to create and manage those projects. Starting a project can be accomplished in just a few steps, and managing them isn’t much harder.
Starting a Project
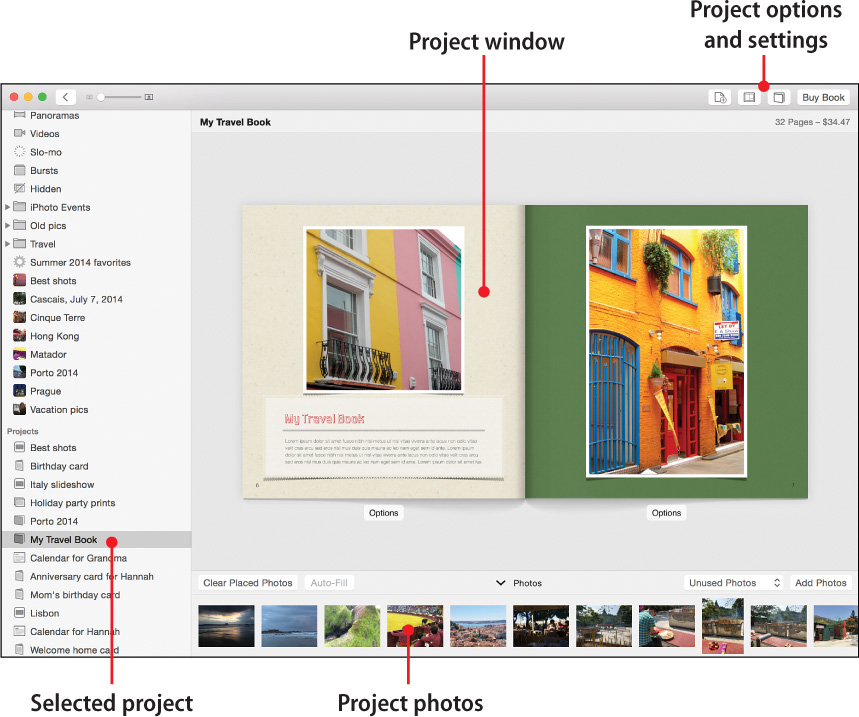
Photos has a single powerful button that makes creating keepsakes easy and fun. This button actually doesn’t have an offical name. Apple just calls it the + button. You can click it to create a project from scratch or you can select photos and then click the + button to add the photos to a project. (This + button is also one of the places you can create albums and smart albums, as discussed in Chapter 5, “Working with Albums”). To make it less confusing, many people refer to this button as either the “create” button or the “add to” button depending on whether they are creating a new project from scratch or adding selected photos to a project.
When no photos are selected in your library and you click the + button, you see a menu that enables you to create a new empty project from scratch.

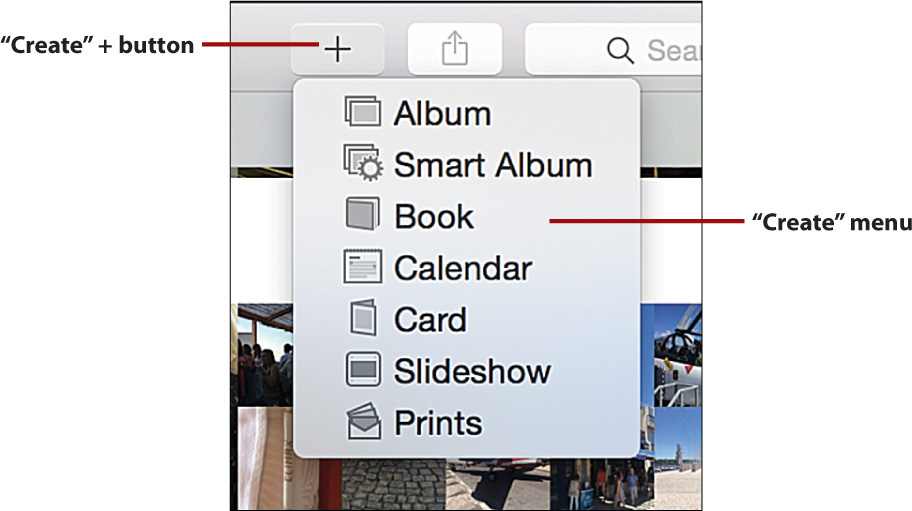
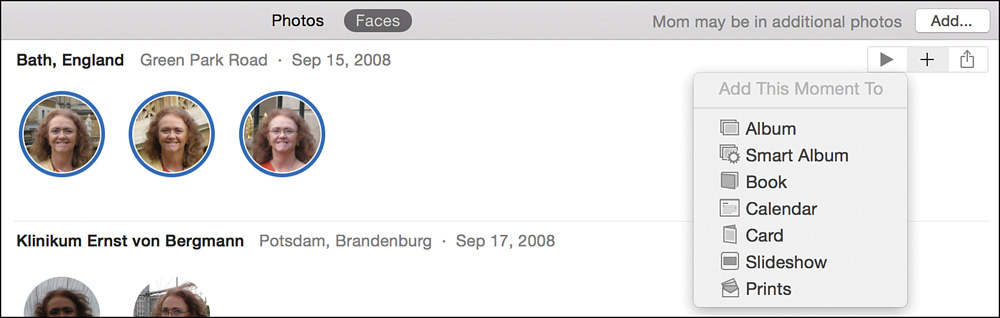
But if you have photos already selected in your library and you click the + button you’ll see the submenu now shows a new header that says Add [number of] Photos To and then lets you select the type of project. The photos you had selected automatically populate the project.
It is also very important to note that although the easiest way to create projects in Photos is from the + menu, you can create projects via three other locations in the app:
• You can click the File menu and then select Create Book, Create Card, Create Calendar, or Create Slideshow.

• When in a Moments grouping, you can move your mouse over the Moment’s header and click the + button to add every image in that Moment to a project.
• You can click the + button in a Face’s album’s header bar.
The steps in this chapter describe creating a project from scratch via the main + button in Photos’ toolbar at the top of the app.
Navigating Projects
Before you get too far into creating projects, you should understand how Photos displays your projects in the Source List and how you can manage them.
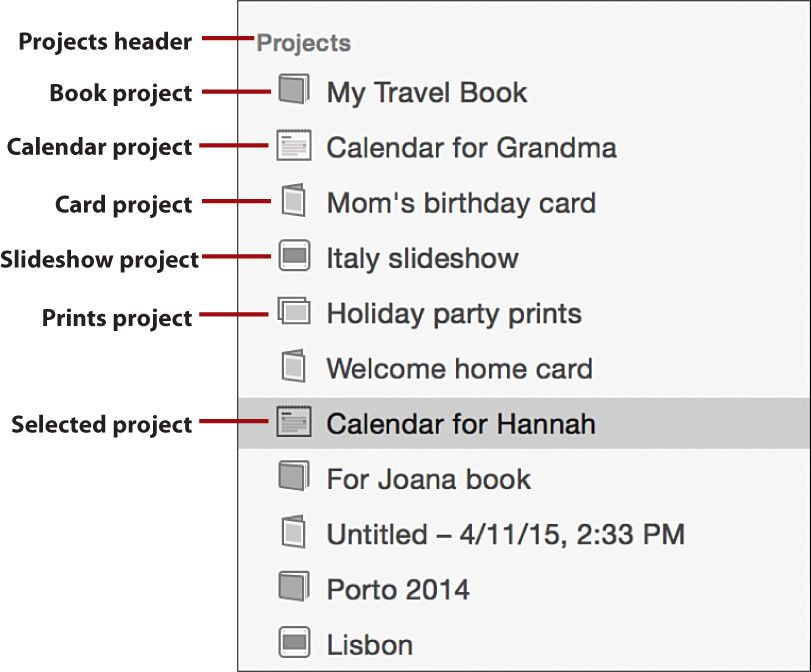
In Photos’ Source List, the projects you have created are grouped under the Projects header. (Note that this header does not appear until you’ve created at least one project.) You can view any projects you’ve created by clicking on them under the Projects header. As you can see, the different types of projects have different icons that enable you to easily distinguish between them at a glance. As with albums in the Source List, you can sort your projects, rename a project, duplicate a project, or delete a project.
Sort Projects
Photos allows you to sort your projects by date modified or manually.
1. Sort your projects by date modified by right-clicking any project in the Source List and selecting Sort By Date. (A check mark appears next to the option when it’s selected.) Your projects are sorted with the most recently modified project at the top of the list.

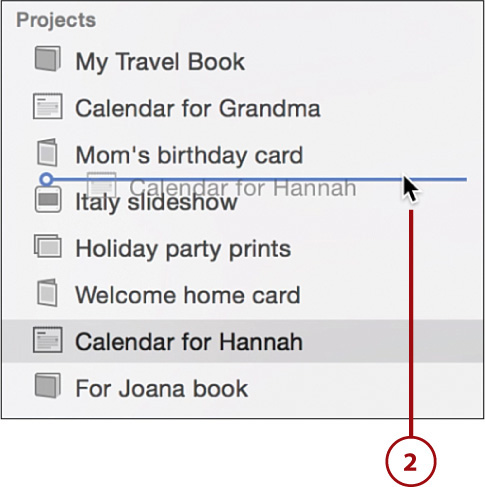
2. Alternatively, manually sort your projects by clicking and dragging them in any order you want.
Rename a Project
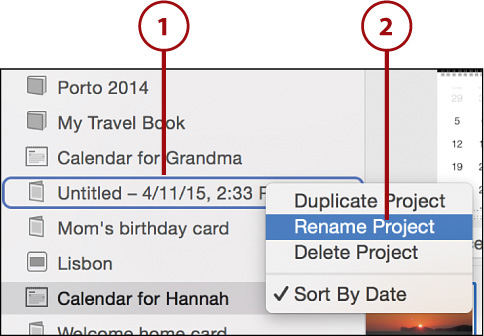
By default, when you create an empty project it is given a name that includes the date and time you create the empty project, such as Untitled – 4/11/15, 2:33 PM. If you create a project from a selection of photos, the new project is named with the title of the album or the Moment the selected photos are from. You can give your projects a more personalized and identifiable name, such as Calendar gift for Grandma.
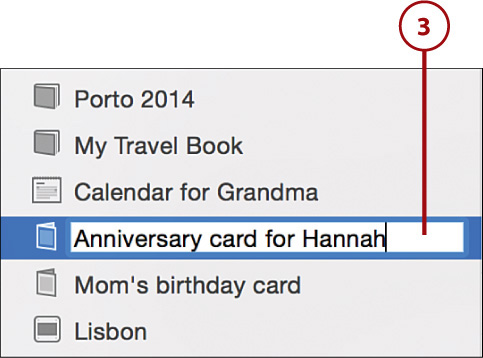
1. Right-click on the name of the project you want to rename.
2. Select Rename Project from the contextual menu.
3. Enter the project’s new name. Alternatively, you can select a project in the Source List and then simply click the project’s existing name and type the new name in the text entry renaming field.
What’s in a Name?
Photos allows you to name your projects anything you want. If you create a lot of projects, I recommend that you include the type of project in the name, such as “Mom’s Birthday Card.” Though a project’s icon gives you some idea of what type of project it is, it’s much easier to read the type of project from the project’s name than look at the tiny gray icon to see what kind of project it is.
Duplicate Projects
You might want to work from a project you’ve created so that you can tweak it without having to re-create it from scratch, such as when you want to personalize a book for two different people. Fortunately, you can duplicate existing projects with just a few clicks.
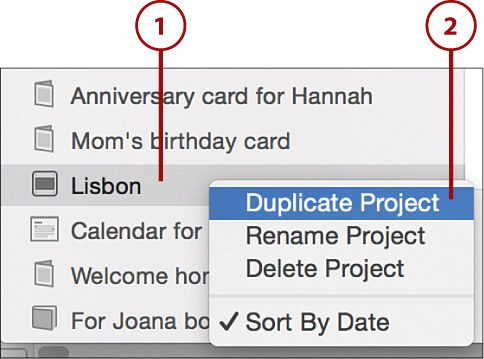
1. Right-click the project in the Source List.
2. Choose Duplicate Project from the contextual menu.
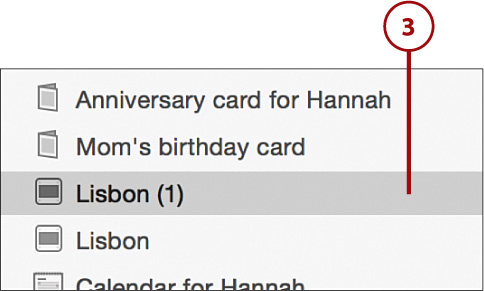
3. An exact duplicate of the project is created with a (1) appended to its name. Refer to the “Rename a Project” section earlier in the chapter for steps to give the new project a different name.
Delete a Project
You might find that you no longer need a project you’ve created. No problem. Deleting it is easy.
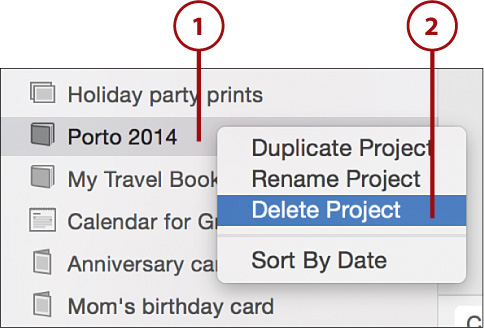
1. Right-click the project in the Source List.
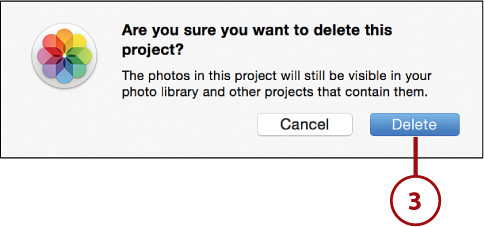
2. Choose Delete Project from the contextual menu.
3. Click Delete in the confirmation dialog box.
Project Goes, Photos Stay
Deleting a project does not delete the photos within that project. The photos are always contained in the main Photos Library and remain in any other albums or projects you have not deleted.
Creating Books
The first time you hold a book that you created in your hands, you will be amazed. The quality of books made in Photos is nothing short of stunning. They literally could sit in a real bookstore and be mistaken for a book from a professional publisher. But before you’re able to hold a Photos book in your hands, you first need to learn how to create one.
Start a Book Project
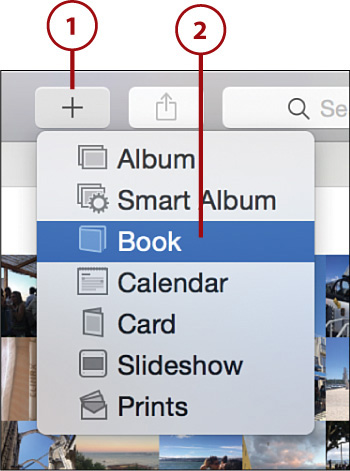
1. Click the + button in Photos’ toolbar.
2. Select Book. You see the Book Format screen.
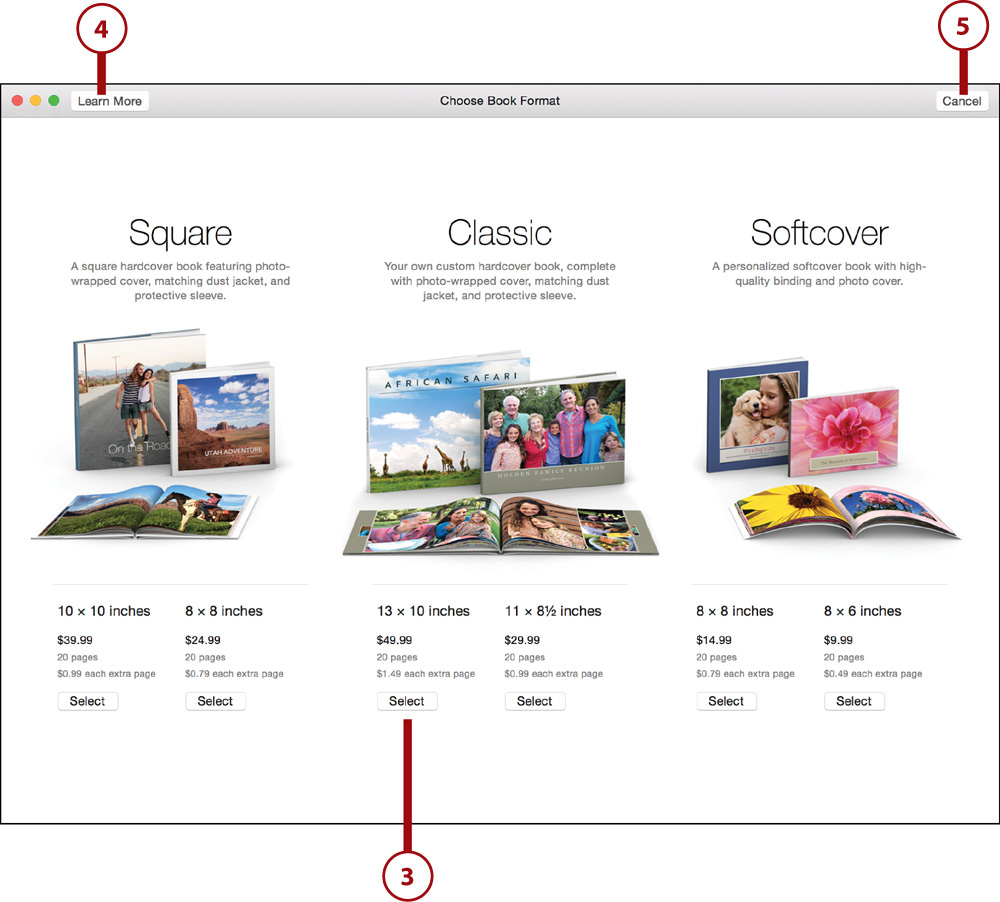
The Book Format Screen
The Book Format screen is where you choose the shape, size, and format for your book. It also shows you the prices of the different options for a set amount of pages and how much each additional page costs.
3. Click the Select button to choose your book’s format.
4. Alternatively, click the Learn More button to open your browser to go to Apple’s information page about buying projects.
5. (Optional) Click the Cancel button to cancel the creation of the new book project.
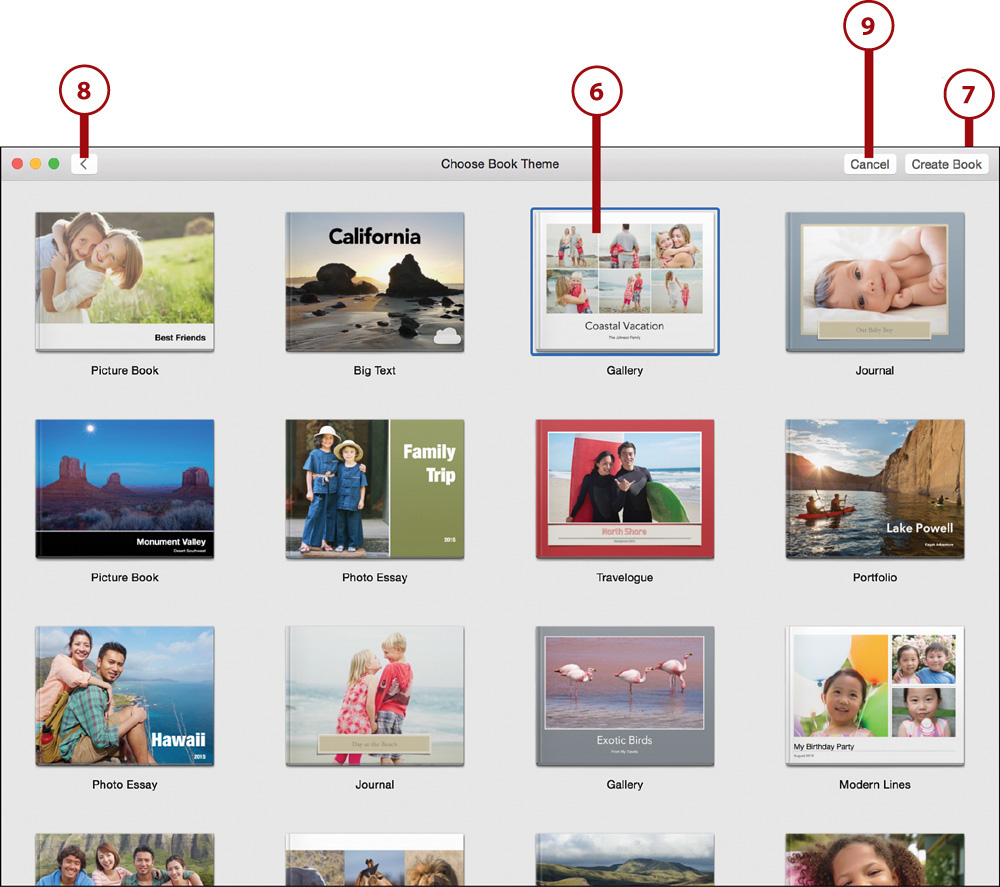
6. Use the Book Theme window to choose the way you want your book to look. Click to higlight your chosen theme.
Book Themes
Book themes vary widely—from travel to portfolio books—and Apple adds new themes all the time. New themes are indicated by a cloud icon.
7. Click the Create Book button. Alternatively, you can double-click a Book Theme to select it.
8. (Optional) Click the Back button to return to the Book Format screen.
9. (Optional) Click the Cancel button to cancel the creation of the new book project.
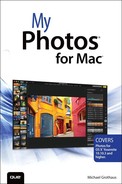
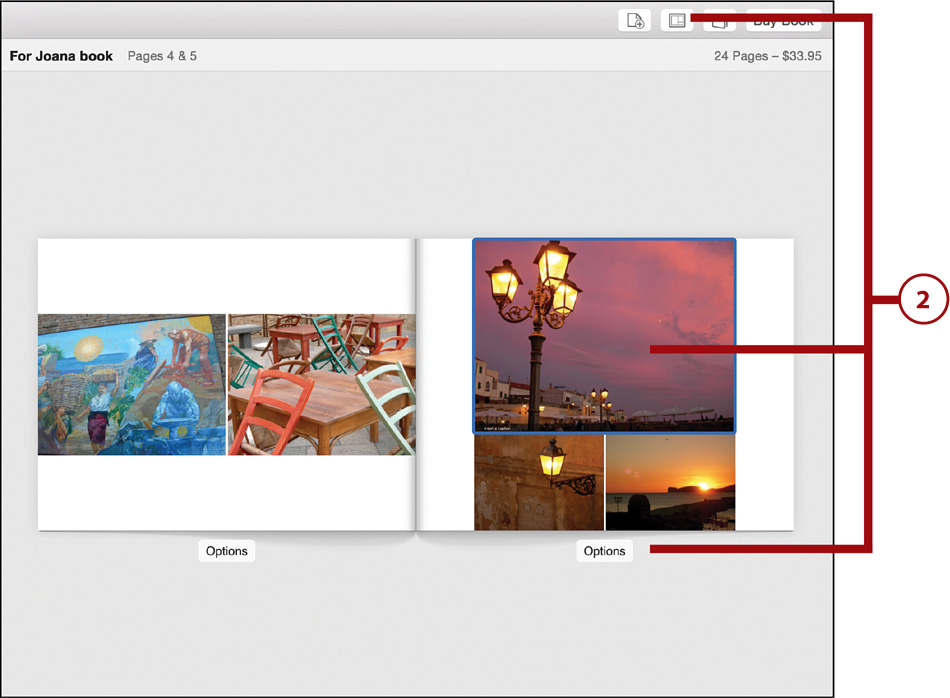
Navigating the Book Project Screen
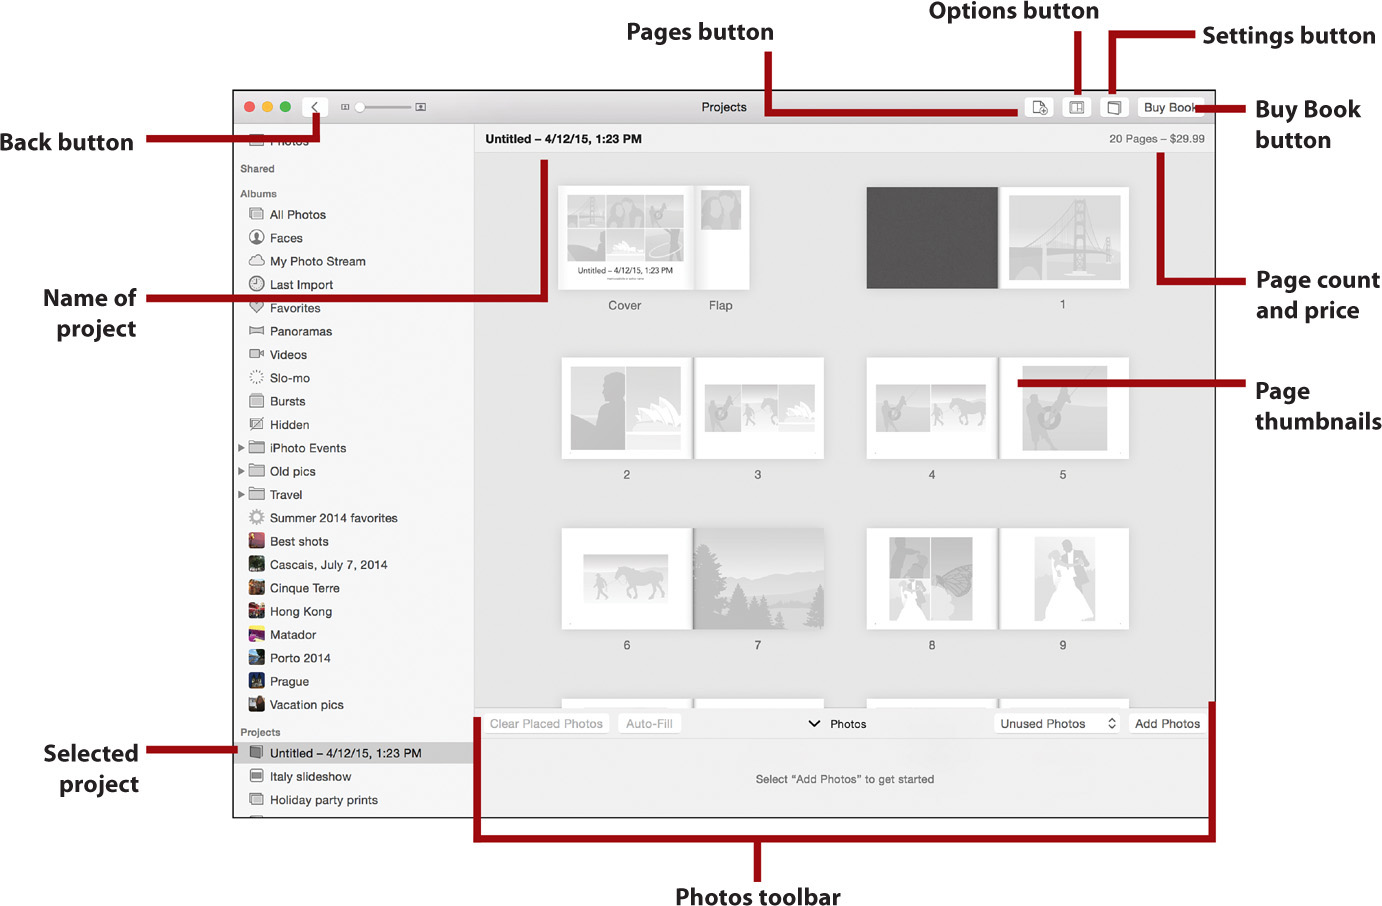
The Book Project screen shows you the exact layout of your book from front cover to back cover. This screen gives you an overall snapshot of your book.
• Selected project: The book project you are currently working on.
• Name of project: Name of the book you are working on.
• Page count and price: The number of pages the book contains and the total price. This is updated in real-time as you add or remove pages.
• Pages button: Add or remove pages from your book.
• Options button: Control various options for the book, including page layout, color, text, and maps.
• Settings button: Adjust the settings of your book, including changing the theme or format.
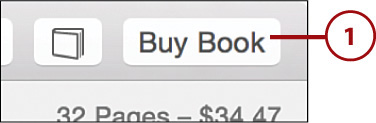
• Buy Book button: Purchase your book.
• Page thumbnails: Thumbnail representations of all the pages in the book. Double-click a page to interact with it.
• Photos toolbar: Toolbar for accessing and controlling what photos appear in your project. If you’ve created the project by first selecting pictures in your Photos library, they appear as thumbnails here. The screenshot doesn’t include picture thumbnails because the example book is being started from scratch.
• Back button: Return to the Projects library.
Page Screen Components
To view an individual page up close and really fine-tune its pictures and text, you use the Page screens. View a book’s pages by double-clicking any page in the Book Project screen.
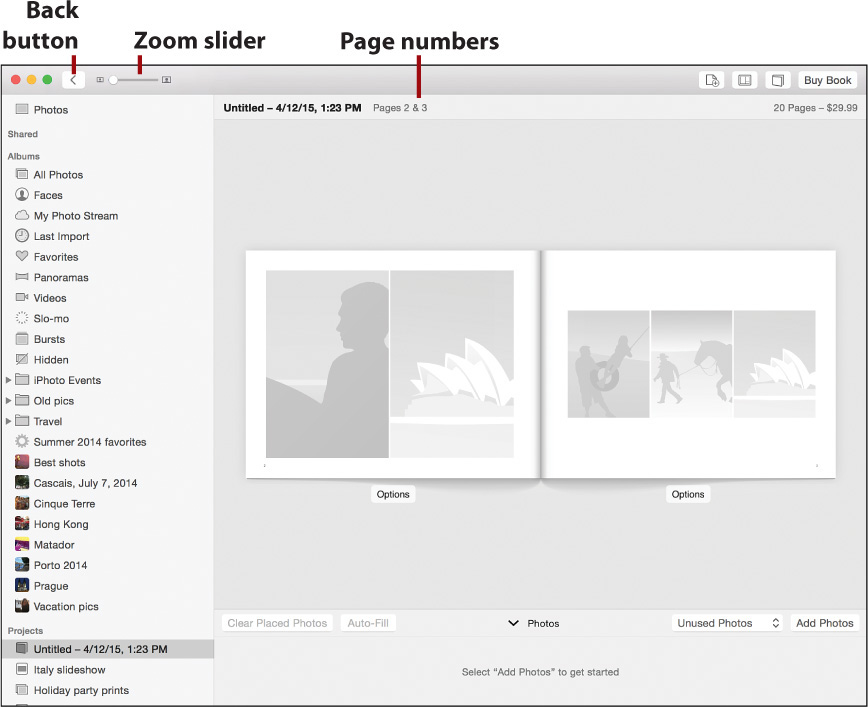
When you double-click a page, Photos zooms in on the selected page. The tools and layout on this page are similar to the Book Project screen. The main differences are that the Back button takes you to the Book Project screen and the page numbers you are viewing are displayed next to the project’s name. If you want to get even more detail about a page, use the zoom slider to zoom in or out. When you move your cursor to the left or right edge of the Pages screen, an arrow appears that enables you to move to the previous or next page in your book. Alternatively, if you have a MacBook with a multi-touch trackpad then you can use two fingers to swipe left or right between pages.
Select Photos for Your Project
To begin adding photos to your book you first need to select some to use in the project. Remember, if you created a project from a selection of photos already, they’ll already be in the project. The following steps are for creating a project from scratch.
1. Click the Add Photos button. By default, you see every photo in your library arranged chronologically.
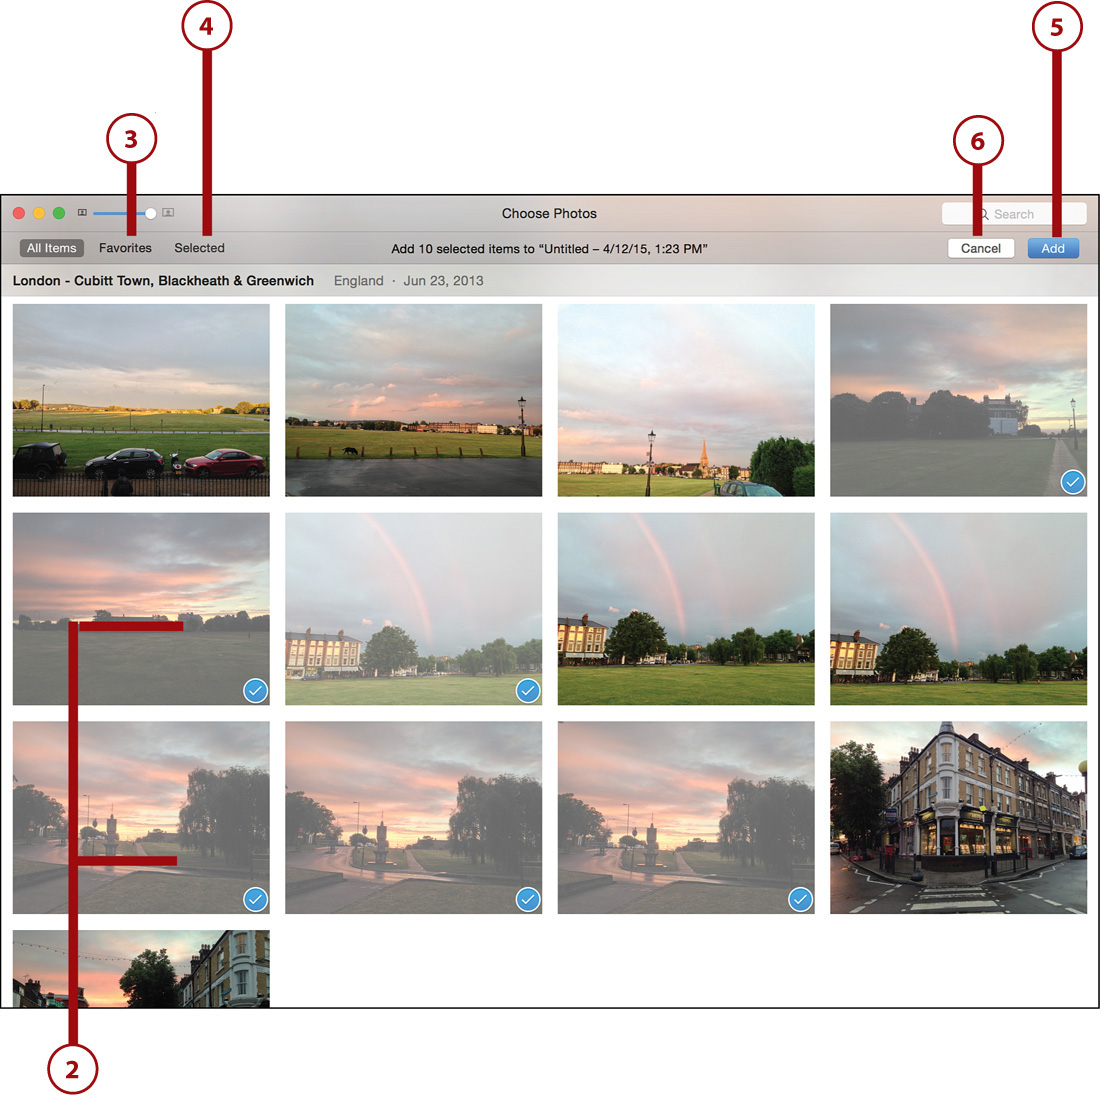
2. Scroll through your photos and click on each one you want to make available to your project. A blue check mark indicates selected photos.
3. (Optional) Click the Favorites button to see only the photographs in your library you’ve marked as a favorite. Scroll through your photos and click each one you want to make available to your project. A blue check mark indicates selected photos.
4. (Optional) Click the Selected button to view all the photos you have chosen to include in the album.
5. Click the Add button to place the selected photos in the photos toolbar in the project.
6. (Optional) Click the Cancel button if you don’t want to add photos to your project.
Add and Remove photos on a Page
After you have selected photos for your project, you can begin placing them on the book’s pages.
1. From either the Book Project screen or a Page screen, drag the photo thumbnail from the photos toolbar to the gray placeholder on a book’s page. Continue manually adding all the photos to all the placeholders on the pages of the book. As you add each photo, its thumbnail is removed from the photos toolbar.
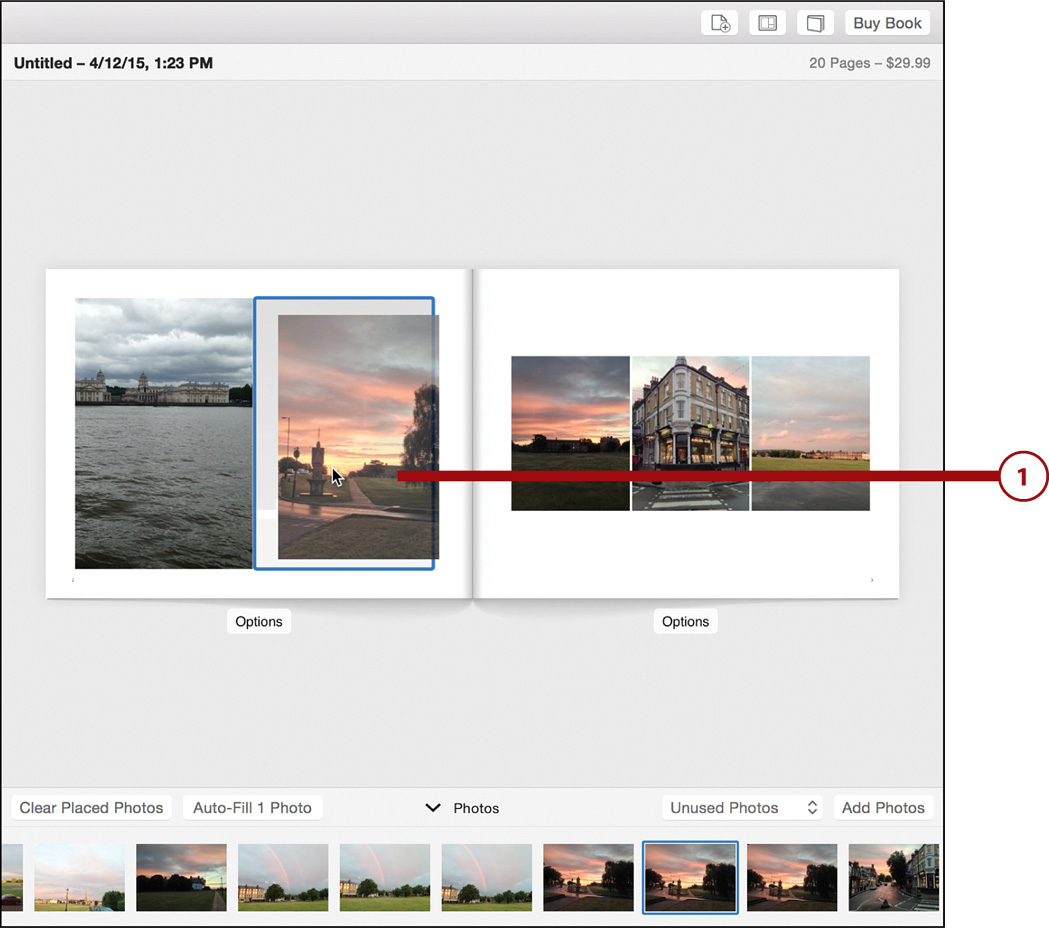
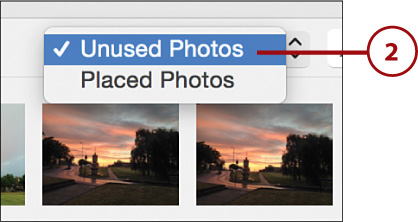
2. Toggle between the toolbar showing Unused Photos and Placed Photos by clicking this menu and selecting an option.
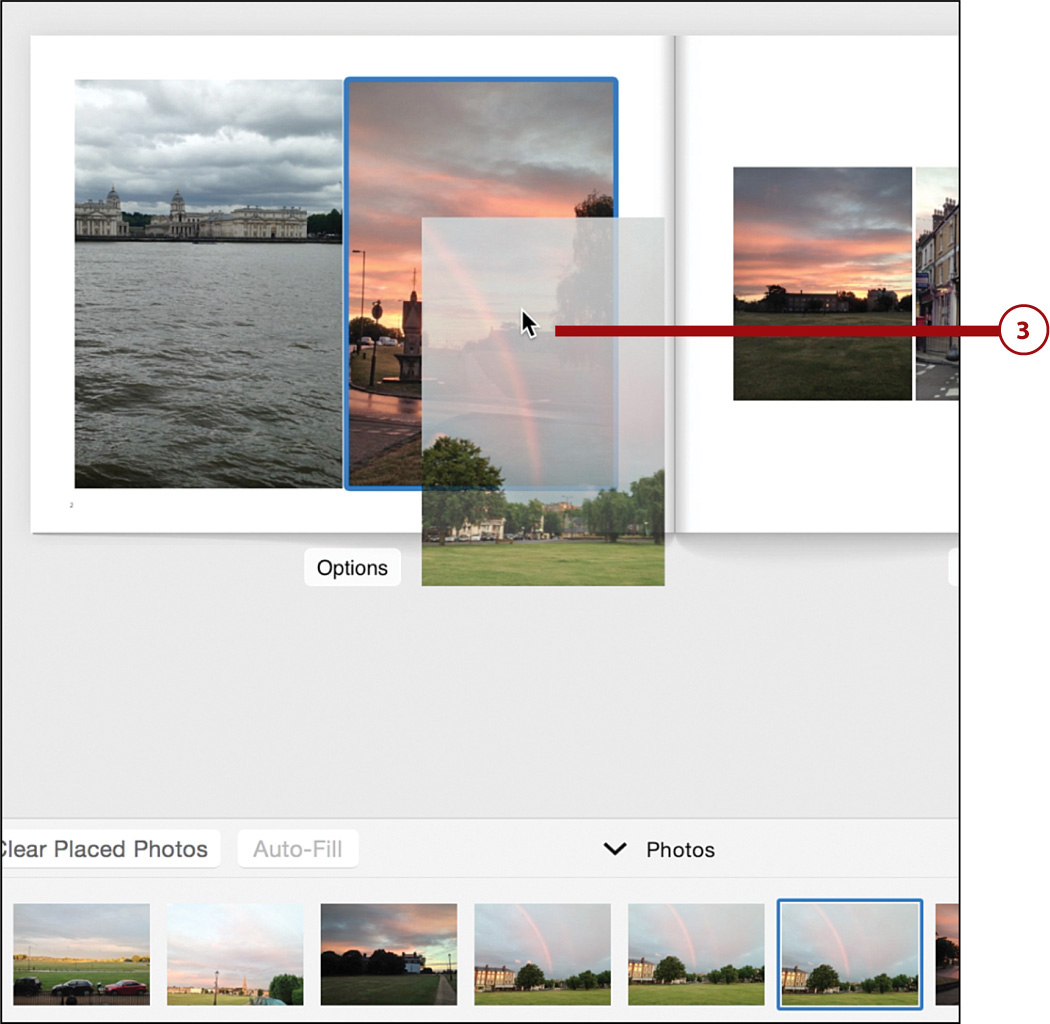
Using Photos More Than Once
Keep in mind that you can place a picture on more than one page. While viewing the placed photos, simply drag the photo to an additional placeholder in the book.
3. Change an image you’ve already placed on a page by dragging a new image on top of an already placed one. The old picture is swapped out for the new one.
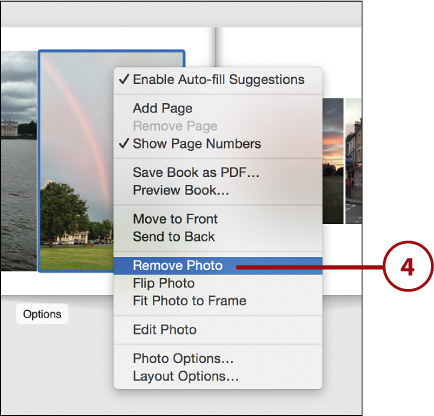
4. While on the Pages screen, remove a placed photo by right-clicking the photo and selecting Remove Photo from the contextual menu.
Autofilling All Photos in Your Book
While manually adding photos to a page can be fun, it can also be timeconsuming if you have a lot of pics or your book has a lot of pages—or the layout of those pages have a lot of thumbnail placeholders (some themes allow you to have up to 36 photos on a page!).
That’s why Photos allows you to autofill all the pages of your book—or just the selected pages—with pictures. With autofill, Photos automatically populates the book’s pages with the photos you’e made available to the project. Photos features your higher-rated pictures as larger images on the page and centers images with faces in them.
Autofill All Photos in Your Book
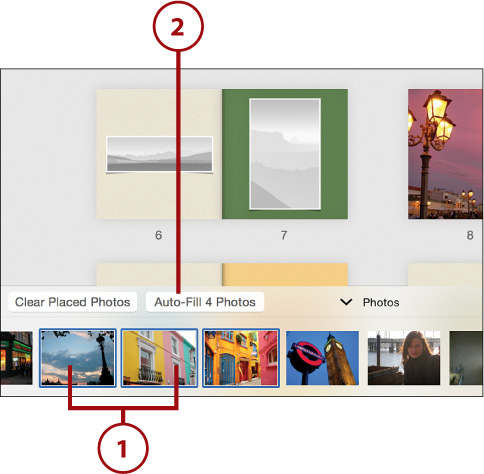
1. In the Book Project screen, select the pictures you would like Photos to use to autofill.
2. Click the Auto-Fill [number of] Photos button to automatically insert the selected photos into your book project.
Autofill Photos on Only Select Pages
1. On the Book Project screen, double-click the two page spread you want to work with.
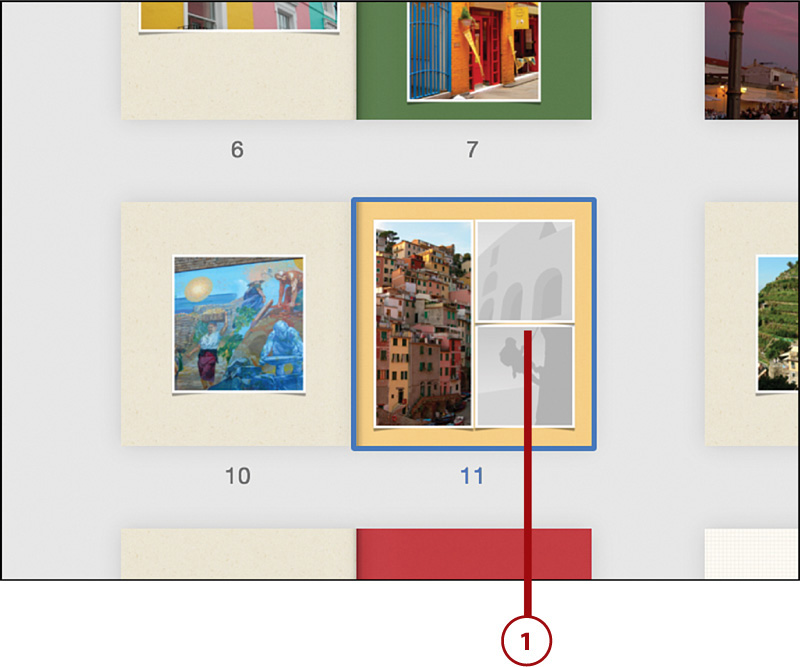
2. On the Page screen, select the pictures you would like Photos to use to autofill on the two pages that appear in the viewer. Note than you cannot autofill images on only one page or the other. It’s a both-pages-or-nothing proposition.
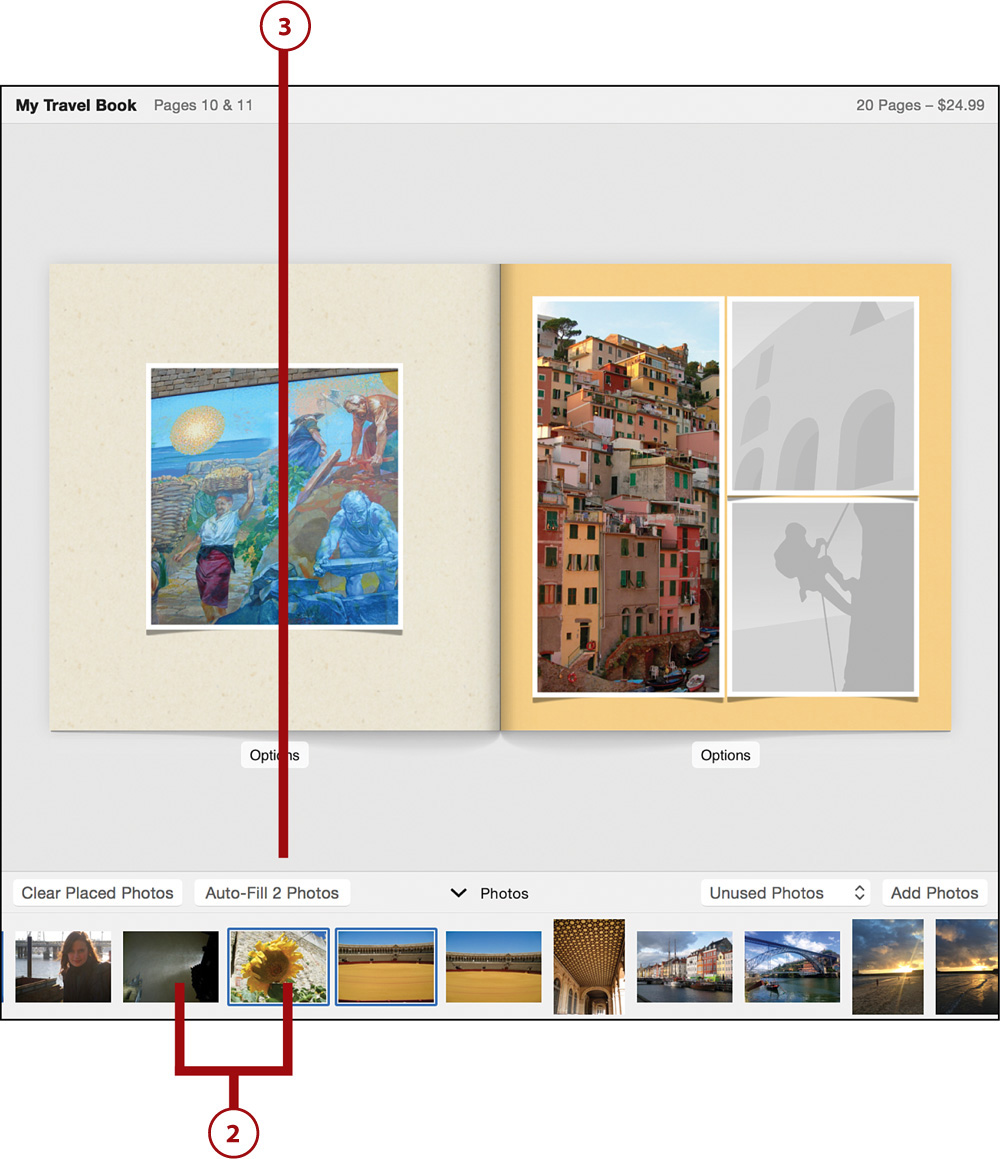
3. Click the Auto-Fill [number of] Photos button to automatically insert the selected photos onto the pages you have selected.
Clearing Photos in Your Book
Sometimes you may not like the way Photos arranged your pictures on the pages, or you may want to start over after manually adding images. In either case, it’s easy to clear individual pages of photos or clear all the filled pictures in your book.
Clear All Photos from Your Book
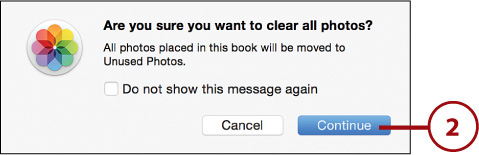
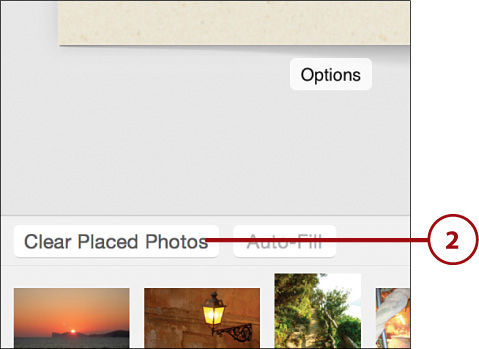
1. In the Book Project screen, click the Clear Placed Photos button.
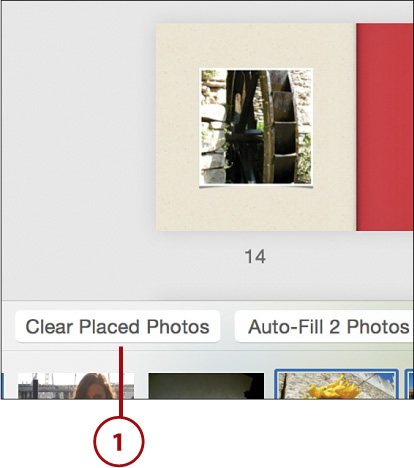
2. Click Continue in the confirmation dialog box, and all the photos are removed from your book and placed in the Unused Photos section of the toolbar at the bottom of the screen.
Clear Photos from Only Select Pages
1. On the Book Project screen, double-click the page you want to work with.
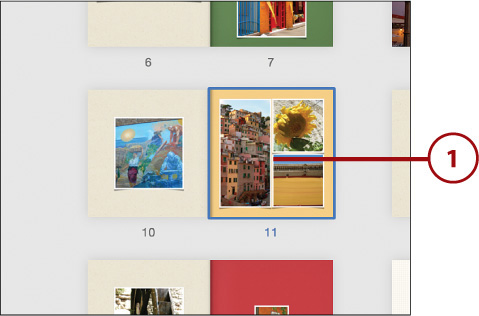
2. Click the Clear Placed Photos button.
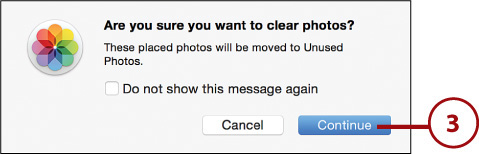
3. Click Continue in the confirmation dialog box, and all the photos are removed from the pages and placed in the Unused Photos section of the toolbar at the bottom of the screen.
Add Pages to Your Book
Just because you first assembled your book based on a selection of photos doesn’t mean you can’t add extra pages at a later time.
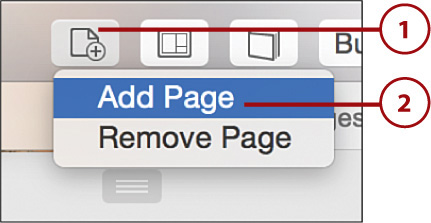
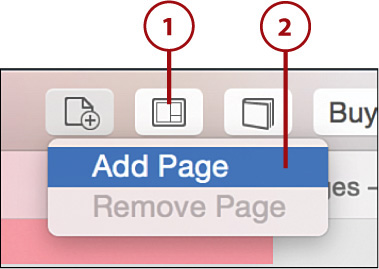
1. Click the Pages button.
2. Click Add Page to insert a new page at the end of your book if no current page is selected. If a current page is selected, the new page is added immediately after the current page.
3. Alternatively, set the exact number of pages you want in the book by clicking the Book Settings button in the toolbar.
4. Drag the slider to specify the number of total pages you want the book to have.

Delete Pages from Your Book
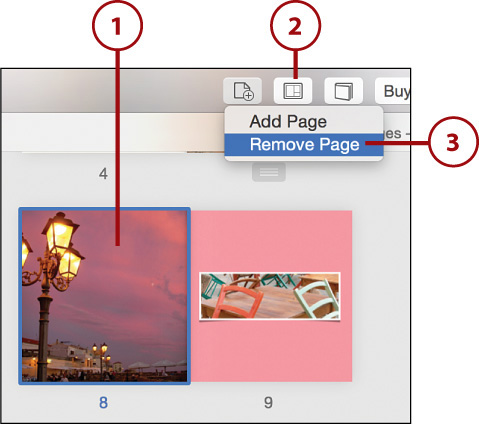
1. Select the page you want to delete.
2. Click the Pages button.
3. Select Remove Page. Alternatively, you can select a page and then press the Delete key or right-click a page and select Remove Page from the contextual menu.
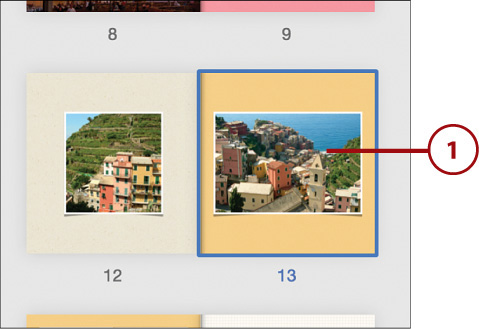
Reorder the Pages in Your Book
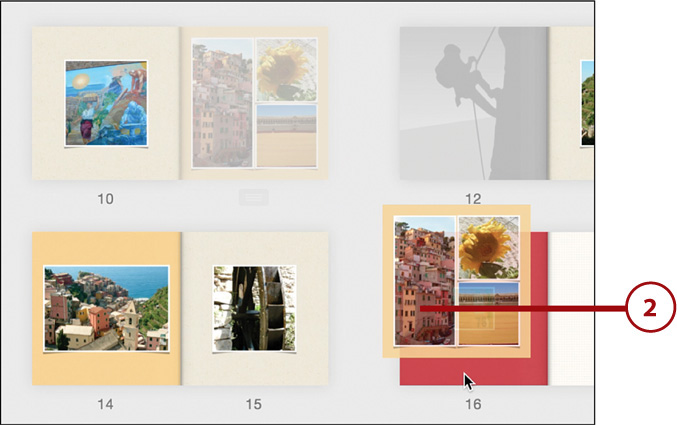
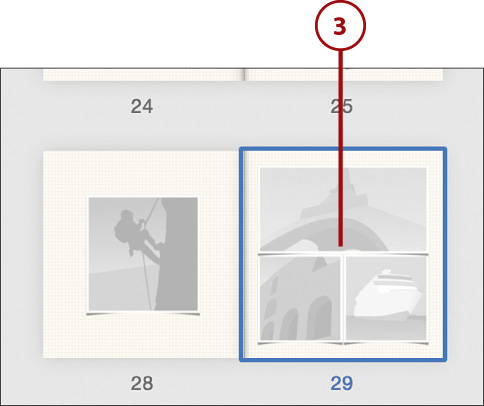
1. In the Book Project screen, move your mouse cursor over the page number below the page of the book you want to move. The page number turns into drag bars.
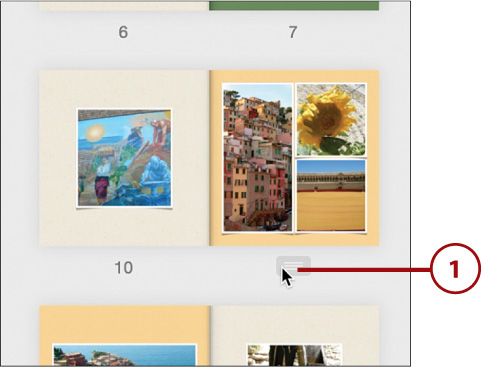
2. Click and hold the bar and drag the page to its new location.
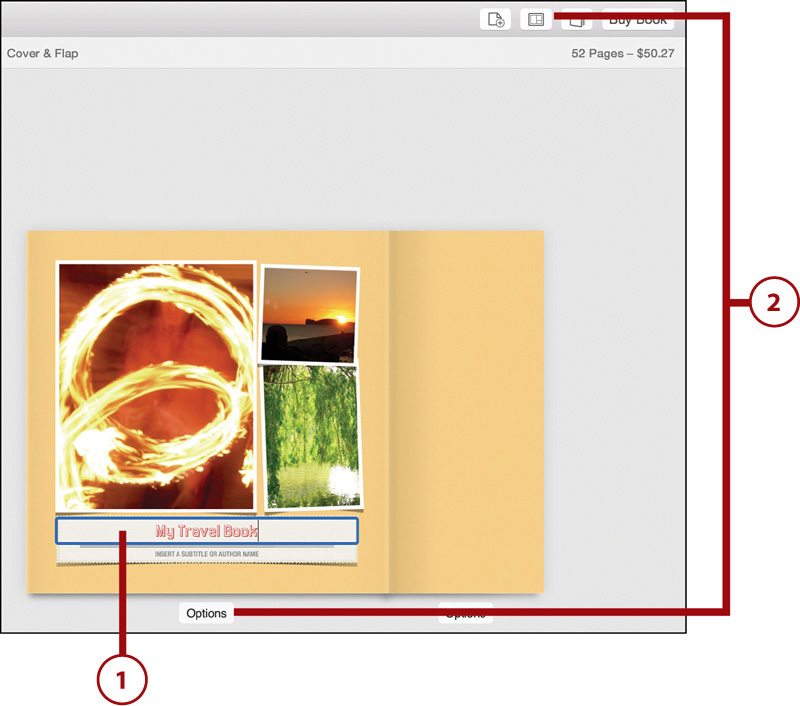
Change the Layout of Pages
While the myriad themes available in Photos’ projects each have their own stunning layout, sometimes its nice to really dig into a project and change its layouts to your liking, so Photos enables you to manipulate the individual layout of your book’s pages.
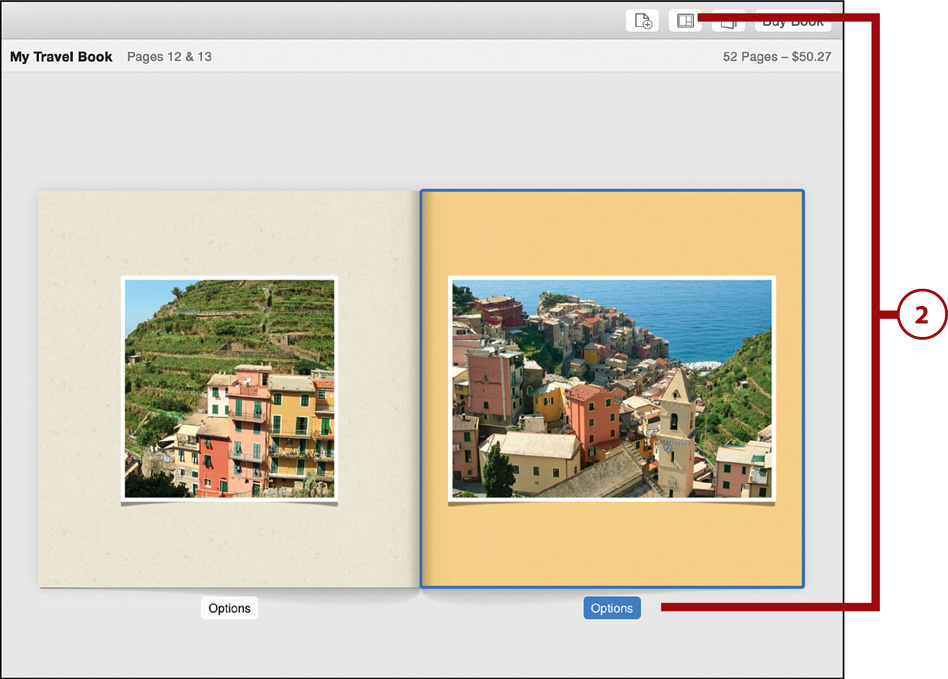
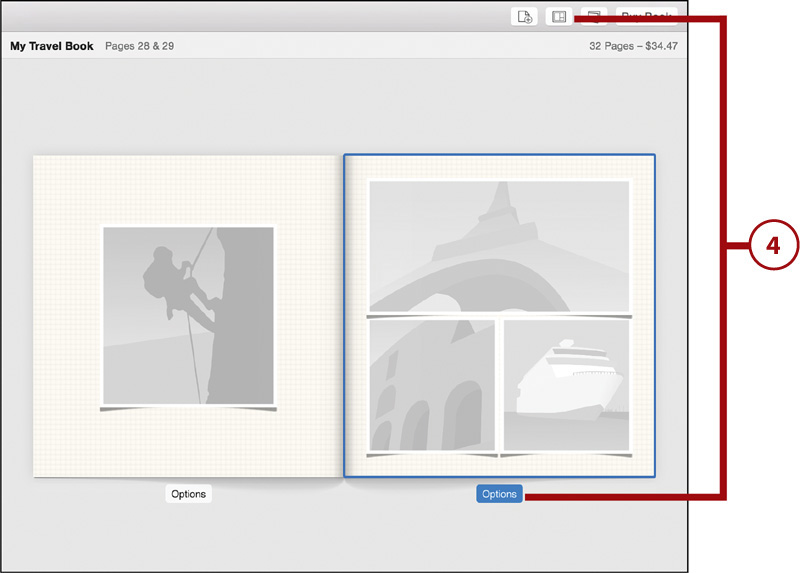
1. Double-click the page you want to change to see the page in the Page screen.
2. Click the Options button below the selected page to see its layout options. Alternatively, you can select the page and then click the Options button in the toolbar.
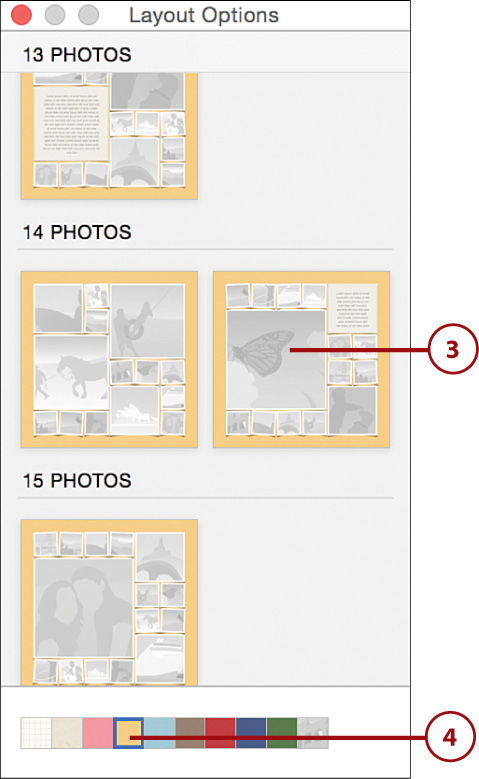
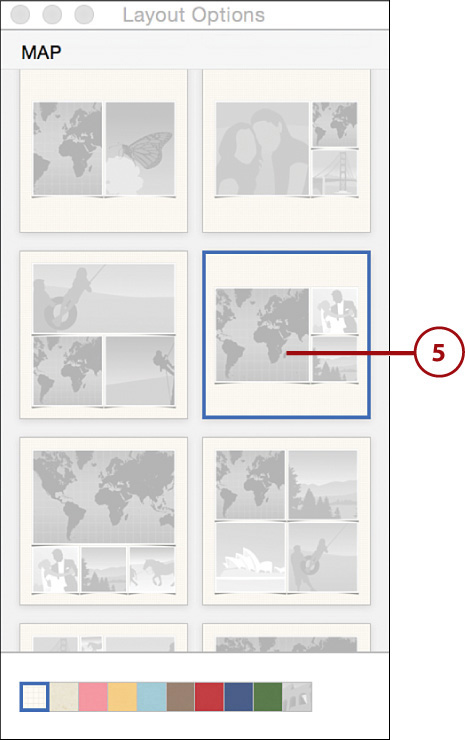
3. Scroll through the available page layouts and select one by clicking it. Page layouts include photos, text, maps, spreads, and even blank pages.
4. From the color picker, choose a background color for the page.
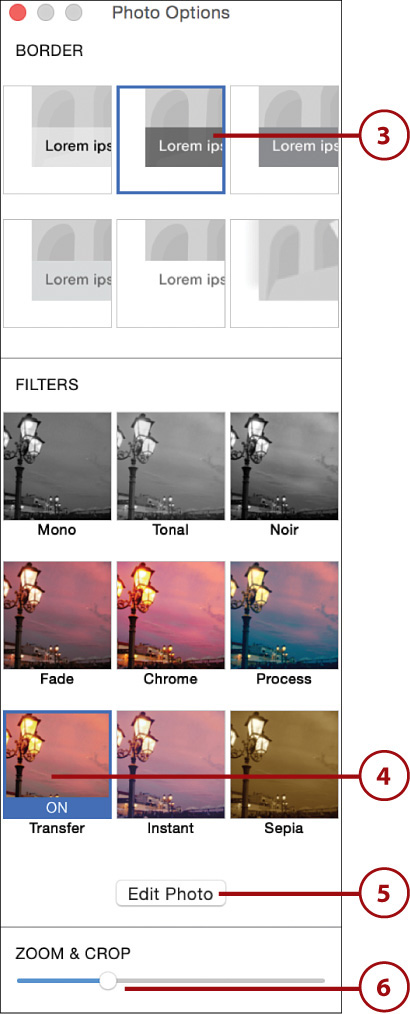
Edit Photos on a Page
You aren’t limited to just rearranging your photos and their layout on an individual page. You can also edit and manipulate individual photos.
1. Double-click the page containing the photo you want to edit.
2. Double-click the photo you want to edit. Alternatively, select the photo and click the Options button in the toolbar at the top of the screen.
Add a Filter Here, Not There
Note that adding a filter to a photo in a book does not add the filter to the photo in your main Photos Library.
3. Click a border option to add a border. Borders are available only in select themes.
4. Click a filter to apply it to a photo. To toggle a filter on or off, click it again.
5. Click the Edit Photo button to go to the regular edit mode in Photos for that image.
6. Use the zoom slider to zoom in or out of the selected photo and then click and drag the photo around to place it in the desired position.
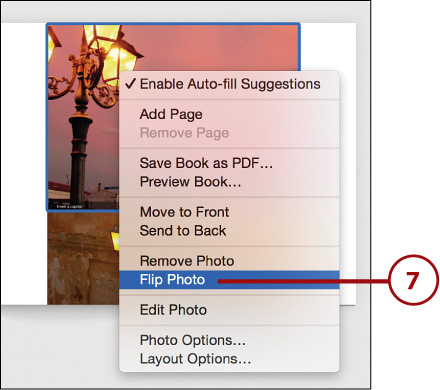
7. Flip the photo’s orientation by right-clicking the photo and selecting Flip Photo from the contextual menu.
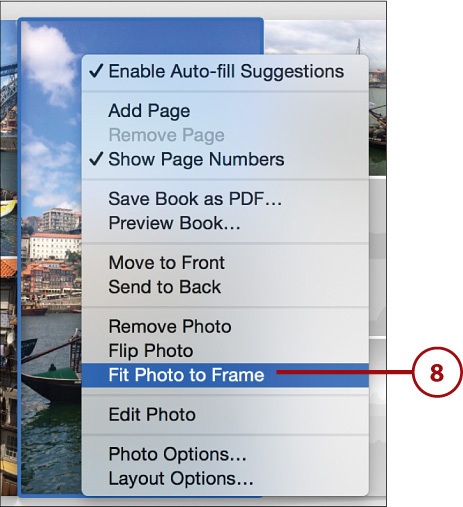
8. Right-click a photo and select Fit Photo to Frame from the contextual menu to fit the photo within the frame. (This option is not available in all themes.)
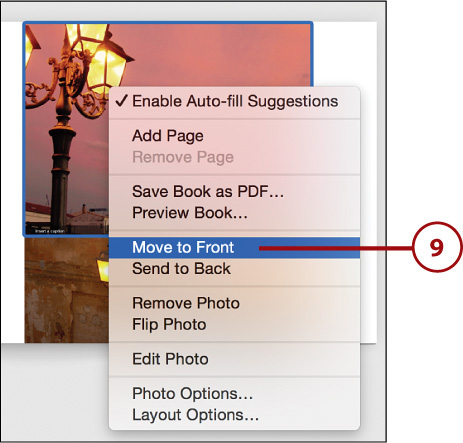
9. In layouts that use overlapping pictures, choose which image you want to be on top by right-clicking the image and then selecting Move to Front or Send to Back from the contextual menu.
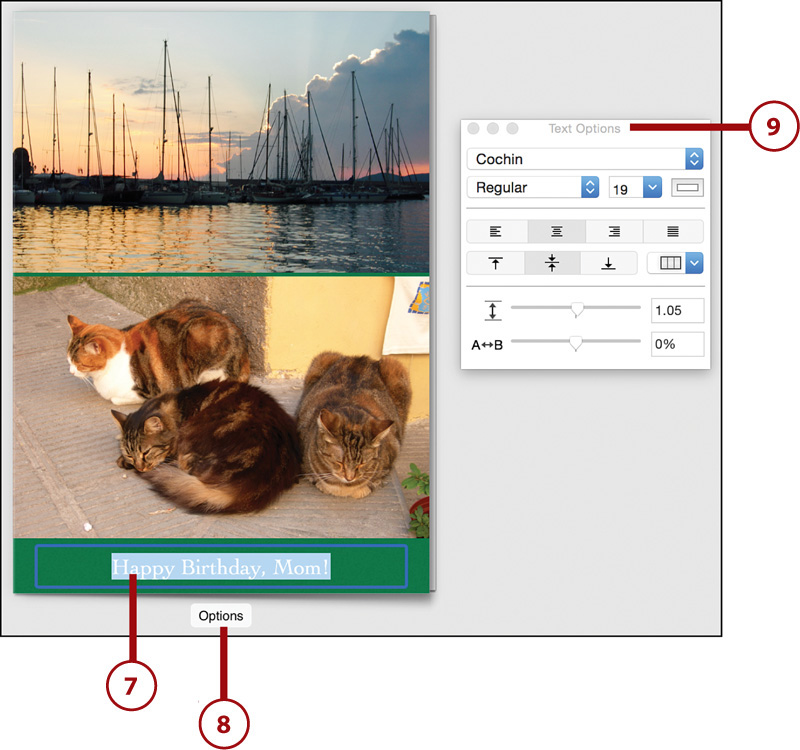
Format Text in Your Project
Many book themes, as well as cards and calendars, allow you to add text to pages—and alter the existing placeholder text.
1. Find a page with a text field, click inside it, and start typing.
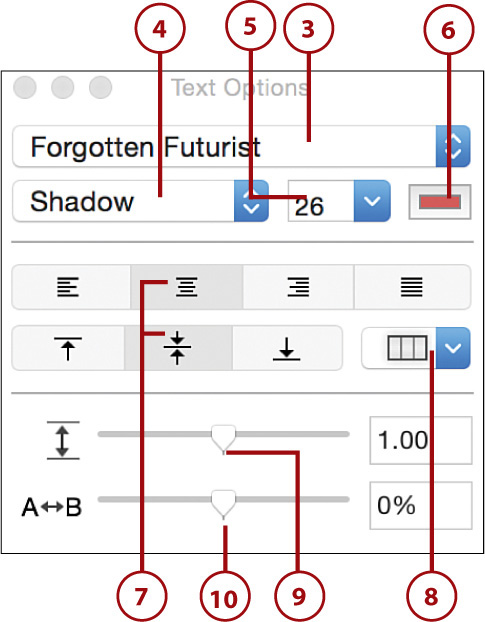
2. Format your text using the Text Options window by double-clicking the text field. Alternatively, select the text field and click the Options button in the toolbar at the top of the screen.
3. In the Text Options window, select the font from the drop-down menu.
4. Select the font styling, such as bold or italic.
5. Select the font size.
6. Select the font color.
7. Select the text alignment.
8. Select whether you want to add additional text columns.
9. Drag the slider to change the line spacing.
10. Drag the slider to adjust the text kerning (the space between letters).

Beware the Red Triangle
When formatting text, be on the lookout for a red triangle with an exclamation point in the text field. This means the text won’t fit in the allotted space when the project is printed. You need to reformat the text until things are all good again, which is indicated by the disappearance of the red triangle.
Use Maps in Books
Out of the myriad layouts you can choose to have in your book, perhaps one of the coolest is the map layout. With a map layout, you can add a map to your book and mark the locations where your photos were taken.
1. Click the Pages button.
2. Click Add Page.
3. Double-click the new page so it displays in the Page screen.
4. Click one of the Options buttons.
5. Scroll until you come to the Map header and select one of the map layouts.
6. Drag photos to any photo drop zones.
7. Double-click the map to see the Map Options window.
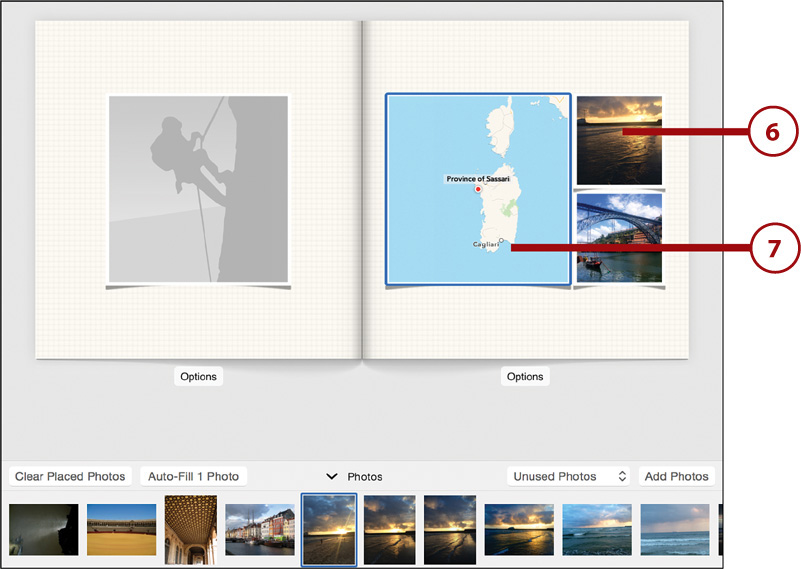
8. Choose what you want your map to look like. Options include standard, satellite, or hybrid map view.
9. Select or deselect the locations of the photos that you want to appear on the map. Locations are indicated by red dots on the map.
10. Remove a location marker by selecting the location from the Places list and clicking the – button.
11. Toggle location marker names on and off by checking or unchecking the Show Marker Labels box.
12. Zoom in on the marker location in a map using the zoom slider.
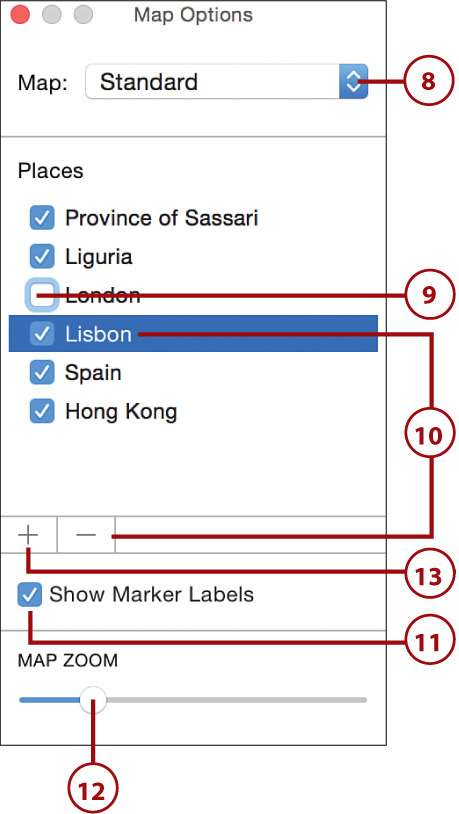
13. Manually add a location marker by clicking the + button.
14. Click and hold the red marker to drag it to your desired location.

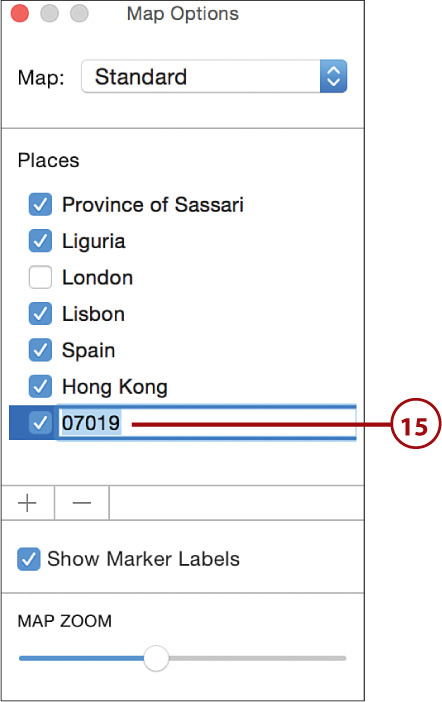
15. Rename the marker by clicking its current name in the Map Options window and typing a new name.
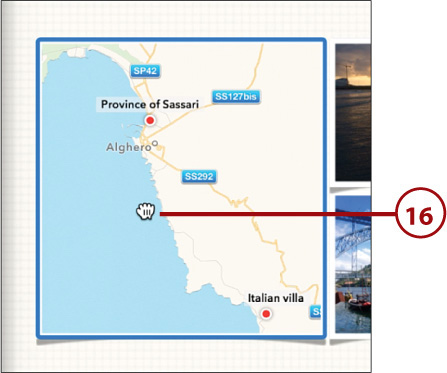
16. Click and hold on the map and then drag it around to position it to your liking.
Change a Book’s Settings
Photos gives you some final settings options for books. They’re available in the Book Settings menu.
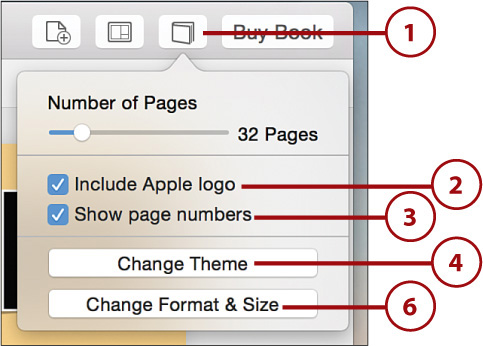
1. Click the Book Settings button.
2. Check or uncheck the Include Apple Logo box to show or hide the Apple logo on the back of your book.
3. Check or uncheck the Show Page Numbers box to indicate whether you want to show or hide page numbers in the book.
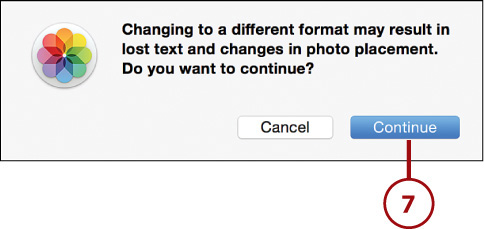
4. Click the Change Theme button to select a different theme. You see a warning that changing to a different theme may result in lost text and changes in photo placement.
5. Click Continue to accept and go to the Theme Chooser selection screen.
6. Click the Change Format & Size button to change a book’s format and size. You see a warning that changing to a different format may result in lost text and changes in photo placement.
7. Click Continue to accept and go to the Book Format screen.

Creating Cards and Calendars
After you’ve figured out how to create a book in Photos, you pretty much know how to create a card or calendar. Apple wisely chose to make the creation process and tools the same.
Create a Card
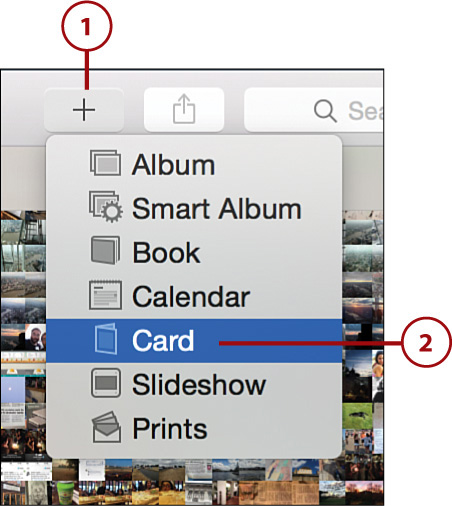
1. Click the + button.
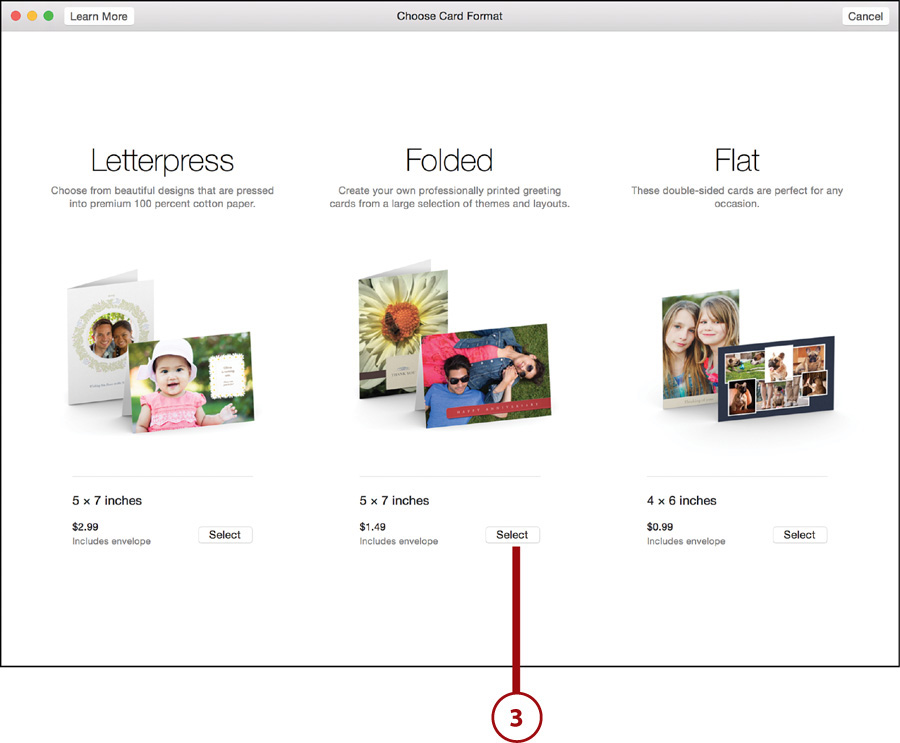
2. Select Card to see the Card Format screen, which shows the available card types (letterpress, folded, or flat).
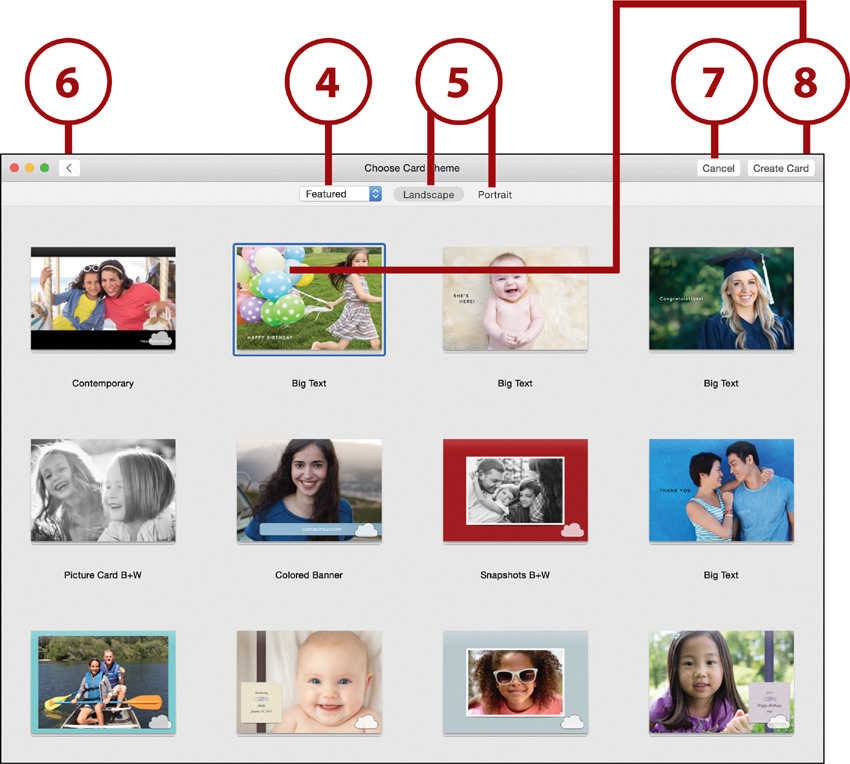
3. Click the Select button to choose your card’s format. The Card Theme window displays so you can choose the way you want your card to look.
4. Click the category drop-down menu to view cards in other categories.
5. Click the Landscape or Portrait button to view cards in those orientations.
6. (Optional) Click the Back button to return to the Card Format screen.
7. (Optional) Click the Cancel button to cancel the creation of the new card project.
8. Click a card option to higlight it and then click the Create Card button. Alternatively, you can double-click a Card Theme to select it.
Design Your Card
You can design your card by adding photos, writing text, and styling all aspects of it. The variations in cards are almost limitless, so each card you make will look different, but the steps to designing each one are similar.
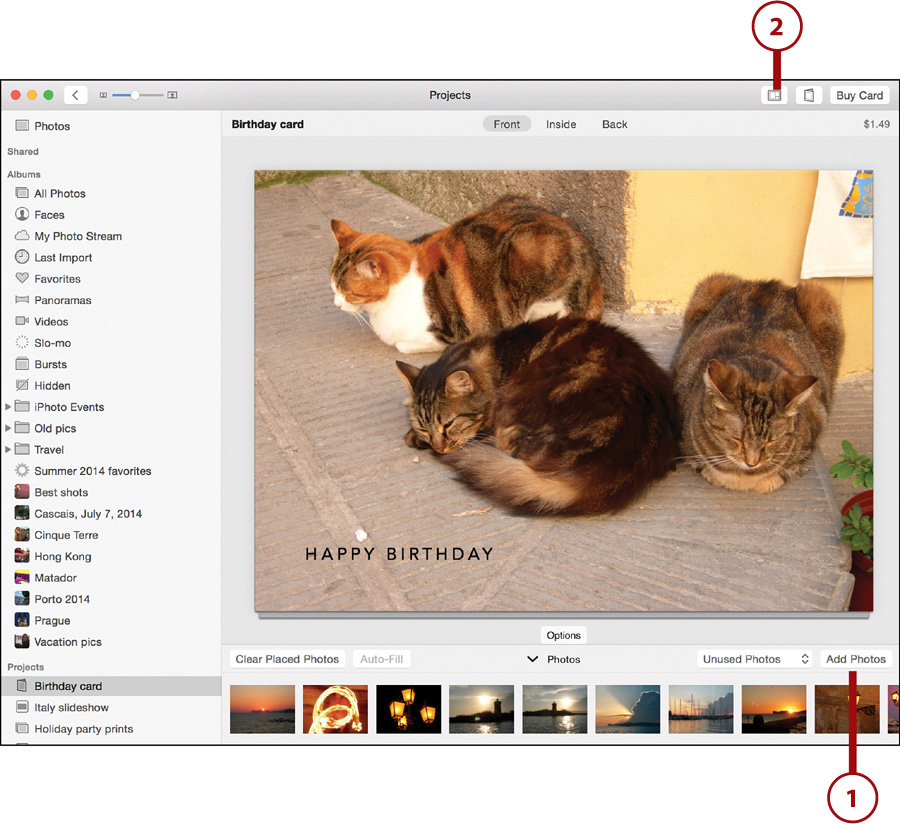
1. Click the Add Photos button to select photos for use in your card project. If you’ve created a card project from a selected photo you’ll already see that photo on the front of your card and any other photos that were selected in the photos toolbar.
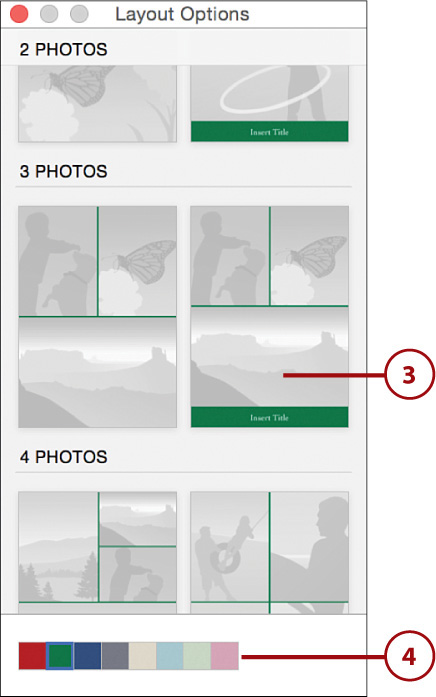
2. Select the card and then click the Options button to change the layout.
3. Scroll through the layout options and select the one that appeals to you.
4. If the card has color options, click any of the colored squares to change its color.
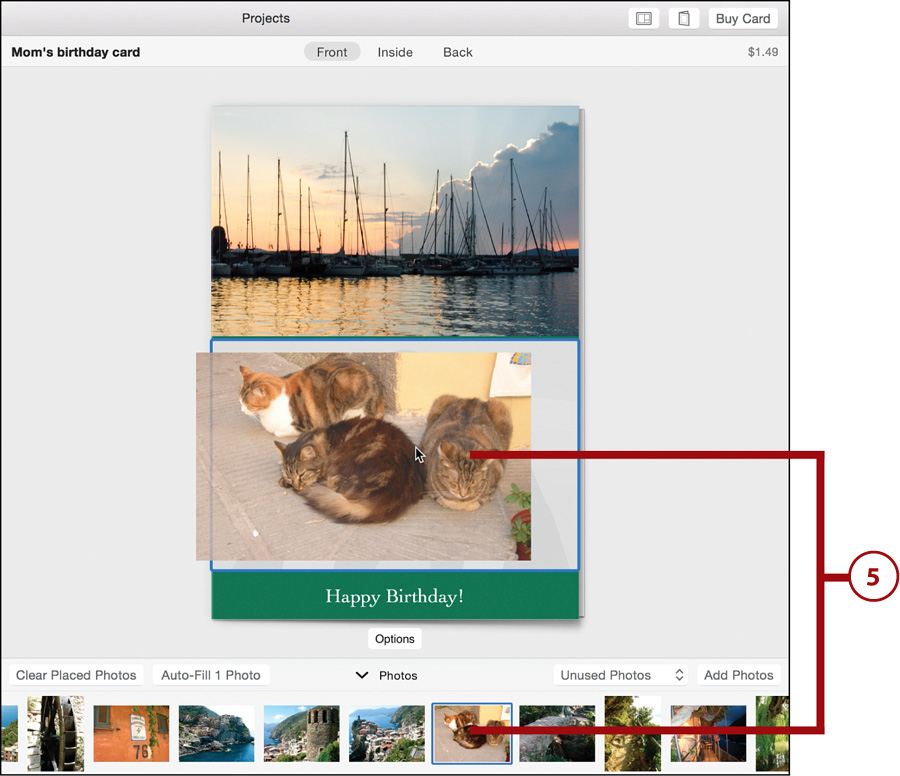
5. Select the photo you want to use and drag it to the drop zone on the front of the card.
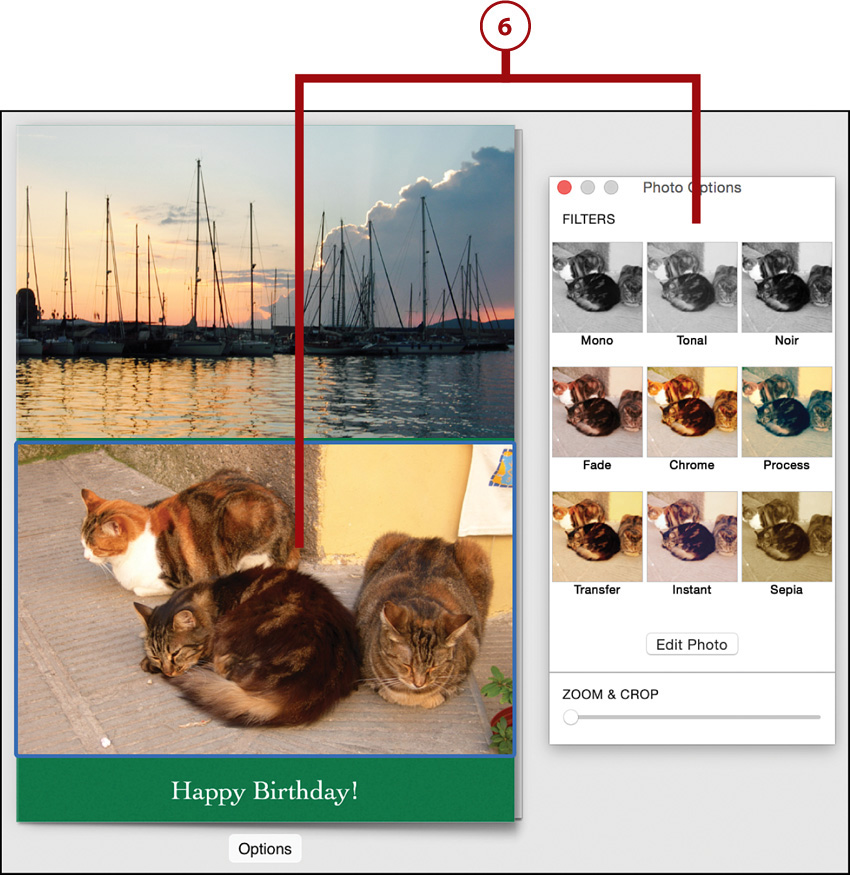
6. Alter the photo by double-clicking it to bring open the Photo Options window, where you can apply a filter, edit the image, or zoom in and crop the photo.
7. If the card you’re using has a text field, select it and type your text.
8. With the text field selected, click the Options button to open the Text Options window.
9. Use the Text Options controls to format the text.
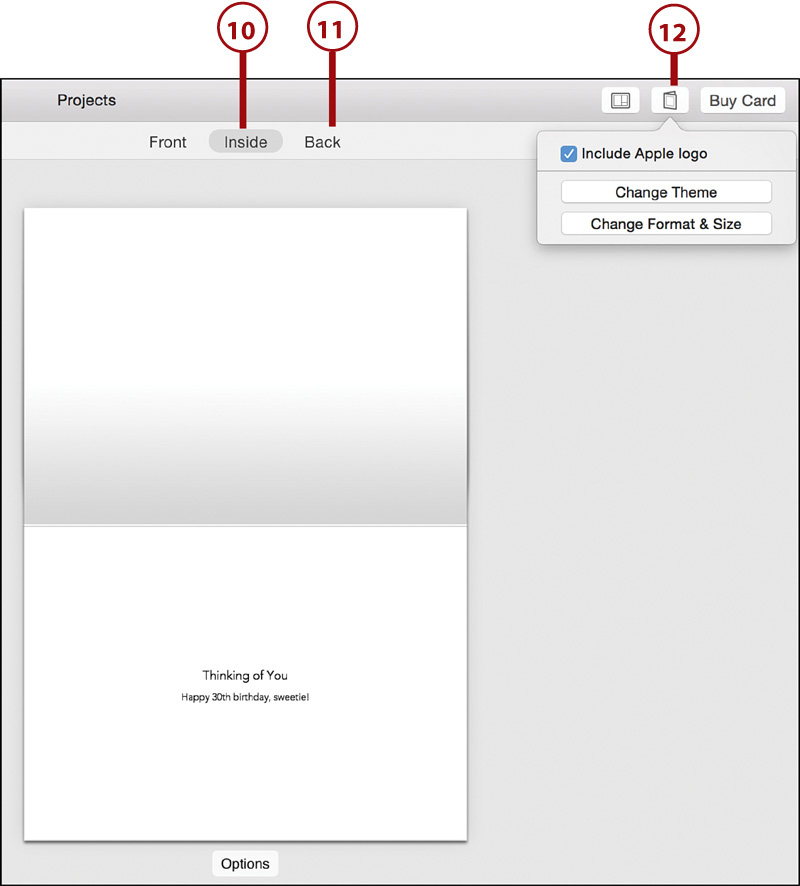
10. When you are done designing the front of the card, click the Inside button and design the card’s interior pages using the preceding steps.
11. After you are done designing the inside of the card, click the Back button and design its back cover using the preceding steps.
12. Use the Card Settings button to remove the Apple logo or change the theme, format, or size of the card.
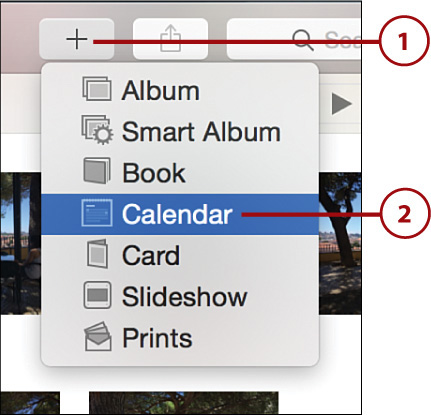
Create a Calendar
1. Click the + button in Photos’ toolbar.
2. Select Calendar.
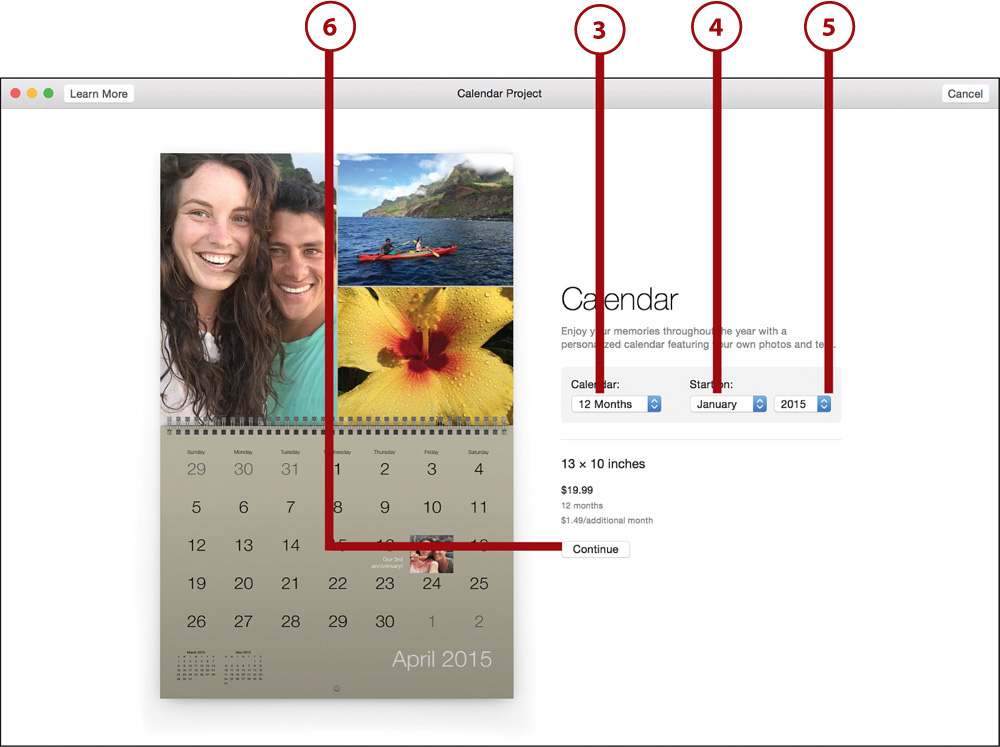
3. Use the drop-down menu to select how many months you want the calendar to cover.
4. Select the month the calendar will start with.
5. Select the year the calendar will start with.
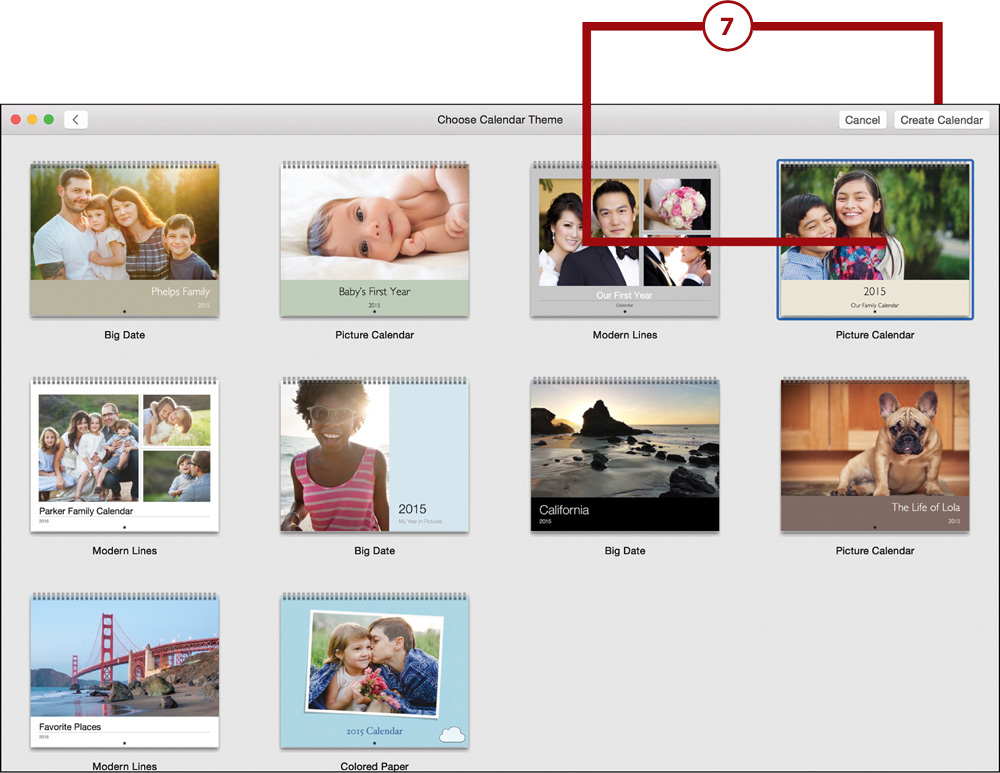
6. Click the Continue button to see the Calendar Theme window.
7. Click a theme to highlight it and then click the Create Calendar button. Alternatively, double-click a Calendar Theme to select it.
Design Your Calendar
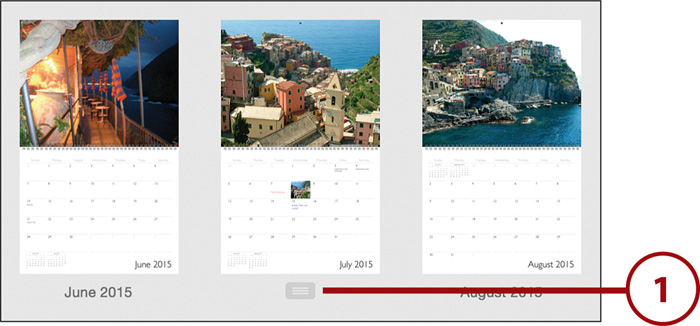
The Calendar Project screen resembles the Book Project screen; it gives you a full overview of every page of your calendar. Here you can begin dragging pictures from the photo toolbar at the bottom of the screen onto your calendar’s drop zones, but designing your calendar is usually easier when you work with one calendar month at time.
1. Double-click a month to vview it.
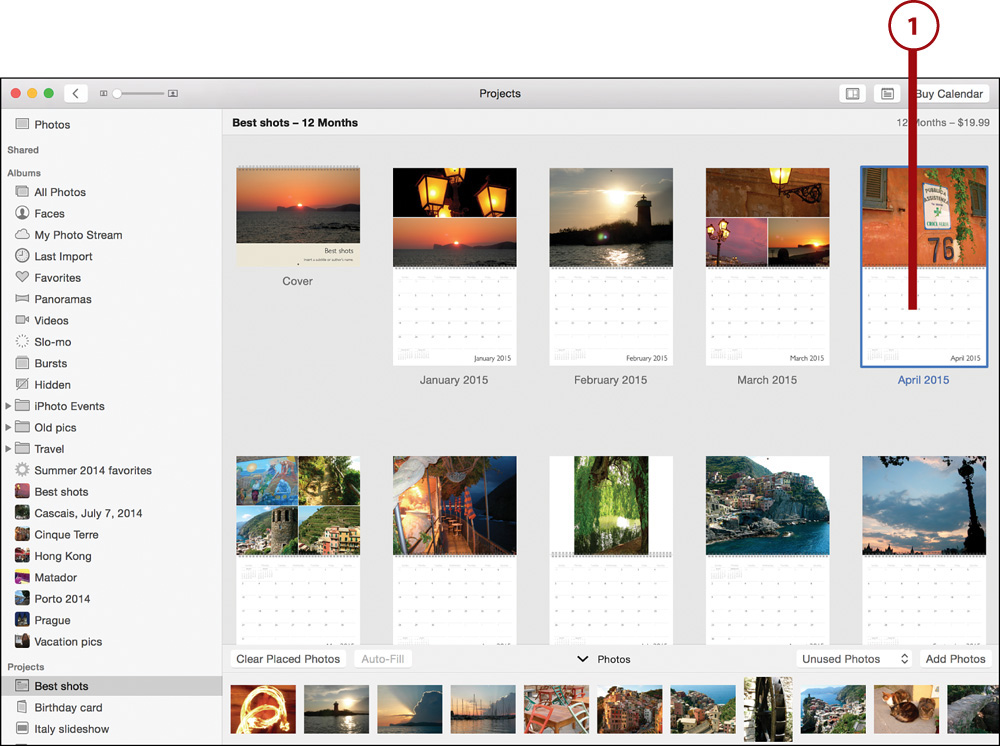
2. Click the Add Photos button to select photos for use in your calendar project. If you’ve created a calendar project from selected photos, you already see those photos inserted into your calendar, and you see any other photos that were selected in the photos toolbar.
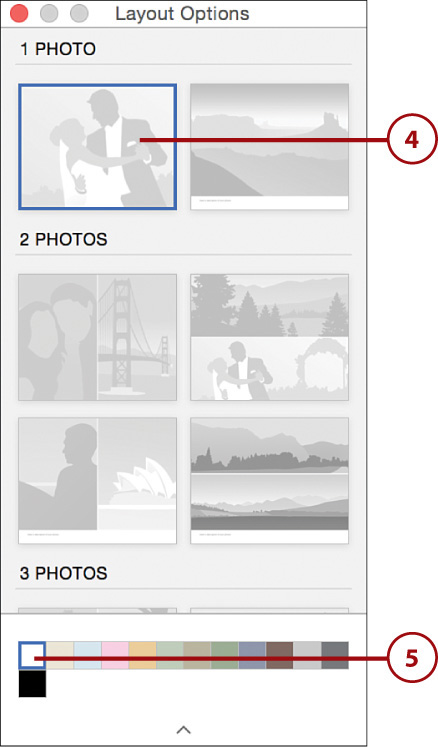
3. Select the calendar and then click the Options button to change the layout of the calendar.
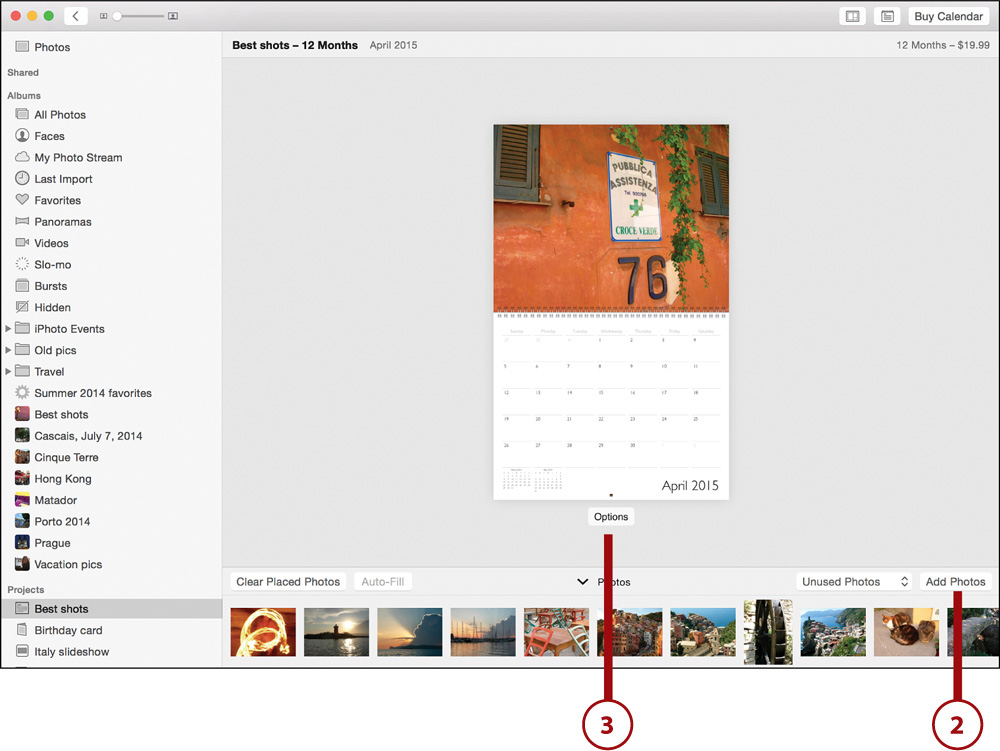
4. Scroll through the layout options and select the one that appeals to you.
5. If the calendar has color options, click any of the colored squares to change the color.
6. Select the photo or photos you want to use for the particular month and drag them to the drop zones on the calendar.
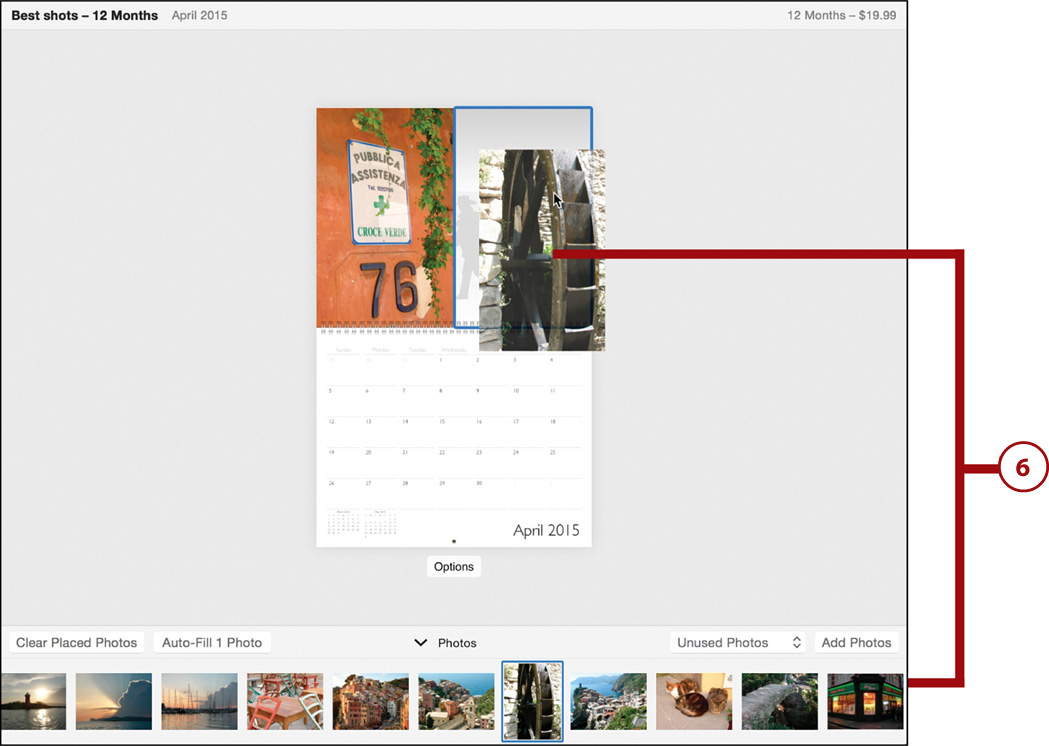
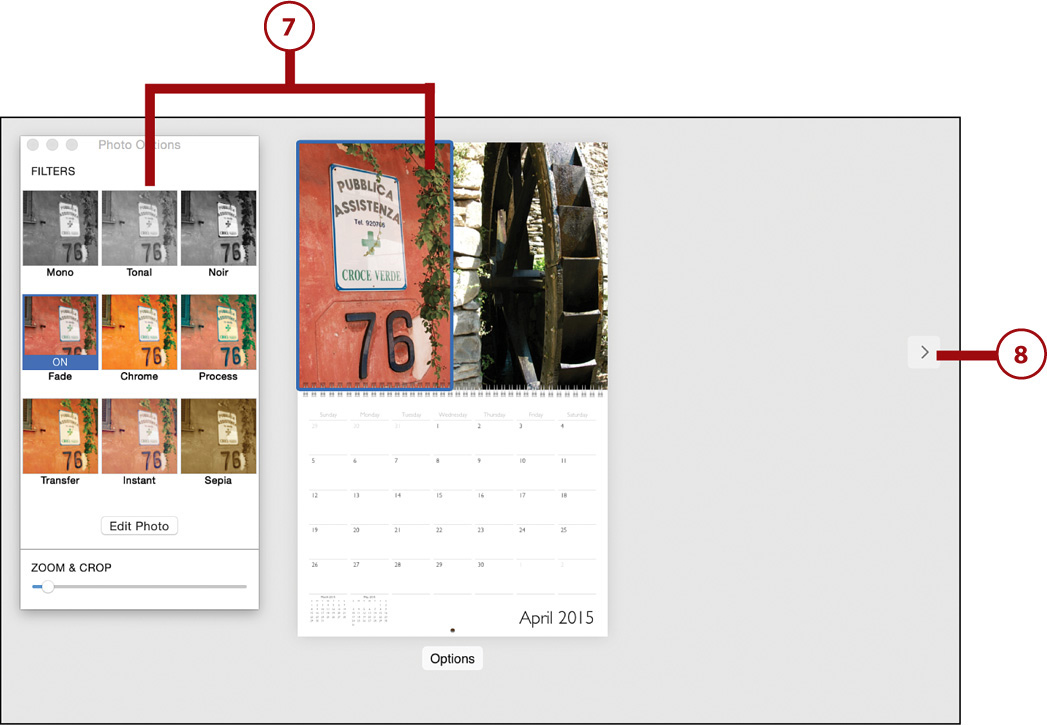
7. Alter the photo by double-clicking the photo to open the Photo Options window, where you can apply a filter, edit the image, or zoom in and crop the photo.
8. Click the left or right arrows to move through all the months of the calendar, desinging each month using the preceding steps.
Add Events to a Calendar
Calendars are most useful when they show upcoming events. Photos enables you to automatically populate your calendars with events.
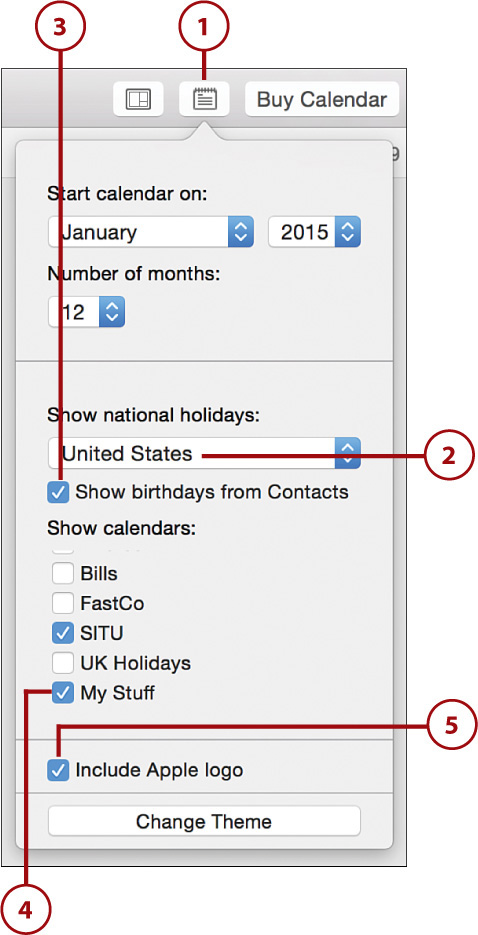
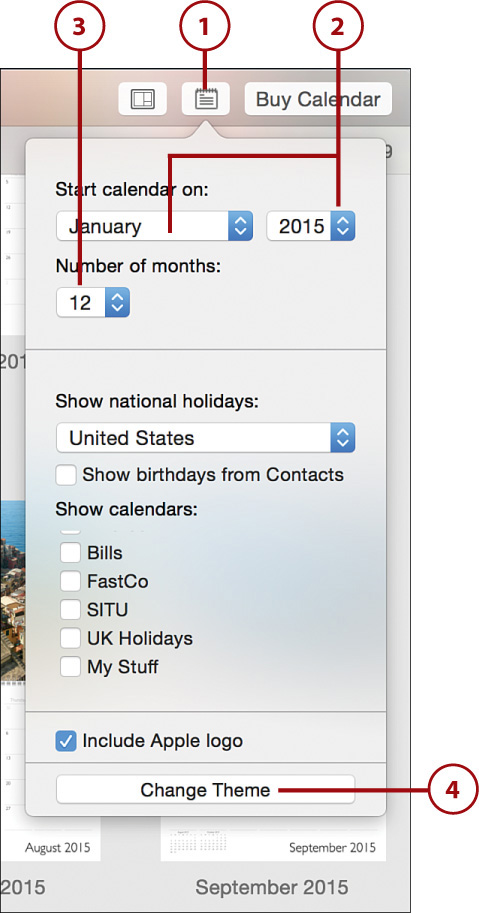
1. Click the Calendar Settings button.
2. Select the country whose national holidays should be on the calendar.
3. Check Show Birthdays from Contacts if you want any birthdays you have recorded for people in your OS X Contacts to show up on your calendar.
4. Select the calendars from which events should be imported to your calendar. Photos pulls this data from the built-in Calendar OS X app. Check a particular calendar’s box to include it in your Photos calendar.
5. Uncheck Include Apple Logo if you don’t want to show the Apple logo on the back of the calendar.
Add Custom Text to Specific Dates
One really cool feature of calendars is the ability to add custom text to any date square on the calendar. This is handy when you want to specify a certain event, such as an anniversary or the beginning of your trip to Europe.
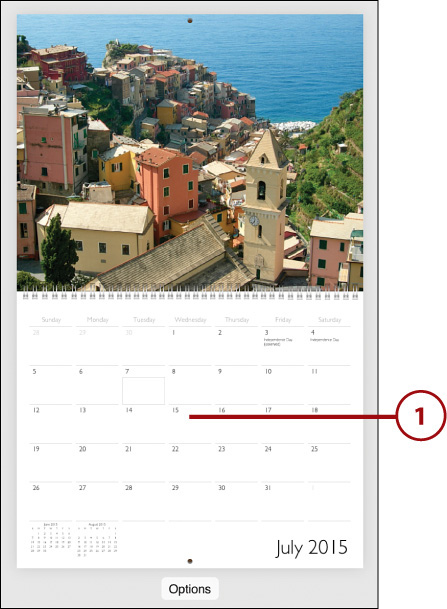
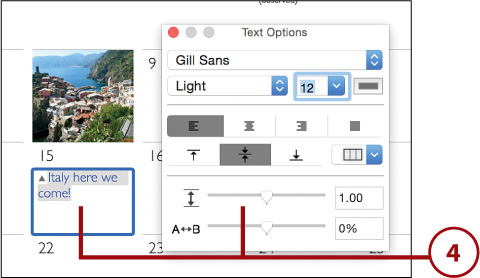
1. From the calendar month layout screen, double-click any date square. The calendar zooms to that specific date.
2. Enter your text and then double-click it to open the Text Options window.
3. Format the text using the Text Options window.

Add Photos to Specific Dates
You can fill date squares with photos. For example, you can signify your child’s birthday with her photograph, or maybe you just want to spice up the calendar page by adding random photos throughout the month.
1. From the calendar month layout screen, drag a picture from the photos toolbar onto the date square.
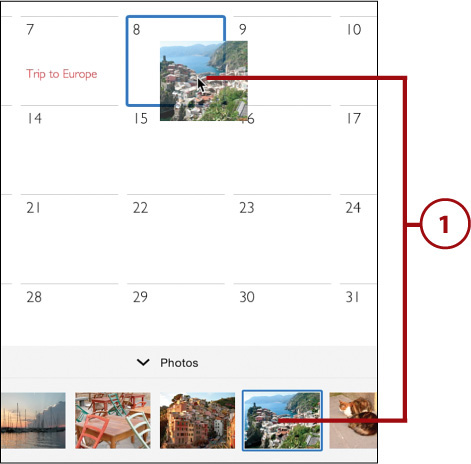
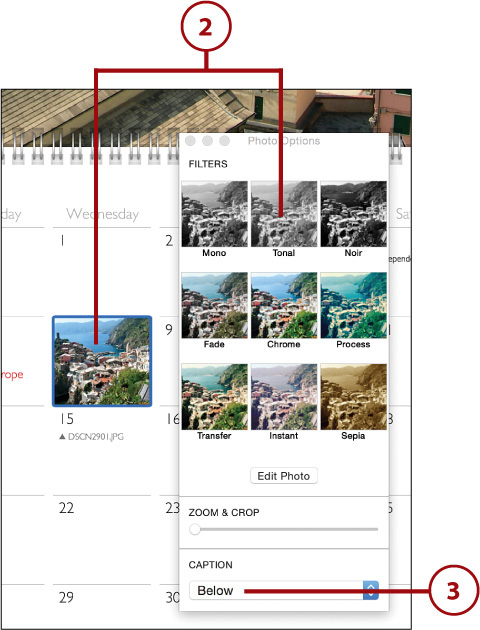
2. Double-click the photo to open the Photo Options window, where you can add a filter, edit the image, or zoom in and crop the image.
3. Select the caption’s location from the drop-down menu in the Photos Options window.
4. By default, the photo’s filename appears in the caption, but you can double-click it to enter a custom caption and format it.
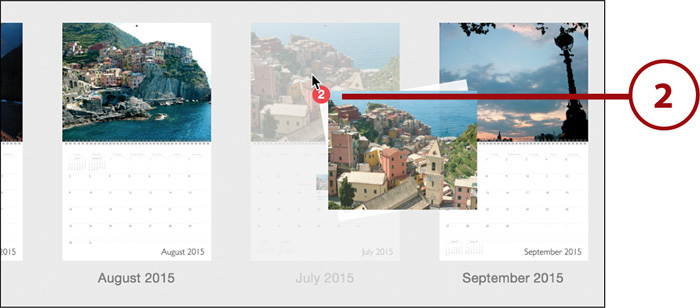
Reorder the Pages in Your Calendar
1. In the Calendar Project screen, move your mouse cursor over the month and year name below the page of the calendar you want to move. The month and year name turn into drag bars.
2. Click and hold the bar and drag the page to its new location. Note that when reordering calendar pages like this you’re only moving the layout and images at the top of the page to a new month. You aren’t, for example, moving the month of January to come after the month of August.
Change a Calendar’s Format and Theme
After you’ve completed creating a calendar you can go back and change its format and theme if you want.
1. Click the Calendar Settings button.
2. Select a new start month and year.
3. Click the drop-down list to change the number of months in the calendar.
4. Click the Change Theme button to return to the Calendar Theme window to select a new theme.
Exporting Books, Calendars, and Cards
Technically you don’t need to spend a dime to share your books, cards, and calendars with someone. That’s because Photos lets you export these projects as PDF documents, which you can then do whatever you want with—including emailing them to friends and family. You can also use the PDF to proof your project and get a sense of what the final product will look like.
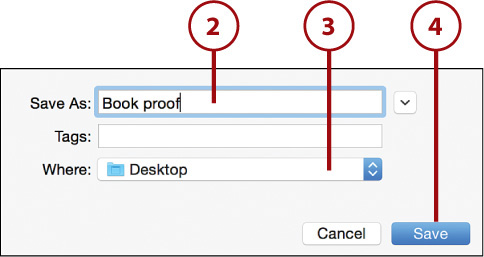
1. Right-click any single page of a book, calendar, or card and select Save [Book, Calendar, or Card] as PDF.

2. Enter a name for the PDF.
3. Select where you want to save the PDF.
4. Click Save and the project is exported as a PDF.
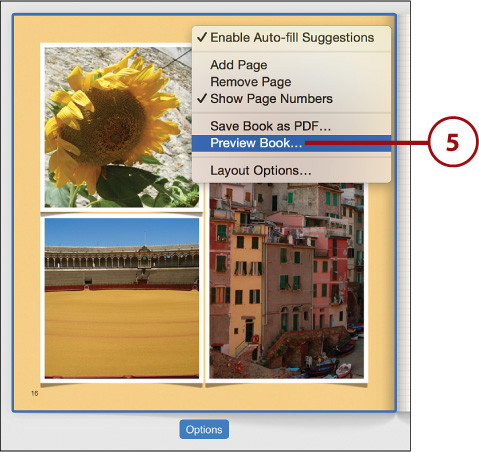
5. Alternatively, right-click any single page of a book, calendar, or card and select Preview [Book, Calendar, or Card]. A PDF preview of the project opens immediately in OS X’s Preview app. This preview is not saved unless you choose to save it in the Previews app.
Buying Your Keepsakes
After you’ve invested time and creativity in putting together your project, you can turn it into a true physical keepsake. Apple has made it easy to purchase your high-quality keepsakes.
1. Make sure you have completed creating your book, card, or calendar, and then click the Buy Book, Buy Card, or Buy Calendar button at the top of your project’s window.
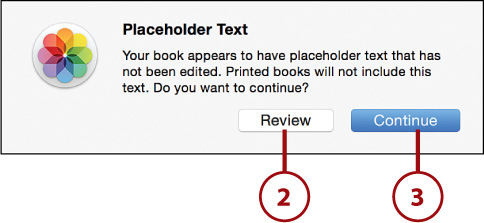
2. If any project still contains placeholder text, you see a warning. Click Review to find and change the placeholder text.
3. Alternatively, click Continue and the placeholder text is removed, leaving a blank spot where the text was. You see a summary window that shows what you are ordering and its price.
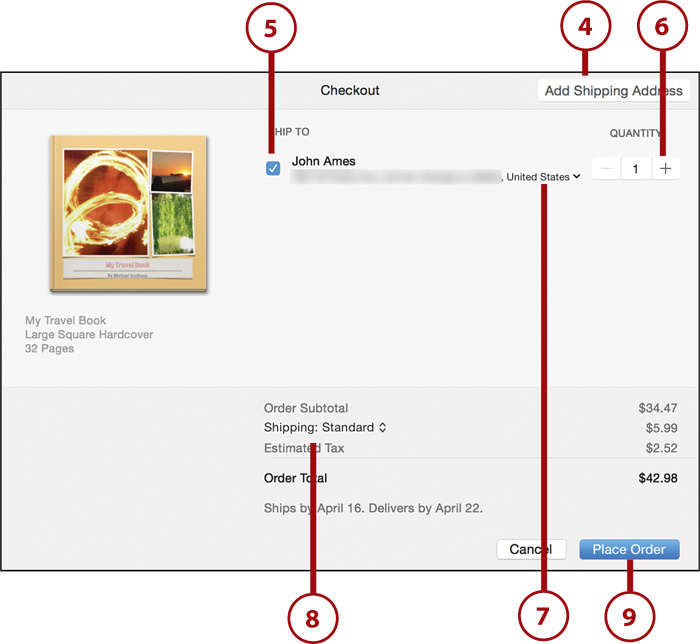
4. Click the Add Shipping Address button to enter a shipping address.
5. If you’ve ordered prints or projects before, past recipients’ addresses are listed. Check an address to select it. You might see an address suggestion screen if Apple thinks it’s found the recipient’s address formatted in a better way. Click the address to accept Apple’s suggestion or click Ignore to keep the address formatted as it is in your Contacts.
6. Click the + or – button to adjust the quantity you’re ordering.
7. Edit the recipient’s address by clicking the drop-down arrow next to the address and clicking the Edit button.
8. Select your shipping option.
9. Click Place Order. You’re prompted to enter your Apple ID to proceed to payment. If you have an iTunes account, you have an Apple ID. If not, you can simply create one on this screen and then enter your credit card information.
Ordering Prints of Your Photos
Remember the days when you would shoot photos with a film camera and then go to your local drugstore to have them printed? It was kind of expensive, somewhat of a pain, and, unless you went to the more expensive one-hour photo places, a long wait before you had nice glossy prints of your photographs.
Nowadays, the traditional print is being usurped by photo-sharing sites such as Flickr, digital picture frames, and smartphones. However, sometimes it’s still nice to have a printed photograph. You can print your photos using File, Print, but that’s handy only if you have a really good photo printer.
Alternatively, you can order physical prints of photos in your Photos Library and send them to anyone, anywhere in the world.
Place a Photo Order
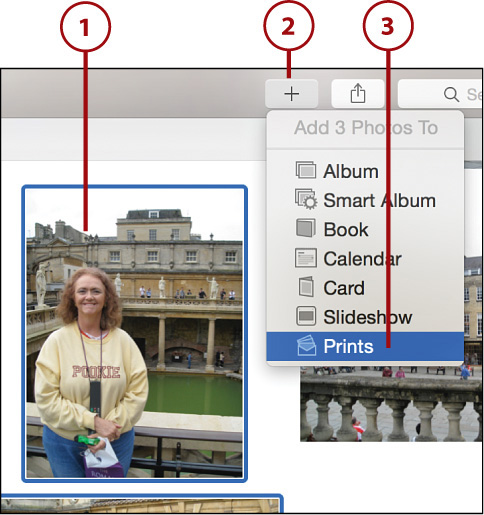
1. Select one or more photos from your Photos Library.
2. Click the + button in Photos’ toolbar.
3. Select Prints.
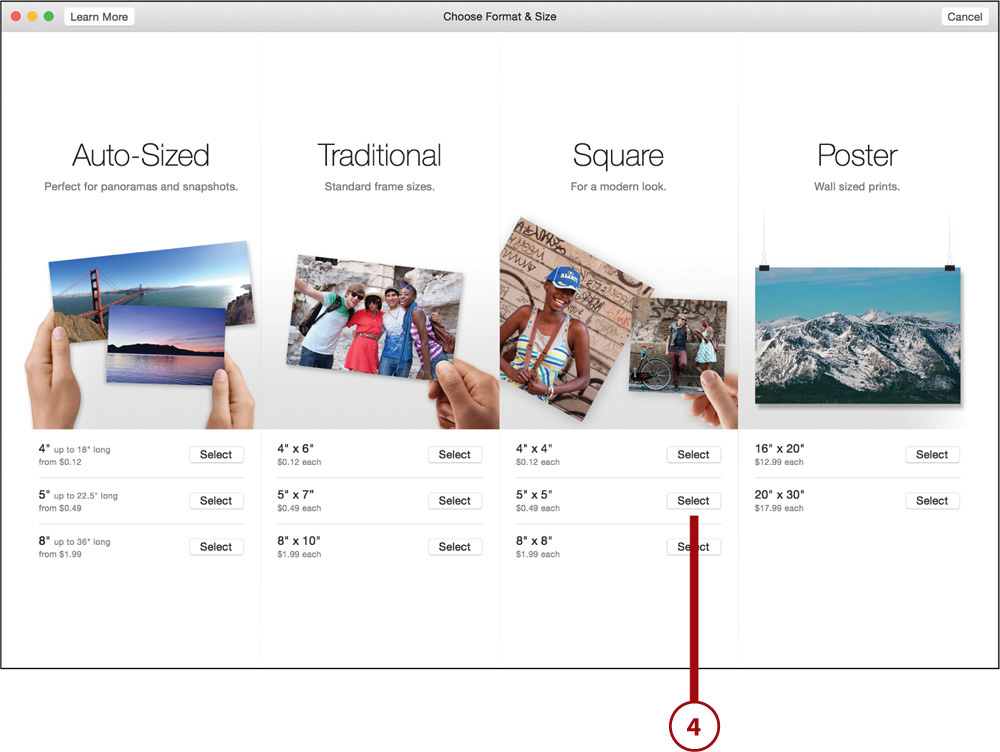
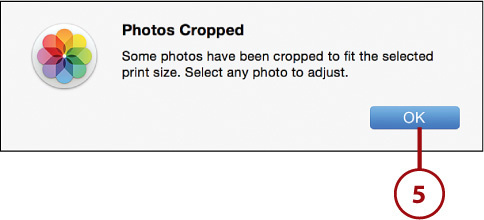
4. Choose the format and size of the photo you want to order by clicking a Select button. If you chose a format or size that is radically different than that of the original photo you may see a Photos Cropped dialog box appear warning you the photos will be cropped.
5. Click OK.
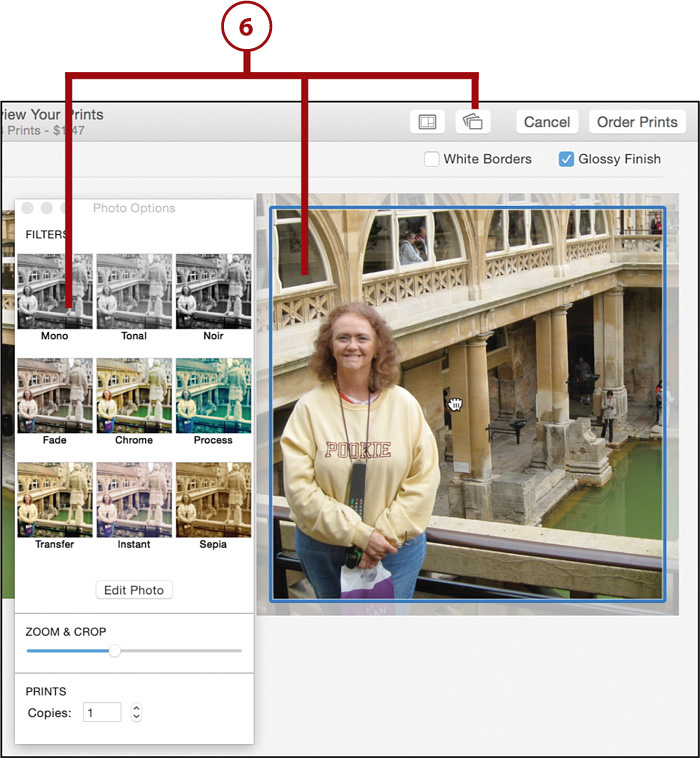
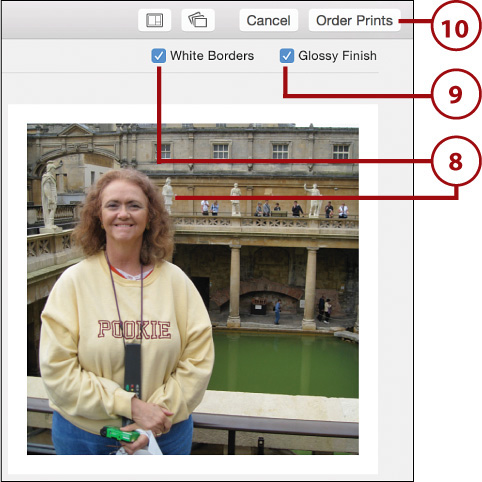
6. Select a photo and then click the Option button in the toolbar to add a filter to it, edit the photo, zoom in and crop the photo, and select the number of prints. You can also click any picture that has been zoomed in on and drag the image to adjust the crop.
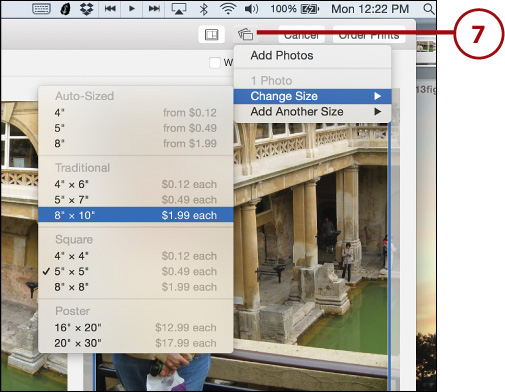
7. Click the Prints button to add more photos to your order, change the print size of the selected photo, or add another print of the selected photo in an additional size.
8. Check the White Borders box if you want to add a white border to your prints.
9. Leave the Glossy Finish box checked if you want to order glossy prints. Alternatively, uncheck it if you want to order matte prints.
10. Click Order Prints to see a summary window of your order.
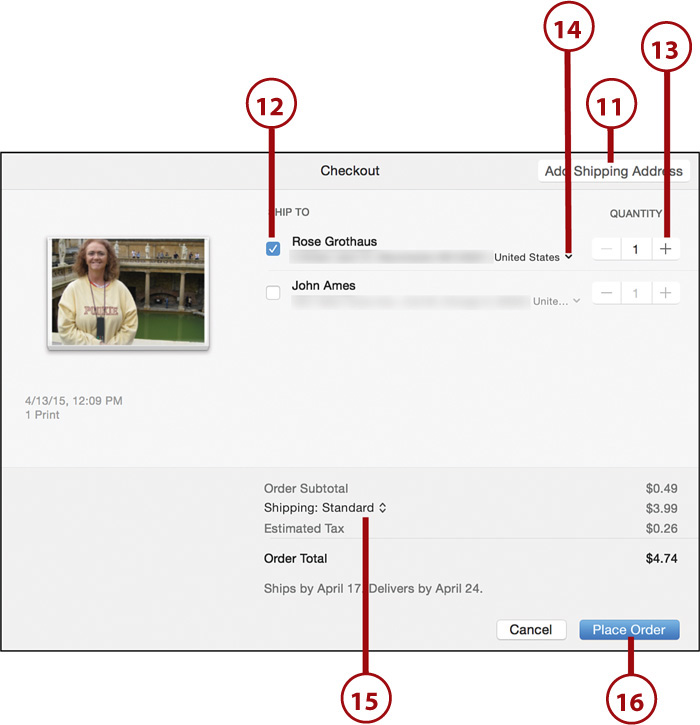
11. Click the Add Shipping Address button to enter a new shipping address.
12. If you’ve ordered prints or projects before, past recipients’ addresses are listed. Check an address to select it. You might see the address suggestion screen if Apple thinks it’s found the receipient’s address formatted in a better way. Click the address to accept it or click Ignore to keep the address formatted as it is in your Contacts.
13. Click the + or – button to adjust the quantity you’re ordering.
14. Edit the recipient’s address by clicking the drop-down arrow next to it and clicking the Edit button.
15. Select your shipping option.
16. Click Place Order. You’re prompted to enter your Apple ID to proceed to payment. If you have an iTunes account, you have an Apple ID. If not, you can simply create one on this screen and then enter your credit card information.
Working with Slideshows
Slideshows are great and, unlike other keepsakes, a free way to show off your photos. With a slideshow you can add text, music, and transitions quickly and easily to your photos and then wow your friends and family with the click of a button.
Create a Slideshow
1. Select the album or group of photos from which you want to create a slideshow.
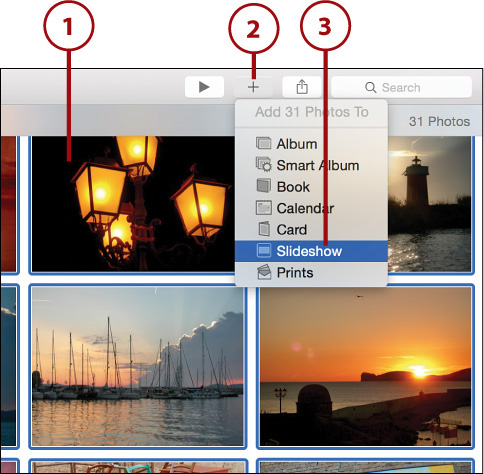
2. Click the + button.
3. Select Slideshow. You see a box that tells you how many photos are being added to the slideshow.
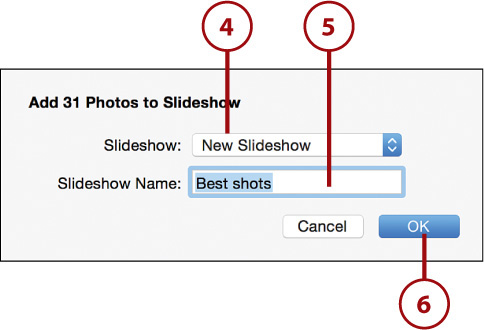
4. Select New Slideshow from the drop-down menu to create a new slideshow. If you’ve already created a slideshow and want to add this selection of photos to it, select the name of the existing slideshow.
5. Type a name for the slideshow. By default the slideshow is named based on similar characteristics of the photographs you’ve selected, such as the Moment or album they were located in.
6. Click OK. A slideshow containing the selected photos appears in the Source List under the Projects header.
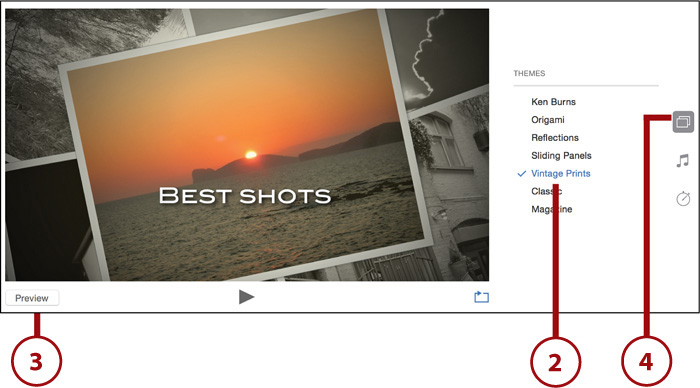
Navigate the Slideshow Window
The slideshow window is the viewer where you interact with and adjust your slideshow settings. It looks pretty sparse at first, but the three buttons on the righthand side open up a ton of options and tools.
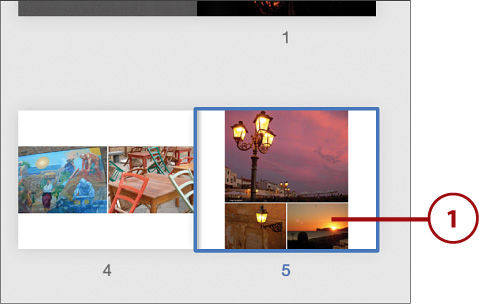
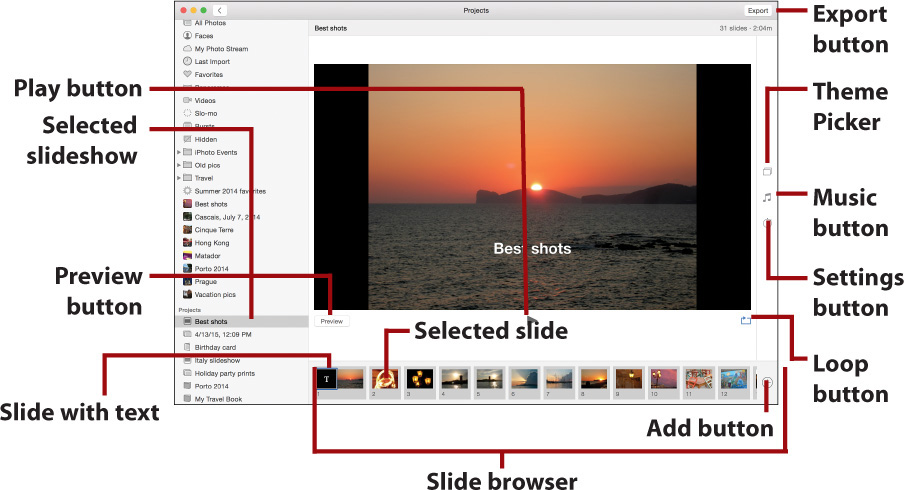
• Selected slideshow: The slideshow you select in the Source List shows in Photos’ viewer.
• Selected slide: Click a slide in the slide browser to display it in the viewer.
• Slide with text: A black box with a white T in it indicates the slide has text written on top of it.
• Slide browser: Thumbnails of all the slides in the slideshow. Click one to display it in the viewer or click and drag a slide to reorder it in the slideshow.
• Preview button: Starts a preview of your slideshow.
• Play button: Plays your slideshow from the beginning in full screen.
• Loop button: Click to run a continuous loop of your slideshow. Click again to end the loop.
• Export button: Opens the Export dialog box. Use this button to save your slideshow as a movie, which is playable on a number of devices including iOS devices.
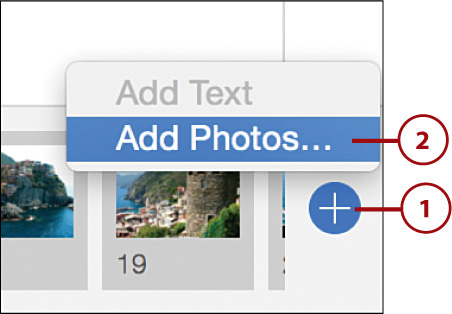
• Add button: Adds text on top of an existing slide or adds an additional photo to the slideshow.
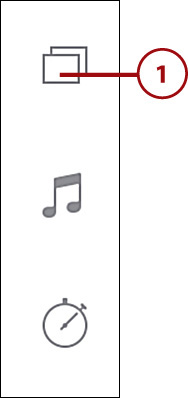
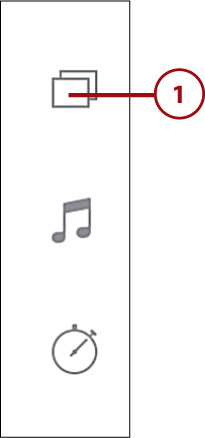
• Theme Picker: Displays the slideshow themes chooser.
• Music button: Displays the music browser for your slideshow.
• Settings button: Displays the settings options for your slideshow.
Add Text to a Slideshow
Some slideshows only need photos, but by adding text, you can give slideshows more context. Text can only be added once per slide.
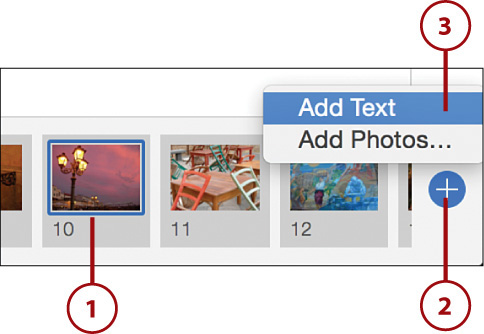
1. Choose a slide that does not have text.
2. Click the Add button.
3. Select Add Text.
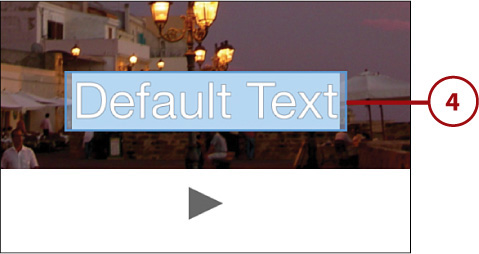
4. Type your text in the text field.
Remove Text from a Slide
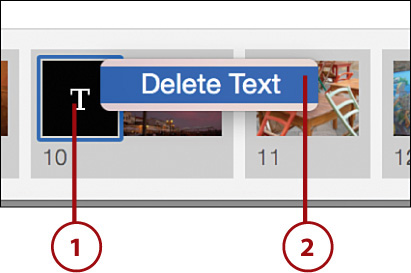
1. In the slide browser, right-click the black-and-white text icon attached to a slide’s thumbnail.
2. Click Delete Text.
Add Photos to a Slideshow
1. Click the Add button in the slide browser.
2. Select Add Photos.
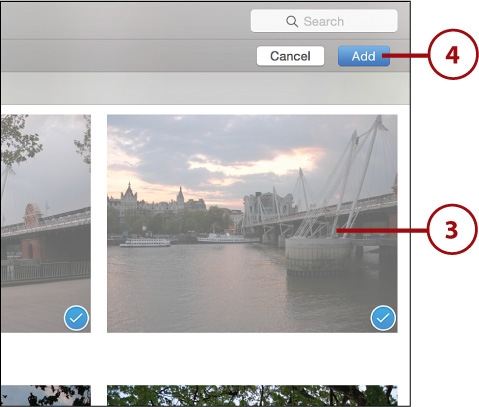
3. Select the photos you want to add.
4. Click Add.
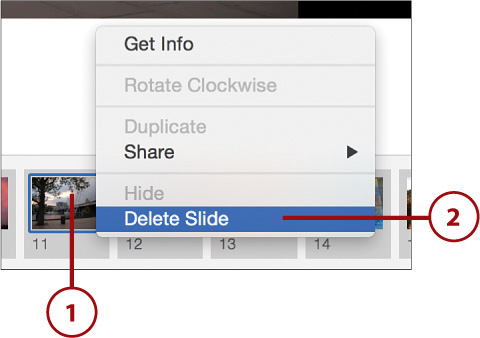
Remove Slides from a Slideshow
1. In the slide browser, right-click the slide you want to remove from the slideshow.
2. Click Delete Slide. Alternatively, you can click a slide to select it and then press the delete key.
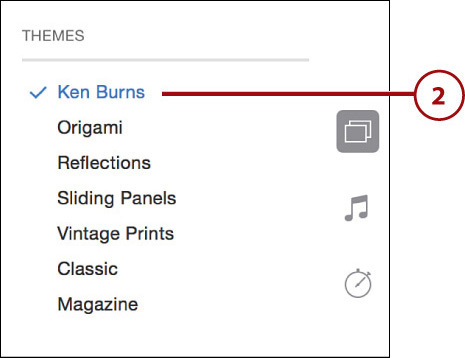
Choose a Slideshow Theme
Photos offers several built-in themes for your slideshows that make you look like you spent hours working on them.
1. Click the Theme Picker button in the slideshow viewer.
2. Click a theme to select it. A blue check mark indicates the selected theme.
3. Click the Preview button to preview a theme.
4. Click the Theme Picker button to close the themes menu.
Work with the Ken Burns Theme
Out of all the slideshow themes available in Photos only one has any extra settings—the Ken Burns theme. The Ken Burns theme is named for an effect created by the famous documentary filmmaker Ken Burns, who pioneered a way to make looking at static photos on screen more interesting by adding a subtle pan and zoom to them. The effect proved so popular with audiences that virtually every documentary—and news report—now uses it.
When you select the Ken Burns theme, a subtle pan and zoom is added to each photo. You can specify where the pan and zoom begins on each photo and where it ends.
1. Click the Theme Picker button in the slideshow viewer.
2. Select the Ken Burns theme.
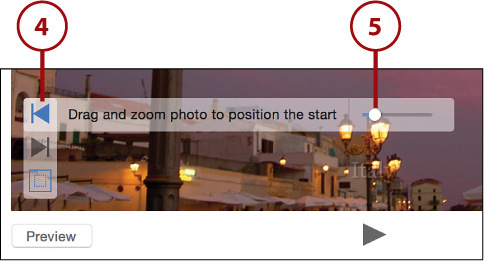
3. Click the Ken Burns Effect button in the lower-left corner of the slide.
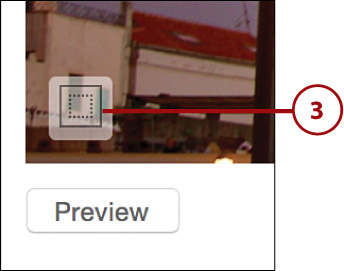
4. Select the top button to set the Ken Burns In-Point.
5. Drag the slider to zoom in on the In-Point. After you’re zoomed in, you can click and hold on the image and drag it to position the pan. This is the location the effect pans from.
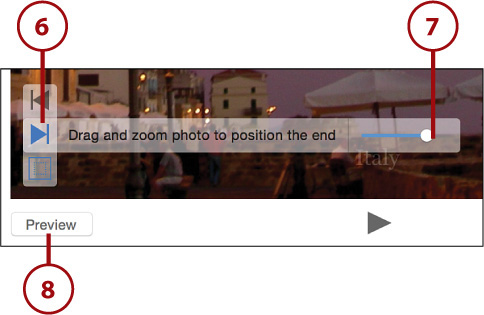
6. Click the bottom button to set the Ken Burns Out-Point.
7. Drag the slider to zoom in on the Out-Point. After you’re zoomed in you can click and hold on the image and drag it around to position the pan. This is the location the effect pans to.
8. Click the Preview button to see how your In- and Out-Points look.
Set All Your Ins and Outs
The In- and Out-Points are set one slide at a time, so be sure to customize them for any slides that should use the effect; otherwise, the default Ken Burns Effect settings will be used. Also note that you don’t need to have the Theme Picker selected to set the In- and Out-Points. You can access the Ken Burns Effect button directly on a slide in the main viewer as long as its slideshow is using the Ken Burns theme.
Add Music to a Slideshow
Adding music to a slideshow can give it some much needed “zing!” to keep your audience interested.
1. Click the Music button in the slideshow viewer. You see a music menu of all the settings. The selected song or songs are displayed under the Selected Music header.

2. Preview the selected song by moving your cursor over the song number and clicking the Play button.
3. Remove a selected song by moving your cursor over the name of the song and clicking the X button.
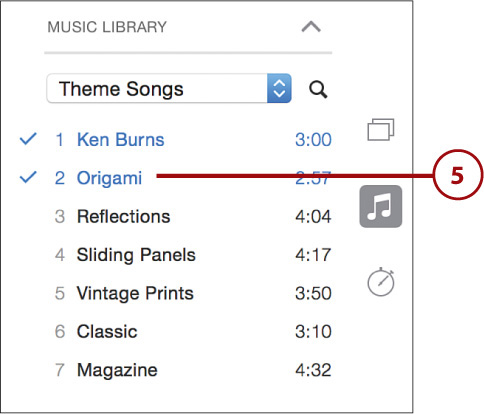
4. Add a new song by clicking the drop-down arrow by the Music Library header.

5. Select either iTunes or Theme Songs. Theme Songs includes the built-in slideshow music provided by Photos. Click a theme song to use it in your slideshow.
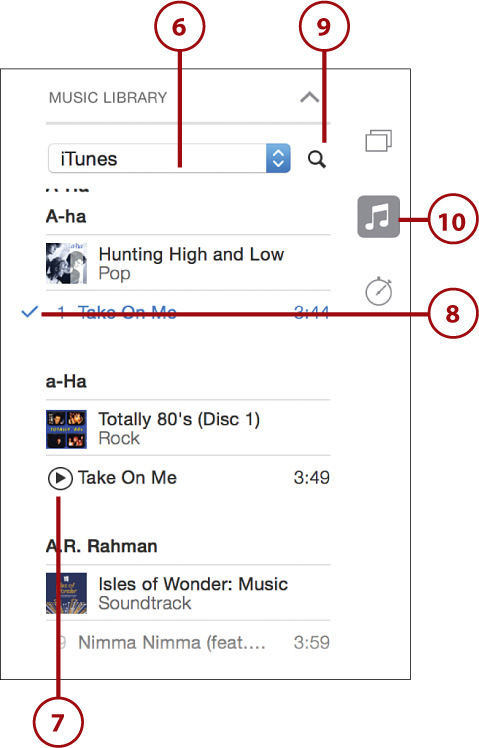
6. If you choose iTunes from the drop-down menu, scroll through all the artists in your iTunes library alphabetically.
7. Move your cursor over a song and click the Play button to preview it.
8. Click the name of the song to set it as the slideshow’s music. You can select more than one song. Selected songs are added to the Selected Music header.
9. Click the Search button to type the name of an artist or song.
10. When you’re done selecting music, click the Music button to exit the music settings.
Adjust Slideshow Settings
Photos gives you a number of additional settings so you tweak your slideshows. You can choose the length of time each slide is displayed, the type of transitions between slides, the aspect ratio of the slideshow, and more.
1. Click the Settings button in the slideshow viewer.

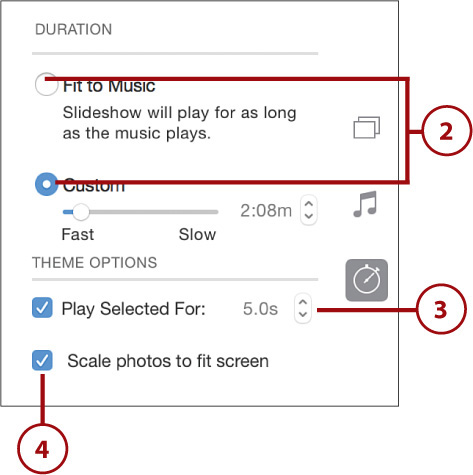
2. A settings menu appears displaying all the possible settings for the selected slideshow based on its theme. Some slideshows have additional settings, but all slideshows have the same duration settings. Under the Duration header select Fit to Music so the slideshow plays for as long as the music plays, or select Custom and use the slider to manually change the length of time the slideshow plays.
3. The Ken Burns theme allows you to set how long you want an individual slide to play for. Select the slide and then check the Play Selected For box and set the time in seconds using the up and down arrows.
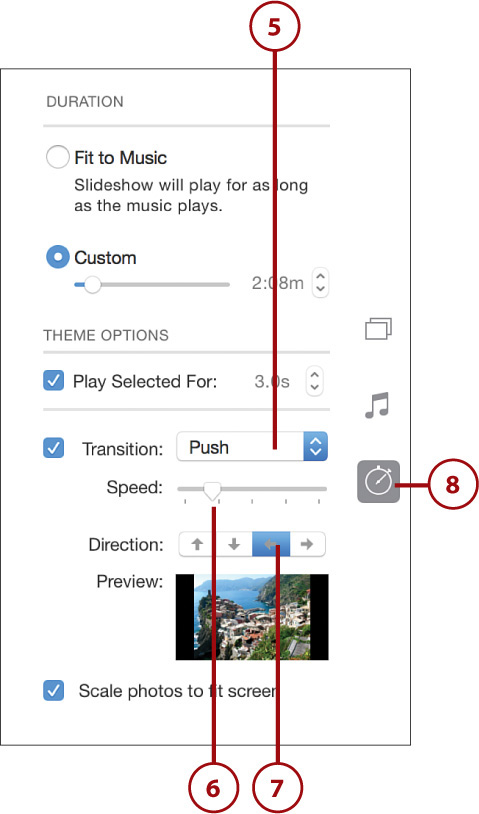
4. With the Ken Burns theme or the Classic theme, you can check the Scale Photos to Fit Screen box, which forces the photo to fit in the entire screen. This option makes black bars fill in the aspect ratio of the screen that is greater than the aspect ratio of the photo.
5. For the Classic theme selected, use the Transition drop-down menu to choose the type of transitions between slides.
6. Drag the slider to set the speed of the transitions.
7. If any transition besides Dissolve is selected, click the arrow button to set the on-screen direction from which the transition should appear.
8. Click the Settings button to exit the settings screen.

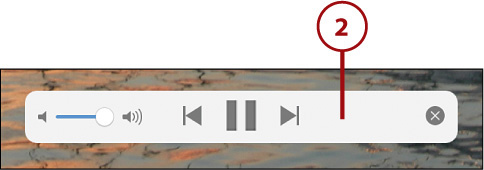
2. Move your mouse while the slideshow is playing to see the on-screen controls. The on-screen controls enable you to play or pause the slideshow, advance to the next slide or go back to the previous one, adjust the volume of the music, and exit to the slideshow viewer.
Export Your Slideshow
Sometimes you might want to show your slideshow to someone, but they aren’t in the same room (or city) as your computer. Good news! They don’t need to be. You can export your slideshow to a movie so you can send it to people or post it to the Web. You can also choose to send the exported slideshow to iTunes, where you can load it on your iOS device as a movie.
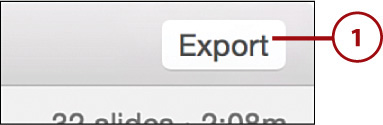
1. Click the Export button.
It Takes Time
If the slideshow is long, it may take some time for it to export. Just let it do its thing, or click Cancel to abort the export.
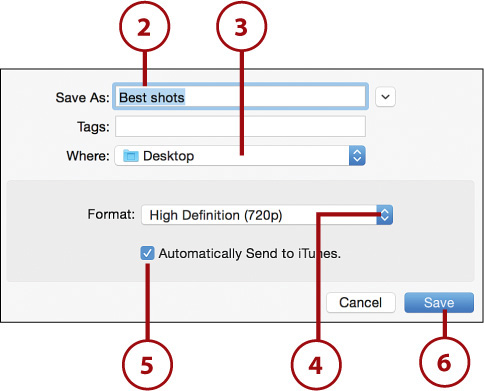
2. Name your exported slideshow.
3. Select where you want your exported slideshow to be saved.
4. Choose the movie format for the slideshow from the drop-down menu. Format options include 480p, 720p, and 1080p.
5. Check the box if you want your exported show to be automatically added to your iTunes library. Doing this ensures that it syncs with your iPhone, iPad, or iPod touch the next time you connect the device to your computer.
6. Click Save. You see a progress dialog box.
Create an Instant Slideshow
If you just want to quickly play a selected album or group of photos as a slideshow, you can create an instant slideshow. An instant slideshow differs from a regular one in that it is never saved. So, if you create an instant slideshow, it will not show up in the Slideshows header in Photos’ Source List.
1. Choose the album or group of photos you want to play as an instant slideshow.
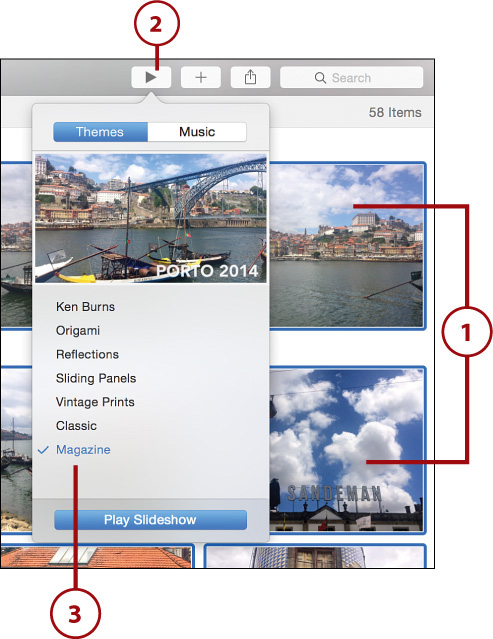
2. Click the Slideshow button at the top of the Photos toolbar.
3. Select your theme.
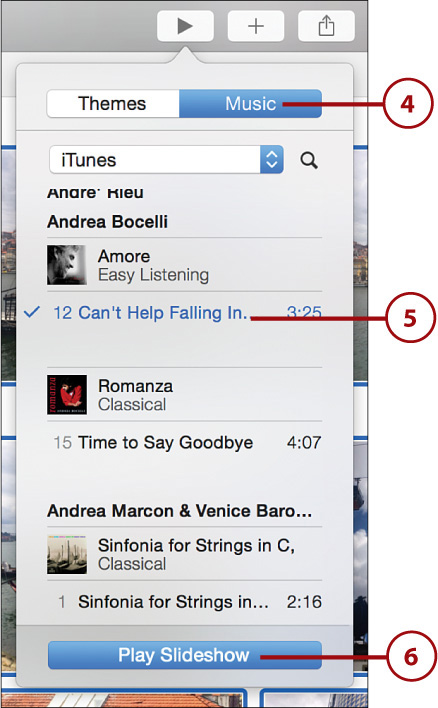
5. Select your music. You can select more than one song.
6. After making your settings, click the Play Slideshow button, and your slideshow begins playing.
7. Alternatively, click the Instant Slideshow button in the header of a Faces album, a Collection, or a Moments album to begin an instant slideshow.
