Lesson 13. Using T-SQL to Design SQL Server Stored Procedures
Stored procedures are at the heart of any client/server application. Using stored procedures, you can guarantee that processing is completed on the server. Stored procedures have many other benefits as well, including the following:
![]() Stored procedures help you to separate the client application from the database’s structure.
Stored procedures help you to separate the client application from the database’s structure.
![]() Stored procedures help you to simplify client coding.
Stored procedures help you to simplify client coding.
![]() Stored procedures process at the server (reduces required bandwidth).
Stored procedures process at the server (reduces required bandwidth).
![]() Stored procedures enable you to create reusable code.
Stored procedures enable you to create reusable code.
![]() Stored procedures enable you to perform error-handling at the server.
Stored procedures enable you to perform error-handling at the server.
![]() Stored procedures facilitate the security of data.
Stored procedures facilitate the security of data.
![]() Because stored procedures are precompiled, they execute more quickly.
Because stored procedures are precompiled, they execute more quickly.
![]() Stored procedures improve the application’s stability.
Stored procedures improve the application’s stability.
![]() Stored procedures reduce network locking.
Stored procedures reduce network locking.
![]() When you build a stored procedure, a query plan is created. This query plan contains the most efficient method of executing the stored procedure given available indexes and so on.
When you build a stored procedure, a query plan is created. This query plan contains the most efficient method of executing the stored procedure given available indexes and so on.
![]() The basics of working with stored procedures
The basics of working with stored procedures
![]() How to declare and work with variables
How to declare and work with variables
![]() How to control the flow of the stored procedures you write
How to control the flow of the stored procedures you write
The Basics of Working with Stored Procedures
Creating stored procedures in SQL Server Management is easy. You can create a stored procedure using the Query Editor or T-SQL.
Designing a Stored Procedure in the Query Editor
Although you may not be able to design an entire stored procedure in the Query Editor, you will probably find it easiest to use the Query Editor to design the T-SQL statement you include in your stored procedure. Take the steps that follow to build the SELECT statement you want to include:
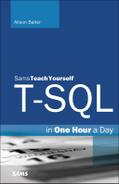
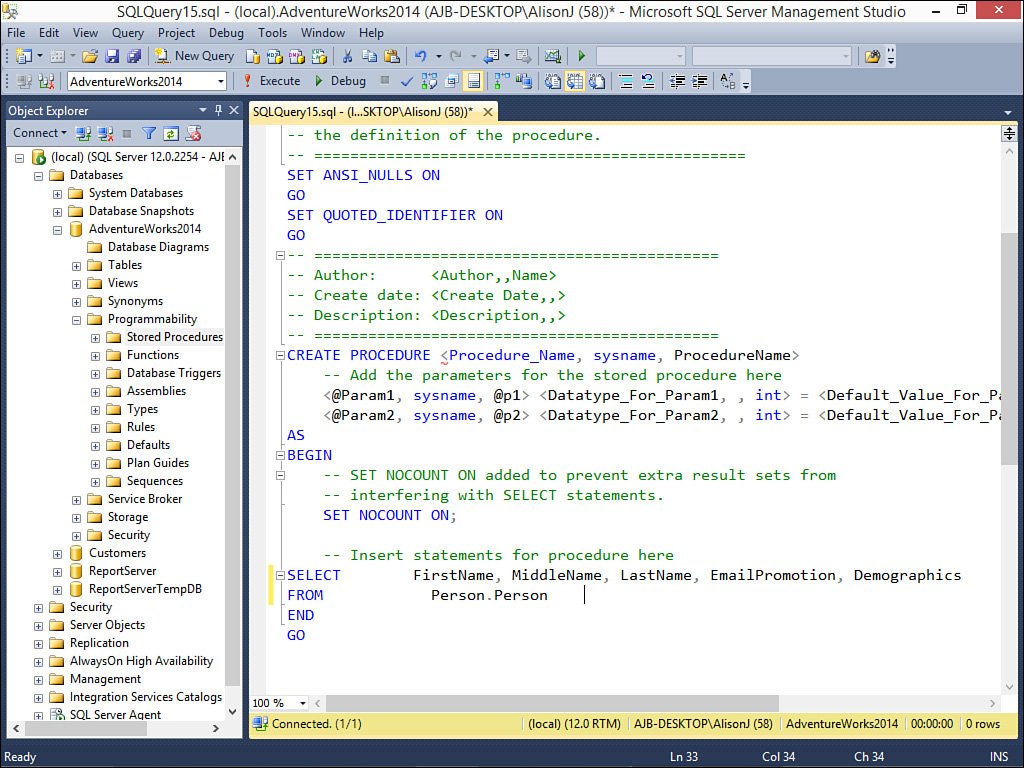
1. Expand the Programmability node of the database you are working with so that you can see the Stored Procedures node underneath it (see Figure 13.1).
2. Right-click the Stored Procedure node and select New, Stored Procedure. A template for a stored procedure appears in the Query Editor (see Figure 13.2).

FIGURE 13.2 When you create a stored procedure, Management Studio provides you with a template for that stored procedure.
3. Click and drag over the SELECT statement included in the template and press the Delete key to delete it.
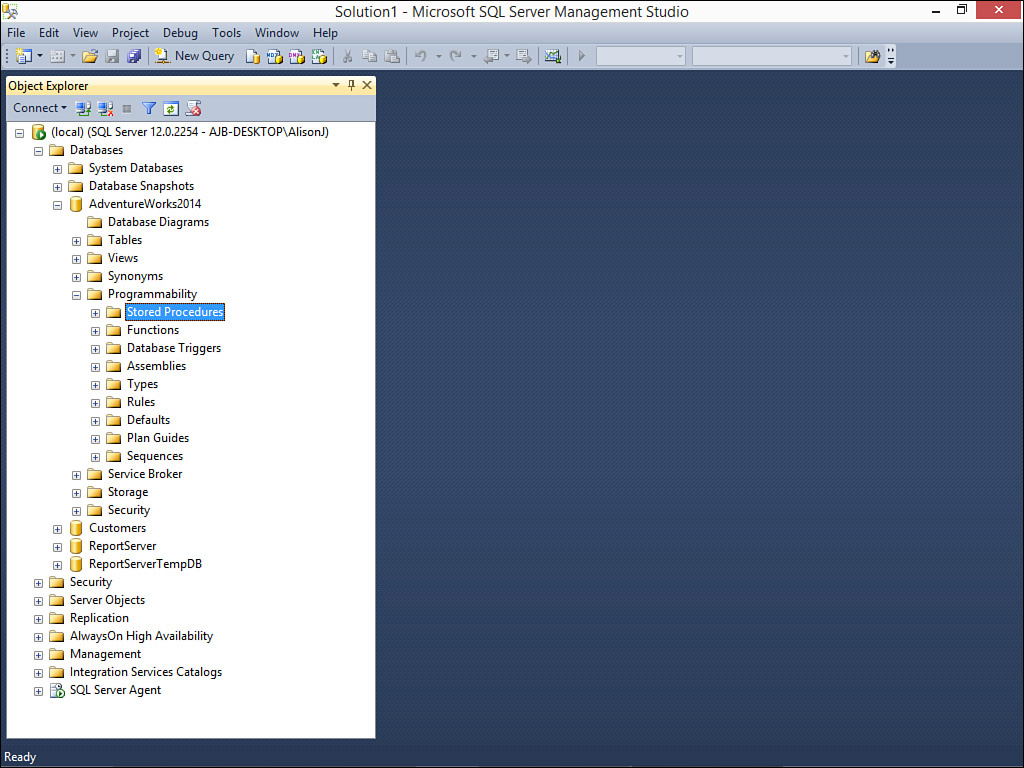
4. Right-click in that same location and select Design Query in Editor. The Add Table dialog box appears (see Figure 13.3).
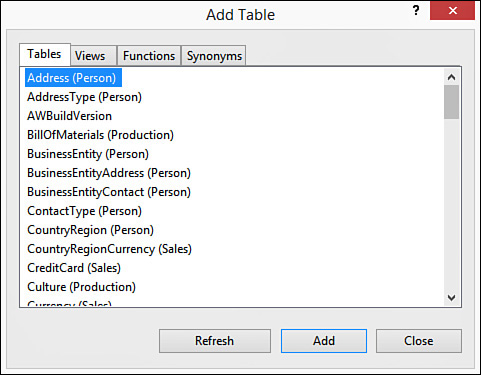
FIGURE 13.3 You replace the template SQL statement with the SQL statement generated by the Query Editor.
5. Add the desired tables to the query by selecting each table and clicking Add.
6. Click Close to complete the process. The Query Designer should look similar to Figure 13.4.
7. Click to add the desired fields to the SELECT statement. Click OK when finished. The stored procedure should appear as in Figure 13.5.
8. Modify the stored procedure, adding all of the functionality you want it to have.
9. After completing the stored procedure, click Execute to execute the CREATE PROCEDURE statement.
10. You only need to save if you want to store the T-SQL behind the stored procedure in an external file.
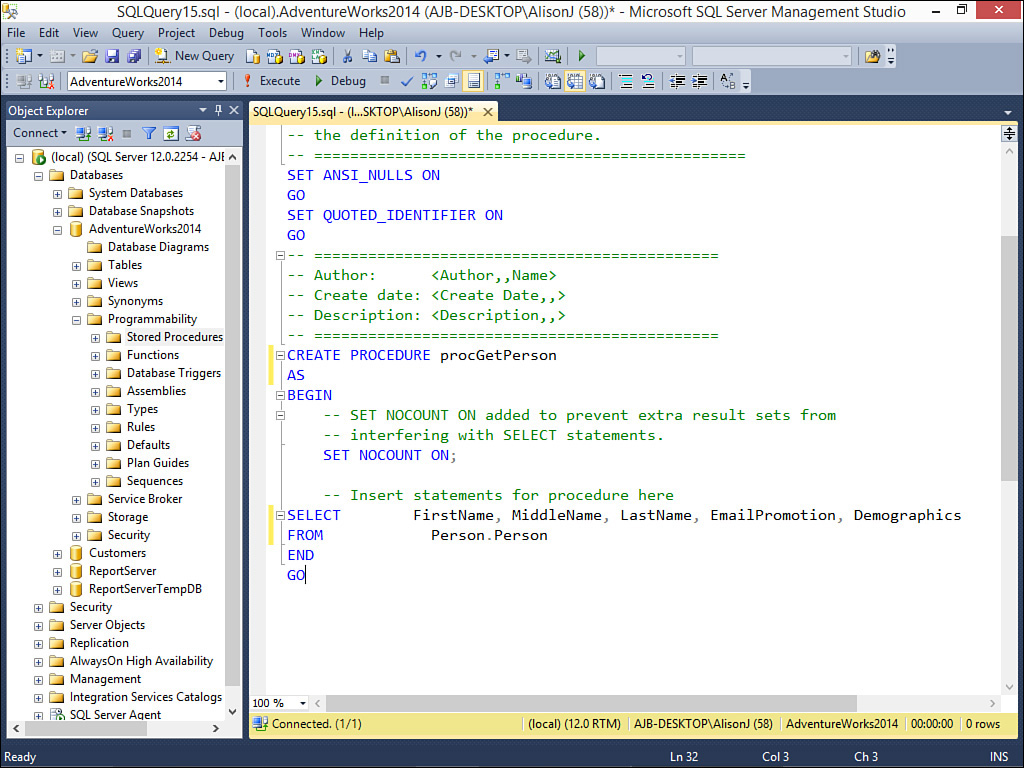
To make the generated stored procedure execute, you must provide the stored procedure with a name and delete all of the superfluous template code, such as the declaration of parameters. An example of a stored procedure that has been modified appears in Figure 13.6.
Using T-SQL to Create a Stored Procedure
Sometimes you might not find it useful to use the Query Editor to get started in creating a stored procedure. In that case, you simply create the stored procedure and begin modifying the template as desired. Here are the steps involved:
1. Expand the Programmability node of the database you are working with so that you can see the Stored Procedures node underneath it.
2. Right-click the Stored Procedure node and select New, Stored Procedure. A template for a stored procedure appears in the Query Editor.
3. Type the body of the stored procedure.
4. After completing the stored procedure, click Execute to execute the CREATE PROCEDURE statement.
5. You only need to save if you want to store the T-SQL behind the stored procedure in an external file.
Executing the Stored Procedures You Build
Regardless of the method you use to create a stored procedure, Management Studio creates a new stored procedure, available under the Stored Procedures node, which is part of the Programmability node. Use the following steps to execute a stored procedure:
1. Click to expand the Programmability node.
2. Click to expand the Stored Procedures node.
3. If you don’t see the stored procedure you want to execute, right-click the Stored Procedures node and select Refresh.
4. Right-click the stored procedure you want to execute and select Execute Stored Procedure. The Execute Procedure dialog box appears (see Figure 13.7).
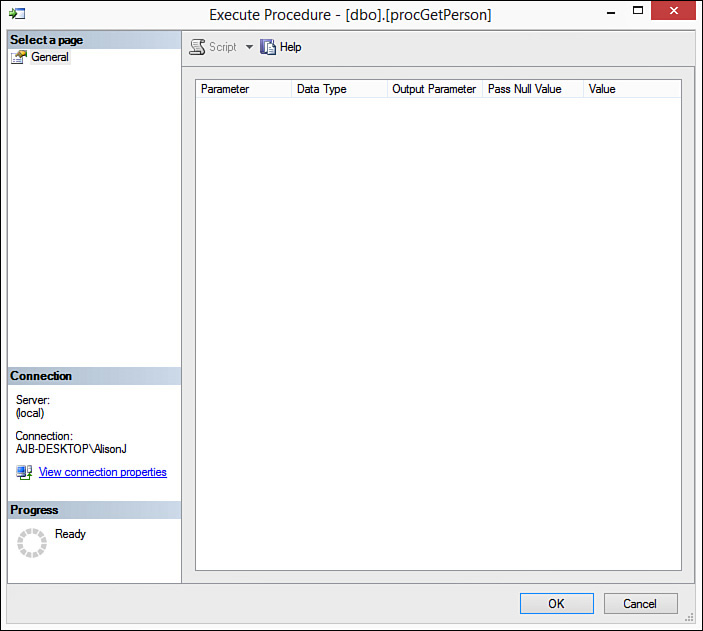
FIGURE 13.7 The Execute Procedure dialog box enables you to supply parameters and execute the stored procedure.
5. Supply the values of any required parameters and click OK to execute the stored procedure. The results appear as in Figure 13.8.
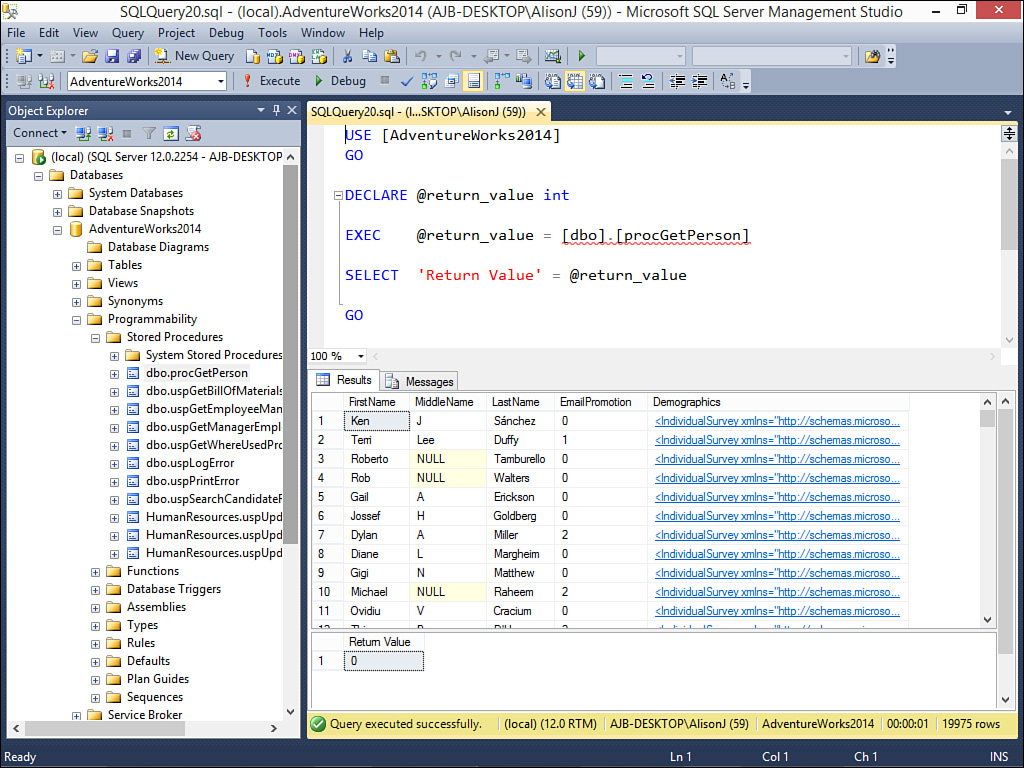
FIGURE 13.8 The result of executing a stored procedure that returns data from the Person.Person table.
Declaring and Working with Variables
Just as you can create variables within the subroutines and functions you build, you can also declare variables in your stored procedures. You use the keyword DECLARE to create a variable. The syntax looks like this:
DECLARE @VariableName DataType [(length)], @VariableName DataType [(length)]
Here’s an example:
DECLARE @FirstName VarChar(35)
Uninitialized variables are assigned the value Null. You use a SELECT statement to assign a value to a variable. It looks like this:
SELECT @FirstName = 'Alexis'
The following is a stored procedure that illustrates the use of a variable:
DECLARE @strFirstName nvarchar (50)
SELECT @strFirstName = Upper(FirstName)
FROM Person.Person
WHERE LastName = 'Erickson'
SELECT @strFirstName
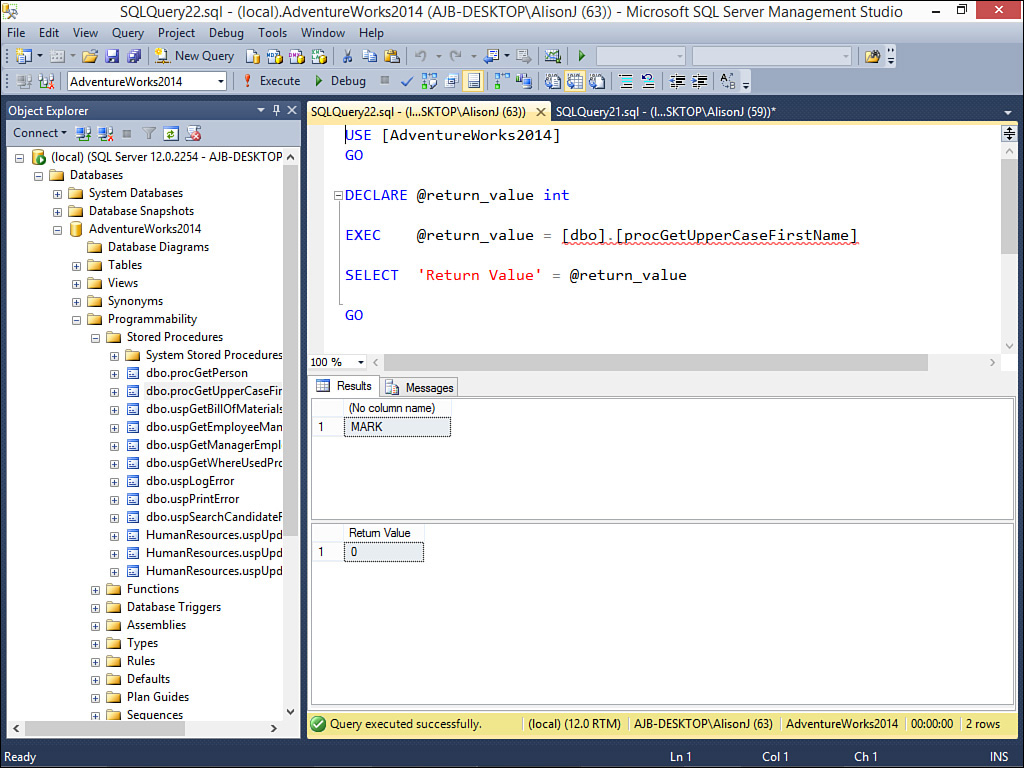
This example declares a variable called @strFirstName. The code stores the uppercase version of the FirstName associated with the last name Erickson into the variable. The procedure returns the variable using a SELECT statement. Figure 13.9 illustrates the result of executing the sample stored procedure.
Controlling the Flow
Often you want specified statements in your stored procedure to execute only if certain conditions are true. T-SQL contains several constructs that enable you to control the flow of your stored procedures. These include BEGIN...END, IF...ELSE, GOTO, RETURN, CASE, and WHILE. The sections that follow cover each of these constructs.
Using IF...ELSE
You use the IF...ELSE construct to make a decision within the stored procedure. This decision is generally based on parameters supplied to the stored procedure. The IF...ELSE construct works like this:
IF (SomeCondition)
BEGIN
--Execute multiple statements
END
With this version of the IF...ELSE construct, certain statements execute only if the condition is true. No special statements execute if the condition is false. The construct that follows accommodates the scenario when the condition is false:
IF (SomeCondition)
BEGIN
--Execute multiple statements
END
ELSE
BEGIN
--Execute multiple statement
END
Here’s an example of an IF...THEN construct in action:
DECLARE @Locale VarChar(20), @Country VarChar(30)
SELECT @Country = CountryRegionName
FROM Sales.vIndividualCustomer
WHERE BusinessEntityID = 1700
IF @Country = 'United States'
BEGIN
SELECT @Locale = 'Domestic'
END
ELSE
BEGIN
SELECT @Locale= 'Foreign'
END
SELECT BusinessEntityID, @Country, @Locale
FROM Sales.vIndividualCustomer
WHERE BusinessEntityID = 1
The code begins by declaring two variables: @Locale and @Country. It stores the contents of the CountryRegionName field for the BusinessEntityID 1700 into the @Country variable. It then evaluates the contents of the @Country variable, storing the appropriate locale into the @Locale variable. Finally, it returns the BusinessEntityID, the contents of the @Country variable, and the contents of the @Locale variable for the customer with the BusinessEntityID 1700. Figure 13.10 provides an example of executing the stored procedure.

It is important to note that if you want to execute more than one statement under a specific condition, you must enclose the statements within the BEGIN...END construct (see the following section).
Working with BEGIN...END
The BEGIN...END construct enables you to group a series of statements together. Without the BEGIN...END construct, only the first statement after the IF or the ELSE executes. Consider the following example:
DECLARE @Locale VarChar(20), @Country VarChar(30)
SELECT @Country = CountryRegionName
FROM Sales.vIndividualCustomer
WHERE BusinessEntityID = 1700
IF @Country = 'United States'
BEGIN
SELECT @Locale = 'Domestic'
PRINT 'This is domestic'
PRINT ' '
PRINT 'Hello there'
END
ELSE
BEGIN
SELECT @Locale= 'Foreign'
PRINT 'This is foreign'
PRINT ' '
PRINT 'Hello there'
END
SELECT BusinessEntityID, @Country, @Locale
FROM Sales.vIndividualCustomer
WHERE BusinessEntityID = 1700
In this example, multiple statements execute if the condition is true, and multiple statements execute if the condition is false. Without the BEGIN...END construct after the IF, the code renders an error. Figure 13.11 shows the Messages tab after executing this stored procedure.

FIGURE 13.11 An example of executing a stored procedure that includes multiple statements between a BEGIN...END construct.
Exploring GOTO, RETURN, and Labels
You use the GOTO statement to jump to a label in your stored procedure. Programmers seem to use this statement most commonly in error handling. The RETURN statement unconditionally exits the stored procedure without executing any other statements. These three keywords are covered together because they generally work as a group. Consider the following examples:
IF Month(GetDate()) > 6
BEGIN
PRINT 'In IF Statement'
GOTO MyLabel
END
SELECT FirstName, LastName FROM Person.Person
MyLabel:
SELECT Left(FirstName, 1) + '.' +
Left(LastName, 1) + '.'
FROM Person.Person
This example evaluates to see whether the month associated with the current date is greater than the value six. If it is, the statement In IF Statement appears and code execution jumps to the label MyLabel without executing the first SELECT statement. The procedure then selects the initials from the Person.Person table. If the month associated with the current date is less than or equal to the value six, the procedure first selects the first and last name from the Person.Person table. Code execution then continues at the label where the procedure selects the initials from the Person.Person table. Figure 13.12 shows an example of executing the code when the month associated with the current date is greater than six. Figure 13.13 shows the sample procedure where the month associated with the current date is less than or equal to six.
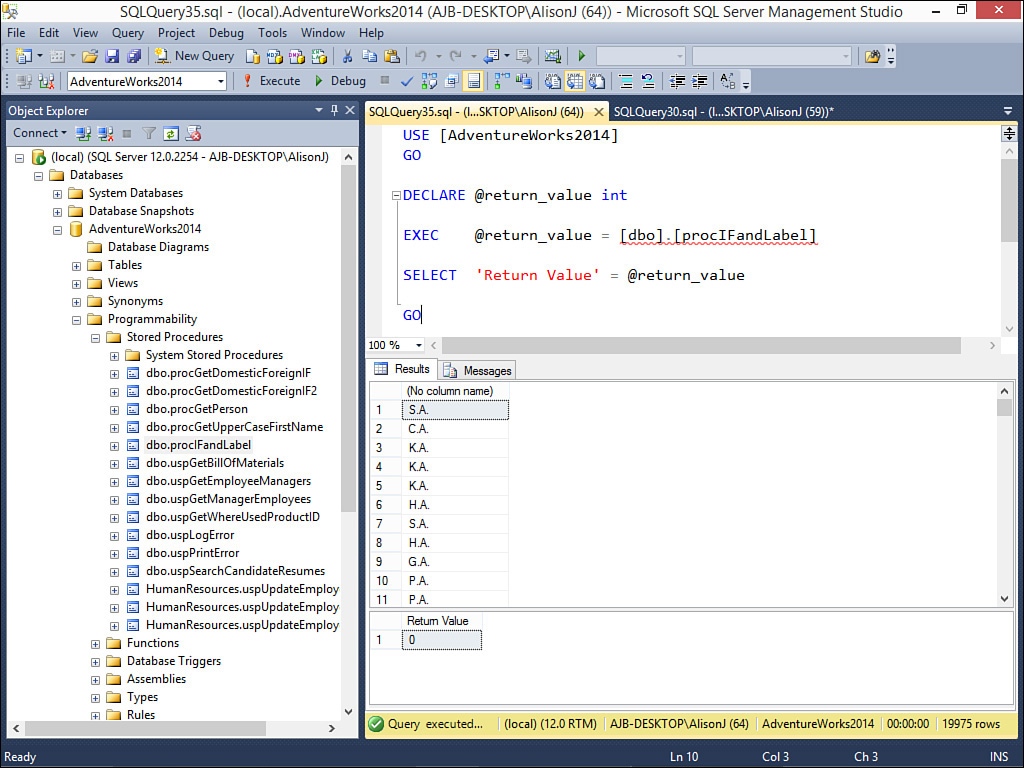
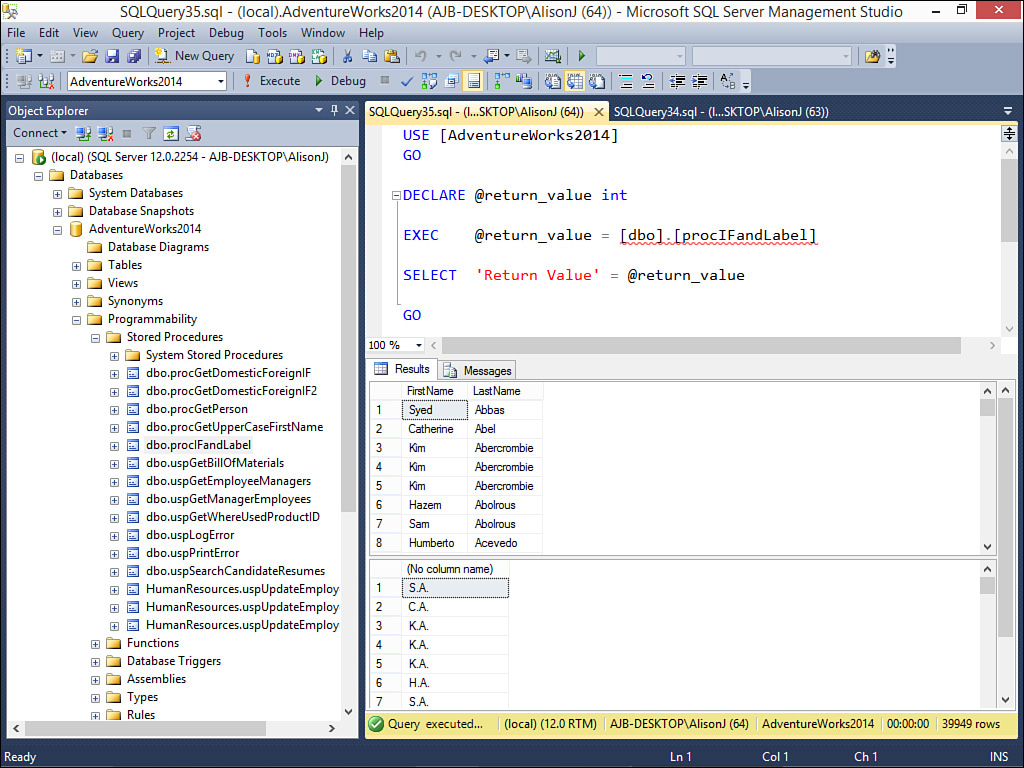
FIGURE 13.13 An example of executing the same stored procedure with a different value for the month of the current date.
As mentioned, a RETURN statement unequivocally exits from the procedure. Take a look at the procedure that follows:
IF Month(GetDate()) > 6
BEGIN
PRINT 'In IF Statement'
GOTO MyLabel
END
SELECT FirstName, LastName FROM Person.Person
RETURN
MyLabel:
SELECT Left(FirstName, 1) + '.' +
Left(LastName, 1) + '.'
FROM Person.Person
In this example, if the month associated with the current date is greater than the value six, the In IF Statement message appears, and then the procedure executes the code in MyLabel, returning the initials associated with each name in the Person.Person table. If the month associated with the current date is less than or equal to the value six, the code selects the first and last name from the Person.Person table and then exits the procedure. Because of the RETURN statement, the procedure does not select the initials from the Person.Person table. Figure 13.14 shows an example of executing the code when the month associated with the current date is less than or equal to six. Figure 13.15 shows the sample procedure where the month associated with the current date is greater than six.

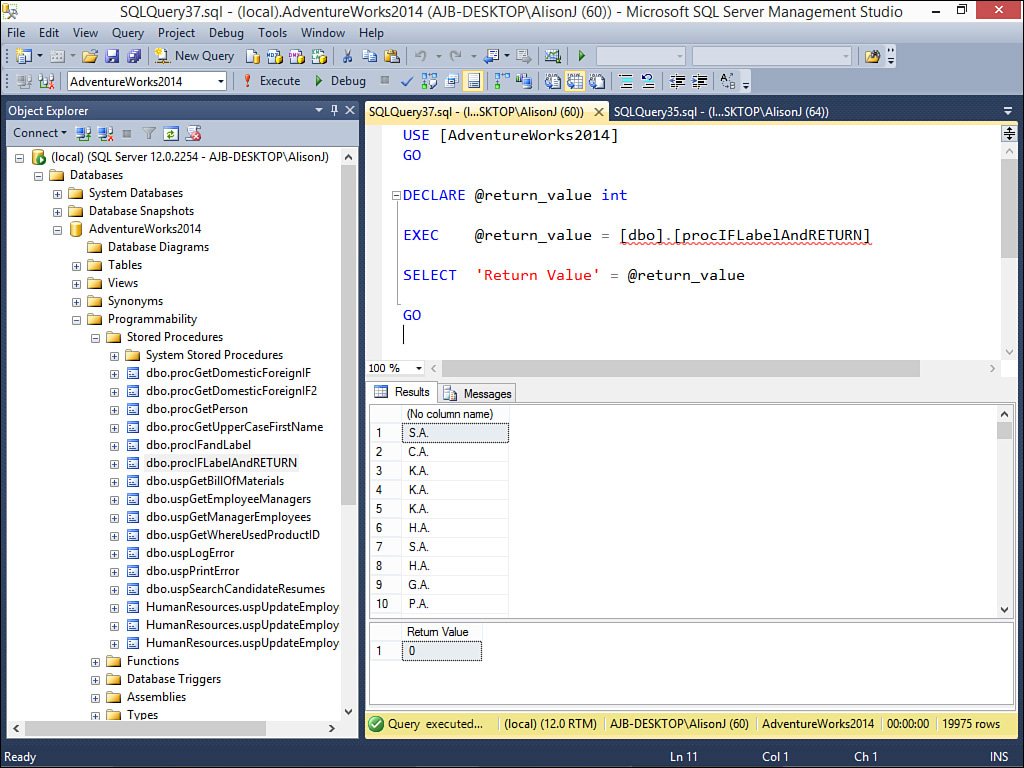
FIGURE 13.15 An example of executing the same stored procedure with a different value for the month of the current date.
Working with the CASE Statement
Most developers use the CASE statement to compare a result from a SQL statement against a set of simple responses. The CASE statement returns the appropriate value. The CASE statement looks like this:
CASE InputExpression
WHEN WhenExpression THEN ResultExpression
[...n]
[ELSE ElseResultExpression]
END
Here’s an example of this use of a case statement:
SELECT SalesOrderID, ShipDate,
CASE ShipMethodID
WHEN 1 THEN 'UPS'
WHEN 3 THEN 'FedEx'
WHEN 5 THEN 'U.S. Mail'
END AS Shipper,
Freight FROM Sales.SalesOrderHeader
WHERE ShipDate BETWEEN '1/1/13' AND '2/28/13'
AND Freight <= 50
The expression selects the SalesOrderID, ShipDate, and Freight fields from the Sales.SalesOrderHeader table. The CASE statement evaluates the contents of the ShipMethodID field. It returns an appropriate string depending on the value in the ShipMethodID field. Figure 13.16 illustrates this example.
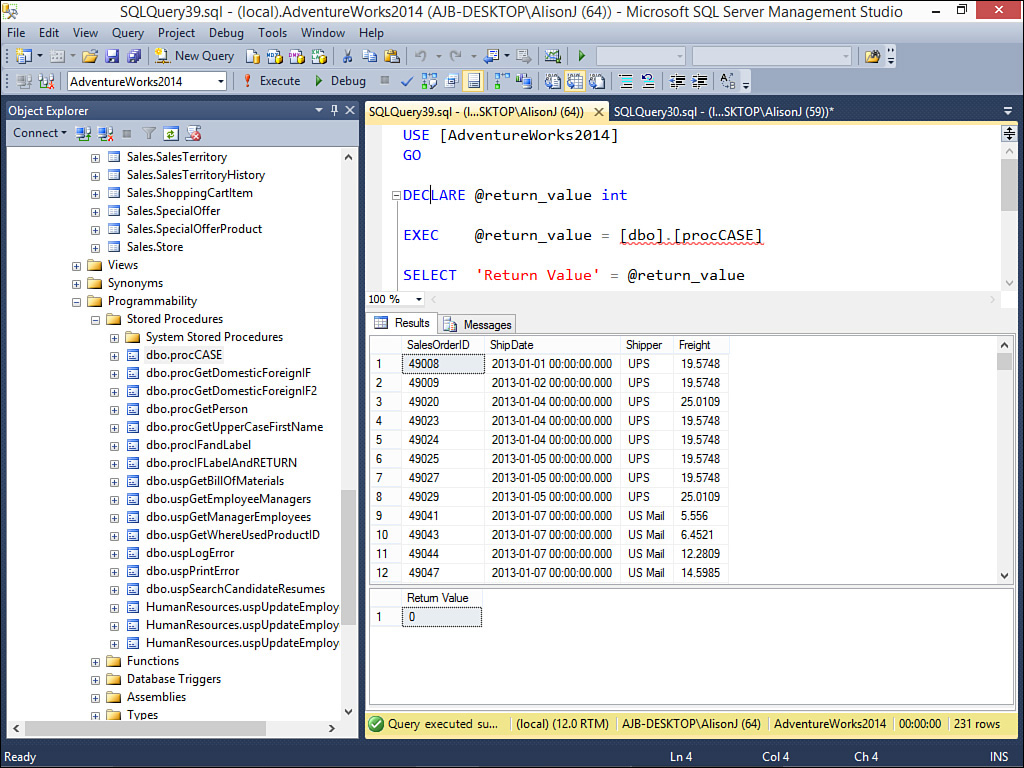
FIGURE 13.16 An example of executing a CASE statement that evaluates a field, returning different values depending on what the field contains.
The second use of the CASE construct looks like this:
CASE
WHEN Expression THEN TruePart
ELSE FalsePart
END
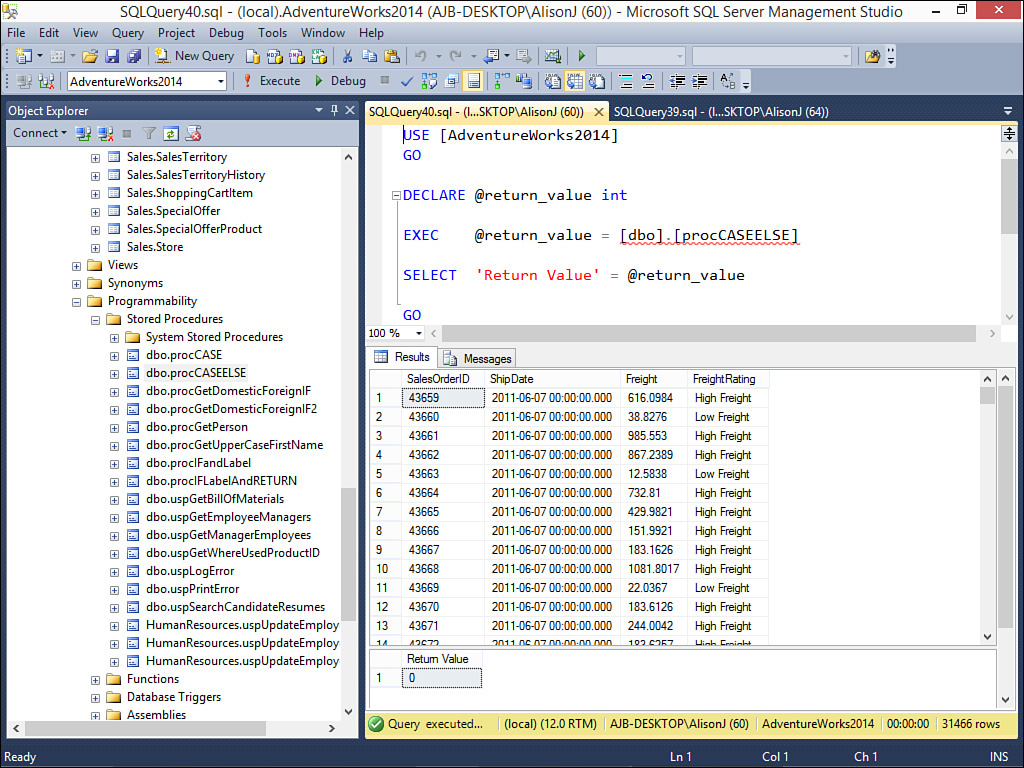
Here’s an example:
DECLARE @AverageFreight Money
SELECT @AverageFreight = AVG(Freight)
FROM Sales.SalesOrderHeader
SELECT SalesOrderID, ShipDate, Freight,
CASE
WHEN FREIGHT <= @AverageFreight THEN 'Low Freight'
WHEN FREIGHT = @AverageFreight THEN 'Average Freight'
ELSE 'High Freight'
END AS FreightRating
FROM Sales.SalesOrderHeader
The example first declares the @AverageFreight variable. It sets the variable equal to the average freight amount from the Sales.SalesOrderHeader table. The CASE statement evaluates whether the freight of the current row is less than the average freight amount. If so, the statement returns Low Freight. If it is equal to the average freight amount, it returns Average Freight. Otherwise, it returns High Freight. This value is combined with the SalesOrderID, ShipDate, and Freight amounts that are also selected from the table. Figure 13.17 shows this use of the CASE statement in action.
Exploring the WHILE Statement
You use the WHILE statement when you want to set up a loop. The loop continues to execute until the specified condition is met. The WHILE construct looks like this:
WHILE BooleanExpression
(SQLStatement | SQLBlock)
Here’s an example:
IF NOT EXISTS (SELECT * FROM sys.objects
WHERE object_id = OBJECT_ID(N'[dbo].[MyTable]')
CREATE TABLE MyTable
(
LoopID INT,
LoopText VarChar(25)
)
DECLARE @LoopValue INT
DECLARE @LoopText CHAR(25)
SELECT @LoopValue = 1
WHILE (@LoopValue < 100)
BEGIN
SELECT @LoopText = 'Iteration #' + Convert(VarChar(25), @ LoopValue)
INSERT INTO MyTable(LoopID, LoopText)
VALUES (@LoopValue, @LoopText)
SELECT @LoopValue = @LoopValue + 1
END
SELECT * FROM MyTable
The routine first checks for the existence of a table called MyTable, deleting it if it exists. It then creates a table called MyTable. The table contains two fields: an INT field and a VARCHAR field. The routine then declares two variables, an INT variable and a VARCHAR variable. It sets the value of the @LoopValue variable to one. The code then loops from 1 to 100. As it loops, it sets the VARCHAR variable equal to the text Iteration # combined with the contents of the @LoopValue variable converted to a VARCHAR. Next, it inserts the contents of the @LoopValue and @LoopText variables into the table. Finally, it increments the value of the @LoopValue variable. Figure 13.18 shows the results of executing the WHILE statement.

FIGURE 13.18 With a WHILE statement, the loop continues to execute until the specified condition is met.
Summary
Stored procedures have many benefits. In this lesson, you learned the ins and outs of working with stored procedures. You learned the basics of stored procedures and how to declare and work with variables. Finally, you learned numerous ways you can control the flow of the stored procedures you write.
A. If you forget to place a BEGIN...END construct on the line immediately following the IF statement or the ELSE statement, only the first statement after the IF or the ELSE executes.
Q. What does the RETURN statement do?
A. The RETURN statement unconditionally exits a stored procedure without executing any other statements.
Q. Why would you use the CASE statement?
A. You use the CASE statement to compare a result from a SQL statement against a set of simple responses. For example, a CASE statement might evaluate the contents of the ContactTitle field and return an appropriate string based on those contents.
Workshop
Quiz
1. What is the main benefit of stored procedures?
2. What keyword do you use to assign a value to a variable?
3. What construct do you use to group a series of SQL statements together?
4. When is the GOTO statement most commonly used?
5. What does a GOTO statement do?
Quiz Answers
1. You guarantee the code will execute on the server.
2. The SELECT keyword.
3. BEGIN..END.
4. In error handling.
5. Jump to a label in your stored procedure.
Activities
Use SQL Server Management Studio to practice creating a stored procedure. First, use the Query Editor to build a SQL statement that joins the Person.Person, Person.BusinessEntityContact, and Person.ContactType tables. Include the FirstName and LastName from the Person table, the ContactTypeID from the BusinessEntityContact table, and the Name from the ContactType table. Include the resulting SQL statement in a procedure that determines whether the Name field in the ContactType table that is associated with a person is Owner. If the Name is Owner, store Head Hancho into a variable called @TitleName. If the Name is not Owner, store Peon into the @TitleName variable. Finally, return the contents of the FirstName and LastName fields and the @TitleName variable for each record in the Person table.