
Lesson 20. SQL Server Permissions Validation
Lesson 19, “Authentication,” discussed SQL Server authentication, which is the process of ensuring that only valid users work with your database. After users gain access to a database, it is important that they have specific rights to objects within the database. This lesson covers:
![]() The types of permissions available
The types of permissions available
![]() How to work with table permissions
How to work with table permissions
![]() How to work with view permissions
How to work with view permissions
![]() How to work with stored procedure permissions
How to work with stored procedure permissions
![]() How to work with function permissions
How to work with function permissions
![]() How to implement column-level security
How to implement column-level security
Types of Permissions
When a user logs in to the server, SQL Server first authenticates him to ensure that he is a valid user. SQL Server then grants the user permission to perform any task assigned to the user or to any roles of which the user is a member.
SQL Server offers three types of permissions:
![]() Object permissions—Permissions set for objects such as tables and views. These include
Object permissions—Permissions set for objects such as tables and views. These include SELECT, INSERT, UPDATE, and DELETE permissions.
![]() Statement permissions—Permissions applied to statements such as the
Statement permissions—Permissions applied to statements such as the CREATE VIEW statement. These permissions define what rights the user has to the specified statement.
![]() Inherited or implied permissions—These permissions refer to rights that a user has to an object because he is a member of a role that has rights to that object or because the user is the owner of the object.
Inherited or implied permissions—These permissions refer to rights that a user has to an object because he is a member of a role that has rights to that object or because the user is the owner of the object.
Adding Database Users
If you want a user to have access to a database, you must first create a user account in the database by following these steps:
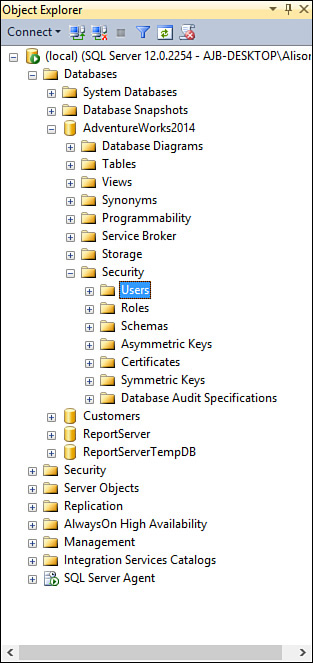
1. Expand the Database node of the desired database until you can see the Users subnode (see Figure 20.1).
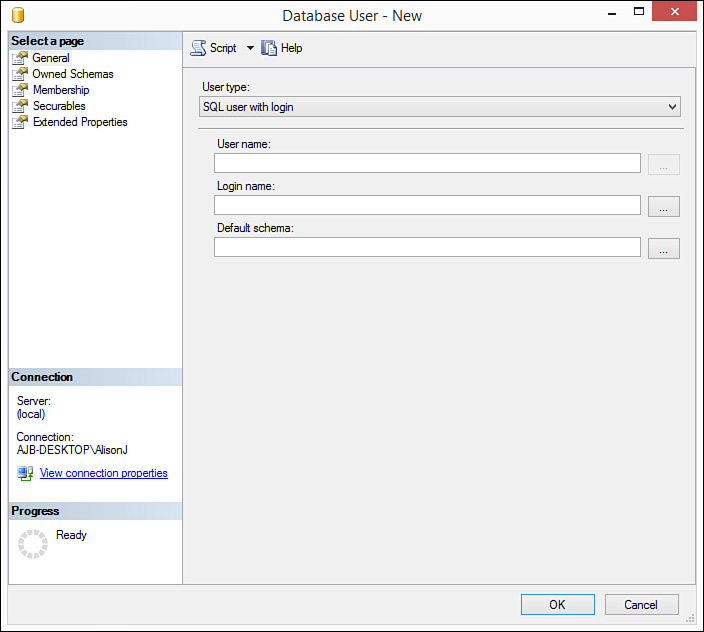
2. Right-click the Users subnode and select New User. The Database User – New dialog box opens, prompting you to enter the login name of the new user (see Figure 20.2).
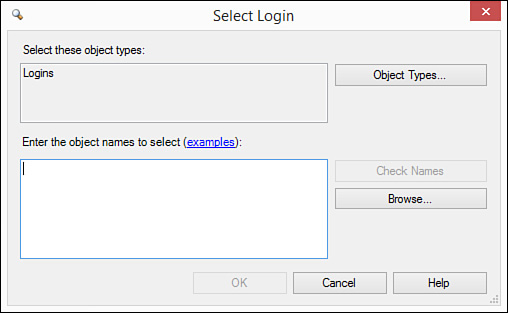
3. Type the login name or click the ellipsis. If you click the ellipsis, the Select Login dialog box appears (see Figure 20.3). Here you can type login names or click Browse. If you click Browse, the Browse for Objects dialog box appears (see Figure 20.4).

4. Click to select the database users you want to add.
5. Click OK to close the dialog box.
6. Click OK to close the Select Login dialog box.
7. Click OK to close the Database User dialog box and add the user(s).
Working with Permission Statements
You can execute three different permission statements for the objects in your database:
![]()
GRANT—Grants permission.
![]()
WITH GRANT—Revokes permission. If you revoke permission for a user to an object, the user still possesses any permissions implied by the roles of which the user is a member.
![]()
DENY—Revokes permission so that permission for that object cannot be inherited.
Administering Object Permissions
You can administer permissions for an object in one of two ways. The first way is via the object. This method shows you the rights for all users and roles for a particular object. It works like this:
1. Right-click the object and select Properties. The Table Properties dialog box opens.
2. Click to select the Permissions page. The rights established for the selected object appear (see Figure 20.5). Here you can assign users and roles rights for the object.

3. Click Search to begin the process. The Select Users or Roles dialog box appears (see Figure 20.6).

FIGURE 20.6 The Select Users or Roles dialog box enables you to enter users or roles to which you want to designate permissions.
4. Enter user and role names or click Browse to select the users and roles to which you want to grant rights (see Figure 20.7).
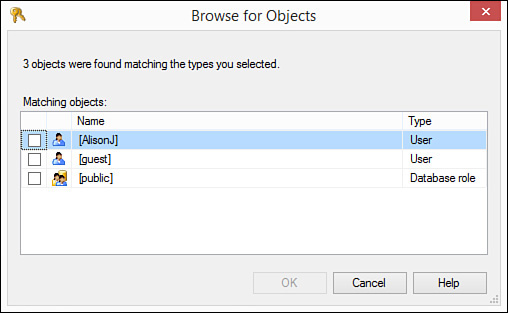
FIGURE 20.7 The Browse for Objects dialog box enables you to select the users and roles for which you are setting rights.
5. Click OK to close the Browse for Objects dialog box.
6. Click OK to close the Select Users or Roles dialog box. The Permissions page of the Table Properties dialog box should look like what’s shown in Figure 20.8.

FIGURE 20.8 The Permissions page after selecting the users and roles to which you want to assign rights.
7. Select a user or role in the list of users and roles.
8. For each type of permission, designate whether you want to Grant, With Grant, or Deny permissions to the user or role, for that object. For example, in Figure 20.9, the user named AlisonJ has been granted Insert rights to the HumanResources. Department table but has been denied Delete rights.
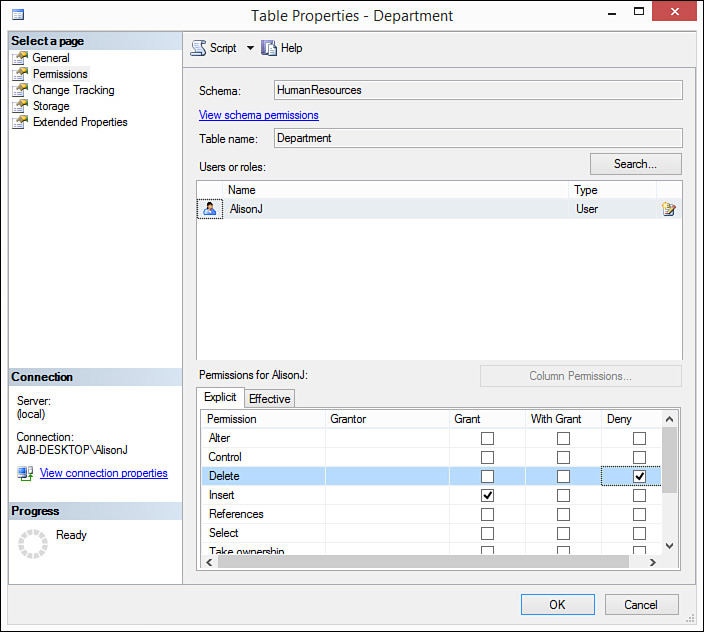
9. After granting all desired rights to all users and roles, click OK to close the Table Properties dialog box. SQL Server applies the designated rights.
As an alternative, you can assign rights for all objects to a database user or role. Follow these steps:
1. Right-click the user or role and select Properties. The Database User dialog box appears.
2. Click to select the Securables page (see Figure 20.10). Here you can see a particular user or role and manage rights to all objects for the user or role.
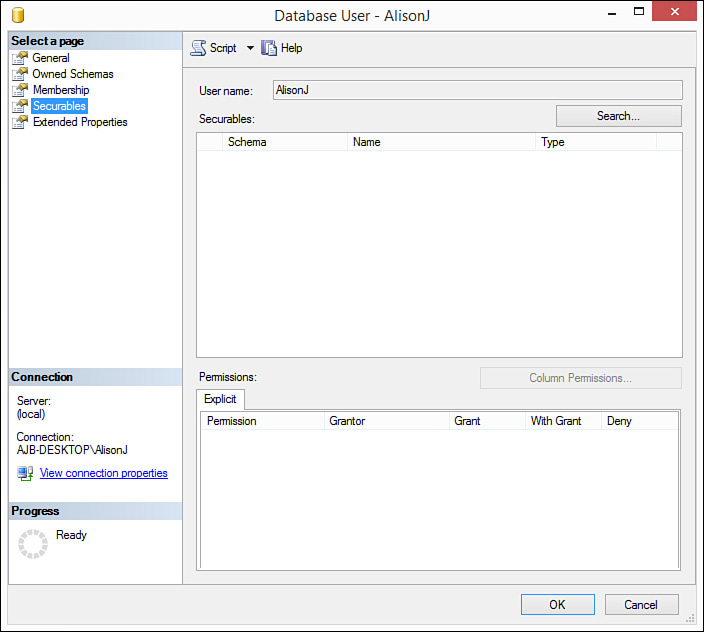
FIGURE 20.10 The Securables page enables you to select a user or role and then manage rights for its objects.
3. Click Search to add the objects you want to secure. The Add Objects dialog box appears (see Figure 20.11).
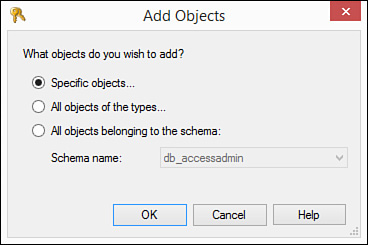
FIGURE 20.11 The Add Objects dialog box enables you to designate the types of objects you want to secure.
4. Indicate whether you want to secure specific objects, all objects of specific types (for example, tables), or all objects belonging to the schema. Make your selection and click OK.
5. If you click Specific Objects and click OK, the Select Objects dialog box opens (see Figure 20.12).
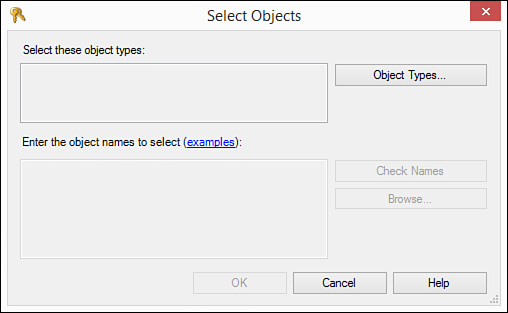
FIGURE 20.12 The Select Objects dialog box initiates the process of allowing you to select the types of objects you want to secure.
6. Click Object Types. The Select Object Types dialog box opens (see Figure 20.13).
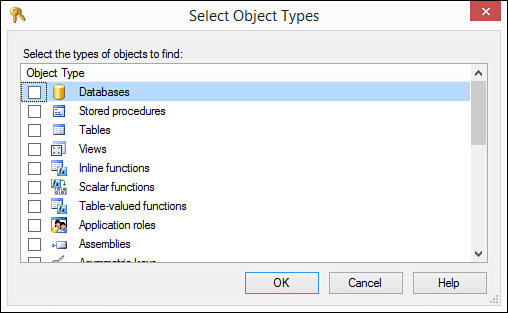
FIGURE 20.13 The Select Object Types dialog box enables you to select the types of objects you want to secure for that user or role.
7. Click to select the types of objects you want to secure for that user. Click OK.
8. Click OK to return to the Select Objects dialog box.
9. Click Browse to locate the object names you want to secure. The Browse for Objects dialog box opens, showing only the selected types of objects (see Figure 20.14).
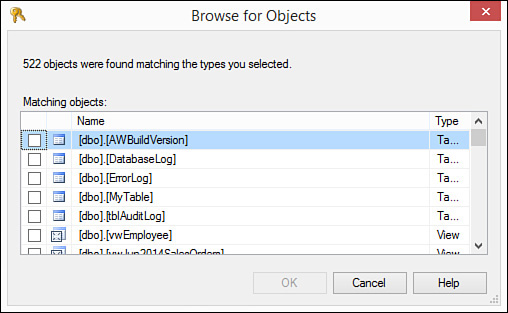
10. Select the objects you want to secure and click OK. The Select Objects dialog box now looks like in Figure 20.15.

11. Click OK to close the Select Objects dialog box. The Securables page of the Database User dialog box looks like in Figure 20.16. You are ready to assign rights to the selected objects.
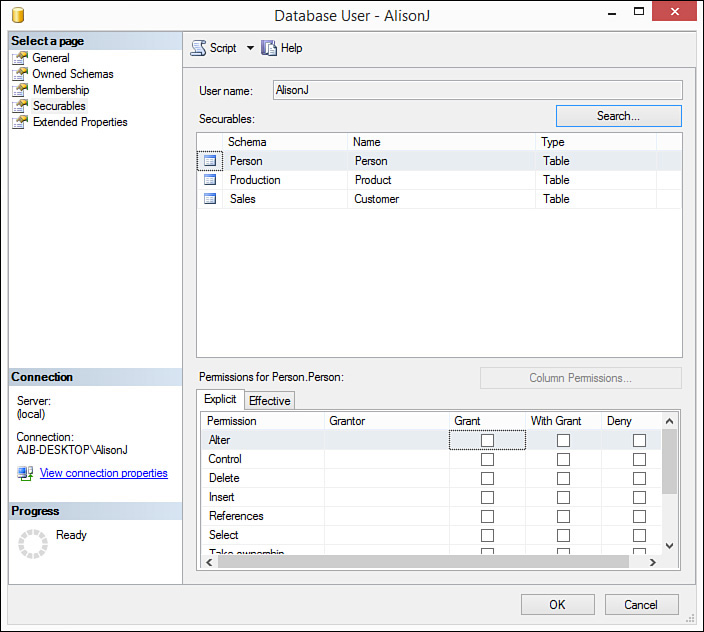
FIGURE 20.16 The Securables page of the Database User dialog box appears with all the objects you want to secure.
Note
If you select all objects of the types in Step 4, the Select Object Types dialog box opens. Here you select the types of objects you want to find. You are then ready to assign rights to the selected objects.
Getting to Know Table Permissions
You can grant ALTER, CONTROL, DELETE, INSERT, REFERENCES, SELECT, TAKE OWNERSHIP, UPDATE, and VIEW DEFINITION rights for a table. These are each described as follows:
![]()
ALTER permissions—Allow the user to alter all properties of a table except ownership. Include the capability to create, alter, and drop tables.
![]()
CONTROL permissions—CONTROL permissions confer ownership-like capabilities for an object. The user can administer the object (assign rights, and so on) and has permissions for all objects within it. For example, users who have CONTROL permissions to a database can fully manage that database.
![]()
DELETE permissions—Allow the user to delete table data.
![]()
INSERT permissions—Allow the user to add data to the table.
![]()
REFERENCES permissions—Allow the user to create a foreign key constraint.
![]()
SELECT permissions—Allow the user to view the data in a table.
![]()
TAKE OWNERSHIP permissions—Allow the user to take ownership of the table on which it is granted.
![]()
UPDATE permissions—Allow the user to update the data in the table.
![]()
VIEW DEFINITION permissions—Allow the user to access metadata for the table.
To assign permissions for a table, follow these steps:
1. Right-click the table for which you want to assign permissions and select Properties. The Table Properties dialog box opens.
2. Click the Permissions page. The Table Properties dialog box appears as in Figure 20.17.
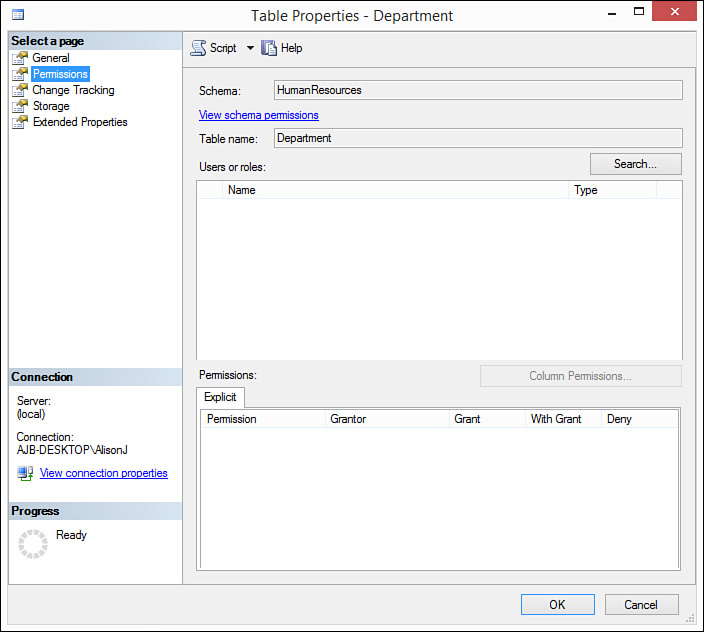
FIGURE 20.17 The Permissions page of the Table Properties dialog box before the users and roles to which you are assigning rights have been designated.
3. Click Search to view the users and roles to which you want to assign rights for that table. The Select Users or Roles dialog box opens.
4. Click Browse. The Browse for Objects dialog box opens.
5. Click to select the users and roles you want to affect.
6. Click OK. SQL Server returns you to the Select Users or Roles dialog box.
7. Click OK to close the Select Users or Roles dialog box and return to the Table Properties dialog box. It should now look like Figure 20.18.
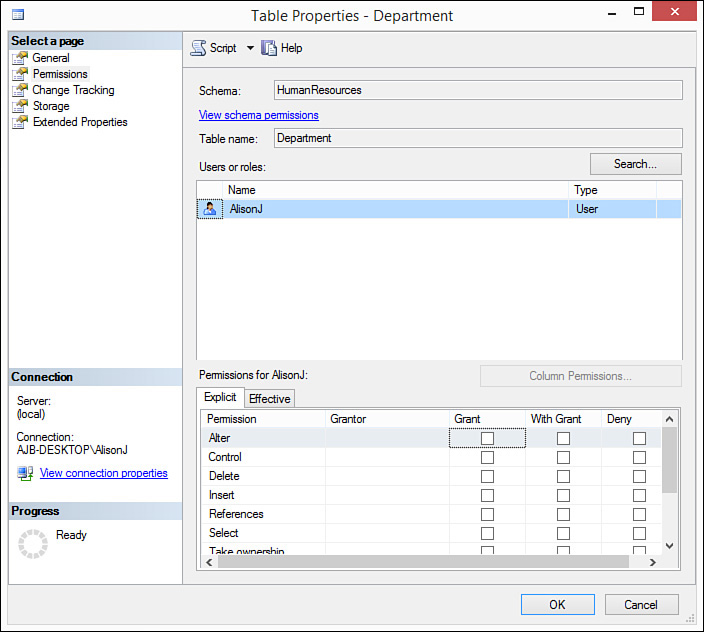
FIGURE 20.18 The Permissions page of the Table Properties dialog box after the users and roles to which you are assigning rights have been designated.
8. Click to Grant, With Grant, or Deny ALTER, CONTROL, DELETE, INSERT, REFERENCES, SELECT, TAKE OWNERSHIP, UPDATE, and VIEW DEFINITION rights as required.
9. Click OK when done. SQL Server applies the designated permissions.
Note
EXEC permissions are not applicable to a table. They are applicable only for stored procedures and are therefore covered in the “Getting to Know Stored Procedure Permissions” section of this lesson.
Getting to Know View Permissions
Permissions for a view override those for the underlying tables. Using views, you can easily apply both row-level and column-level security. You can achieve column-level security by limiting the columns included in the view. You can implement row-level security by adding a WHERE clause to the view. Because the results of most views are updateable, the process of applying security for a view is similar to that for a table. Follow these steps:
1. Right-click the view for which you want to assign permissions and select Properties. The View Properties dialog box opens.
2. Click the Permissions page of the View Properties dialog. The View Properties dialog box should look like Figure 20.19.
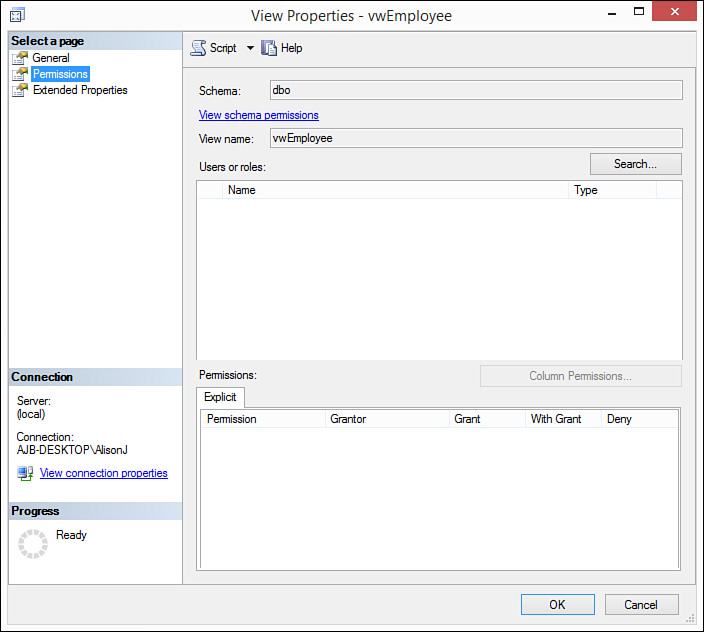
FIGURE 20.19 The View Properties dialog box enables you to assign ALTER, CONTROL, DELETE, INSERT, REFERENCES, SELECT, TAKE OWNERSHIP, UPDATE, and VIEW DEFINITION permissions for a View as required.
3. Click Search to add the users and roles who will gain rights to the view. The Select Users or Roles dialog box opens.
4. Click Browse to designate the users and roles to which you want to assign rights. The Browse for Objects dialog box opens.
5. Select the users and roles to which you want to assign rights for the view.
6. Click OK to close the Browse for Objects dialog box.
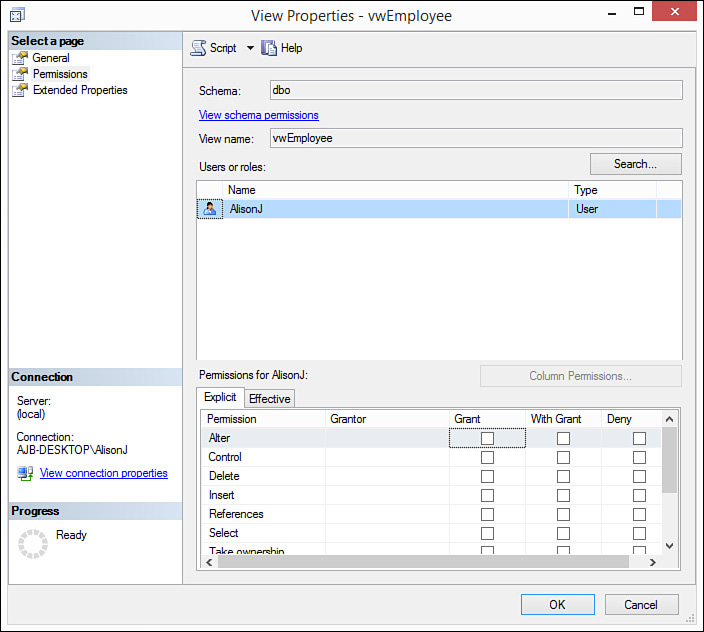
7. Click OK to close the Select Users or Roles dialog box. The Permissions tab of the View Properties dialog box appears as shown in Figure 20.20.
8. Click the check boxes to assign ALTER, CONTROL, DELETE, INSERT, REFERENCES, SELECT, TAKE OWNERSHIP, UPDATE, and VIEW DEFINITION rights as required.
Getting to Know Stored Procedure Permissions
As with rights for a view, rights assigned for a stored procedure override rights assigned for the underlying tables and views. This is the case as long as the stored procedure has the same owner as the tables referenced with it. Stored procedures have only five permissions: ALTER, CONTROL, EXECUTE, TAKE OWNERSHIP, and VIEW DEFINITION. The most commonly assigned right, the EXECUTE right, determines whether the user or role can execute the stored procedure.
Getting to Know Function Permissions
As with rights assigned for views and stored procedures, rights assigned for a user-defined function that returns a table override rights assigned for the underlying tables and views. This is the case as long as the function has the same owner as the tables referenced with it. Functions have the same permissions as tables. The main limitation of functions is that they return read-only results.
Implementing Column-Level Security
SQL Server enables you to assign column-level permissions easily for tables and views. Column-level permissions enable you to determine on a column-by-column basis whether the user has SELECT and UPDATE rights for that particular column. INSERT and DELETE rights cannot be assigned at a column level because they affect the entire row. To assign column-level permissions for tables and views, follow these steps:
1. Right-click the table for which you want to assign permissions and select Properties. The Table Properties dialog box opens.
2. Click the Permissions page to select it. You see the Permissions page of the dialog box.
3. Click Search to add the users and roles to which you want to apply column-level permissions. The Select Users or Roles dialog box opens.
4. Click Browse to designate the users and roles to which you want to apply column-level permissions.
5. Click to select your choices.
6. Click OK to close the dialog box.
7. Click OK to close the Select Users or Roles dialog box.
8. Click to grant SELECT or UPDATE rights to the selected user or role for that table or view. The Column Permissions command button becomes enabled (see Figure 20.21).
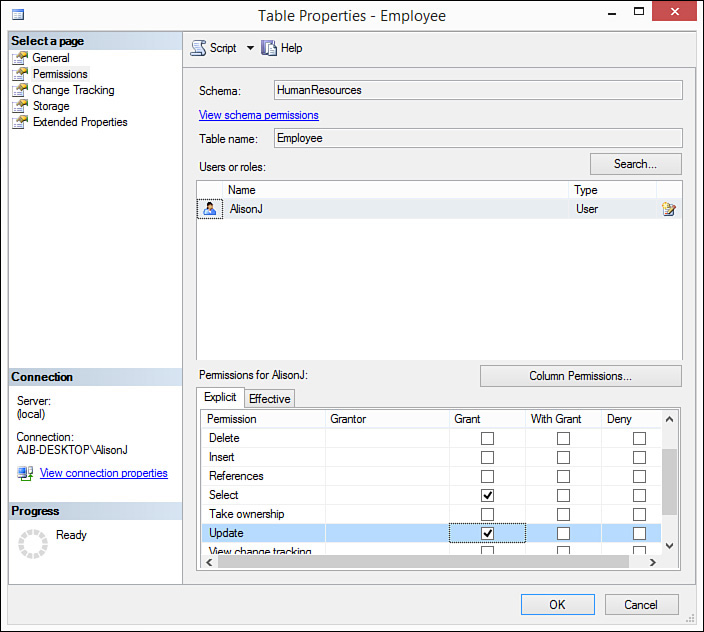
FIGURE 20.21 The Column Permissions command button becomes enabled after you grant SELECT or UPDATE rights to the selected user or role.
9. Click the Column Permissions button. The Column Permissions dialog box opens (see Figure 20.22). Indicate the SELECT or UPDATE rights for the individual columns as desired.
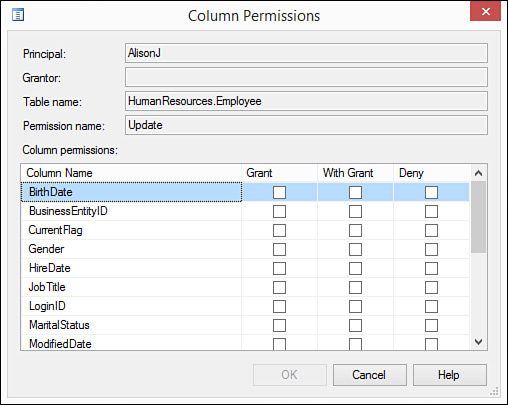
FIGURE 20.22 The Column Permissions dialog box lets you determine on a column-by-column basis whether the user has SELECT and UPDATE rights for that particular column.
10. Click OK to close the Column Permissions dialog box and return to the Table Properties dialog box.
11. Click OK to apply the permissions.
Summary
After a user gains access to a database, you must then determine what rights the user has to objects within the database. This lesson explained permissions validation, the process of determining what a user can do after gaining access to the database. You were shown how to designate permissions for the various types of objects in the database, and you were introduced to the types of permissions available. Finally, you walked through how to apply table and view security at a column-level.
Q&A
Q. Explain inherited permissions.
A. Inherited permissions refer to rights that a user has to an object because he is a member of a role that has rights to that object or because he is the owner of the object.
Q. Explain the difference between WITH GRANT and DENY permissions.
A. WITH GRANT permissions revoke permission for an object unless that user is a member of a role that has rights to that object. DENY permissions revoke permission so that permission for an object cannot be inherited.
Q. Describe CONTROL permissions.
A. With CONTROL permissions, the user or role has ownership-like capabilities for the object. The user can administer the object and has permission to all objects within it.
Workshop
Quiz
1. Name three types of permissions.
2. Name the permission statement that gives a user rights to an object.
3. Describe VIEW DEFINITION permissions.
4. Permissions for a view override those for the underlying table (true/false).
5. How can you implement row-level security with a view?
6. The results of views are not updateable (true/false).
7. What is the most commonly assigned right for a stored procedure?
Quiz Answers
1. Object, Statement, and Inherited or Implied.
2. GRANT.
3. VIEW DEFINITION permissions allow the user to access metadata for the table.
4. True.
5. By using a WHERE clause.
6. False. The results of most views are updateable.
7. EXECUTE.
Activities
Add three roles to the AdventureWorks database. Name one staff, another managers, and another system administrators. Apply permissions for the HumanResources.Department table in the AdventureWorks database. Give staff SELECT and INSERT rights to the table. Give management SELECT, INSERT, UPDATE, and DELETE rights to the table. Give system administrators CONTROL permissions for the table. Add three users, assigning each user to one of the three roles. Practice logging in as each user and note what you can do within the HumanResources.Department table.