1. Getting Started
In This Chapter
![]() Register, purchase, and install Minecraft on your platform of choice.
Register, purchase, and install Minecraft on your platform of choice.
![]() Choose a gameplay mode that suits your gaming style.
Choose a gameplay mode that suits your gaming style.
![]() Want to change the world? Here’s how!
Want to change the world? Here’s how!
![]() Confused by the controls? See the complete list.
Confused by the controls? See the complete list.
Minecraft is an amazing place. More than just a game, it’s a world of pixelated possibilities: an incredible 3D grid of blocks, resources, creatures, monsters, and pitfalls. It features multiple gameplay styles, from the safe, free-soaring Creative mode to the challenging Survival mode and the multiplayer Adventure mode.
In this chapter, you will learn how to register, download, and install Minecraft. You’ll also get a full rundown on the different gameplay modes and options, determine the way the world generates, and learn how to control your Minecraft character.
Registering and Downloading
Before you can immerse yourself in the world of Minecraft and start exploring, you’ll need to do a few things. You’ll need to set up an account with its creators, Mojang, purchase a license (you only need to do this once), and, of course, install the software. Although you can do a lot offline, Minecraft works best when you have a steady connection to the Internet. If you have already completed these steps, turn to the next section in this chapter.
Minecraft is available in several different versions, including a free demo that runs on your PC or Mac for 100 minutes, which is the equivalent of 5 Minecraft day/night cycles. There are some limitations for this demo version, such as only being able to play a single world without any of the extensive customization options.
Although the PC and OS X versions of the game are (in general) the most prevalent and popular, Minecraft has been ported to many other operating systems and platforms:
![]() Minecraft: Pocket Edition for Android, iOS (iPhone, iPad, and iPod touch), Kindle Fire, and Windows Phone
Minecraft: Pocket Edition for Android, iOS (iPhone, iPad, and iPod touch), Kindle Fire, and Windows Phone
![]() Minecraft: Xbox 360 Edition
Minecraft: Xbox 360 Edition
![]() Minecraft: Xbox One Edition
Minecraft: Xbox One Edition
![]() Minecraft: PlayStation 3 Edition
Minecraft: PlayStation 3 Edition
![]() Minecraft: PlayStation 4 Edition
Minecraft: PlayStation 4 Edition
![]() Minecraft: PS Vita Edition
Minecraft: PS Vita Edition
![]() Minecraft: Pi Edition (seriously scaled-down version for the $35 pocket-sized Raspberry Pi computer; intended for educational purposes and not, strictly speaking, for fun)
Minecraft: Pi Edition (seriously scaled-down version for the $35 pocket-sized Raspberry Pi computer; intended for educational purposes and not, strictly speaking, for fun)
In general, the versions released on platforms other than the PC and OS X lack some features, but they also undergo regular updates. If you play on the Xbox 360 or Xbox One, you might want to consider reading The Ultimate Player’s Guide to Minecraft: Xbox Edition. The Ultimate Player’s Guide to Minecraft: PlayStation Edition focuses on the version produced for the PS3 and PS4. This title does not cover the Windows 10 Edition, as the recently released beta lacks numerous features.
Note: A Few Technical Specs
I use the term PC throughout this book to refer to any personal computer running Microsoft Windows, OS X, or any flavor of Linux. The one primary hardware requirement for Minecraft on a PC is that the video card support OpenGL hardware acceleration. Because almost every video card in existence does that these days, you should find that Minecraft installs and runs pretty much perfectly even on a laptop with integrated graphics. If you have any problems getting the game to run, make sure you have the latest Java release installed (visit http://java.com if you are unsure) and update your video card driver.
Caution: Try the Demo First
If you’re concerned that Minecraft won’t run on your computer, register an account with Mojang (see the following section) and then download and play the demo version of Minecraft to ensure that your computer has the necessary specs. The demo will run long enough for you to test many of the concepts covered in this book, and if you decide to buy, it will unlock so that you can continue further.
Registering a Mojang Account
Before you can play the demo version or even purchase the full game, you need to register an account with Mojang. (The Xbox, PlayStation, and handheld versions are exceptions.) It’s a quick process, similar to registering a free account for any other site. If you just want to check out the demo to see whether you like it (and you will), you do not need a credit card. The process differs a little from a lot of other software purchases, so I’ll take you through it step by step.
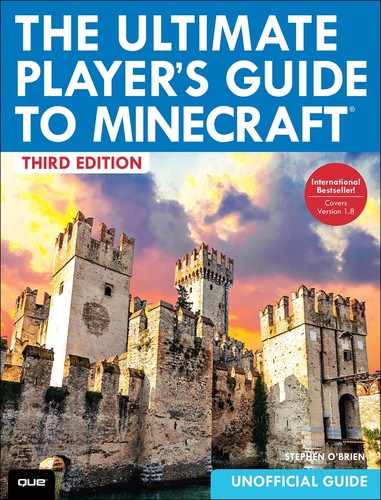
Start by visiting http://minecraft.net in your browser and click the blue Register link in the top-right corner of the screen, shown in Figure 1.1.
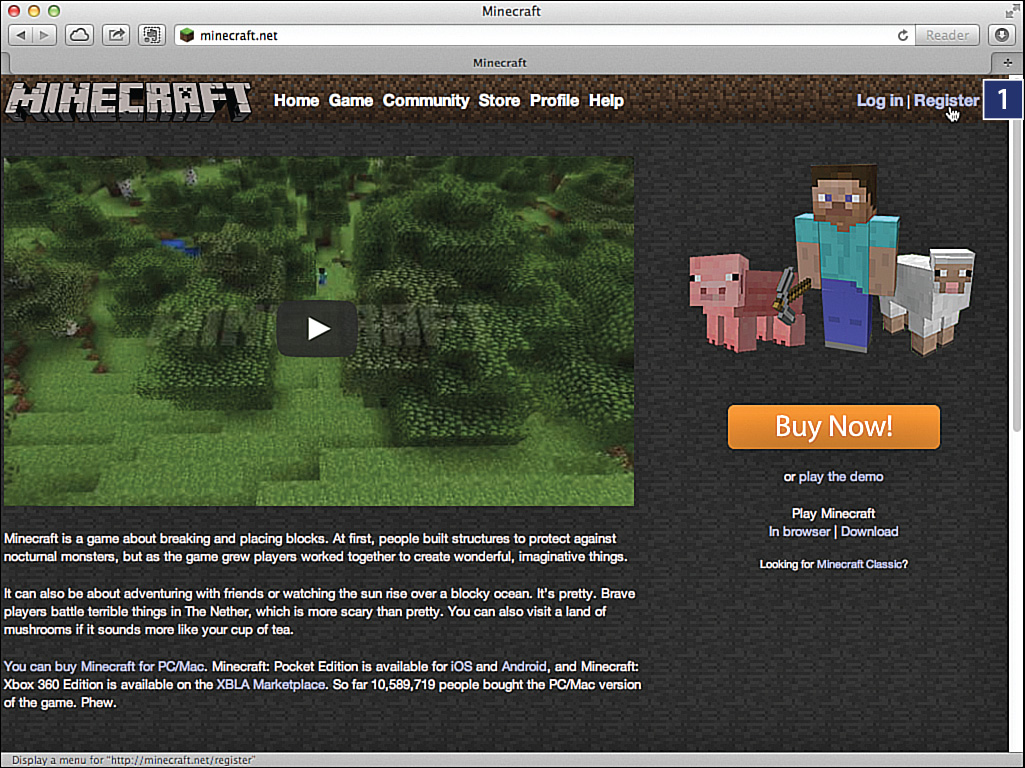
FIGURE 1.1 The first step in using the demo or download versions of Minecraft is to register with Mojang.
1. Register here
Provide your email address and create a secure password. You’ll also need to give your first and last name and date of birth. Then select and provide the answers to three security questions.
Note: Choose Your Security Questions Wisely
Choose your answers to the security questions carefully. You’ll be asked one of the three questions at random the first time you log in to Minecraft.net from a new PC.
Tip: Don’t Make Your Password Impossible to Remember!
Passwords don’t need to be a confusing, impossible-to-recall mishmash of letters and numbers in order to be secure. A simple strategy that defeats all but the most sophisticated attack is to choose two random words, an adjective and a noun, a separator, and then add a number. For example, redLight#29 is strong. Hackers will check your date of birth and variations of your name and initials, so avoid any combinations of these. Just to be safe, also use something different from those you use for your regular email, bank access, and so on. There’s no need to make it too easy for the real creepers out there to hijack your accounts.
Check your inbox for an email from Mojang. Click the link contained in the email to confirm your email address, and you’re ready to go.
In the next two sections, I’ll take you through the process of purchasing and downloading Minecraft. If you’ve already done that, you can skip to Chapter 2, “First-Night Survival.” You can also bypass this section if you just want to play the demo version in your browser.
Purchasing Minecraft
After you’ve purchased Minecraft, it is permanently linked to your Mojang account. There’s no need to worry about losing the install software, misplacing serial numbers, or changing PCs and being unable to reinstall. Just log in and download again.
There is a way to download Minecraft after you’ve registered. But don’t get too excited about seeing the download link there unless you just want to try it in demo mode. You still need to have the actual purchase of Minecraft linked to your account before you can play a complete game. The good news is that you need only log in once from within the Minecraft Launcher to verify the purchase. After that, you can still play, even offline. And if you are online, the site conveniently checks to ensure that you have all the latest files installed, updating as it goes.
To purchase and download Minecraft, follow these steps:
1. Log in to http://minecraft.net with the account you set up earlier and click the big Get Minecraft button on the right of the web page. This takes you to the Mojang store.
2. Complete all the fields on the Buy or Redeem Code screen. From there, the rest is standard online purchasing. Provide your credit card details and billing address, and you can complete your order. Note that you can also use PayPal to pay for your purchase. After you’ve completed your purchase, you can return to http://minecraft.net at any time.
3. Log in if you haven’t already, and you’ll see that the Get Minecraft button has changed to Download. Click it to move to the actual download screen, shown in Figure 1.2.
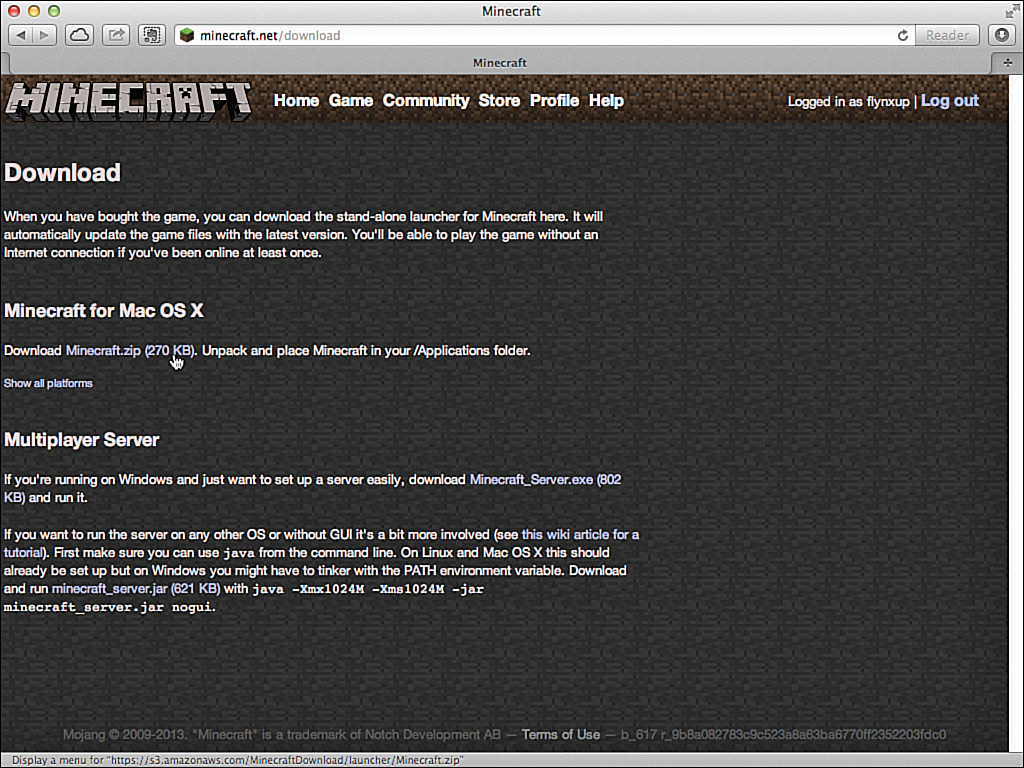
FIGURE 1.2 The download page provides links to the Minecraft download for your current platform. Click Show all platforms if you don’t see the correct version.
These days, application and game files tend to run to hundreds of megabytes, if not gigabytes, in size. So you may be surprised at the relatively small size of the Minecraft download. It’s actually just a few hundred kilobytes for OS X and Windows, and even less for Linux. That’s because you aren’t really downloading the game, just a utility called Minecraft Launcher. The launcher takes care of checking for updates, downloading the main Minecraft application files (around 190MB in all), and checking your account credentials. You always use the launcher to access the actual game.
Tip: Other Custom Launchers Available
Some enterprising developers have created their own compatible versions of the Minecraft Launcher with additional features that let you easily manage mods, resource packs, and other third-party add-ons to the software. One of my favorites is MultiMC. You can learn more about this handy utility by visiting http://multimc.org. See Chapter 13, “Mods and Multiplayer,” for more on mods, and my other book, The Advanced Strategy Guide to Minecraft, for even more. Be careful using a “cracked” Minecraft launcher that supposedly allows you to play the game for free. These launchers are likely to also install malware that will unleash a plague of problems on your system.
Note: Giving the Gift of Minecraft
Want to give the gift that keeps on giving? When you reach the Minecraft purchase screen, you can also choose to email a gift code to someone else or receive the gift code yourself and then pass it on personally. You can then participate in cooperative online sessions on your local network and join sessions that are hosted on the many independent multiplayer servers available online, or subscribe to Minecraft Realms to use Mojang’s own server system. For more information on multiplayer servers, see Chapter 13.
Different browsers treat downloaded files in different ways. I’ll assume you are already familiar with the process of opening downloaded files for your particular computer platform. Following are a few notes to keep in mind:
![]() Windows—On Windows, you can save the file anywhere you prefer, perhaps in a special Minecraft folder within the Documents folder or to your desktop.
Windows—On Windows, you can save the file anywhere you prefer, perhaps in a special Minecraft folder within the Documents folder or to your desktop.
![]() OS X—On Mac OS X, you should copy Minecraft Launcher to your Applications folder, just to keep things tidy, although I’ve had no problems running it from elsewhere. After you launch the game, you can attach it to the dock with a right-click.
OS X—On Mac OS X, you should copy Minecraft Launcher to your Applications folder, just to keep things tidy, although I’ve had no problems running it from elsewhere. After you launch the game, you can attach it to the dock with a right-click.
![]() Linux—The Linux version can also run from just about anywhere, but you’ll probably want to move it to its own subfolder in your home folder as well.
Linux—The Linux version can also run from just about anywhere, but you’ll probably want to move it to its own subfolder in your home folder as well.
Launching Minecraft
You’ve set up your account, and you’ve purchased and downloaded Minecraft. It’s time to get the show on the road!
1. The first time you launch Minecraft, ensure that you are online, and then go to your install location and double-click the Minecraft icon to open the Minecraft Launcher.
2. Fill in these two fields:
![]() Username—Enter the email you used when creating your Mojang account.
Username—Enter the email you used when creating your Mojang account.
![]() Password—Enter your account password.
Password—Enter your account password.
Tip: It’s Just Java
If you see a message that Java is either not installed or an older version, visit http://java.com to do a quick update, and you’ll be good to go.
3. Now click Log In. The screen shown in Figure 1.3 will become the default screen you see the next time you launch Minecraft. If you are not currently connected to the Internet, Play changes to Play Offline after a short delay, although you must have at least logged in once online from the Minecraft Launcher before this option becomes available.

FIGURE 1.3 The Minecraft Launcher provides the latest news, links to Minecraft-related sites, and the Twitter handles of the Mojang team.
4. If this is the first time you’ve run Minecraft, wait while the game components download; on a broadband connection, this takes only a few minutes. The Minecraft title screen, shown in Figure 1.4, is pleasantly spare. Although it’s tempting to party up and hit Multiplayer mode, let’s head into the Singleplayer mode first because that is the best place to learn Minecraft.

FIGURE 1.4 The Minecraft title screen provides your launch point for singleplayer and multiplayer games, as well as global and language options.
1. Singleplayer offers access to the Creative and Survival modes, new games, and previously saved games.
2. Use Multiplayer to explore worlds with other players, often in highly customized environments.
3. Minecraft Realms provides you with an easy way to create small Minecraft multiplayer servers without having to know much about the Internet or web development.
4. Click the World icon to change the default interface language.
5. Change the global options such as video settings; you can also change these in-game.
6. Quit to your operating system.
5. Click Singleplayer and let’s get started!
Note: Single-Player and Multiplayer Terminology
Minecraft calls single-player games singleplayer, so I also use that spelling here. Multiplayer games are also often referred to as PvP (or Player versus Player), although those games can be cooperative, creative, or a faction-based mix of both.
Starting a New Game
The Create New World screen shown in Figure 1.5 allows you to set a few essential parameters. Just follow these steps:
1. Type a name for your world in the World Name text box. You can use the default New World multiple times because Minecraft keeps the saved game files separate, but doing so can become a little confusing over time.
2. Click the Game Mode selector to choose between Survival, Hardcore, and Creative modes. (See “Singleplayer Game Modes,” later in the chapter, for more information.) For now, leave it on Survival.
3. Click More World Options.
4. For the options that appear, ignore the Seed for the World Generator field at the top of the window for now. (You’ll read about it later in the chapter, in the section “Seeding Your World.”) Ensure that Generate Structures is On so that Minecraft can populate the world with villages, temples, pyramids, dungeons, and ocean monuments. This is an essential gameplay element. Leave the World Type as Default (see the next section). Set Allow Cheats to On. (We walk through a few of the basic cheat commands in this and the next chapter.) Finally, leave Bonus Chest set to Off. When turned On, this option places a chest with a few random but typically useful items near your spawn point, but here you’re going to start from scratch.
5. When you’ve finished, click Create New World. Welcome to Minecraft!

FIGURE 1.5 Rename each of your Minecraft worlds as you go so that you can return to them (and keep track of them) easily.
Minecraft, like most other games, has its own vocabulary, and it helps to learn the terms quickly.
Spawn refers to the appearance of any new entity in the world.
Your spawn point is your starting location in the world. Until it’s updated by sleeping in a bed, this becomes the place you reappear should you be slain by monstrous mobs or other misfortune.
Note: Cheats, Really?
Minecraft’s cheats are a series of commands accessed by tapping the forward slash (/) key (or the T key). You’ll also see them referred to in community forums as slash commands, to get away from the negative connotation of the word cheat, but given that Minecraft refers to them as cheats, I’ll stick to that here.
Cheats reset the time, change game modes and difficulty on-the-fly, and allow you to set a spawn point, teleport to another location, and more. They mostly provide a host of commands that help with managing players on shared servers, but they can also save your bacon in Survival mode. I’ve suggested setting cheats here so that you can explore some of the different options, but after you know the ropes, it’s not a bad idea to turn them off for a survival experience that’s true to form.
Now that you’re up and running, you can turn to Chapter 2 to start the survival tutorial, or you can keep reading for a little more background information.
Choosing a World-Generation Style
Minecraft provides three basic world-generation styles. The default World Type provides a traditional Minecraft world, even if each of those worlds features different topology above and below ground. The three others are Large Biomes, Superflat, and Amplified. Usually biomes (think of them as individual ecosystems) are quite small and can be traversed easily, providing diversity of terrains and ecosystems in each world. Selecting Large Biomes increases their size 16x. A superflat world is actually completely flat except for any generated structures. If you select Superflat, you also gain access to new customization options and a range of presets for different types of superflat worlds.
The Amplified world type is intended just for fun and, according to Mojang, requires that you have a fairly powerful computer to run it (due to the abundance of complex geometry). For instance, the Amplified world features out-of-proportion landforms, huge oceans, and mountains that reach the top of the Minecraft address space. Figure 1.6 shows a screenshot from the Amplified world type.
FIGURE 1.6 Each Minecraft world brings you its own personality, which is to say, its own collection of biomes and geostructures. Here we see the curious (and dangerous) Amplified world type in action.
There is one final option: Customized. Use this to create worlds where almost every aspect of the terrain generation has undergone a tweak or even a major change. This is an astonishingly flexible system, but if it becomes a little boggling, you can also load a range of presets that, like an Amplified world, may place excessive demands on any but the fastest PCs. See Chapter 8, “Creative Construction,” for more on fully customized worlds.
So, which biome world type is for you? The default setting is great for starting out. Each biome contains different resources, and their smaller size in this setting makes them easy to traverse, which means you can move quickly from open land to a jungle, through a forest, and so on, gathering all the bits and pieces you need as you go.
Large biomes open up the terrain, making it more like the real world. These worlds present a greater challenge for the intrepid explorer, with Columbus-confounding oceans that disappear over the horizon, large flat grasslands perfect for galloping across at high speed on horseback, dense endless forests, and majestic mountains. They force you to get out and see more of the world, and you’ll need to be prepared for a lot of impromptu camping on the way.
The term biome, you may be interested to know, is distinct from a world type. Specifically, a biome refers to the regions or terrains that are contained within a Minecraft world. In Minecraft worlds, we see one or more of the following types of biomes:
![]() Snowy—Includes Frozen River, Ice Plains, Ice Spike Plains, Cold Beach, Cold Taiga, and Cold Taiga M(ountainous).
Snowy—Includes Frozen River, Ice Plains, Ice Spike Plains, Cold Beach, Cold Taiga, and Cold Taiga M(ountainous).
![]() Cold—Includes Extreme Hills, Extreme Hills M, Taiga, Taiga M, The End, Mega Taiga, Mega Spruce Taiga, Extreme Hills+, Extreme Hills+ M, and Stone Beach.
Cold—Includes Extreme Hills, Extreme Hills M, Taiga, Taiga M, The End, Mega Taiga, Mega Spruce Taiga, Extreme Hills+, Extreme Hills+ M, and Stone Beach.
![]() Medium/Lush—Includes Plains, Sunflower Plains, Forest, Flower Forest, Swampland, Swampland M, River, Mushroom Island, Mushroom Island Shore, Beach, Jungle, Jungle M, Jungle Edge, Jungle Edge M, Birch Forest, Birch Forest M, Birch Forest Hills M, Roofed Forest, and Roofed Forest M.
Medium/Lush—Includes Plains, Sunflower Plains, Forest, Flower Forest, Swampland, Swampland M, River, Mushroom Island, Mushroom Island Shore, Beach, Jungle, Jungle M, Jungle Edge, Jungle Edge M, Birch Forest, Birch Forest M, Birch Forest Hills M, Roofed Forest, and Roofed Forest M.
![]() Dry/Warm—Includes Desert, Desert M, Hell, Savanna, Savanna M, Mesa, Mesa (Bryce), Plateau, and Plateau M.
Dry/Warm—Includes Desert, Desert M, Hell, Savanna, Savanna M, Mesa, Mesa (Bryce), Plateau, and Plateau M.
![]() Neutral—Includes Ocean, Deep Ocean, and Hills.
Neutral—Includes Ocean, Deep Ocean, and Hills.
The superflat world is less interesting in that sense, with nary a bump to disturb the ground, but you might prefer its blank canvas to explore different techniques in Creative mode, such as creating redstone circuits.
By the way, each block in Minecraft measures 1m per side, or 1 cubic meter. Each world in the PC edition has a maximum size of 60,000,000 blocks squared, or 60,000 kilometers per side. Curiously, the Pocket Edition, playable on portable devices, has an infinite size.
Tip: Track Their Trek
If you need inspiration, see Far Lands or Bust at http://farlandsorbust.com, where you can track Kurt and Wolfie’s daily journey to the fabled Far Lands. Kurt is journeying to raise money for Child’s Play, a charity for sick children, and has been trekking since March 2011. He and his canine companion probably have quite a few more years to go, but as I write this, they have already raised over $270,000—quite an achievement! Kurt is using an earlier version of Minecraft with a large, but still finite, world.
The current Xbox 360 and PS3 editions create a world of 1024×1024 blocks, whereas the Xbox One and PS4 editions are approximately 36 times larger, although all other features are in parity between all four console versions. Surprisingly, the Pocket Edition worlds are truly infinite in size.
Happy exploring.
![]() Survival—This is the default mode for all new games and is the one I mostly focus on throughout the book. Survival mode is made up of two phases: day and night. During the day, you have a 10-minute window to gather resources, mine, build, farm—do whatever you need to do. During the first few days, this is usually made up of a few key activities, but after you’ve established your base, be it underground, in a walled fortress, in a building, or even in a tree, you can rest a little easier. If you spawn near sheep, you can also kill a few to quickly build a bed, even out in the open, and blissfully slumber the night away, as long as no hostile mobs are present. I show you how in Chapter 2.
Survival—This is the default mode for all new games and is the one I mostly focus on throughout the book. Survival mode is made up of two phases: day and night. During the day, you have a 10-minute window to gather resources, mine, build, farm—do whatever you need to do. During the first few days, this is usually made up of a few key activities, but after you’ve established your base, be it underground, in a walled fortress, in a building, or even in a tree, you can rest a little easier. If you spawn near sheep, you can also kill a few to quickly build a bed, even out in the open, and blissfully slumber the night away, as long as no hostile mobs are present. I show you how in Chapter 2.
Daylight is followed by 1.5 minutes of dusk—time to get back to your base. The nighttime phase lasts 7 minutes and is a time you definitely don’t want to be outside, protected by nothing more than your stumpy fists. They might be able to beat chunks out of trees, but they won’t help you in a deadly scrap. Sunrise and dawn last another 1.5 minutes and cause some hostiles, although not all, to burn up. Then it’s a brand-new day. Death in this mode is only temporary. You’ll respawn within 20 blocks of your original spawn point and live to fight another day.
![]() Hardcore—After you’ve cut your teeth in the regular Survival mode and presumably made it all the way through, you may want to revisit the game in this mode. The difficulty level is set to Hard (described in the next list), and you get only one life—no respawning. It’s quite a challenge, if you’re up for it. In case you’re curious, you can see the end game screen in Figure 1.7.
Hardcore—After you’ve cut your teeth in the regular Survival mode and presumably made it all the way through, you may want to revisit the game in this mode. The difficulty level is set to Hard (described in the next list), and you get only one life—no respawning. It’s quite a challenge, if you’re up for it. In case you’re curious, you can see the end game screen in Figure 1.7.

FIGURE 1.7 The Hardcore game mode in Minecraft is pretty harsh. If your avatar dies, you lose everything, including your world.
![]() Creative—This is where Minecraft really shines. If you’re looking for an artistic outlet, this is the mode you want. It’s a great way to build enormous structures, intricate redstone circuits, and fantastic rail systems; anything is possible. Build a model of the human heart or a gigantic floating castle, or, as UK user Squadhob did, create a simplified version of a functioning iPad in virtual space.
Creative—This is where Minecraft really shines. If you’re looking for an artistic outlet, this is the mode you want. It’s a great way to build enormous structures, intricate redstone circuits, and fantastic rail systems; anything is possible. Build a model of the human heart or a gigantic floating castle, or, as UK user Squadhob did, create a simplified version of a functioning iPad in virtual space.
![]() Adventure—Although surviving Survival is an adventure in itself, Minecraft’s Adventure mode adds some specific challenges by limiting the destruction of blocks to specific tools. For example, you can use an axe to harvest only wood-based items and a pickaxe to extract only ores. Adventure mode is used most often on multiplayer servers but can be accessed from a singleplayer game by using the cheat command /gamemode adventure. It’s also often turned on for you in downloadable Adventure maps that provide their own plot lines and challenges.
Adventure—Although surviving Survival is an adventure in itself, Minecraft’s Adventure mode adds some specific challenges by limiting the destruction of blocks to specific tools. For example, you can use an axe to harvest only wood-based items and a pickaxe to extract only ores. Adventure mode is used most often on multiplayer servers but can be accessed from a singleplayer game by using the cheat command /gamemode adventure. It’s also often turned on for you in downloadable Adventure maps that provide their own plot lines and challenges.
Note: Set Difficulty for Each World
In Minecraft 1.8, the global difficulty setting has been disabled; difficulty it is now set per world. This prevents accidentally changing the difficulty when joining a world. It can be locked for each world, taking away the temptation to change to an easier difficulty in challenging situations. Locking, however, cannot be undone without the use of external editors.
Survival mode offers four levels of difficulty, and you can switch between them at any time through the in-game Options window:
![]() Peaceful—All hostile mobs disappear instantly and permanently until the difficulty setting is switched to any of the other three mentioned here. Your hunger bar also remains at maximum, or the level it was when you switched to peaceful. You can still die, and therefore respawn, so you need to be wary of long falls, lava pits, trapped temples, and other threats; but it is, as the name suggests, a peaceful existence.
Peaceful—All hostile mobs disappear instantly and permanently until the difficulty setting is switched to any of the other three mentioned here. Your hunger bar also remains at maximum, or the level it was when you switched to peaceful. You can still die, and therefore respawn, so you need to be wary of long falls, lava pits, trapped temples, and other threats; but it is, as the name suggests, a peaceful existence.
![]() Easy—You see hostiles, but they deliver less damage than normal. Your hunger bar does deplete, but it still leaves you with 10 health points at a minimum, or 5 hearts in the Heads Up Display (HUD). Some other mob effects, such as poison, are minimized.
Easy—You see hostiles, but they deliver less damage than normal. Your hunger bar does deplete, but it still leaves you with 10 health points at a minimum, or 5 hearts in the Heads Up Display (HUD). Some other mob effects, such as poison, are minimized.
![]() Normal—As the name suggests, this is the default mode. Hostile mobs deliver normal damage (which without armor can quickly kill you), and running out of food reduces your health to just half a point, making you particularly vulnerable and unable to sprint away from the mobs to a safer location.
Normal—As the name suggests, this is the default mode. Hostile mobs deliver normal damage (which without armor can quickly kill you), and running out of food reduces your health to just half a point, making you particularly vulnerable and unable to sprint away from the mobs to a safer location.
![]() Hard—Hostile mobs cause more damage, and running out of food kills you...eventually.
Hard—Hostile mobs cause more damage, and running out of food kills you...eventually.
Note: Mobs, Spawning, and Respawning
In Minecraft, any other creature besides your player and villagers (known as NPCs, or nonplayer characters) is called a mob. The term originates from mobile entity. You’ll meet three kinds of mobs in future chapters: peaceful, neutral, and hostile. The sudden appearance of any entity in the game world is called a spawn. Your own character will probably also die at some point. It’s practically unavoidable. In any difficulty level except hardcore, you’ll respawn shortly after death. There is no limit to the number of times you can do so.
Seeding Your World
Minecraft worlds are randomly generated using an algorithm that takes a number, or seed, as its starting point. This seed comes from the clock that keeps track of the date and time in your PC. As time marches on, the clock provides the seed for trillions of worlds, each one unique. However, you can also override this and provide your own seed. Each world created with that seed will be identical in terrain, including the location of mining resources and also generally the same in mob spawn locations. You can use just about anything for the seed, including a random set of numbers or letters such as a phrase (Minecraft rocks!) or even your birth date. Actually, something quite fun to do is to create a Minecraft world seeded with your own real name, your unique Minecraft username, or your email address. Essentially, it is a world created just for you. Try it and explore your new domain.
Tip: Sharing Seeds
Share the seed you used with a friend, and your friend can play in Singleplayer mode in a world similar to your own. Some worlds happen to be more interesting than others, so this makes for an easy way to share the better ones. If you don’t know it already, you can discover the seed in-game by using the cheat command /seed. Some websites also provide lists of seeds that create unusual worlds. Keep in mind that Mojang, the makers of Minecraft, change the world-generation algorithm now and then, which in turn changes the world that results from any particular seed. Match your Minecraft version with the seed for best results; otherwise, you might end up with something completely different.
About Snapshots
The good developers at Mojang AB are an enthusiastic bunch! To that end, you’ll discover that the Mojang team publishes prerelease Minecraft versions, called snapshots. The easiest way to learn what’s new in each snapshot is to visit the blog at http://mojang.com.
The naming format used for the development snapshots is YYwWWx, where YY represents the two-digit year, w stands for week, WW is the two-digit week, and x is a sequential identifier for releases within that week.
Many Minecraft players, myself included, are eager to play-test these prerelease snapshots so that we can get a feel for new or changed game features. For instance, as of this writing, the big hubbub in the Minecraft world is what v1.9 will look like when (not if, contrary to some people’s belief) the final version is released.
Here’s how you can play-test development snapshots if you’re so inclined:
1. Fire up the Minecraft Launcher as usual. If you want to use your current player profile, click Edit Profile. Alternatively, if you want to be safe, you can create a new profile for use with experimental game versions.
2. In the Profile Editor dialog box, shown in Figure 1.8, tick the Enable experimental development versions (“snapshots”) option and then click Save Profile. You’ll be prompted to confirm your choice.
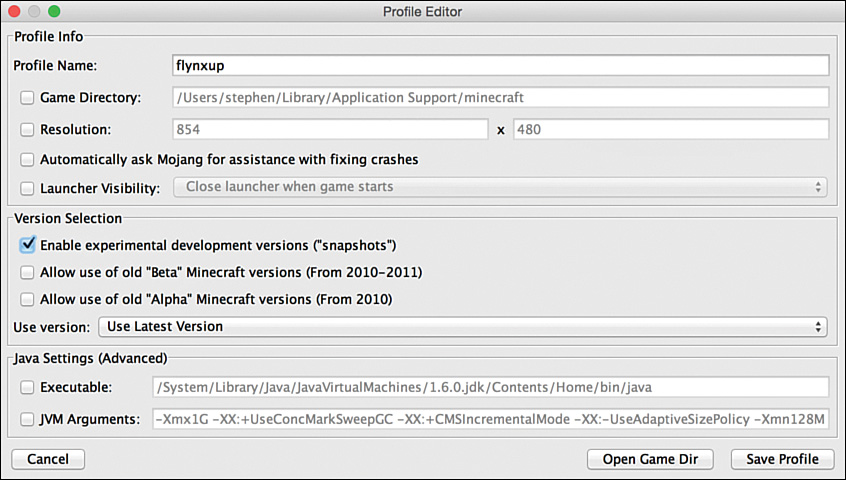
FIGURE 1.8 The Minecraft Launcher enables you to play-test prerelease versions of the game to get a feel for new or changed features.
3. You now can open the Use Version drop-down menu, and you’ll see snapshot IDs in addition to released Minecraft versions. Pretty cool, eh? Select Use Latest Version to ensure that your game is running the most recent snapshot, but keep in mind that you may need to create a new world to see the latest changes.
It’s important to recognize that these prerelease snapshots are volatile and do not necessarily represent the state of a final game release. To that end, I suggest that you concentrate the majority of your Minecraft gaming efforts on stable public releases and leave the prerelease experimentation to just that—experimentation.
Controls
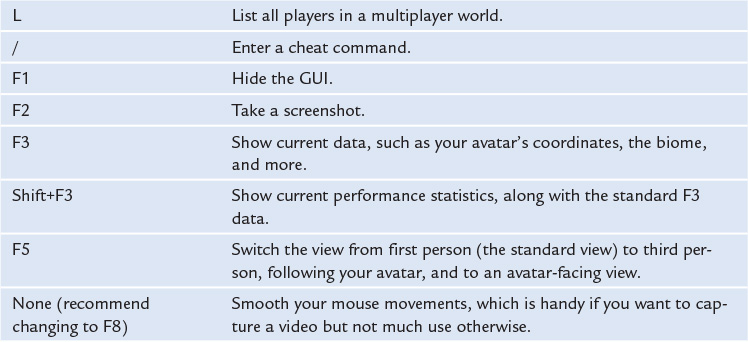
You’ll find it helpful to memorize a few control keys for when you begin playing Minecraft. Fortunately, there aren’t too many. Table 1.1 lists the full set available. You can reassign all the controls through the Options menu (accessed by pressing Esc while in-game). While you’re still learning, it’s probably best to leave the controls as they are; once you start developing your skills, you’ll be able to customize to suit your playing style.

Tip: Controls for Lefties
If you’ve played any other first-person game on a computer in the past 20 years, your fingers will probably fall naturally to the WASD keys with your left hand and to the mouse with your right. If you are left-handed and prefer to have the controls reversed, consider remapping each key under the Options menu so that you use IJKL with your right hand and the mouse with your left. Change your dominant hand in the game (the main hand that uses items and attacks) through the Options screen under Skin Customization.
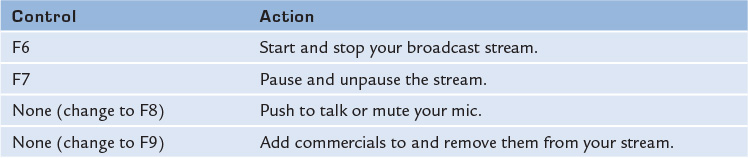
In addition, Minecraft supports streaming directly to Twitch, an online service that allows you to broadcast your gameplay to the world, and optionally earn revenue from advertising. You’ll need to set up a Twitch account at http://www.twitch.tv and then bind that to your Mojang account via the account settings page on the Mojang website. Once you’re ready to roll, use the keys shown in Table 1.2 to control your broadcasting.
Tip: Mac Users Press the fn key
Use a Mac? You may need to hold the function key (marked as fn in the bottom-left corner of your keyboard) while you press any of the function keys (F1, F2, and so on) listed in the preceding table to access these additional commands. You can change this in your keyboard preferences so that the function keys work as assumed by default. Another option is to buy a third-party USB PC-style keyboard, available at most electronics stores, to use while playing Minecraft.
If you’re playing Minecraft on a touch-capable monitor, be sure to consider toggling on Touchscreen Mode on the Minecraft Options screen.
The Bottom Line
It’s difficult to decide whether to call Minecraft a game or virtual Lego blocks. It straddles both in a way that has hardly been achieved before.
Although the registration and launch systems are a little different from those in many other games, they have advantages. You’ll never need to worry about updating the game because that happens automatically, and from time to time there’ll be some surprises in store with continuous, steady improvements.
Once registered, you can even change the skin of your character. Search online for “Minecraft skins.” When you find one you like, you can install it through your account profile on Minecraft.net. There are plenty to choose from, even copies of popular superheroes or Doctor Who. The next time you launch the game, you’ll see the new you. Use F5 to switch views so that you can see the result.
Minecraft world seeds also provide some useful opportunities. Not happy with how your gaming is working out? Select your old one and click Re-Create in the Select World window to automatically generate the same terrain and spawn at or close to the same point.
Finally, don’t feel daunted by the control list. It’s actually quite short compared to the lists in many other games. The main controls are your mouse, the WASD key set, the spacebar, and the inventory key.