2. First-Night Survival
In This Chapter
![]() Welcome to your new world.
Welcome to your new world.
![]() Harvest your first resources and start crafting essential tools.
Harvest your first resources and start crafting essential tools.
![]() Head for the hills and build a fast shelter in style.
Head for the hills and build a fast shelter in style.
![]() Cut your clicks with inventory shortcuts.
Cut your clicks with inventory shortcuts.
![]() Bring some light into the night.
Bring some light into the night.
![]() Skip the night in seconds.
Skip the night in seconds.
When you start a Minecraft world, your in-game character arrives with nothing but the shirt on his or her back, some dodgy-looking pants, and fists of fury. You have work to do! There are many ways to meet your demise in Minecraft, and you’re bound to discover quite a few of them in time, but it’s actually quite easy to survive your first night and get enough done to set you up for a great next day. There’s no need to become spider bait, zombie fodder, or a handy target for skeleton archery practice when darkness falls and the mobs come out to play.
This chapter shows you how to make it through that first night and come out in better shape than ever.
Surviving and Thriving
Your first day in Minecraft is an important one because you need to accomplish a few things quickly to prepare for the dangerous night ahead. As soon as you spawn into a new Minecraft world, take a quick look around. Just move your mouse. Your first target is trees for their wood because they provide the starting point you need for crafting tools and, frankly, it’s difficult to get anywhere without them.
Note: Welcome to The Overworld
The Minecraft world is composed of three dimensions. You arrive in The Overworld, the largest dimension. Over time, you’ll make your way through a portal into The Nether, Minecraft’s very Dante-esque “hellish” dimension, and then finally into The End, a small dimension where you’ll fight the Ender Dragon. That being said, most of your time is spent in The Overworld. Chapter 12, “Playing Through: The Nether and The End,” will help you move back and forth between the three, but don’t worry too much about that for now as there are many interesting challenges ahead before the final boss fight.
Your second task is to scout for a handy cliff or mound into which you can dig your first shelter or, failing that, a little bit of level ground so that you can build the Minecraft equivalent of a shepherd’s hut, even if it’s just made from some dirt blocks.
Here, then, is a brief list of your first-day tasks:
![]() Find a few trees and punch their trunks to obtain wood.
Find a few trees and punch their trunks to obtain wood.
![]() Turn the wood into planks and build a crafting bench.
Turn the wood into planks and build a crafting bench.
![]() Turn some of those planks into sticks.
Turn some of those planks into sticks.
![]() Craft a wooden axe out of planks and sticks to speed up the collection of more wood.
Craft a wooden axe out of planks and sticks to speed up the collection of more wood.
![]() Craft a wooden pick to dig up stone so you can turn it into the cobblestone required to build a furnace.
Craft a wooden pick to dig up stone so you can turn it into the cobblestone required to build a furnace.
![]() Craft a wooden sword, just in case.
Craft a wooden sword, just in case.
![]() Dig out a basic shelter.
Dig out a basic shelter.
![]() Build a wooden door for your shelter, although if time is pressing, you can just block off the entrance with some of the materials you’ve gathered as you go.
Build a wooden door for your shelter, although if time is pressing, you can just block off the entrance with some of the materials you’ve gathered as you go.
![]() Build a furnace and smelt some wood to make charcoal.
Build a furnace and smelt some wood to make charcoal.
![]() Use the charcoal and sticks to create torches.
Use the charcoal and sticks to create torches.
![]() Optionally, find three sheep so you can use their wool to build a bed.
Optionally, find three sheep so you can use their wool to build a bed.
This is quite a list, but it won’t take you long. Think of it as survival of the quickest.
Minecraft days are short, so feel free to press your keyboard’s Esc key any time you need to pause the game. Just keep in mind that time does not pause in multiplayer games, or even those you’re playing on your own and have opened up for sharing on your local network. Given that the sharing setting isn’t turned on by default, you more than likely don’t need to worry about that just yet.
Heading for the Trees
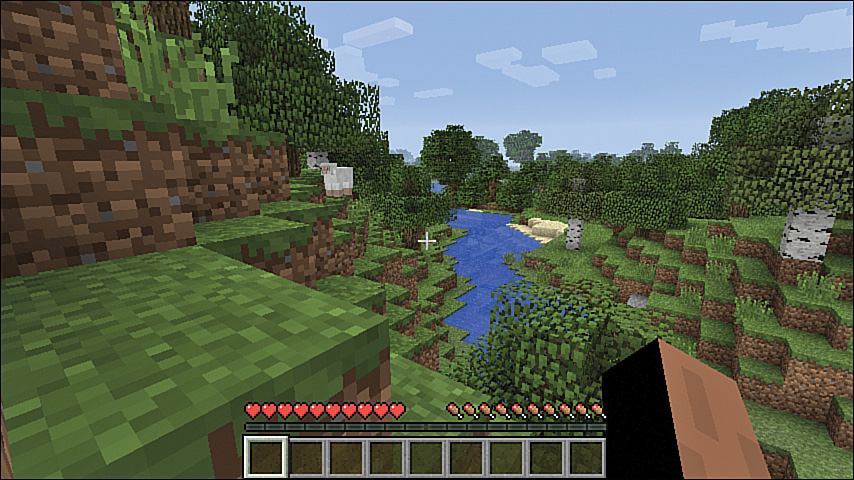
Start by heading toward the trees. You need a few, so look for a group of them. Use your mouse to set your direction and the W key to move forward, A and D to move left and right, and S to back up. Most biomes contain trees, so they shouldn’t be too far away, and if you spawned into a jungle, forest, or taiga biome, trees are all around. Figure 2.1 shows a spawn point by a river biome. (I’ll use the world shown in Figure 2.1, henceforth dubbed Elysia, for the remainder of the book.)
There is a chance you won’t be lucky enough to have so many trees. Some biomes, such as the desert, simply don’t have trees. If that’s the case, head straight for the nearest hill and jump to the top to get a good view. Press the spacebar to jump up each block while you hold down W to climb. If you spot any trees in the distance, make haste—the countdown to nighttime has already begun!
If you don’t spawn anywhere near a decent chunk of wood—it is possible, although rare, to spawn on a small island in the middle of a large ocean—you might want to consider abandoning the current world and creating a new one. With an infinite variety of worlds available, it’s fair enough to reset your situation if you find yourself starting out in a tough position.
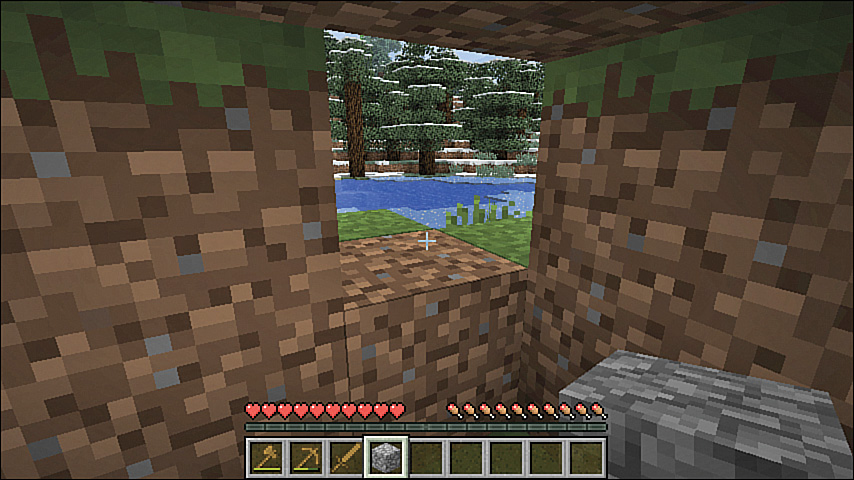
When you reach those woody perennials, start swinging. That fleshy appendage you can see to the right of the Heads-Up Display (HUD) is your arm. Hold down the left mouse button while pointing the crosshairs at the trunk to chip away at the tree, as shown in Figure 2.2. The tree develops a spidering of cracks as you wear it down, and it takes only a few seconds to punch out the first block of wood. You see a smaller representation of the block fall toward the ground and float, bobbing gently up and down. Congratulations on your first harvested resource. Well done!
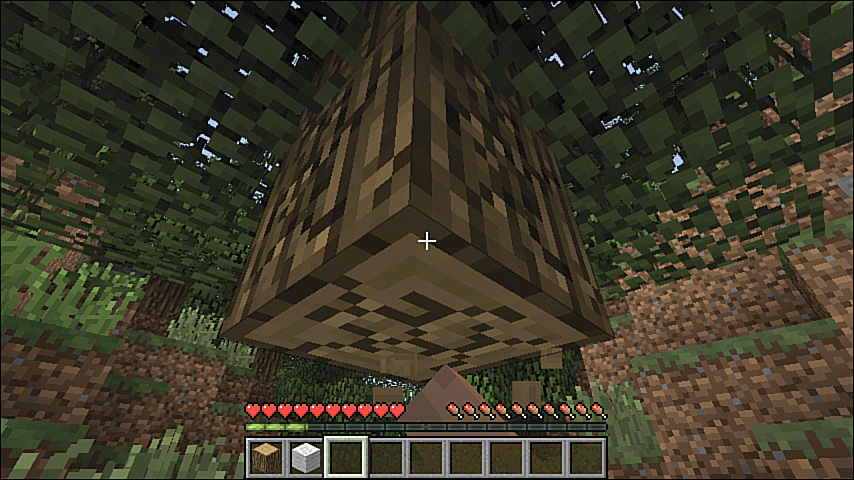
FIGURE 2.2 Punching out wood takes a little patience, but you will build some tools shortly to speed that up quite significantly.
If you are close enough, the block is scooped up into your inventory automatically. If not, just move closer until the block jumps in. Now take out the rest of the blocks, or as many as you can reach, and do the same to another two or three trees. You’ll need about 15 blocks to get off to a good start. Don’t worry about that mass of foliage remaining behind. It fades away, although if you do hack away at some of it, you have a good chance of getting a few saplings that you can replant in the interests of sustainability. If you thwack oak, you might also score an apple or two that you can collect and save for snacking on later.
There’s an easy way to get most of the blocks from the trunk. Start by taking out the two blocks just above the one that is on the ground. Then jump onto that block and look straight up. Finish punching blocks out of the rest of the trunk above you. They fall on you and go straight into your inventory. When you’ve gone as high as you can go, look straight down and take out the block on which you are standing. You can take out most tree trunks this way. If for some reason you can’t jump onto the block after you remove the two above it, you might need to clear out some foliage directly above you.
Now that you’ve harvested your first resources, it’s time to get familiar with your inventory and crafting.
Using Your Inventory
The inventory screen is central to your management of resources as you start collecting and crafting various materials and items.
You’ve already seen part of it: Those nine slots at the bottom of the screen represent items you’ve already collected, such as the wood blocks from the trees and perhaps a sapling or two. However, this is only one-quarter of your total inventory.
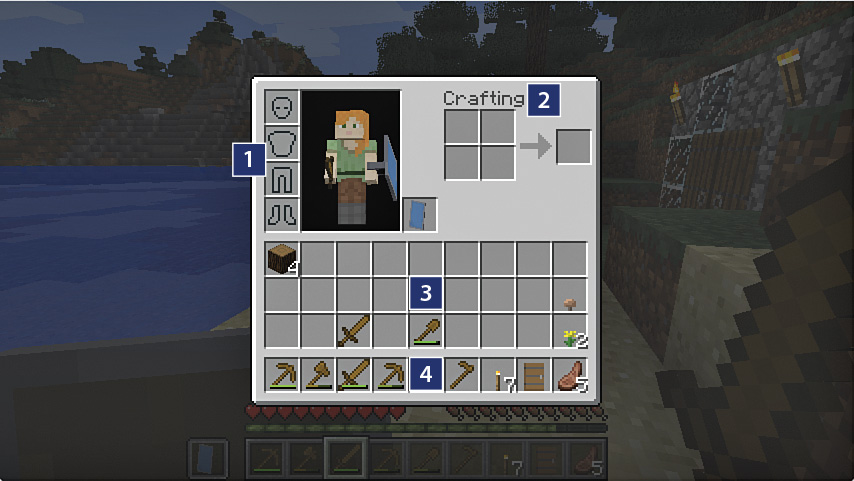
Press E to open the inventory screen. You see the window shown in Figure 2.3, with at least the blocks of wood showing.
Let’s take a closer look:
![]() Armor slots—These four slots allow you to don armor. From the top down, they represent: your helmet, chestplate, leggings, and boots, and each can be made from five different materials. Initially, you’ll probably start with armor made from leather or iron, because these materials are relatively easy to obtain. I’ll show you how to craft them as well as handy armor stands on which you can store them in Chapter 5, “Combat School.” Shift+click a piece of armor to automatically place it into the correct slot.
Armor slots—These four slots allow you to don armor. From the top down, they represent: your helmet, chestplate, leggings, and boots, and each can be made from five different materials. Initially, you’ll probably start with armor made from leather or iron, because these materials are relatively easy to obtain. I’ll show you how to craft them as well as handy armor stands on which you can store them in Chapter 5, “Combat School.” Shift+click a piece of armor to automatically place it into the correct slot.
![]() Crafting grid—Use this grid to create basic items on the run—torches, planks, sticks, and so on. In the next section, you’ll use this to build a crafting table with a larger grid so that you can make more complex items. Figure 2.3 shows the wood blocks being crafted into wooden planks.
Crafting grid—Use this grid to create basic items on the run—torches, planks, sticks, and so on. In the next section, you’ll use this to build a crafting table with a larger grid so that you can make more complex items. Figure 2.3 shows the wood blocks being crafted into wooden planks.
![]() Inventory slots—These slots represent your full inventory:
Inventory slots—These slots represent your full inventory:
![]() Hotbar—The bottom row provides quick access to items either with your mouse scroll wheel or by using the 1–9 keys on your keyboard. You can use any selected item in this row with the left mouse button as the action key, or you can discard it with a quick press of Q.
Hotbar—The bottom row provides quick access to items either with your mouse scroll wheel or by using the 1–9 keys on your keyboard. You can use any selected item in this row with the left mouse button as the action key, or you can discard it with a quick press of Q.
![]() Storage area—The top three rows of the inventory slots provide storage space for items you don’t immediately need but want to carry with you. This may include items you’ve collected on your travels and intend to carry back to your shelter for longer-term storage or to use for construction and further crafting.
Storage area—The top three rows of the inventory slots provide storage space for items you don’t immediately need but want to carry with you. This may include items you’ve collected on your travels and intend to carry back to your shelter for longer-term storage or to use for construction and further crafting.
Typically, you should store weapons and tools in the hotbar slots, along with some food to quickly rebuild your health and other vital items you think you’ll need. Keep the rest of these vital items upstairs in the storage area.
Note: Stacking Items
The inventory shows 36 empty slots but can store many more items than this through stacking. Typically, items of a similar type can stack up to 64 units high in each slot, although some items are limited to stacks just 16 units high. Tools, weapons, armor, and some other specialized items can stack only 1 unit high.
Minecraft has some neat tricks up its blocky sleeve that make it easier to move items between the slots in your inventory. Here’s what you really need to know:
![]() Pick up items—Left-click on a slot to pick up its full stack of items. Right-click to pick up just half the items in that slot.
Pick up items—Left-click on a slot to pick up its full stack of items. Right-click to pick up just half the items in that slot.
![]() Place items—Left-click to place all the items you are holding into a slot. If that slot is occupied, the items are swapped so that you end up holding the item or stack of items that was there initially. Right-click to place just a single item from the stack you are holding into a slot or hold down the button and sweep through the different positions to place a stack of held items in multiple slots.
Place items—Left-click to place all the items you are holding into a slot. If that slot is occupied, the items are swapped so that you end up holding the item or stack of items that was there initially. Right-click to place just a single item from the stack you are holding into a slot or hold down the button and sweep through the different positions to place a stack of held items in multiple slots.
![]() Move items between the storage area and the hotbar slots—Shift+click a slot to transfer its items to the first available position in the other grid. Items of the same type are automatically stacked in the target grid until they reach their stack limit.
Move items between the storage area and the hotbar slots—Shift+click a slot to transfer its items to the first available position in the other grid. Items of the same type are automatically stacked in the target grid until they reach their stack limit.
![]() Distribute items evenly—While holding a stack of items, press and hold the left mouse button and drag it across a group of slots to automatically split the stack into equal amounts across those slots. (This is particularly handy when you’re crafting a stack of similar items simultaneously.) If there is any remainder from the split, it stays selected, and you can place it elsewhere.
Distribute items evenly—While holding a stack of items, press and hold the left mouse button and drag it across a group of slots to automatically split the stack into equal amounts across those slots. (This is particularly handy when you’re crafting a stack of similar items simultaneously.) If there is any remainder from the split, it stays selected, and you can place it elsewhere.
![]() Discard an item—Drag and drop items from any inventory slot to the outside of the inventory window to discard them. This way you can discard an entire stack of items simultaneously. You can also quickly discard any single item in a hotbar slot at any time by selecting it with your scroll wheel or the 1–9 keys and pressing Q.
Discard an item—Drag and drop items from any inventory slot to the outside of the inventory window to discard them. This way you can discard an entire stack of items simultaneously. You can also quickly discard any single item in a hotbar slot at any time by selecting it with your scroll wheel or the 1–9 keys and pressing Q.
Now that you are familiar with the inventory, let’s take a look at crafting.
Building a Crafting Table

Why, you may be wondering, do you need a crafting table when the inventory already provides a crafting grid? It’s simple, really. The inventory provides a 2×2 grid, which is big enough for building only a limited set of items. The crafting table provides a 3×3 grid, which you need for more complex items, such as tools and just about everything else. However, you can’t build a crafting table without first using the inventory crafting grid. Follow these steps to knock together your own:
1. Open your inventory screen by pressing E.
2. Remember those wood blocks you punched out of the tree? You need to turn them into planks. Left-click on the stack of wood blocks to pick them up and drop them into any of the four squares in the crafting section. Bingo! A stack of four wood planks shows up in the output square to the right.
3. Click the stack of planks in the output square three times more to create a total of 16 planks.
4. Click to pick up any unused blocks left in the crafting grid and click on an empty storage slot to move them back out of the crafting grid.
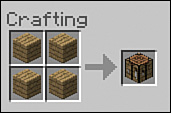
5. Click on the planks in the output square to pick up the entire stack and right-click once on each of the four squares in the crafting area. Well done! You’ve just created your first crafting table.
6. Click on an empty storage slot to move your unused planks back there.
7. Finally, click to pick up the crafting table and move it to one of the empty hotbar slots that run along the lower edge of the inventory window.
Caution: Mobs Can Strike Even with Your Inventory Open
Don’t walk away with your inventory screen open, thinking you’ve paused the game. Time still passes, night still falls, and you’re still vulnerable to hostile mobs. You can easily come back to find that your character has keeled over after an attack right there in the inventory window. Remember to use the Esc key to really pause the game if you need to duck away for a while.
Okay, now the fun really begins. Let’s place the crafting table and build some tools.
Use your mouse wheel to scroll until you have the crafting table selected or press the number key that corresponds to the crafting table’s hotbar slot. For example, if the table is in the third slot from the left, press 3 to select it directly.
Now look for a clear space to put the table, point your crosshairs down, and right-click. You can see an example of the result in Figure 2.4.
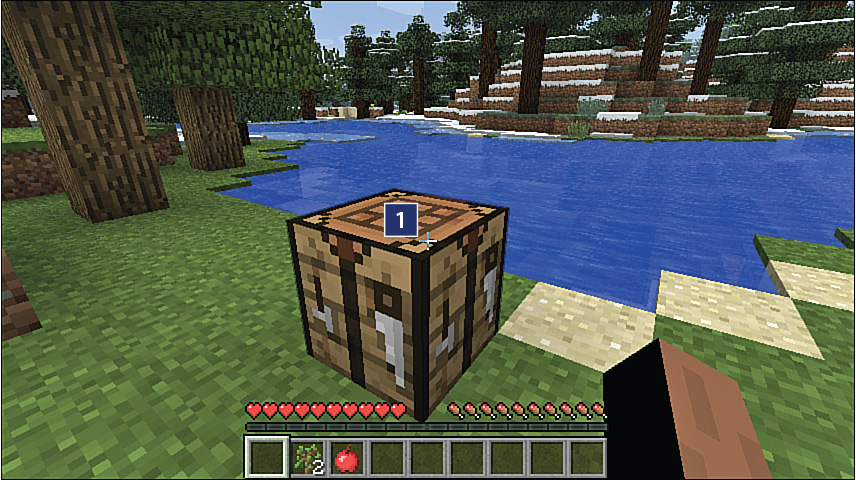
FIGURE 2.4 You don’t have to find a nice scenic spot for your first crafting table, but a view doesn’t hurt.
1. Crafting table
Building Some Tools
Your initial crafting list includes an axe, a pickaxe, and a sword. Building tools takes no time at all, and once you have tools, your fists will get a bit of a break from punching.
Right-click on the table to open the crafting window. You’ll notice that the 3×3 grid provides more room to place crafting ingredients. You’re going to use all of that space.
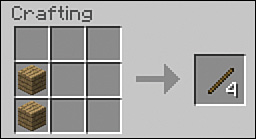
First, craft some sticks to form the handles for your tools. Stack two plank blocks vertically, using any two of the squares in the crafting grid to create four sticks. Drop these into your inventory.
Note: Crafting on the Other Editions
The Xbox, PlayStation, and Pocket Editions use a simpler crafting interface that lists all the available crafting recipes and makes recipes selectable when all the required ingredients are included in your inventory. You’ll still need to craft the base components, such as turning wood blocks into planks and then those into sticks, to open up the derivative recipes, but you won’t need to worry about remembering the components of each recipe or where they should be placed on the crafting grid. It’s all in view. On the Xbox, press the X button to open the initial 2×2 inventory crafting area so you can build a crafting table and then use the left trigger to access the table’s grid. On PlayStation, use the ![]() button and then the left trigger. Access the Pocket Edition’s crafting menu with the ellipsis (...) block on the hotbar. Figure 2.5 shows the Pocket Edition crafting interface.
button and then the left trigger. Access the Pocket Edition’s crafting menu with the ellipsis (...) block on the hotbar. Figure 2.5 shows the Pocket Edition crafting interface.
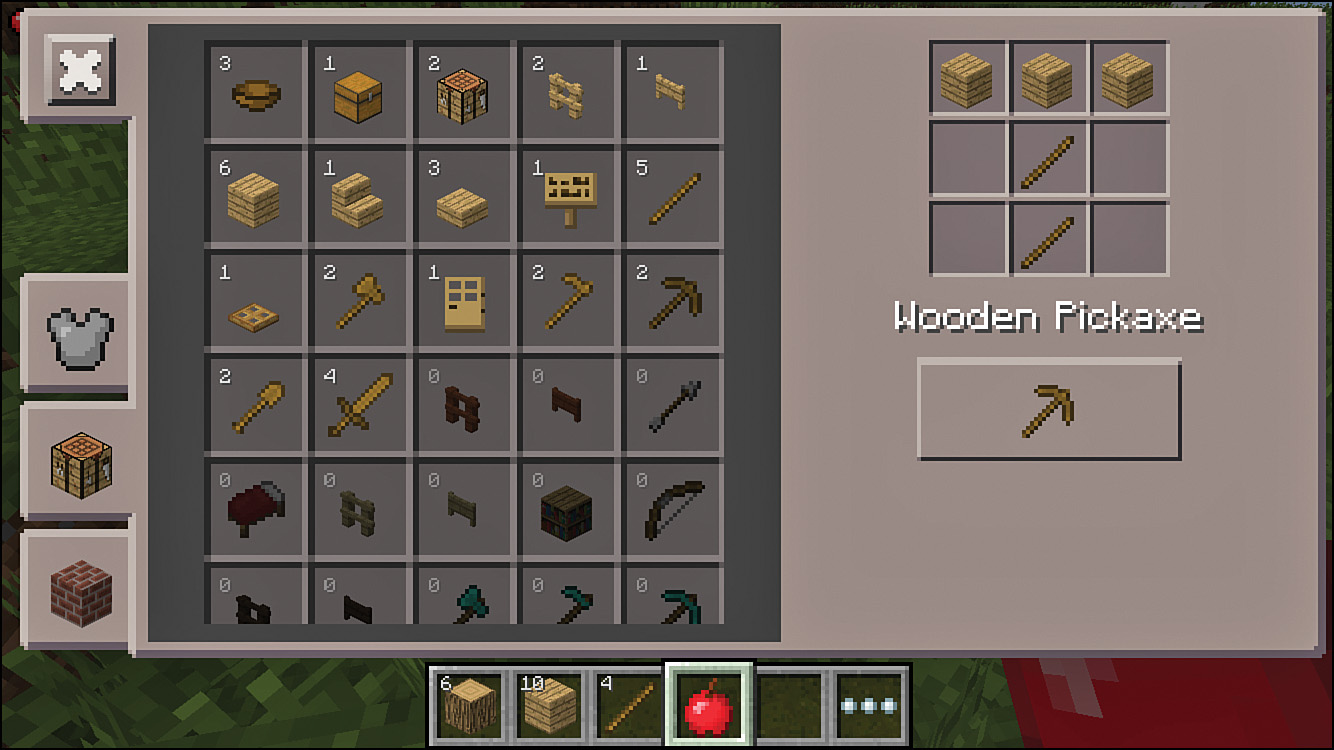
FIGURE 2.5 Crafting in the Minecraft Pocket and Console editions is easier as it saves having to remember the crafting recipes, but in my opinion, that’s not quite as satisfying as memorizing them in the full version of Minecraft.
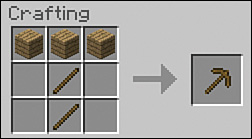
Now craft an axe by placing two sticks in the middle and lower-middle slots in the crafting table. Then arrange three wooden plank blocks in the upper-middle, upper-right, and middle-right slots to build an axe.

That’s all there is to it. Easy, right? There are hundreds of crafting recipes in Minecraft, all with different arrangements of items in the grid, using many different materials, but the actual arrangement of items usually shares some similarity with the physical object. You can see this especially with the pickaxe and sword, and it won’t take long for you to memorize the most useful recipes. See “There’s More Online...” on page 4 in the Introduction to download a complete list of all the crafting recipes.
To create your first pickaxe, set another two sticks in the middle and lower-middle slots. Then arrange three wooden planks across the top row.
Create more sticks and planks if you need to, but don’t go overboard. Just make what you need. The inventory looks like it has plenty of space right now, but it quickly fills, and although you can stack most items in piles of 64 in each inventory slot, it’s more efficient to store wood in particular in its most efficient form. You see, if one wooden block can create 4 planks of wood, then converting 64 wooden blocks to planks creates 256 planks, and they completely fill another 4 slots. Converting all those blocks to sticks fills 8 slots. So just craft what you need when you need it.
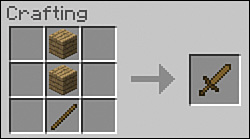
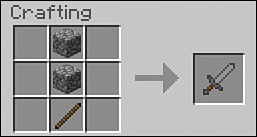
Now create a sword using one stick block and two plank blocks, using any column of three slots in the crafting grid.
If you’re enjoying crafting, also create a shovel. It’s a faster choice when digging through dirt, sand, and gravel.

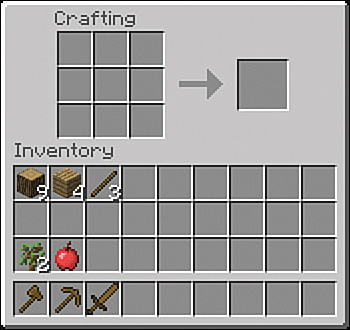
When you’ve finished, your inventory should look something like the one shown in Figure 2.6.
You’re done for now, so switch to an empty slot in the hotbar and break down the crafting table with your fists. Walk over to it and scoop it up into your inventory so you can use it again.
Creating a Shelter
Now that you have some basic tools, it’s time to prepare for the night. By far the quickest way to do this is to dig a little hideout into the side of a hill. Don’t just duck into a cave because you might get a nasty surprise.
Note: Building an Above-Ground Shelter
If you have spawned into a flat area, you can build an aboveground shelter (see “Finding a Building Site” on page 68) or dig into the ground to create a small cave.
Head toward any convenient hill, cliff, or mound and select your pickaxe. You’ll be digging a space that’s two blocks high, but because you also need a roof over your head, the target area should be at least three blocks high. Left-click to swing the pickaxe and quickly break up the block in front of you at ground level, and the next one above it that’s at eye level. If you are facing a terraced hill (Minecraft doesn’t have any hills that aren’t terraced), just dig out a couple of blocks at ground level until you’ve created a path to a three-block-high space, like the one shown in Figure 2.7.

Move forward and keep swinging that pickaxe, because you need to carve out a little bit of room to fit your crafting table, a furnace, and possibly a bed. A space 4×4 should do for now, although you can certainly expand it later. As you move forward, you automatically collect the blocks you’re breaking. If you break out into a cave or through the hill and outside again (see Figure 2.8), open your inventory and pull some of the blocks you’ve collected back down into your hotbar, select them as your active tool, and point your crosshairs at the top of the block beneath the gap. Then right-click to drop a new block in place.
Unfortunately, your shelter still lacks a door. In a pinch, you can just place a block in the gap and huddle in for the night. (You just need to make sure to stay out of the line of sight of the gap just in case a skeleton wanders by and starts firing arrows at you.) But you can do a better job than that.
Place your crafting table in a corner of the room, right-click it, and then arrange two columns of wooden planks to create three doors.
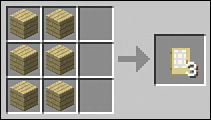
Crafting can seem like a lot of clicking, but one handy shortcut to remember is that you can left-click to pick up a stack of items such as wooden planks and then hold down the left mouse button as you paint them into the desired pattern in the crafting grid. Minecraft does its best to balance the number of items in each grid position as you go. When you’ve crafted enough of the final object, don’t worry about dragging all the unused crafting elements back; just press Esc to exit the inventory, and any unused items float to the ground, ready to be scooped back into your inventory.
Tip: Multicrafting
Crafting a bunch of the same item at once is easy. Hold down Shift while clicking the output slot, and you pick up as many of the same item as can be produced with the raw materials in the crafting slots.
Now head outside your shelter, select the doors in the hotbar, and point your crosshairs at the ground block that is under the first section of your shelter where you have a true two-space-high tunnel with a roof. Right-click to place the door. Figure 2.9 shows mine. You can then right-click to open the door, step through, and right-click once more to close it. Now the cave is getting more homelike, but it’s still missing something vital—light! There are no energy-saving bulbs in Minecraft. For light, you need a torch fashioned from a stick and a lump of coal or charcoal.
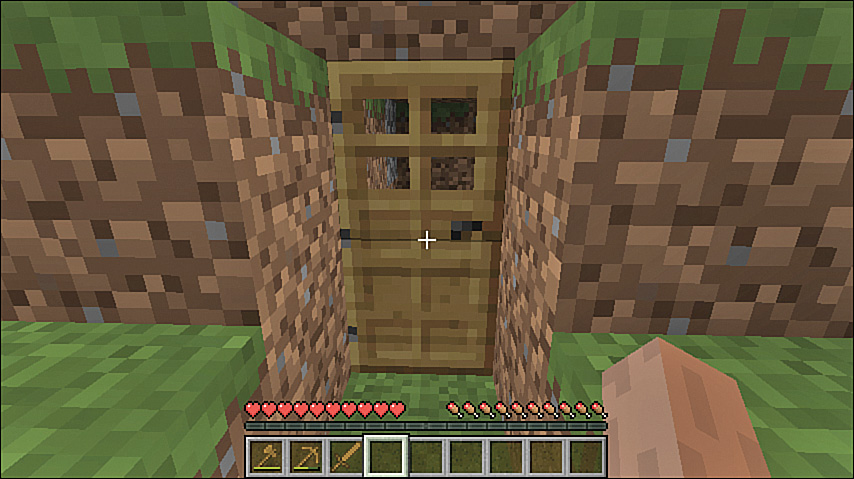
FIGURE 2.9 Shelter secured. In Easy and Normal difficulty levels, zombies still try to break down your door, and you even see some worrying cracks appear. Don’t panic! Zombies give up before they break through.
Caution: Close the Door While You’re Gone
Always remember to close the door when you leave your shelter. Leaving it open is like leaving out the welcome mat for mobs, and you don’t want to find anyone lurking inside when you return.
Tip: Airlocks, Iron Doors, and More
In the Hard difficulty level, zombies can break through wooden doors. Give yourself a better chance of survival by building airlock structures, using two doors instead of just one. If a zombie breaks through the first door, it will take him some time to break through the second. Hopefully, creepers aren’t lined up behind. Iron doors are impervious to a zombie’s attack but can be opened only with buttons or other redstone devices. Perimeter structures such as fences, moats, and lava pits also keep mobs away. See “Protecting Your Perimeter” on page 176 for a few examples.
You can find coal in the ground here and there. The blocks are patterned with flecks of black and are often visible on the sides of cave walls. But you can’t dig too far or venture too deep into a tunnel complex without the lack of light becoming a problem. Fortunately, there’s an easier way to make torches, and that’s by using charcoal instead of coal. To make charcoal, you need a furnace, and for that you need cobblestone.
Note: Emergency Shelters and Pillar Jumping
Caught out exploring as night falls? You can easily survive a night in the open if you can’t get back to base. Here are a few techniques. First, find the most precarious ledge you can on a cliff. Hold down the Shift key as you approach the cliff edge to avoid a potentially fatal fall. The “cliff edge” location doesn’t guarantee survival, but mobs are less likely to find you there. You can improve the situation by digging into the cliff a little way to create a corridor two blocks high. Go sideways at the end to create an L- shape where you can hide out of sight. Block the lower half of the doorway with sand, dirt, or gravel—whatever you have that’s handy really—and wait out the night in your nook.
Another way to protect yourself quickly is to dig down three blocks in anything other than sand or gravel. Just take out the first two blocks, jump in the hole, and dig out the last one, hoping it doesn’t drop you straight into a lava pit or through the top of a deep cave. Place one block of the material you removed above your head, making sure that it isn’t sand or gravel, which would cause you to suffocate and somewhat defeat the purpose. Wait about 8 minutes of real time for the sun to rise. If you are impatient, knock out the block and replace it now and then to check for daylight. When dawn hits, take out the block in front of you to create a step and make your escape into a brand new day.
A final trick that can prove quite handy if you spawn in the midst of a giant desert is to dig up some 10 blocks of sand or other ground covering and then place the first block down, climb on top, and with some careful timing, jump while looking straight down to place another block directly beneath you. This is known as pillar jumping. Repeat until you are perched on top of a pillar 10 blocks high. This keeps you well out of reach of hostile mobs. When sunrise hits, look down and left-click your mouse to dig out the blocks beneath you and ease yourself back down to the ground.
The Furnace Is Your Friend
You craft a furnace from eight blocks of cobblestone, and to get that, you need to mine stone. Fortunately, stone is ubiquitous. It’s the second-most-common element in Minecraft besides air and is usually found just one or two blocks under a layer of dirt, if not just lying around in the open, waiting for you to stub an inadvertent toe. One trick to stone, though, is that you can’t render it into cobblestone with your fists. You’ll just pulverize it to dust instead. You need a pickaxe to do it properly.
Check your inventory, and if you haven’t yet found eight blocks of cobblestone, start expanding your shelter using the pickaxe to render any stone you find into cobblestone. Although there are many other types of ore, only stone will do in this case. Don’t dig more than one block down at a time because you won’t be able to jump back up. Use a shallow staircase effect if needed but try to just stick to the horizontal plane for now, expanding the perimeter of each interior wall rather than plowing into a long tunnel. Figure 2.10 shows a handy layer of stone that came to light just one block from the entrance.

As soon as you have the blocks, head back to your crafting table and run eight blocks around the edge of the crafting grid, leaving the middle block empty.
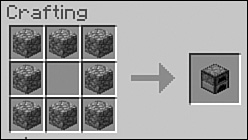
Drag the completed furnace to one of your hotbar slots and then place it with a right-click next to your crafting table. It’s torch time!
Let There Be Light
Light is a great tool for dispelling fear of the dark—in any setting. In Minecraft, light keeps hostile mobs at bay. More specifically, it prevents them from spawning. Certain rules built into the software prevent mobs from springing into existence close to you, no matter the light level, but they also can’t spawn anywhere near bright light. As you expand your shelter, mine, and explore, place torches to keep the coast somewhat clear. In any case, torches add much-needed ambiance to any home.
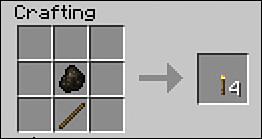
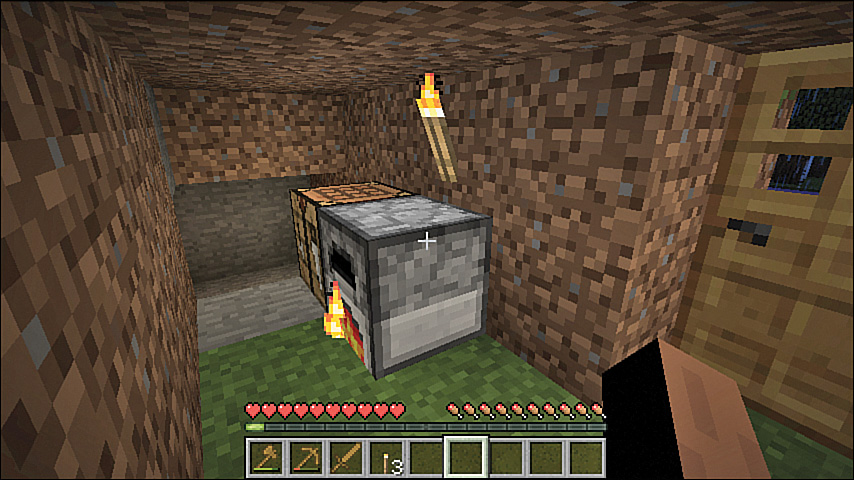
Right-click on your furnace. You see your inventory screen again, as shown in Figure 2.11, but this time with an upper grid containing just two slots. The lower slot holds the combustible to power the furnace, while the upper one holds the object you are smelting. Place a couple of blocks of wood in each of the lower and upper slots to start making charcoal, as shown. You’ll soon see the charcoal pop into the output grid. Each chunk of charcoal when combined with a stick makes four torches.

FIGURE 2.11 Burn, baby, burn. A furnace smelts objects into items more useful for crafting, building, decorating, and cooking. Keep a furnace handy at all times.
Tip: Buckets of Lava Are the Best Fuel
You can use both coal and charcoal as sources of fuel in a furnace, and they are much more effective than most other materials—able to process eight blocks apiece. But what’s the best possible fuel? A bucket of lava. You’ll be able to find these easily enough later on. For now, just keep it in mind. One bucket of lava equals 100 smelted blocks. It’s like your own personal nuclear reactor!
The furnace can take a little time to do its thing, but you can set it and forget it. Walk away, and the furnace keeps on burning while it has fuel and something to work on. When either fuel or raw material runs out, the furnace shuts down, and you can collect the results whenever you’re ready.There’s no need to worry about leaving the gas on or the pot boiling over.
Now that you have some charcoal, press E to open your inventory window (or right-click your crafting table if you prefer). Place one stick in any lower position of the crafting grid and one piece of charcoal above it. Great work! You’ve just created four torches, and in Minecraft, they’re going to be some of your best friends.
Place the torches in a hotbar slot and step back a moment. Find a nice position on a wall, select the torch, and right-click the wall to attach it. You can also place torches directly on the floor or on top of many other items, such as a crafting table or a furnace, by using Shift+right-click. Torches never burn out, so you never need to replace them, although you can knock them down with a left-click, scoop them up, and place them elsewhere if your interior decorating instinct kicks in. Torches can also provide a useful beacon function, so you might want to place a few outside your shelter. They create a nice beacon of light you can spot from a distance, which is especially helpful if you’re making a last-minute dash for home at sunset.
Figure 2.12 shows the much-needed result of adding torches in the first Elysian hidey-hole.
Slumbering with Lumber
Beds are great because they make a house a home. They lend a comforting aesthetic that a crafting table and furnace can’t really provide. But more than that, they serve a purpose that gets right down to the underlying game mechanic: A bed protects you. It shelters you from harm through the night so that you can skip to sunrise and get on with your day.
Most importantly, sleeping in a bed resets your spawn point to the location of the bed so that you can venture further and further out into the world, covering vast distances, without having to restart at your point of origin should you die. Note that if the last bed you slept in is destroyed for any reason, your spawn point reverts to your original point of origin, so it pays to keep your bed safe.
Note: Time Is on Your Side
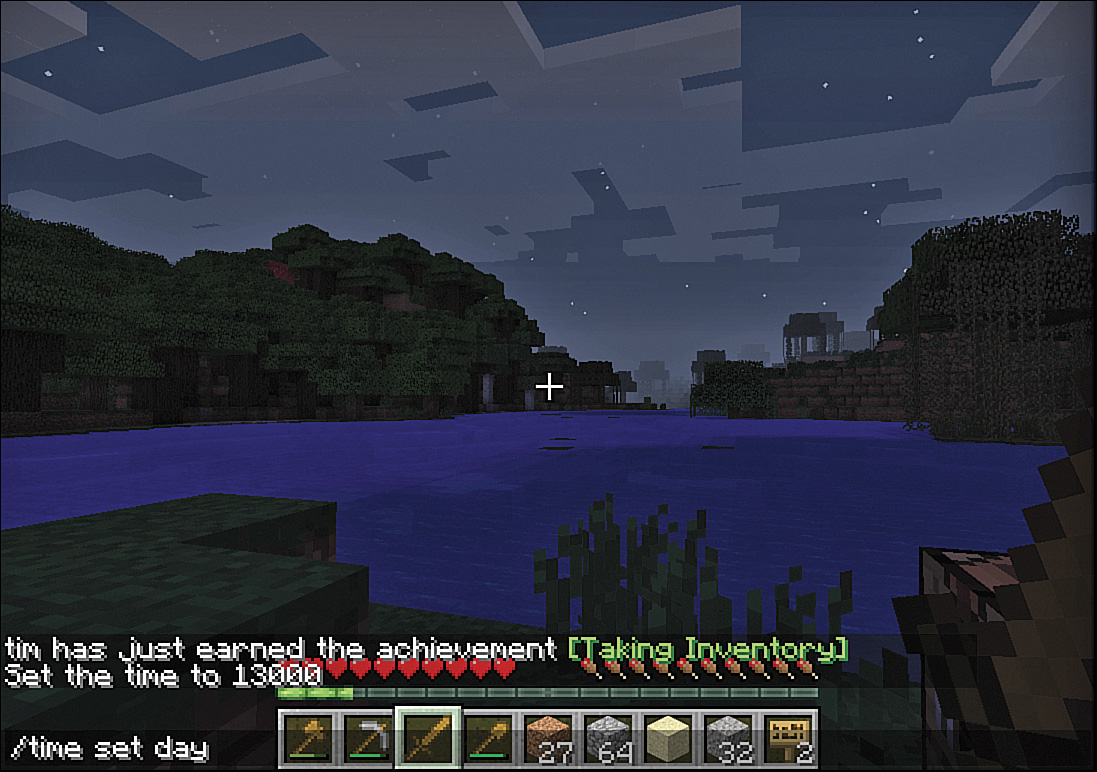
While you are sleeping, time doesn’t really tick by. Sleeping is really just like typing the /time set 0 cheat code, causing an instant adjustment in the game’s clock to dawn but leaving everything else in the same state it was in before you actually went to sleep.
If you have cheats enabled in the game options (see Chapter 1, “Getting Started”), issue them by typing a forward slash (/) and then your cheat text. You’ll see your input and Minecraft’s response to that input in the lower-left portion of the screen. Check out Figure 2.13 to see what it looks like.
Tip: Spawn Point Cheat
With cheats enabled, type /spawnpoint to reset the world’s original spawn point to your current position. If you die, you’ll pop up again nearby.
Building a bed is easy, but you first need to find and kill three sheep to get their wool. Later you can build shears for a more sheep-friendly experience, but for now, lamb skewers are the only option.
If you’ve seen sheep nearby, take your sword in hand and have at them with a few left-clicks. Keep track of your bearings, though. The sheep make a dash for it on the first attack, and you don’t want to become lost as you give chase.
Getting sheep is the easiest way to harvest wool for a bed. If you can’t find any, skip the bed-building and start on Chapter 3 spending the night improving your tools at the crafting table. You can quietly dig up more cobblestone by expanding your shelter. Just remember to place torches every nine or so spaces to ensure that you leave no dark places where a hostile mob can spawn. If there are simply no sheep anywhere nearby, look for spiders. Each one drops between 0 and 2 pieces of string. Collect 4 of those, and you can make a block of wool, so collect 12, and you’ll have enough for a bed. Fair warning, though: This might take a while.
Each sheep drops one block of wool. When you’ve collected three, head back to your crafting table, lay three blocks of wood planks on the bottom layer and the three blocks of wool across the middle layer. Voilà! A bed is born.
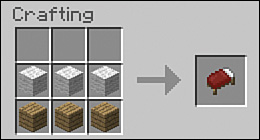
You can place the bed anywhere there is space for two blocks. Stand facing the direction you want the bed to face, where the foot of the bed would be closest to you. Then right-click on the block where the foot should go (not the head). Figure 2.14 shows the placement, and Figure 2.15 shows the result in a now very comfortable, if simple, shelter.
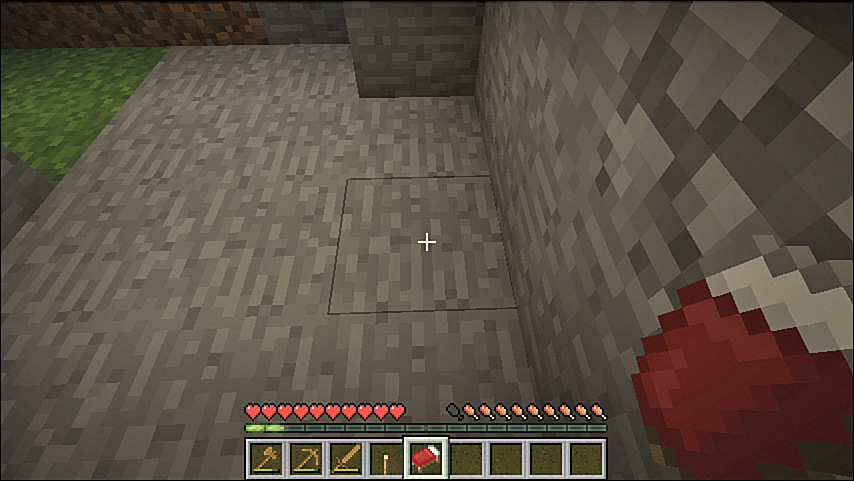
FIGURE 2.14 Bed placement can be a little tricky because a bed takes two blocks. Always aim for the space you plan to place the foot of the bed.

Keep a bed in your inventory if you’re trekking through the wilderness. You can place it down anywhere there’s enough space and, as long as no monsters are nearby, sleep cozily through the dark. The bed is Minecraft’s equivalent of a Get Out of Jail Free card. However, this technique does have its hazards should you wake and find mobs looming over you, and it really takes little effort to build a quick shelter. In other words, use this trick at your own risk.
Tools and Their (Over)Use
Take a close look at my tools in Figure 2.16. Do you see the little bar that appears beneath them? This is a property of some items, including tools, weapons, and armor, called the durability bar, and you should pay attention to it as you play. In Minecraft, when an item’s durability expires, the item is unusable, and you have to invoke a replacement.
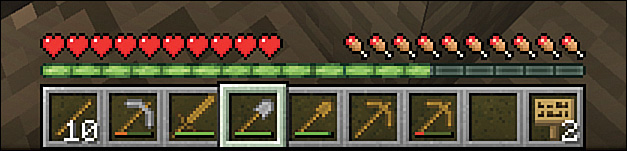
FIGURE 2.16 Tools, weapon, and armor have a durability bar that shows an item’s degree of “wear and tear.”
You can press F3+H to display the numeric durability of your items. As an item’s durability decreases with use, the durability bar shortens from the right to the left, turning from green to red.
You’ll learn more about tool and item durability (as well as the cool ability to repair durable items) in subsequent chapters. At this point, I just wanted to make you aware of the behavior so that you weren’t surprised when, all of a sudden, that axe you’ve been wielding like a madman suddenly drops out of your inventory.
A Bit About Achievements
In Minecraft, achievements are intended to give you a well-deserved “pat on the back” for performing certain actions in the game. Most players find that these onscreen achievement notifications (one of which you can see in Figure 2.17) provide inspiration to continue playing the game.
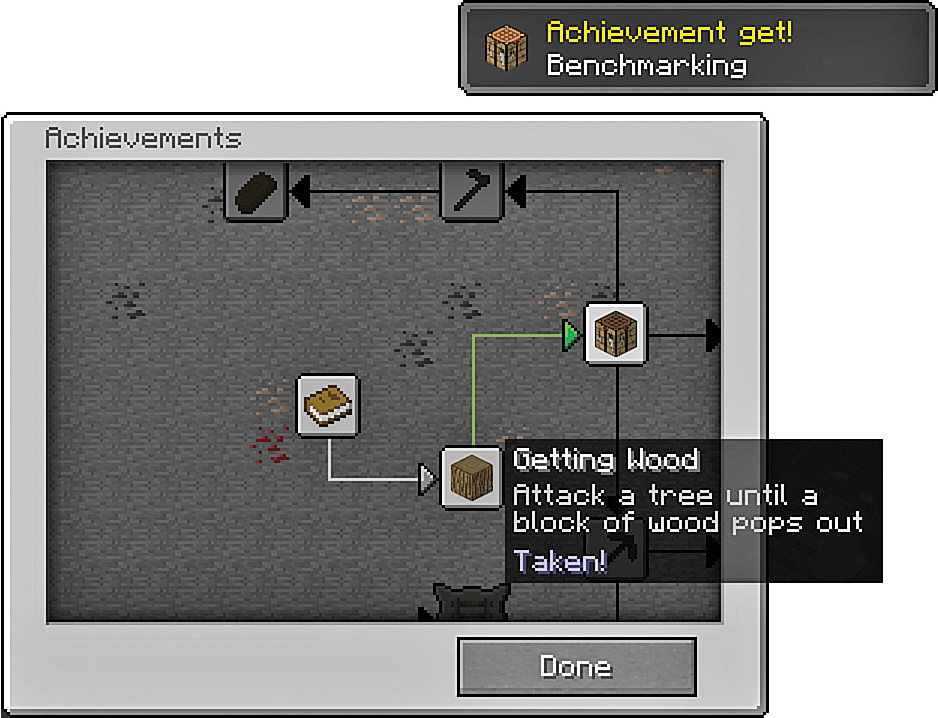
FIGURE 2.17 You can track your overall achievement progress by visiting the Achievements screen. I’ve superimposed an achievement notification so that you can see what those look like onscreen as well.
Press Esc to pause the game and click Achievements to see your overall achievement progress in Minecraft.
You can earn achievements in any Minecraft game mode, including Creative. However, the console editions support achievements only in Survival game mode.
To see a comprehensive list of achievements, along with their descriptions, point your web browser toward the official Minecraft wiki: http://minecraft.gamepedia.com/Achievements#List_of_achievements. You can also use this shorter version of that link: http://goo.gl/AbeKYZ.
What Is This “Bonus Chest” You Speak Of?
In Chapter 1 I suggested that you turn off the Bonus Chest option when you create a new world in Minecraft. My justification for this tip is that the bonus chest reduces your first-night incentive to punch some trees and gather your core survival resources.
For the sake of completeness, I want to briefly discuss the bonus chest with you now. In essence, the bonus chest is a sort of “starter kit” that helps new Minecraft players (or experienced players who are tired of the repetition of initially punching trees) get a leg up on surviving their first night in the world.
The bonus chest spawns just once, at world creation, and its contents are unique to the world seed. You’ll find up to four torches surrounding the bonus chest. It should appear within sight distance of your avatar at game start or should at least be nearby. By the way, you can and should retrieve those torches! Figure 2.18 shows an example of a bonus chest.
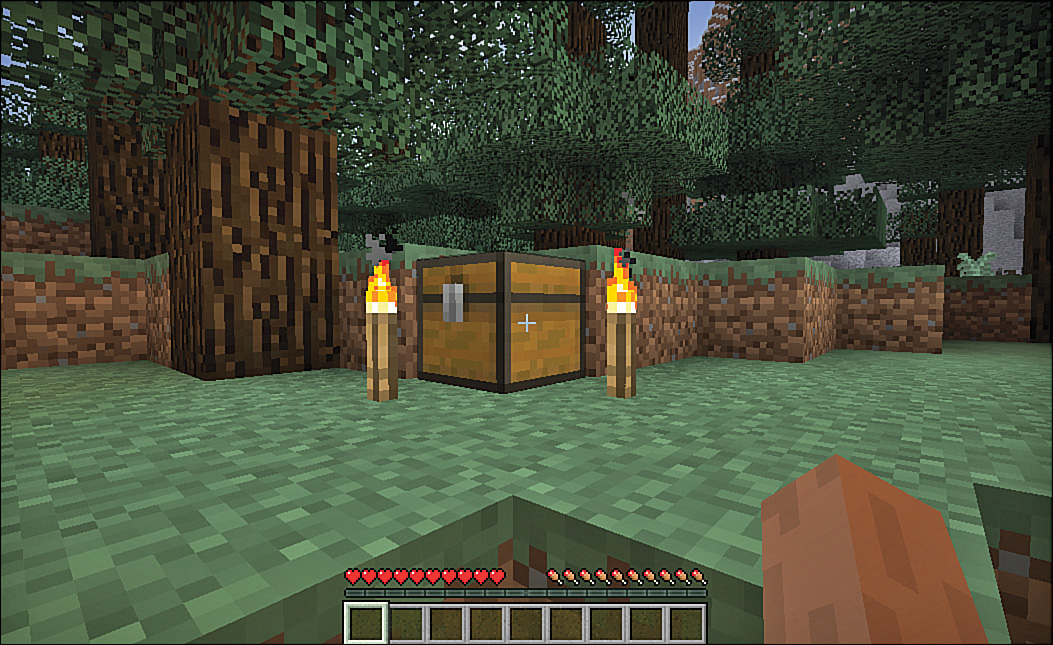
FIGURE 2.18 Everything in or around the bonus chest—even the torches—can be harvested for your first-night survival benefit.
The contents of the bonus chest are variable. The chest contains up to 10 item stacks, chosen at random from the following list:
![]() Acacia wood
Acacia wood
![]() Apple
Apple
![]() Bread
Bread
![]() Oak wood
Oak wood
![]() Oak wood planks
Oak wood planks
![]() Stick
Stick
![]() Stone axe
Stone axe
![]() Stone pickaxe
Stone pickaxe
![]() Wooden axe
Wooden axe
![]() Wooden pickaxe
Wooden pickaxe
Bonus chests on the console edition can also include additional content.
The Bottom Line
Surviving your first night can seem daunting at first. It’s a bit of a learning curve, but get through it just once, and you’ll find it much easier next time. First-night survival entails just a few simple steps: Harvest wood, create a crafting table, build tools, and hollow out a shelter.
But remember, Minecraft days pass really quickly. Keep an eye out for the sun setting in the west, and make sure you can at least create a small cave in a cliff or hillside so that you are out of harm’s way when night falls. When you head out again in the morning, check for hostile mobs. Their sound gives them away. Some lurk all day, whereas others burn up in the sunlight or take cover in shade. Be especially careful if it’s an overcast day or raining, though, because the lower light level makes it easier for them to survive.
Now that you’ve had an initial taste of Minecraft, I bet you’re hungry for more. At this point, we’ve only scratched the surface of the crafting table, and while the shelter serves its purpose, Minecraft provides unlimited real estate and resources—enough to create any architectural dream. In the next chapter, you’ll learn some essential survival tricks, including how to stave off hunger, deal with mobs, and build additional tools.